Building a Blazor WebAssembly application that talks to a protected API forces us to think about identity differently. We cannot tuck a client secret into a SPA and hope nobody looks. We also want a predictable way to refresh tokens without asking users to sign in every few minutes. The OAuth 2.1 authorization code flow with PKCE is the right answer for public clients, and AWS Cognito gives us a hosted identity layer that plays nicely with .NET 10.
In this article, we will wire Blazor WASM to Cognito’s Hosted UI, exchange authorization codes with a PKCE verifier, pull down access and refresh tokens, and call a .NET 10 Web API that validates Cognito JWTs. All Cognito work happens in the AWS console so you can see every checkbox.
This article is sponsored by AWS. Huge thanks for helping me produce more .NET on AWS content!
If you want a refresher on Cognito fundamentals first, I already covered the client credentials and password grant flows in an earlier post: Securing .NET WebAPI with Amazon Cognito - Serverless Authentication System - Client Credentials & Password Flows - JWT!. This guide builds on that foundation and brings PKCE, Blazor, and refresh handling into the mix. Consider reading both if you want a mental model that spans server-to-server flows, username/password flows, and the browser-driven authorization code flow we are using here.
What we are building
- A Cognito User Pool with Hosted UI and a public app client that requires PKCE, issues access/ID/refresh tokens, and exposes a custom API scope.
- A Blazor WebAssembly client that signs in via Hosted UI, exchanges the auth code with a PKCE verifier, keeps tokens in session storage, and calls the API with bearer tokens.
- A .NET 10 Web API that validates Cognito JWTs via JWKS, enforces scopes, and allows CORS for the Blazor origin.
Everything is laid out in the order you would do it on a fresh machine so you can follow along without jumping around.
Authorization Code Flow (the base that PKCE builds on)
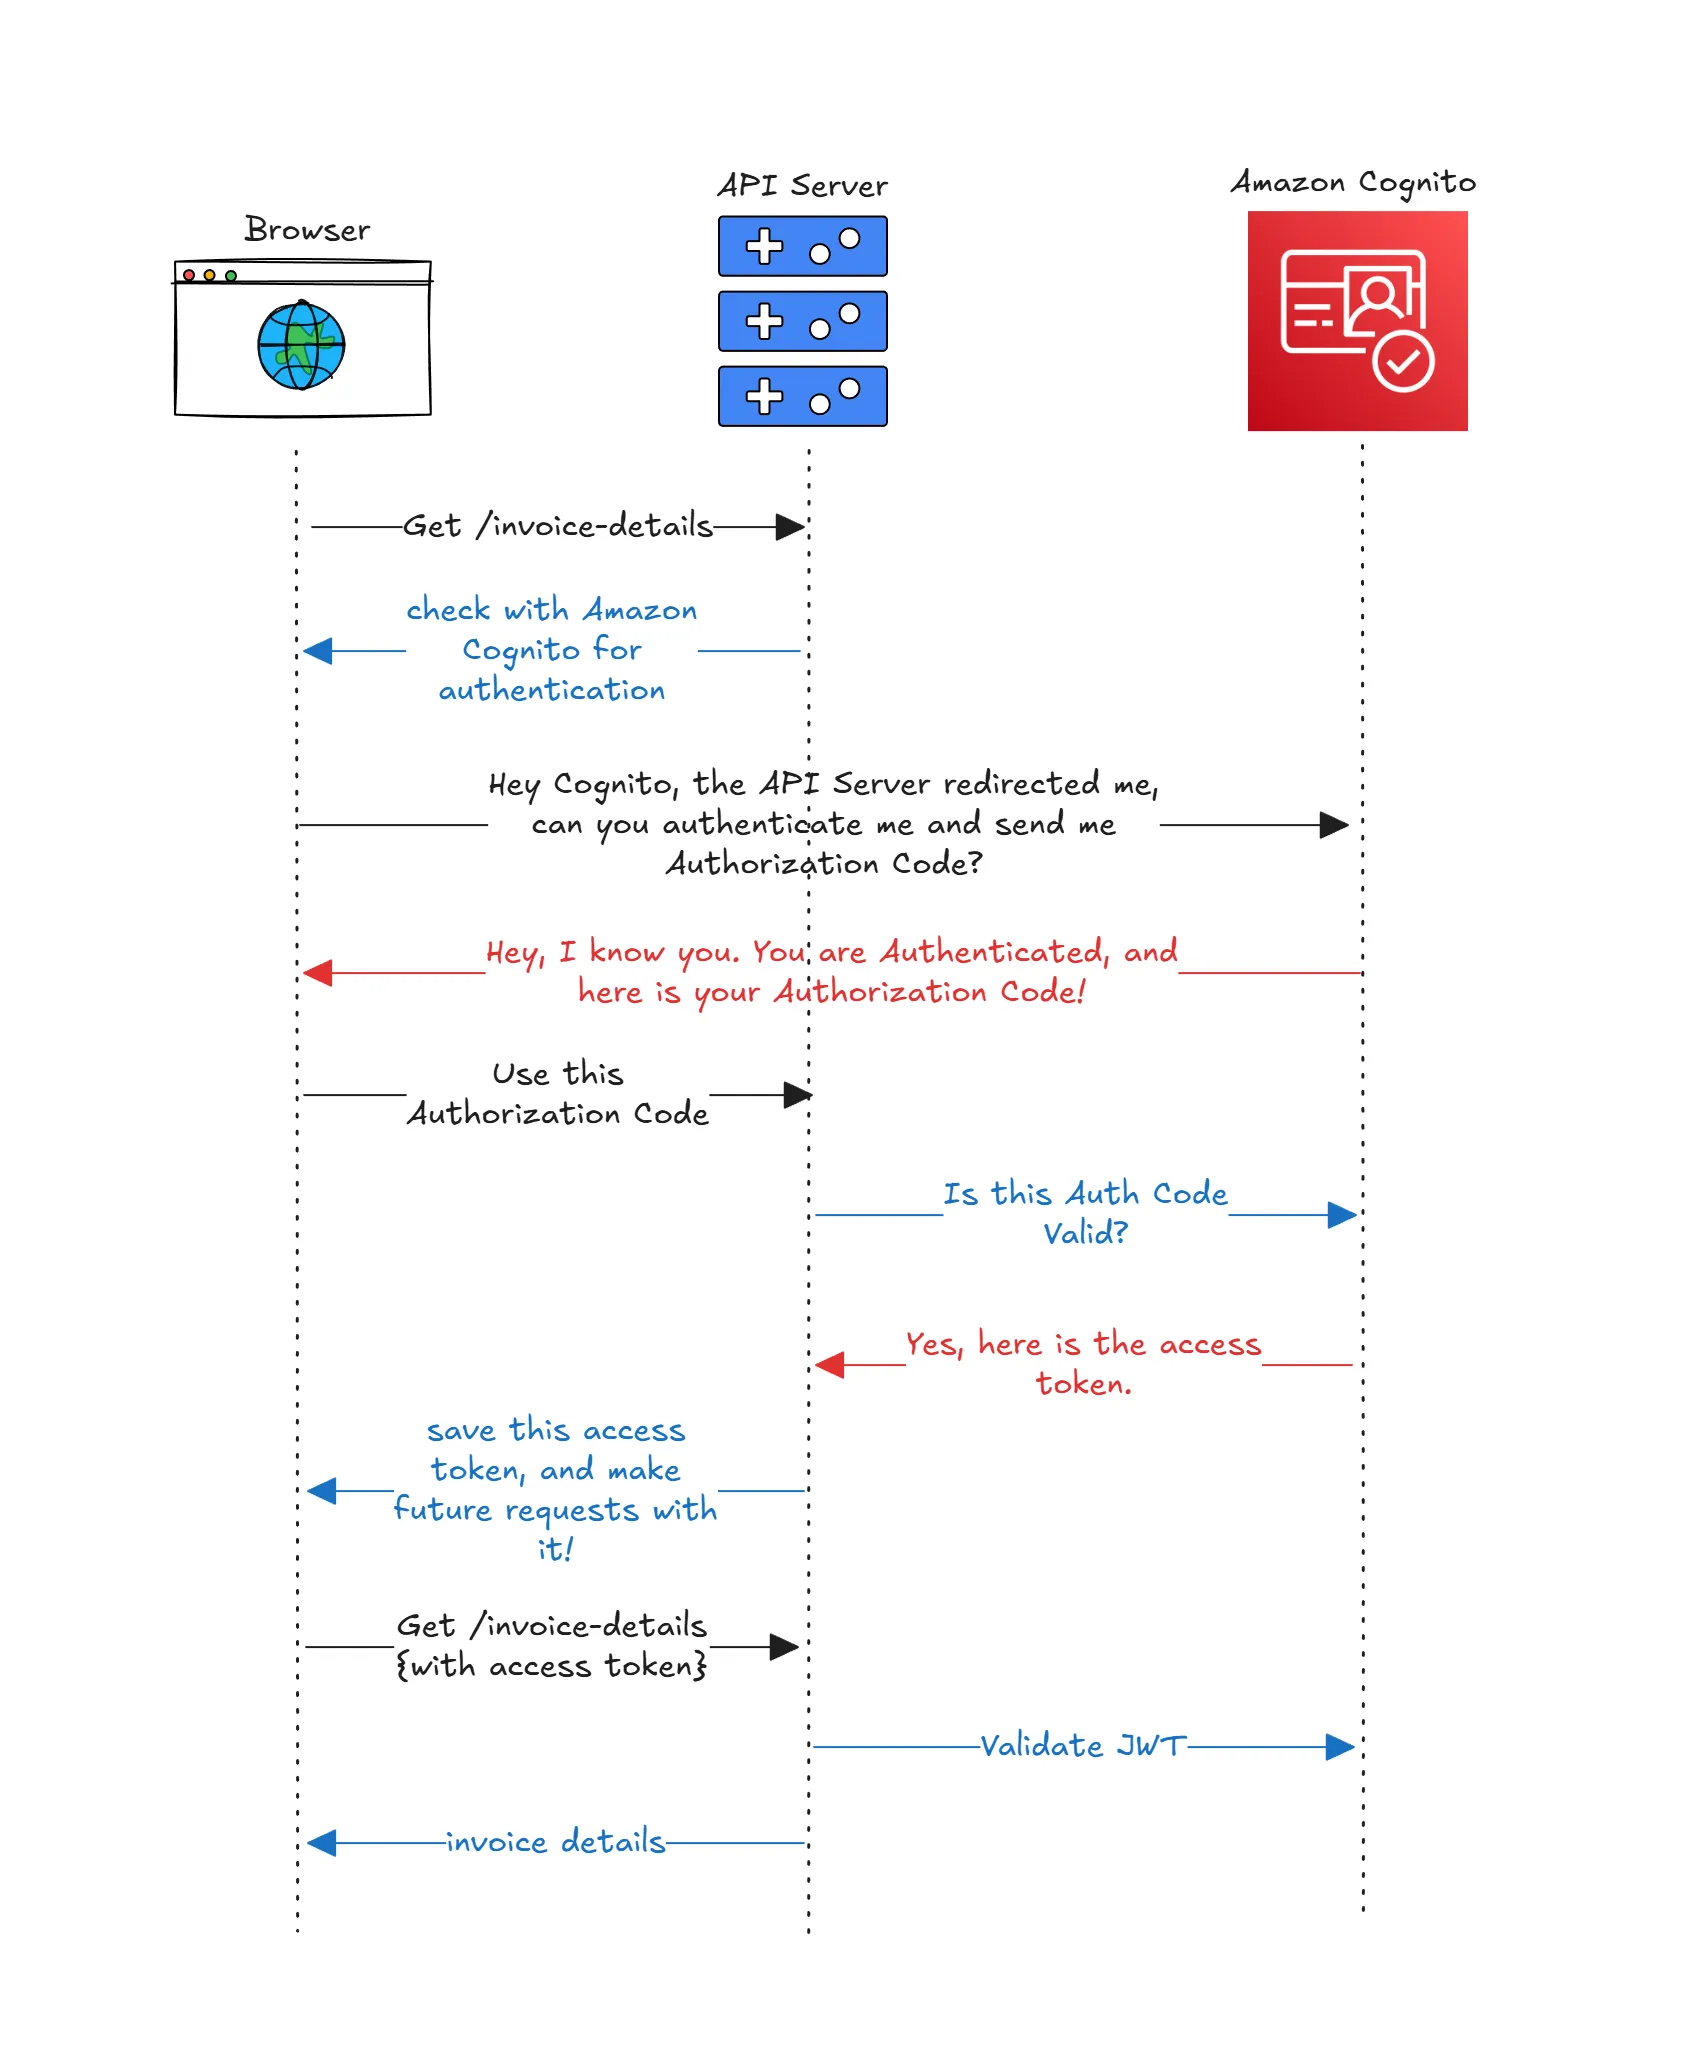
The authorization code flow has a simple loop. The browser is redirected to the authorization server (Cognito Hosted UI) with client ID, requested scopes, and a redirect URI. The user signs in, and Cognito redirects back with a short-lived authorization code. The client exchanges that code at the token endpoint for an ID token (who the user is), an access token (what the client can do on the API), and optionally a refresh token (how to keep the session alive). The client then calls the API with the access token in the Authorization: Bearer header. The API validates the token’s signature, issuer, audience, expiry, token use, and scopes before serving data. PKCE slots into this flow by binding the code to the originating client so intercepted codes cannot be replayed elsewhere.
Here is a precise workflow diagram of the authorization code flow:
The problem with Auth Code Flow in SPAs
Without PKCE, a SPA that runs the authorization code flow is exposed because the browser cannot hide a client secret. An attacker on the same device or network could lift the authorization code from the redirect URL and redeem it on another machine to get tokens. The code itself becomes the key, and there is nothing tying it to the original browser session. That threat is tolerable for confidential server apps that guard a secret, but it is unacceptable for public clients like Blazor WASM, React, or mobile apps. PKCE fixes this by turning the code into a locked box: the PKCE verifier is the only key, and it never leaves the original client, so a stolen code alone cannot be exchanged for tokens.
PKCE Explained and Where it is needed?
PKCE (Proof Key for Code Exchange, RFC 7636) is a small extension to the authorization code flow that stops attackers from stealing authorization codes in the browser and redeeming them elsewhere. Instead of trusting a client secret, the public client generates a random string (the code_verifier), hashes it to make a code_challenge, and sends that challenge with the initial authorize request. Cognito stores the challenge with the pending authorization request. When Cognito later redirects back with an authorization code, the client must prove it owns the original verifier by sending it to the token endpoint. If the verifier does not match the stored challenge, the token request fails. This means a code intercepted in transit is useless without the verifier that never left the original client.
You need PKCE whenever you run the authorization code flow from a public client that cannot keep a secret: SPAs (Blazor WASM, React, Angular), mobile apps, native desktop apps, and command-line tools that initiate browser sign-in. OAuth 2.1 makes PKCE mandatory for these scenarios. Confidential clients that truly can keep a secret (server-side apps) still benefit from PKCE, but the requirement is strict only for public clients. PKCE is not used for client credentials flow or for legacy implicit flow; the former does not involve user login, and the latter should be avoided in favor of auth code + PKCE. In this guide, Blazor WASM is the public client, so PKCE is non-negotiable.
If you want the full working solution as reference while you follow along, the source code is on GitHub: PKCE Authentication in Blazor WASM & AWS Cognito.
Why PKCE is mandatory for Blazor WASM
Blazor WASM runs entirely in the browser. Anything you ship ends up in the user’s hands, so storing a client secret is off the table. PKCE fixes the most obvious hole in the authorization code flow by binding the returned code to a one-time verifier that only the original client possesses. The browser generates a random code_verifier, hashes it into a code_challenge, and sends that challenge in the initial authorize request. When Cognito redirects back with a code, the browser proves possession of the original verifier to swap that code for tokens. Even if someone steals the redirect and the code, they cannot redeem it without the verifier. That is why the Cognito app client we create will refuse to issue tokens without PKCE. OAuth 2.1 formalizes this as the default for public clients, and Cognito has solid first-party support, which saves you from wiring a custom PKCE stack.
One subtle but important point: the access token we fetch is meant for the API, not for identity display. Cognito will also issue an ID token that contains profile claims such as email and name. The Blazor UI can read the ID token to show the signed-in user, but the API should only care about the access token and should explicitly reject ID tokens by checking the token_use claim. This keeps the separation of concerns clean and avoids the classic mistake of accepting the wrong token type at your backend.
PKCE also changes how you think about the Hosted UI. Because you redirect the user to Cognito for sign-in, you are not passing around passwords or implementing login forms in your own app. That removes entire classes of security bugs (injected scripts, CSRF on custom login pages, accidental logging of credentials) and keeps you aligned with best practices from the AWS side. It also makes it much easier to drop in social or enterprise identity providers later, because the Hosted UI becomes the single front door for authentication.
Architecture at a glance
The path is straightforward once you see it: the user visits Blazor WASM, clicks sign-in, and the app redirects to the Cognito Hosted UI with the PKCE challenge and requested scopes. Cognito authenticates the user, redirects back with an authorization code, and the Blazor app posts the code plus the verifier to Cognito’s token endpoint. Cognito returns an ID token for UI claims, an access token for API calls, and a refresh token because we enable it. Blazor keeps tokens in session storage and calls the API with an Authorization: Bearer <access_token> header. The API validates the JWT signature and claims via Cognito’s JWKS and rejects calls without the required scope. CORS is configured so the Blazor origin can reach the API. Everything runs locally for development, with HTTPS on both sides. If you later place the API behind API Gateway, the same access token can be validated by an HTTP API JWT authorizer before it even touches your code, and the backend will still re-validate to avoid trusting only the edge.
You can refer to the previous architecture diagram above for a visual summary.
Prerequisites
- AWS account with permissions to create Cognito resources (console access is enough here).
- AWS CLI configured for your target region (using
us-east-1in this guide). - .NET 10 SDK installed.
- Node.js for the Blazor WebAssembly toolchain.
- Local HTTPS endpoints:
https://localhost:5003for Blazor,https://localhost:5001for the API (adjust if needed, but keep them consistent in Cognito callback settings). - Optional: custom domain noted for production; we start with the default Cognito domain for simplicity.
Step 1: Create the Cognito User Pool in the console
Navigate to AWS Console and open the Cognito service. In the Cognito console, choose Create user pool.
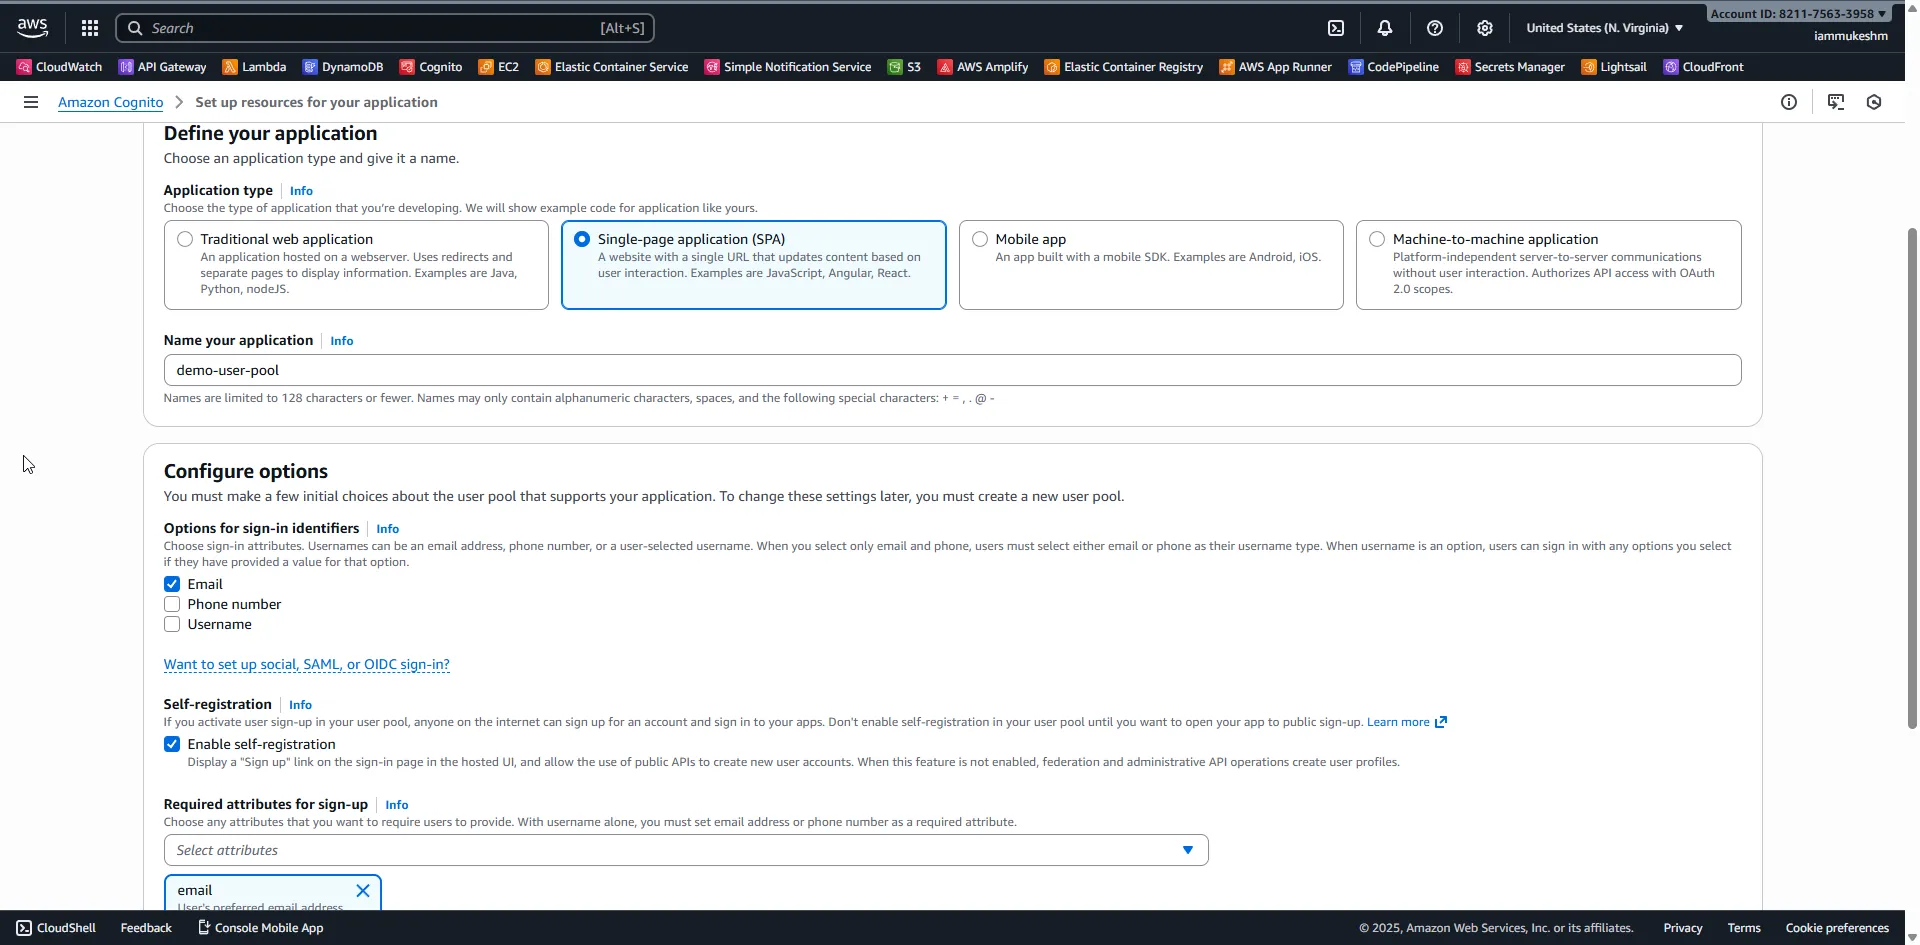
First, under the ‘Define Your Application’ section, set the application type to Single Page Application (SPA). This configures the pool for public clients and PKCE by default. Give a name to the application, in my case ‘demo-user-pool’, and proceed to the next step.
Under the Configure options, select Email, enable self registration, and for the required attributes for sign-up, select Email. Leave other settings at their defaults for this demo.
Step 2: Create an App Client
By default, when you created the user pool, Cognito will create an app client for you. Let’s configure that client and copy its ID for later use.
Open up the newly created user pool, go to App clients under the Applications section, and select the default app client (it will have a generated name same as what you configured for the application during the user pool creation). Mine is demo-user-pool.
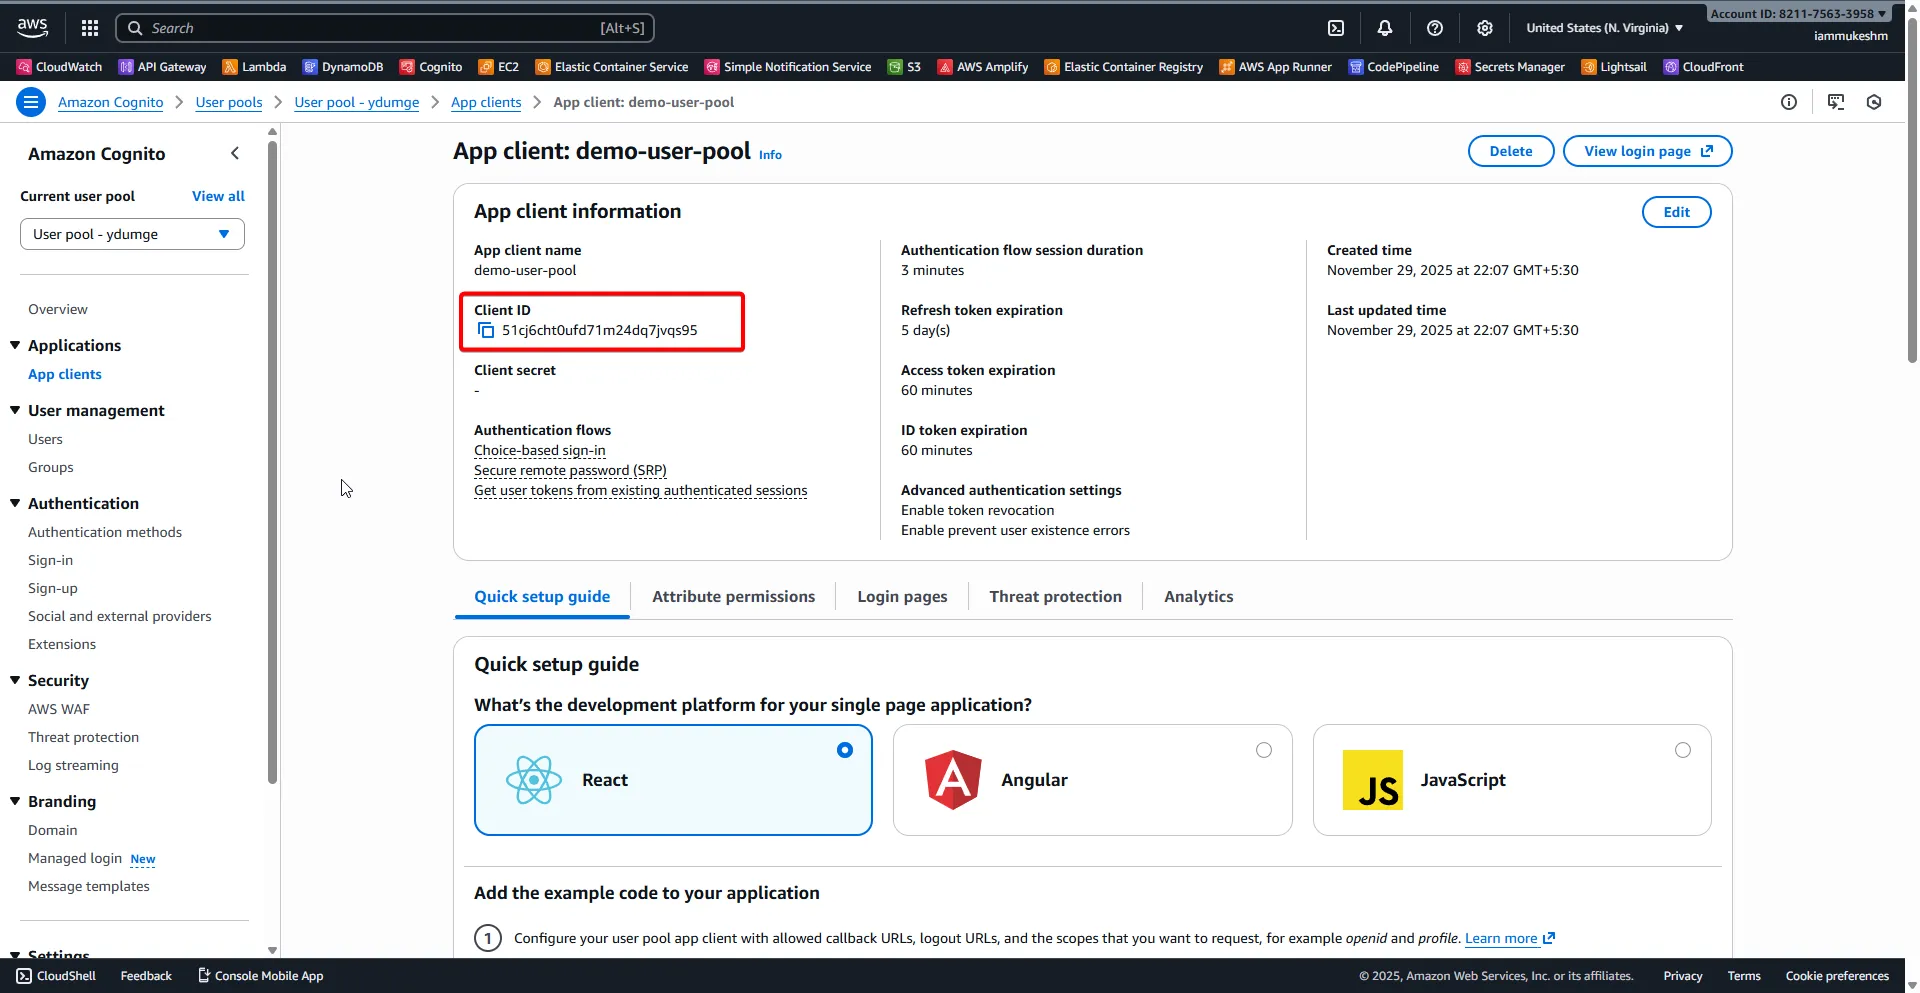
Click on View Login Page.
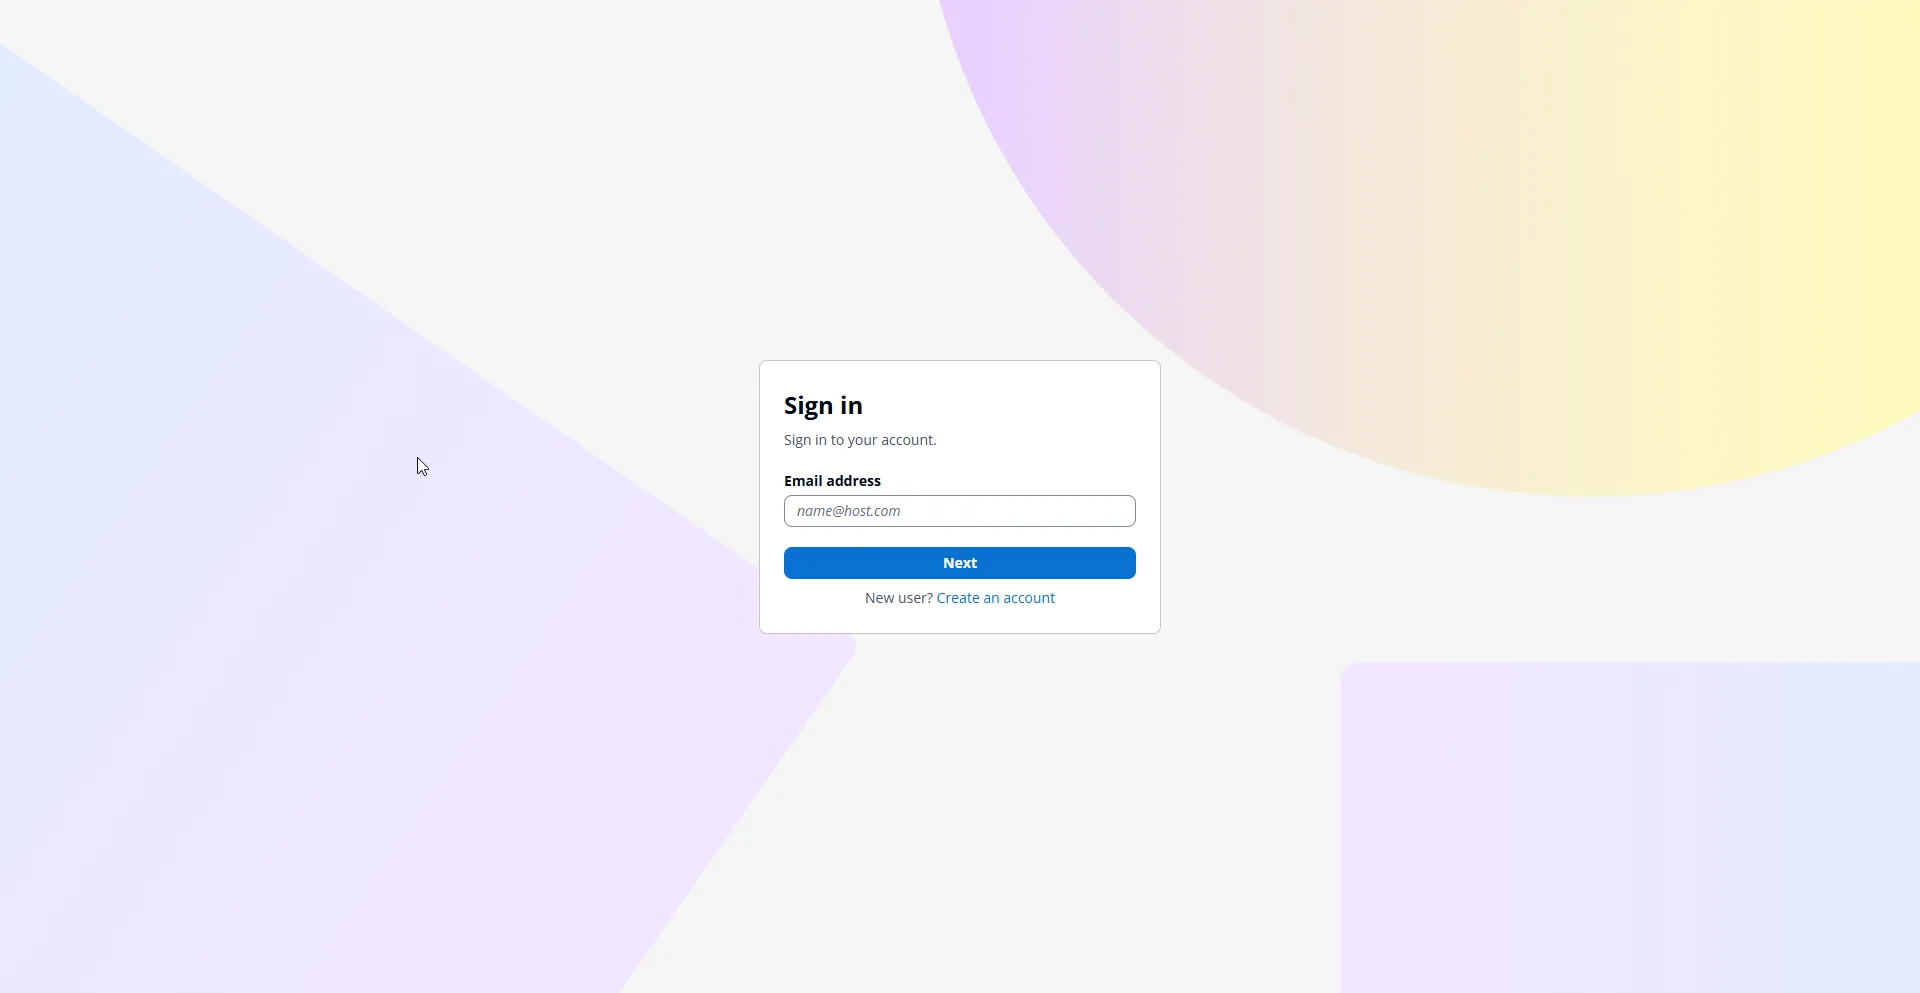
This is the login page that is generated for you. We will be using this Hosted UI for user sign-in and sign-up from the Blazor WASM app.
Go back to the App client settings page, and note down the Client ID; you will need it in the Blazor app configuration later.
Click on Edit under the App client information section. Here you can rename the app client, configure various Authentication flows, and set token expiration times. This configuration is populated based on the application type you selected during user pool creation. In our case, we selected SPA, so PKCE is already enabled, and the implicit flow is disabled. Nothing else to change here for now.
Step 3: Define a Resource server and API scope
Under App integration > Resource servers, create one with identifier api://blazor-pkce-api and name Blazor PKCE API. Add a scope named access with description “Access to the Blazor API.” Save.
Next, still under App integration, open App clients, choose your SPA client, and go to Login pages > Edit. This is where we bind the scope to the client.
Scroll down to Custom scopes and select api://blazor-pkce-api/access.
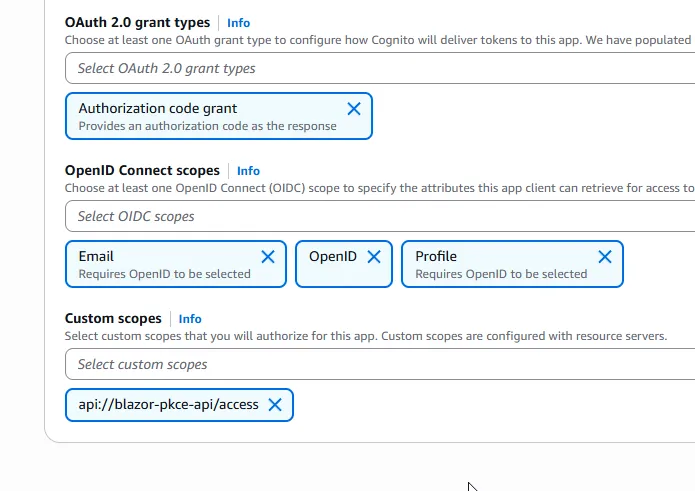
Under the OpenID Connect scopes section, ensure that openid, email, and profile are selected. These scopes will allow us to get user identity information in the ID token.

Step 4: Configure the domain, callback, and sign-out URLs
While still on the app client configuration, switch to Domain and claim a domain prefix (for example, blazor-pkce-demo) in your region. Without a domain, the Hosted UI cannot load.
Return to Login pages > Edit and add the callback and logout URLs.
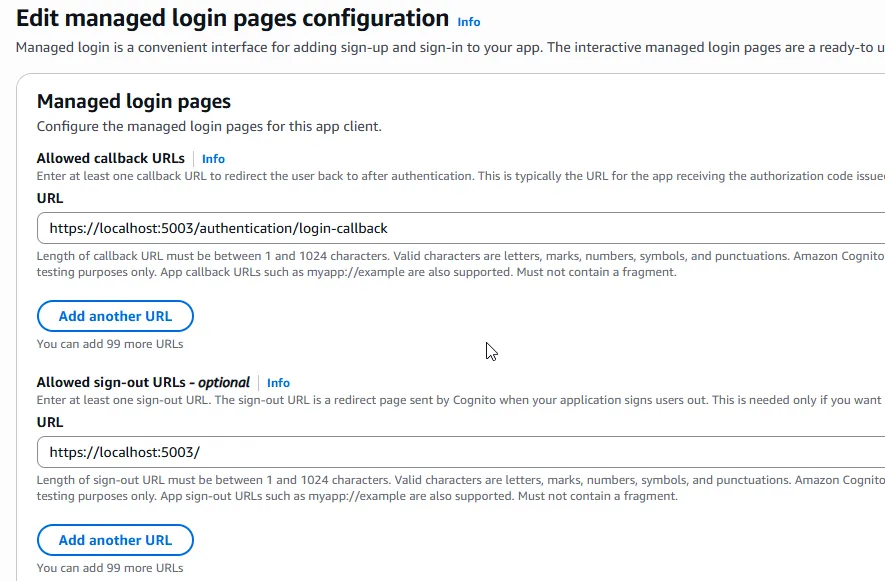
It is important to note that I am assuming that my Blazor WASM app will be running on https://localhost:5003. Adjust these URLs if you plan to run them on different ports or domains.
That’s it. Your Cognito User Pool is ready with PKCE enabled app client, Hosted UI, and a custom API scope. Click on Save Changes.
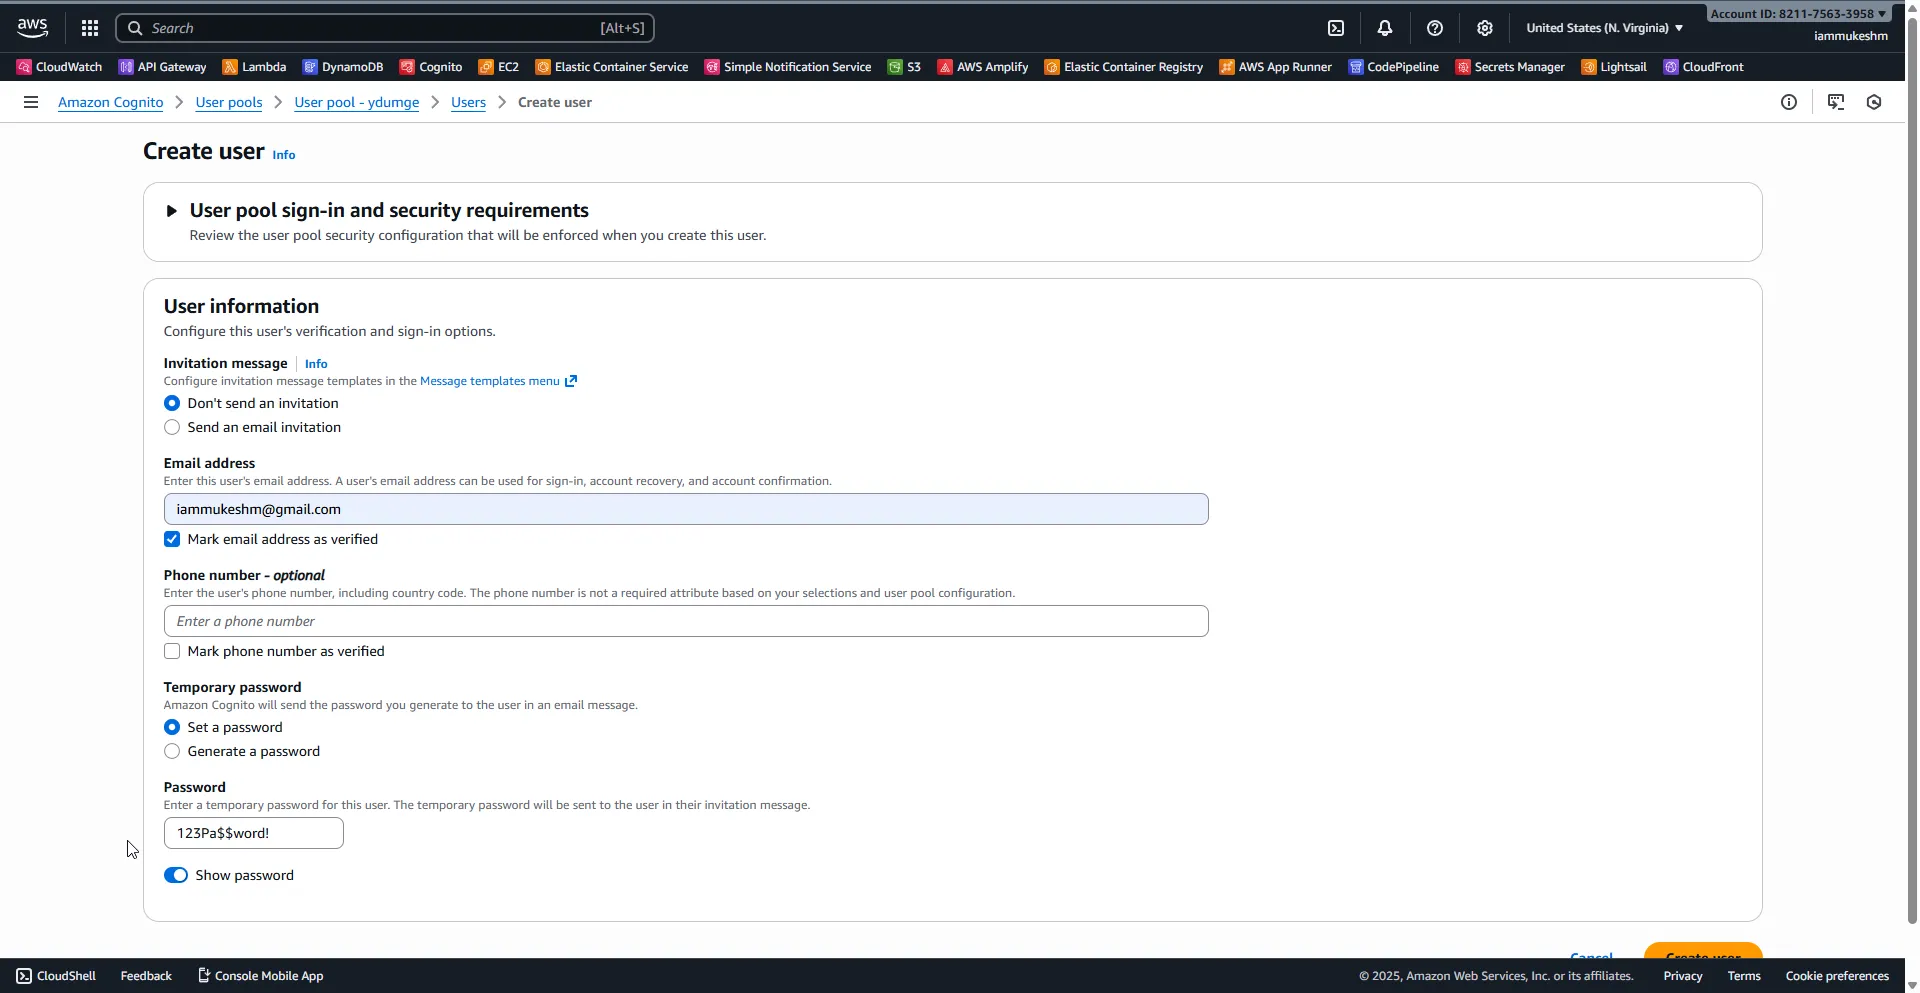
Step 5: Add a Test User
In Users, choose Create user. Enter an email/username, set a temporary password if prompted, and mark the email as verified if you want to skip verification for this walkthrough. If verification is required, complete it once so you do not hit a “User is not confirmed” error on first login.
That’s everything you have to do on the Cognito side. Now let’s build the Blazor WASM client and the .NET 10 API.
Step 6: Build the Blazor WebAssembly client
Scaffold the client, add the authentication package, and then wire Cognito exactly as shown in the code below. Update only the identifiers and domains to match your User Pool.
dotnet new blazorwasm -n BlazorPkceClientcd BlazorPkceClientdotnet add package Microsoft.AspNetCore.Components.WebAssembly.AuthenticationProgram.cs configures the named Api client so it automatically carries the access token to https://localhost:5001, and sets up OIDC against the Cognito issuer with authorization code + PKCE. The redirect and logout callbacks match the Hosted UI settings we added in Cognito.
If you want to clone and run the exact sample, the repo is here: iammukeshm/pkce-authentication-blazor-wasm-aws-cognito. Update appsettings.json (API) and the OIDC settings in Program.cs (client) with your own pool ID, client ID, and domain before testing.
using BlazorPkceClient;using Microsoft.AspNetCore.Components.Web;using Microsoft.AspNetCore.Components.WebAssembly.Hosting;
var builder = WebAssemblyHostBuilder.CreateDefault(args);
builder.RootComponents.Add<App>("#app");builder.RootComponents.Add<HeadOutlet>("head::after");
builder.Services.AddScoped<ApiAuthorizationMessageHandler>();
builder.Services.AddHttpClient("Api", client =>{    client.BaseAddress = new Uri("{API_URL}");}).AddHttpMessageHandler<ApiAuthorizationMessageHandler>();
builder.Services.AddScoped(sp => sp.GetRequiredService<IHttpClientFactory>().CreateClient("Api"));
builder.Services.AddOidcAuthentication(options =>{    options.ProviderOptions.Authority = "{COGNITO_DOMAIN}/{YOUR_USER_POOL_ID}";    options.ProviderOptions.ClientId = "{CLIENT_ID}";    options.ProviderOptions.ResponseType = "code";    options.ProviderOptions.DefaultScopes.Add("openid");    options.ProviderOptions.DefaultScopes.Add("email");    options.ProviderOptions.DefaultScopes.Add("profile");    options.ProviderOptions.DefaultScopes.Add("api://blazor-pkce-api/access");    options.ProviderOptions.RedirectUri = "{BLAZOR_WASM_URL}/authentication/login-callback";    options.ProviderOptions.PostLogoutRedirectUri = "{BLAZOR_WASM_URL}";});
await builder.Build().RunAsync();
ApiAuthorizationMessageHandler is the single place that defines where tokens are allowed to flow and which scopes must be present. Keeping this isolated avoids accidentally attaching tokens to the wrong endpoints.
using Microsoft.AspNetCore.Components;using Microsoft.AspNetCore.Components.WebAssembly.Authentication;
namespace BlazorPkceClient;
public class ApiAuthorizationMessageHandler : AuthorizationMessageHandler{    public ApiAuthorizationMessageHandler(IAccessTokenProvider provider, NavigationManager navigation)        : base(provider, navigation)    {        ConfigureHandler(            authorizedUrls: new[] { "{API_URL}" },            scopes: new[] { "api://blazor-pkce-api/access" });    }}
Add a protected page to validate that the access token reaches the API. The named Api client is injected, and the [Authorize] attribute ensures the user signs in before calling the endpoint.
Pages/ApiTest.razor:
@page "/api-test"@using Microsoft.AspNetCore.Authorization@attribute [Authorize]@inject HttpClient Http
<h3>Protected API call</h3>
<button class="btn btn-primary" @onclick="CallApi">Call API</button>
@if (!string.IsNullOrEmpty(Result)){    <pre>@Result</pre>}
@code {    private string? Result;
    private async Task CallApi()    {        // Call the protected API        Result = await Http.GetStringAsync("https://localhost:5001/weather");    }}
LoginDisplay.razor renders the user’s email and signs out through the Hosted UI. It also clears the OIDC entries from session storage before redirecting to Cognito’s logout endpoint.
@using Microsoft.AspNetCore.Components.WebAssembly.Authentication@inject NavigationManager Navigation@inject IJSRuntime JS
<AuthorizeView>    <Authorized>        <span class="me-2">Hello, @context.User.FindFirst("email")?.Value </span>        <a @onclick="LogoutAsync" class="btn btn-link px-2">Log out</a>    </Authorized>    <NotAuthorized>        <a href="authentication/login" class="btn btn-link px-2">Log in</a>    </NotAuthorized></AuthorizeView>
@code {    async Task LogoutAsync()    {        var clientId = "{CLIENT_ID}";        var redirectUrl = "{BLAZOR_WASM_URL}";        var authority = "{COGNITO_DOMAIN}";        var logoutUrl = $"{authority}/logout?client_id={clientId}&logout_uri={redirectUrl}";        await JS.InvokeVoidAsync("authHelper.clearBlazorAuth");        Navigation.NavigateToLogout(logoutUrl);    }}
Surface the login widget in the layout so it is always visible.
Shared/MainLayout.razor:
@inherits LayoutComponentBase<div class="page">    <div class="sidebar">        <NavMenu />    </div>
    <main>        <div class="top-row px-4">            <LoginDisplay />        </div>
        <article class="content px-4">            @Body        </article>    </main></div>
Add a tiny helper script to wipe the Blazor auth cache on logout and reference it from wwwroot/index.html.
wwwroot/authHelper.js:
window.authHelper = {    clearBlazorAuth: function () {        const prefix = "oidc";
        for (let i = sessionStorage.length - 1; i >= 0; i--) {            const key = sessionStorage.key(i);            if (key && key.startsWith(prefix)) {                sessionStorage.removeItem(key);            }        }    }};
Why add this? Blazor’s OIDC library stores state and tokens in session storage. When you redirect to the Cognito logout endpoint, Cognito clears its session but the browser tab may still hold the cached OIDC entries. Removing them locally prevents stale tokens from being reused after logout, especially if you log out and back in with another user during testing. Keep this helper minimal and scoped to the OIDC keys only.
wwwroot/index.html:
<script src="authHelper.js"></script>Wire the routing and authenticator to handle Hosted UI redirects. The defaults in App.razor stay intact, and Authentication.razor hosts the remote authenticator view.
App.razor:
@using Microsoft.AspNetCore.Components.Authorization
<CascadingAuthenticationState> <Router AppAssembly="@typeof(App).Assembly" NotFoundPage="typeof(Pages.NotFound)"> <Found Context="routeData"> <AuthorizeRouteView RouteData="@routeData" DefaultLayout="@typeof(MainLayout)"> <NotAuthorized> <RedirectToLogin /> </NotAuthorized> </AuthorizeRouteView> <FocusOnNavigate RouteData="@routeData" Selector="h1" /> </Found> </Router></CascadingAuthenticationState>Pages/Authentication.razor:
@page "/authentication/{action}"@using Microsoft.AspNetCore.Components.WebAssembly.Authentication<RemoteAuthenticatorView Action="@Action" />
@code {    [Parameter] public string? Action { get; set; }}
The WebAssembly authentication handler handles PKCE end-to-end: it creates the verifier and challenge, exchanges the code, stores tokens in session storage, and refreshes silently when possible. Keep your allowed origins and callback URLs in sync with the values above so tokens stay scoped to the right endpoints.
Important: the Blazor WASM app runs on https://localhost:5003 and the API on https://localhost:5001. Those ports must stay consistent with the callback URLs and authorized API base address in the code; change them in both Cognito and your configuration if you use different ports.
Configuration hygiene: keep the authority, client ID, scopes, and callback URLs in configuration (appsettings, user secrets, or environment variables) so you can switch environments without code changes. Just ensure the values in Program.cs stay in lockstep with your Cognito app client and Hosted UI settings; mismatches here are the top cause of 401/redirect errors.
Step 7: Build the .NET 10 API and wire JWT validation
Create a new Web API project and add the JWT bearer authentication package. We will keep the API minimal: one public health endpoint and one protected weather endpoint that checks the Cognito scope. The configuration binds Cognito values from appsettings.json.
dotnet new webapi -n BlazorPkceApicd BlazorPkceApidotnet add package Microsoft.AspNetCore.Authentication.JwtBearerappsettings.json:
{ "Logging": { "LogLevel": { "Default": "Information", "Microsoft.AspNetCore": "Warning" } }, "AllowedHosts": "*", "Jwt": { "Authority": "https://cognito-idp.us-east-1.amazonaws.com/us-east-1_jCxyFPmjA", "Scope": "api://blazor-pkce-api/access" }, "Cors": { "AllowedOrigins": [ "https://localhost:5003" ] }}Update Program.cs with CORS, JWT bearer validation, and a scope-based authorization policy. Notice that we check token_use to ensure we only accept access tokens, not ID tokens. We also set a small clock skew to keep expiry strict during development.
using Microsoft.AspNetCore.Authentication.JwtBearer;using Microsoft.IdentityModel.Tokens;
var builder = WebApplication.CreateBuilder(args);
var jwtSection = builder.Configuration.GetSection("Jwt");var authority = jwtSection.GetValue<string>("Authority");var scope = jwtSection.GetValue<string>("Scope");var allowedOrigins = builder.Configuration.GetSection("Cors:AllowedOrigins").Get<string[]>() ?? Array.Empty<string>();
builder.Services.AddCors(options =>{    options.AddPolicy("BlazorCors", policy =>    {        policy.WithOrigins(allowedOrigins)              .AllowAnyHeader()              .AllowAnyMethod();    });});
builder.Services.AddAuthentication(JwtBearerDefaults.AuthenticationScheme)    .AddJwtBearer(options =>    {        options.Authority = authority;        options.TokenValidationParameters = new TokenValidationParameters        {            ValidateIssuer = true,            ValidateAudience = false,            ValidateLifetime = true,            ValidateIssuerSigningKey = true,            ValidIssuer = authority,            ClockSkew = TimeSpan.FromMinutes(1)        };        options.Events = new JwtBearerEvents        {            OnTokenValidated = context =>            {                var tokenUse = context.Principal?.FindFirst("token_use")?.Value;                if (!string.Equals(tokenUse, "access", StringComparison.OrdinalIgnoreCase))                {                    context.Fail("Invalid token_use");                }                return Task.CompletedTask;            }        };    });
builder.Services.AddAuthorization(options =>{    options.AddPolicy("ApiScope", policy =>    {        policy.RequireAuthenticatedUser();        policy.RequireAssertion(context =>        {            var scopeClaim = context.User.FindFirst("scope")?.Value;            if (string.IsNullOrEmpty(scopeClaim))                return false;
            var scopes = scopeClaim                .Split(' ', StringSplitOptions.RemoveEmptyEntries);
            return scopes.Contains(scope, StringComparer.Ordinal);        });    });});
var app = builder.Build();
app.UseHttpsRedirection();app.UseCors("BlazorCors");app.UseAuthentication();app.UseAuthorization();
app.MapGet("/health", () => Results.Ok("OK"));
app.MapGet("/weather", () =>{    var forecast = new[]    {        new { Date = DateOnly.FromDateTime(DateTime.Now), TemperatureC = 24, Summary = "Mild" }    };    return Results.Ok(forecast);}).RequireAuthorization("ApiScope");
app.Run();
For local HTTPS, trust the development certificate (dotnet dev-certs https --trust). Authority points to the Cognito issuer so the API can download JWKS keys; Audience is the app client ID; Scope is the custom API scope. The middleware enforces issuer, audience, lifetime, and scope via the ApiScope policy, and the token_use check rejects ID tokens. Keep CORS aligned with the Blazor origin or you will see 401/CORS errors when calling /weather.
Code Walkthrough
Authority, Audience, Scope, and Cors:AllowedOrigins come from appsettings.json. They must mirror your Cognito issuer (https://cognito-idp.<region>.amazonaws.com/<pool_id>), app client ID, custom scope (api://blazor-pkce-api/access), and the Blazor origin (https://localhost:5003).
BlazorCors whitelists those origins and allows any header/method. If the origin does not match the Blazor port or host, the browser will fail on CORS before auth even runs.
AddJwtBearer points to the Cognito issuer and audience. The middleware downloads JWKS keys, validates signature, issuer, audience, and lifetime with a 1-minute clock skew, and then runs a token type check.
OnTokenValidated inspects token_use and rejects anything except access, which blocks ID tokens from hitting your API. The ApiScope policy then requires the exact scope string inside the space-delimited scope claim.
The pipeline order matters: UseHttpsRedirection, then UseCors, then UseAuthentication and UseAuthorization so HTTPS, CORS, and auth run before your endpoints. /health stays anonymous; /weather is gated by RequireAuthorization("ApiScope") and needs a valid access token with the custom scope.
Keep these values in sync with Cognito and the Blazor client. Most 401s come from a mismatched audience/scope or CORS pointing to the wrong origin.
Why the custom scope check? Cognito emits all scopes in a single space-separated scope claim instead of multiple claims, so the policy splits that string and looks for the exact api://blazor-pkce-api/access value. This avoids false positives from partial matches and keeps the check aligned with how Cognito formats scopes.
Claims and authorization design
Scopes answer “what can you do,” while claims answer “who are you.” In this guide we use a single API scope to gate access to the weather endpoint, but you can layer richer authorization by adding groups or custom claims in Cognito and mapping them into tokens. For example, you can create groups like admins and readers in the User Pool, then configure a group-to-claim mapping so cognito:groups appears in the access token. In the API, add policies that check for specific group claims in addition to scope, which lets you differentiate between read and write endpoints. If you prefer more granular scopes, define read and write scopes in the resource server and attach them to different routes. The key is to keep scope names stable and self-explanatory because they become part of your long-term contract with clients.
Blazor can also read ID token claims to drive UI decisions. You might hide admin-only navigation links unless the user has an admin group in the ID token. Keep in mind that UI checks are for convenience; enforce authorization again in the API. Relying solely on the front end for authorization is not enough, especially when tokens can be crafted outside your app if someone compromises a client. Defense in depth means claims inform the UI, scopes and claims enforce at the API, and JWT validation happens both at the edge (API Gateway authorizer) and inside the service.
Local HTTPS, certificates, and dev ergonomics
Local development with HTTPS is unavoidable when you work with OAuth flows. Both Cognito and modern browsers expect secure origins. Run dotnet dev-certs https --trust once and restart your browser so the self-signed dev cert is trusted. If your corporate environment blocks self-signed certs, use a local reverse proxy like Traefik or Caddy to terminate TLS with a certificate that your machine trusts. Keep your Blazor dev server and API on different ports but the same host to simplify CORS.
Why console-first in this guide
I am using the AWS console for Cognito configuration so you can see every switch and so new readers can follow without installing extra tooling. In real projects, Infrastructure as Code is still the right answer. CDK in C# or Terraform can model User Pools, app clients, custom domains, and resource servers cleanly. The values we configure here-domain, callback URLs, scopes, refresh token settings-map directly to CDK constructs (UserPool, UserPoolClient, UserPoolDomain, ResourceServer). Once you are comfortable with the flow, codify it to avoid drift between environments.
Let me know in the comment section if you want a Terraform version of this guide.
Step 8: Token acquisition and refresh in Blazor WASM
The Blazor authentication handler takes care of the full PKCE dance. It generates the verifier and challenge, redirects to the Hosted UI, processes the callback, and exchanges the code for tokens. Tokens are stored in session storage, which means closing the tab will sign the user out; that is acceptable for most security-sensitive apps. If you want longer-lived sessions, lean on refresh tokens rather than storing tokens in persistent storage.
To ensure refresh works, request the scopes we configured and keep refresh tokens enabled on the app client. Cognito may require offline_access in some setups; if so, add it to the scopes. When access tokens expire, the handler will attempt a silent refresh using the stored refresh token. If refresh fails (expired or rotated), the user is redirected to sign in again. Keep access tokens short-lived-five to fifteen minutes is a reasonable window-so compromised tokens age out quickly.
If you want to see what a manual refresh call looks like for debugging, the request is a simple form post to the Cognito token endpoint:
POST https://{COGNITO_DOMAIN}/oauth2/tokenContent-Type: application/x-www-form-urlencoded
grant_type=refresh_token&client_id=YOUR_CLIENT_ID&refresh_token=THE_REFRESH_TOKEN
In normal Blazor WASM usage you do not have to write this call yourself; the built-in handler manages it. Just keep an eye on network traces to confirm the refresh flow is working when access tokens expire.
We will test this in the later section of this article.
If you find yourself dealing with “invalid_client” or “unauthorized_client” errors during refresh, verify that you did not accidentally add a client secret to the app client. Public clients in Cognito should never require client secrets. If the Hosted UI shows a generic error page on redirect, the usual culprits are scope mismatches or an unverified user. Decode the ID token and check the email_verified claim if you require it for sign-in.
Step 9: Let’s Test PKCE Authentication with Blazor WASM and Cognito
Start the API with dotnet run and make sure it is reachable at https://localhost:5001. Start the Blazor app on https://localhost:5003.
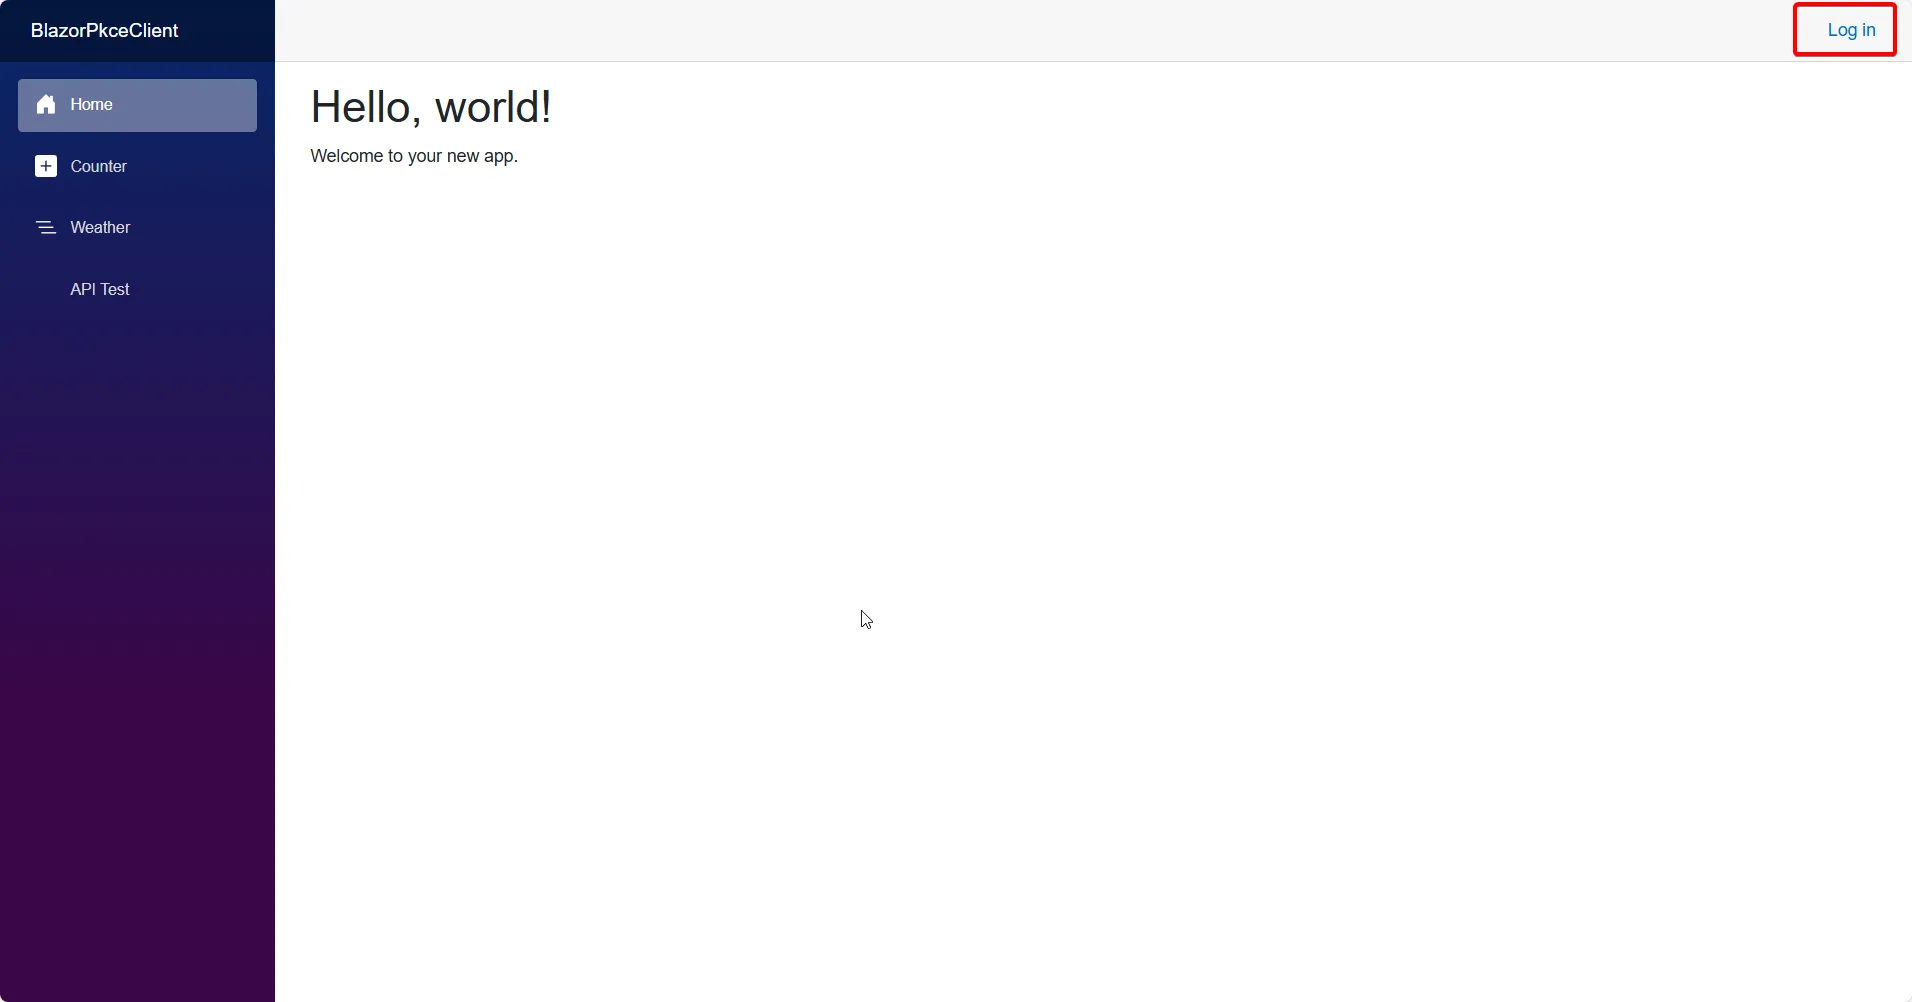
Browse to the app, click Log in, and you should be redirected to the Cognito Hosted UI.
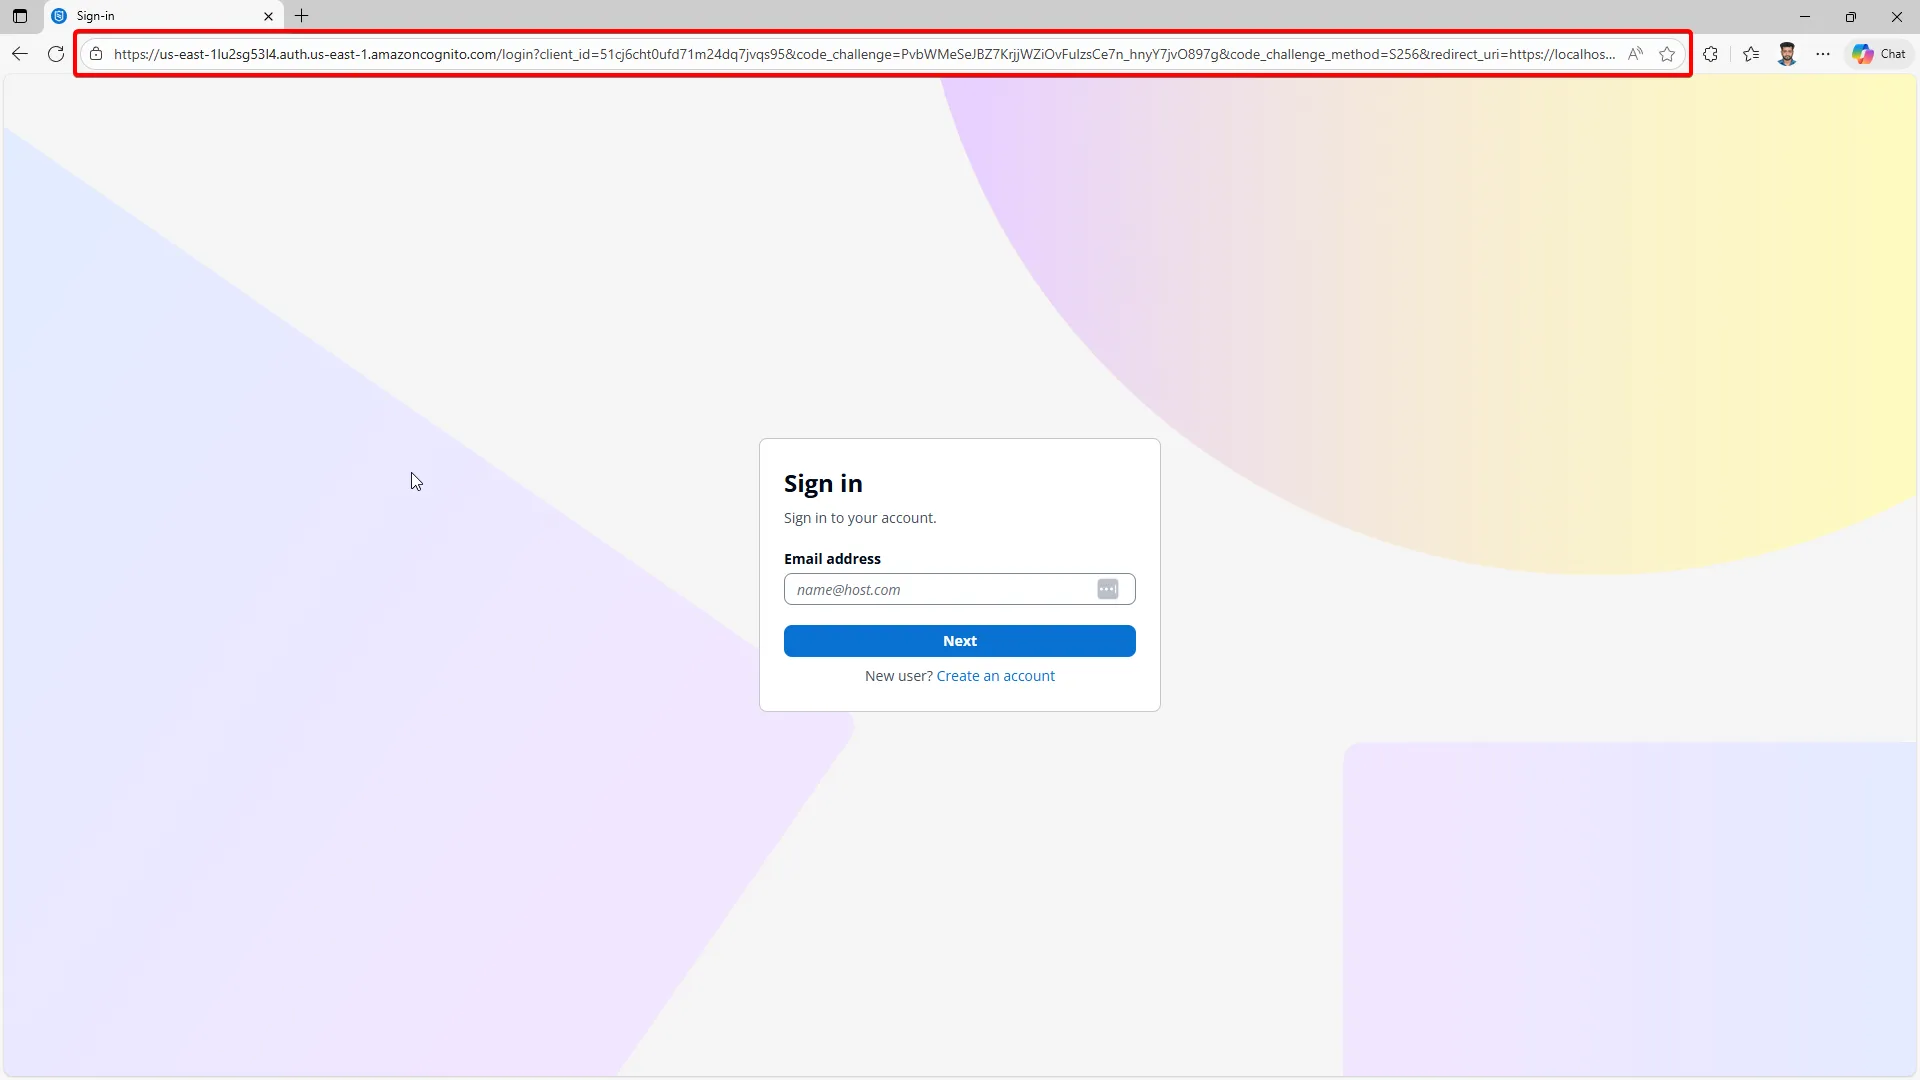
If you inspect the URL, you should see the code_challenge and code_challenge_method=S256 parameters in the authorize request, indicating that PKCE is in use.
https://us-east-1lu2sg53l4.auth.us-east-1.amazoncognito.com/login?client_id=51cj6cht0ufd71m2568q7jvqs95&code_challenge=PvbWMettJBZ7KrjjWZiOvFulzsCe7n_hnyY7jvO22397g&code_challenge_method=S256&redirect_uri=https://localhost:5003/authentication/login-callback&response_mode=query&response_type=code&scope=openid+profile+openid+email+profile+api://blazor-pkce-api/access&state=b1ebeb5a9fbc49298311a11f92be6a2Enter your credentials (that we already created in Cognito) and sign in. After successful authentication, you should be redirected back to the Blazor app.
While the redirect happens, the Blazor handler exchanges the authorization code for tokens using the original code_verifier. If everything is wired correctly, you will land back in the app as a signed-in user.
If you see this momentary screen, here is the Authorization Code that is returned by Cognito, which Blazor exchanges for tokens behind the scenes.
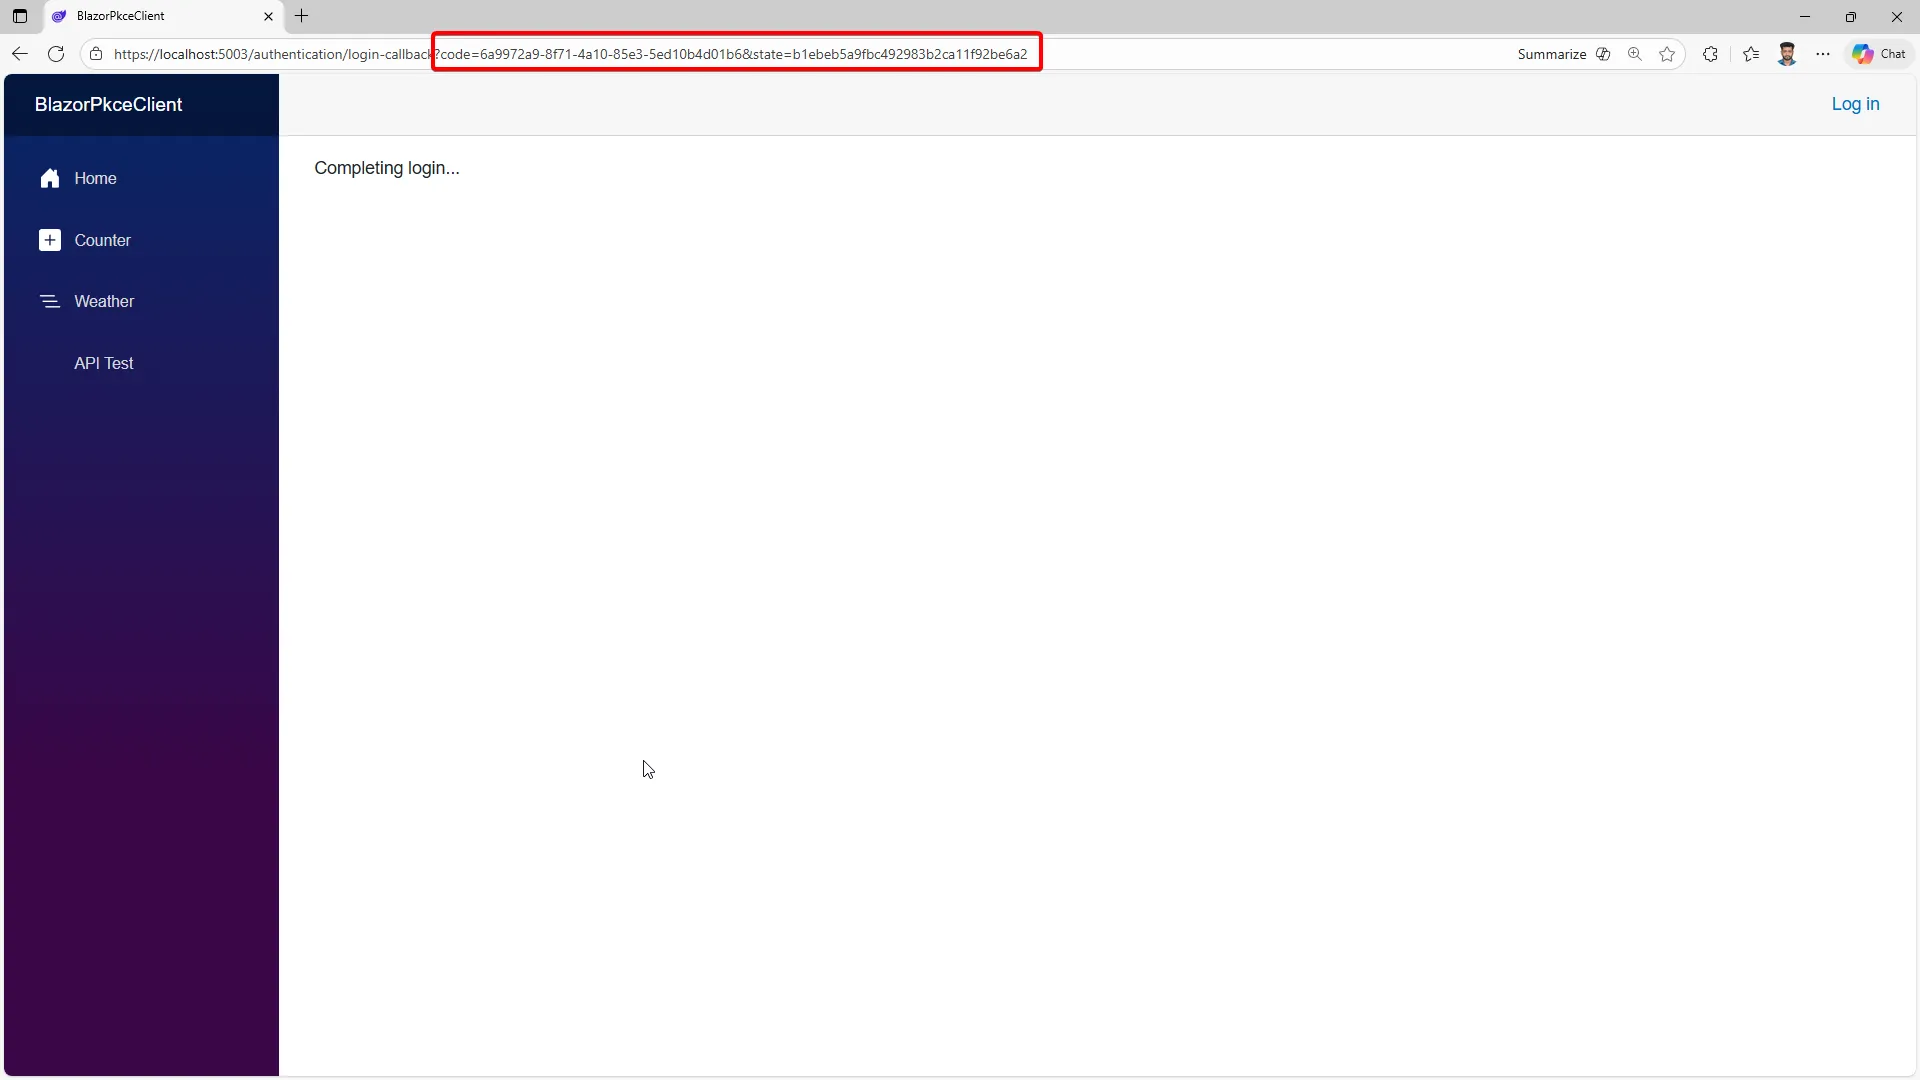
And you can see the successful login state in the Blazor app:
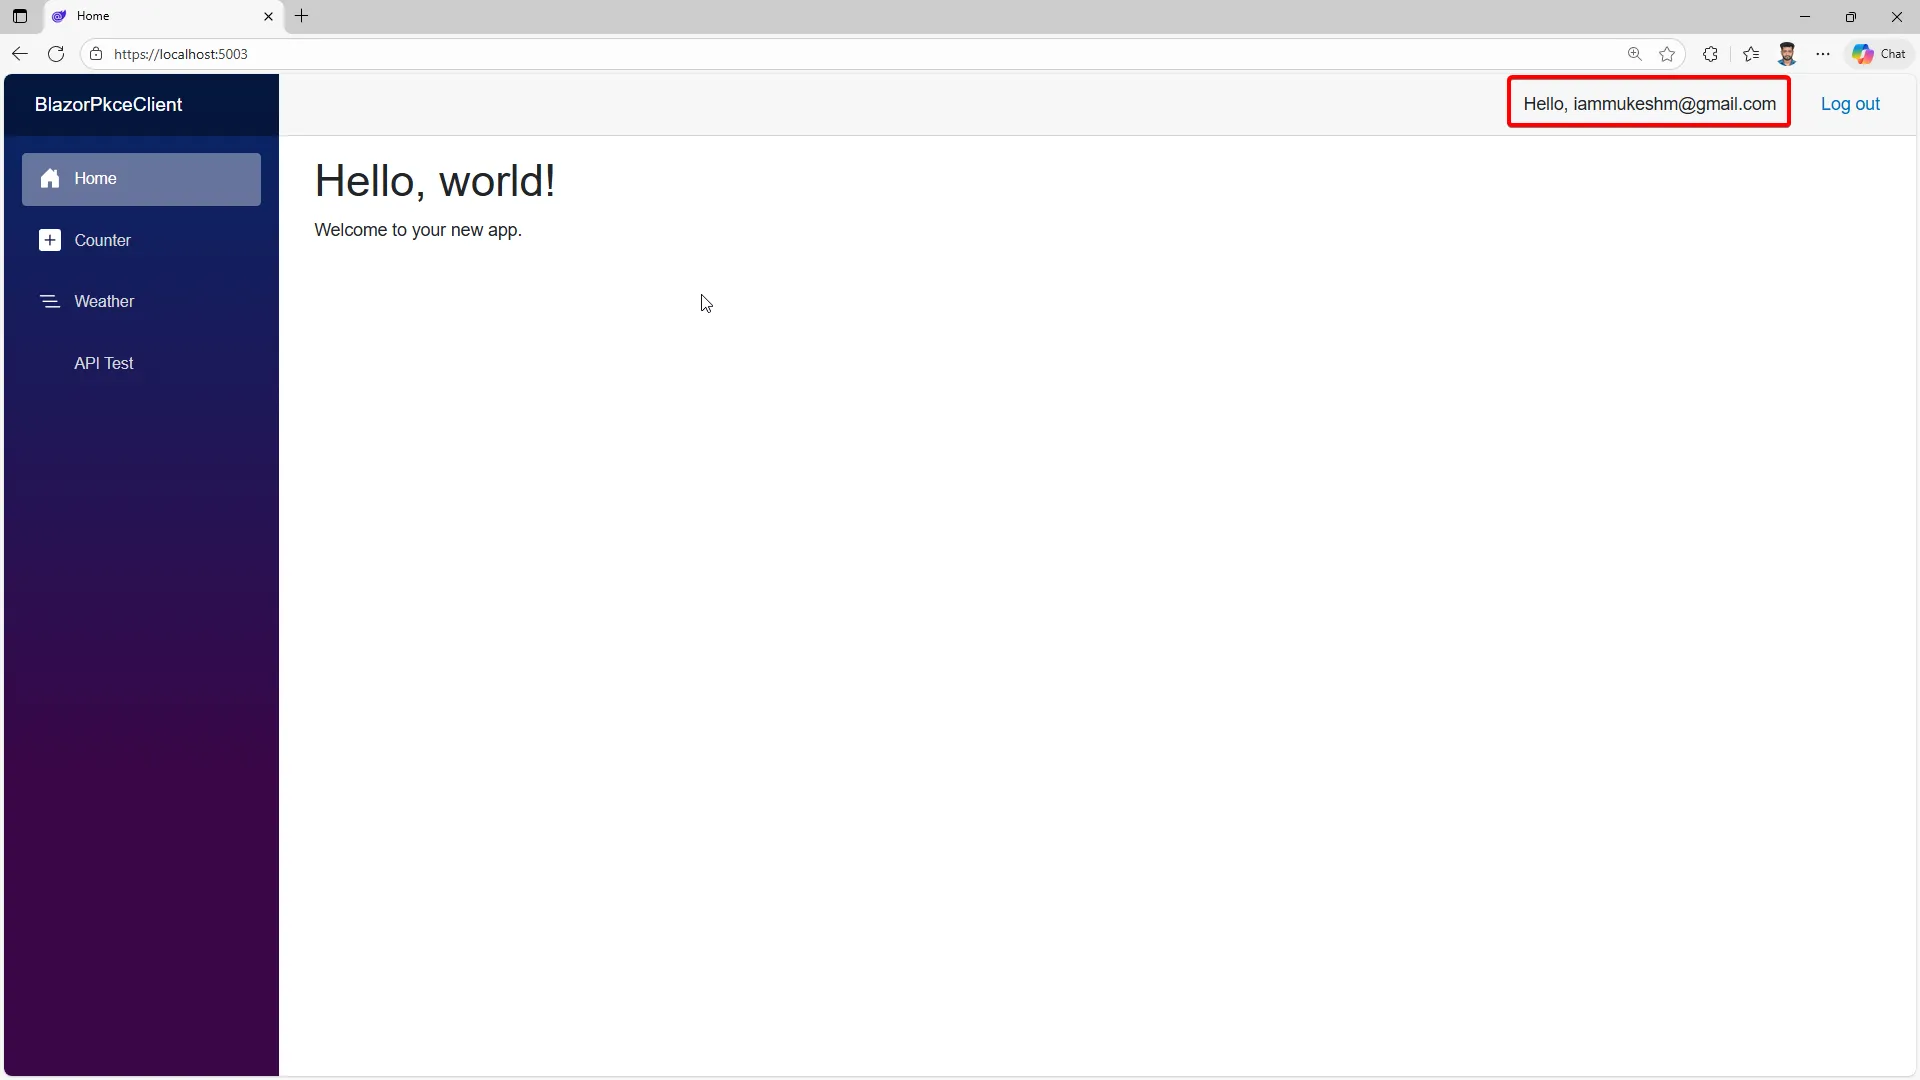
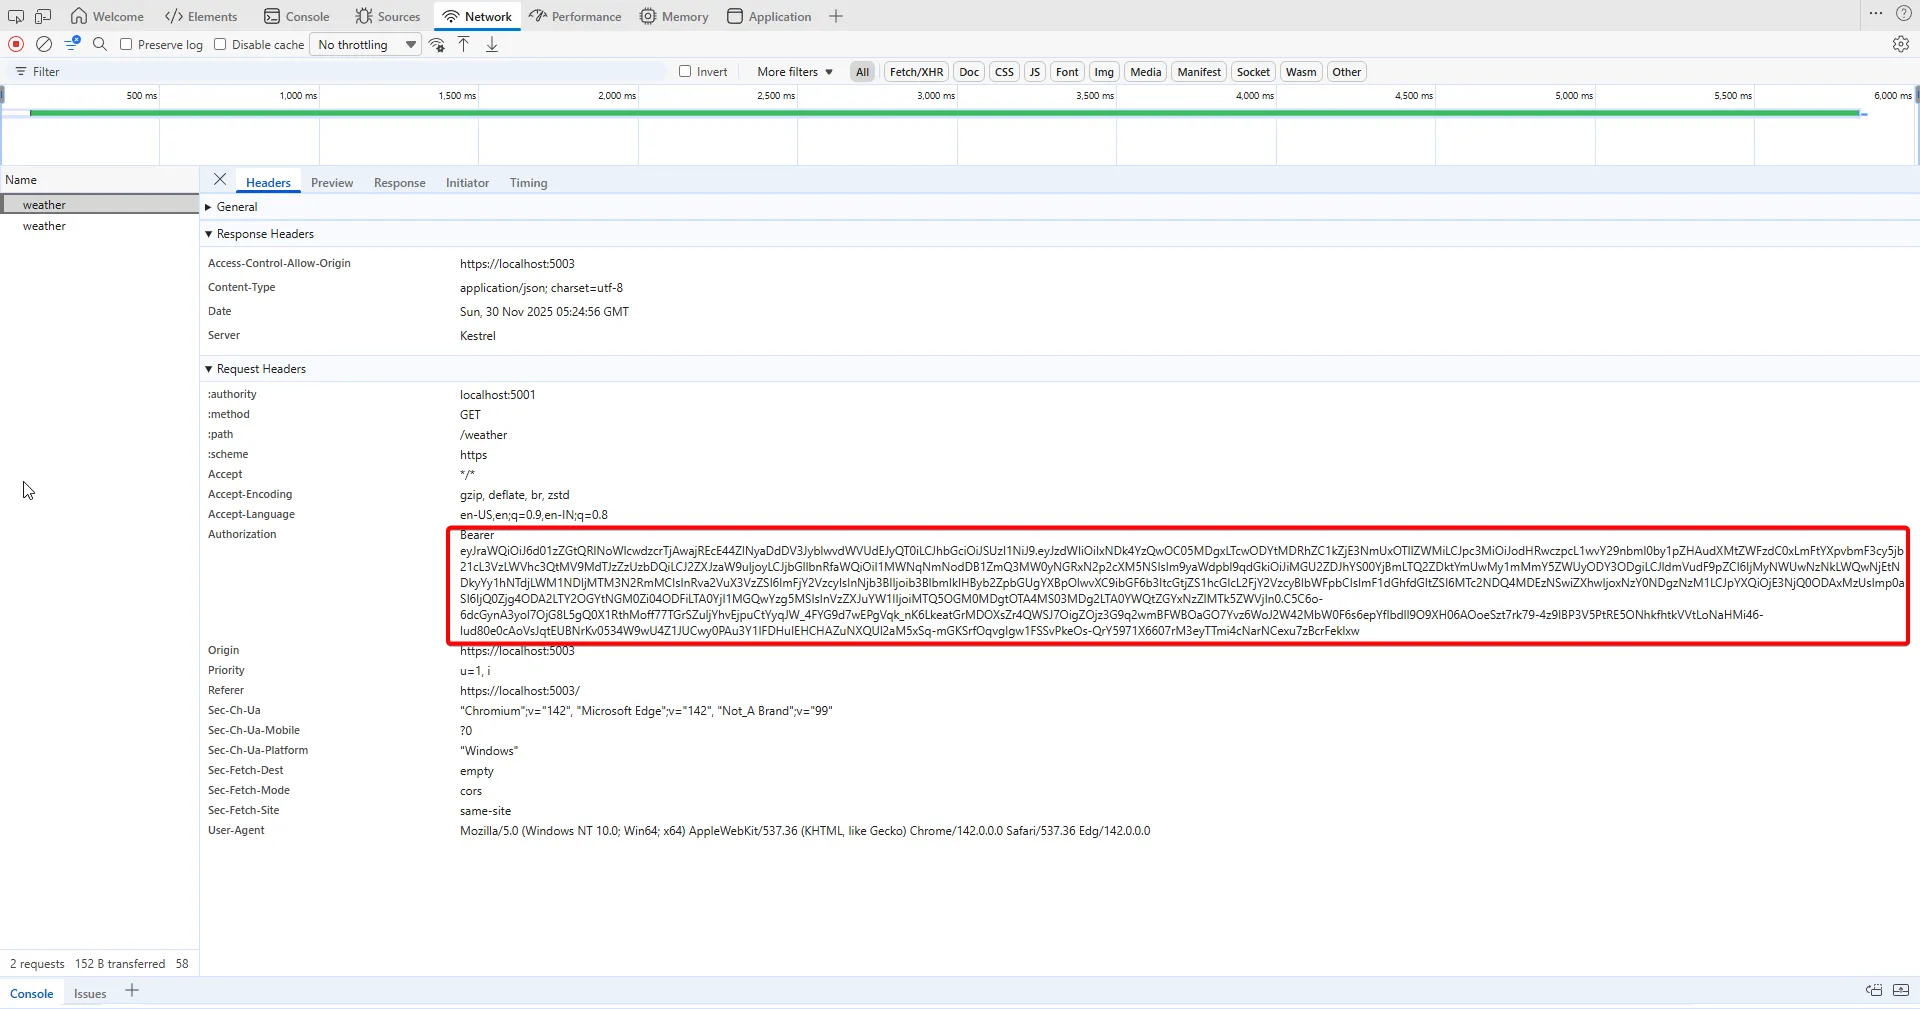
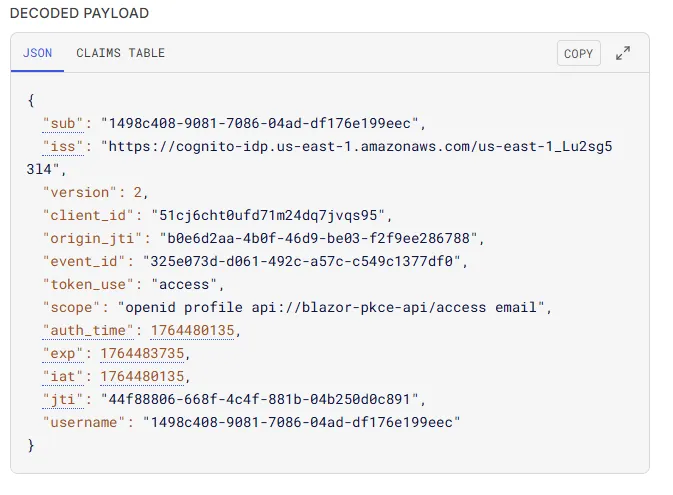
After signing in with the test user, you return to the app and can open /api-test. Clicking the button should hit the /weather endpoint and return JSON. Open your browser’s network tab to see the Authorization header on the API call and decode the JWT at jwt.io to confirm the iss, token_use, and scope values match your configuration.
I used jwt.io to decode the access token and verify the claims.
If you cloned the repo, update appsettings.json in the API and the OIDC values in the Blazor client so your issuer, client ID, and scope match your Cognito pool before running.
Common failures have predictable causes. A 401 with “audience invalid” usually means the API is validating against a different client ID than the one Blazor uses. A 403 with scope errors means you forgot to request or allow the custom scope in the app client. CORS errors show up when the API does not allow the Blazor origin in its policy. Redirect URI mismatches point back to the Cognito app client configuration; the exact URL, including scheme and port, must match what Blazor uses.
If you want to test the API independently of Blazor, grab the access token from the browser storage or network tab and call the API with curl:
curl -k -H "Authorization: Bearer <ACCESS_TOKEN>" https://localhost:5001/weatherThe -k flag ignores cert validation for local dev; drop it when you use trusted certs. If the call fails, check the response headers for WWW-Authenticate details from the JWT middleware-they often include a reason like invalid_token or insufficient_scope. You can also point curl at /.well-known/jwks.json on the Cognito issuer to confirm key retrieval works; if that fails, your Authority URL is probably wrong.
Once you are done, click Log out in the Blazor app. You should be redirected to the Cognito logout endpoint and then back to the app’s home page, signed out. In the background, the Blazor helper cleared the OIDC session storage entries to avoid stale tokens.
Troubleshooting notes from real projects
Most Cognito integration bugs show up as redirects back to the login page or opaque “Not authorized” messages. When you see a loop back to the Hosted UI, check the browser console for CORS errors and verify that the callback URL matches exactly-case, scheme, and port. If the page throws invalid_grant after exchanging the code, the PKCE verifier did not match the challenge; clear site data to reset the stored verifier and retry. When Blazor silently fails to attach a token, confirm that the API base address you configured in BaseAddressAuthorizationMessageHandler matches the one you are calling; an extra slash or missing HTTPS will cause the handler to skip attaching the token. If your API suddenly rejects tokens after a Cognito change, fetch the JWKS and compare kid values to ensure key rotation has propagated; restarting your API can force a fresh JWKS fetch if you cached keys aggressively.
Another common snag is mixing environments. If you test against a dev User Pool but your API expects tokens from a staging pool, issuer validation will fail with a 401. Keep environment-specific appsettings files and consider surfacing the issuer and audience in health output during development (never in production logs) to sanity check your wiring. Finally, watch for system clock skew on your dev machine; OAuth tokens have tight expirations, and a clock that drifts by more than a couple of minutes can cause “token not yet valid” errors that look mysterious until you sync your time.
Mapping Dev to Prod cleanly
As soon as you are happy with the local loop, document the values you will change for production: the Cognito domain (likely a custom domain), the callback and logout URLs, the API base URL, and the CORS origins. Store them in environment-specific configuration and avoid recompiling just to switch regions or hosts. Consider creating separate User Pools per environment to keep test users and production identities isolated. If you do that, mirror the resource server scopes across environments so your API policy code does not diverge. For production builds, set AllowedHosts tightly, restrict CORS to your real frontend origins, and turn on CloudWatch alarms for authentication anomalies.
Hardening for Production
Keep HTTPS everywhere, including the Hosted UI. Limit CORS to the real origins you own. Rotate refresh tokens and set short access token lifetimes so compromised tokens expire quickly. Validate token_use, iss and scopes on every call, and keep clock skew low. Use CloudWatch to monitor sign-in failures and token refresh attempts. If you own a domain, configure a custom domain for Cognito with ACM so users do not see the default auth.<region>.amazoncognito.com URL. Avoid local storage for tokens; session storage plus good frontend hygiene is safer. Consider adding a Content Security Policy to reduce XSS risk. When you move to production, store Cognito identifiers and audiences in configuration rather than code and load them from a secret store or environment variables.
What changes for Blazor Server
If you run Blazor Server instead of WASM, authentication happens server-side with the standard OpenID Connect middleware. You can keep a client secret on the server, store tokens in server memory or a secure store, and rely on cookies to represent the user in the browser. CORS is less of a problem because the server makes API calls on behalf of the user, though you still need to allow browser calls if you mix client-side requests. Redirect URIs look like /signin-oidc and /signout-callback-oidc, and you configure them in the Cognito app client just as you did for WASM. Token refresh is handled by the middleware, and tokens never sit in the browser. The Cognito setup stays the same: Hosted UI, PKCE still fine, scopes unchanged. The main difference is where tokens live and how they are sent to the API.
One practical tip for Blazor Server: set the cookie authentication scheme as the default and configure OpenID Connect as the challenge scheme. That lets you preserve the standard cookie pipeline while still pulling fresh access tokens for outbound API calls. If you call APIs from the server, cache access tokens per user in memory with expiration tied to the token lifetime and refresh proactively. Because tokens never touch the browser, you reduce your XSS risk surface significantly, but you must protect the server from CSRF. Use anti-forgery tokens on state-changing endpoints and consider SameSite=Lax or Strict cookies if your navigation model allows it.
Wrap-up
We built a full PKCE-based authentication flow for Blazor WebAssembly against AWS Cognito, configured everything in the console, and secured a .NET 10 API with JWT validation and scope-based authorization. The Blazor client signs in through the Hosted UI, exchanges codes with a PKCE verifier, keeps tokens in session storage, and calls the API with bearer tokens. The API checks token_use, audience, issuer, and scope before serving data. Refresh tokens keep users signed in without long-lived access tokens. If you switch to Blazor Server later, the Cognito wiring stays the same while token handling moves to the server.
I hope this guide helps you get started with secure PKCE authentication in your Blazor apps using AWS Cognito. If you have questions or want to see more advanced scenarios like custom claims, group-based authorization, or Infrastructure as Code examples, let me know in the comments! Happy coding!

