Modern notification systems rarely live inside a single process. In a typical .NET application, you might receive notification requests via an API, publish them to a queue, fan them out to multiple subscribers, and track their delivery status in a database. Once you add AWS Lambda, Amazon SNS, Amazon SQS, and Amazon DynamoDB into the mix, local development can quickly become painful.
You end up with separate projects for each Lambda, separate configuration for each AWS resource, and a lot of manual wiring just to spin everything up in a way that feels close to production. Even simple changes can require redeploying to AWS just to see how the pieces behave together.
With .NET Aspire 13 and the latest .NET 10 SDK, we can flip this model. Instead of juggling individual processes and ad-hoc scripts, we treat the entire notifications system as a single distributed application. The Aspire app host becomes the source of truth for our services and AWS resources, making AWS local development with .NET Aspire not just possible, but enjoyable.
This article is sponsored by AWS. Huge thanks for helping me produce more .NET on AWS content!
In this article, we will build a serverless notifications system for AWS that uses:
- Two .NET Lambda projects running locally under Aspire.
- A real Amazon DynamoDB table to store notification requests and delivery status.
- An Amazon SNS topic to fan out notification events.
- An Amazon SQS queue subscribed to that topic, consumed by a dispatcher Lambda.
The key idea is this: our application code runs locally under Aspire, but the messaging and data flows go through real AWS services. This hybrid setup gives you fast feedback during development while still exercising the real SNS/SQS/DynamoDB behaviour in your AWS account.
By the end of this guide, you will have a clear pattern for orchestrating AWS serverless workloads locally with .NET Aspire-and you can reuse the same idea for other architectures like order processing, background jobs, or event-driven workflows.
If you are new to Aspire or some of the AWS services we’ll be using, I strongly recommend reading these articles first:
- .NET Aspire for .NET Developers - Deep Dive
- Amazon SQS vs SNS - When to Use What
- Amazon DynamoDB Streams - Getting Started
- DynamoDB Pagination in .NET
- AWS Lambda Text Extraction with Textract and .NET
These posts cover the fundamentals of Lambda, DynamoDB, SNS, SQS, and Aspire so that we can move faster here without re-explaining all the basics.
You can find the complete source code for this article in the GitHub repository: https://github.com/iammukeshm/aws-local-development-with-dotnet-aspire. I recommend keeping it open as you read through, so you can cross-check the AppHost, Lambdas, and CDK stack as we go.
What we are going to build
To keep things realistic, we will build a user notifications system that you could easily drop into a real-world application.
At a high level, the workflow looks like this:
- Your application creates a notification request (for example, “Send an email to user X”).
- A producer Lambda receives that request, stores it in DynamoDB, and publishes an event to an SNS topic.
- The SNS topic fan-outs the event to an SQS queue.
- A dispatcher Lambda polls messages from the SQS queue, simulates sending the notification (for example, logs the action), and updates the notification’s status in DynamoDB.
In production, these Lambdas would be deployed to AWS and triggered by different mechanisms (API Gateway, EventBridge, direct SDK invocation, etc.). For this guide, we deliberately avoid API Gateway to keep the core idea focused: .NET Aspire orchestrates local processes, while AWS actually moves the messages and stores the data.
Conceptually, the architecture looks like this:
- AppHost (.NET Aspire)
- Knows about two services:
Notifications.ProducerandNotifications.Dispatcher. - Provides configuration (AWS region, DynamoDB table name, SNS topic ARN, SQS queue URL) to the services via environment variables.
- Knows about two services:
- AWS Account (real services)
- DynamoDB table:
Notifications_dev - SNS topic:
notifications-topic-dev - SQS queue:
notifications-queue-dev, subscribed to the topic
- DynamoDB table:
This setup gives you the best of both worlds:
- Local developer ergonomics with Aspire’s dashboard, health checks, and unified view of services.
- Real AWS behaviour for SNS fan-out, SQS message semantics, and DynamoDB persistence.
Prerequisites
Before we start, make sure you have the following in place:
- .NET 10 SDK installed on your machine.
- .NET Aspire 13 workloads and project templates installed. If you have not set this up yet, follow the instructions in the official docs or in my article on .NET Aspire for .NET Developers.
- An AWS account with permissions to work with DynamoDB, SNS, and SQS.
- AWS CLI installed and configured with a profile that has access to your development account:
aws configure --profile aspire-dev- AWS CDK installed globally so that
Aspire.Hosting.AWScan use it behind the scenes:
npm install -g aws-cdk- Your AWS account bootstrapped for CDK in the region you plan to use. This step is very important-without it, the CDK stack that Aspire defines will not be able to synthesize and deploy resources. Replace the account ID with your own and run:
cdk bootstrap aws://123456789012/us-east-1Here 123456789012 is just an example of a valid 12-digit AWS account number-replace it with your own. This command prepares your AWS environment for CDK by creating a bootstrap stack (S3 buckets, roles, and other supporting resources). You only need to do this once per account/region combination; after that, Aspire can safely create and update CDK-based infrastructure like DynamoDB tables, SNS topics, and SQS queues.
Project structure and solution setup
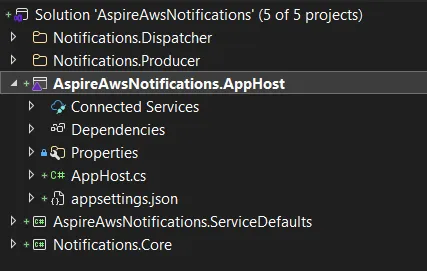
We will start by creating an Aspire-based solution that contains:
- An AppHost project (the Aspire application host).
- A ServiceDefaults project (shared cross-cutting configuration like logging and OpenTelemetry).
- A
Notifications.Coreclass library that holds our shared contracts (DTOs). - Two AWS Lambda projects:
Notifications.ProducerandNotifications.Dispatcher.
Create a directory for the solution and initialise the Aspire app:
dotnet new aspire-starter -n AspireAwsNotificationsThis template gives you:
AspireAwsNotifications.AppHost- the application host.AspireAwsNotifications.ServiceDefaults- a central place for logging, OpenTelemetry, and health checks.- A sample API and front-end you can safely remove or adapt.
Next, add the core class library and two Lambda projects:
dotnet new classlib -n Notifications.Coredotnet new lambda.Emptyfunction -n Notifications.Producerdotnet new lambda.Emptyfunction -n Notifications.DispatcherAdd the projects to the solution:
dotnet sln add Notifications.Core/Notifications.Core.csprojdotnet sln add Notifications.Producer/Notifications.Producer.csprojdotnet sln add Notifications.Dispatcher/Notifications.Dispatcher.csprojReference the core library from the Lambda projects.
Finally, add the Lambda projects to the app host so Aspire knows about them.
With this structure:
- The Lambda projects give you real Lambda entry points you can deploy to AWS later.
- The core library keeps your contracts shared and consistent.
- The AppHost orchestrates everything for local development by wiring environment variables and grouping the services together.
All of this is implemented in the sample repository at https://github.com/iammukeshm/aws-local-development-with-dotnet-aspire, where you can see the exact solution layout and project references.
Domain model and shared contracts
Our domain is intentionally simple. A notification has:
- A unique
NotificationId. - A
UserIdto identify the recipient. - A
Channel(for example,Email,Sms,Push). - A
Messagebody. - A
Status(Pending,Sent,Failed). - Timestamps for creation and last update.
Define simple records in the Notifications.Core project:
namespace Notifications.Core;
public sealed record NotificationRequest(    string UserId,    string Channel,    string Message);
public sealed record Notification(    string NotificationId,    string UserId,    string Channel,    string Message,    string Status,    DateTimeOffset CreatedAt,    DateTimeOffset? UpdatedAt = null);
In DynamoDB, we will store notifications as single items using NotificationId as the partition key. If you want to go deeper into DynamoDB modelling patterns, I recommend my articles on batch operations and optimistic locking.
Using AWS SDK clients inside Lambda handlers
To keep the focus of this article clear, we will not use dependency injection or the generic host inside our Lambda projects. Instead, we will:
- Keep only contracts (like
NotificationandNotificationRequest) in theNotifications.Coreproject. - Use the AWS SDK for .NET clients directly inside the Lambda
Functionclasses. - Read configuration such as the DynamoDB table name, SNS topic ARN, and SQS queue URL from environment variables that Aspire and your deployment process set.
This approach keeps the Lambda examples easy to follow and makes it clear how Aspire participates in local development: primarily by providing a convenient way to set and manage environment variables for your services.
Implementing the Producer Lambda
The producer Lambda is responsible for accepting a notification request, storing it in DynamoDB, and publishing an event to SNS so that downstream consumers can process it.
In the Notifications.Producer Lambda project, install the required packages:
dotnet add Notifications.Producer package AWSSDK.DynamoDBv2dotnet add Notifications.Producer package AWSSDK.SimpleNotificationServicedotnet add Notifications.Producer package Amazon.Lambda.Coredotnet add Notifications.Producer package Amazon.Lambda.Serialization.SystemTextJsondotnet add Notifications.Producer package System.Text.Jsondotnet add Notifications.Producer reference Notifications.Core/Notifications.Core.csprojThen, implement the Lambda Function class as follows:
using Amazon.DynamoDBv2;using Amazon.DynamoDBv2.Model;using Amazon.Lambda.Core;using Amazon.SimpleNotificationService;using Amazon.SimpleNotificationService.Model;using Notifications.Core;using System.Text.Json;
[assembly: LambdaSerializer(typeof(Amazon.Lambda.Serialization.SystemTextJson.DefaultLambdaJsonSerializer))]
namespace Notifications.Producer;
public sealed class Function{    private static readonly IAmazonDynamoDB DynamoDb = new AmazonDynamoDBClient();    private static readonly IAmazonSimpleNotificationService Sns = new AmazonSimpleNotificationServiceClient();
    private static readonly string TableName =        Environment.GetEnvironmentVariable("AWS__Resources__Notifications__TableName") ?? "Notifications_dev";
    private static readonly string TopicArn =        Environment.GetEnvironmentVariable("AWS__Resources__NotificationsTopic__TopicArn") ?? string.Empty;
    public async Task<string> FunctionHandler(NotificationRequest request, ILambdaContext context)    {        var notificationId = Guid.NewGuid().ToString("N");        var now = DateTimeOffset.UtcNow;
        var item = new Dictionary<string, AttributeValue>        {            ["NotificationId"] = new AttributeValue(notificationId),            ["UserId"] = new AttributeValue(request.UserId),            ["Channel"] = new AttributeValue(request.Channel),            ["Message"] = new AttributeValue(request.Message),            ["Status"] = new AttributeValue("Pending"),            ["CreatedAt"] = new AttributeValue(now.ToString("O"))        };
        await DynamoDb.PutItemAsync(new PutItemRequest        {            TableName = TableName,            Item = item        });
        var payload = new        {            NotificationId = notificationId,            request.UserId,            request.Channel,            request.Message        };
        var json = JsonSerializer.Serialize(payload);
        await Sns.PublishAsync(new PublishRequest        {            TopicArn = TopicArn,            Message = json        });
        return notificationId;    }}
Key points:
- We create AWS SDK clients (
AmazonDynamoDBClient,AmazonSimpleNotificationServiceClient) asstaticfields. Lambda will reuse them across invocations, which is good for performance. - We read
AWS__Resources__Notifications__TableNameandAWS__Resources__NotificationsTopic__TopicArnfrom environment variables that Aspire sets for us when we reference the DynamoDB table and SNS topic from the AppHost. These names are not random-they are generated byAspire.Hosting.AWSbased on the logical resource names (NotificationsandNotificationsTopic) and properties (TableName,TopicArn). You can see these environment variables in the Lambda details panel when you run the AppHost, and then reuse them in your own code instead of inventing custom names. - The handler accepts a
NotificationRequestfromNotifications.Core, ensuring a shared contract between your upstream application and the Lambda.
Implementing the Dispatcher Lambda
The dispatcher Lambda is triggered by SQS. AWS passes a batch of messages to your Lambda via the SQSEvent type.
In the Notifications.Dispatcher Lambda project, install the required packages:
dotnet add Notifications.Dispatcher package AWSSDK.DynamoDBv2dotnet add Notifications.Dispatcher package Amazon.Lambda.Coredotnet add Notifications.Dispatcher package Amazon.Lambda.SQSEventsdotnet add Notifications.Dispatcher package Amazon.Lambda.Serialization.SystemTextJsondotnet add Notifications.Dispatcher package System.Text.Jsondotnet add Notifications.Dispatcher reference Notifications.Core/Notifications.Core.csprojThen implement the dispatcher Function class:
using Amazon.DynamoDBv2;using Amazon.DynamoDBv2.Model;using Amazon.Lambda.Core;using Amazon.Lambda.SQSEvents;using System.Text.Json;
[assembly: LambdaSerializer(typeof(Amazon.Lambda.Serialization.SystemTextJson.DefaultLambdaJsonSerializer))]
namespace Notifications.Dispatcher;
public sealed class Function{    private static readonly IAmazonDynamoDB DynamoDb = new AmazonDynamoDBClient();
    private static readonly string TableName =        Environment.GetEnvironmentVariable("AWS__Resources__Notifications__TableName") ?? "Notifications_dev";
    public async Task FunctionHandler(SQSEvent sqsEvent, ILambdaContext context)    {        foreach (var record in sqsEvent.Records)        {            try            {                var body = record.Body;
                // If SNS is configured with raw message delivery, body is the JSON we published.                using var document = JsonDocument.Parse(body);                var root = document.RootElement;
                var message = root.GetProperty("Message").GetString();                if (message == null)                {                    context.Logger.LogWarning($"Message property is missing in record {record.MessageId}");                    continue;                }                var notification = JsonDocument.Parse(message);                var notificationId = notification.RootElement.GetProperty("NotificationId").GetString();                if (!string.IsNullOrWhiteSpace(notificationId))                {                    await MarkAsSentAsync(notificationId);                }            }            catch (Exception ex)            {                context.Logger.LogError(ex, $"Failed to process message {record.MessageId}");            }        }    }
    private static async Task MarkAsSentAsync(string notificationId)    {        var now = DateTimeOffset.UtcNow;
        var updateRequest = new UpdateItemRequest        {            TableName = TableName,            Key = new Dictionary<string, AttributeValue>            {                ["NotificationId"] = new AttributeValue(notificationId)            },            UpdateExpression = "SET #s = :sent, #u = :updatedAt",            ExpressionAttributeNames = new Dictionary<string, string>            {                ["#s"] = "Status",                ["#u"] = "UpdatedAt"            },            ExpressionAttributeValues = new Dictionary<string, AttributeValue>            {                [":sent"] = new AttributeValue("Sent"),                [":updatedAt"] = new AttributeValue(now.ToString("O"))            }        };
        await DynamoDb.UpdateItemAsync(updateRequest);    }}
Here again we keep things simple:
- The dispatcher only depends on DynamoDB and the
AWS__Resources__Notifications__TableNameenvironment variable. - We assume SNS is configured with raw message delivery to SQS, so the SQS message body contains exactly the JSON we published from the producer.
- We parse the JSON, extract the
NotificationId, and mark the corresponding item in DynamoDB asSent.
Wiring everything together in the Aspire app host
Now we need to teach Aspire about our notification services and AWS resources-and this is where Aspire.Hosting.AWS shines.
Instead of manually creating the DynamoDB table, SNS topic, and SQS queue up front, we can:
- Model them as AWS resources in the AppHost using
Aspire.Hosting.AWS. - Let Aspire/AWS CDK provision them the first time (or be configured to target existing resources in higher environments).
- Flow the generated table name, topic ARN, and queue URL into our Lambda projects via environment variables.
Adding Aspire.Hosting.AWS to the AppHost
First, add the package to your AppHost project:
dotnet add AspireAwsNotifications.AppHost package Aspire.Hosting.AWS --version 9.3.0Then, in your AppHost code, bring the AWS hosting extensions into scope:
using Amazon;using Amazon.CDK.AWS.DynamoDB;using Aspire.Hosting;using Aspire.Hosting.AWS; // from Aspire.Hosting.AWSBefore you run the AppHost for the first time, make sure you have bootstrapped your AWS environment for CDK in the target region (for example, us-east-1) using:
cdk bootstrap aws://123456789012/us-east-1This example uses 123456789012 as a placeholder for a valid 12-digit AWS account number-replace it with your own. This step is critical because the CDK stack (AspireAwsNotificationsStack) that your AppHost defines cannot create or update resources until the account/region is bootstrapped. Once this is done, Aspire and Aspire.Hosting.AWS can safely deploy and manage your DynamoDB table, SNS topic, and SQS queue.
Modelling AWS resources with Aspire.Hosting.AWS
The Aspire.Hosting.AWS package gives you a resource model for common AWS services. In your AppHost, you will typically:
- Define a DynamoDB table resource for notifications (partition key
NotificationId). - Define an SNS topic resource for notification events.
- Define an SQS queue resource subscribed to that topic.
Each resource can be configured in one of two ways:
- Create new (typical in local development and isolated test environments).
- Use existing (typical in staging/production, where tables, topics, and queues already exist).
Practically, this means:
- In Development, you configure
Aspire.Hosting.AWSto provision aNotifications_devDynamoDB table,notifications-topic-devSNS topic, andnotifications-queue-devSQS queue if they don’t exist. - In Staging/Production, you configure those resource definitions to target existing AWS resources (by ARN, name, or URL) so Aspire does not attempt to recreate them.
Here is how the complete AppHost can look using Aspire.Hosting.AWS (this is a working example):
using Amazon;using Amazon.CDK.AWS.DynamoDB;using Aspire.Hosting;using Aspire.Hosting.AWS;
#pragma warning disable CA2252
var builder = DistributedApplication.CreateBuilder(args);
var awsConfig = builder.AddAWSSDKConfig().WithRegion(RegionEndpoint.USEast1);
var resources = builder.AddAWSCDKStack("AspireAwsNotificationsStack").WithReference(awsConfig);
var notificationsTable = resources.AddDynamoDBTable("Notifications", new TableProps(){    TableName = "Notifications_dev",    PartitionKey = new Amazon.CDK.AWS.DynamoDB.Attribute()    {        Name = "NotificationId",        Type = Amazon.CDK.AWS.DynamoDB.AttributeType.STRING    },    BillingMode = BillingMode.PAY_PER_REQUEST,    RemovalPolicy = Amazon.CDK.RemovalPolicy.DESTROY});
var notificationsQueue = resources.AddSQSQueue("NotificationsQueue");
var notificationsTopic = resources.AddSNSTopic("NotificationsTopic").AddSubscription(notificationsQueue);
var producer = builder.AddAWSLambdaFunction<Projects.Notifications_Producer>(    name: "Producer",    lambdaHandler: "Notifications.Producer::Notifications.Producer.Function::FunctionHandler")    .WaitFor(notificationsTopic)    .WithReference(notificationsTopic)    .WaitFor(notificationsTable)    .WithReference(notificationsTable)    .WithReference(awsConfig);
var dispatcher = builder.AddAWSLambdaFunction<Projects.Notifications_Dispatcher>(    name: "Dispatcher",    lambdaHandler: "Notifications.Dispatcher::Notifications.Dispatcher.Function::FunctionHandler")    .WaitFor(notificationsQueue)    .WithReference(notificationsQueue)    .WaitFor(notificationsTable)    .WithSQSEventSource(notificationsQueue)    .WithReference(notificationsTable)    .WithReference(awsConfig);
builder.Build().Run();
Let’s quickly break down what is happening here:
builder.AddAWSSDKConfig().WithRegion(RegionEndpoint.USEast1)
Creates a shared AWS SDK configuration resource that knows which region to use. By referencing this resource from other components, you ensure they all use the same AWS region and credentials configuration.builder.AddAWSCDKStack("AspireAwsNotificationsStack")
Adds an AWS CDK stack to your application model. This stack becomes the place where you define infrastructure resources like DynamoDB tables, SNS topics, and SQS queues. TheWithReference(awsConfig)call ensures the stack uses the AWS SDK configuration you just defined.resources.AddDynamoDBTable("Notifications", new TableProps { ... })
Uses the CDK integration to define a DynamoDB table:- The logical name is
"Notifications". - The physical table name is
Notifications_dev. - The partition key is
NotificationIdof typeSTRING. - Billing mode is
PAY_PER_REQUEST(on-demand capacity). RemovalPolicy.Destroytells CDK to delete the table when the stack is destroyed (suitable for dev/test, not production).
- The logical name is
resources.AddSQSQueue("NotificationsQueue")- Defines an SQS queue that will hold notification messages to be processed by the dispatcher Lambda.
resources.AddSNSTopic("NotificationsTopic").AddSubscription(notificationsQueue)- Defines an SNS topic and immediately subscribes the SQS queue to it. This gives you the classic SNS → SQS fan-out pattern that you described in the introduction.
builder.AddAWSLambdaFunction<Projects.Notifications_Producer>(...)
Registers the producer Lambda with Aspire:name: "Producer"is the logical name inside Aspire.lambdaHandlerpoints to your function entry point in the Lambda project..WaitFor(notificationsTopic)and.WaitFor(notificationsTable)ensure Aspire treats the topic and table as dependencies of the Lambda (they are provisioned before the function is considered ready)..WithReference(notificationsTopic)and.WithReference(notificationsTable)connect the Lambda to those resources so configuration (like ARNs and table names) can flow into the function’s environment..WithReference(awsConfig)tells Aspire that this Lambda should use the shared AWS SDK configuration.
builder.AddAWSLambdaFunction<Projects.Notifications_Dispatcher>(...)
Registers the dispatcher Lambda:- Depends on the SQS queue and DynamoDB table via
.WaitFor(...). - Uses
.WithSQSEventSource(notificationsQueue)to hook the queue up as an event source for the Lambda. This is equivalent to configuring an SQS event source mapping in AWS, but done declaratively in your AppHost. - References the table and AWS configuration in the same way as the producer.
- Depends on the SQS queue and DynamoDB table via
Behind the scenes, Aspire.Hosting.AWS and the CDK integration will:
- Synthesize and deploy the CDK stack (
AspireAwsNotificationsStack) to your AWS account. - Create or update the DynamoDB table, SNS topic, and SQS queue as needed.
- Configure event source mappings so that messages in the SQS queue trigger the dispatcher Lambda.
- Supply connection details (region, ARNs, table names, queue URLs) to your Lambda functions through environment variables and AWS SDK configuration when they run under Aspire.
With this setup, your AppHost becomes the single source of truth for:
- What AWS resources your notifications system needs.
- How Lambdas are wired to those resources.
- Which region and account everything runs in.
If you want to see the exact AppHost implementation and CDK stack in a working solution, check out the GitHub repository: aws-local-development-with-dotnet-aspire.
In local development, Aspire can create or update the DynamoDB table, SNS topic, and SQS queue for you (for example, by running AWS CDK under the hood). In higher environments, you switch the resource configuration to target existing AWS resources so that Aspire does not attempt to recreate them.
This pattern keeps your AppHost as the single place where:
- AWS resources are defined and associated with your application.
- Lambdas get wired to the correct tables, topics, and queues per environment.
Running the Aspire notifications system locally
With the services wired into the app host, you are ready to run everything locally.
- Make sure your AWS CLI profile is configured and that the DynamoDB table, SNS topic, and SQS queue exist in your AWS account.
- From the solution root, run the app host:
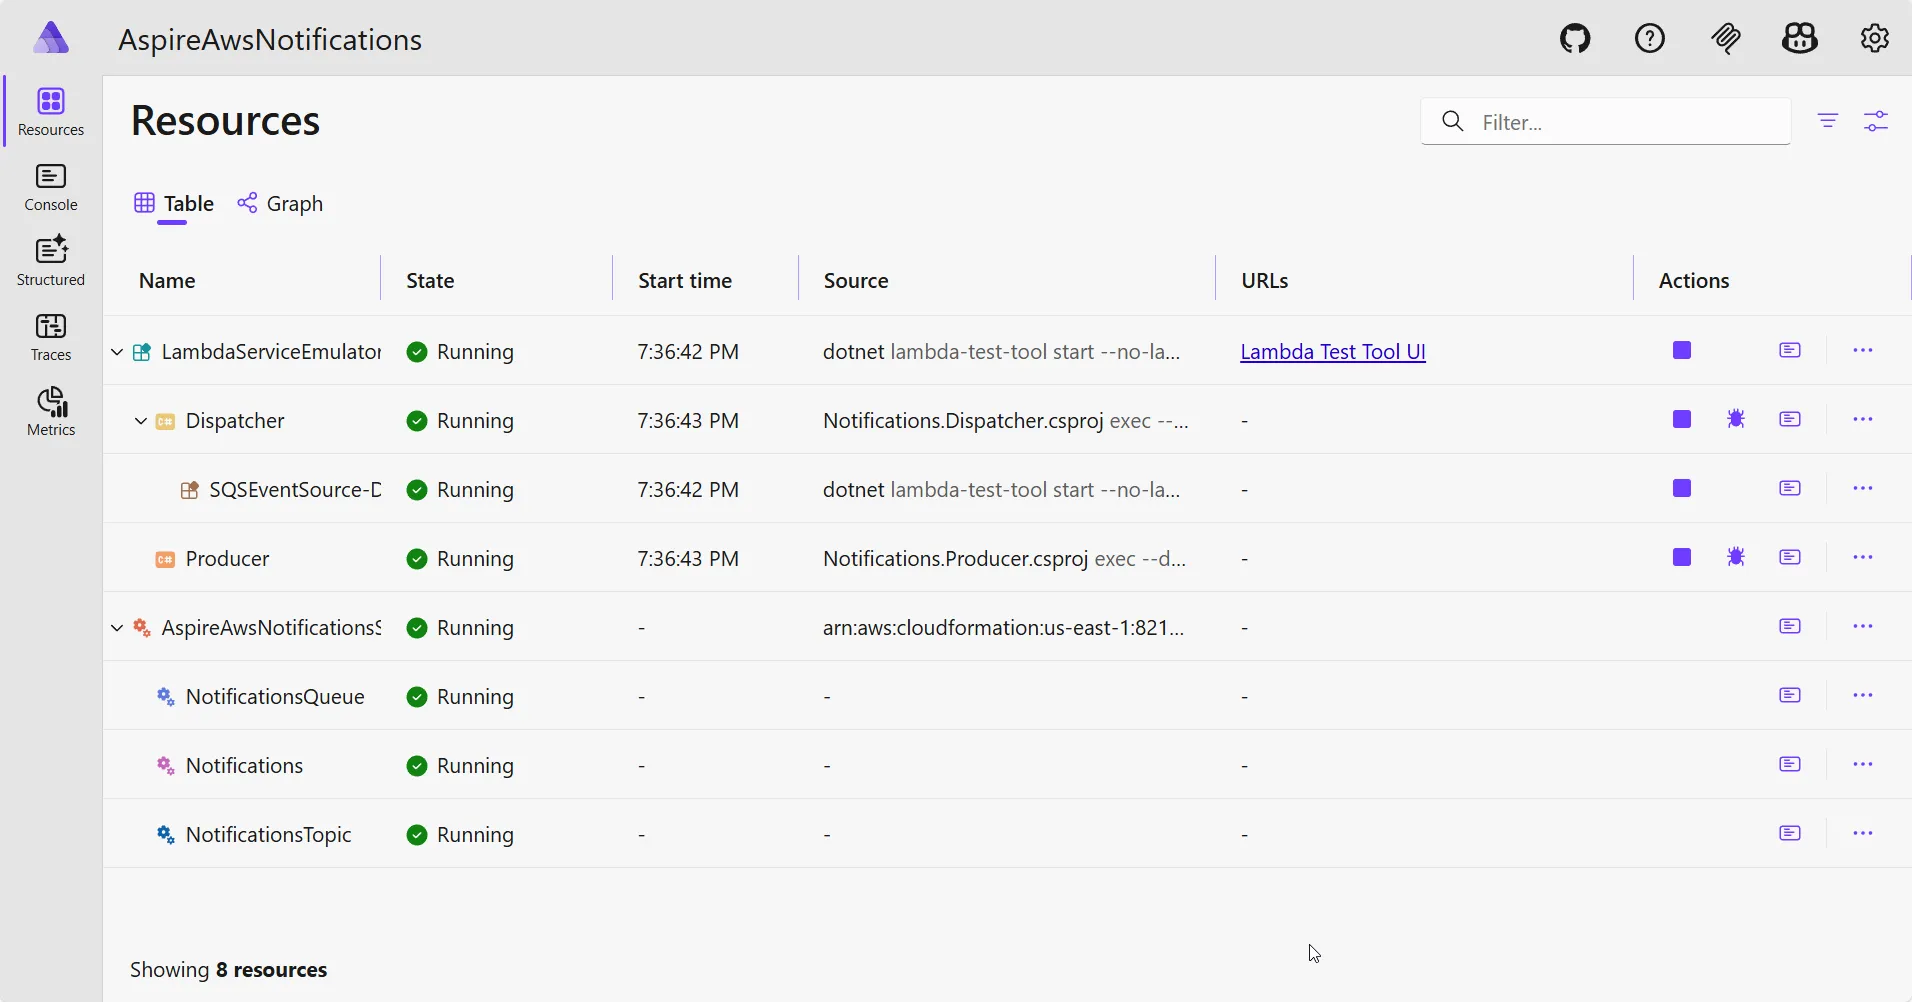
dotnet run --project AspireAwsNotifications.AppHost- The Aspire dashboard should open (or you can navigate to it manually). You will see:
- The
ProducerandDispatcherLambdas running under the LambdaServiceEmulator. - The
AWS CDK Resources, i.e., the DynamoDB table, SNS topic, and SQS queue.
- The
- Verify that everything is healthy and that logs are flowing.
Now comes the fun part: testing the whole flow without writing any extra console apps or test harnesses.
The Aspire dashboard exposes a Lambda Test Tool UI link for each Lambda running under the LambdaServiceEmulator. This UI lets you invoke your Lambda handlers locally with arbitrary JSON payloads.
To test the producer Lambda end-to-end:
- In the Aspire dashboard, find the
ProducerLambda under the LambdaServiceEmulator and click the Lambda Test Tool UI link. - In the test tool, select the
FunctionHandlerentry point if it is not already selected. - Paste the following sample JSON payload (matching the
NotificationRequestcontract):
{ "userId": "user-123", "channel": "email", "message": "Welcome to FSH, your account has been created."}- Invoke the Lambda.
Behind the scenes, this invocation will:
- Insert a new item into the
Notifications_devDynamoDB table with:- A generated
NotificationId. Status = Pending.- The
UserId,Channel, andMessagefrom your JSON payload.
- A generated
- Publish a JSON message to the
notifications-topic-devSNS topic containing the same data (including theNotificationId).
Because we configured .WithSQSEventSource(notificationsQueue) on the dispatcher Lambda in the AppHost, the notifications queue is subscribed to the topic and wired as an event source for the dispatcher. This means:
- SNS fan-outs the message to the
notifications-queue-devSQS queue. - The dispatcher Lambda, running under the LambdaServiceEmulator, receives a new
SQSEventfrom that queue. - The dispatcher parses the payload, extracts the
NotificationId, and updates the corresponding item in DynamoDB fromStatus = PendingtoStatus = Sent.
Here is how, Open up the Lambda Test Tool UI for the producer and invoke it:
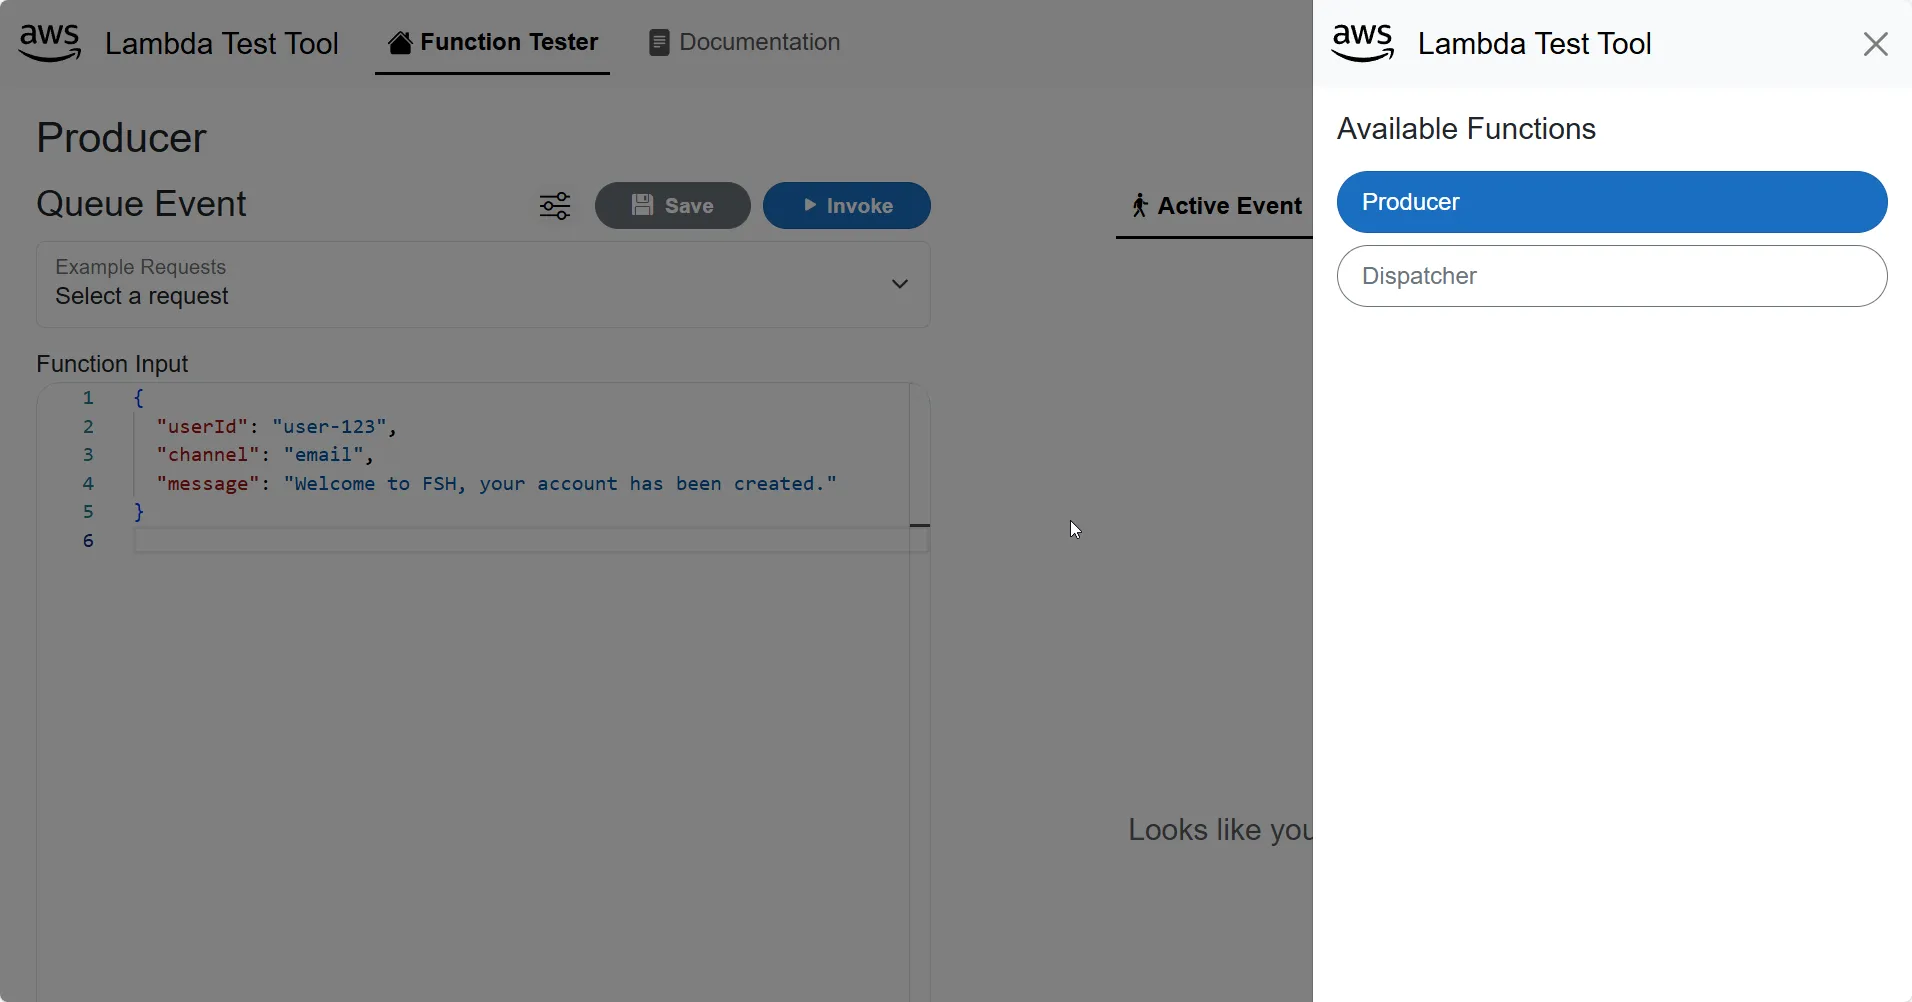
I pasted in a sample notification request and clicked Invoke.
{ "userId": "user-123", "channel": "email", "message": "Welcome to FSH, your account has been created."}Make sure that the Producer Lambda is selected. You will see a success message.

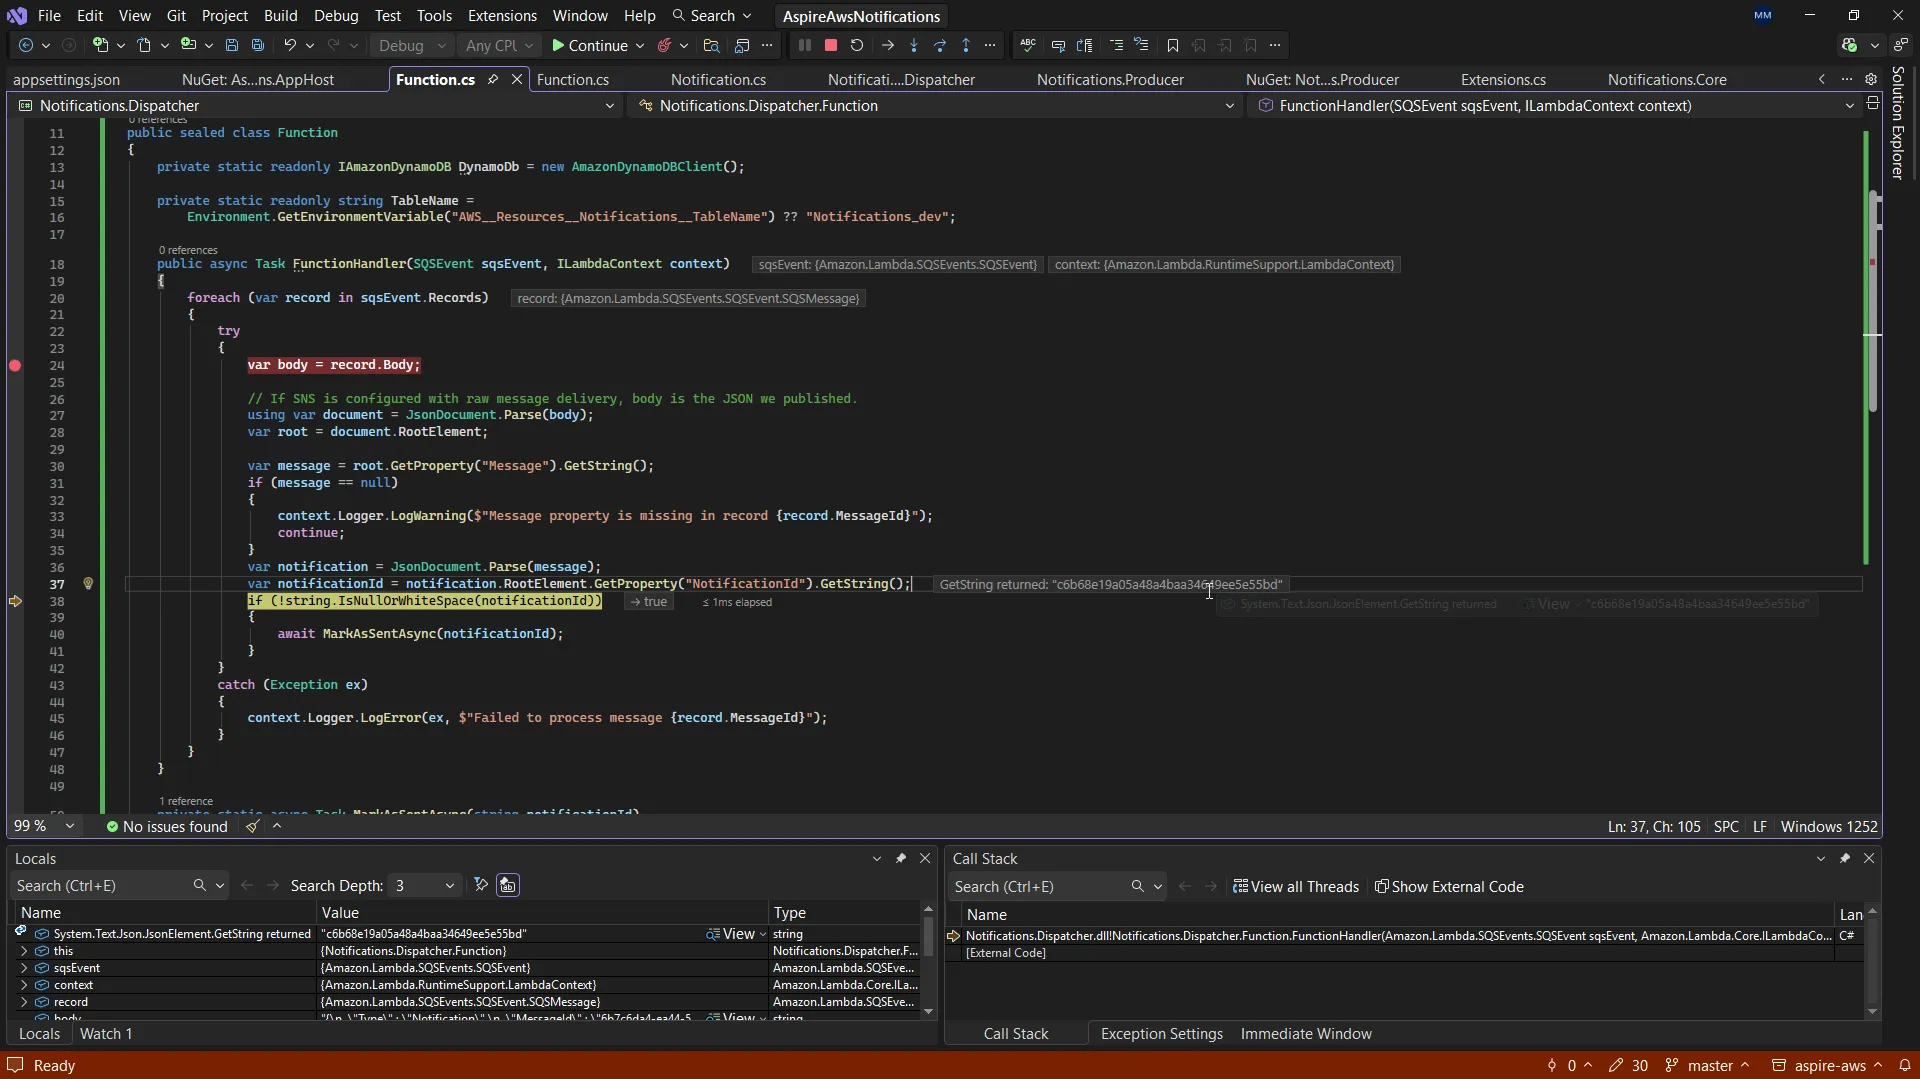
Note that I am running the Solution in Debug Mode, and I have a placed a breakpoint in the Dispatcher Lambda’s FunctionHandler method. When the Producer Lambda publishes the message to SNS, the Dispatcher Lambda is automatically triggered via SQS, and I hit my breakpoint locally!
Also, in the DynamoDB console, I can see the notification item being created with Status = Pending:

Here is the breakpoint hit in the Dispatcher Lambda:
Once the Dispatcher Lambda processes the message, it updates the DynamoDB item to Status = Sent:
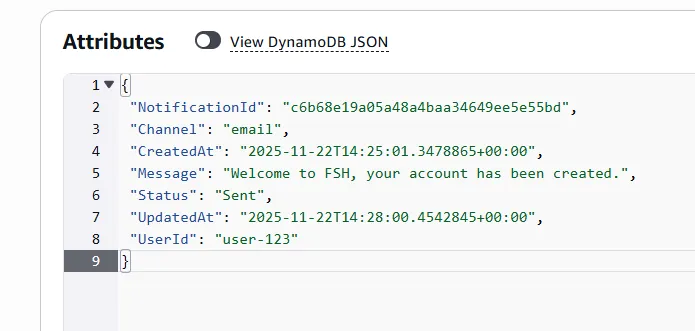
To verify the flow:
- Open the DynamoDB console and inspect the
Notifications_devtable-you should see at least one item withStatus = Sent. - Check the Lambda logs in the Aspire dashboard to see the producer and dispatcher activity.
- Optionally, inspect the
notifications-queue-devqueue in the SQS console to confirm messages are flowing through and being consumed.
Using different AWS environments with Aspire
One of the biggest benefits of using Aspire as your application model is that you can easily target different environments by changing configuration, not code.
For example, you might have:
Notifications_devtable in a development account.Notifications_stagetable in a staging account.Notifications_prodtable in a production account.
In your app host, you can vary the table name, topic ARN, and queue URL based on the environment:
var environment = builder.Configuration["DOTNET_ENVIRONMENT"] ?? "Development";
var suffix = environment switch{    "Development" => "dev",    "Staging" => "stage",    "Production" => "prod",    _ => "dev"};
var notificationsTableName = $"Notifications_{suffix}";
You can also wire different AWS profiles per environment using standard AWS mechanisms (for example, AWS_PROFILE environment variables or named profiles in your shared credentials file).
The important takeaway is this: the AppHost becomes the place where you map logical resources (like “Notifications table”) to concrete AWS resources in specific environments. Your producer and dispatcher Lambdas stay focused on business logic and do not need to know which account or region they are running in.
Observability and troubleshooting with Aspire
If you followed my Aspire deep dive, you already have a ServiceDefaults project that configures logging, metrics, and tracing for all services. The same patterns apply here.
Some practical tips for this notifications system:
- Logging: Log notification IDs, user IDs, and status transitions (
Pending -> Sent -> Failed) so you can trace individual notifications across producer, SNS/SQS, and dispatcher. - Health checks: Add simple health endpoints or checks to the services that verify:
- DynamoDB is reachable.
- AWS credentials are valid for the configured profile.
- Tracing: If you use OpenTelemetry, emit a span around the full notification flow (from producer through SNS/SQS to dispatcher). Aspire’s dashboard can help you visualise these traces during local development.
Combined, these tools make the local development loop much smoother. Instead of guessing what happened to a message, you can inspect logs and traces from a single dashboard while still using real AWS messaging infrastructure.
Wrap-up and next steps
In this article, we used .NET Aspire 13, the latest .NET 10 SDK, and the AWS SDK for .NET to build a cloud-ready notifications system that:
- Uses real AWS services: DynamoDB, SNS, and SQS.
- Runs two .NET Lambdas locally under Aspire as part of a single distributed application.
- Keeps AWS configuration simple by relying on standard environment variables that Aspire wires for you.
- Supports multiple environments without changing application code.
You now have a repeatable pattern for AWS local development with .NET Aspire. Instead of treating each Lambda and AWS resource as a separate island, you describe the entire notifications workflow once and let Aspire orchestrate the local pieces for you, while AWS handles the actual data and messaging.
From here, you can take this foundation further by:
- Adding retries and dead-letter queues for failed notifications.
- Introducing Amazon EventBridge for richer event routing.
- Integrating Amazon SES or an external provider to actually send emails or SMS messages.
- Deploying the producer and dispatcher to AWS using your preferred approach (SAM, CDK, or Terraform), while keeping Aspire as your primary local development experience.
If you enjoyed this architecture-first, implementation-focused walkthrough, you will also like my other posts on serverless and AWS for .NET developers, starting with:
- .NET Aspire for .NET Developers - Deep Dive
- Amazon SQS vs SNS - When to Use What
- Serverless Image Processing with .NET, S3, SQS, and Lambda
And again, the complete working implementation for this article is available on GitHub: https://github.com/iammukeshm/aws-local-development-with-dotnet-aspire. Feel free to clone it, run the AppHost, and experiment with your own notification flows.
Happy building with .NET Aspire and AWS!

