CQRS, or Command Query Responsibility Segregation helps you build super clean and scalable systems with ease. In this article, we will explore this pattern, and use the MediatR package in ASP.NET Core to implement the CQRS Pattern and build a simple yet clean CRUD application in .NET!
In this article, we will build an ASP.NET Core 8 Web API with CRUD Functionalities, using the CQRS Pattern and the MediatR Library. Of the several design patterns available, CQRS is one of the most commonly used patterns that helps architect solutions follow clean architecture principles. I will be publishing an updated article on Clean Architecture soon, which is the cleanest way to structure a .NET Solution. Let’s get started!
What is CQRS?
CQRS stands for Command Query Responsibility Segregation. It is a software architectural pattern that separates the read and write operations of a system into two different parts. In a CQRS architecture, the write operations (commands) and read operations (queries) are handled separately, using different models optimized for each operation. This separation can lead to simpler and more scalable architectures, especially in complex systems where the read and write patterns differ significantly.
This pattern originated from the Command and Query Separation Principle devised by Bertrand Meyer. It is defined on Wikipedia as follows.
It states that every method should either be a command that acts or a query that returns data to the caller, but not both. In other words, asking a question should not change the answer. More formally, methods should return a value only if they are referentially transparent and hence possess no side effects.
— Wikipedia
Traditional architectural patterns often use the same data model or DTO (Data Transfer Object) for both querying and writing to a data source. While this approach works well for basic CRUD (Create, Read, Update, Delete) operations, it can become limiting when faced with more complex requirements. As applications evolve and requirements grow in complexity, this simplistic approach may no longer be sufficient to handle the intricacies of the system.
In practical applications, there often exists a disparity between the data structures used for reading and writing data. For instance, additional properties may be required for updating data that are not needed for reading. This disparity can lead to challenges such as data loss during parallel operations. Consequently, developers may find themselves constrained to using a single Data Transfer Object (DTO) throughout the application’s lifespan, unless they introduce another DTO, which could potentially disrupt the existing application architecture.
The idea with CQRS is to enable an application to operate with distinct models for different purposes. In essence, you have one model for updating records, another for inserting records, and yet another for querying records. This approach provides flexibility in handling diverse and complex scenarios. With CQRS, you’re not limited to using a single DTO for all CRUD operations, allowing for more tailored and efficient data processing.
Here is a diagrammatic representation of the CQRS Pattern.
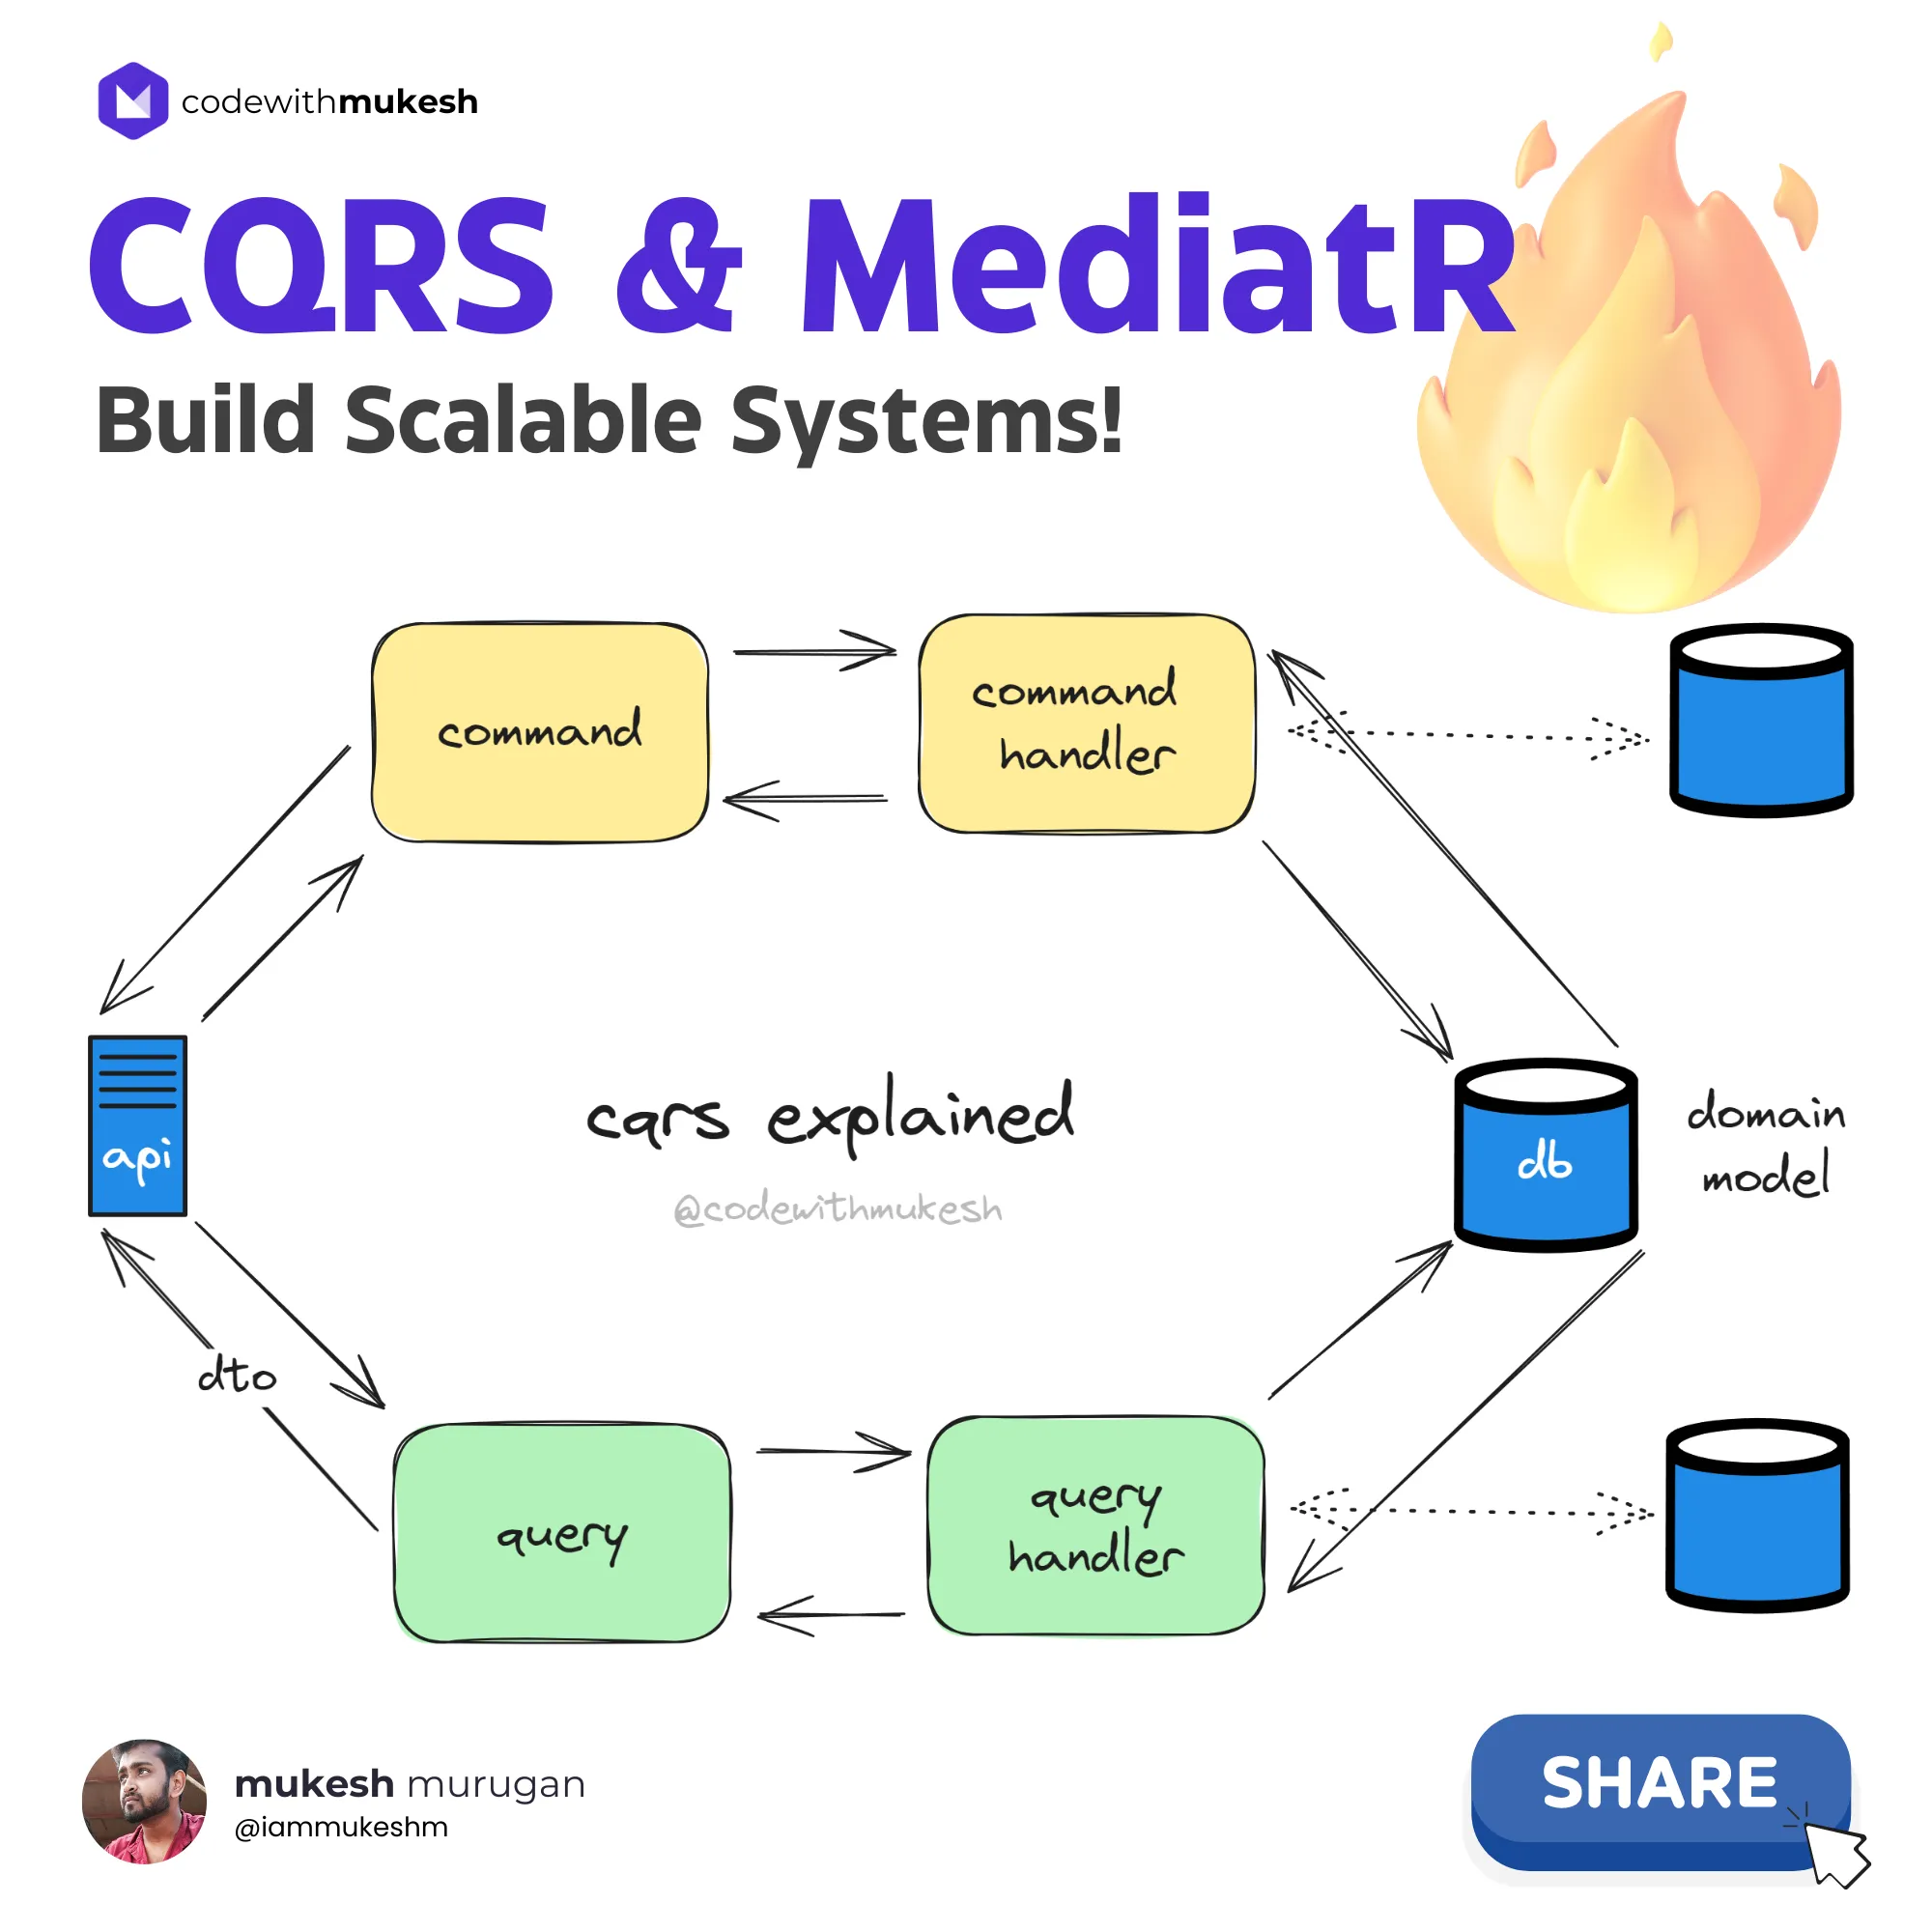
For instance, in a CRUD Application, we can split the API operations into two sets,
- Commands
- Write
- Update
- Delete
- Queries
- Get
- List
Let’s say a CREATE operation comes in. It would trigger the handler that is meant to handle the create command. This handler would contain the persistence logic to write to the data source and would return the created Entity ID. The incoming command would be transformed into the required domain model, and written to the database.
In the case of querying, the query handler will come into action. The entity model returned from the database will be projected to a DTO (or a different model as design), and be returned to the client. In case certain properties should not be exposed to the consumer, this is a very efficient approach.
You can also write to a different database, and read from a different database if required using this pattern. But in our case, we will keep it simple and just rely on a simple In-Memory database for this demo.
This way, we are logically separating the workflows for writing and reading from a data source.
Pros of CQRS
There are quite a lot of advantages to using the CQRS Pattern for your application. A few of them are as follows.
Streamlined Data Transfer Objects
The CQRS pattern simplifies your application’s data model by using separate models for each type of operation, which enhances flexibility and reduces complexity.
Scalability
By segregating read and write operations, CQRS enables easier scalability. You can independently scale the read and write sides of your application to handle varying loads efficiently.
Performance Enhancement
Since read operations typically outnumber write operations, CQRS allows you to optimize read performance by implementing caching mechanisms like Redis or MongoDB. This pattern inherently supports such optimizations, making it easier to enhance overall performance.
Improved Concurrency and Parallelism
With dedicated models for each operation, CQRS ensures that parallel operations are secure, and data integrity is maintained. This is especially beneficial in scenarios where multiple operations need to be performed concurrently.
Enhanced Security
CQRS’s segregated approach helps in securing data access. By defining clear boundaries between read and write operations, you can implement more granular access control mechanisms, improving overall application security.
Cons of CQRS
Increased Complexity and Code Volume
Implementing the CQRS pattern often results in a significant increase in the amount of code required. This complexity arises from the need to manage separate models and handlers for read and write operations, which can be challenging to maintain and debug.
But, given the advantages of this pattern, the additional code complexity can be justified. By segregating read and write operations, CQRS enables developers to optimize each side independently, leading to a more efficient and maintainable system in the long run.
CQRS Pattern with MediatR in ASP.NET Core 8 Web API
Let’s build an ASP.NET Core 8 Web API to showcase the implementation and better understand the CQRS Pattern. I will push the implemented solution over to GitHub, to our .NET 8 Series Repository. Would appreciate it if you star this repository.
We will have a couple of Minimal API endpoints that do CRUD operations for a Product Entity, ie, Create / Delete / Update / Delete product records from the Database. Here, I use Entity Framework Core as the ORM to access data. For this demonstration, we will not plug into an actual database but use the InMemory Database of our application.
PS - We will not be using any advanced architectural patterns, but let’s try to keep the code clean. The IDE I use is Visual Studio 2022 Community.
Setting up the Project
Open up Visual Studio and Create a new ASP.NET Core Web API Project.
Installing the Required Packages
Install the following packages to your API project via the Package Manager Console.
Install-Package Microsoft.EntityFrameworkCoreInstall-Package Microsoft.EntityFrameworkCore.InMemoryInstall-Package MediatRSolution Structure
We are not going to create separate assemblies to demonstrate clean architecture, but we will cleanly organize our code with the same assembly. The CRUD operations will be separated via folders. This approach is almost a minimal Vertical Slice Architecture.
Domain
First up, let’s create the domain model. Add a new folder named Domain, and create a C# class named Product.
public class Product{    public Guid Id { get; set; }    public string Name { get; set; } = default!;    public string Description { get; set; } = default!;    public decimal Price { get; set; }
    // Parameterless constructor for EF Core    private Product() { }    public Product(string name, string description, decimal price)    {        Id = Guid.NewGuid();        Name = name;        Description = description;        Price = price;    }}
We are not complicating this domain model either. It’s a simple entity with a parameterized constructor that takes in the name, description, and price of the product.
EFCore DBContext
Coming to the data part, as mentioned we will be using EFCore and InMemory Database. Since we have already installed the required packages, let us create our DBContext, so that we can interact with the data source. We will also take care of inserting some seed data into the InMemory database as soon as the application boots up.
Create a new folder named Persistence and add a new class, AppDbContext.
public class AppDbContext : DbContext{ public AppDbContext(DbContextOptions<AppDbContext> options) : base(options) { Database.EnsureCreated(); } public DbSet<Product> Products { get; set; } protected override void OnModelCreating(ModelBuilder modelBuilder) { modelBuilder.Entity<Product>().HasKey(p => p.Id); modelBuilder.Entity<Product>().HasData( new Product("iPhone 15 Pro", "Apple's latest flagship smartphone with a ProMotion display and improved cameras", 999.99m), new Product("Dell XPS 15", "Dell's high-performance laptop with a 4K InfinityEdge display", 1899.99m), new Product("Sony WH-1000XM4", "Sony's top-of-the-line wireless noise-canceling headphones", 349.99m) ); } protected override void OnConfiguring(DbContextOptionsBuilder optionsBuilder) { optionsBuilder.UseInMemoryDatabase("codewithmukesh"); }}To the constructor of the DbContext, we will ensure that the database is created. This is required, as it also helps in inserting the sample data that we have defined in the OnModelCreating function.
In the OnModelCreating function, we specify the Primary Key of the Product table, which is ID. We also add seed data for the Product entity using the HasData extension.
Next, in the OnConfiguring section, we specify what kind of database we will use. In our case, we will go with an InMemory database as mentioned earlier.
Registering the Entity Framework Core Database Context
Let’s register the DBContext to the DI Container. Open up Program.cs and add in the following.
builder.Services.AddDbContext<AppDbContext>();The Mediator Pattern
In ASP.NET Core applications, Controllers / Minimal API endpoints should ideally focus on handling incoming requests, routing them to the appropriate services or business logic components, and returning the responses. Keeping controllers slim and focused helps in maintaining a clean and understandable codebase.
It’s a good practice to offload complex business logic, data validation, and other heavy lifting to separate service classes or libraries. This separation of concerns improves the maintainability, testability, and scalability of your application.
By following this approach, you can also adhere to the Single Responsibility Principle (SRP) and keep your controllers clean, focused, and easier to maintain.
The Mediator pattern plays a crucial role in reducing coupling between components in an application by facilitating indirect communication through a mediator object. This pattern promotes a more organized and manageable codebase by centralizing communication logic.
In the context of CQRS (Command Query Responsibility Segregation), the Mediator pattern is particularly beneficial. CQRS separates the read and write operations of an application, and the Mediator pattern can help in coordinating these operations by acting as a bridge between the command (write) and query (read) sides.
By using Mediator with CQRS, you can achieve a cleaner architecture where commands are handled separately from queries, leading to a more maintainable and scalable system.
MediatR Library
MediatR is a popular library that helps implement Mediator Pattern in .NET with no dependencies. It’s an in-process messaging system that supports requests/responses, commands, queries, notifications, and events.
MediatR is a go-to library for me whenever I kick off a new .NET project! It’s a fantastic tool that simplifies the implementation of the Mediator pattern in my applications. MediatR helps me keep my codebase clean and organized by centralizing the handling of requests and promoting a more loosely coupled architecture.
Registering MediatR
As we have already installed the required package to our application, let’s register MediatR handlers to the application’s DI Container. Open up Program.cs file.
builder.Services.AddMediatR(cfg => cfg.RegisterServicesFromAssembly(Assembly.GetExecutingAssembly()));This will register all the MediatR handlers that are available in the current assembly. When you expand your projects to have multiple assemblies, you will have to provide the assembly where you place your handlers. In Clean Architecture solutions, these handlers would ideally be located at the Application layer.
Implementing the CRUD Operations
CRUD essentially stands for Create, Read, Update, and Delete. These are the Core components of RESTful APIs. Let’s see how we can implement them using our CQRS Approach. Create a Folder named Features/Products in the root directory of the Project and subfolders for the Queries, DTOs, and Commands.
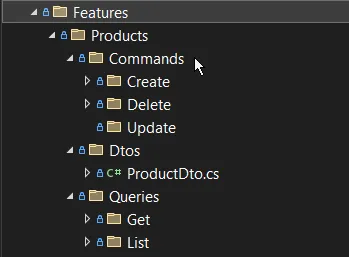
Each of these folders will house the required classes and services.
Feature Folder: Vertical Slice Architecture
This is yet another minimal demonstration of VSA, or Vertical Slice Architecture, where we would organize our features by folders. As in, everything related to Product Creation would belong to the Features/Product/Commands/Create folder, and so on. This approach makes it easier to locate and maintain code related to specific features, as all related functionality is grouped. This can lead to improved code organization, readability, and maintainability, especially in larger projects.
Later, I will write an article that combines VSA, Clean Architecture, and Modular Monolith Architecture. Let me know in the comment section if you want this article soon!
DTO
Our Query APIs, Get and List would return records related to the following DTO. Under the Features/Product/DTOs, create a new class named ProductDto.
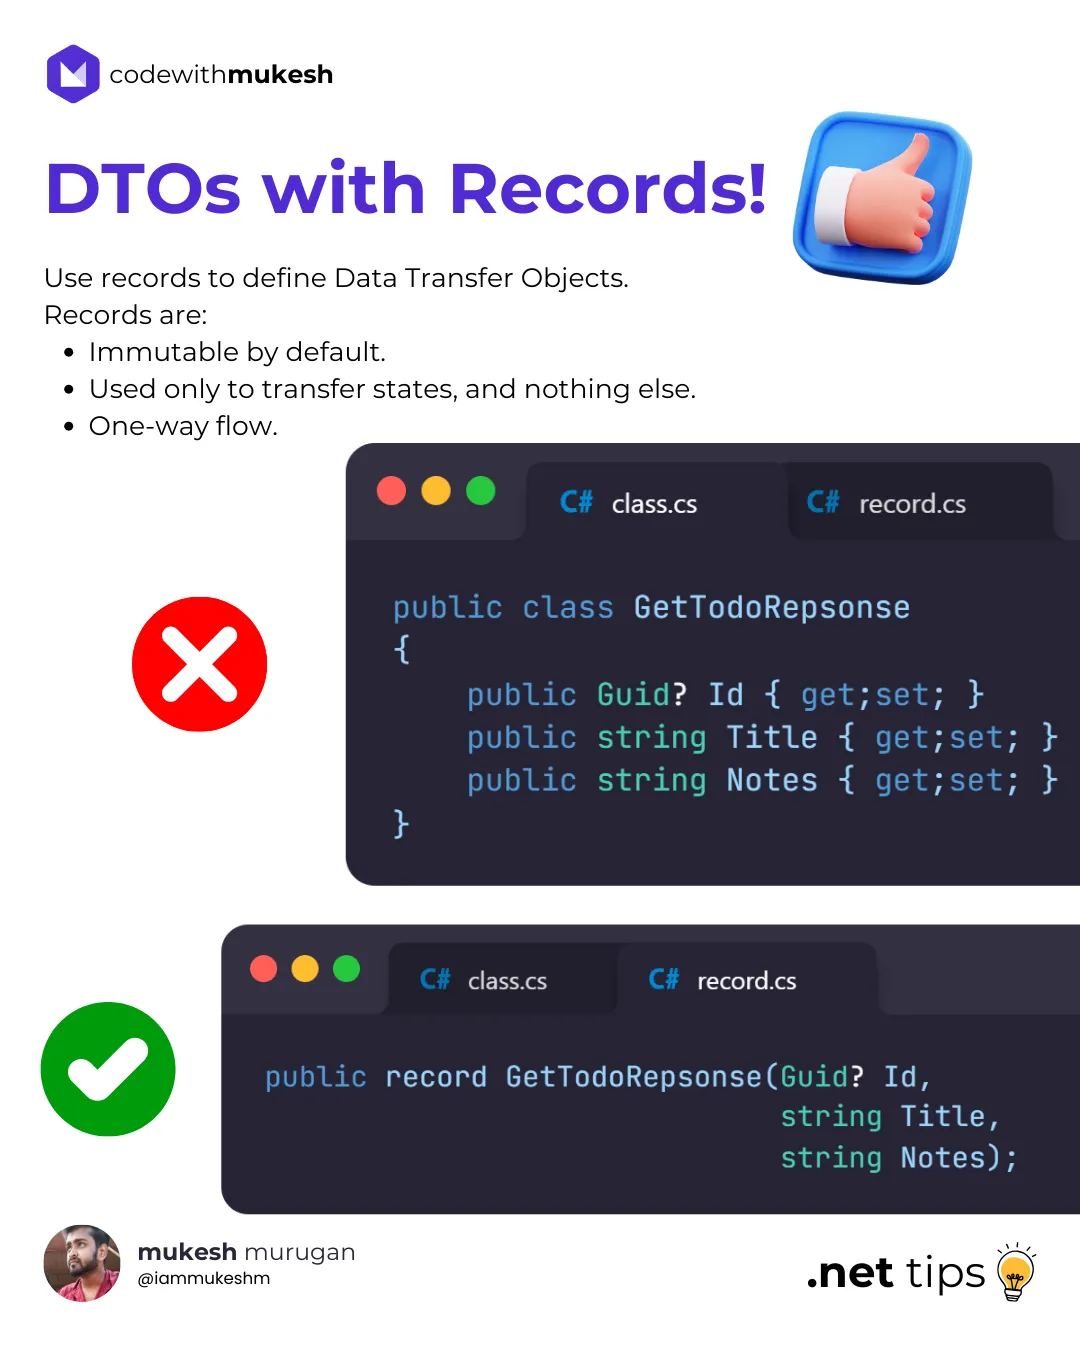
public record ProductDto(Guid Id, string Name, string Description, decimal Price);Quick Tip: It’s recommended to use records to define Data Transfer Objects, as they are immutable by default!
Queries
First up, let’s focus on building our queries and query handlers. As mentioned, there will be 2 parts for this, the Get and List endpoint. The Get endpoint would take in a particular GUID and return the intended Product Dto object, whereas the List operation would return a list of Product Dto objects.
List All Products
Under the Features/Product/Queries/List/ folder, create 2 classes named ListProductsQuery and ListProductsQueryHandler.
public record ListProductsQuery : IRequest<List<ProductDto>>;Every Query / Command object would inherit from IRequest<T> interface of the MediatR library, where T is the object to be returned. In this case, we will return List<ProductDto>.
Next, we need handlers for our Query. This is where the ListProductsQueryHandler comes into the picture. Note that whenever our LIST endpoint is hit, this handler will be triggered.
public class ListProductsQueryHandler(AppDbContext context) : IRequestHandler<ListProductsQuery, List<ProductDto>>{ public async Task<List<ProductDto>> Handle(ListProductsQuery request, CancellationToken cancellationToken) { return await context.Products .Select(p => new ProductDto(p.Id, p.Name, p.Description, p.Price)) .ToListAsync(); }}To the primary constructor of this handler, we will inject the AppDbContext instance, for data access. Also, all the handlers would implement the IRequestHandler<T, R> where T is the incoming request (which in our case would be the Query itself), and R would be the response, which is a list of products.
This interface would want us to implement the Handle method. We simply use the DB Context to project the Product domain into a list of DTOs with ID, Name, Description, and Price. This list would be returned.
Once, we have created all our handlers, we will write the Minimal Endpoints.
Get Product By ID
Under the Features/Product/Queries/Get/ folder, create 2 classes named GetProductQuery and GetProductQueryHandler.
public record GetProductQuery(Guid Id) : IRequest<ProductDto>;This record query will have a GUID parameter which will be passed on by the client. This ID will be used to query for products in the database.
public class GetProductQueryHandler(AppDbContext context) : IRequestHandler<GetProductQuery, ProductDto?>{ public async Task<ProductDto?> Handle(GetProductQuery request, CancellationToken cancellationToken) { var product = await context.Products.FindAsync(request.Id); if (product == null) { return null; } return new ProductDto(product.Id, product.Name, product.Description, product.Price); }}In the Handle method, we will use the ID to get the product from the database. If the result is empty, null is returned, indicating a not found result. Otherwise, we project the product data to a ProductDto object and return it.
Commands
Now that we have our queries and query handlers in place, let’s build our commands.
Create New Product
Again, under the Features/Product/Commands/Create/ folder, create the following 2 files.
public record CreateProductCommand(string Name, string Description, decimal Price) : IRequest<Guid>;Firstly, the command itself, which takes in Name, Description, and Price. Note that this Command object is expected to return the newly created product’s ID.
public class CreateProductCommandHandler(AppDbContext context) : IRequestHandler<CreateProductCommand, Guid>{ public async Task<Guid> Handle(CreateProductCommand command, CancellationToken cancellationToken) { var product = new Product(command.Name, command.Description, command.Price); await context.Products.AddAsync(product); await context.SaveChangesAsync(); return product.Id; }}Next, the handler simply creates a Product Domain Model from the incoming command and persists it to the database. Finally, it would return the newly created product’s ID. Note that the GUID generation is handled as part of the Domain Object’s constructor.
Delete Product By ID
Next, we will have a feature to delete the product by specifying the ID. For this, create the following classes under Features/Product/Command/Delete/.
public record DeleteProductCommand(Guid Id) : IRequest;The Delete Handler would take in the ID, fetch the record from the database, and try to remove it. If the product with the mentioned ID is not found, it simply exits out of the handler code.
public class DeleteProductCommandHandler(AppDbContext context) : IRequestHandler<DeleteProductCommand>{ public async Task Handle(DeleteProductCommand request, CancellationToken cancellationToken) { var product = await context.Products.FindAsync(request.Id); if (product == null) return; context.Products.Remove(product); await context.SaveChangesAsync(); }}Update Product
I will leave this section for you to implement. This will be ideal for you to practice. Simply for the repository() and add the Update Command and its handler. You will also have to add the API endpoint for updating the product details. Refer to the next section for endpoints.
Minimal API Endpoints
Now that we have all the required commands/queries and handlers in place, let’s wire them up with actual API endpoints. For this demonstration, we will use Minimal API endpoints. You can use the traditional Controllers approach as well.
Open up Program.cs and add in the following endpoint mappings.
app.MapGet("/products/{id:guid}", async (Guid id, ISender mediatr) =>{ var product = await mediatr.Send(new GetProductQuery(id)); if (product == null) return Results.NotFound(); return Results.Ok(product);});
app.MapGet("/products", async (ISender mediatr) =>{ var products = await mediatr.Send(new ListProductsQuery()); return Results.Ok(products);});
app.MapPost("/products", async (CreateProductCommand command, ISender mediatr) =>{ var productId = await mediatr.Send(command); if (Guid.Empty == productId) return Results.BadRequest(); return Results.Created($"/products/{productId}", new { id = productId });});
app.MapDelete("/products/{id:guid}", async (Guid id, ISender mediatr) =>{ await mediatr.Send(new DeleteProductCommand(id)); return Results.NoContent();});The important thing to note here is that we will be using the ISender interface from MediatR to send the commands/queries to its registered handlers. Alternatively, you can also use the IMediator interface, but the ISender interface is far more lightweight, and you don’t always need the fully blown up IMediator interface. I would use the IMediator interface if my service/endpoint wants to perform more than simple request-response messaging, like notifications, etc.
As you see from the above code, we have added all the required endpoints. Let’s explore them one by one.
- Firstly the Get Endpoint, at
/products/{id}, where theidparameter is a GUID. We create a Query object with this ID and pass it through the MediatR pipeline. If the result is empty, we return a 404 Not Found status back to the API consumer. Else the valid product is returned. - Next, the List endpoint, at
/products/. Here there are no parameters involved, yet you can build up on this API by introducing parameters like page size, number, and a whole lot to facilitate paging, sorting, and searching. (This will be explained in detail in another article). But in this scenario, we will return all the products available in the database. - The POST endpoint is responsible for creating a new product. It accepts the
CreateCommand, which is passed on to the handler via the MediatR Pipeline. If the returning product ID is empty, then we return a Bad Request. Otherwise, a 201 Created Response is returned. - Finally, The Delete endpoint also requires an ID, which will be sent to the
DeleteCommandHandler. We do not bother to return the status of deletion here, and simply return aNoContentresponse.
Additionally, feel free to add your Update Endpoint here.
Testing the Endpoints via Swagger
We are done with the implementation. Now let’s test it using Swagger! Build and Run your ASP.NET Core application, and open up the Swagger UI.

Let’s test each of our endpoints. First up, is the LIST endpoint. This can be tested to verify if we have the initial seed data as expected.
[ { "id": "c2537bef-235d-4a72-9aaf-f5cf1ff2d080", "name": "iPhone 15 Pro", "description": "Apple's latest flagship smartphone with a ProMotion display and improved cameras", "price": 999.99 }, { "id": "93cfebdb-b3fb-415d-9aba-024cad28df5c", "name": "Dell XPS 15", "description": "Dell's high-performance laptop with a 4K InfinityEdge display", "price": 1899.99 }, { "id": "2fde15c1-48cb-4154-b055-0a96048fa392", "name": "Sony WH-1000XM4", "description": "Sony's top-of-the-line wireless noise-canceling headphones", "price": 349.99 }]Next, let me create a new Product. Here is the product payload.
{ "name": "Tesla Model Y", "description": "Tesla Model Y", "price": 45000}And here, is the response.
{ "id": "4eb60a75-1dfa-401d-8f65-c4750457d19d"}Let’s use this Product ID to test the Get By ID endpoint.
{ "id": "4eb60a75-1dfa-401d-8f65-c4750457d19d", "name": "Tesla Model Y", "description": "Tesla Model Y", "price": 45000}As you can see, we got the expected response. Similarly, you can also Test the DELETE endpoint as well as the UPDATE endpoint that you have newly added!
Now, we will explore a few more important features of the MediatR library.
MediatR Notifications - Decoupled Event-Driven Systems
Up to now, we have looked into the request-response pattern of MediatR, which involves a single handler per request. But what if your requests need multiple handlers? For instance, every time you create a new product, you need a logic to add/set stock, and another handler to perform a random X action. To build a stable/reliable system, you need to make sure that these handlers are decoupled and executed individually.
This is where notifications come in. Whenever you need multiple handlers to react to an event, notifications are your best option!
We will tweak our existing code to demonstrate this. As mentioned, we will add this functionality within our CreateProductCommandHandler to publish a notification, and register two other handlers against the new notification.
First up, create a new folder called Notifications, and add the following record.
public record ProductCreatedNotification(Guid Id) : INotification;Note that this record will inherit from INotification of the MediatR library.
As mentioned, we will create two handlers that would subscribe to this notification. Under the same folder, add these files.
public class StockAssignedHandler(ILogger<StockAssignedHandler> logger) : INotificationHandler<ProductCreatedNotification>{ public Task Handle(ProductCreatedNotification notification, CancellationToken cancellationToken) { logger.LogInformation($"handling notification for product creation with id : {notification.Id}. assigning stocks."); return Task.CompletedTask; }}public class RandomHandler(ILogger<RandomHandler> logger) : INotificationHandler<ProductCreatedNotification>{ public Task Handle(ProductCreatedNotification notification, CancellationToken cancellationToken) { logger.LogInformation($"handling notification for product creation with id : {notification.Id}. performing random action."); return Task.CompletedTask; }}I am not going to go into the functionality of each of these handlers. For demo purposes, I have just added simple log messages denoting that the handlers are triggered. So, the idea is that, whenever a new product is created, a notification will be sent across, which would trigger our StockAssignedHandler and RandomHandler.
To publish the notification, I will modify our POST endpoint code as follows.
app.MapPost("/products", async (CreateProductCommand command, IMediator mediatr) =>{ var productId = await mediatr.Send(command); if (Guid.Empty == productId) return Results.BadRequest(); await mediatr.Publish(new ProductCreatedNotification(productId)); return Results.Created($"/products/{productId}", new { id = productId });});At Line #5, we will use the MediatR interface to create a new notification of type ProductCreatedNotification and publish it in memory. This will in turn trigger the handler registered against this notification. Let’s see it in action.
If you run the API and create a new product, you will be able to see the following log messages on the server.

As you see, both of the handlers are triggered in parallel. This can be super important while building decoupled event-based systems.
That’s it for this article. I hope you thoroughly enjoyed the content!
In the next article, we will discuss Pipeline Behavior in MediatR and combine FluentValidation, IExceptionHandler, and CQRS to build a durable system!
Summary
We’ve explored CQRS implementation and its definition, the Mediator pattern, and the MediatR Library. We’ve also covered Entity Framework Core implementation, Vertical Slice Architecture, and more. Further, we also discussed Request/Response patterns as well as the Notifications in MediatR. If there’s something I missed or if any part of the guide wasn’t clear, please let me know in the comments below.
Is CQRS your preferred approach for handling complex systems? Share your thoughts!
Frequently Asked Questions
What does CQRS stand for?
CQRS stands for Command Query Responsibility Segregation. It’s a design pattern that separates the read and write operations in an application.
Does implementing CQRS slow down an application?
No, implementing CQRS does not inherently slow down an application. While it may require more code, when implemented correctly, it can improve performance by optimizing data source calls.
Is CQRS a scalable design pattern?
Yes, CQRS is designed with scalability in mind, making it a suitable choice for applications that need to scale efficiently.

