In this article, we will go through the step-by-step process of hosting ASP.NET Core WebAPI on Amazon EC2, a reliable and resizable computing service in the cloud. This will give you a more Hands-On experience of working directly on the Linux instance to set up the .NET environment as well as host your applications. We will be covering quite a lot of cool concepts along the way which will help you understand various DevOps-related practices as well.
This article is sponsored by AWS. Huge thanks for helping me produce more .NET on AWS content!
About Amazon EC2
Amazon EC2 is a highly scalable and flexible cloud computing service offered by Amazon Web Services. It allows you to rent virtual servers (known as instances) on which you can run your own applications. With EC2, you can choose from a range of instance types to match your application’s requirements be it the memory or the CPU. These instances can be easily scaled up or down depending on your needs, and you only pay for what you use.
As part of the free tier, AWS offers up to 750 hours of Linux and Windows (micro) instances every month for 1 full year. This will be more than enough to host your mid-sized applications. For more powerful instances, check out the pricing: https://aws.amazon.com/ec2/pricing/
What we will build?
- We will build an ASP.NET Core Web API which performs CRUD against a PostgreSQL database.
- This Web API will have built-in docker support
- We will write a docker-compose file with instructions to deploy both the application and database to docker containers.
- The source code will be hosted on GitHub.
- We will boot up an EC2 Linux instance and pull in the source code from GitHub. All the required runtimes and SDKs will be installed on this instance.
- We will SSH into this instance via PuTTY.
- The .NET Application’s docker image will be built on the Linux Instance
- Both the application and database will be deployed to containers in this instance.
- A specific port on which the Web API is running will be exposed to the public.
As you see, this is going to be an in-depth article covering various aspects.
Developing a simple ASP.NET Core Web API with CRUD
In this section, we will build a pretty simple ASP.NET Core Web API with the following specifications
- .NET 7 API hosted on GitHub
- EF Core + PostgreSQL
- Built-In Container Support
- CRUD Operations
- docker-compose with PostgreSQL container + API container
You are free to skip this section if you already have a .NET Web API project with you.
You can find the source code of the implementation here: https://github.com/iammukeshm/hosting-aspnet-core-webapi-on-amazon-ec2
Init Git
Create a new repository, and clone it to your local development environment.
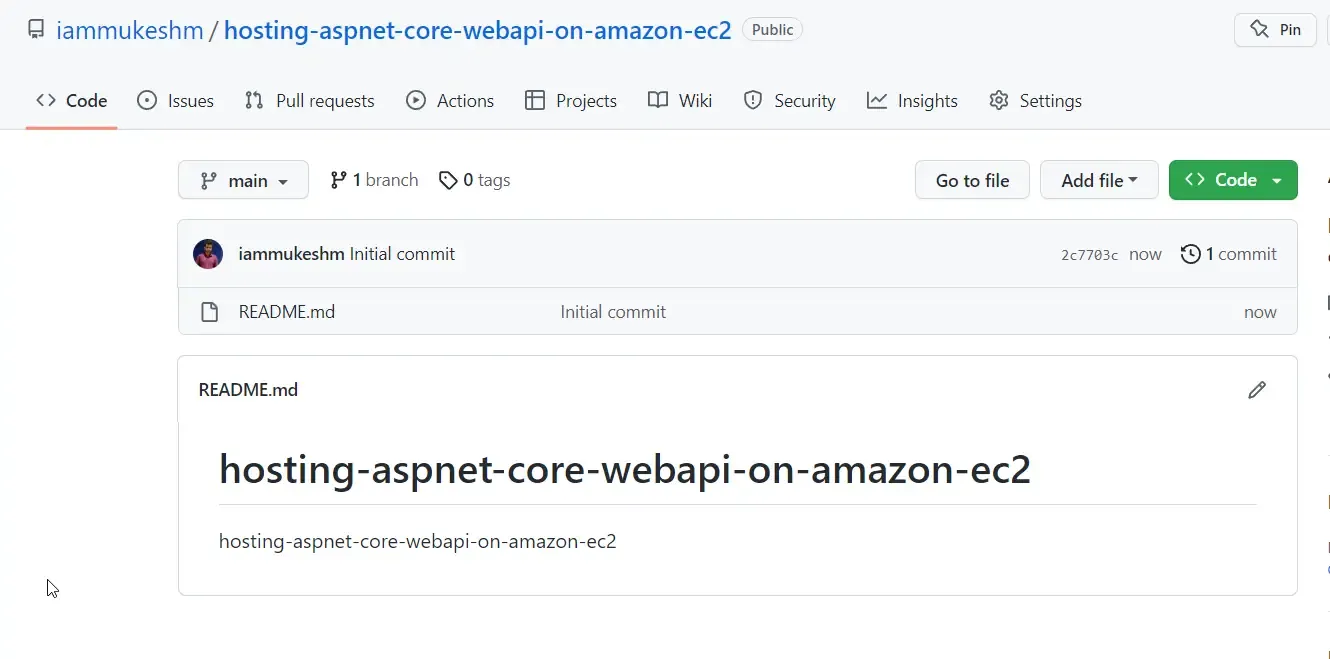
Once that’s done, run the following commands at the root of your local folder.
dotnet new gitignoredotnet new sln -n ProductCRUDdotnet new webapi -o src/ProductCRUD.API --framework net7.0dotnet sln add .\src\ProductCRUD.API\ProductCRUD.API.csprojgit add .git commit -m "initial changes"git pushThe following actions are executed.
- A new gitignore file is created, specifically for the .NET workload.
- Creates a new solution with the provided name.
- A new WebAPI is created under the src folder. Ensure that you have .NET 7 SDKs installed.
- The WebAPI project is added to the solution file.
- Once the required projects and solution is created, simply push the changes to GitHub.
Installing Required Packages
Open up the Solution on Visual Studio and get the following packages installed. You can simply run the following commands by opening up the package manager console.
Install-Package Microsoft.EntityFrameworkCore.ToolsInstall-Package Microsoft.EntityFrameworkCoreInstall-Package Npgsql.EntityFrameworkCore.PostgreSQLInstall-Package Microsoft.EntityFrameworkCore.DesignInstall-Package Microsoft.NET.Build.ContainersThe first 4 packages are related to EFCore, while the last one will be useful when we try to add in the built-in container support for .NET applications (starting from .NET 7)
I have written a dedicated article related to the Built-In Support for Containerization for .NET Applications starting from .NET 7. Read more about it here.
Models, DB Context & Migrations
Our use case is to build simple CRUD applications for Products. First up, let’s create a model class for Products. (To keep things simple, I will just create 3 endpoints - Create, GetAll, GetById)
Create a new folder named Models and add a new class named Product.
public class Product{ public Guid Id { get; private set; } public string Name { get; set; } public string? Description { get; set; } public decimal Price { get; set; } public static Product Create(string name, string description, decimal price) { return new Product() { Id = Guid.NewGuid(), Name = name, Description = description, Price = price }; }}I also added a new request class that will be used to invoke the CREATE endpoint. Create a new class named CreateProductRequest within the Models folder.
public record CreateProductRequest(string Name, string Description, decimal Price);Once the Models are added, let’s create a DBContext for the Database access. Create a new class named ProductDBContext and add in the following.
public class ProductDbContext : DbContext{ public DbSet<Product> Products { get; set; } public ProductDbContext(DbContextOptions<ProductDbContext> options) : base(options) { }}Note that you will need to have an instance of PostgreSQL running on your local machine for development purposes. In my case, I spun up a docker container by pulling the PostgreSQL image and connected to it locally.
Open up your appsettings.json and add the connection string of your instance under the default connections.
"ConnectionStrings": { "DefaultConnection": "Host=localhost;Port=5430;Database=productDb;Username=admin;Password=admin;Include Error Detail=true" }As the final touch, we will have to register our DB Context to the application’s DI Container.
var assemblyName = typeof(Program).Assembly.GetName().Name;var connectionString = builder.Configuration.GetConnectionString("DefaultConnection");
builder.Services.AddDbContext<ProductDbContext>(c => c.UseNpgsql(connectionString, m => m.MigrationsAssembly(assemblyName)));var app = builder.Build();
using var scope = app.Services.CreateScope();var context = scope.ServiceProvider.GetRequiredService<ProductDbContext>();if (context.Database.GetPendingMigrations().Any()){ await context.Database.MigrateAsync();}- Line #1 gets the current assembly. We will be using this to add our Migrations.
- Line #2 fetches the connection string from appsettings.
- Lines #4 & 5 add the ProductDbContext to the container using the extracted connection string and specify the Migration assembly as well.
- Finally, we check if there are any pending migrations to be applied to the database.
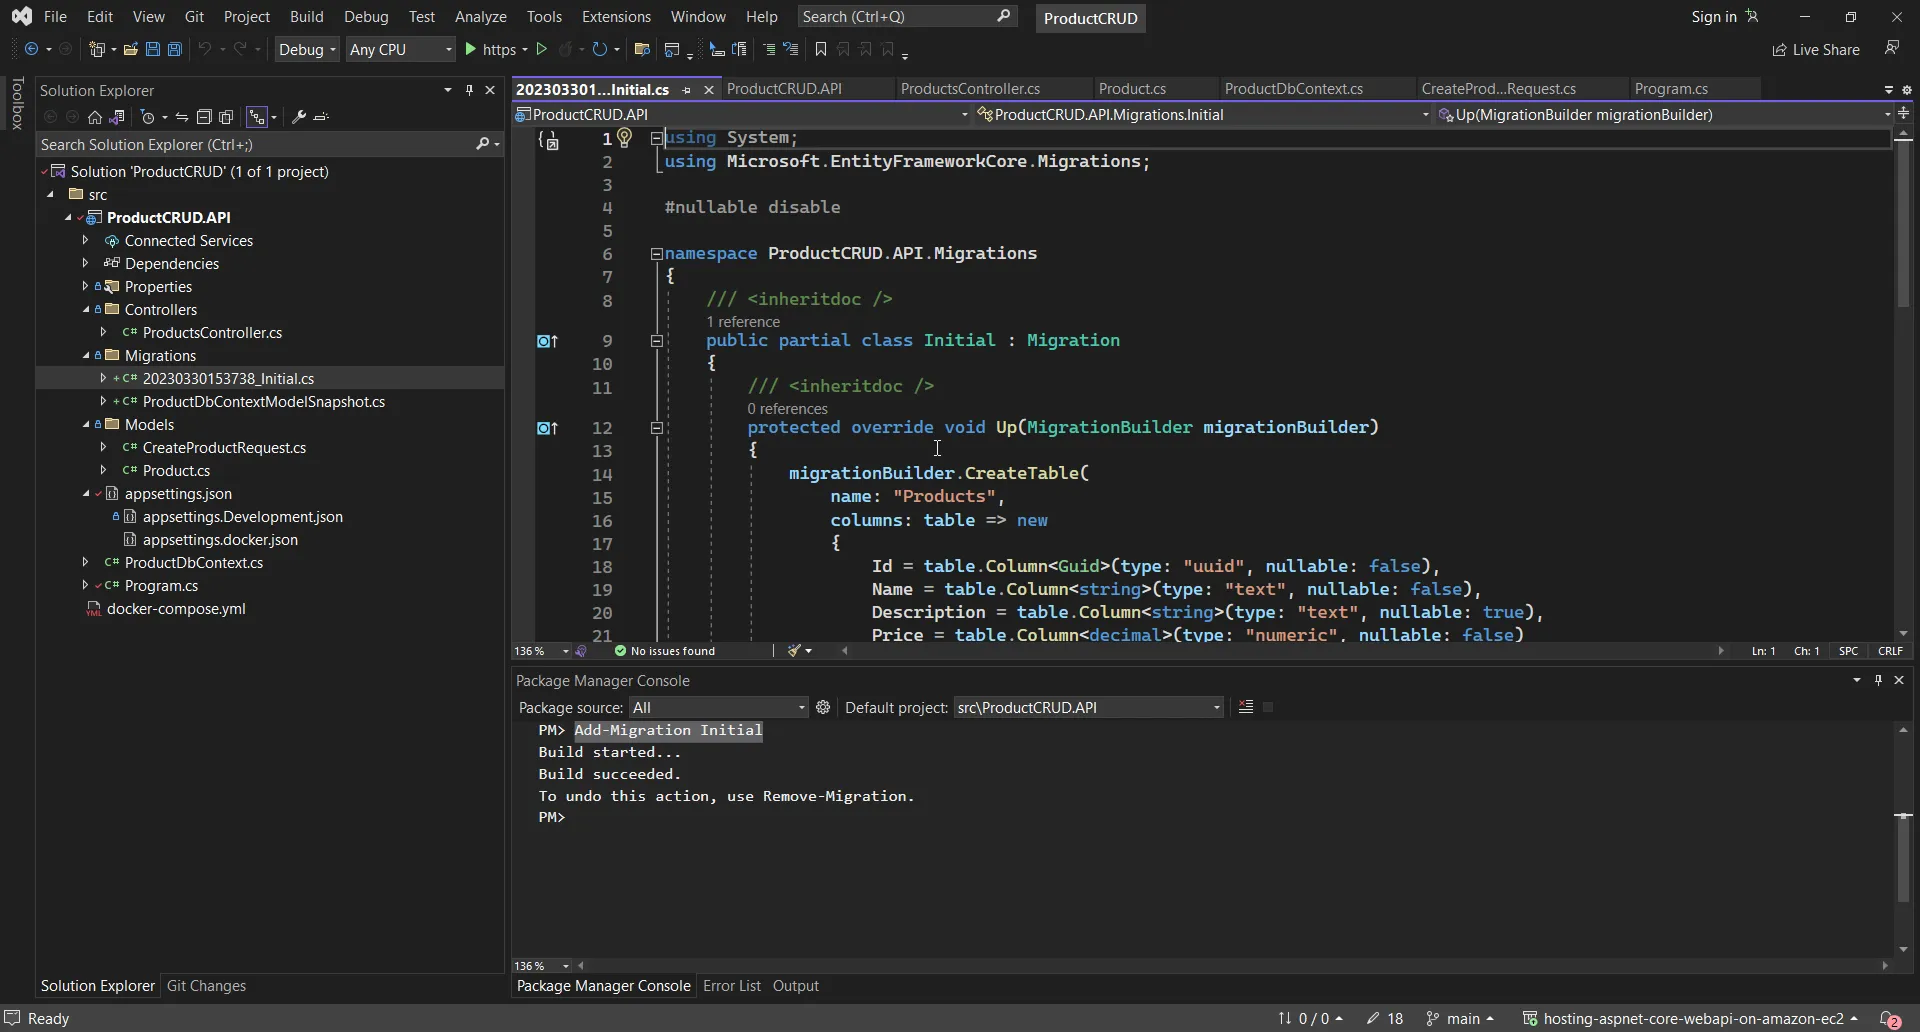
With all that done, we should be able to generate the database migration files. Open up the package manager console and run the following:
Add-Migration InitialIf all goes as excepted, you will be now able to see a new folder named Migrations get created on your project.
Controllers
Now that we have wired up everything, let’s write some controller code to create API endpoints. As mentioned earlier, for now, we will be creating just 3 endpoints: Create, GetAll, and GetById to keep the implementation simple. You can add the remaining CRUD operations as well if you wish to.
Create a new empty API Controller under the “controllers” folder, and name it ProductsController.
namespace ProductCRUD.API.Controllers{ [Route("api/[controller]")] [ApiController] public class ProductsController : ControllerBase { private readonly ProductDbContext _context; public ProductsController(ProductDbContext context) { _context = context; } [HttpGet] public async Task<IActionResult> GetAllAsync() { var products = await _context.Products.ToListAsync(); return Ok(products); } [HttpGet("{id:guid}")] public async Task<IActionResult> GetByIdAsync(Guid id) { var product = await _context.Products.FindAsync(id); if (product is null) { return NotFound(id); } return Ok(product); } [HttpPost] public async Task<IActionResult> CreateAsync(CreateProductRequest request) { var product = Product.Create(request.Name, request.Description, request.Price); await _context.Products.AddAsync(product); _context.SaveChanges(); return Ok(product.Id); } }}- Lines #7 to #11 deal with the constructor injection of ProductDbContext into the controller.
- Line #15 returns a list of products back to the client.
- Line #21 gets a product with a specific id and returns it if it exists.
- Line #26 to #33 uses the CreateProductRequest record that we created earlier and creates a product entity with the request data. This entity is then saved into the database, and its ID will be returned.
That’s it for our .NET 7 Web API.
Dockerizing
Next, let’s add certain properties to our csproj file to enable the Built-In Dockerization support.
Open up the ProductCRUD.API.csproj file and add in the following PropertyGroup.
<PropertyGroup> <ContainerImageName>products-crud-api</ContainerImageName> <ContainerImageTags>latest</ContainerImageTags> <PublishProfile>DefaultContainer</PublishProfile> <RuntimeIdentifier>linux-x64</RuntimeIdentifier></PropertyGroup>Here, we defined the name of the image that will be built, its tag, and the runtime it will be built against. For more details about this approach, please refer to my recent blog post.
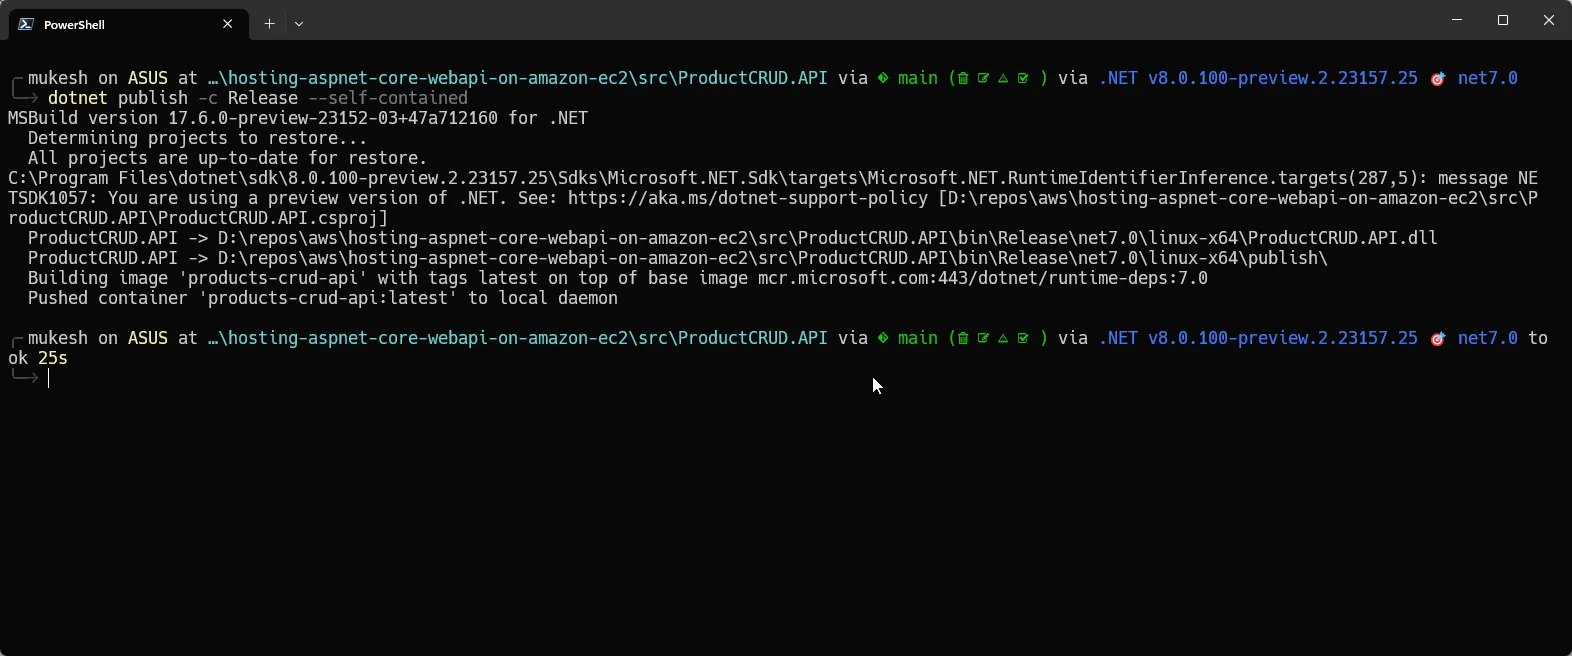
Once this is done, all we would have to do, to build the Docker image of the application is simply run the following command.
dotnet publish -c Release --self-containedEnsure that you have docker-desktop installed on your development machine.
You will be seeing something like the one below, which indicates that your API’s image has been pushed to the local docker instance.
Note that we will be doing the same things over at the Amazon EC2 instance and building a docker image there.
Docker Compose with PostgreSQL Container
Now that we have our Docker Image ready to go, we will set up a docker-compose file, which will contain the instructions to bring up both the API service as well as a PostgreSQL instance.
At the root of the project, create a new file and name it docker-compose.yml with the following content.
version: '3.8'name: product-crudservices: api: container_name: product-api image: products-crud-api:latest environment: - ASPNETCORE_ENVIRONMENT=docker - ASPNETCORE_URLS=http://+:80 ports: - 80:80 depends_on: postgres: condition: service_healthy postgres: container_name: postgres image: postgres:15-alpine environment: - POSTGRES_USER=postgres - POSTGRES_PASSWORD=admin ports: - 5432:5432 volumes: - postgres-data:/data/db healthcheck: test: ["CMD-SHELL", "pg_isready -U admin"] interval: 10s timeout: 5s retries: 5volumes: postgres-data:Here, we have created 2 services:
- API - which pulls the image with the name product-crud-api:latest. If you remember, this is the same name of the image that we had specified in our csproj property group. This image will be pulled from the local instance of docker (which will be eventually running on our EC2 Linux instance). Apart from this, we have set some env variables, firstly the ASPNETCORE_Environment to docker (we will be adding a separate appsettings.docker.json file for this in the next section), and also the URL which would point to PORT 80.
- postgres - Here, we will be pulling the Postgres image and setting the basic env variables like the username and password. Additionally, I have also added the health checks which is a nice to have feature in your specification.
Apart from this, we have also created a volume, which will be used by our Postgres service to retain data.
Once this is done, let’s add new appsettings for our application. At the root of the project, add a new file and name it appsettings.docker.json. This way, our application will load data from this file, when the ASPNETCORE_ENVIRONMENT value is set to docker. We can use this to explicitly define our connection string when running on docker containers.
The following is the content of the new appsettings file. Note that the server name will be the same as the name of the service we had defined in our docker-compose file, which is postgres. Also ensure that you have added a valid username and password, exactly the same as we defined in the compose file.
{ "ConnectionStrings": { "DefaultConnection": "Server=postgres;Port=5432;Database=identityDb;User Id=postgres;Password=admin" }}That’s everything you have to do with .NET and your repository setup. The next task in front of us is to spin up an EC2 container, get the .NET environment ready, run docker, pull the code repository from GitHub, build the docker image, and host the API making it accessible to the public!
Ensure that you have pushed all your changes to GitHub.
Launching the Amazon EC2 Linux Instance
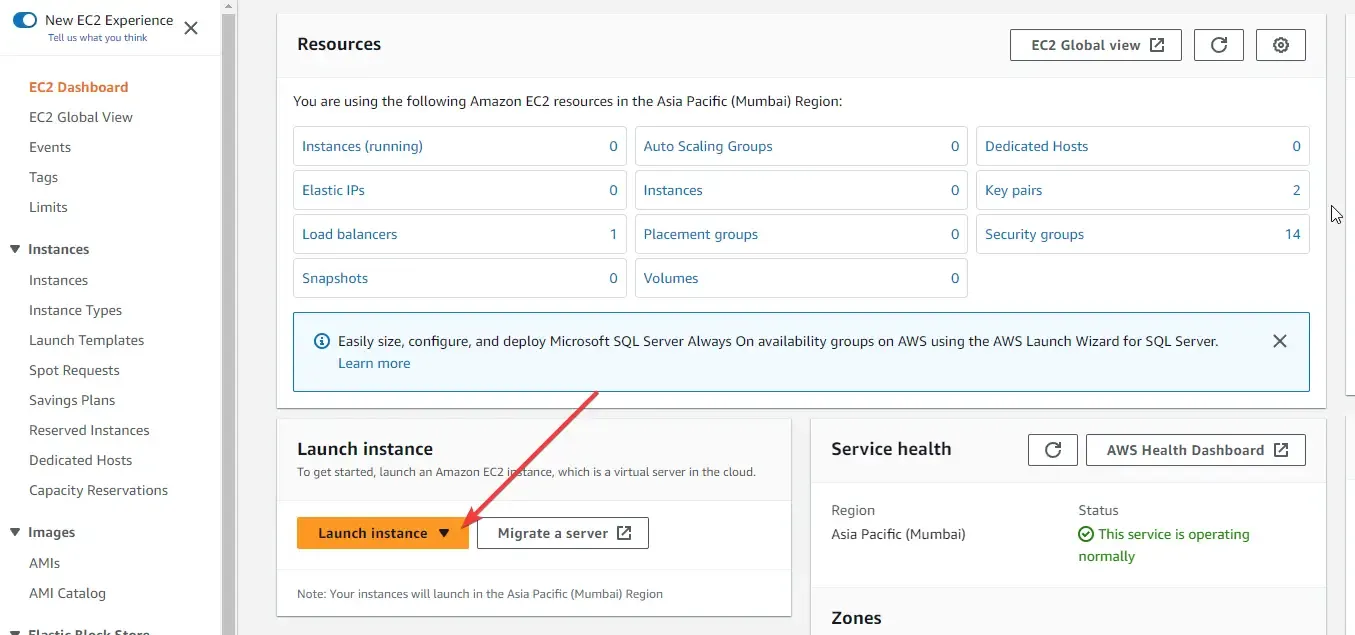
Now that everything is ready, let’s boot up an amazon ec2 Linux instance! Login to your AWS Management Console, and search for EC2.
Here, click on Launch Instance.
I named my instance as api-server, and selected the Amazon Linux 2023 AMI (this is eligible for the free tier).
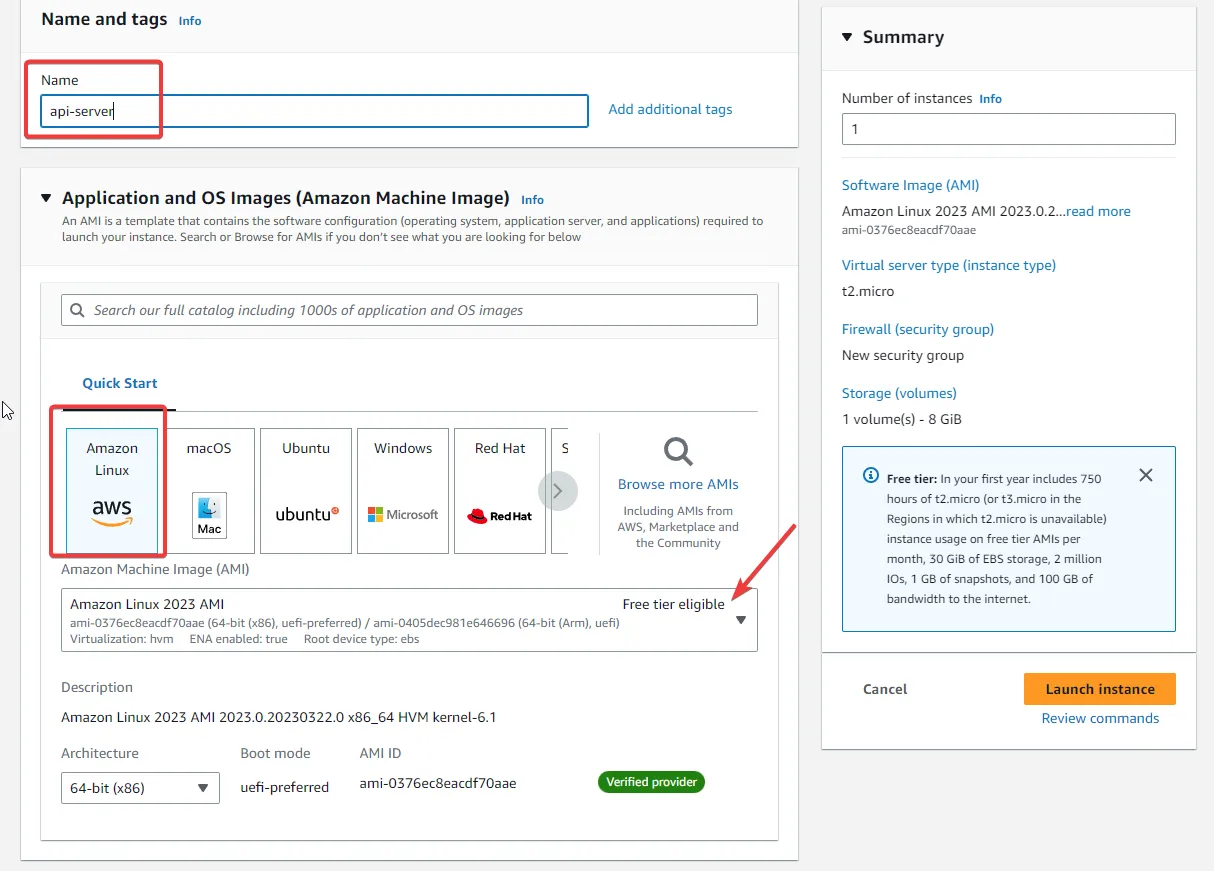
Also, the instance type is selected by default as t2.micro which comes with 1CPU and 1Gb Memory, which is pretty much enough for our use case.
In the Key Pair section, ensure that you create a new one.
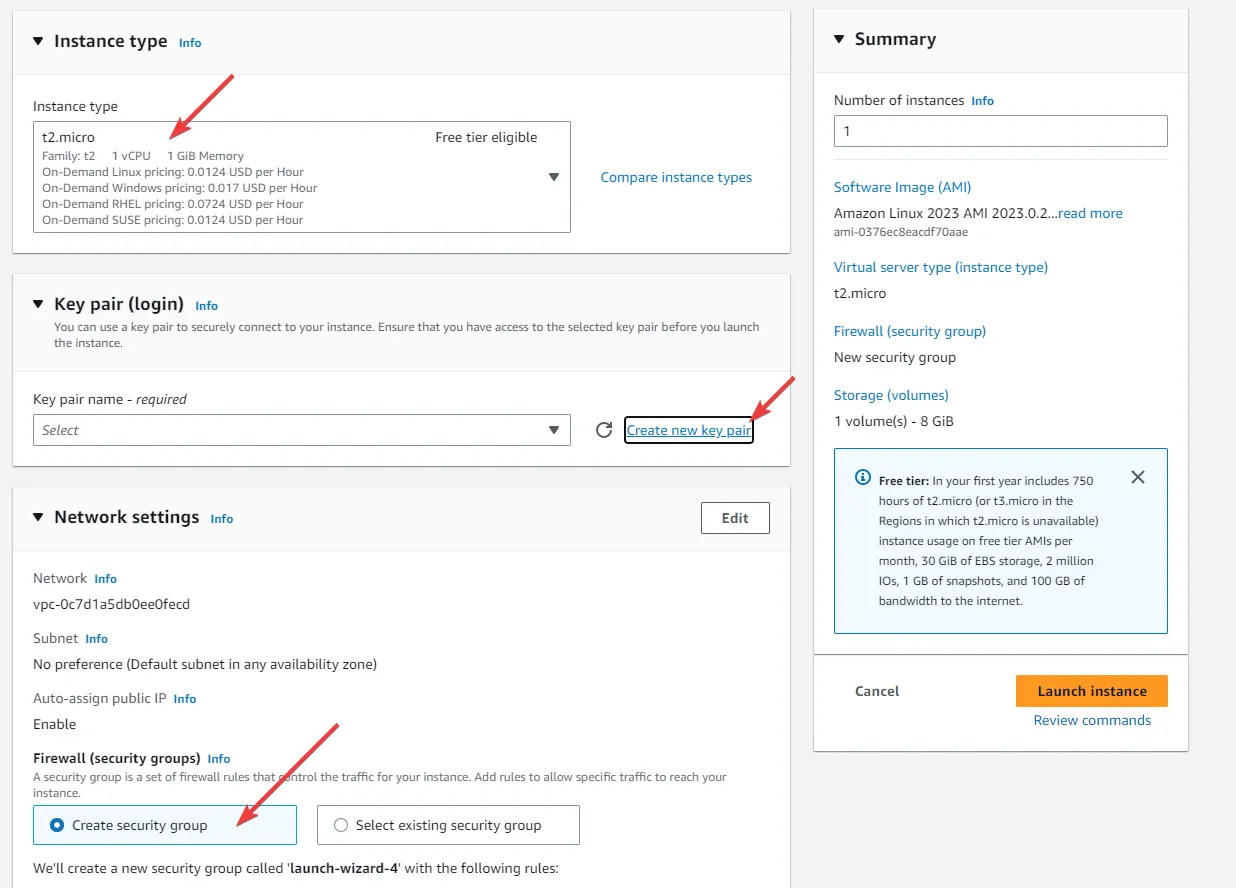
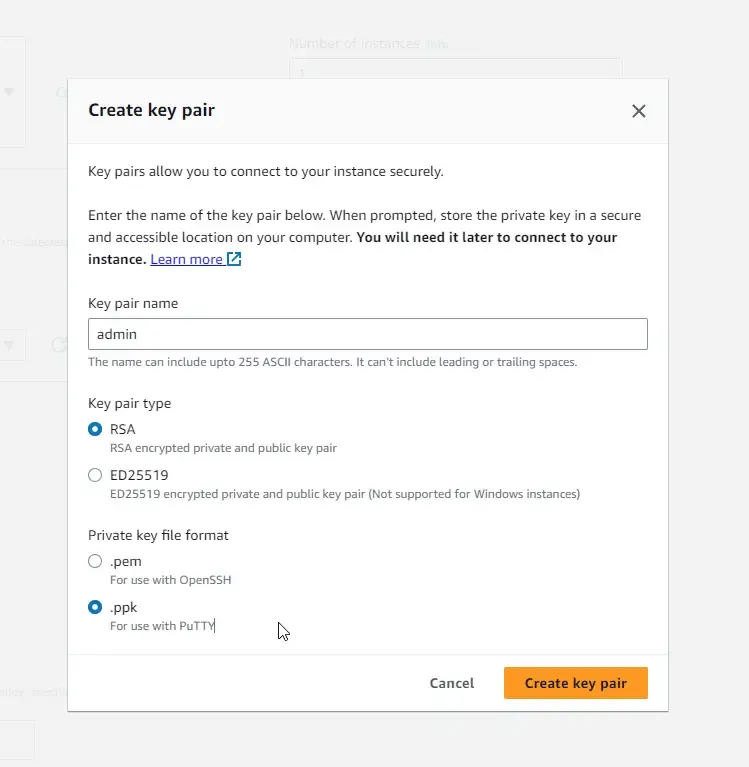
Give the Key pair an identifiable name, and select the file format as .ppk. This will be later used by us to connect remotely to our Amazon EC2 instance. Make sure that you have securely downloaded this file into your machine.
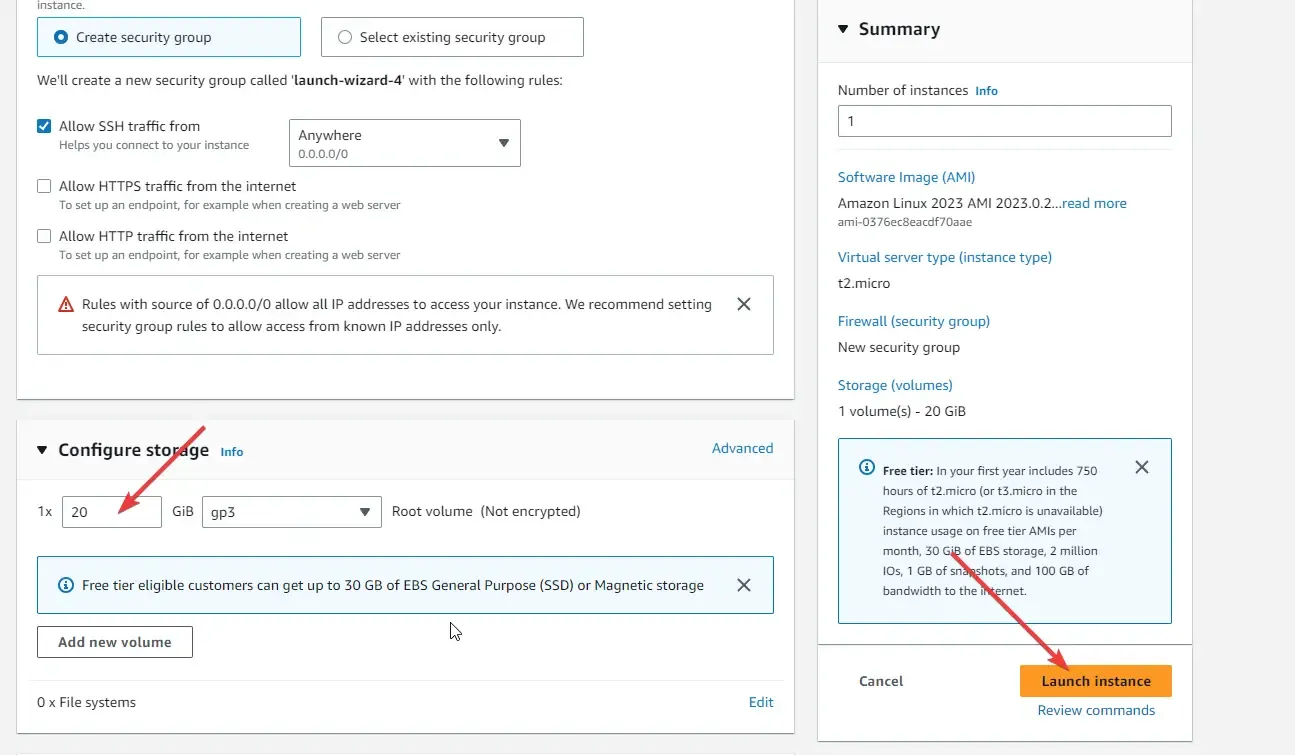
Once saved, let’s proceed with the instance creation. I have configured a storage of 20 GB, just in case. ( I also wanted to use this ec2 instance for other development purposes)
With that done, review your selections and click on Launch instance. It will take about under a minute for Amazon to provision your EC2 instance.
Once created, you will be seeing a success message.
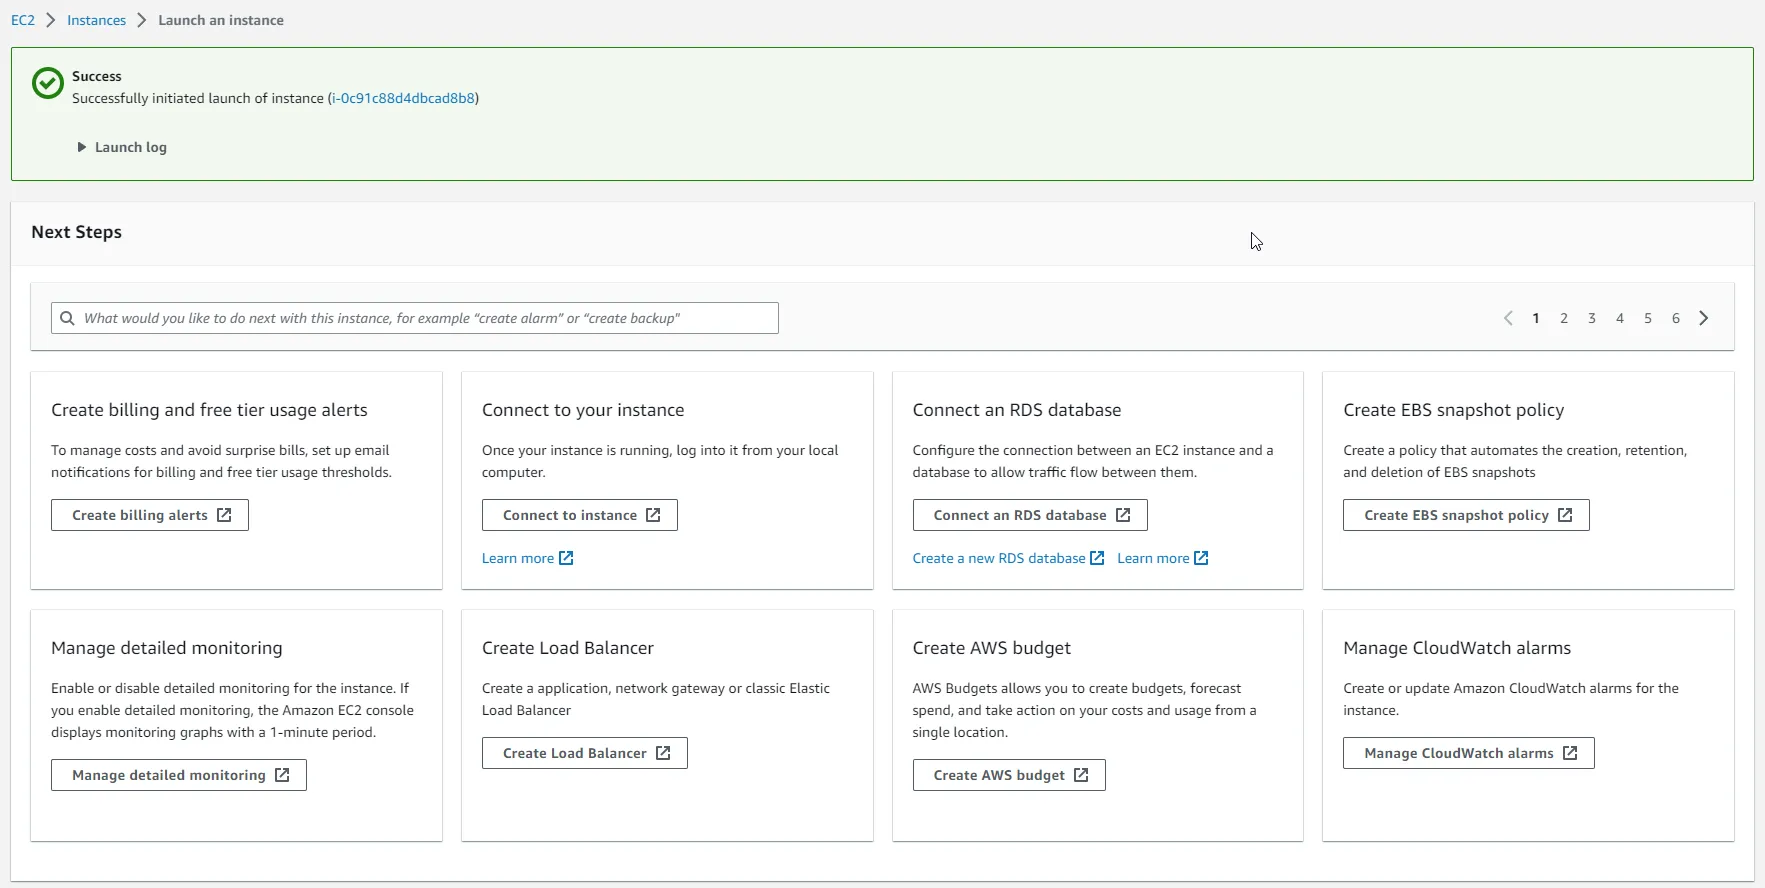
SSH into the EC2 Instance with PuTTY
Our next step is to connect to this EC2 instance from our machine. Alternatively, you can also use the Management console to connect to this instance. Feel free to try it. In my case, i preferred using SSH tools like PuTTY to log in to the instance. For this to work, you need the following details:
- username, which will be ec2-user in this case.
- Public Hostname / DNS of the EC2 instance. You can fetch this by navigating into the Management Console > EC2 > Instance. Here, simply copy the Public IPv4 DNS.
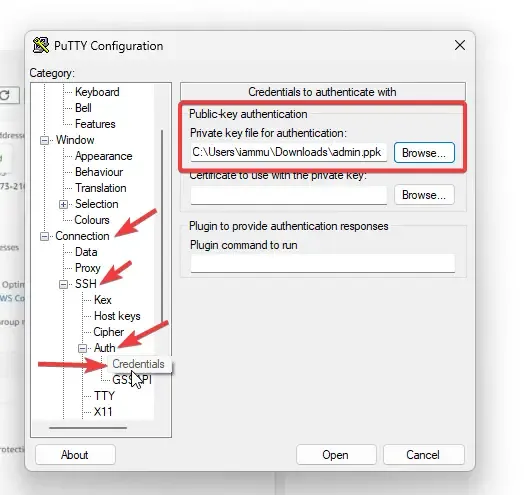
- A private key, which we have already downloaded during the Instance creation.
Note: you can download PuTTY from https://www.putty.org/
Once installed, open it up.
In the Session section, under the hostname, give the name in the following format.
ec2-user@<your public ipv4 dns>
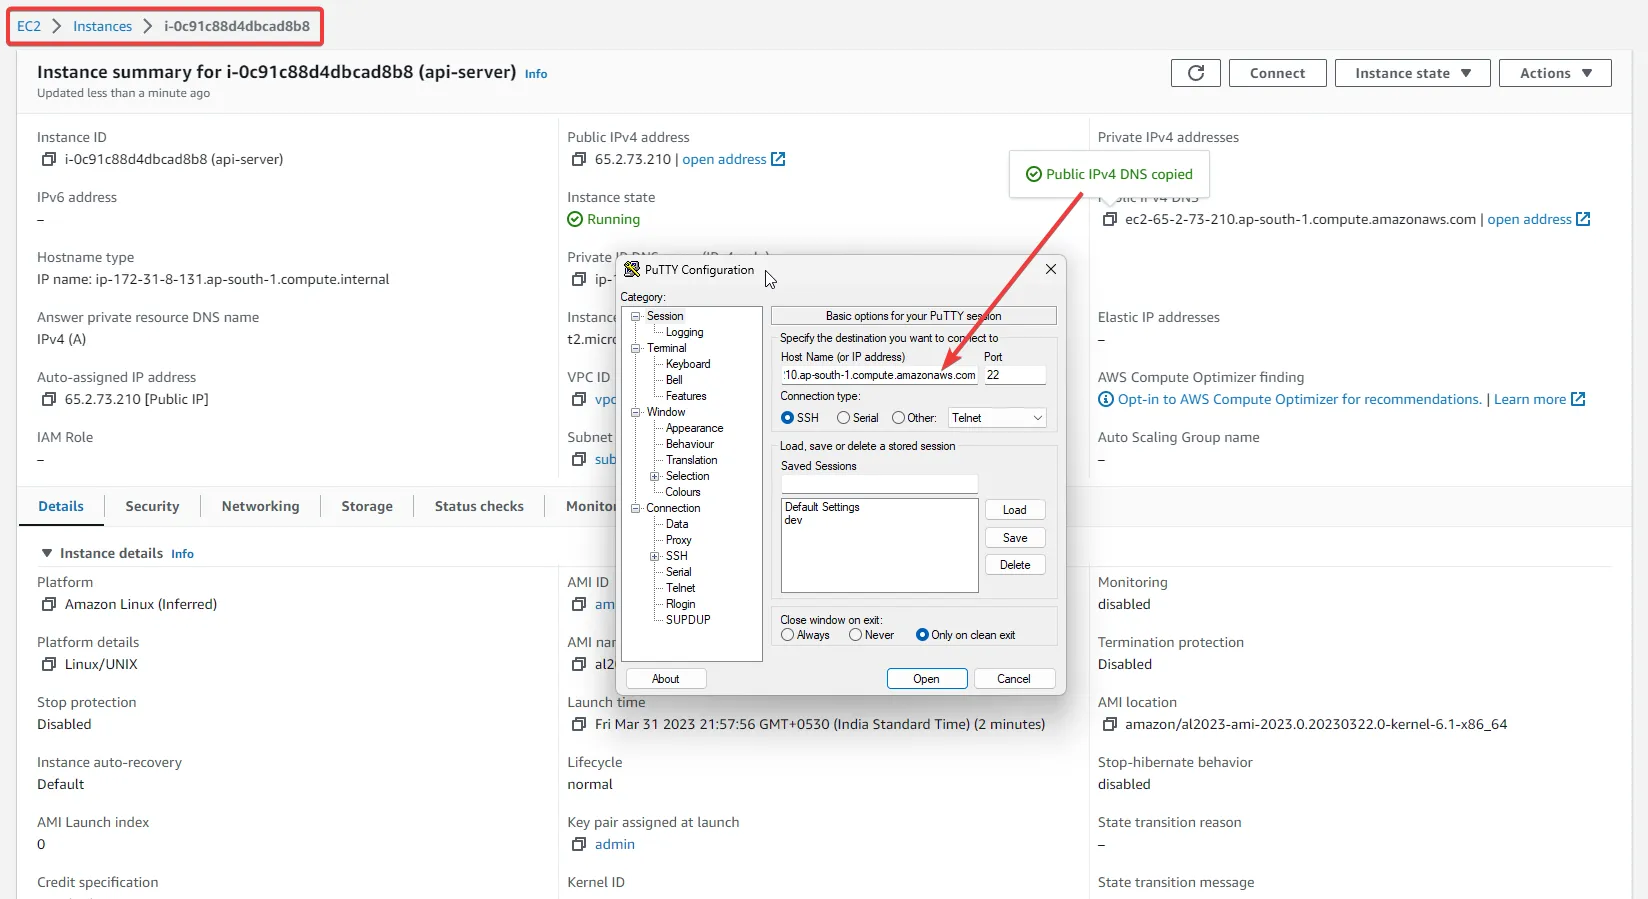
Once done, navigate to the Connection > SSH > Auth > Credentials section of PuTTY and load the previously downloaded PPK file.
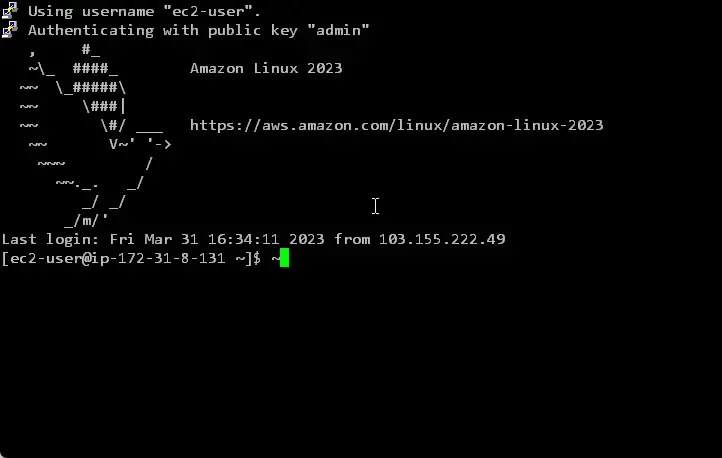
With these 2 steps done, you will be ready to connect to the instance. Simply click on Open, and the SSH terminal would load up. Here, Click on Accept.
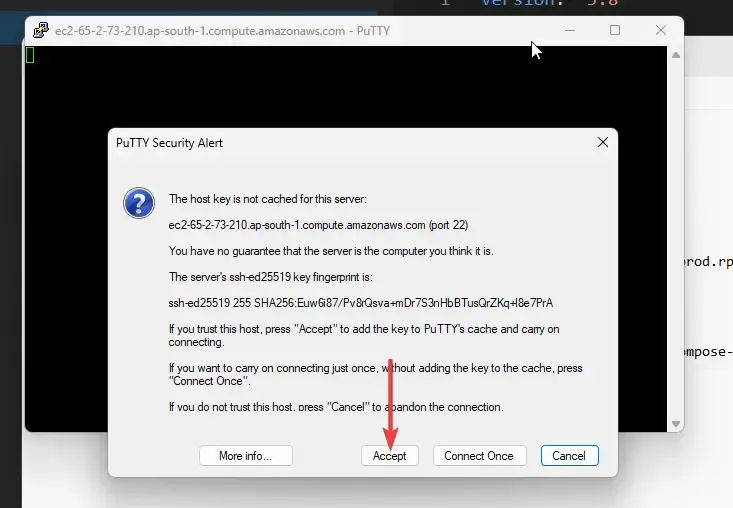
Congrats! You have logged into your Amazon Linux Instance!
Setting up the Environment
Next, we will have to set up the Environment in our instance. This basically includes the following setup:
- Install Git
- Install Docker and start the service
- Install .NET 7 Runtimes and SDK
- Install Docker-Compose Tools
- Pull our GitHub Repository into the instance, and build the Docker Image
- Run the Compose file to start up the API and PostgreSQL Database instance!
I had to do quite a lot of research to get the correct commands for setting up all the above-mentioned services and packages. Ensure that you bookmark this page/section for future reference.
First up, let’s switch to the Super User. Simply type in the following command on your SSH terminal.
sudo suNext, let’s install git.
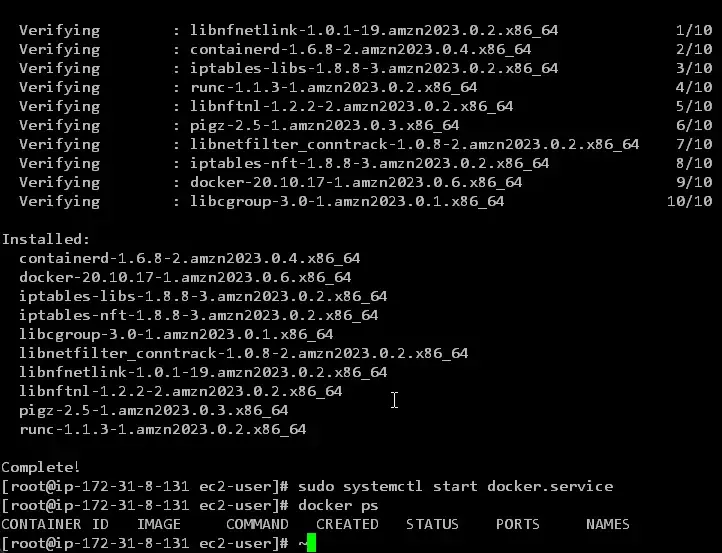
yum install gitNext, install docker, and start the docker service on Linux.
yum install dockersudo systemctl start docker.servicedocker psAttaching a screenshot below where I confirmed that docker has been installed, and its service is initialized.
We will install the dotnet workloads next. Since our application was built using .NET 7, let’s install the same runtime and SDK. You can probably avoid the Runtime in your case.
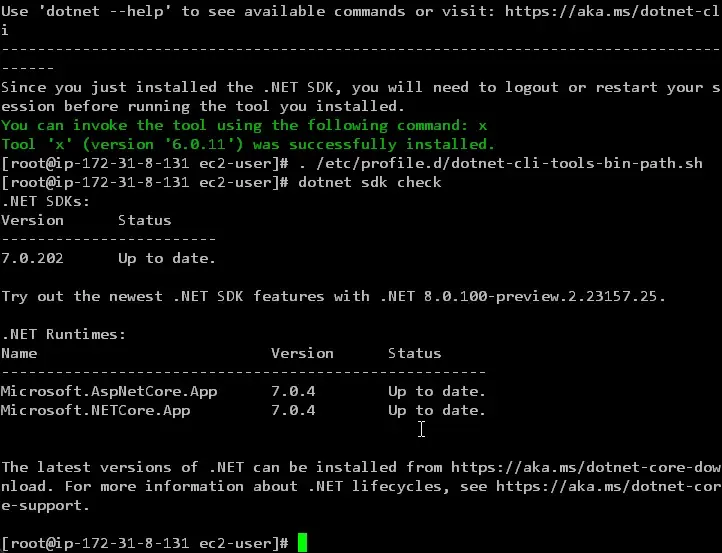
sudo yum install aspnetcore-runtime-7.0sudo yum install dotnet-sdk-7.0dotnet tool install --global x. /etc/profile.d/dotnet-cli-tools-bin-path.shdotnet sdk checkHere, apart from installing the runtime and SDK, I have also installed the dotnet tooling package. Finally, I ran the dotnet SDK check command to list out all the installed SDKs.
As you can see from below screenshot 7.0.202 version of .NET SDK is properly installed on the Amazon EC2 Linux instance.
Next, let’s install the tools required for our docker-compose file to run. Execute the following command.
sudo curl -L https://github.com/docker/compose/releases/latest/download/docker-compose-$(uname -s)-$(uname -m) -o /usr/local/bin/docker-composesudo chmod +x /usr/local/bin/docker-composedocker-compose version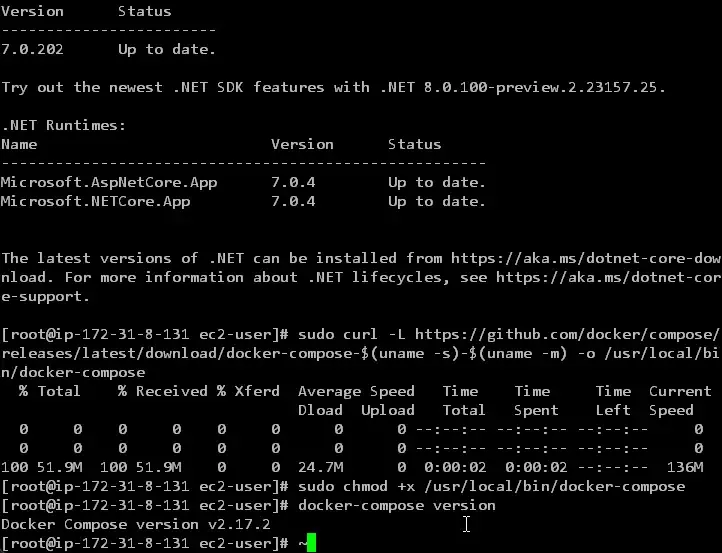
By now, all our required tooling, SDK, and packages are properly installed into the instance. Now, let’s clone our Github repository into the instance Volume and proceed. Note that my Github repository is public. In case, your repository is Private, you would have to log in to GitHub via cli.
I executed the following commands to pull the repository from Github, and also to build the docker image out of it.
mkdir reposcd reposgit clone https://github.com/iammukeshm/hosting-aspnet-core-webapi-on-amazon-ec2.gitcd hosting-aspnet-core-webapi-on-amazon-ec2dotnet publish -c Release --self-containeddocker imagesFirstly, I created a new folder named repos and cloned my repository into it. Once the cloning is completed, I navigated into the project folder and simply ran the dotnet publish command. If you remember from earlier, this command would not only build the .NET application but also build the Docker image using the specifications that we had mentioned earlier in the csproj file.
Finally, I ran the docker images command to get a list of images present in the local docker instance of my Amazon EC2 Linux box. You can see the product-crud-api image with the tag set to latest.
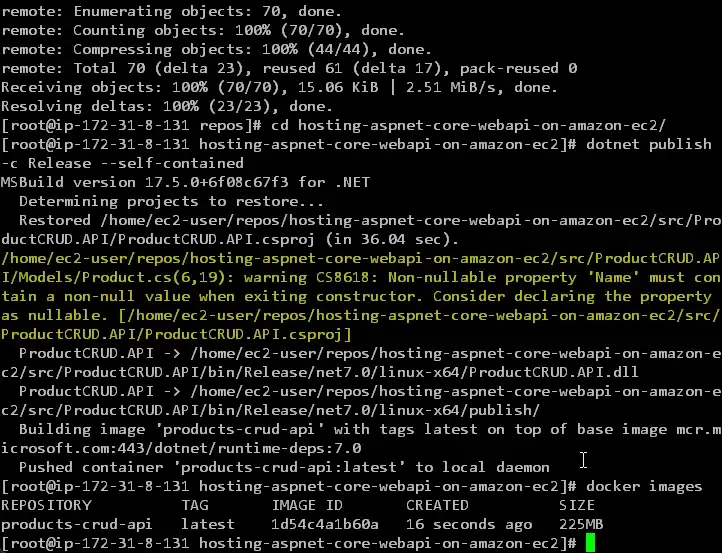
Now that our API image is available, all we have to do is run our docker-compose file.
docker-compose up -dYou should be able to see that the PostgreSQL image is being pulled and both containers should be up and running.
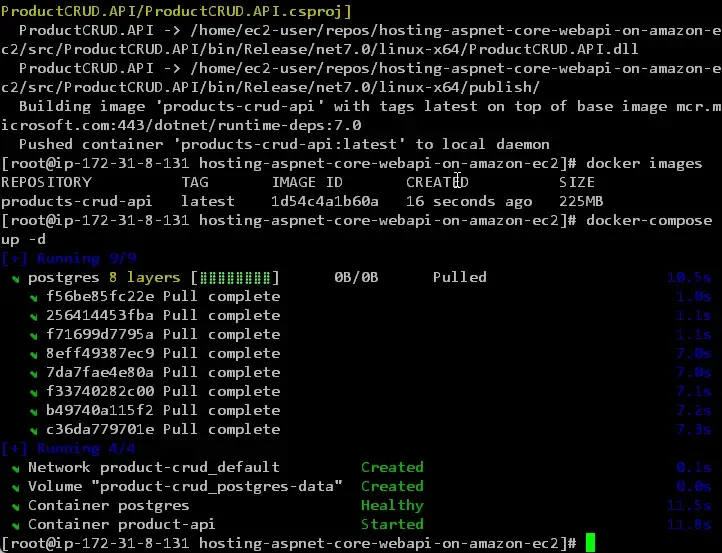
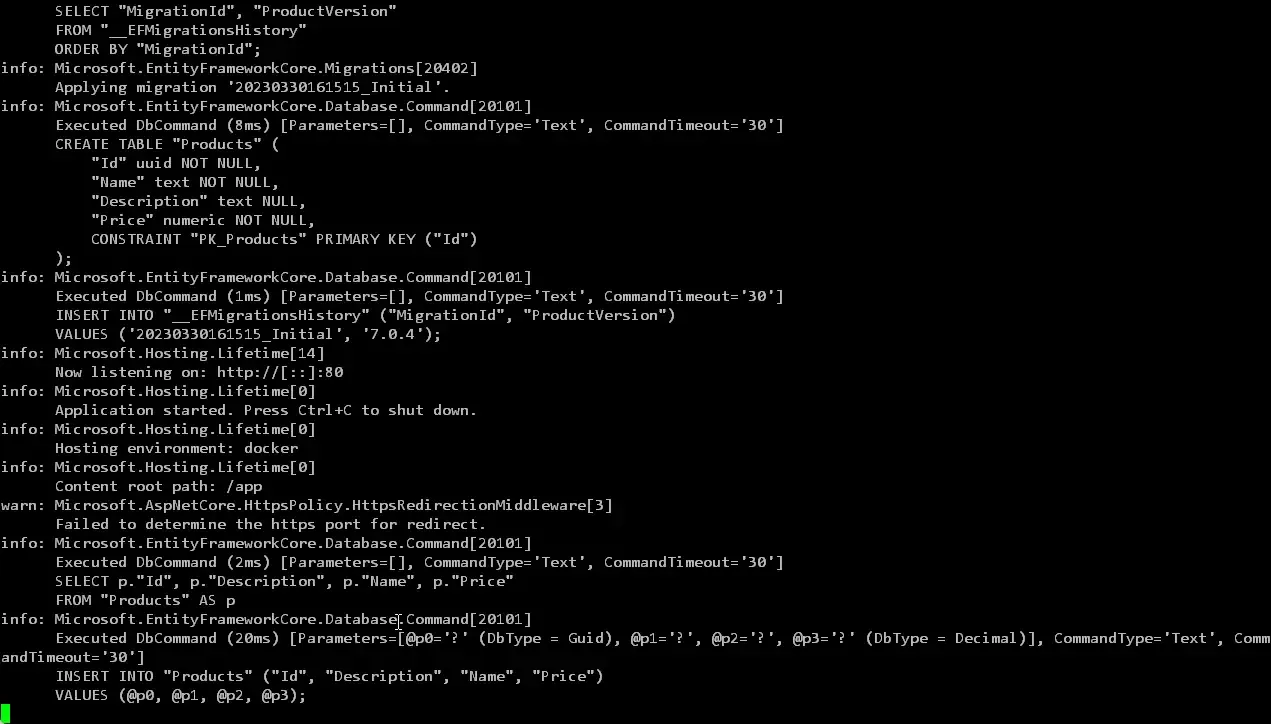
To verify if the containers are working as expected, the first thing I would do is to inspect the logs of the containers by running the following command.
docker logs product-api -f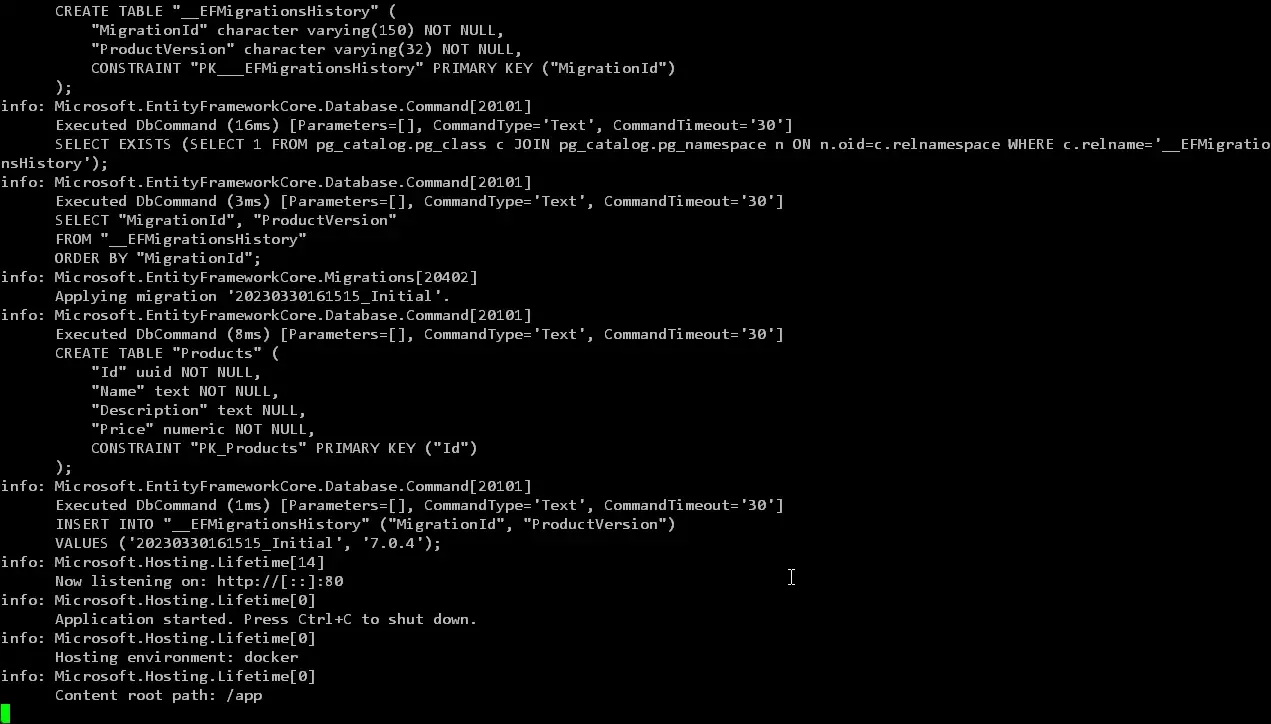
As you see, everything is working as expected from within the container.
Inbound Rules
The next step is to make our Product API Server available to the public. How do we do this? Simple, by allowing inbound traffic into port 80, on which our product API server is up and running.
For this, switch to the AWS Management Console, EC2, and select our instance. Here click on the Security Tab, and open up the Security Group attached to this instance.
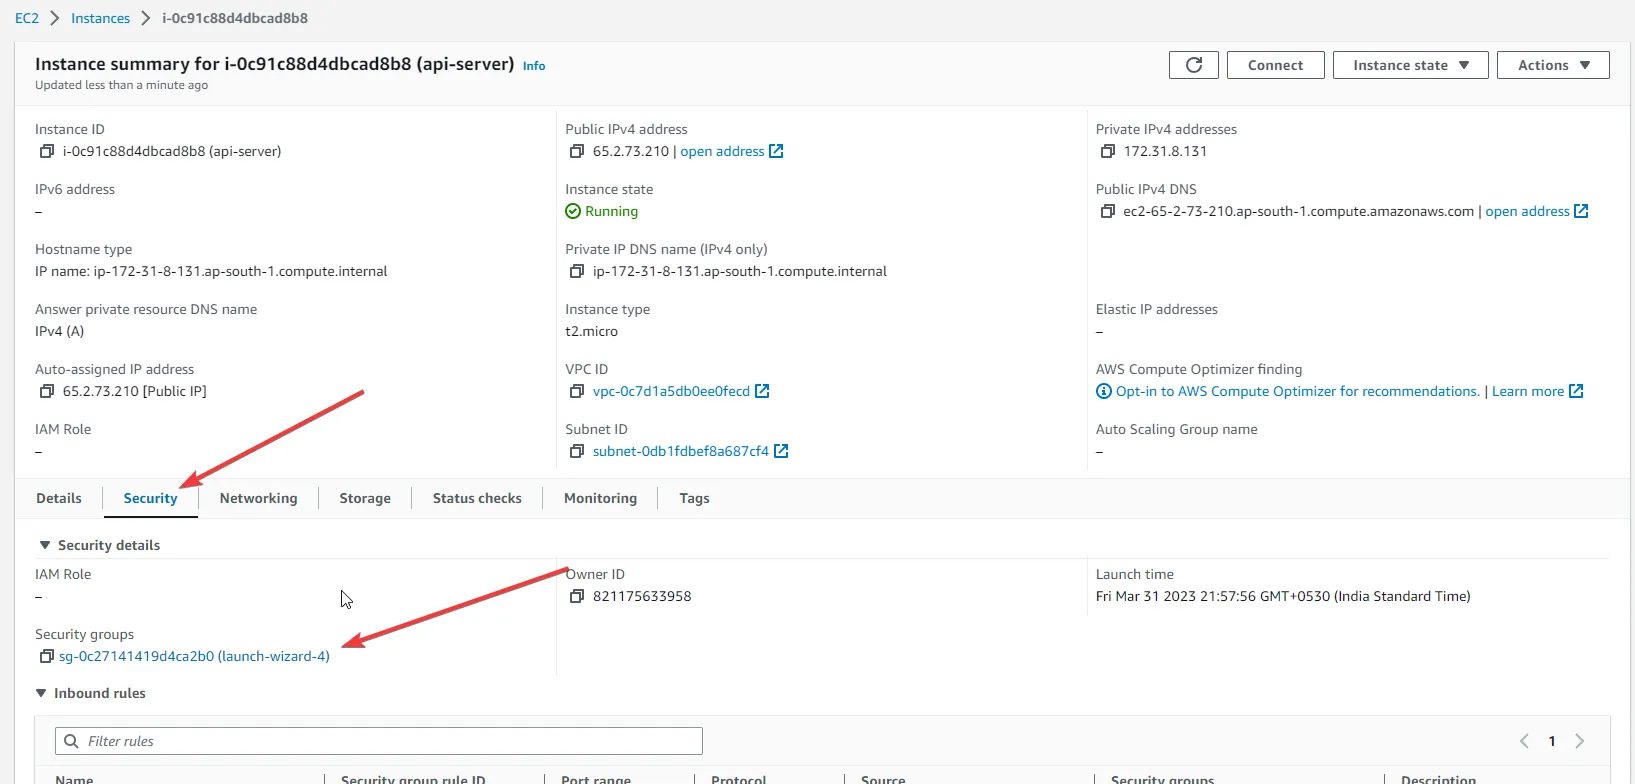
Here, click on Edit Inbound Rules and add a new rule.
Specify the port range as 80 and the source from Anywhere-IPv4. This should open up port 80 to the public.

And which URL do we hit to test this? You will need the same Public IPv4 DNS or the Public IPv4 Address. You can get this data from the Instance details.
Testing with POSTMAN
Let’s test our API Server that’s hosted on Amazon EC2 Linux Instance!
Open up postman and send a POST request to the api/products endpoint.
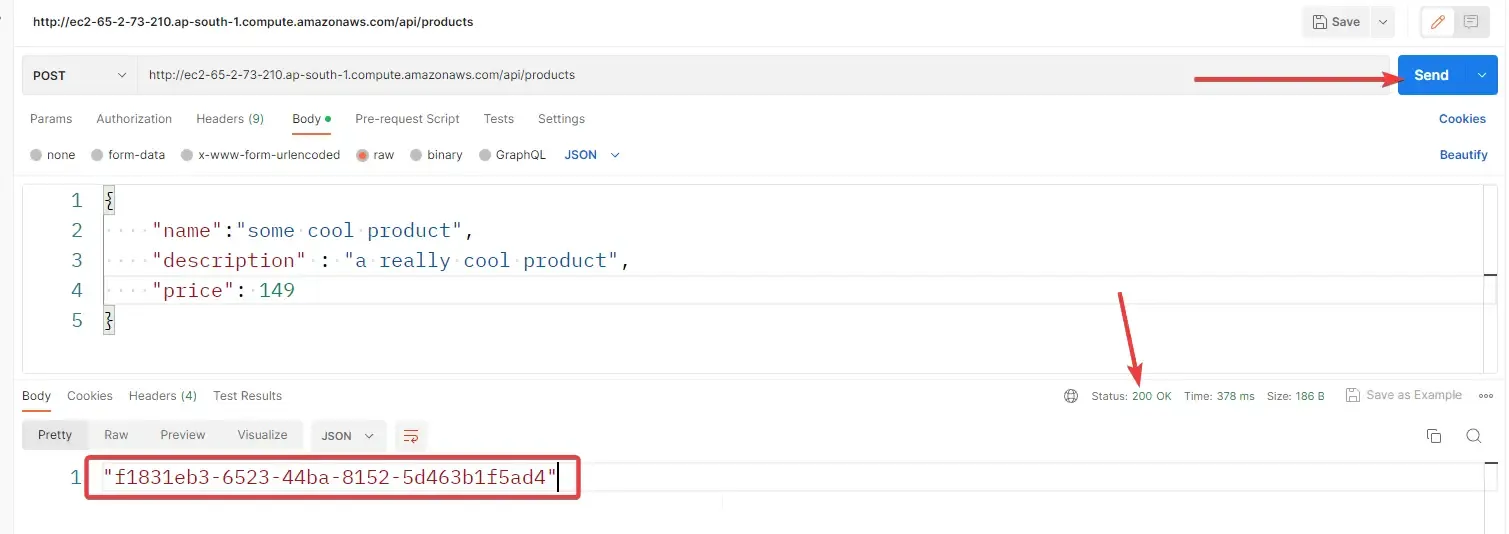
You can see a 200 Status Code with a GUID Retuend as a response from the API. This is the ID of the newly created product. You can also check the logs of the docker container (product-API) to confirm that this request has been entered into the EC2 instance.
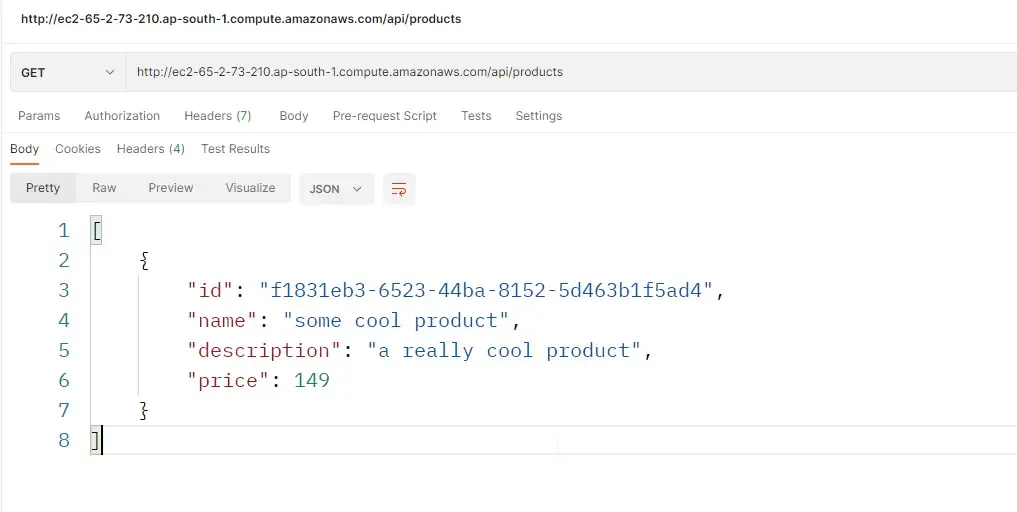
Here is the result of /api/products GET endpoint which is supposed to return a list of all products available in the database.
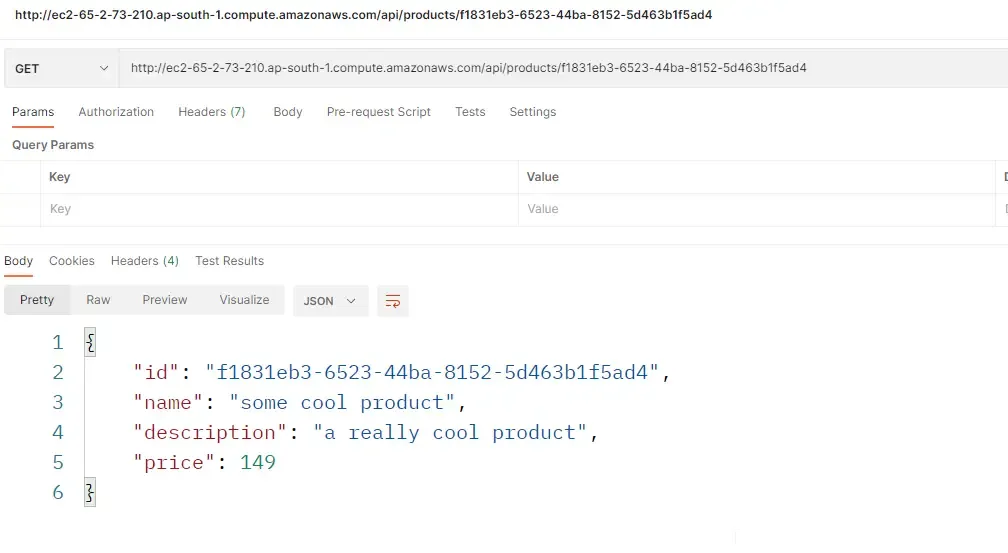
Finally, here is the response of the GetByID endpoint, where in we pass the id of the product, and the API server would fetch the product details for us.
Important: Destroy
Once you are done with testing, or no longer need the API to be running, ensure that you destroy the EC2 instance so that you don’t incur any additional bills. Make this a practice when working with Cloud Platform resources.
Hope you liked this article!
Grab the source code of this implementation from here: https://github.com/iammukeshm/hosting-aspnet-core-webapi-on-amazon-ec2
Summary
In this detailed article, we learned quite a lot about Hosting ASP.NET Core WebAPI on Amazon EC2 Linux instance and all the various specifications to be taken care of while setting it up. In the initial section, we developed a .NET 7 Web API that does CRUD operation over the PostgreSQL table. We then enabled the Built-In dockerization support for the API and went ahead with writing a docker-compose for the Api and Database service.
Once that’s done, an EC2 Instance was spun up with the specifications matching our requirements. We have also gone through each and every command required to set up an environment on your new instance with Git, Docker, Docker-Compose, and .NET 7 Workloads. From there, we built the Docker image of our ASP.NET Core Web API and hosted it within the containers along with a PostgreSQL instance. The API was made public by opening up port 80 access to the public by modifying the Inbound Rules.
Make sure to share this article with your colleagues if it helped you! Helps me get more eyes on my blog as well. Thanks!
Stay Tuned. You can follow this newsletter to get notifications when I publish new articles – https://newsletter.codewithmukesh.com. Do share this article with your colleagues and dev circles if you found this interesting. Thanks!

