In this article, we will learn about implementing CRUD in Golang REST API with Gorilla Mux for routing requests, GORM as the ORM to access the database, Viper for Loading configurations, and MySQL as the database provider. We will also follow some clean development practices to help organize the GoLang project folder structure in a more easy-to-understand fashion. This is a super beginner-friendly tutorial that is also quite comprehensive!
You’ll find the entire codebase for the tutorial over at my GitHub Repository.
Prerequisites
Before getting started, make sure you have the latest version of Go installed on your machine. Here is where you can download the latest version of Go. At the time of writing 1.18 is the latest available stable version of Go.
Also, I would recommend you use VSCode as the IDE for Developing Go mainly for the tooling and builtin terminal which makes things much easier. Make sure to install the Go extension on VSCode that would provide you extra tooling that kinda helps a lot while developing GoLang Projects.
Getting Started with Implementing CRUD in GoLang REST API
Implementing CRUD Operations is probably the best way to get along with a new web development framework/language. We will essentially be building a simple REST API in Golang that performs CRUD Operations over Products. In other words, the API that we will build will be more of a Product Management API. This will help us get the basic idea of the various departments like Routing, Configurations, Packages, Handlers, and so on.
Setting up the Golang Project
Here is how I usually go about creating GoLang projects from scratch.
Open up the folder where you typically store your code. Here create a new folder with the project name, navigate to the newly created folder and open it up on VS Code using the below CLI / Terminal command.
mkdir golang-crud-rest-apicd golang-crud-rest-apicode .This would open up VSCode using the newly-created directory. Now, open up the terminal in VS Code and run the following. This is to basically install the touch tooling that helps create new files with ease directly from the CLI. Just a handy add-on in case ;)
npm install -g touch-cliWith that part out of the way, let’s get started with the actual development. Let’s create the main.go file in the root directory.
touch main.goAdd the basic syntax of the main.go file. We will go on adding much more functions to the main file as we progress.
package main
func main() {}
Next, let’s initialize the Modules file and install all the required packages.
go mod init golang-crud-rest-apigo get -u github.com/gorilla/muxgo get -u gorm.io/gormgo get -u gorm.io/driver/mysqlgo get -u github.com/spf13/viperThis would install all the required packages for Implementing REST API in Golang! Let’s understand in brief what each of the packages will be responsible for.
- gorilla/mux will be what we be using to route the incoming HTTP request to the correct method that handles the specific operation. For instance when a client send a POST request to /api/products endpoints, routing helps the application understand where the request should be routed to, and in this case it gets routed to a method that is responsibe for Creating Product.
- gorm is an ORM that helps access the defined database. It provides easy to understand helper functions that can query or execute commands over a specific database. No more writing boring old SQL Queries to work with the data! In this article we will be just using the basic functionalities of GORM to achieve CRUD operations. We’ll talk about GORM in detail in a seperate article. Note that we are using MySQL driver in this example. Read more about the supported databases here.
- viper is a configurations manager that helps us to load file and environment defined values into the application’s runtime. There will be seperate article about Viper too!
Loading Configurations using Viper
Now, there are some variables in the application that would have to be configurable. This includes the API port number, MySQL connection string and so. You get the idea.
Create a new file by using the below command.
touch config.goBelow will be the content of the config file.
package main
import (  "log"  "github.com/spf13/viper")type Config struct {  Port             string `mapstructure:"port"`  ConnectionString string `mapstructure:"connection_string"`}var AppConfig *Configfunc LoadAppConfig(){  log.Println("Loading Server Configurations...")  viper.AddConfigPath(".")  viper.SetConfigName("config")  viper.SetConfigType("json")  err := viper.ReadInConfig()  if err != nil {    log.Fatal(err)  }  err = viper.Unmarshal(&AppConfig)  if err != nil {    log.Fatal(err)  }}
Line 7 - 10: Here we define a struct that will contain the allowed configurations. In our case, it will be the port number and the MySQL connection string.
Line 11: Here we define the AppConfig variable that will be accessed by other files and packages within the application code.
Line 12 - 25: Here is where we use Viper to load configurations from the config.json file ( which we will create in the next step) and assign its values to the AppConfig variable. The idea will be to call the LoadAppConfig function from the main program which in turn will be loading the data from the JSON file into the AppConfig variable. Pretty neat, yeah?
Line 15: Basically tells Viper that our configuration file is named config.
Line 16: Tells Viper that our config file is of JSON type. It’s interesting to know that Viper supports multiple file types to load configurations, like env, yml, and so on.
Next, let’s create a config.json in the root directory with the following properties. Make sure to replace the connection strings with working ones as per your development machine.
{ "connection_string": "root:root@tcp(127.0.0.1:3306)/crud_demo", "port": 8080}Defining the Product Entity
Let’s create Models! Make a new folder and name it entities. Here, create a new file and name it product.go
This is where we would be defining the properties for the Product struct.
package entitiestype Product struct { ID uint `json:"id"` Name string `json:"name"` Price float64 `json:"price"` Description string `json:"description"`}Connecting to the database
Next, let’s set up the code to connect to our MySQL database. Make sure you have a valid MySQL connection ready to go!
Create a new folder named database and create a file named client.go under it.
Here is the required code. Make sure to name the package ’ database ’.
package database
import (  "golang-crud-rest-api/entities"  "log"
  "gorm.io/driver/mysql"  "gorm.io/gorm")
var Instance *gorm.DBvar err error
func Connect(connectionString string) {  Instance, err = gorm.Open(mysql.Open(connectionString), &gorm.Config{})  if err != nil {    log.Fatal(err)    panic("Cannot connect to DB")  }  log.Println("Connected to Database...")}
func Migrate(){  Instance.AutoMigrate(&entities.Product{})  log.Println("Database Migration Completed...")}
Line 11 & 12: Defines an instance of the database and an error variable that will be used within other functions.
Line 14 - 21: This function basically attempts to connect to the database via GORM helpers using the connection string provided in our config.json. Once connected, the variable Instance will be able to access the database to perform operations.
Line 23 - 26: It’s kinda important to make sure that the Entities in concern exist as tables in the connected database. This particular method ensures that a table named products is created on the connected database.
Note that these functions (Connect & Migrate) will be called in the main.go file later on in the tutorial while the app gets initialized!
Routing
As mentioned earlier, the MUX package handles the HTTP routing for this particular project. This means that any kind of HTTP request sent to the Golang API Server will be routed to the appropriate method handlers.
Open up the main.go file and add the following function. This basically takes care of all routing concerns related to Products.
func RegisterProductRoutes(router *mux.Router) { router.HandleFunc("/api/products", controllers.GetProducts).Methods("GET") router.HandleFunc("/api/products/{id}", controllers.GetProductById).Methods("GET") router.HandleFunc("/api/products", controllers.CreateProduct).Methods("POST") router.HandleFunc("/api/products/{id}", controllers.UpdateProduct).Methods("PUT") router.HandleFunc("/api/products/{id}", controllers.DeleteProduct).Methods("DELETE")}Note that you will be seeing a couple of errors because we haven’t yet created our controllers. Not to worry, we will be doing it in the next step.
But before that, let’s wire up our Configuration and Database initializers to the main.go file. Open up the main file and make sure you have something similar to the below snippet.
func main() {  // Load Configurations from config.json using Viper  LoadAppConfig()
  // Initialize Database  database.Connect(AppConfig.ConnectionString)  database.Migrate()
  // Initialize the router  router := mux.NewRouter().StrictSlash(true)
  // Register Routes  RegisterProductRoutes(router)
  // Start the server  log.Println(fmt.Sprintf("Starting Server on port %s", AppConfig.Port))  log.Fatal(http.ListenAndServe(fmt.Sprintf(":%v", AppConfig.Port), router))}
Line 3: Loads the configuration using the LoadAppConfig function that is placed in the config.go file.
Line 6 & 7: Using the database package and the connection string from the JSON file, the application attempts to connect to the MySQL Database and migrates the required table.
Line 10: Creates a new instance of the MUX Router.
Line 13: Registers the Product Route Handlers into the MUX router.
Line 17: Starts up the REST API Server on the port defined in the config.json file.
Implementing CRUD in Golang Rest API
Now with all the setup done, let’s get to the core of this article - Implementing CRUD in Golang Rest API!
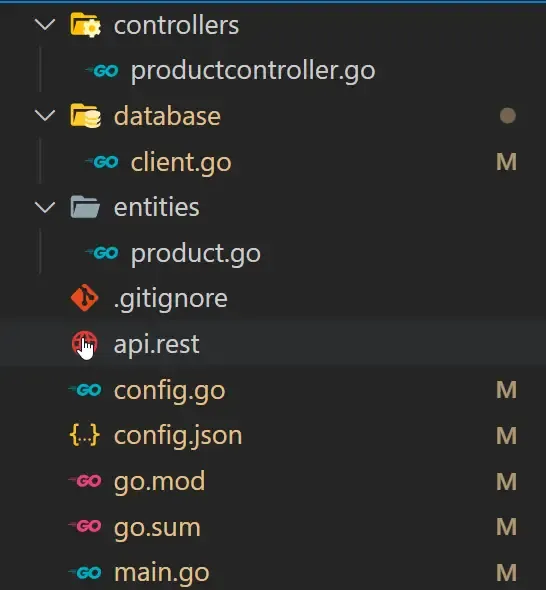
Firstly, let’s create the controllers that we mentioned in the previous step. At the root of the project directory, create a folder named controllers and add in a new file named productcontroller.go.
At this point in time, your project folder structure would be somewhat similar to the below screenshot.

Looks kinda neatly organized, yeah?
Remember that the productcontroller file would belong to the package named controllers.
package controllersNote that all of the below methods of each of the CRUD operations would be going into the productcontroller file.
Create
Firstly, let’s work on creating a new product.
Oh, just a tip here for the VS Code users. Type in hand and the IDE would automatically generate you some code to save time writing handlers. Pretty handy!
https://giphy.com/gifs/vscode-golang-Fzx1rHHEh7J0atBcQI
func CreateProduct(w http.ResponseWriter, r *http.Request) { w.Header().Set("Content-Type", "application/json") var product entities.Product json.NewDecoder(r.Body).Decode(&product) database.Instance.Create(&product) json.NewEncoder(w).Encode(product)}Line 3: Defines a new product variable.
Line 4: Decodes the Body of the Incoming JSON request and maps it to the newly created product variable.
Line 5: Using GORM, we try to create a new product by passing in the parsed product. This would ideally create a new record in the products table for us.
Line 6: Returns the newly created product data back to the client.
Get By ID
Next, Getting Product details by Product Id. For this firstly we will need to have a function that checks if the product ID we are requesting actually exists in our database.
func checkIfProductExists(productId string) bool { var product entities.Product database.Instance.First(&product, productId) if product.ID == 0 { return false } return true}The above function takes in the productId and queries against the database if the ID is found in the table. If there are no records found for the ID, GORM would return the ID as 0 for which the entire function, in turn, would return false. If the Product Id is found in the table, a true flag will be returned. Note that we will be using this function in a couple of other CRUD operations as well like the Delete and the Update Operations.
func GetProductById(w http.ResponseWriter, r *http.Request) { productId := mux.Vars(r)["id"] if checkIfProductExists(productId) == false { json.NewEncoder(w).Encode("Product Not Found!") return } var product entities.Product database.Instance.First(&product, productId) w.Header().Set("Content-Type", "application/json") json.NewEncoder(w).Encode(product)}Line 2: Gets the Product Id from the Query string of the request. To be clear, the client would have to send a GET request to the **host/api/products/{id}** to get the details of a particular product. This means that the product id will be passed as a part of the Request URL. MUX makes it simple for us to extract this passed product id from the request URL.
Line 3-6: Calls the checkIfProductExists passing the extracted product Id. If the id is not found in the product table, a message saying “Product Not Found!” will be sent back to the client.
Line 7: Creates a new product variable.
Line 8: With the help of GORM, the product table is queried with the product Id. This would fill in the product details to the newly created product variable.
Finally, we encode the product variable and send it back to the client.
Get All
Next, let’s get a list of all the products available in the table.
func GetProducts(w http.ResponseWriter, r *http.Request) { var products []entities.Product database.Instance.Find(&products) w.Header().Set("Content-Type", "application/json") w.WriteHeader(http.StatusOK) json.NewEncoder(w).Encode(products)}Line 2: Here we define an empty new list of products.
Line 3: Maps all the available products into the product list variable.
Finally, it simply encodes the products variable and returns it back to the client. Another thing to note here is that we are also writing an HTTP Status code of 200 OK to the Header of the response. You may also use this for other handlers if you like.
Update
Similarly, let’s also code up the Update function.
func UpdateProduct(w http.ResponseWriter, r *http.Request) { productId := mux.Vars(r)["id"] if checkIfProductExists(productId) == false { json.NewEncoder(w).Encode("Product Not Found!") return } var product entities.Product database.Instance.First(&product, productId) json.NewDecoder(r.Body).Decode(&product) database.Instance.Save(&product) w.Header().Set("Content-Type", "application/json") json.NewEncoder(w).Encode(product)}Line 2-6: Here too, MUX extracts the id from the URL and assigns the value to the id variable. Then the code checks if the passed product Id actually exists in the product table.
Line 7-9: If found, GORM queries the product record to the product variable. The JSON decoder then converts the request body to a product variable, which is then saved to the database table.
Delete
Finally, let’s write an endpoint that allows us to delete products by passing in the product id.
func DeleteProduct(w http.ResponseWriter, r *http.Request) { w.Header().Set("Content-Type", "application/json") productId := mux.Vars(r)["id"] if checkIfProductExists(productId) == false { w.WriteHeader(http.StatusNotFound) json.NewEncoder(w).Encode("Product Not Found!") return } var product entities.Product database.Instance.Delete(&product, productId) json.NewEncoder(w).Encode("Product Deleted Successfully!")}Line 2-9: Extracts the id to be deleted from the request URL. Checks if the ID is actually available in the product table. Then we create a new product variable.
Line 10: GORM deletes the product by ID.
Finally, a message of “Product Deleted Successfully!” is sent back to the client!
That’s almost everything we have to do.
Testing CRUD Operations
Now that we have implemented CRUD in Golang REST API, let’s test it out.
Usually, we would be using POSTMAN on some external REST client to test APIs. But, here is another great advantage to using VSCode as the Development IDE. You could test APIs without even leaving VS Code, as well as save the collections files within the repository of the project ;)
You would have to install REST Client extension on to VS Code and that’s it. Create a new file and name it api.rest or really anything you want, but be sure to add in the extension of the file as .rest.
Here is a sample code that I wrote to test each of the CRUD endpoints that we created.
@host = localhost:8080
// Create ProductPOST http://{{host}}/api/products HTTP/1.1content-type: application/json
{    "name": "test-product",    "description": "random-description",    "price": 100.00}
###
// Get Product By IDGET http://{{host}}/api/products/23 HTTP/1.1content-type: application/json
###
// Get All ProductsGET http://{{host}}/api/products/ HTTP/1.1content-type: application/json
###
// Update ProductPUT http://{{host}}/api/products/23 HTTP/1.1content-type: application/json
{    "name": "updated-product",    "description": "random-description-updated",    "price": 100.00}
###
// Delete ProductDELETE http://{{host}}/api/products/23 HTTP/1.1content-type: application/json
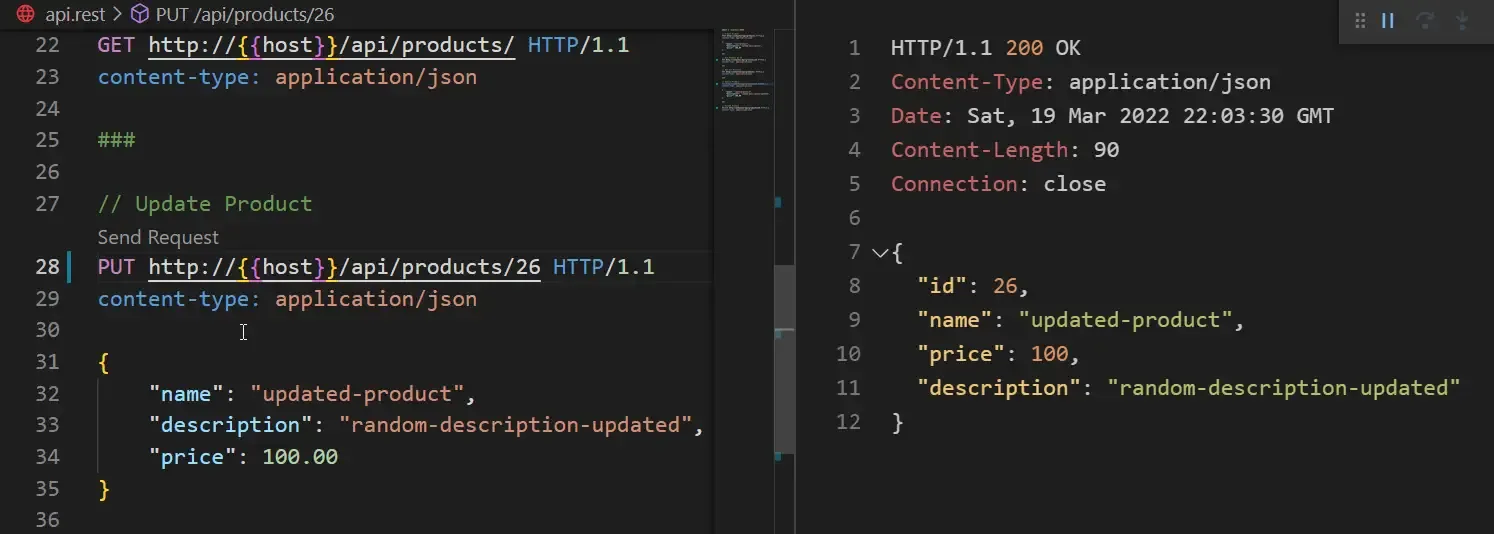
Note that the request is on the left side and the response from the Golang CRUD REST API is on the right side of the following screenshots. Make sure the API is up and running. You go this by navigating to the root directory of the application where the main.go file is present and run the following go command.
go build .go run .If everything went well, this would fire up your API server of the port that you had defined the config.json file earlier.
Scenario #1 - Creating a new Product

Scenario #2 - Getting a product by Id (which actually doesn’t exist on the database.) Quick Note - Notice that even if the product is not found, the API returns a 200 OK Status code. This kinda violates the RESTFUL Conventions. It should ideally return a 404 NOT FOUND status code. Nothing too serious, but you could probably take up this is a small exercise and fix this up? ;)

Scenario #3 - Getting a product by Id but this time, the ID is available in the database.

Scenario #4 - Getting all available products from the database.

Scenario #5 - Deleting a product

Scenario #6 - Updating a product

That’s a wrap for implementing CRUD in Golang REST API!
Summary
So, with this article, we learned about Implementing CRUD in Golang REST API in a quite comprehensive manner. We also learned a thing or two about neatly organizing Golang Rest API Projects to ensure that the project is both readable and scalable if required. Other than that, we had hands-on experience working with Mux routing and GORM Database Access using the MySQL Driver.
Do share this article with your colleagues and dev circles if you found this interesting. You can find the source code of this mentioned implementation here. Thanks!


