In this article, we will learn about implementing JWT Authentication in Golang REST APIs and securing it with Authentication Middleware. We will be building a simple, yet neatly organized Golang REST API with packages like Gin for Routing (mostly), GORM for persisting user data to a MySQL Database, and so on. We will also be building a Middleware that can secure Endpoints and allow requests that have a valid JWT in the Request’s Authorization Header.
In a previous article, we learned about implementing CRUD in Golang REST API with Mux & GORM. It is a good reference to get started with APIs in Golang. Read here.
You can find the complete source code of the JWT Authentication in Golang Implementation here.
JWT Explained
So, before getting started with the implementation, what exactly is a JWT or a JSON Web Token?
You can skip this section if you are already aware of what a JWT is and what it does.
These tokens are used by RESTful APIs for Authentication and Information Exchange where there is no need to manage the state of the application.
According to jwt.io,
JSON Web Tokens are an open, industry-standard RFC 7519 method for representing claims securely between two parties.
JWT is a really good contender for securing REST APIs. Let’s see the structure of an actual JWT in action. Head over to jwt.io where there is a sample JWT for our understanding.
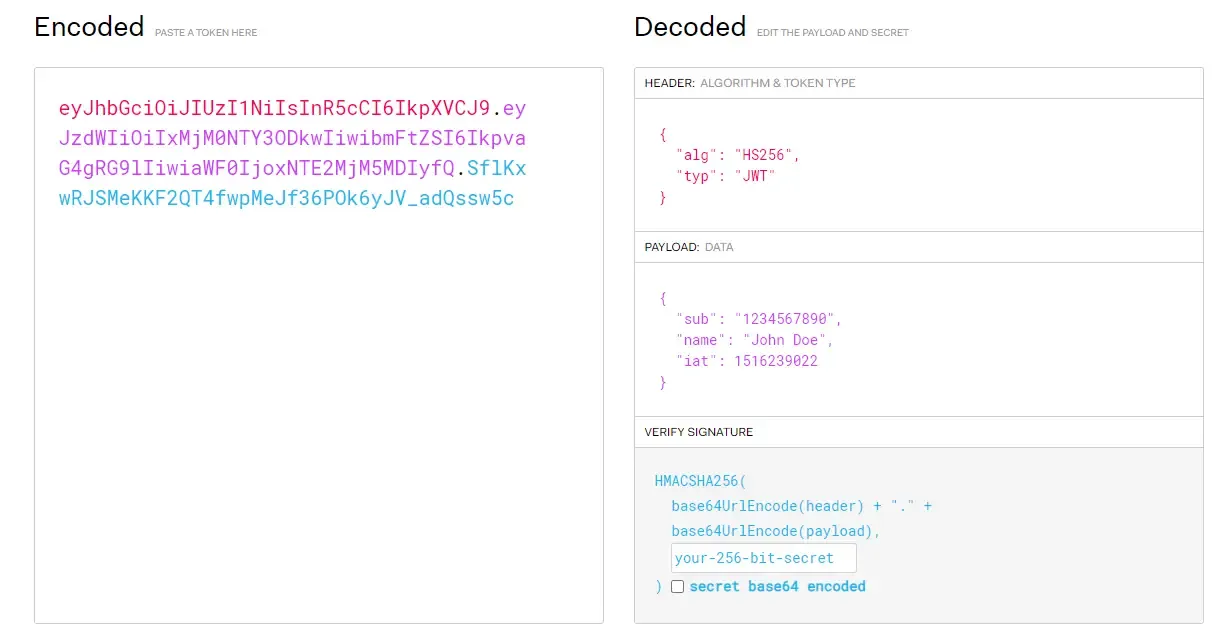
You can see that these tokens are separated into 3 parts with a period.
- Header
- Payload
- Signature
The header contains the signing algorithm used such as RSA or HMAC SHA256. The payload contains the data to be exchanged. It’s usually claims sent by the server like username, email, and stuff. Note that sensitive data such as passwords should be never sent in through a JSON Web Token. The third part of the token, which is the Signature, is used to verify that the JWT has not been tampered with.
Getting Started with JWT Authentication in Golang
Let’s get started with implementing JWT Authentication in Golang REST API. Visual Code will be the IDE of choice for the article (and probably every other Golang Article that I will be posting in the future), because of its ease of use and productivity. Make sure you have the latest stable SDK of Golang. The latest available version while writing this article is Go 1.18.1.
Also, ensure that you have installed the Golang Extension on VS Code which helps a ton in improving the Golang development experience. Another really cool reason to use VSCode for API development is the ability to send requests to the API right from the VS Code interface using the REST API conventions. Helps save a lot of time, rather than switching over to postman or other REST Clients.
Open up a new folder in VS Code and enter the following to initialize the Golang Project Dependencies.
go mod init jwt-authentication-golangHere, create a main.go file with the following boilerplate code.
package mainfunc main() {}What we will Build?
Let me give a brief overview of what we will be building. So, it is going to be a REST API with the following controllers.
- Token Controller - This will have one endpoint that will be used to generate the JWTs. Here, the user has to send in a list of valid email/passwords.
- User Controller - There will be a “register user” endpoint that can be used to create new users.
- Secured Controller - A dummy controller that will be secured by JWT Authentication. This is just to showcase the ability of the middleware that we will build to restrict access to only the requests that have an actual valid JWT in the request header.
We will also add some helpers for JWT that will assist us in Generating the tokens with proper expiration times and claims, and a way to Validate the sent tokens. This will be used by our custom Middleware to restrict access. Also, as mentioned earlier, in the registration process, we will be storing the user data in a MySQL database using the GORM Abstraction. Here, we will be using a bunch of helpers to encrypt/hash the user passwords. We don’t want to store the actual password directly into the database, yeah?
Gin - Quick Introduction
I came across Gin, which is a web development framework for Golang APIs. They advertise themselves to be 40 times faster than the normal HTTP routers. They are kinda popular too, with over 55,000 stars on Github. I liked their tooling and how much better the development experience gets. Gin is a framework that reduces boilerplate code that would normally go into building these applications. Run the following to install gin on your machine and use it for golang projects.
go get -u github.com/gin-gonic/ginFor this article, we will be using the Gin Routers and Middleware Implementation. In future articles, we will explore more of the Gin Framework.
Setting up the Database & Migrations
First up, let’s create a folder named models and a new file for the user model. Let’s name it user.go
type User struct { gorm.Model Name string `json:"name"` Username string `json:"username" gorm:"unique"` Email string `json:"email" gorm:"unique"` Password string `json:"password"`}As you can see, our User Model will have a Name, Username, Email, and password. Here, the Username and Email will be unique. This means, that once we complete our application and try to register new users with the same username or email, the code won’t allow you to do it. The best part is that you don’t have to write any code specifically for this. Everything is handled by GORM.
The gorm.Model specification adds some default properties to the Model, like id, created date, modified date, and deleted date.
Note that, later in the article, we will be adding a couple of helpers to this go file to assist us in password hashing and validation using an encryption package of golang.
Next, let us set up the client that helps us to connect to the MySQL Database. I assume that you already have a MySQL Instance running on your local machine at port 3306, which is the default MySQL port.
Let’s install the required Golang packages. Run the following commands.
go get gorm.io/gormgo get gorm.io/driver/mysqlThis will install the GORM packages and the MySQL database driver, which will essentially help you perform operations on a MySQL database instance easily without writing much boilerplate code. Things are pretty straightforward and simple with Golang!
To the root directory of the Golang Project, add another folder named database and create a new file named client.go
package databaseimport ( "jwt-authentication-golang/models" "log" "gorm.io/driver/mysql" "gorm.io/gorm")var Instance *gorm.DBvar dbError errorfunc Connect(connectionString string) () { Instance, dbError = gorm.Open(mysql.Open(connectionString), &gorm.Config{}) if dbError != nil { log.Fatal(dbError) panic("Cannot connect to DB") } log.Println("Connected to Database!")}func Migrate() { Instance.AutoMigrate(&models.User{}) log.Println("Database Migration Completed!")}Line 8: Here, we are defining an instance of the database. This variable will be used across the entire application to communicate with the database.
Line 10-17: The Connect() function takes in the MySQL connection string (which we are going to pass from the main method shortly) and tries to connect to the database using GORM.
Line 18-21: Once connected to the database using the previous Connect() function, we will call this Migrate() function to ensure that in our database, there is a users table. If not present, GORM will automatically create a new table named “users” for us.
Make sure to install the golang packages by running the go get commands.
Navigate to the main.go file and modify the main() function as shown below.
func main() { // Initialize Database database.Connect("root:root@tcp(localhost:3306)/jwt_demo?parseTime=true") database.Migrate()}As discussed earlier, we will first connect to the database using the provided connection string. Once that is done, we will apply the migrations.
Hardcoding the connection string within the code is obviously not a good way to about it. For keeping the article short, I have done so. To know about storing the connection string and other variables into a JSON file, Read my previous article where I have used Viper to load configurations from a JSON file at runtime.
Another mysterious thing to me is that the connection string to the MySQL database gave me issues when I used just ‘root:root@tcp(localhost:3306)/jwt_demo’. This was the error I was getting.
2022/04/24 18:39:06 D:/repos/golang/jwt-authentication-golang/controllers/tokencontroller.go:27 sql: Scan error on column index 1, name "created_at": unsupported Scan, storing driver.Value type []uint8 into type *time.TimeAfter a quick research, I found that it is mandatory to include the parseTime parameter within the connection string to make things work. Here is the connection string that worked for me.
root:root@tcp(localhost:3306)/jwt_demo?parseTime=trueMake sure that you have the mentioned database already created on your server. In my case, I had to create a database/schema named jwt_demo before running the application. Else, GORM would complain saying that such a database could not be found on the server.
Let’s run the application using the following command.
go run .The expectation is that the application would create a new table named users on your database.
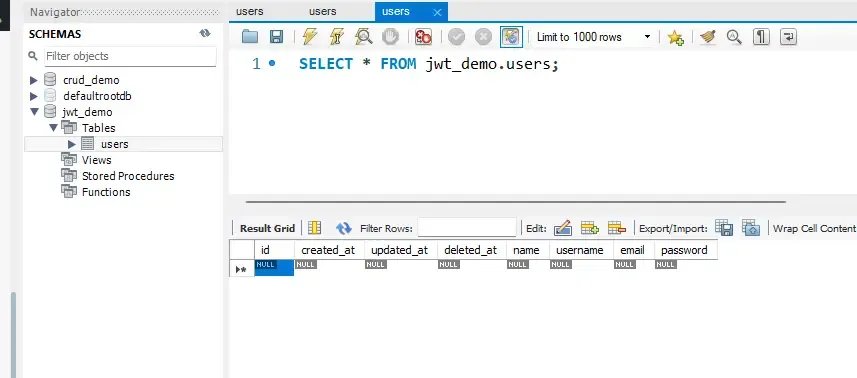
There you go, that’s done. Let’s continue with the controllers now.
User Controller - Registering a New User
Firstly, let’s write a controller and endpoint that is responsible to create new users and do some basic validation checks.
But before that, as mentioned earlier, let’s add some helper methods that can Hash and Compare Passwords. Open up the models/user.go file and add these two methods there. Note that these methods have receivers of type *User.
func (user *User) HashPassword(password string) error { bytes, err := bcrypt.GenerateFromPassword([]byte(password), 14) if err != nil { return err } user.Password = string(bytes) return nil}func (user *User) CheckPassword(providedPassword string) error { err := bcrypt.CompareHashAndPassword([]byte(user.Password), []byte(providedPassword)) if err != nil { return err } return nil}You will need to run the following command on your terminal to install the bcrypt package that’s used to encrypt/decrypt passwords.
go get golang.org/x/crypto/bcryptNext, create a new folder named controllers at the root of the project and add a new file under it named usercontroller.go
package controllersimport ( "jwt-authentication-golang/database" "jwt-authentication-golang/models" "net/http" "github.com/gin-gonic/gin")func RegisterUser(context *gin.Context) { var user models.User if err := context.ShouldBindJSON(&user); err != nil { context.JSON(http.StatusBadRequest, gin.H{"error": err.Error()}) context.Abort() return } if err := user.HashPassword(user.Password); err != nil { context.JSON(http.StatusInternalServerError, gin.H{"error": err.Error()}) context.Abort() return } record := database.Instance.Create(&user) if record.Error != nil { context.JSON(http.StatusInternalServerError, gin.H{"error": record.Error.Error()}) context.Abort() return } context.JSON(http.StatusCreated, gin.H{"userId": user.ID, "email": user.Email, "username": user.Username})}Line 9: Here we declare a local variable of type models.User.
Line 10-14: Whatever is sent by the client as a JSON body will be mapped into the user variable. It’s quite simple with gin.
Line 15-19: Here, we hash the password using the bcrypt helpers that we added earlier to the models/user.go file.
Line 20: Once hashed, we store the user data into the database using the GORM global instance that we initialized earlier in the main file.
Line 21-25: If there is an error while saving the data, the application would throw an HTTP Internal Server Error Code 500 and abort the request.
Line 26: Finally, if everything goes well, we send back the user id, name, and email to the client along with a 200 SUCCESS status code.
Token Controller - Generating JWTs in Golang
Since we are ready with the user creation endpoint, let’s add another endpoint that can generate JWTs for us. This is the core of the JWT Authentication in Golang REST API implementation.
First, let’s add some helpers for generating the actual JWT and validating it.
package authimport ( "errors" "time" "github.com/dgrijalva/jwt-go")var jwtKey = []byte("supersecretkey")type JWTClaim struct { Username string `json:"username"` Email string `json:"email"` jwt.StandardClaims}func GenerateJWT(email string, username string) (tokenString string, err error) { expirationTime := time.Now().Add(1 * time.Hour) claims:= &JWTClaim{ Email: email, Username: username, StandardClaims: jwt.StandardClaims{ ExpiresAt: expirationTime.Unix(), }, } token := jwt.NewWithClaims(jwt.SigningMethodHS256, claims) tokenString, err = token.SignedString(jwtKey) return}func ValidateToken(signedToken string) (err error) { token, err := jwt.ParseWithClaims( signedToken, &JWTClaim{}, func(token *jwt.Token) (interface{}, error) { return []byte(jwtKey), nil }, ) if err != nil { return } claims, ok := token.Claims.(*JWTClaim) if !ok { err = errors.New("couldn't parse claims") return } if claims.ExpiresAt < time.Now().Local().Unix() { err = errors.New("token expired") return } return}Line 7: Here, we are declaring a secret key that will be used later for generating JWTs. For now, the key is “supersecretkey”. You should be ideally storing this value outside the code. But for the sake of simplicity, let’s proceed as it is.
Line 8-12: We define a custom struct for JWT Claims which will ultimately become the payload of the JWT (if you remember the first section of this article).
Line 13-15: In the GenerateJWT() function, which takes in email and username as parameters, would return the generated JWT string. Here we set a default expiration time as 1 Hour, which can be (and should be) made configurable. From there on we create a new claim variable with the available data and expiration time. Finally, we generate the token using the HS256 Signing Algorithm by passing the previously created claims.
Line 26-47: Here, in the ValidateToken() function, we would take in the token string coming from the client’s HTTP request header and validate it. Further in this tutorial, we will be using this function in our Authentication middleware to verify if the incoming client request is authenticated. Clear, yeah? So, here we will try to parse the JWT into claims using the JWT package’s helper method “ParseWithClaims”. From the parsed token, we extract the claims at Line 37. Using these claims, we check at Line 42 if the token is actually expired or not. That’s it. Quite Simple if you understand the flow.
Now that our helpers are done, let’s get started with writing our Token controller.
Create another file named tokencontroller. go under the controllers folder.
package controllersimport ( "jwt-authentication-golang/auth" "jwt-authentication-golang/database" "jwt-authentication-golang/models" "net/http" "github.com/gin-gonic/gin")type TokenRequest struct { Email string `json:"email"` Password string `json:"password"`}func GenerateToken(context *gin.Context) { var request TokenRequest var user models.User if err := context.ShouldBindJSON(&request); err != nil { context.JSON(http.StatusBadRequest, gin.H{"error": err.Error()}) context.Abort() return } // check if email exists and password is correct record := database.Instance.Where("email = ?", request.Email).First(&user) if record.Error != nil { context.JSON(http.StatusInternalServerError, gin.H{"error": record.Error.Error()}) context.Abort() return } credentialError := user.CheckPassword(request.Password) if credentialError != nil { context.JSON(http.StatusUnauthorized, gin.H{"error": "invalid credentials"}) context.Abort() return } tokenString, err:= auth.GenerateJWT(user.Email, user.Username) if err != nil { context.JSON(http.StatusInternalServerError, gin.H{"error": err.Error()}) context.Abort() return } context.JSON(http.StatusOK, gin.H{"token": tokenString})}Line 9-12: Here we define a simple struct that will essentially be what the endpoint would expect as the request body. This would contain the user’s email id and password.
Line 13-41: In the GenerateToken() function, we Bind the incoming request to the TokenRequest struct. At Line 22, we communicate with the database via GORM to check if the email id passed by the request actually exists in the database. If so, it will fetch the first record that matches. Else, an appropriate error message will be thrown out by the code. Next, on line 28, we check if the entered password matches the one in the database. For this, we will be using the CheckPassword() method that we created earlier in the jwt.go file, remember?
If everything goes well, and the password is matched, we proceed to Line 34, where we Generate the JWT using the GenerateJWT() function. This would return a signed token string with an expiry of 1 hour, which in turn will be sent back to the client as a response with a 200 Status Code.
Secured Controller - Top Secret Pongs
Now that we have our token and user controllers set up. Let’s write an endpoint that will hold some super-secret information, which will be a “pong”, obviously.
Create a new controller file under the controllers folder, and name it securecontroller.go
package controllersimport ( "net/http" "github.com/gin-gonic/gin")func Ping(context *gin.Context) { context.JSON(http.StatusOK, gin.H{"message": "pong"})}Too simple, yeah? The idea is that we would secure this endpoint so that only the requests having a valid JWT at the Request header will be able to access this. And yeah, it just returns a pong message with a 200 status code.
So, how do we check if the incoming request contains a valid token? Remember, we wrote a helper method earlier to combat this particular use case. One option is to go around and use this method in each and every endpoint that we need to secure. But, if there are 10s of 100s of endpoints in your application, this would not be feasible, yeah? That’s exactly why need to place this validation check somewhere globally and make it usable by all the endpoints we need to secure.
Middleware is the answer to this. So, what a Middleware does is, it attaches to the HTTP pipeline of the application. So, once a client sends a request, the first block it hits will be the middleware, only after this, the request will be hitting the actual endpoint. That’s a suitable place to position our Token Validation check, right? Let’s see how it’s done.
Authentication Middleware - Validating the Token
Create a new folder under the root of the project and name it middlewares. For this article, we will need only one middleware - that is to check the validity of the incoming token from the client request. Let’s create a new file and name it auth.go
package middlewaresimport ( "jwt-authentication-golang/auth" "github.com/gin-gonic/gin")func Auth() gin.HandlerFunc{ return func(context *gin.Context) { tokenString := context.GetHeader("Authorization") if tokenString == "" { context.JSON(401, gin.H{"error": "request does not contain an access token"}) context.Abort() return } err:= auth.ValidateToken(tokenString) if err != nil { context.JSON(401, gin.H{"error": err.Error()}) context.Abort() return } context.Next() }}Line 8: Extracts the Authorization header from the HTTP context. Ideally, we expect the token to be sent as a header by the client. If there are no tokens found at the header, the application throws a 401 error with the appropriate error message.
Line 14: Here, we validate the token using the earlier created helper function. If the token is found to be invalid or expired, the application would throw a 401 Unauthorized exception. If the token is valid, the middleware allows the flow and the request reaches the required controller’s endpoint. As simple as that.
Setting Up the Routes
Now that we have created the endpoints and middleware, how do we connect everything together? That’s where routing comes in handy, especially the gin routing is super awesome at this.
Open up the main.go and make sure your code looks like the below snippet.
package mainimport ( "jwt-authentication-golang/controllers" "jwt-authentication-golang/database" "jwt-authentication-golang/middlewares" "github.com/gin-gonic/gin")func main() { // Initialize Database database.Connect("root:root@tcp(localhost:3306)/jwt_demo?parseTime=true") database.Migrate() // Initialize Router router := initRouter() router.Run(":8080")}func initRouter() *gin.Engine { router := gin.Default() api := router.Group("/api") { api.POST("/token", controllers.GenerateToken) api.POST("/user/register", controllers.RegisterUser) secured := api.Group("/secured").Use(middlewares.Auth()) { secured.GET("/ping", controllers.Ping) } } return router}Apart from the existing lines of code, we added an initRouter() method that returns a gin router variable.
Line 13: Calls the new initRouter() function.
Line 17: Creates a new Gin Router instance.
Line 18-26: Here is one feature that I enjoyed learning. Imagine we need a couple of routes as below.
- api/user/register
- api/token
- api/secured/ping
- api/secured/something-else
GIN makes it pretty easy to group up these things efficiently. In line 18, we grouped everything under /api. Then, in Line 20, we routed the api/token to the GenerateToken function that we wrote in the tokencontroller. Similarly, for the user registration endpoint too.
Now, we need to secure all the endpoints that will come under the api/secured/ routes. Here is where we tell GIN to use the middleware that we created. In Line 22, we use the Auth middleware that will be attached to this particular set of endpoints. Cool, yeah? Helps save a lot of lines of code.
Finally, at line 14, we run the API server at Port 8080.
Testing Golang API with VSCode REST Client
As mentioned earlier, the key benefit of using VS Code for Rapid API development is the ability the test the API endpoints right from the IDE. So, under the project root, I created a new folder named rest, where I have placed all the .rest files which contain sample API requests. We will be using this to test our JWT Authentication in Golang implementation.
Firstly, make sure that you have installed the REST Client extension on your VS Code.

Ensure that your database server is up and running. Start your Golang API Server by running the following command at the root directory of the project.
go run .You would see something like this on your terminal.

Register a new user
Create a new folder named rest and add in a new file named user.rest
@host = localhost:8080
// Register UserPOST http://{{host}}/api/user/register HTTP/1.1content-type: application/json
{    "name": "Mukesh Murugan",    "username": "mukesh.murugan",    "email": "[email protected]",    "password": "123465789"}
###
So, what we are doing is, sending a POST request to the api/user/register endpoint with a JSON body that defines the username, email, name, and password of the user we need to be registered into the application. If your REST client is properly installed on your VS Code, you would see a send request option above Line 4. Hit it!
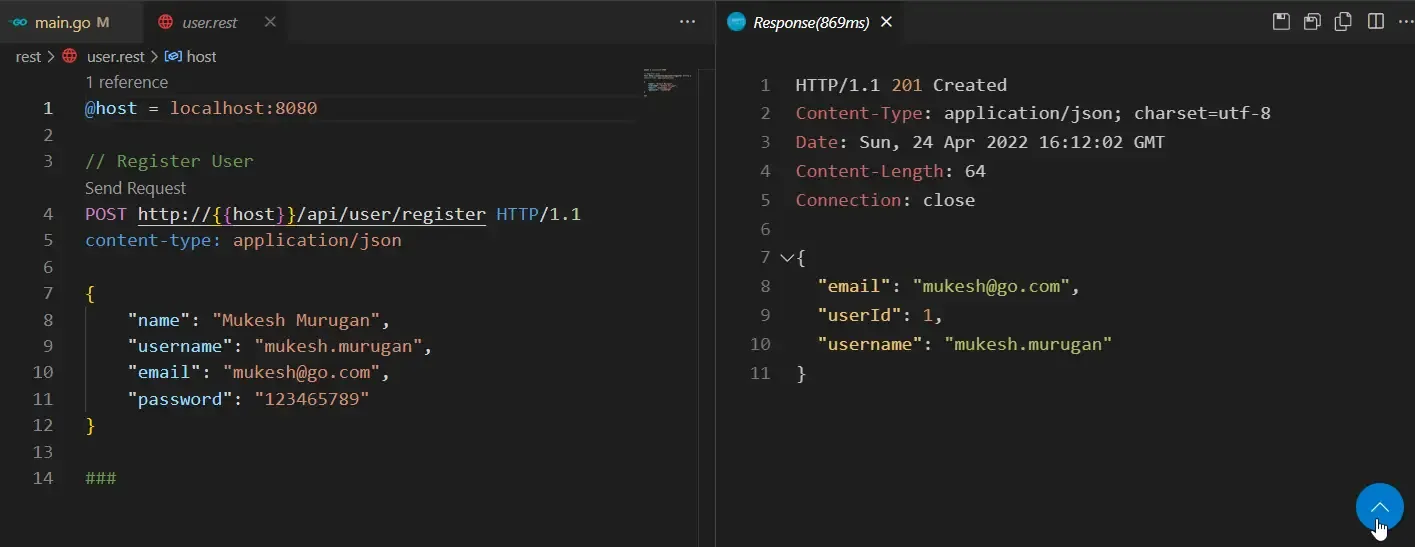
You can see that the API responds back with the user id, username, and email along with a 201 Status code. This means that our new user has been entered into the database successfully.
Also, you see a nice log on the terminal from GIN stating the request that we just sent.

Let’s log in to our MySQL Workbench to check if the user is added to the database.

There you go, everything is good.
Generate JSON Web Token
Now that we have registered the user, let’s use his credentials to generate some fresh JWTs.
Create a new file under the same rest folder and name it token.rest
@host = localhost:8080
// Generate JWTPOST http://{{host}}/api/token HTTP/1.1content-type: application/json
{    "email": "[email protected]",    "password": "123465789"}
###
Here we will be just passing the user credentials to the api/token endpoint. This is what a client will be doing to generate authentication tokens.
Send the request. You can see that the API responds with an actual JWT token.

Let’s do one more thing for fun’s sake. Copy this token and head over to jwt.io
Paste the token into the Encoded textbox.
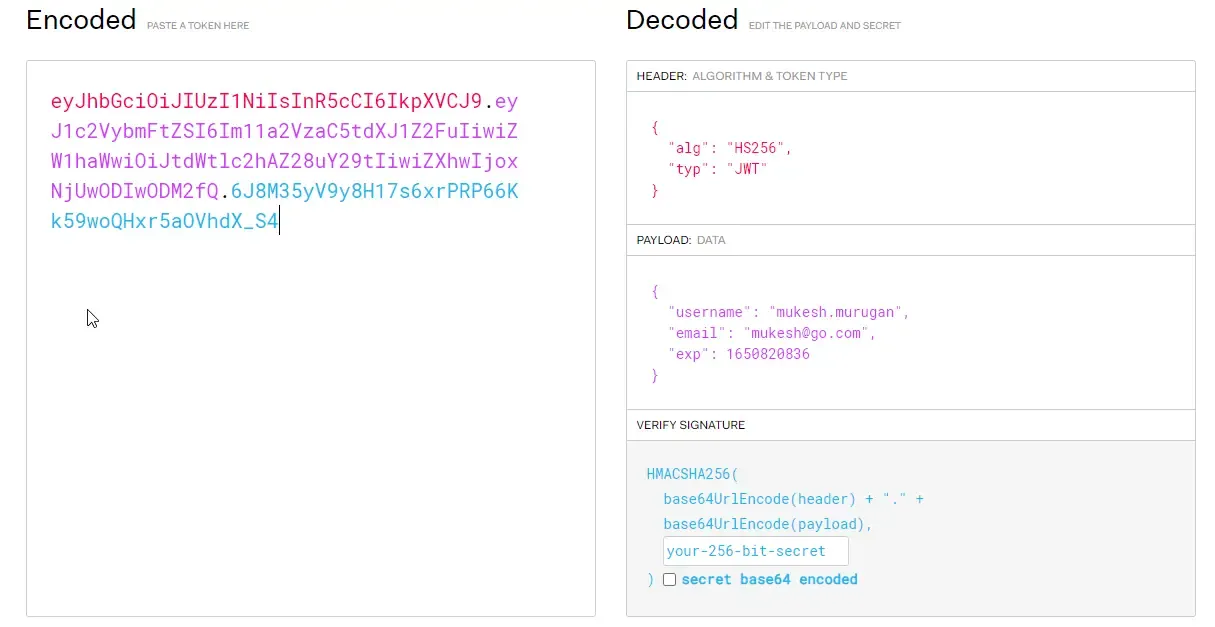
Here you can see that the Payload contains the username and email of our user. Super cool, yeah?
Keep this token aside. We will need it in our next test, where we will be sending a request to the api/secured/ping endpoint which happens to be secured. The middleware that we created will allow access only if the request has a valid JWT at the Authorization Header.
Secured Endpoint - Middleware Magic
Create a new file named secured.rest
@host = localhost:8080
// Access a Secured API EndpointGET http://{{host}}/api/secured/ping HTTP/1.1content-type: application/jsonauthorization: eyJhbGciOiJIUzI1NiIsInR5cCI6IkpXVCJ9.eyJ1c2VybmFtZSI6Im11a2VzaC5tdXJ1Z2FuIiwiZW1haWwiOiJtdWtlc2hAZ28uY29tIiwiZXhwIjoxNjUwNzQzMjA1fQ.7cAcWxvpqJ1DDZ-ZOM2kIKKedeCEWuUzl0Hj2VuMxYA
###
Here, in line 6, you can see that we have mentioned the authorization header and pasted some dummy JWT. So, we know that this JWT is not valid. Let’s test it.

There, the application says that this particular JWT is already expired, like 20 hours ago. Now, in our request, let’s replace the JWT with the one that we generated earlier. Remember, the JWT is valid for only 1 hour from the time of generation. Once you add in the new JWT to the request header, send the request.

Great, we get the ping response back from the secured endpoint.
That’s a wrap for this detailed article on JWT authentication in Golang REST API!
Summary
We learned in detail about implementing JWT Authentication in Golang Rest APIs with ease. Along the way, we covered various topics like JWT Basics, getting started with GIN Framework, GORM Setup and MySQL migrations, User Registration, Token Generation using the JWT-GO package, working with GIN Middlewares, hashing & decrypting passwords using the bcrypt package, working with Gin Routes and so on.
Do share this article with your colleagues and dev circles if you found this interesting. You can find the source code of this mentioned implementation here. Cheers!

