In a previous article, we learnt all about Microservice Architecture in ASP.NET Core (I recommend reading this before continuing), API Gateways, Ocelot Configuration and much more. In this article, let’s talk about another aspect - Microservice Communication using RabbitMQ with ASP.NET Core. Essentially, we will learn how to enable communication between Microservices using RabbitMQ and MassTransit. Let’s get started!
What is RabbitMQ?
RabbitMQ is one of the most popular Message-Broker Service. It supports various messaging protocols. It basically gives your applications a common platform for sending and receiving messages. This ensures that your messages (data) is never lost and is successfully received by each intended consumer. RabbitMQ makes the entire process seemless.
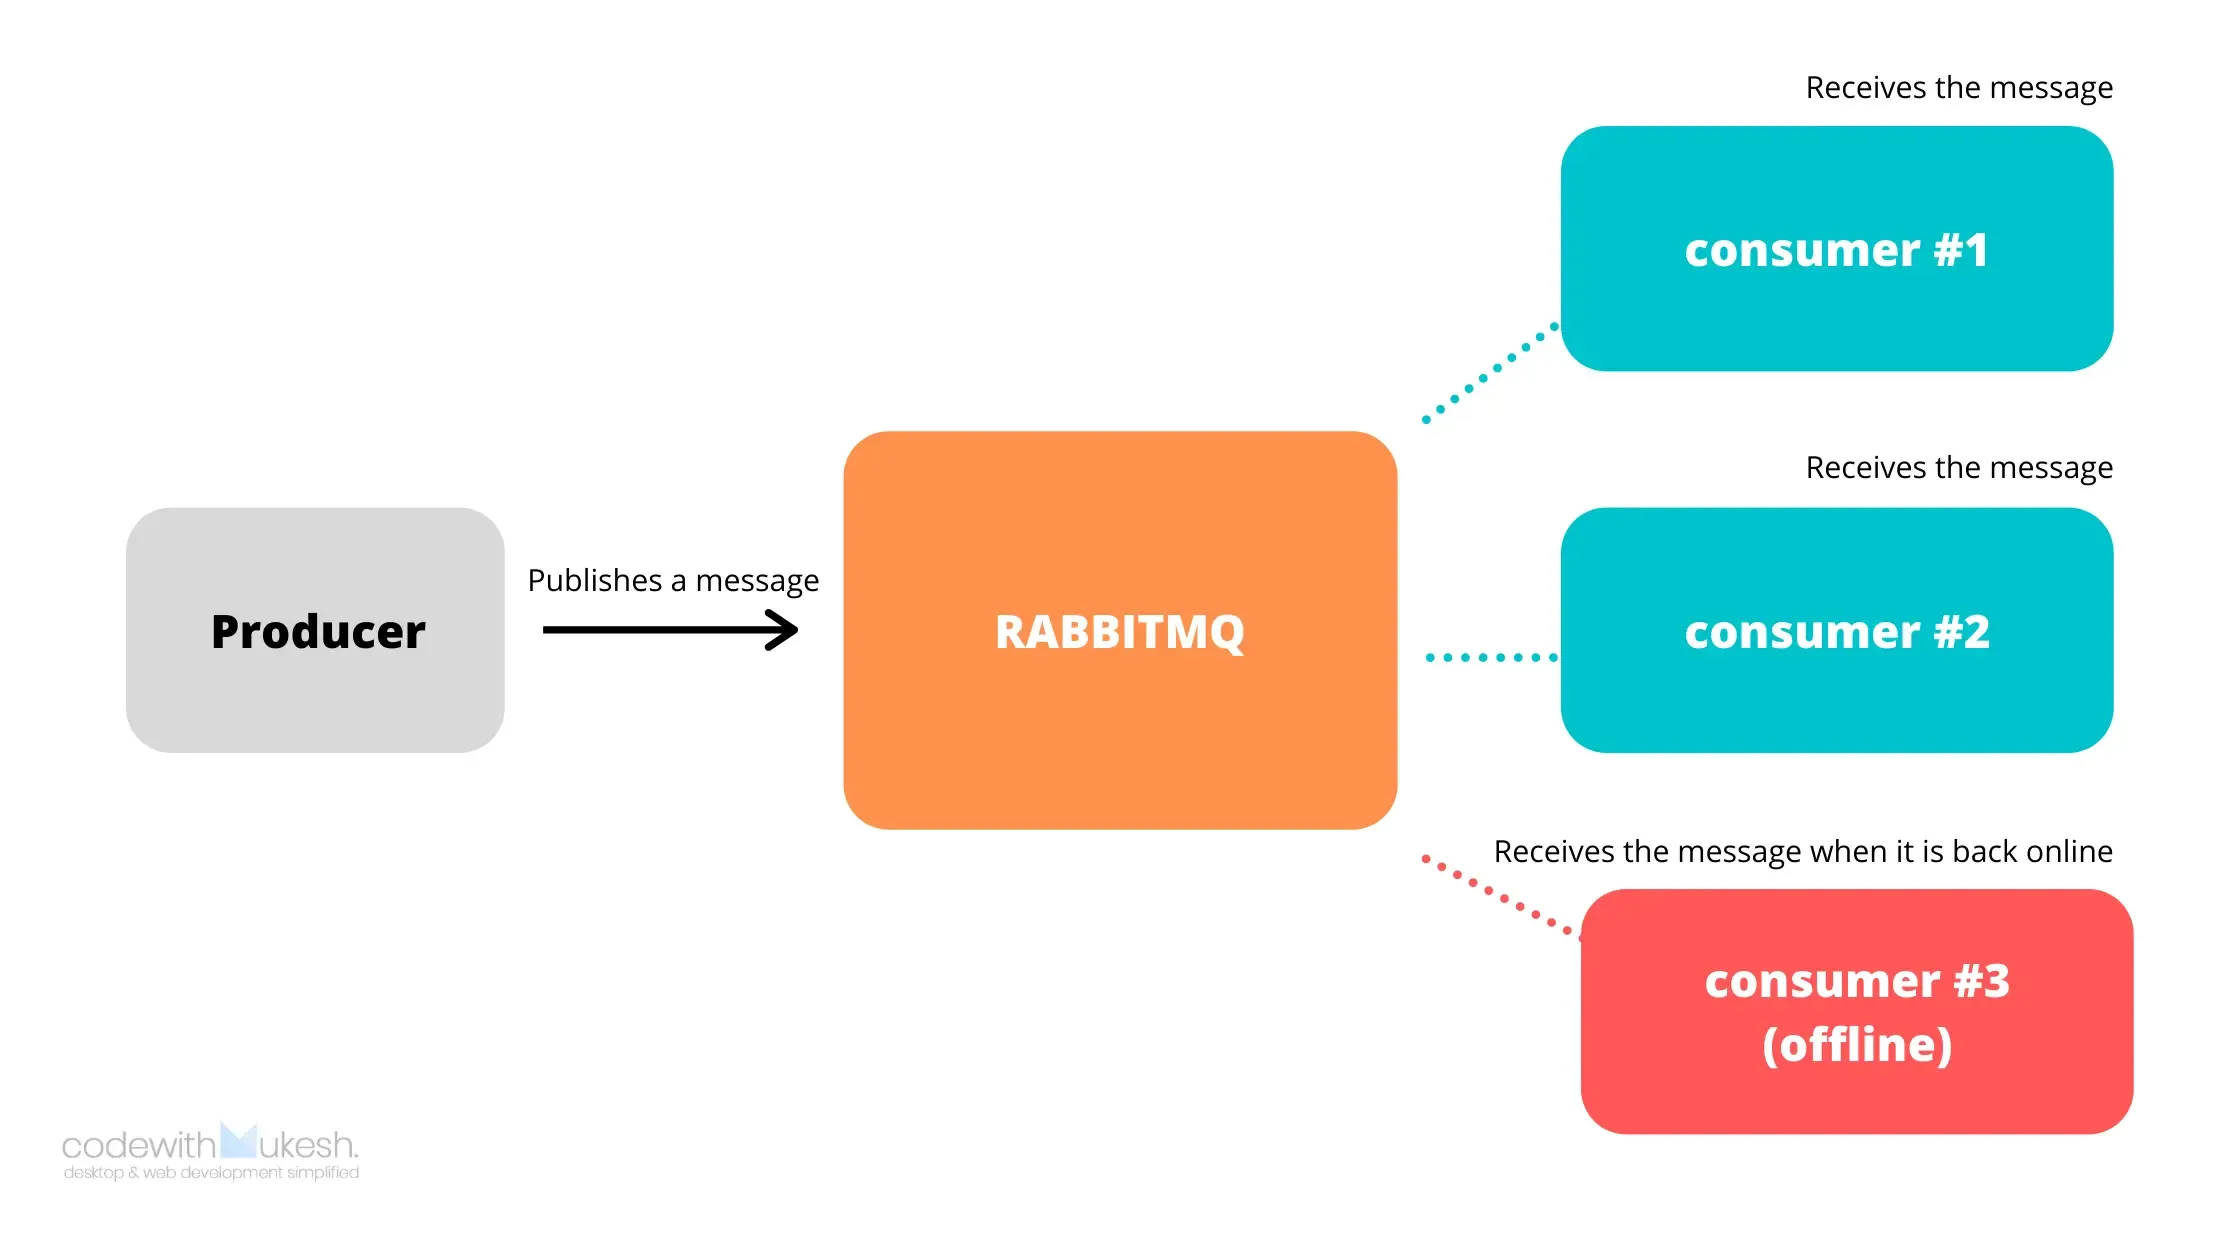
In simple words, you will have a publisher that publishes messages to the message broker (RabbitMQ Server). Now the server stores the message in a queue. To this particular queue , multiple consumers can subscribe. Whenever there is a new message, each of the subscibers would receive it. An application can act as both producer / consumer based on how you configure it and what the requirement demands.
A message could consist of any kind of information like a simple string to a complex nested class. RabbitMQ stores these data within the server till a consumer connects and take the message off the queue for processing.
Additional, RabbitMQ provides a cool Dashboard for monitoring the messages and queues. We will be setting up this too later in this article!
Advantages of RabbitMQ
There are quite a lot of advantages of using a queue based messaging solution rather that directly sending messages to the intendend consumer. Here are few of the advantages.
- Better Scalability - Now, you will not have to depend on just one VM / processor / server to process your request. When it get’s to the point where you first server finds it tough to process the incoming queue data, you can simply add another server that can share the load and improve the overall response time. This is quite easy with the queue concept in RabbitMQ.
- Clean User Experience - You users are less likely to see any errors, thanks to the microservice based message broker architecture.
- Higher availability - Even if the main Microservice is down to a technical glitch on on-going update, the messages are never lost. It gets stored to the RabbitMQ server. Once the Service comes online, it consumes the pending messages and processes it.
Here is a simple demonstration of work-flow in a basic RabbitMQ setup. Here consumer #3 is offline for a specific time. This does not in any way affect the integrity of the system. Even if all the consumers are offline, the messages are still in RabbitMQ waiting for the consumers to come online and take the message off their particular queues.
What we will build?
Let’s mimic a ticketing application where the user can book his/her ticket. We will have 2 Microservices with RabbitMQ connection for communication. The user buys a tickets via the front-end. Internally, this generates a POST request from the Ticket Microservice. The ticket details would be sent to a RabbitMQ Queue, which would later be consumed by the OrderProcessing Microservice. These details will finally be stored to a database and the user will be notified by email of the order state. We will keep it quite simple.
So, why RabbitMQ in this scenario? Can’t we Directly POST to the OrderProcessing Microservice?
No. This defeats the purpose of having a Microservice architecture. Since this is a client facing, business oriented application, we should ensure that the Order always get stored in the memory and doesnt fail / get lost at any point of time. Hence we push the order details to the Queue. **What happens if the OrderProcessing Microservice is offline? Absolutely nothing! The user would be notified something like “Tickets confirmed! Please wait for the confirmation mail”. When the OrderProcessing Microservice comes online, it takes the data from the RabbitMQ Server and processes it and notifies the user by email or SMS. That’s some great User Experience, right?
Setting up the Environment
We will be working with ASP.NET Core 3.1 WebAPI using Visual Studio 2019 IDE. Make sure you have them up and running with the latest SDK.
After that, we will need to setup the RabbitMQ server and dashboard.
Installing ErLang
Erlang is a programming language with which the RabbitMQ server is built on. Since we are installing the RabbitMQ Server locally to our Machine (Windows 10), make sure that you install Erlang first.
Download the Installer from here - https://www.erlang.org/downloads . At the time of writing , the latest available version of Erlang is 23.0.1 (105 Mb).
Install it in your machine with Admin Rights.
Installing RabbitMQ as a Service in Windows
We will be installing the RabbitMQ Server and a service within our Windows machine.
Download from here - https://www.rabbitmq.com/install-windows.html. I used the official installer. Make sure that you are an Admin.
Enabling RabbitMQ Management Plugin - Dashboard
Now that we have our RabbitMQ Service installed at the sysyem level, we need to activate the Management Dashboard which by default is disabled. To do this, open up Command Prompt with Admin Rights and enter the following command
cd C:\Program Files\RabbitMQ Server\rabbitmq_server-3.8.7\sbinrabbitmq-plugins enable rabbitmq_managementnet stop RabbitMQnet start RabbitMQLine #1 we make the instalation directory as our default working directory for cmd. Please note that your directory path may differ.
Line #2 - Here we enable the Management Plugin
Line #3-4 - We restart the RabbitMQ Service.
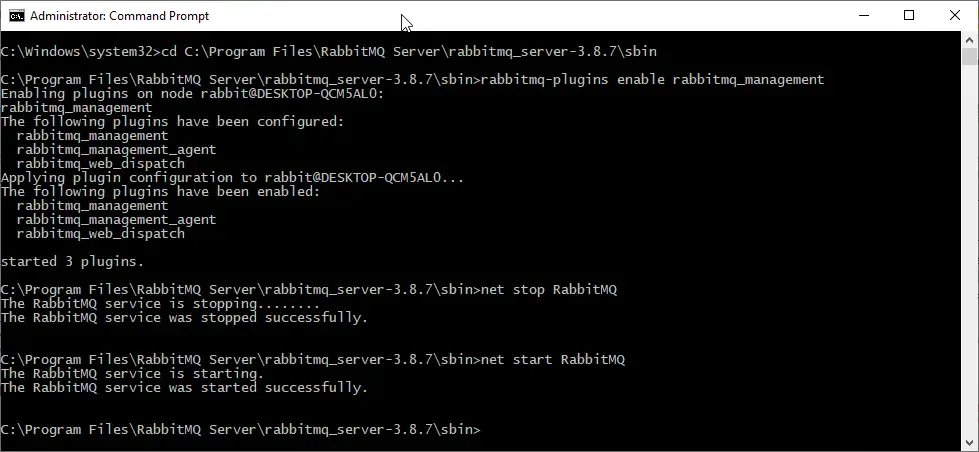
That’s it. Now Navigate to http://localhost:15672/. Here is where you can find the management dashboard of RabbitMQ running.

http://localhost:15672/ - This is the default port of RabbitMQ
The default credentials are guest/guest . Use this to login to your dashboard.
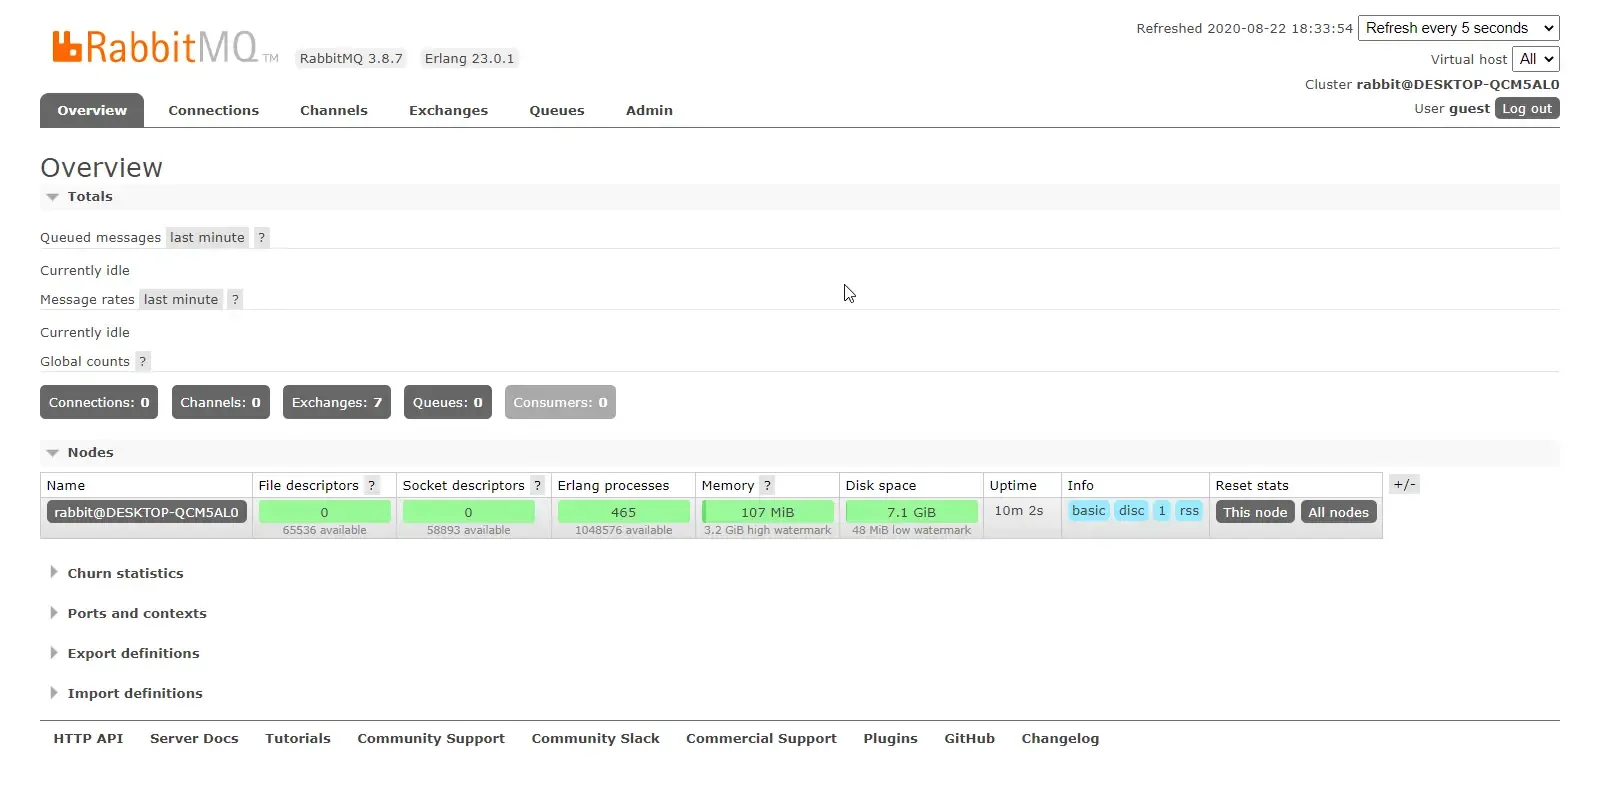
You can see that our RabbitMQ Server is up and running. We will go through the required tabs when we start setting up the entire application. However, you can manage users via the Admin Tab.
Getting Started - RabbitMQ with ASP.NET Core
Now that our server is configured, let’s build the actual microservices that can interact with each other via RabbitMQ. Before proceeding, I highly recommend you to go through Microservice Architecture in ASP.NET Core with API Gateway to get a basic idea on how Microservice Architecture works. We also discussed about API gateways with Ocelot Configurations.
So, i created a new Blank solution ‘Microservices.Ticketing.WebApi’. Here we will be adding 2 Microservices
- Ticketing Microservice.
- Order Processing Microservice.
Since this is going to be a more RabbitMQ centric implementation, I will skip the Database Access and Email Notifications for the user. We will concentrate of sending and receiving the ticket order information only.
Shared Model Library
Create a new .NET Core Library Project and Name is ‘Shared.Models’. Here we will define the shared models, which in our case is a simle Ticket Model.
IMPORTANT - Note that it is necessary to have a shared Model class that is used by both the Publisher / Consumer. This is so because RabbitMQ treats messages based on it’s namespaces. if the received message and outgoing message are of different namespace (signatures), RabbitMQ would not recognize the Consumer.
Here is a simple Ticket class . I created this model at Models/Ticket.cs in the Shared.Models Project.
public class Ticket{ public string UserName { get; set; } public DateTime BookedOn { get; set; } public string Boarding { get; set; } public string Destination { get; set; }}Setting up the the Publisher Microservice
Note that in our requirement, the first microservice is essentialy the publisher that sends a ticket model to the queue of RabbitMQ.
Let’s create a new ASP.NET Core 3.1 WebAPI Project and name it Ticketing.Microservice.
Installing the Required MassTransit Packages
Open up Package Manager Console and install the following. Note that we will be installing the same packages in our second microservice too, but with a different configuration.
Install-Package MassTransitInstall-Package MassTransit.RabbitMQInstall-Package MassTransit.AspNetCoreWhat is MassTransit?
MassTransit is a .NET Friendly abstraction over message-broker technologies like RabbitMQ. It makes it easier to work with RabbitMQ by providing a lots of dev-friendly configurations. It essentially helps developers to route messages over Messaging Service Buses, with native support for RabbitMQ.
MassTransit does not have a specific implementation. It basically works like an interface, an abstraction over the whole message bus concept. Remember how Entity Framework Core provides an abstraction over the data access layers? Similary MassTransit supports all the Major Messaging Bus Implementations like RabbitMQ, Kafka and more.
Since we are using RabbitMQ, we could have installed the client packages of RabbitMQ like RabbitMQ.Client and so on, that enables us to interact with the RabbitMQ Server. But, for a cleaner and future-proof solution, it is always advisable to go with an Abstraction. Makes your life much easier on the longer run.
In our context, we will be using MassTransit Helpers to publish / receive messages from our RabbitMQ server. Get the point, yeah?
Configuring MassTrasit
After adding the MassTransit packages, we will have to configure it to work as a publisher in ASP.NET Core Container. Navigate to the Startup.cs and add the following before services.AddController();.
public void ConfigureServices(IServiceCollection services){ services.AddMassTransit(x => { x.AddBus(provider => Bus.Factory.CreateUsingRabbitMq(config => { config.UseHealthCheck(provider); config.Host(new Uri("rabbitmq://localhost"), h => { h.Username("guest"); h.Password("guest"); }); })); }); services.AddMassTransitHostedService(); services.AddControllers();}Line #3 - Adds the MassTransit Service to the ASP.NET Core Service Container.
Line #4 - Creates a new Service Bus using RabbitMQ. Here we pass paramteres like the host url, username and password.
After that, let’s create a simple API Controller that can take in a Ticket Model passed by the user (via POSTMAN). Create a new API Controller, Controllers/TicketController.cs
public class TicketController : ControllerBase{ private readonly IBus _bus; public TicketController(IBus bus) { _bus = bus; } [HttpPost] public async Task<IActionResult> CreateTicket(Ticket ticket) { if (ticket != null) { ticket.BookedOn = DateTime.Now; Uri uri = new Uri("rabbitmq://localhost/ticketQueue"); var endPoint = await _bus.GetSendEndpoint(uri); await endPoint.Send(ticket); return Ok(); } return BadRequest(); }}Line #3-7 Here we use the Bus variable we configured earlier in the Startup file. Finally we will inject the IBus object to the constructor of the Ticket Controller.
Line #13 - We add the current datetime to the received ticket object.
Line #14 - We will name our Queue as ticketQueue. Now, let’s create a new URL ‘rabbitmq://localhost/ticketQueue’. If ticketQueue does not exist, RabbitMQ creates one for us.
Line #15 - Gets an endpoint to which we can send the shared model object.
Line #16 - Push the message to the queue.
Thats’s it for our first Microservice, the publisher. Let’s build it and run. We will POST data to the ticket endpoint using POSTMAN. Here is the POST request we will pass to the ticket endpoint.
{ "userName" : "Mukesh", "Boarding" : "Muscat", "Destination" :"Trivandrum"}Now what happens is, the endpoint takes this in as a parameter and sends it to rabbitmq://localhost/ticketQueue. This means that RabbitMQ would create a new Exchange Queue for us and also store the passed data within the server. Let’s switch to RabbitMQ Dashboard after posting the message via POSTMAN.
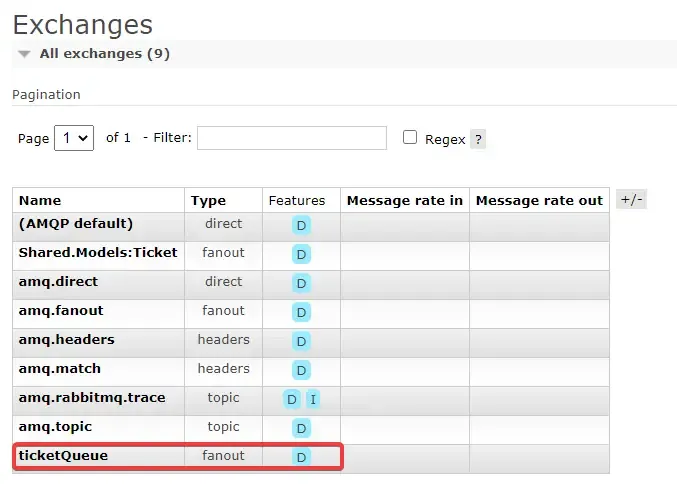
You can see that RabbitMQ has created a new Exchange for us names ‘ticketQueue’. Also, it is important to note that since we do not have a subscriber yet for this publisher, the message we passed is not seen. So, let us build a consumer first.
Setting up the the Consumer Microservice
We are done with the Publisher Microservice that can send ticket to the RabbitMQ Exchange. Let us now create a new ASP.NET Core WebAPI Project and name it ‘TicketProcessor.Microservice’. This Microservice will be responsible for consuming the incoming messages from RabbitMQ Server and process it further.
Remember the packages we installed earlier? Install the same one in this project too.
Similar to the previous Startup.cs configuration setup, we will have to configure here too, but keeping in mind that this is a consumer.
Navigate to Startup.cs of the new Project and add the following.
public void ConfigureServices(IServiceCollection services){ services.AddMassTransit(x => { x.AddConsumer<TicketConsumer>(); x.AddBus(provider => Bus.Factory.CreateUsingRabbitMq(cfg => { cfg.UseHealthCheck(provider); cfg.Host(new Uri("rabbitmq://localhost"),h => { h.Username("guest"); h.Password("guest"); }); cfg.ReceiveEndpoint("ticketQueue", ep => { ep.PrefetchCount = 16; ep.UseMessageRetry(r => r.Interval(2, 100)); ep.ConfigureConsumer<TicketConsumer>(provider); }); })); }); services.AddMassTransitHostedService(); services.AddControllers();}Line #5 - We will add a new consumer, named TicketConsumer. PS we have not created the class yet.
Line #14 - Here we define the Receive endpoint, since this is a consumer.
Line #18 - Finally we link the ticketQueue to the TicketConsumer class.
Let’s create the Ticket Consumer class now. Consumers/TicketConsumer.cs. Add in the following code.
public class TicketConsumer : IConsumer<Ticket>{ public async Task Consume(ConsumeContext<Ticket> context) { var data = context.Message; //Validate the Ticket Data //Store to Database //Notify the user via Email / SMS }}This is a very simple consumer that implements the IConsumer of the MassTransit class. Any message with the signature of the Ticket Model that is sent to the ticketQueue will be received by this consumer.
At Line #5, we are extracting the actual message from the Context.
Later on, we will have the parts where the order is validated, saved to Database and the customer will be notified. You get the point, yeah?
Testing the Microservice
Let’s test our Microservices now. Remember that we need both the Microservices running in order to send and receive the ticket data. To enable Multiple Starup Projects, Right click on the solution and enable the required projects in the Multiple Starup Projects RadioButton.
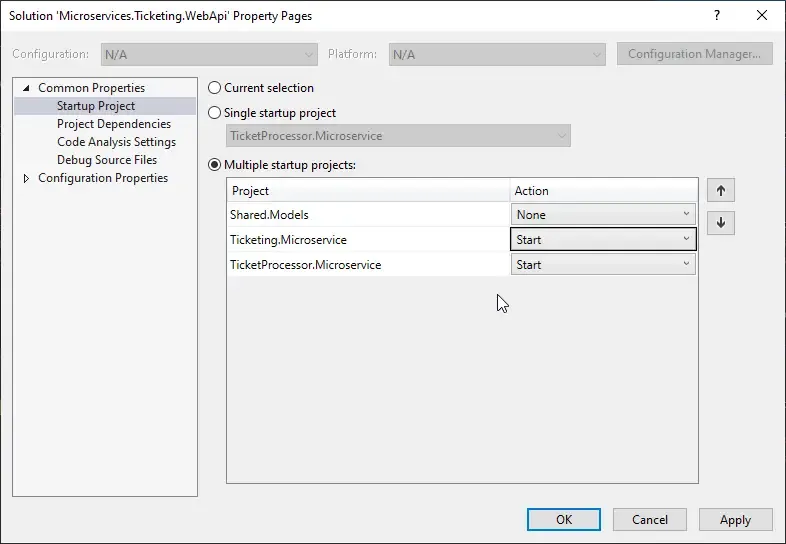
We will test a few scenarios now.
Scenario #1 - When the Consumer is Online
First, we will have both the services online, and try to pass some sample data. I put a breakpoint at the Consumer Class and also at the TicketController to verify the received data from POSTMAN. Let’s run the Applications and switch back to POSTMAN.
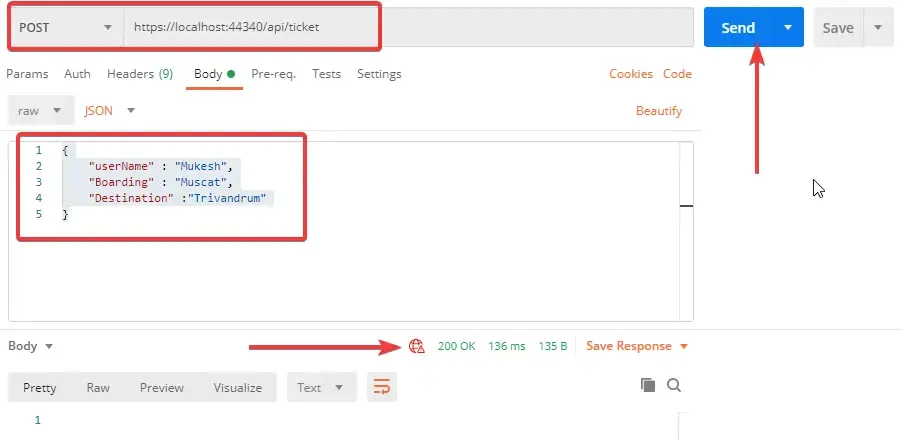
This is how my POST request looks like. If things go well, we should have a breakpoint hit at the TicketController. Let’s see the data.
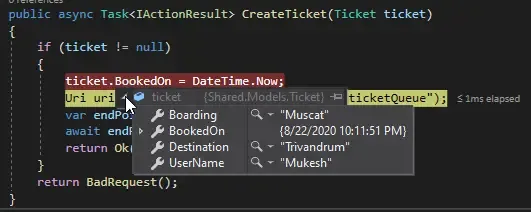
You can see that we are able to pass the Model to the First Microservice - Ticketing.Microservice. Let’s continue the debug and switch back to our RabbitMQ Dashboard.
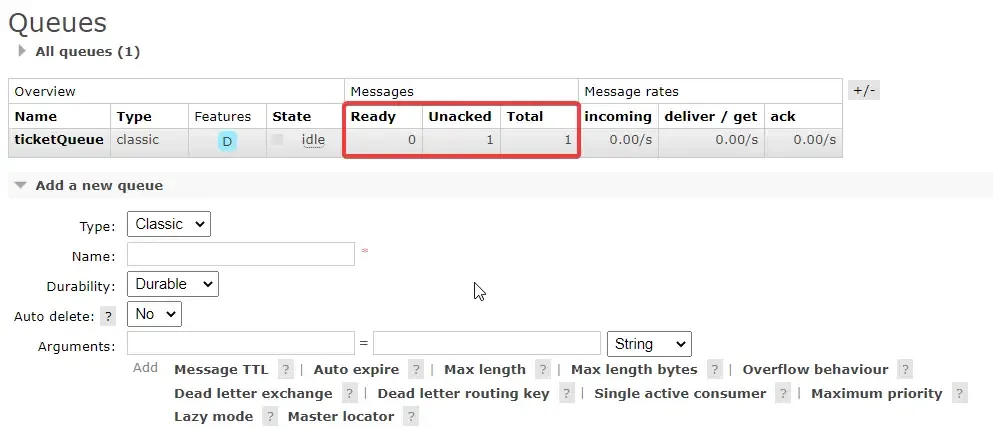
You can see the we have one un-Processed message. Also, we will be hitting our next breakpoint at the second Microservice as well. Let’s verify the data.
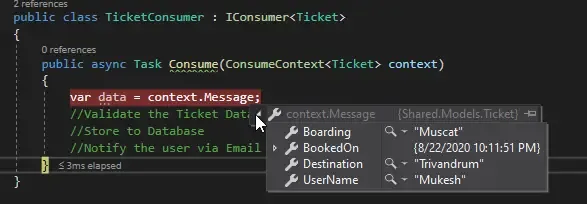
The Consumer works as expected. Great! Let’s now move to our next test scenario.
Scenario #2 - Consumer is Offline. Back Online after N Minutes
In this case, a more practical scenario where the consumer can be offline due to several reasons. When the consumer is offline, the publisher can still send the message to the RabbitMQ server queue. As soon as the consumer comes online, it should be able to consume the pending message. That’s the whole point of Message Broking right? Let’s check.
So, I disables the Startup of the Consumer Project. Now only the Ticketing.Microservice will run. This mimics the scenaior where the consumer if offline.
Let’s POST the message via POSTMAN to the publisher. We will get back a 200 Ok Response as expected. Let’s check the RabbitMQ Dashboard.
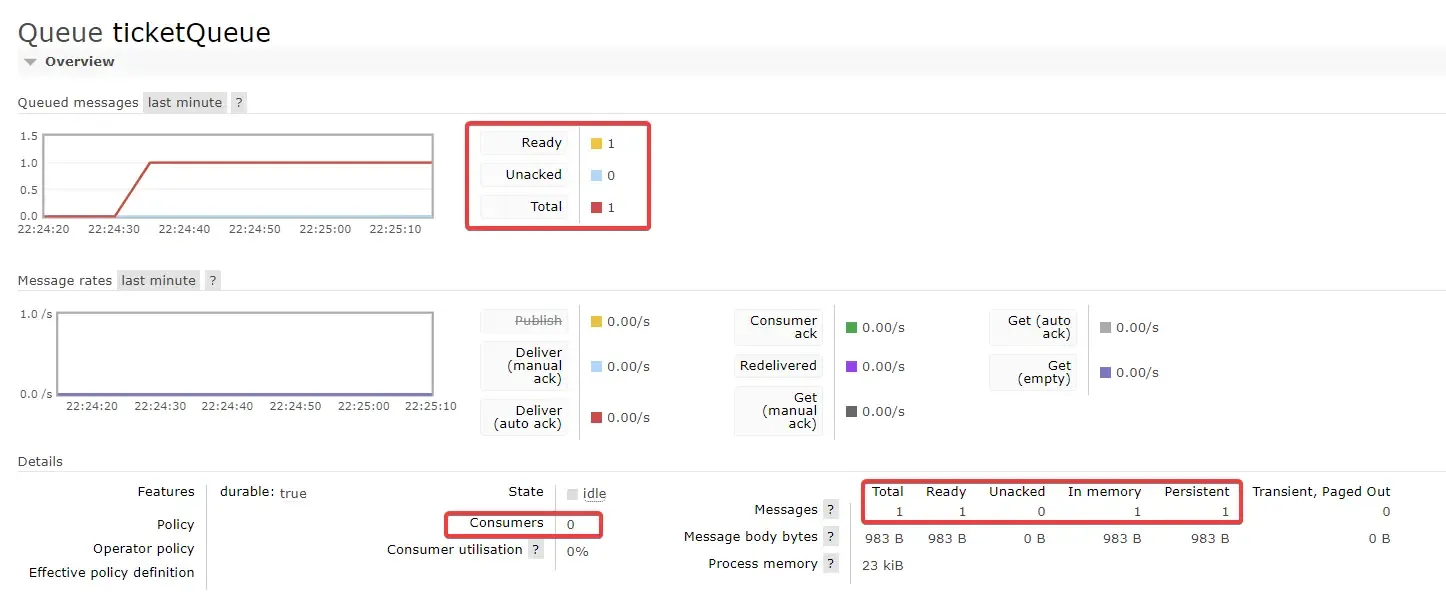
You can clearly see that our Queue has 1 new Message pending and 0 Consumers available. It will keep the message in memory till a consumer is connected. Let’s bring our Consumer online now.
As soon as the Consumer Microservice is online, you can see that we are hitting the breakpoint with the pending message. Cool, yeah? Continue the debug and switch back to the RabbitMQ Dashboard.
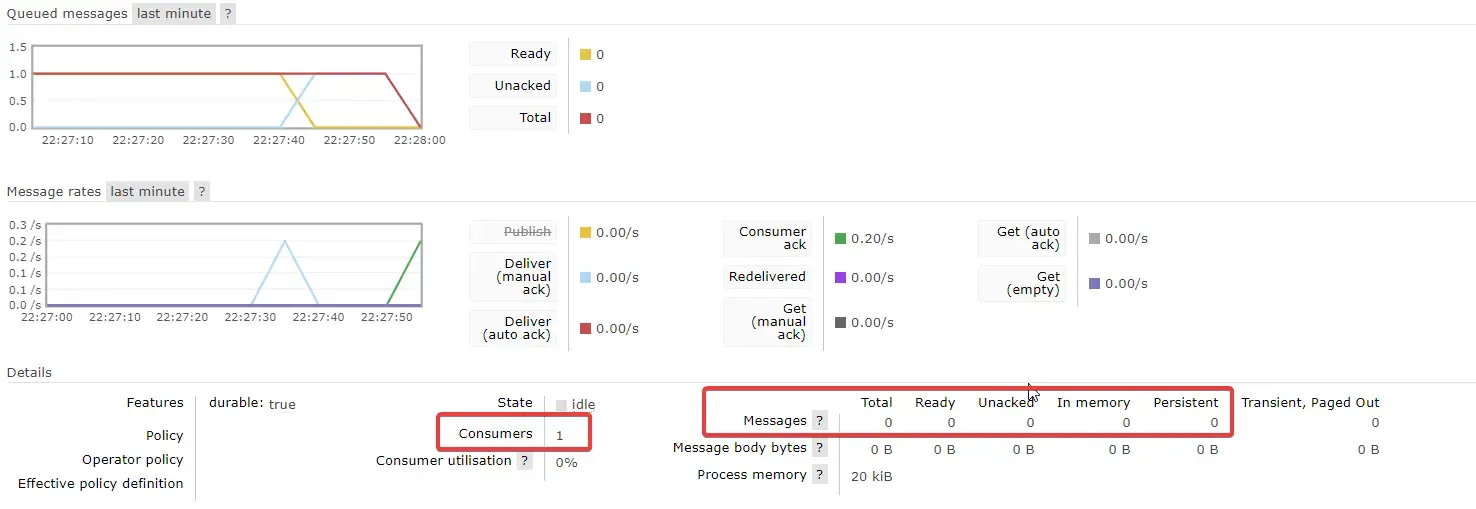
You can see that the Consumer count has become 1 and the Messages have become 0, meaning that our messages are now consumed and taken off the queue.
That’s a wrap for this article!
Summary
In this article, we have gone through Message Brokers, RabbitMQ, Advantages , Integrating RabbitMQ with ASP.NET Core using MassTransit. We also build a small prototype application to send data over the RabbitMQ Server. You can find the source code of this implementation here.
Leave behind your valuable queries, suggestions in the comment section below. Also, if you think that you learned something new from this article, do not forget to share this within your developer community. Happy Coding!

