This article is a comprehensive guide on Securing .NET WebAPI with Amazon Cognito. Our focus is on creating a Serverless Authentication system by utilizing OAuth and Amazon Cognito. We will be exploring two authentication flows: Client Credentials Flow and Username/Password Flow, and delve into essential topics like User Pools & Logins, Registering New Users, JWT Auth Tokens, Account Confirmations, and more. With these step-by-step instructions, you will be able to build a reliable and secure authentication system that safeguards access to your WebAPI endpoints. By the end of this tutorial, you will have a thorough understanding of how to implement Amazon Cognito for securing your .NET Web API. Improve your .NET WebAPI security today with Amazon Cognito!
Introducing Amazon Cognito
Authentication is crucial for applications of all scales. You can either build your own Authentication system or consume it from a third-party provider. Amazon Cognito is a fully Managed User Identity Service provided by AWS. It helps developers seamlessly add user log-in, sign-up, and access control to their web-facing applications. As .NET Developers, we used to build our own Authentication system (like this one) or use Identity Server. Although these are still very valid approaches, the advantages offered by a Managed Service like Amazon Cognito might make more sense in your workflow. Let’s see the benefits of using Amazon Cognito for your .NET Web API:
- User Management is relatively easy. AWS provides a real fluent UI for managing users and authentication. It even gives your a hosted UI for actually signing in and creating users as well. Apart from this, there is also support for external identity providers like Facebook, Google, and so on.
- Amazon handles the infrastructure for you. Being a fully managed Service, Amazon Cognito can scale to accommodate any number of users without you having to worry about any infrastructure details.
- Top-notch security. Building your own Authentication systems might have slight chances of potential bugs and loopholes.
- If you already have some AWS Services in your project stack, Amazon Cognito can easily be integrated with them. AWS also provides a strong SDK for .NET developers.
- Cost-effective. Amazon Cognito Free Tier allows up to 50,000 Monthly Active Users who register into a Cognito user pool, and about 50 users who use External Identity Providers to Sign in. Note that the free tier is available indefinitely and doesn’t expire after 12 months. But even after crossing the FREE Tier limits (if you cross it), their pricing is pretty decent as well. You can check out Amazon Cognito pricing here -https://aws.amazon.com/cognito/pricing/
This article is sponsored by AWS. Huge thanks for helping me produce more .NET on AWS content!
What will we build?
We will be building a .NET 6 Web API that is secured by a serverless Authentication system using AWS Cognito. This is mainly for developers who want to set up a hassle-free authentication system without worrying about the infrastructure related to it.
The developed Web API would rely on JSON Web Tokens (JWTs) that are generated by AWS Cognito User Pool for authentication into the API Endpoints.
During this process, we will create all the necessary AWS resources using the AWS Management Console. The resources include AWS Cognito User Pool, default users, User Pool Clients, etc. Then, we will integrate our Web API with Cognito using the AWS SDK for .NET to authenticate requests using JWTs generated by Amazon Cognito for flows like Client Credentials and Password Grant flow.
Firstly, we will go through setting up the client credentials and password flow in Cognito. Next, we will test if these flows are able to generate Tokens for us. Once the token generation is sorted, we will build an ASP.NET Core Web API which will be secured by Amazon Cognito and verify that the API is able to take in both of the tokens (from each flow) and is able to authenticate requests into a secure API endpoint.
Grab the entire source code of this implementation from here: https://github.com/iammukeshm/securing-dotnet-webapi-with-amazon-cognito
Client Credentials Flow & Password Grant Flow
- As mentioned earlier, we will look into the Client Credentials flow, where the client (our web API) will pass its client id and the secret to Cognito in exchange for an access token. Here, user consent won’t be required. This mode of authentication is typically used for server-to-server communication and when the client owns the protected resource.
- On the other hand, the password flow is used when the user needs to authenticate into a server to access resources. Here, the user would send his credentials like username and password.
We will implement both of these approaches.
Prerequisites
- AWS Account - Grab a free one here - https://aws.amazon.com/free/. Free Tier is sufficient.
- AWS SDK for .NET - We will install the required packages along the way.
- .NET 6 - https://dotnet.microsoft.com/en-us/download/dotnet/6.0
- AWS CLI and profile setup - refer https://www.youtube.com/watch?v=oY0-1mj4oCo
Creating an Amazon Cognito User Pool
Let’s create an Amazon Cognito User Pool. Login to your AWS Management Console and search for Cognito, and open it up. Here, click on create User Pool.
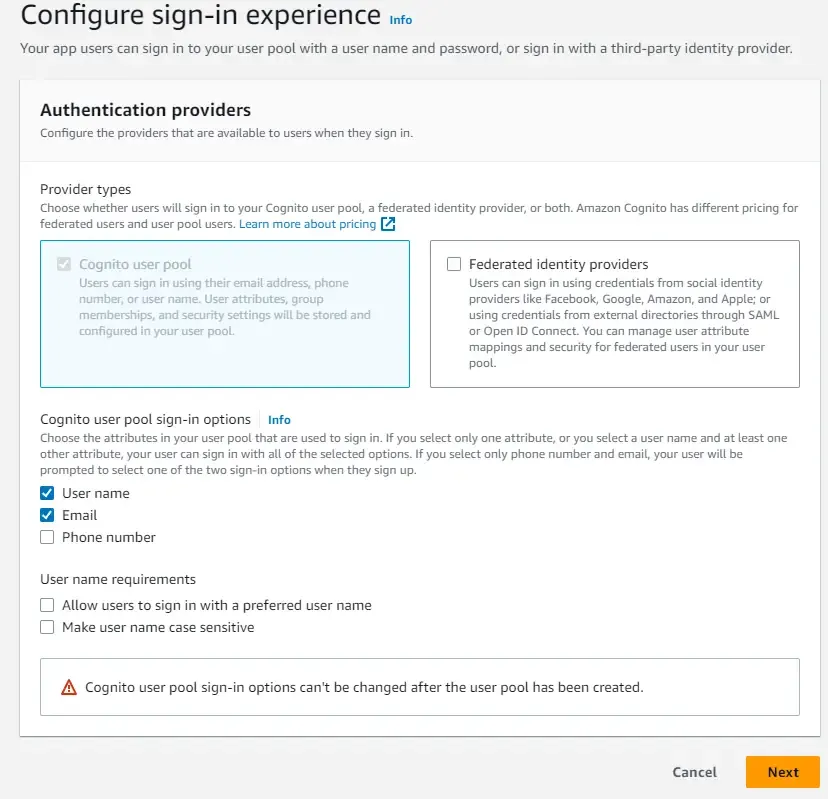
For the sign-in experience, we are only using the Cognito user pool for now. The other option is related to 3rd party identity providers like Google and so. For the sign-in option, I have selected username and password.
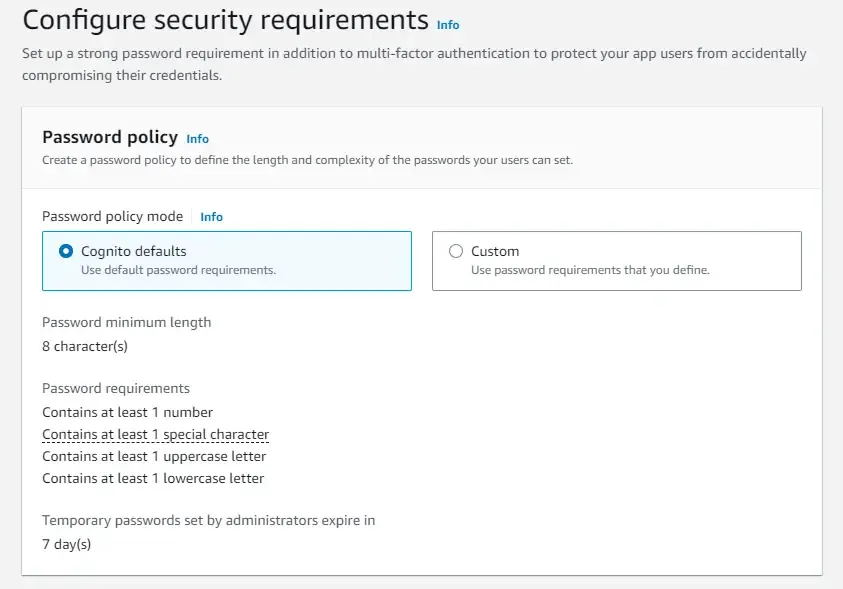
We will go with the default Password Policy of Cognito.
We will not be looking into Multi-Factor Authentication in this article. But, enforcing multi-factor authentication is really secure way to protect your resources.
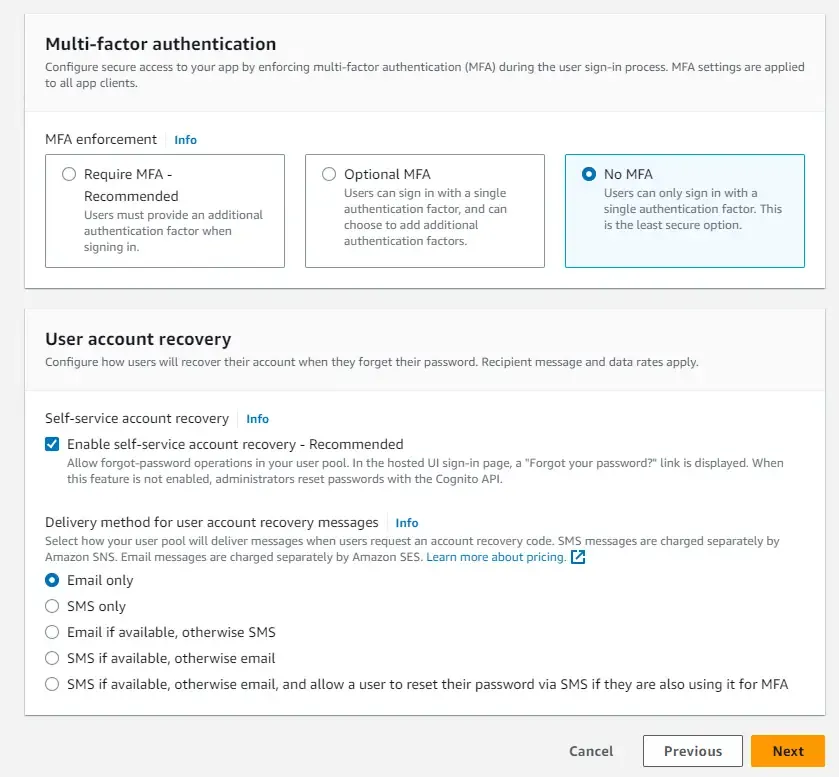
Most of the below options are left at their default selections only.
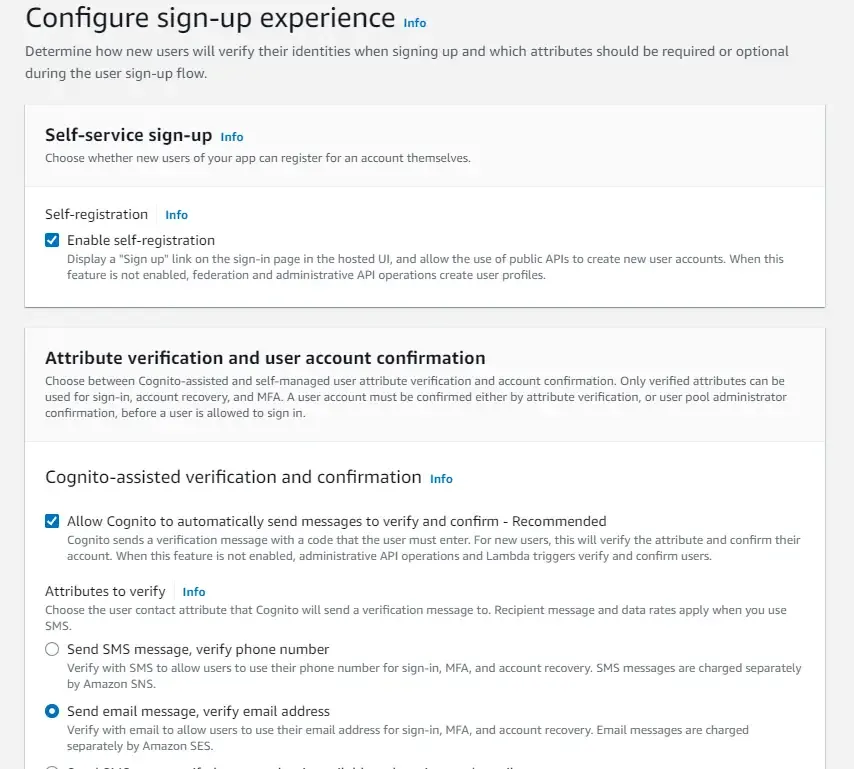
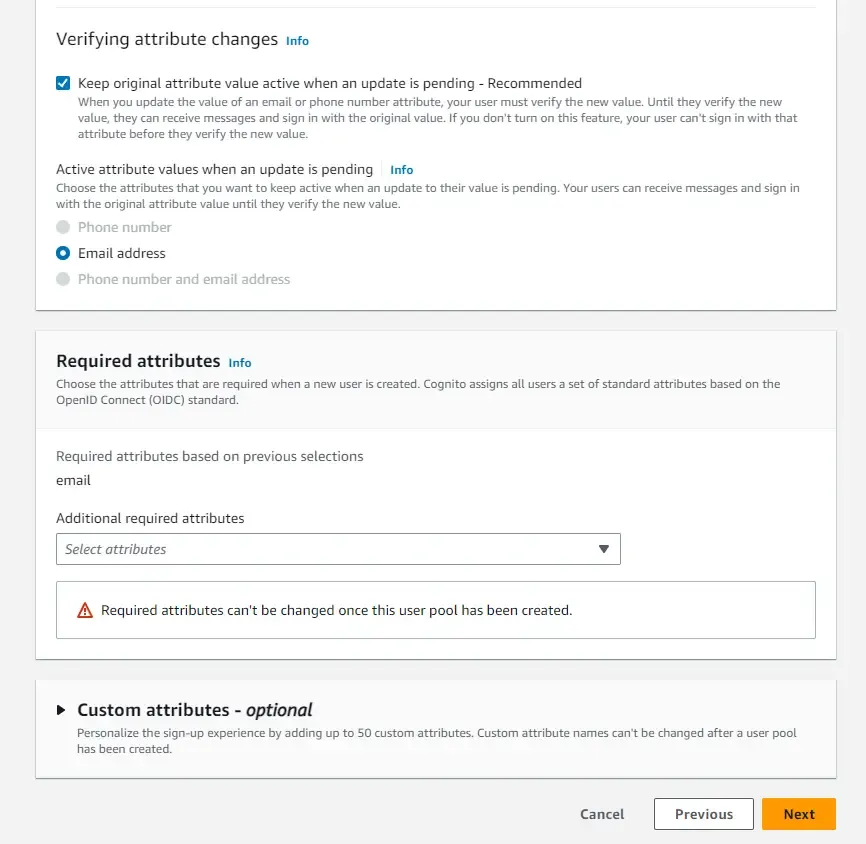
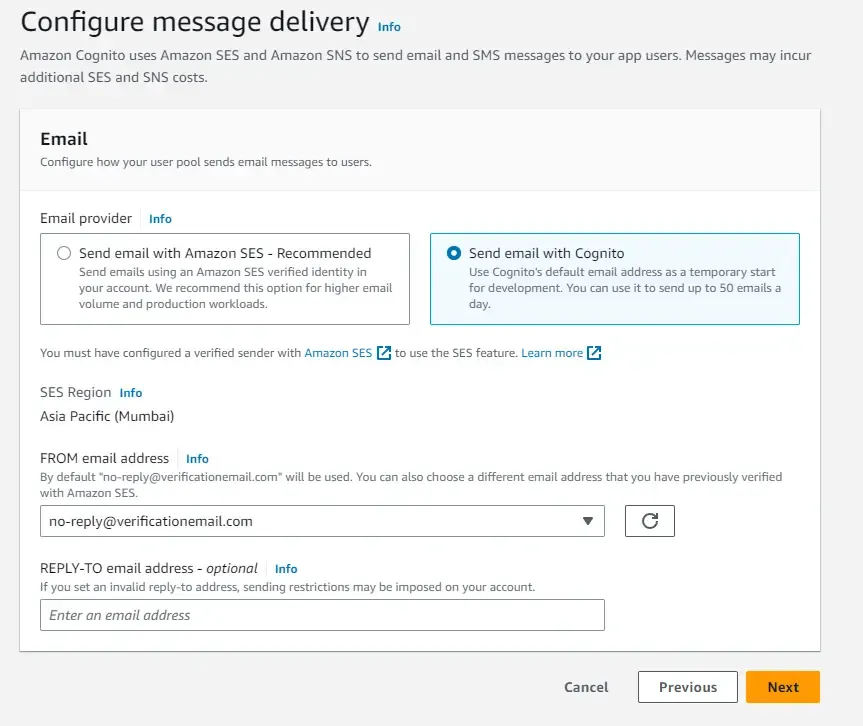
As for the confirmation mail delivery, we will use Cognito’s default email address. This is very simple to get started when you are learning this service on developing it.
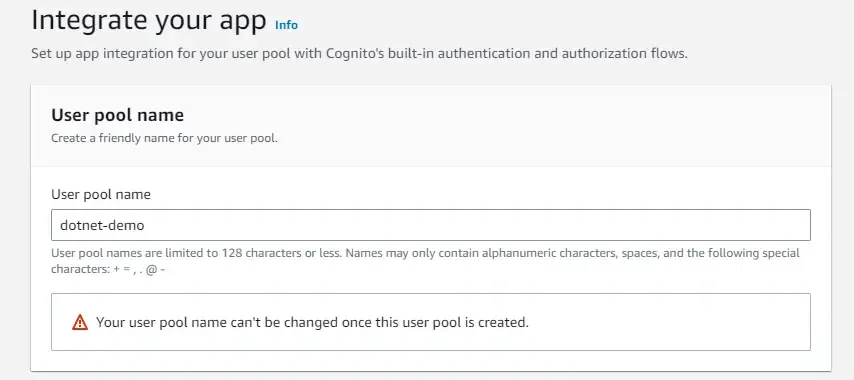
Finally, let’s name our user pool. I have named mine as dotnet-demo
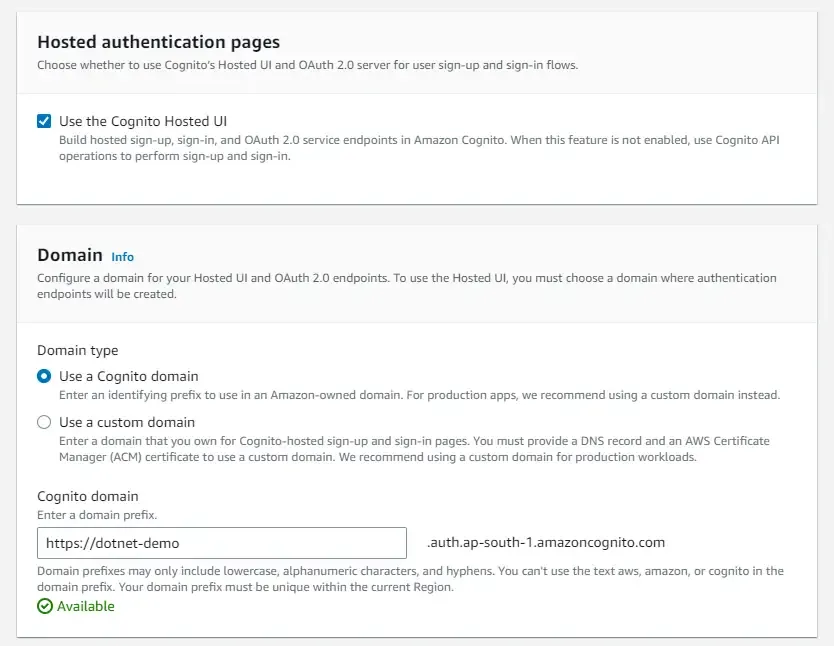
I have also enabled the Hosted UI, wherein we will get a default Singin/Signup Page out of the box from Amazon. Also, ensure that you are creating a new Cognito domain. I named mine as dotnet-demo here also.
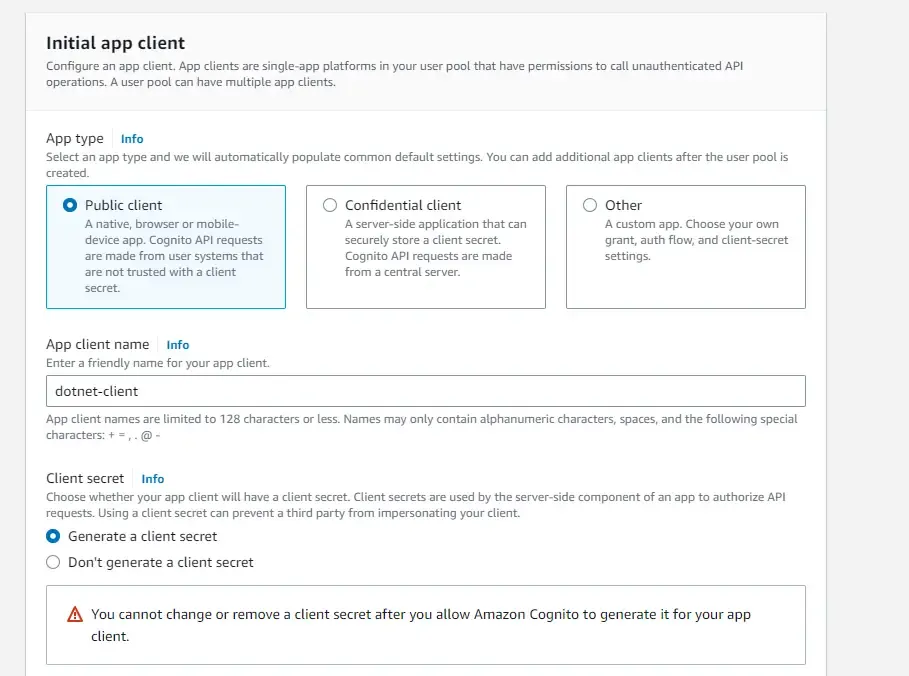
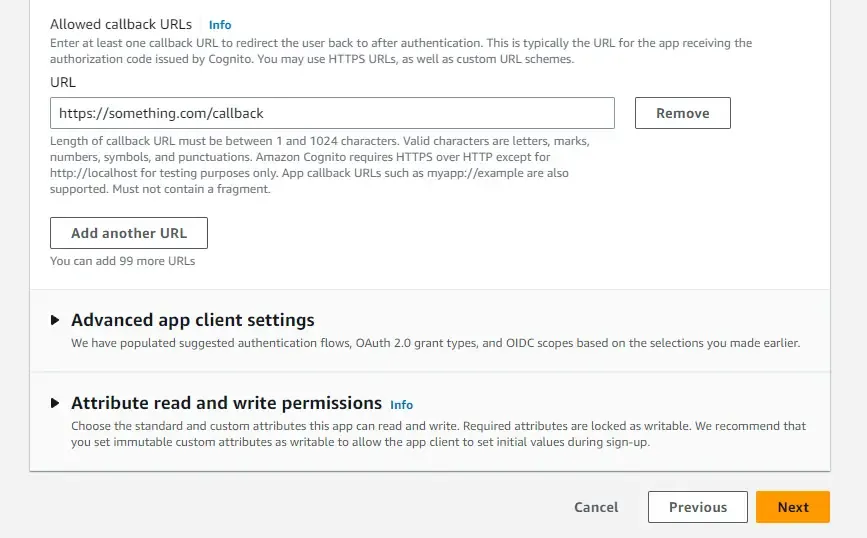
In the next screen, you get to define your user pool app client. Just a note, we will be creating 2 clients throughout this article. This initial client will be responsible for handling the Client Credentials Grant Type Flow for generating JSON Web Tokens. Ensure you have selected ‘Generate a client secret’. This is very important in the client credentials authentication flow. Add a dummy callback URL for now and create your user pool.
Client Credentials Flow: Setup & Testing
As mentioned earlier, we have already created the first user pool client. The first client will be the one who is going to have the client credentials flow. Note that for security reasons, you will not be able to implement multiple flows within the same user pool client. Hence, when we go to the next topic in the article, which is about the password grant flow, we will be creating a new client as well for it.
The idea with Client Credentials Flow is that the client application authenticates with Amazon Cognito using its own credentials (e.g., client ID and client secret) rather than user credentials. This flow is typically used for machine-to-machine communication and other non-interactive scenarios.
Since we have already created a new user pool app client, we will need to make slight modifications for it to work as expected.
Firstly, we will need a resource server to ensure that only authorized clients can access protected resources.
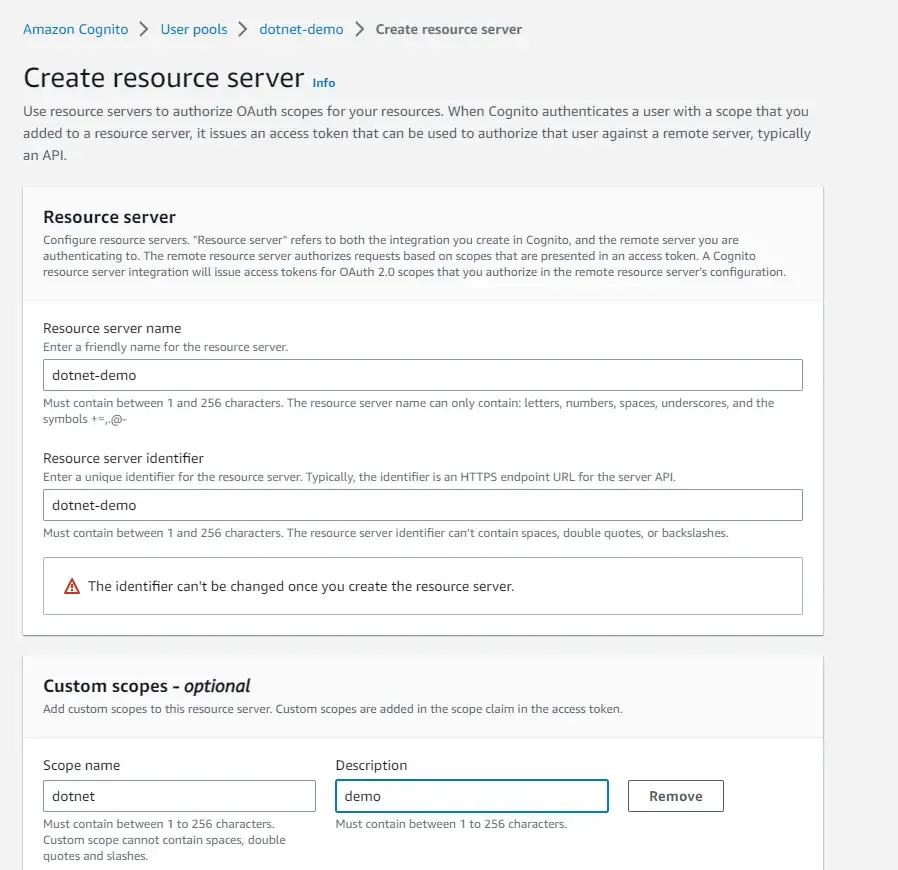
Open up the user pool that we created earlier, scroll down to the section of resource server, and create one. Give it a unique name and identifier. Also, ensure that you add a custom scope to this server. I just added something like “dotnet”. We will need this at a later point when we would be generating JWTs.
Once you have the resource server ready, navigate to the earlier created App Client, and scroll down to the Hosted UI section. Here, click on Edit.

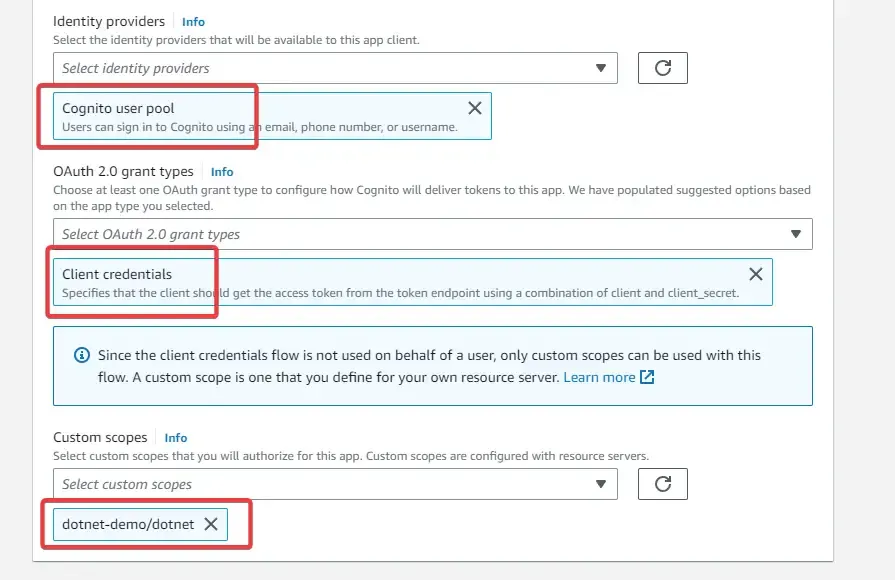
Ensure that you set the Cognito User Pool as the Identity Provider, and selected the scope as Client Credentials. Also, select the custom scopes as our previously created scope. In my case, it is dotnet-demo/dotnet.
That’s it for this authentication flow to work. For our reference, make sure that you keep the client id and secret copied somewhere easily accessible for you.
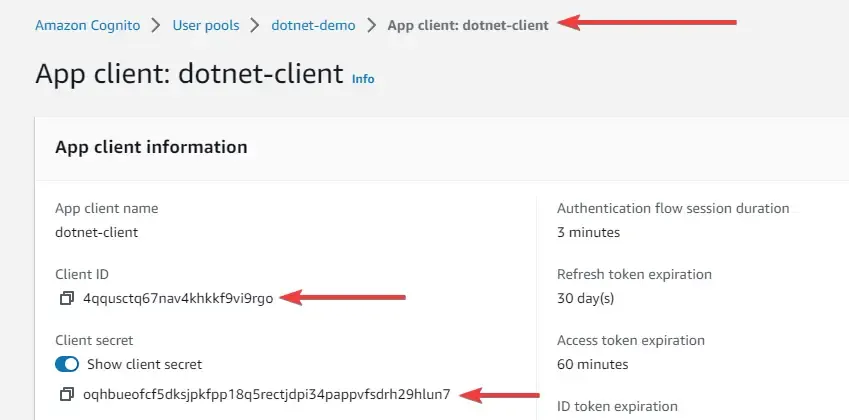
Specifically, you will client Id, client secret, grant type, domain name, and scope for generating a JWT token using the client credentials authentication flow.
Let’s test by generating a JWT. Open up postman and create a new request. We will be sending a POST request to https://{**domain**}.auth.{**region**}.amazoncognito.com/oauth2/token with some other parameters for generating a JSON Web Token.
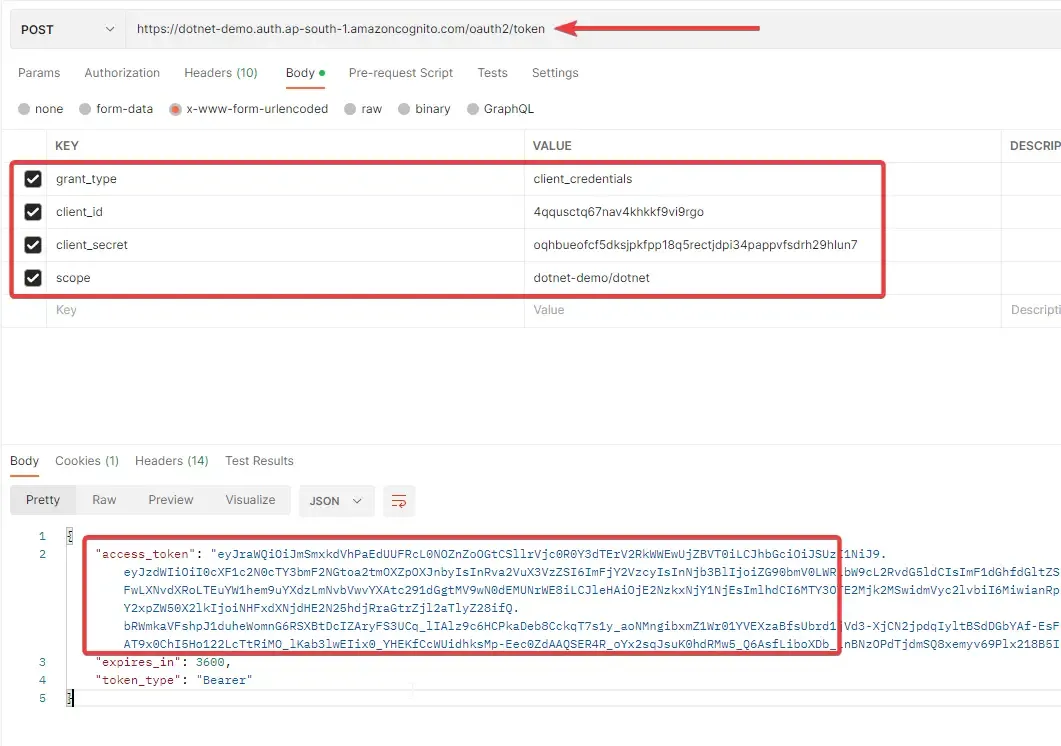
Make sure that you pass the correct values for all the form keys like grant_type, client_id, client_secret, and scope.
You can see that you will be getting back a JWT token. Now if I take this token and decode it on jwt.io, you will be able to see the client_id and scope. Attaching a screenshot below.
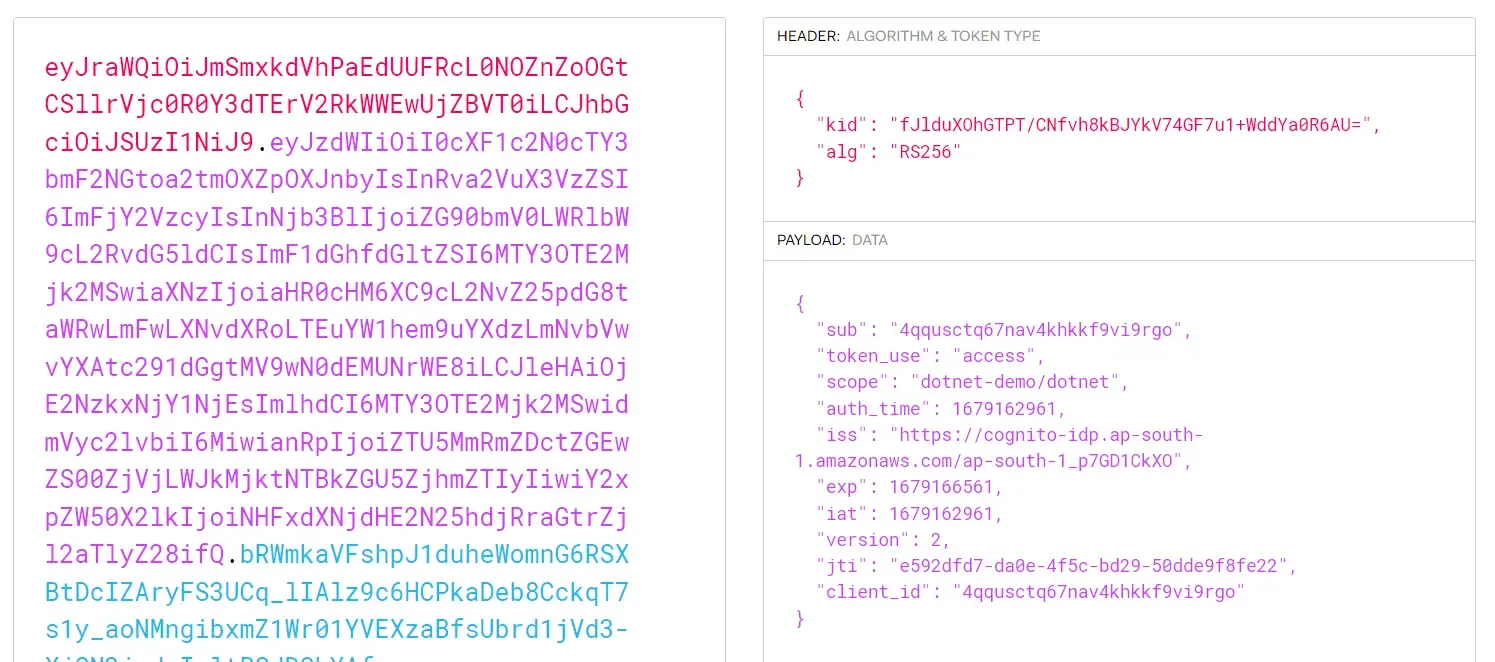
Note that we have only verified if the client credentials flow is working properly and is able to generate the expected tokens. In the next step, we will set up the password authentication flow also, where we will use a username and password for generating valid JWT tokens.
Username Password Grant Flow: Setup & Testing
Create another app client, this time specifically for the password flow authentication. Here, ensure that you don’t generate a client secret, as it’s not needed in this flow.
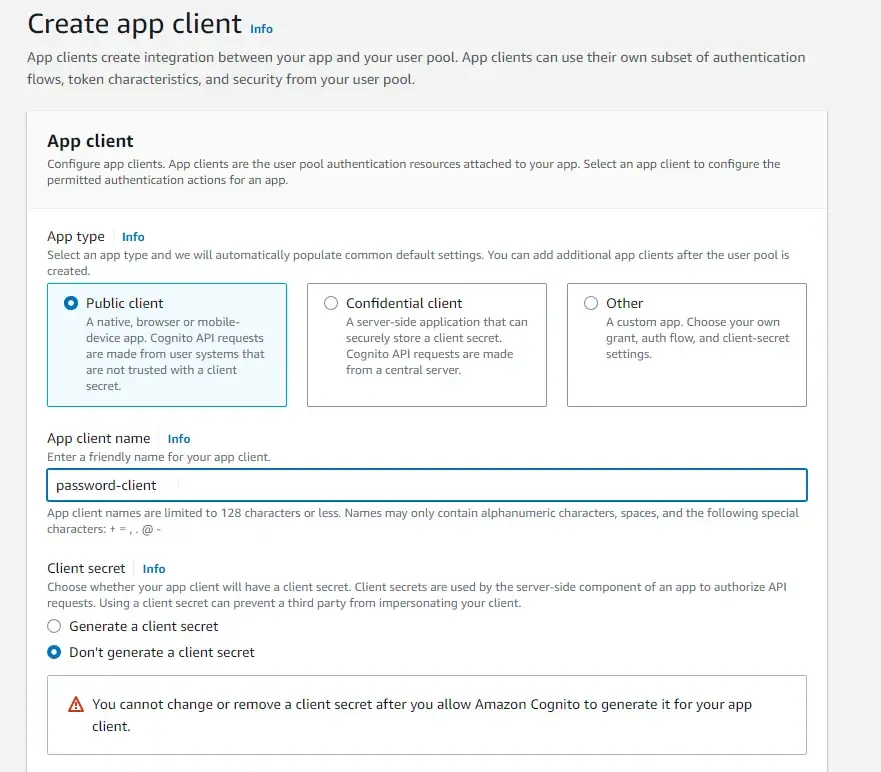
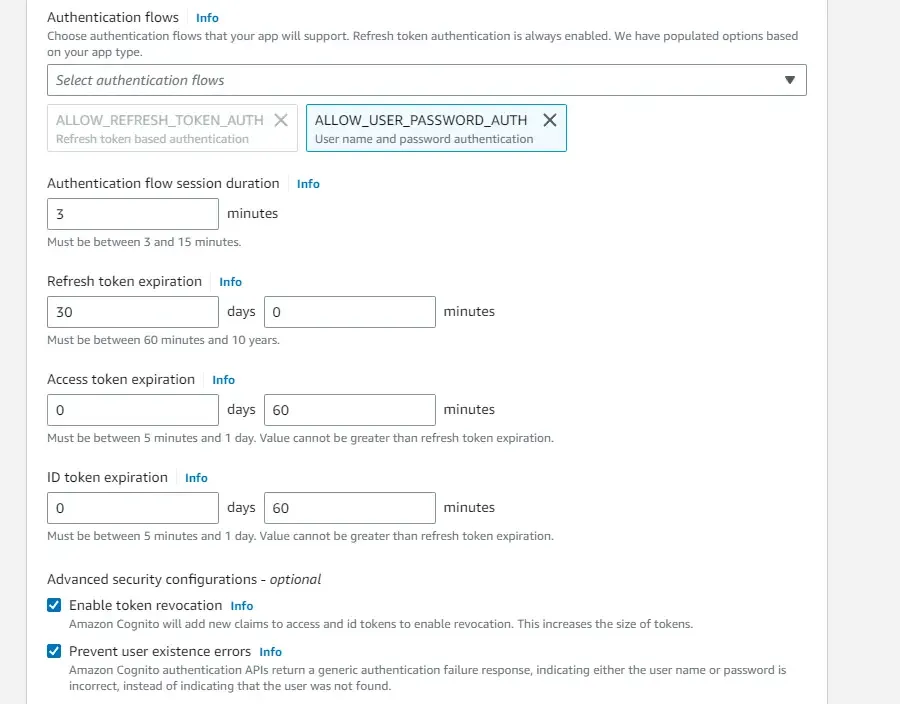
In the authentication flows, select only ALLOW_USER_PASSWORD_AUTH option. You can change the durations of the tokens as per your requirement. But I am sticking to the default values for now.
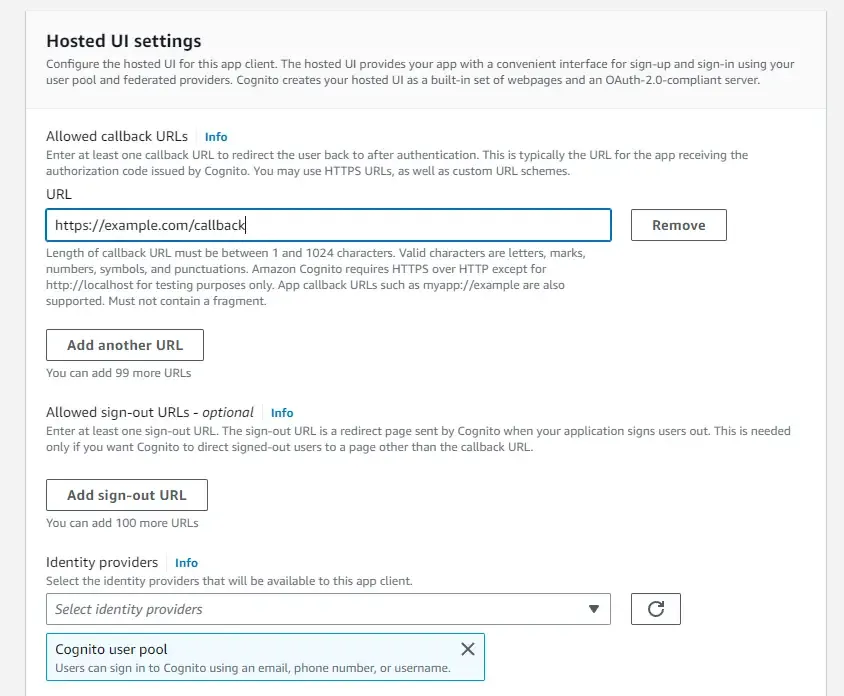
Once that’s done, head over to the Hostel UI Settings, and here, again write in a sample callback URL.
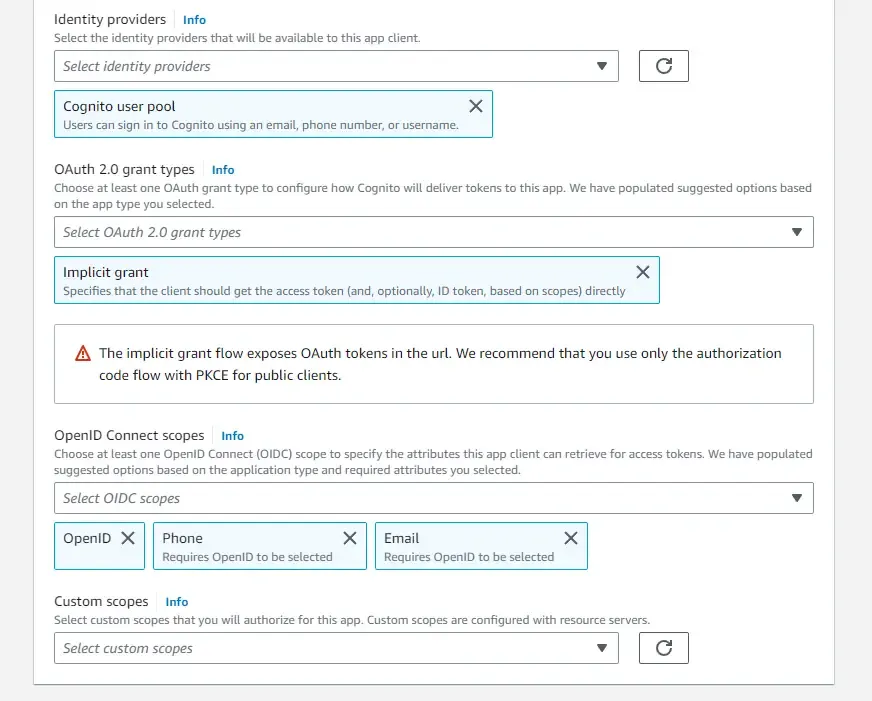
Make sure that you select the Cognito User Pool as the Identity provider and Implicit grant as the grant type. This will ensure that the client can directly get the access tokens by specifying usernames and passwords.
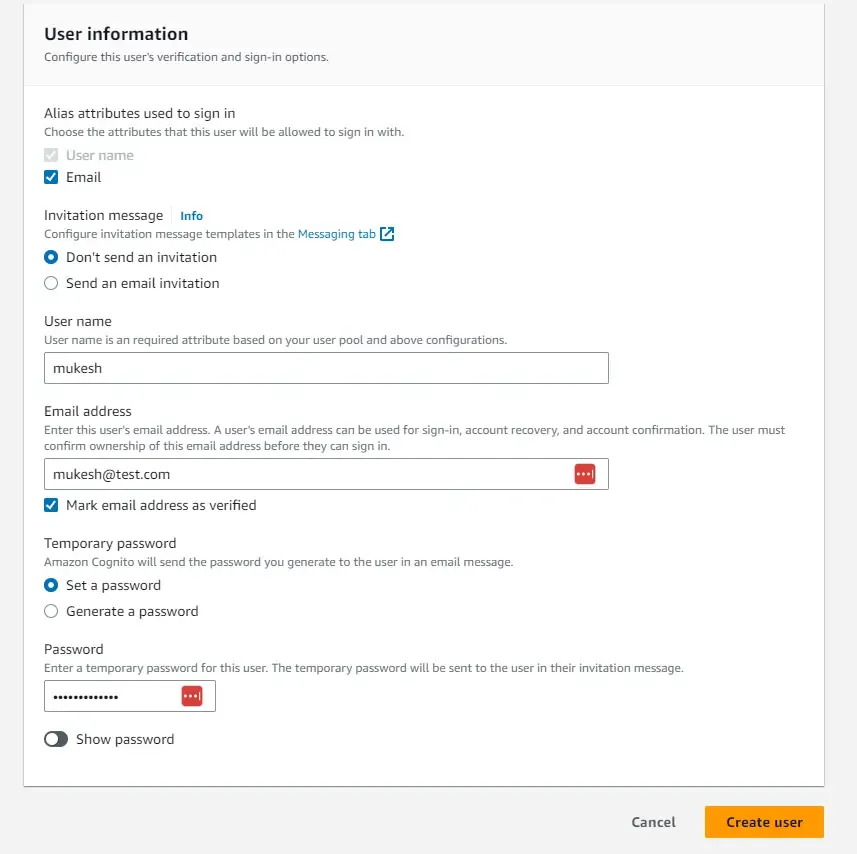
Once that’s in place, navigate back to our newly created User pool. Here, we will have to create a new one for our testing purposes. Click on Create User. So, the idea is that we will create a default user whose email will be set as verified. The only catch is that you will have to reset the temporary password once the default user is created inside the user pool. You can use similar settings as I have done in the below screenshot.
You can see that the new user is created, and the mail is verified. But the Confirmation status says, force change password.

The easiest way to set a permanent password is to run an AWS CLI command on your machine. Ensure that you have your AWS Credentials and profiles already set up on your machine for this. ( Refer to this tutorial if you have any doubts: https://www.youtube.com/watch?v=oY0-1mj4oCo&ab_channel=MukeshMurugan)
Here is the CLI command that you need to run. You will have to replace the below params with your user pool id, username, and password.
aws cognito-idp admin-set-user-password --user-pool-id "<user-pool-id>" --username "<username>" --password "<permanent-password>" --permanentSomething like this for example.

Once that’s done, you will be able to see that the new user has the confirmed status. We are all good to go now!

With that, let’s test the implementation by generating JWTs. Now here, the way we generate the token will be slightly different, as the oauth URL doesn’t actually support the password grant type since it’s considered less secure. This is because, in the flow, the client has to transmit the user credentials directly to the server.
But there is still a way to generate tokens based on username and password. We will have to send a POST request to the Cognito IDP with the required parameters and you will be able to receive the JWT token!
Open up Postman and create a new POST Request to this URL - https://cognito-idp.{**region**}.amazonaws.com/
In my case, the region is ap-south-1.
Next, in the headers section, add the following 2 Headers.
- Content-Type : application/x-amz-json-1.1
- X-Amz-Target: AWSCognitoIdentityProviderService.InitiateAuth
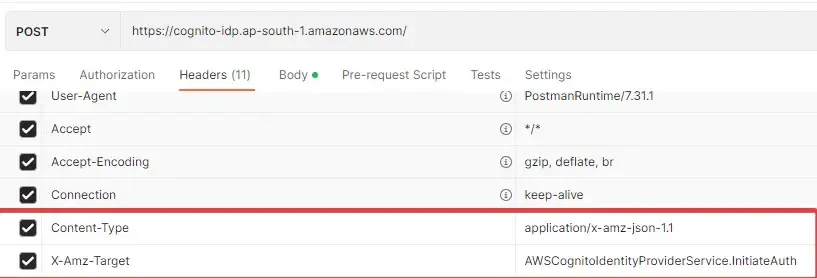
In the body of the request, add the following JSON Content. Replace your username, password, and app client id. Once done, send the POST request.
{ "AuthParameters" : { "USERNAME" : "<username>", "PASSWORD" : "<password>" }, "AuthFlow" : "USER_PASSWORD_AUTH", "ClientId" : "<app-client-id>"}My Request and Response look somewhat like this. You can see that we are getting what we expected.
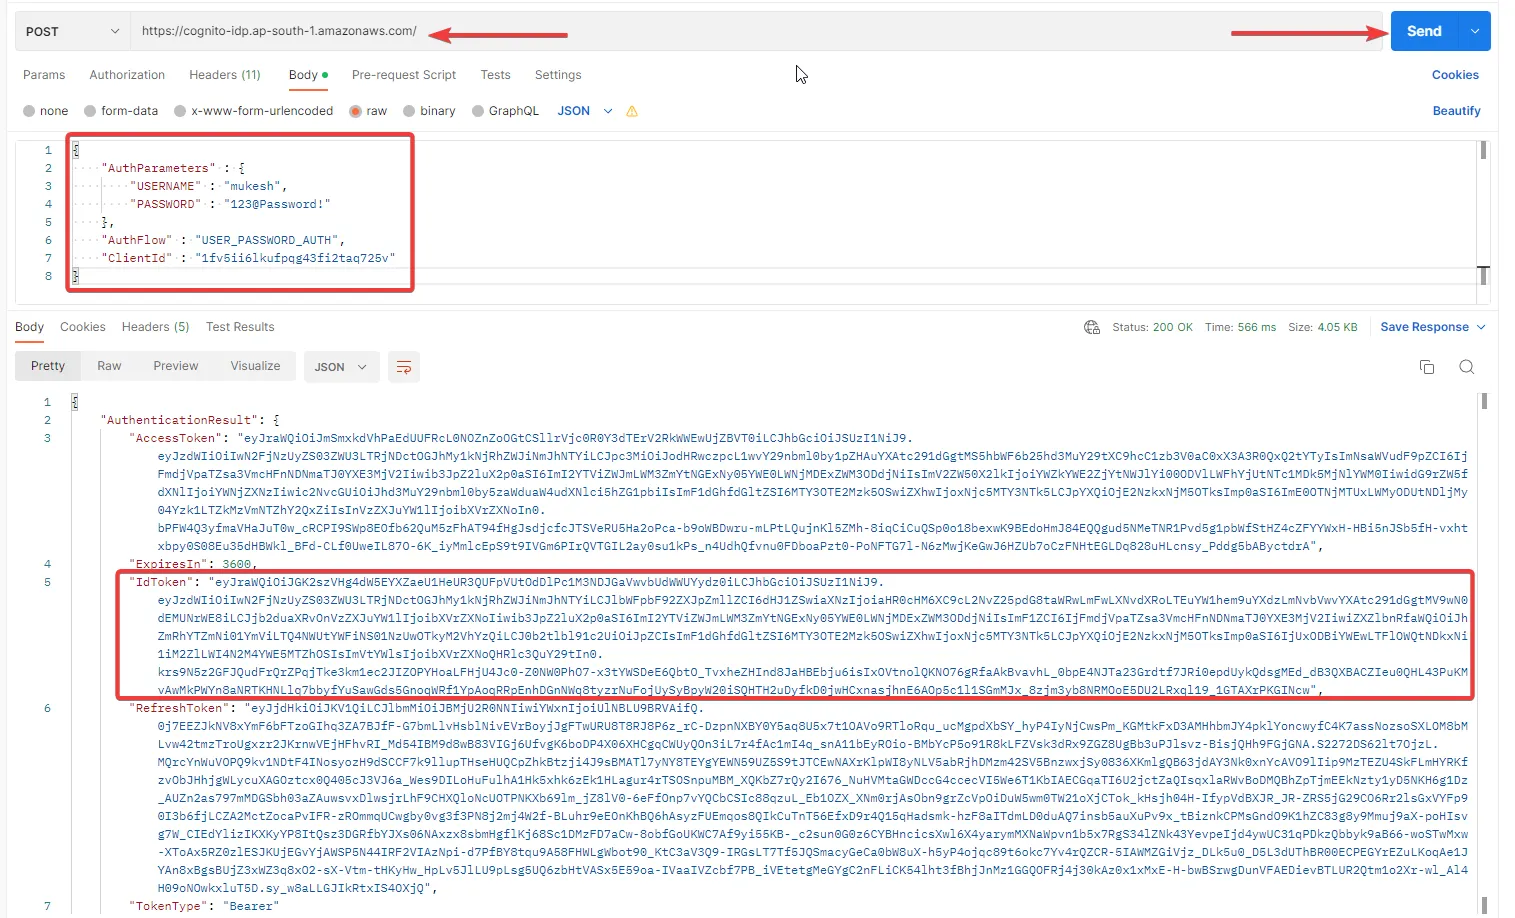
From the response, we are interested only in the ID Token for now. Let’s grab it and same as before, navigate to jwt.io and decode the token,
You can see the metadata of the user, like email_verified, email, username, and so on!
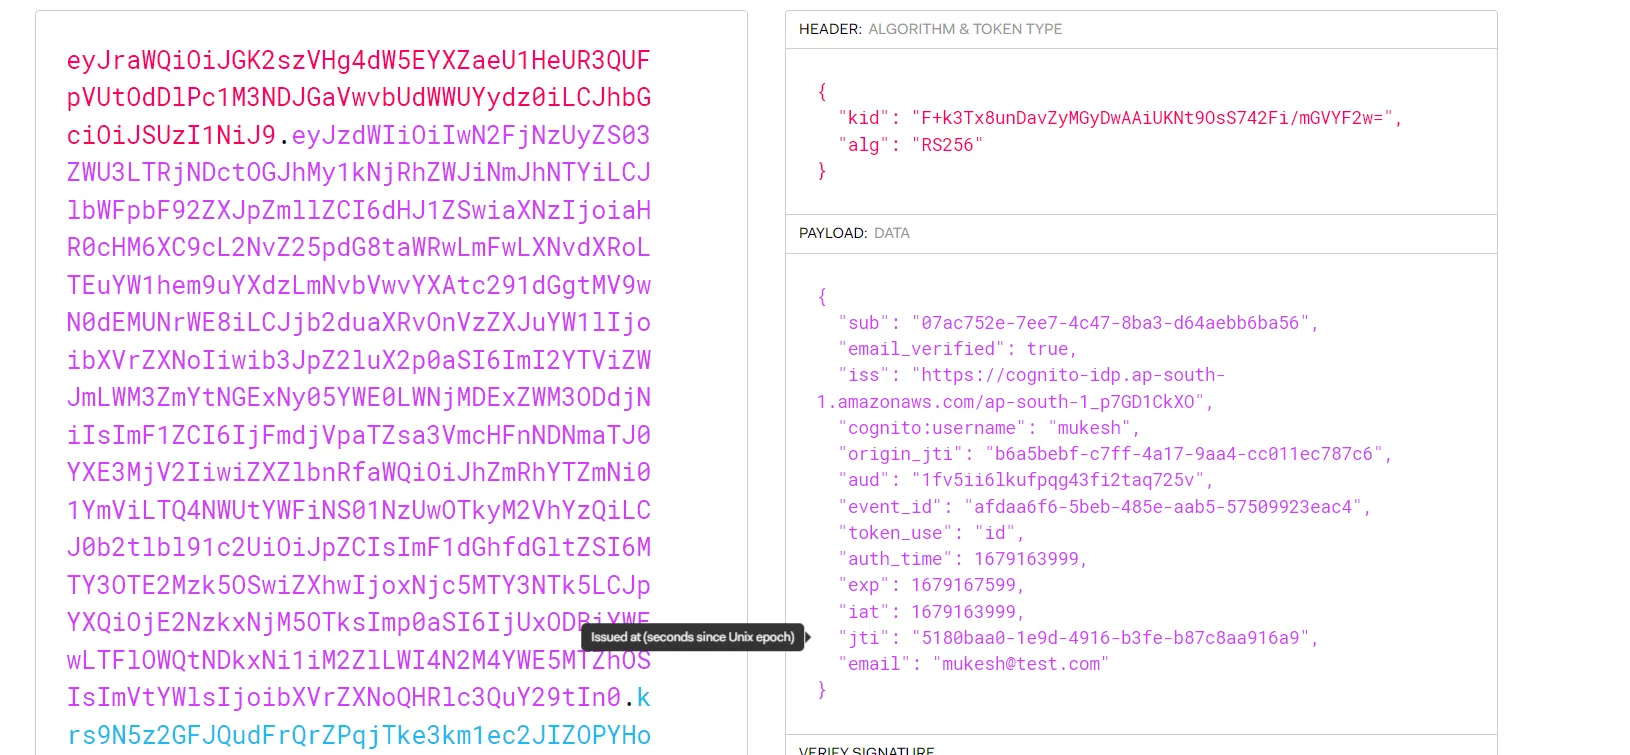
This way, we have generated Tokens using both Authentication flows. Now what remains, is to secure a .NET Web API using this serverless authentication system.
Creating an ASP.NET Core WebAPI: Securing .NET Web API with Amazon Cognito
Next, let’s build an ASP.NET Core WebAPI that will have a secured endpoint. I will be using Visual Studio 2022 Community Edition for this demonstration. Open up Visual Studio and create a new .NET 6 ASP.NET Core Web API Project. I named my project `AWSCognitoDemo`.
Here, let’s install the required AWS SDK packages first.
Run the following on your terminal opened at the root directory of the project.
dotnet add package Amazon.AspNetCore.Identity.Cognitodotnet add package Microsoft.AspNetCore.Authentication.JwtBearerOnce the Required Packages are installed, let’s navigate to Programs.cs and add the Authentication configuration to the services.
builder.Services.AddCognitoIdentity();builder.Services.AddAuthentication(options =>{ options.DefaultAuthenticateScheme = JwtBearerDefaults.AuthenticationScheme; options.DefaultChallengeScheme = JwtBearerDefaults.AuthenticationScheme;}).AddJwtBearer(options =>{ options.Authority = builder.Configuration["Cognito:Authority"]; options.TokenValidationParameters = new TokenValidationParameters { ValidateIssuerSigningKey = true, ValidateAudience = false };});The first line adds Cognito services to the dependency injection container. This allows the application to use Cognito APIs for user authentication and authorization. The next block of code configures the authentication options by setting the default authentication and challenge schemes to JWT Bearer authentication.
Line #7 configures the JWT Bearer authentication scheme. The ‘options.Authority’ property specifies the URL of the Cognito authorization server. This is where the application will send token validation requests.
Ensure that you add both the Authentication and Authorization middleware as mentioned below.
app.UseHttpsRedirection();app.UseAuthentication();app.UseAuthorization();app.MapControllers();app.Run();Finally, open up appsettings.json and add the Authority URL. Don’t forget to replace the below placeholders with your AWS region and User Pool ID. Mine looks something like this - https://cognito-idp.ap-south-1.amazonaws.com/ap-south-1\_p7GD1CkXO
"Cognito": { "Authority": "https://cognito-idp.{region}.amazonaws.com/{user-pool-id}"}Now, we will need a secured endpoint, right? Let’s secure the default weatherforecast API for our demonstration. Simply navigate to Controllers/WeatherForecastController.cs and add the Authorize attribute over the GET method.
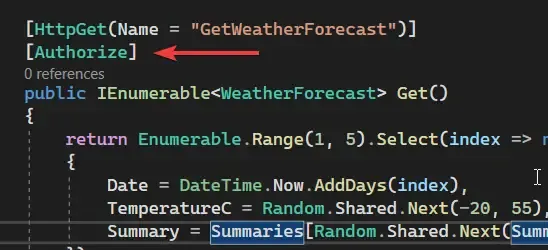
That’s actually everything you need to do to make our WebAPI aware that it is secured by Tokens that are generated by Cognito, and from a specific user pool too. Let’s start testing now!
Postman Testing
Now that we have secured our weather forecast endpoint, let’s try to hit the local URL via POSTMAN without Auth tokens in the request headers.

As expected, we get back a 401 request code, which means the request is not authorized.
Let’s go back to our JWT generation requests (either client credentials or using a password), and generate a new JWT.
Note that these tokens have a validity of 60 mins. You can alter this by going into the user pool configuration and setting your desired validity periods.
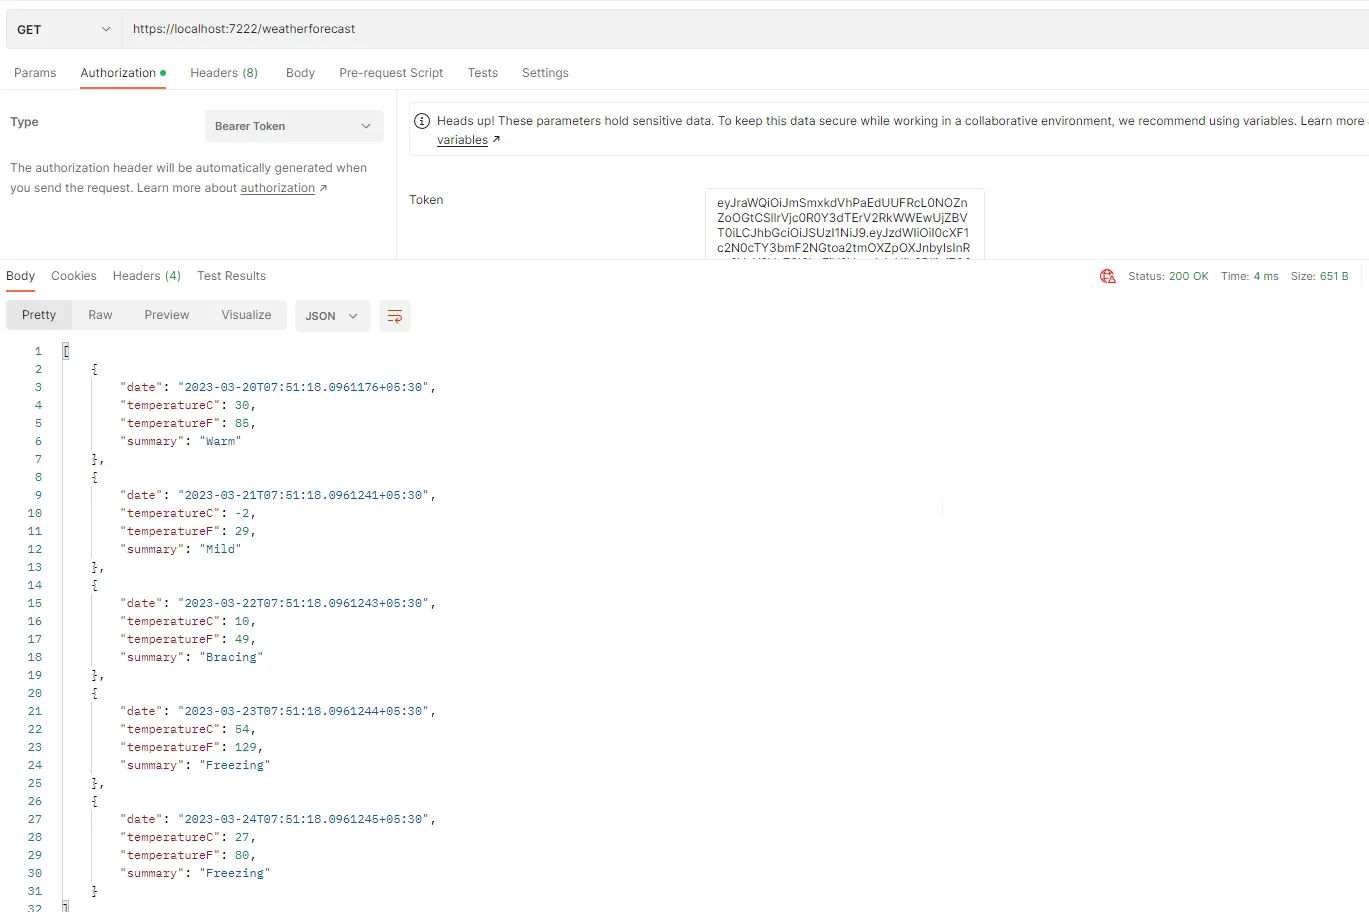
Once you have the JWT generated, simply set the Authorization Type of the weatherforecast request to Bearer, and paste the JWT in the token text box. That’s it! Hit send request.
You will now be able to see the secured data, which in our case is a bunch of weather-related data.
That’s a wrap for this article. Hope you liked it!
Grab the entire source code of this implementation from here: https://github.com/iammukeshm/securing-dotnet-webapi-with-amazon-cognito
Summary
In this article, we learned about Securing .NET WebAPI with Amazon Cognito. We have explored 2 major authentication flows, which are the client credentials grant and the password grant type. We have configured the Amazon Cognito resources as per our requirement and were able to generate JWTs for both authentications flows in no time! Following this, we have also built an ASP.NET Core WebAPI which has a secured endpoint and validates tokens from a specific Cognito User pool as well.
Make sure to share this article with your colleagues if it helped you! Helps me get more eyes on my blog as well. Thanks!
Stay Tuned. You can follow this newsletter to get notifications when I publish new articles – https://newsletter.codewithmukesh.com. Do share this article with your colleagues and dev circles if you found this interesting. Thanks!


