When building a new ASP.NET Core project, one should prioritize setting up logging to ensure robust monitoring and debugging capabilities right from the start. Serilog is the most popular logging library for ASP.NET Core Applications. In this article, we will learn everything you need to know to master Structured Logging in your ASP.NET Core Application using Serilog. We will understand Serilog Configuration, Sinks, and all the best practices that you need to follow. This will be the only guide you need to refer to master logging for your .NET Application.
Why Choose Serilog?
As mentioned, Serilog is a popular third-party logging library that plugs into the default ILogger instance of a .NET application with its logging implementation. It enables applications to log events into various destinations like console, file, database, CloudWatch Logs, and more. Serilog offers structured logging, which can help you store and analyze your logs in a much cleaner way. Serilog also provides super flexible configurations, which we will see in the later sections of this article. Serilog is the first library I tend to install, every time I start a new ASP.NET Core Project!
Performance-wise, Serilog has close to 0 impact on the performance of your application due to its features such as asynchronous logging, and log message batching.
On top of this, there are several aspects to this library that you need to know. Let’s get started.
Getting Started with Serilog in ASP.NET Core
I will be using .NET 8 Web API Project with Visual Studio 2022 Community Edition for this demonstration.
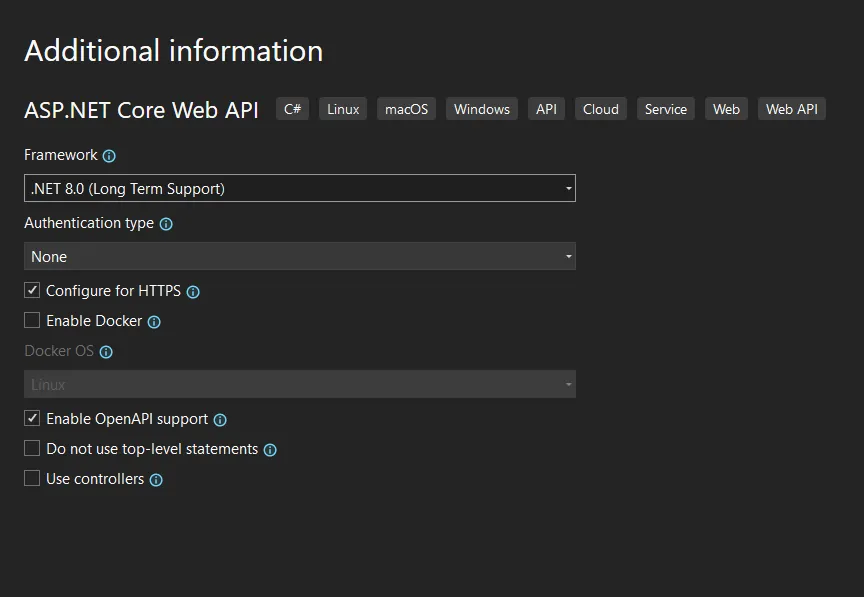
Installing the Serilog Package for ASP.NET Core Applications
First up, install the Serilog package for your ASP.NET Core application by running the following command.
Install-Package Serilog.AspNetCoreConfiguring Serilog - Basics
Once the package is installed, let’s configure Serilog. For this, open up Program.cs and make the following changes.
using Serilog;Log.Logger = new LoggerConfiguration() .WriteTo.Console() .CreateLogger();try{ Log.Information("starting server."); var builder = WebApplication.CreateBuilder(args); builder.Host.UseSerilog((context, loggerConfiguration) => { loggerConfiguration.WriteTo.Console(); loggerConfiguration.ReadFrom.Configuration(context.Configuration); }); builder.Services.AddEndpointsApiExplorer(); builder.Services.AddSwaggerGen(); var app = builder.Build(); if (app.Environment.IsDevelopment()) { app.UseSwagger(); app.UseSwaggerUI(); } app.UseHttpsRedirection(); app.Run();}catch (Exception ex){ Log.Fatal(ex, "server terminated unexpectedly");}finally{ Log.CloseAndFlush();}- Here, Lines #2 to #4 are where we are creating the logger instance using Serilog while enabling it to write logs to the console. Note that the only purpose of this piece of code is to enable logging within the
Program.cs. So, this is just optional. - From line #9 to #13, we will add Serilog to our ASP.NET Core Application’s DI Container. We have defined 2 configurations here, which are to write to Console, and to read configurations from
appsettings.json. This will be applied to the entire application wherever we use theILogger<>interface. Also, this will ignore theLoggingconfiguration from the appsettings file and consider only theSerilogsection inappsettings.json. - Apart from that, we have added a try-catch block to log any kind of application-level fatal errors.
Note that, by default, we are enabling our .NET application to log to the console, at line #11. It’s up to you to remove this. I use this so that all logs are by default logged at the console. Helps a lot during debugging.
Next, open up the appsettings.json file and add the following. As said earlier, here we have skipped the Logging section, and instead, we will use the Serilog section to configure our logger. For now, we are just sticking to the basic configuration. As we progress, we will add in more configurations.
{ "Serilog": { "MinimumLevel": { "Default": "Information", "Override": { "Microsoft": "Warning", "Microsoft.AspNetCore.Hosting.Diagnostics": "Error", "Microsoft.Hosting.Lifetime": "Information" } } }, "AllowedHosts": "*"}Logging Minimum Level - Understanding Log Levels in Serilog
As you can see above, we have set the default MinimumLevel to Information, which means that only logs above Information Level Priority will be logged. To understand this, you will have to know about the log levels and priorities in Serilog.
In Serilog, there are 6 Log Levels that you can work with. In the earlier code snippet, we used Log.Information() and Log.Fatal(). These are some commonly used log levels. This helps determine the criticality of the message we are trying to log.
Here are the 6 Log Levels included with Serilog.
| Level | Usage |
|---|---|
| Verbose | Verbose is the noisiest level, rarely (if ever) enabled for a production app. |
| Debug | Debug is used for internal system events that are not necessarily observable from the outside, but useful when determining how something happened. |
| Information | Information events describe things happening in the system that correspond to its responsibilities and functions. |
| Warning | When service is degraded, endangered, or maybe behaving outside its expected parameters, Warning-level events are used. |
| Error | When functionality is unavailable or expectations are broken, an Error event is used. |
| Fatal | The most critical level, Fatal events demand immediate attention. |
Thus, in our application, all levels above Information will be logged, including Information level logs. In our appsettings, we have defined custom minimum levels for various contexts. For example, only the Warning and above messages from Microsoft Libraries will be logged. Similarly, only error / fatal messages from Microsoft.AspNetCore.Hosting.Diagnostics will be logged. This gives super precise control over what you want to log in to your ASP.NET Core application.
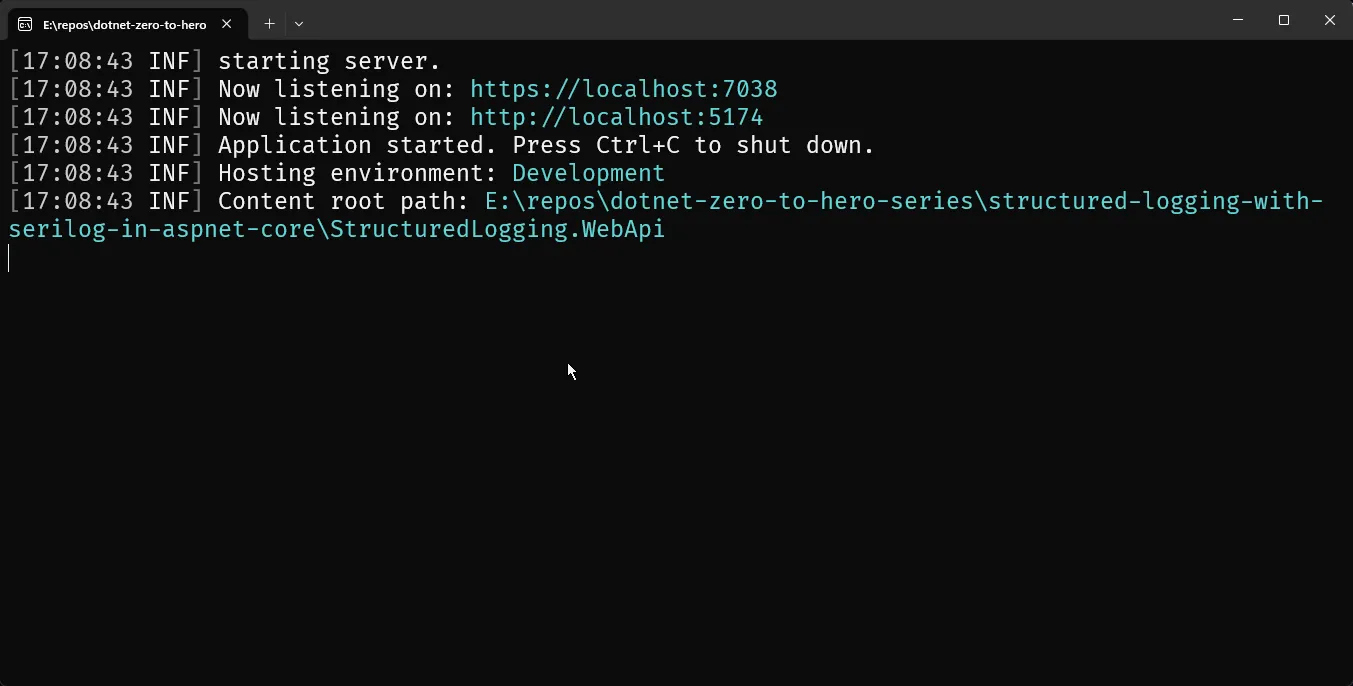
With these changes, if you build and run your .NET application, you will see the following logs on your console.
ILogger
Now, we will learn about using the ILogger interface to log messages. For this, we will create a Dummy Service along with an interface, and wire it up with a Minimal Endpoint. For this, create a new folder named Services, and add the following classes/interface.
public interface IDummyService{ void DoSomething();}public class DummyService(ILogger<DummyService> logger) : IDummyService{ public void DoSomething() { logger.LogInformation("something is done"); logger.LogCritical("oops"); logger.LogDebug("nothing much"); }}So, we have a simple interface that has a function called DoSomething, whose implementation just logs messages at different log levels.
Next, we will have to register the DummyService, and create a Minimal API Endpoint that uses this service. Open your Program.cs file and add the following.
builder.Services.AddTransient<IDummyService, DummyService>();This ensures that IDummyService is registered into the DI Container of the application.
app.MapGet("/", (IDummyService svc) => svc.DoSomething());And, the above is the code to register an (GET) API endpoint at the root of the application, ”/” which in turn invokes the DoSomething method of the Dummy interface.
That’s everything! Let’s build our application and run it.
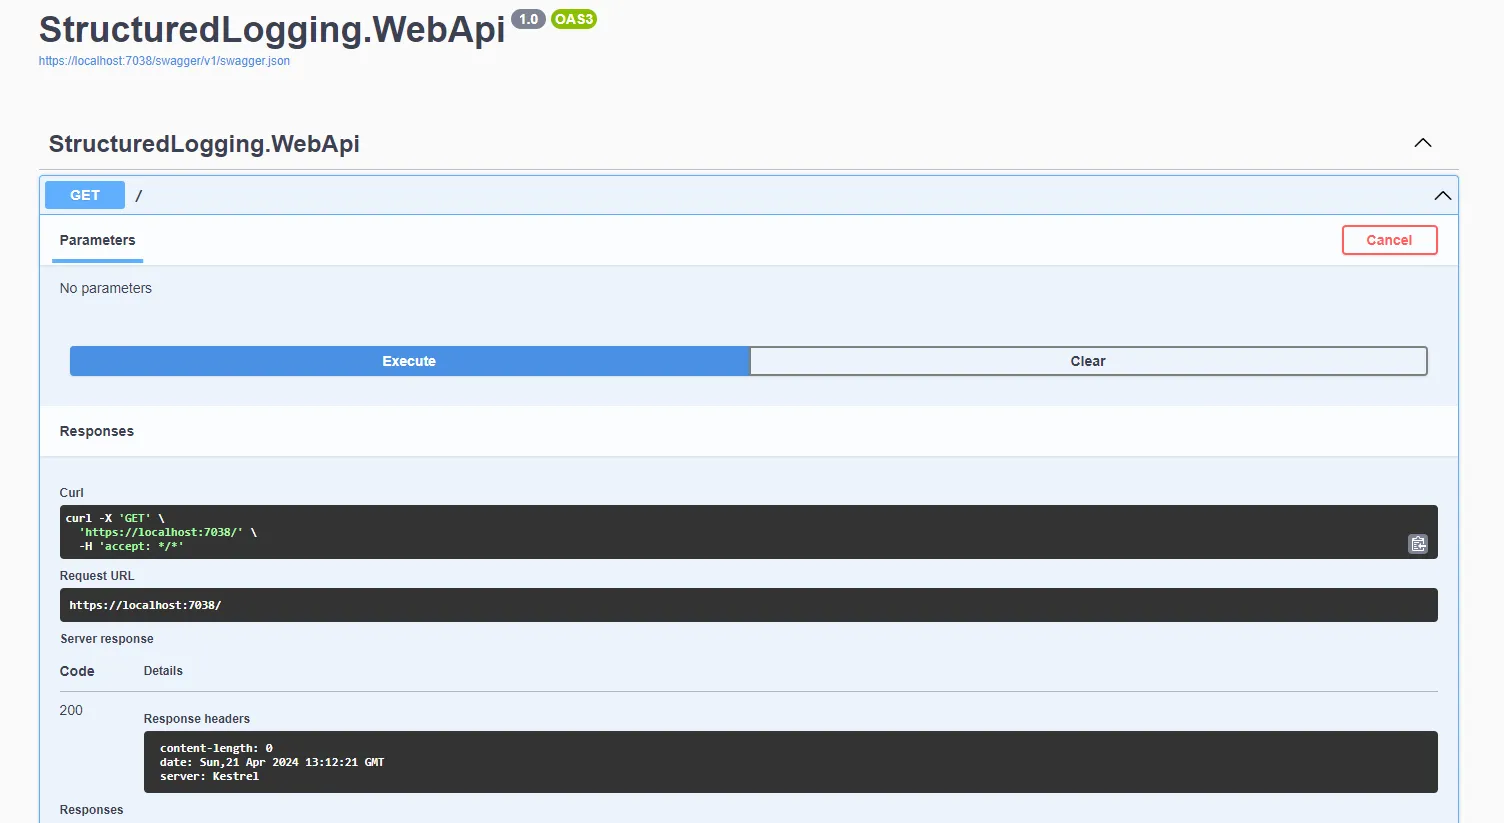
You will be able to see our new API endpoint show up on Swagger. I have sent a GET request to this endpoint.
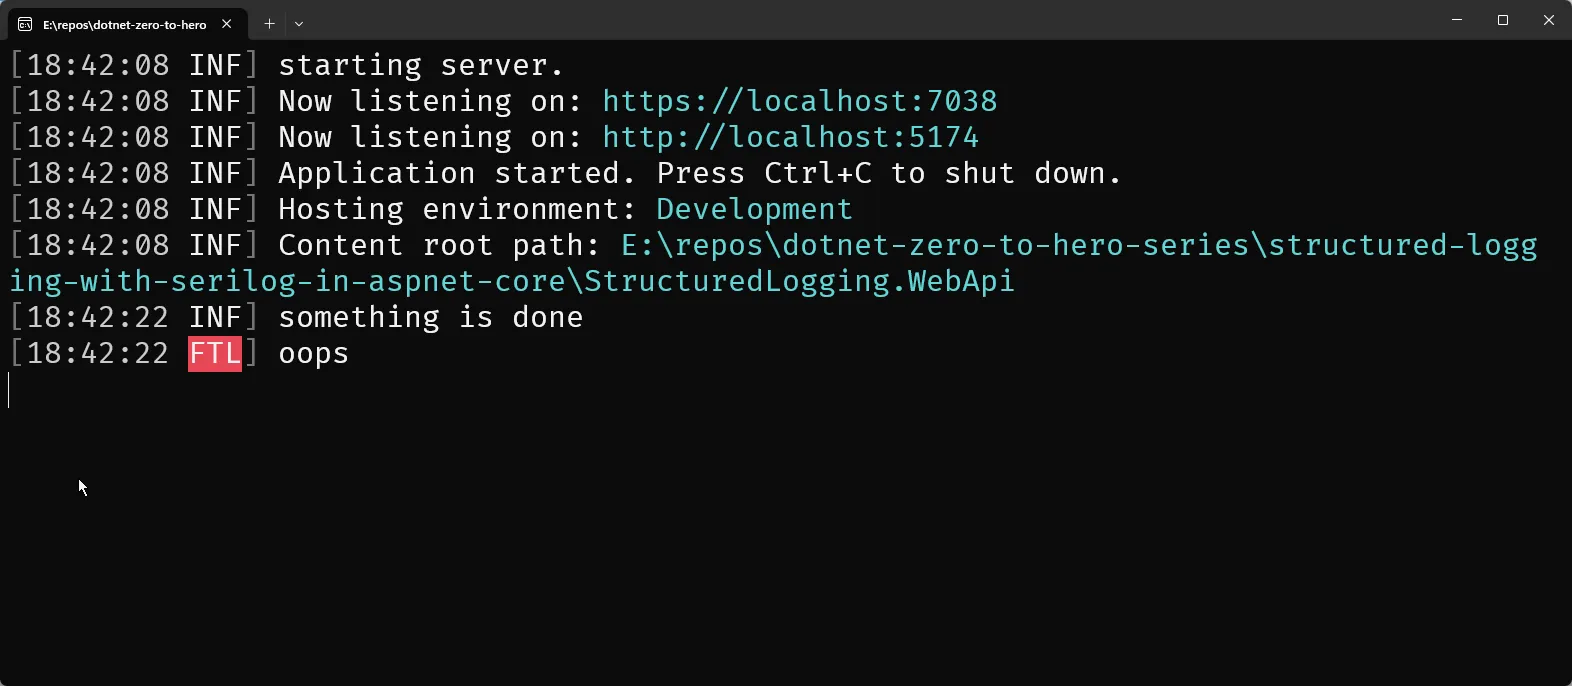
Note that only the Information and Fatal logs are visible. This is solely because we have set the Minimum Log level to Information, and thus the Debug Logs will be skipped. Now, If you want to show the debug logs as well, simply go to your appsettings.json and set the Serilog > MinimumLevel > Default value to Debug.
As you see, with minimal changes we have already switched entirely to Serilog Logging for our ASP.NET Core application.
Configuring Serilog
Let’s get into the Configurations! Basically, there are two ways of configuring Serilog in your .NET Applications, and it depends on your requirements. You can either use appsettings.json or Fluent API to configure Serilog in a more hard-coded way.
Configuring via appsettings.json (Recommended)
In the earlier code, we had used logger.ReadFrom.Configuration(context.Configuration); to ensure that the logger can read from appsettings.json. This is the recommended approach since it allows us to define different configurations per environment.
Configuring via Fluent API
In case, you want a more hard-coded approach, you can use Fluent API to configure Serilog. For instance, we had defined the Minimum Log Levels in appsettings.json as Information. If you want to do this via code, you can do the following in your Program.cs.
builder.Host.UseSerilog((context, logger) =>{ logger.MinimumLevel.Warning(); logger.WriteTo.Console();});I wouldn’t recommend this approach as it may limit the configuration possibilities. But again, it depends on your use case and preference.
Serilog Sinks
Serilog supports writing logs to multiple targets like Console, File, Amazon CloudWatch, DynamoDB, SEQ, SQL Server, MongoDB, and a ton of other providers. Read the entire list here. Serilog Sinks in simpler words relate to destinations for logging the data.
We will explore a couple of Serilog Sinks and configure them on our appsettings.json.
File
By default, Serilog ships with File and Console sinks. This means you don’t have to install any additional packages to be able to log into Console or File. We have already tested Console-based logging. To enable logging data to file, open up appsettings.json and add the highlighted code.
{ "Serilog": { "MinimumLevel": { "Default": "Information", "Override": { "Microsoft": "Warning", "Microsoft.AspNetCore.Hosting.Diagnostics": "Error", "Microsoft.Hosting.Lifetime": "Information" } }, "WriteTo": [ { "Name": "File", "Args": { "path": "D:\\Logs\\log.txt", "rollingInterval": "Day" } } ] }, "AllowedHosts": "*"}Here, we added a WriteTo Section, and declared the sink as File. In the arguments, we passed the path of the text file and defined the rolling interval as Day. This ensures that a new log file will be created daily to keep file sizes in control.
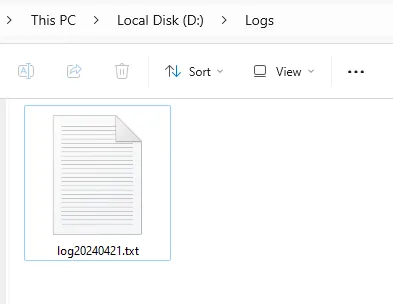
You can see that the filename has been appended with the time information.
If you want to clean up older log files, you can set up the retainedFileCountLimit property as well in the arguments. By default, 31 files are retained, and the older ones will be deleted.
Similarly, you can also create log files based on the file sizes. For this, you need to set the fileSizeLimitBytes property and set rollOnFileSizeLimit to true. The default FileSizeLimitBytes is set to 1 GB. So, once your log file size crosses the 1 GB mark, a new file will be rolled out with names like,
log.txtlog_001.txtlog_002.txtHere is the data logged into the text file. As simple as that!
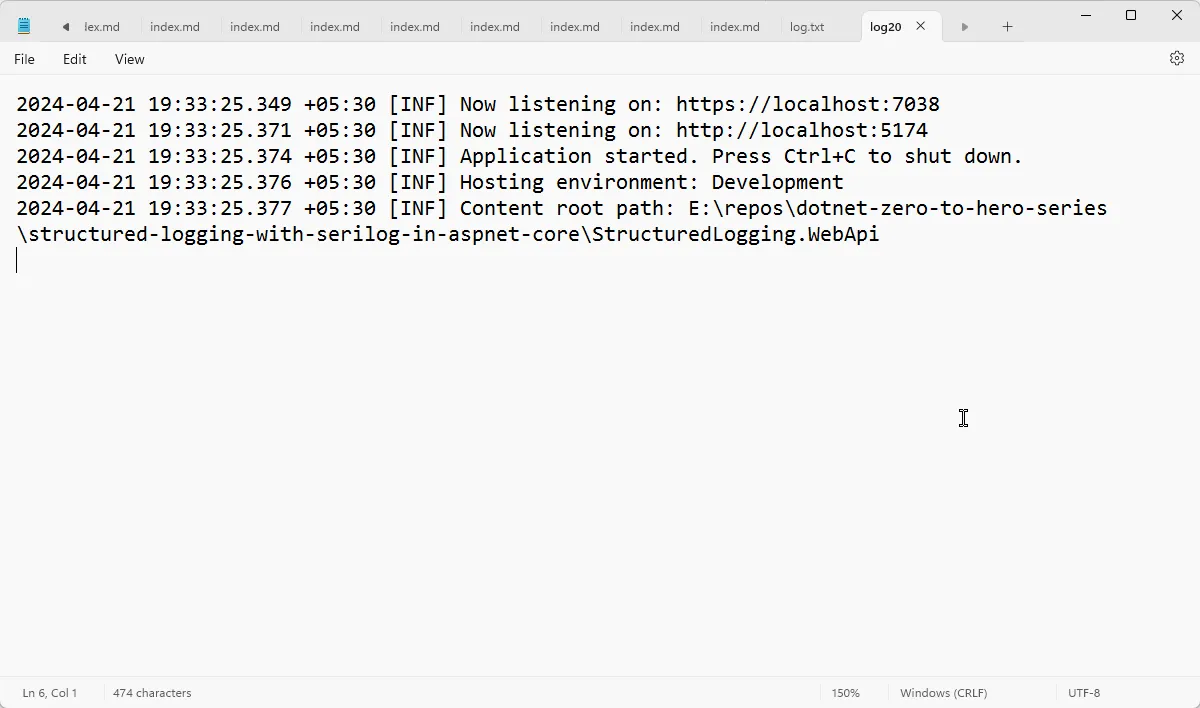
Custom Output Message Formats
Additionally, if you want to configure the output/message format, you can simply add the outputTemplate property to the arguments of the sink. For example, I have given the following configuration.
"outputTemplate": "{Message}{NewLine:1}{Exception:1}"If you run your application, you can see the following logs in your text file, this time without any timestamp data.
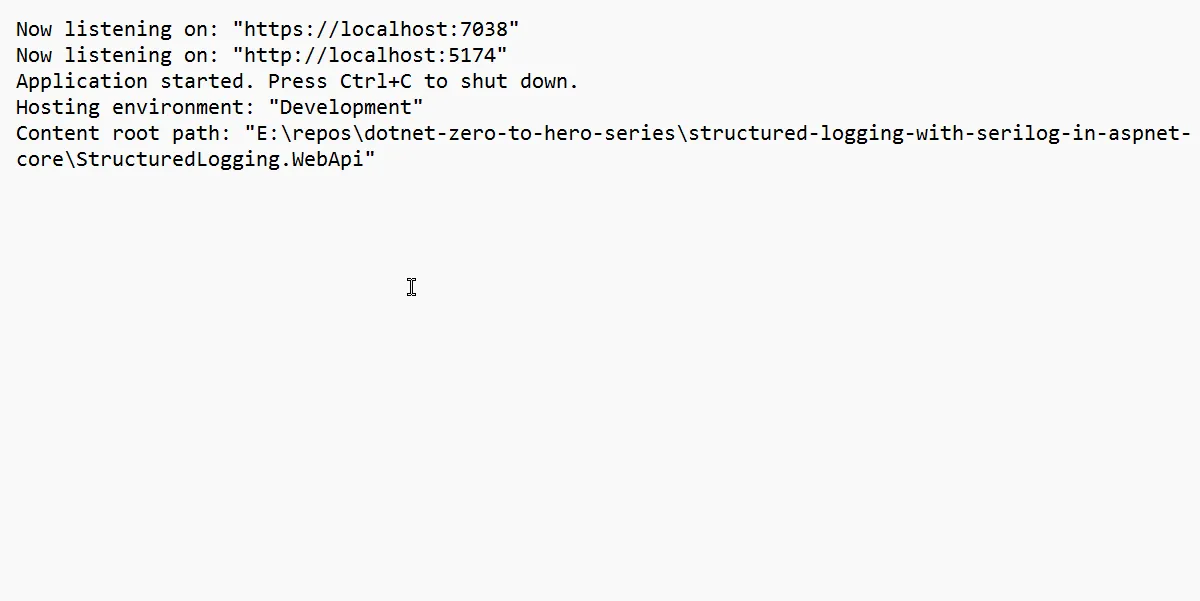
Read more about the Supported Output Templates here.
Structured Logging
To enable structured logging with the File Sink, we need to add a JSON formatter as a Parameter to the Settings. Let’s change our configuration as below.
{ "Name": "File", "Args": { "path": "D:\\Logs\\log.json", "rollingInterval": "Day", "rollOnFileSizeLimit": true, "formatter": "Serilog.Formatting.Compact.CompactJsonFormatter, Serilog.Formatting.Compact" }}Let’s restart our application.
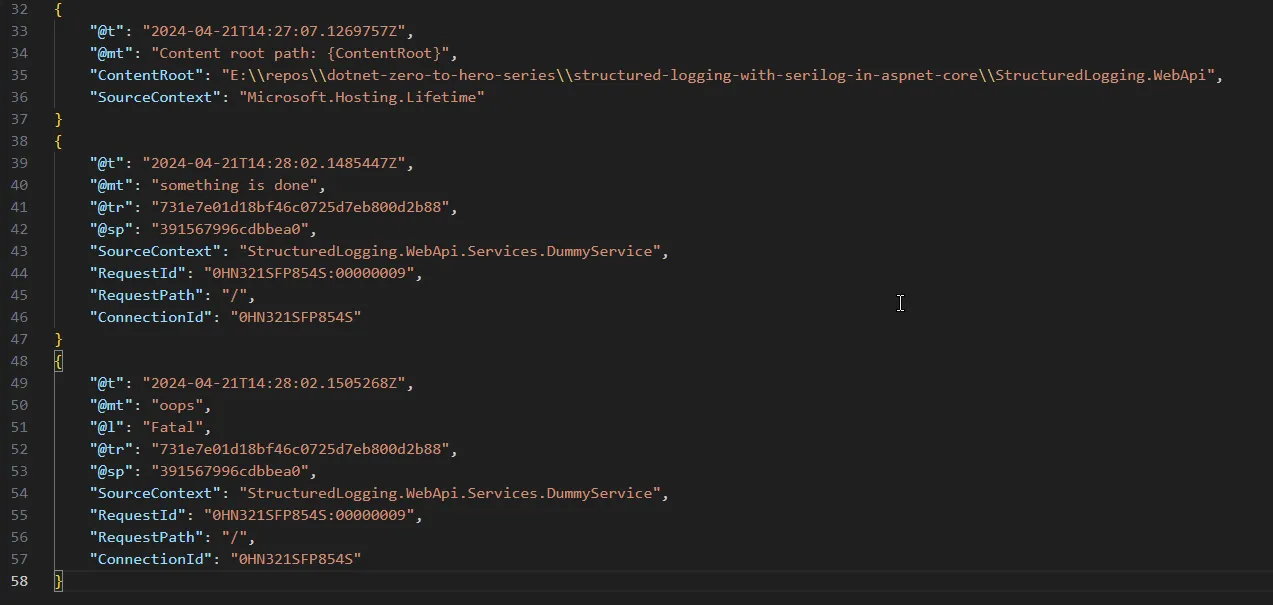
As you see, we now have a beautifully structured log. Now, if we want to add additional metadata to our structured log, let’s go back to our DummyService and make the following changes so that we accommodate a couple of more properties.
public class DummyService(ILogger<DummyService> logger) : IDummyService{ public void DoSomething() { logger.LogInformation("something is done"); logger.LogCritical("oops"); logger.LogDebug("nothing much"); logger.LogInformation("Invoking {@Event} with ID as {@Id}", "SomeEvent", Guid.NewGuid()); }}As you see, we have added a separate log message with 2 parameters, namely Event and Id. Let’s run the application.
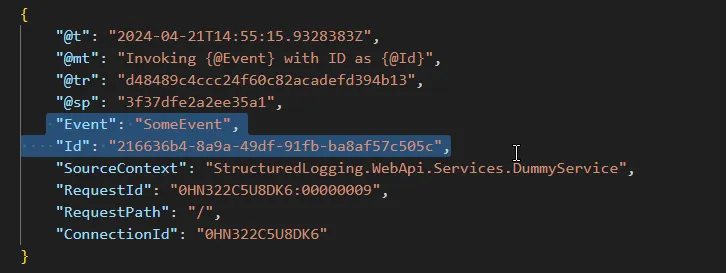
So, the additional parameters are also now a part of the structured log message. This is a powerful feature of structured logging and will help immensely while tracing bugs.
SEQ - Recommended for Local Development
Next, we will explore writing our application logs to an external service, SEQ.
SEQ is a super cool tool to monitor and analyze your application’s structured logs. This works seamlessly with Serilog and ASP.NET Core.
Here is a simple Docker command to spin up a SEQ container on your local. Please note that this is just for demonstration purposes. Ideally, you would want to have a docker-compose file for this and attach your SEQ container to a volume so that the log data can be retained.
docker run --name seq -d -e ACCEPT_EULA=Y -p 80:80 -p 5341:5341 datalust/seqOnce your container has started, navigate to localhost:80. You can see that your SEQ dashboard is now accessible. Let’s write some logs to this instance.
But first, let’s install the required sink package for serilog.
Install-Package Serilog.Sinks.SeqNext, let’s add a new sink to our appsettings.json configuration.
{ "Name": "Seq", "Args": { "serverUrl": "http://localhost:5341" }}That’s it! Just restart your application, and you will be able to see the following log messages.
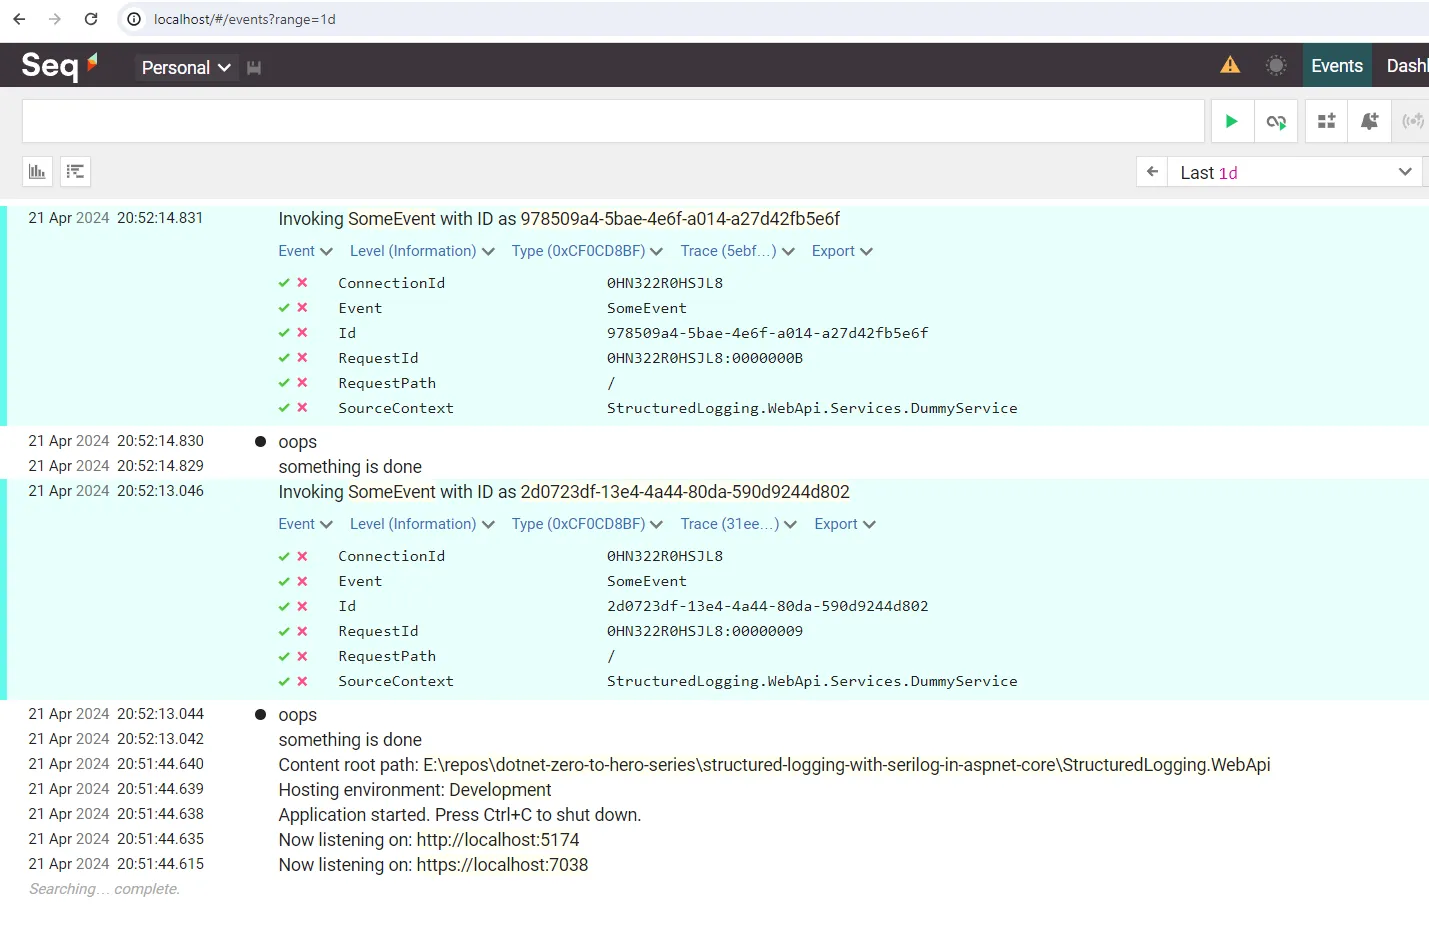
Enriching Logs
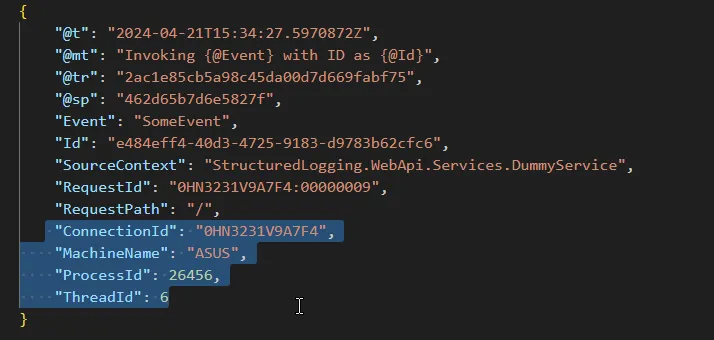
To unleash the full potential of Serilog, we use enrichers. These enrichers give you additional details like MachineName, ProcessId, ThreadId when the log event occurs for better diagnostics. It makes a developer’s life quite simpler.
Install-Package Serilog.Enrichers.EnvironmentInstall-Package Serilog.Enrichers.ProcessInstall-Package Serilog.Enrichers.ThreadOnce the packages are installed, open up appsettings.json and add the enrichers.
"Enrich": [ "WithMachineName", "WithProcessId", "WithThreadId"]Simply restart your application, and check the newly generated logs. You will be able to see additional properties like Machine Name, Process ID, and Thread ID.
Request Logging
You can make use of Serilog to log ASP.NET Core HTTP requests to the sinks. You just have to add the following line of code in your Program.cs file.
app.UseSerilogRequestLogging();From now on, every time a new request hits the HTTP pipeline, Serilog will log in to your sinks.
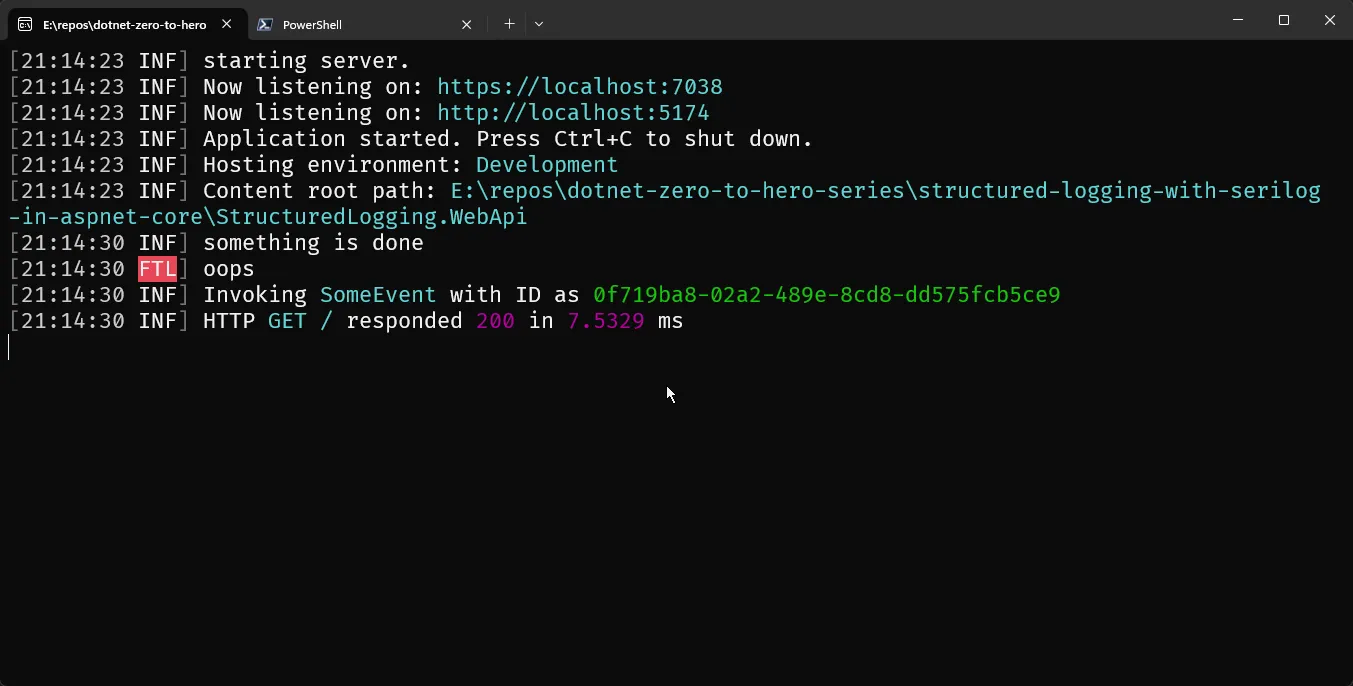
You can see the HTTP Request logged.
Best Practices
Here are some best practices and recommendations for using Serilog in ASP.NET Core Applications.
- Do not rely on File and Console logging in Production
- Sparingly use console logging in Production, as this might be a blocking call at times. Do console logging only for Errors if needed. Otherwise always stick to external logging in Production.
- Prefer appsettings.json over fluent api configuration, as appsettings is more robust and flexible to work with.
- Prefer SEQ For Local Development as it’s easy to diagnose issues based on the incoming logs.
- Use Asynchronous Logging to ensure the best performance of your ASP.NET Core application.
- For larger systems, try to add a correlation ID to your structured logs so that you can identify the logs of a single request. This can be done by introducing a middleware and pushing a GUID as the correlation ID.
Summary
That’s all for this guide. I hope you have found this interesting and helpful. In this article, we covered everything you need to know about integrating Serilog in ASP.NET Core applications. We further learned about Sinks, Enrichers, Request Logging, and so on.
Do share this article with your colleagues if you like this article. Also, leave your valuable feedback regarding this article so that I can constantly improve the quality of my content.
This is the first article of my .NET Zero to Hero Series. To join this series and get future updates, do subscribe to my newsletter. I have also attached the source code of this implementation.


