In this article, we will look into Structured Logging in Golang with Zap from Uber! When it comes to product development, logging plays a vital role in identifying issues, evaluating performances, and knowing the process status within the application. Most of the time, we would expect the logger to provide us information like log level, timestamp, error message, stack trace that can pinpoint the line of the code that hits the exception, and so on.
You can find the source code of the Zap Logger implementation in Golang here.
Golang’s Default Logging Package - Explained
So, by default, Golang ships with a standard Logging Package that is quite simple to use. It can log the messages to the console as well to an external file. You can find the logging package here - https://pkg.go.dev/log
Here is the syntax for using the default Golang Log package.
package mainimport "log"func main() { log.Println("Hello, world!")}Once you run the Go application, here is how the message will be logged to the console. You can see that this default logging package is capable of printing out the date & time as well.
2022/03/27 10:33:19 Hello, worldNow, if you want to write these logs into a text file, you would have to do the following.
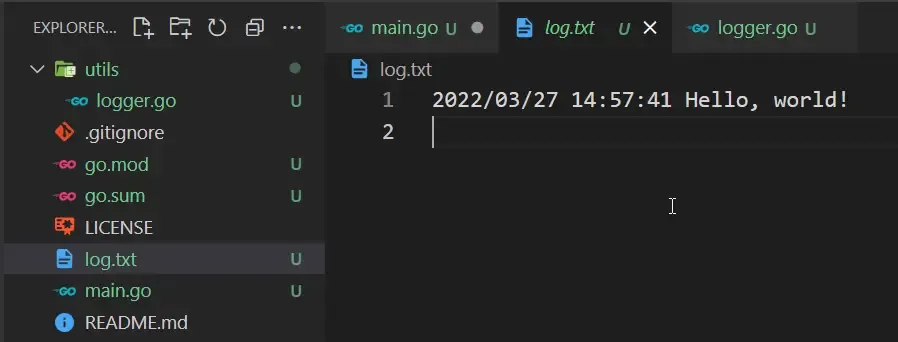
package mainimport ( "log" "os")func main() { logFile, _ := os.OpenFile("log.txt", os.O_CREATE|os.O_WRONLY|os.O_APPEND, 0666) defer logFile.Close() log.SetOutput(logFile) log.Println("Hello, world!")}Here, in Line 7, we are essentially opening the log.txt file in the Create and Append mode. Next line, we instruct the program to close the file once the function is exited. In Line 9, to the logger instance, we are setting the output file as the previously opened logfile. After that, every time we log anything using the log package, the messages, and content will be written to the defined log file.
Let’s run the Golang program.

You can see that there is a newly created file named log.txt in the root of the application which contains the logged message.
Although the default logger is pretty simple to work with, it doesn’t have all the required features to be included in a production system. It’s fine for a quick development/prototype, but for real-time scenarios, it barely ticks all the boxes. We would prefer logs that are more structural and easy to read. Meaning, with the logs thrown out by the system, we would essentially need to categorize them for easier identification and probably contain a lot more fields and data.
The major advantages of the default log package of Golang are the following:
-
Very basic logging.
-
Limited log levels. There is no way to categorize messages into Info, Warning, Fatal, Errors, and so on.
-
During exception, by using the Fatal or Panic methods, the application exits. There is no way to log an error message without quitting the application.
-
Primitive Message Formatting. It would be better if there were ways to include stack trace, format the date-time if needed, add additional contexts, and so on.
This is why we need a better solution for logging messages in a Golang application.
Introducing Zap
Zap is a logging package from the developers at Uber. It is advertised as ‘Blazing fast, structured, leveled logging in Go’. This package supposedly solves all the problems we had with Go’s default logging package. It not only provides a flexible way of logging messages but also is the fastest logging package out there for Golang applications.
Zap comes with 2 different types of loggers depending on your use case. In applications where performance is not that critical, you can use SuggaredLogger ( which is still 4 - 10 times faster than the other structured loggers ). It supports both structured logging and the normal printf logging too!
In cases where the application performance is critical, the Logger from Zap is used. It’s much faster than the SuggaredLogger but only supports Structural logging.
Let’s look at some code samples on how to implement structure logging in Golang with Zap and do some modifications to customize this awesome logger a bit more!
Getting Started with Structured Logging in Golang with Zap
For this implementation, I will be using VSCode as my IDE for developing the Golang prototype. Let’s get started by creating a new folder and opening the folder with VSCode.
Initialize the Go application by creating a new main.go file and run the following command.
go mod init logging-exampleThis would create the go.mod file for you in the directory.
Next up, let’s install the Zap package by running the following go-get command.
go get -u go.uber.org/zapBefore getting started with implementation, this article also concentrates on clean practices while developing the Golang application. That being said, in terms of application development, logging packages are usually something that is external and can be treated like a utility to the entire application that can be switched if needed. This can be done by moving the logger initialization and usage code to a different package apart from the main package.
So, let’s create a new folder named utils and create a new file named logger.go in it.
Logging to Console with Zap in Golang
Firstly, this is how the logger.go file would look like this with minimal initialization code. We will add more functionalities to this moving forward. As of now, our requirement is quite simple, to log the messages to the console in a structured way.
package utilsimport ( "go.uber.org/zap" "go.uber.org/zap/zapcore")var Logger *zap.Loggerfunc InitializeLogger() { logger, _ = zap.NewProduction()}Note that the name of the package is ‘utils’. This ensures that the logger instance can be used throughout the application once it’s initialized from the main package’s entry point which is the main function.
Line 7 to 9, this function will be called by the main function which would initialize the Zap logger instance.
Now, navigate to the main function under the main go file and add the below code. Note that your import section will be different from what I have.
package mainimport ( "github.com/iammukeshm/structured-logging-golang-zap/utils" "go.uber.org/zap")func main() { utils.InitializeLogger() utils.Logger.Info("Hello World") utils.Logger.Error("Not able to reach blog.",zap.String("url", "codewithmukesh.com"))}Line 7 calls the Initialization function of the logger package that we wrote earlier.
Line 8 adds a simple Info level log.
Line 9 adds an Error level log. Note that the Error method can take in n number of arguments. The first argument has to be always the error message, followed by various zap arguments that will denote fields in the resulting log JSON. In this instance, we are going to return a simple exception that says that the application is not able to reach a particular URL. To understand better, let’s run the Golang application and check.
This is the output you would be seeing in the terminal.

{ "level": "error", "ts": 1648382422.5089228, "caller": "utils/logger.go:22", "msg": "Not able to reach blog.", "url": "codewithmukesh.com", "attempt": 3, "stacktrace": "github.com/iammukeshm/structured-logging-golang-zap/utils.Error\n\tD:/go-repo/structured-logging-golang-zap/utils/logger.go:22\nmain.main\n\tD:/go-repo/structured-logging-golang-zap/main.go:10\nruntime.main\n\tC:/Program Files/Go/src/runtime/proc.go:250"}You can see that we get the log level, timestamp (which is on a different encoding), the file that is calling the log method, the message, stack trace, and the other parameters that we passed while calling this log function. Also, note that the messages are in JSON format.
Now, let’s add some vital customizations to the code and make it more production-ready. First up, let’s make the logger write to a file rather than to the console.
Logging to File with Zap in Golang
You would have to make these modifications to the Initialize method.
func Initialize() { config := zap.NewProductionEncoderConfig() config.EncodeTime = zapcore.ISO8601TimeEncoder fileEncoder := zapcore.NewJSONEncoder(config) logFile, _ := os.OpenFile("log.json", os.O_APPEND|os.O_CREATE|os.O_WRONLY, 0644) writer := zapcore.AddSync(logFile) defaultLogLevel := zapcore.DebugLevel core := zapcore.NewTee( zapcore.NewCore(fileEncoder, writer, defaultLogLevel), ) logger = zap.New(core, zap.AddCaller(), zap.AddStacktrace(zapcore.ErrorLevel))}Line 2 creates a new config for the Zap encoder.
Line 3 sets the time encoder to follow the standard ISO time format.
Line 4 creates a file encoder that follows the standard JSON encoding.
Line 5 opens up the log.json in the Create and Append mode.
Line 6 creates a file writer that will be used later on by Zap to write the messages to the file.
Line 7, we simply create a variable that says the default logging level will be at Debug. You can change it as you want it to be.
Line 8-10 add the file writer, encoder, and default log level to the Zap core instance.
Line 11 creates a new Zap instance passing the previously created configs. It also adds in other options like including the log caller, and the stack trace ( for the errors ).
Let’s run the application and check.

You can see that the application creates a log.json file for us and adds the JSON corresponding to the error that we triggered along with the complete stack trace of the error.
Logging to both File and Console with ZAP in Golang
But now if you notice, the application no longer logs to the console. There is a way to make Zap log to multiple areas, as in both the file and the console. To do this, we might have to modify the Initialize function again as follows, by adding the highlighted lines of code.
func Initialize() { config := zap.NewProductionEncoderConfig() config.EncodeTime = zapcore.ISO8601TimeEncoder fileEncoder := zapcore.NewJSONEncoder(config) consoleEncoder := zapcore.NewConsoleEncoder(config) logFile, _ := os.OpenFile("text.log", os.O_APPEND|os.O_CREATE|os.O_WRONLY, 0644) writer := zapcore.AddSync(logFile) defaultLogLevel := zapcore.DebugLevel core := zapcore.NewTee( zapcore.NewCore(fileEncoder, writer, defaultLogLevel), zapcore.NewCore(consoleEncoder, zapcore.AddSync(os.Stdout), defaultLogLevel), ) logger = zap.New(core, zap.AddCaller(), zap.AddStacktrace(zapcore.ErrorLevel))}Run the application again and see the console.

There can be some real-time use cases like, I need to log only the errors to the file and log everything else to the console. How would you go about it? Simply change the default log level and pass different values for different zapcores that you created in lines 10 & 11. Get the idea? There are quite a lot of modifications you can do if you play around with the code.
That’s a wrap for this article. I will try to add more functionalities to this article over time.
Summary
So, in this article, we learned about Structured Logging in Golang with Zap. We also learned a thing or two about neatly organizing Golang Project to ensure that the logger is easily accessible by other packages as well. Other than that, we learned about writing logs to the console, files and added a few customizations to it. Which is your favorite logger in Golang?
Do share this article with your colleagues and dev circles if you found this interesting. You can find the source code of this mentioned implementation here. Thanks!

