In this article, we will learn about a simple package that can improve the user experience by adding Toast Notifications in ASP.NET Core MVC / Razor Applications. We must have all seen those beautiful Javascript toast notifications and have always tried to integrate it with our ASP.NET Application. We usually end up copying the scripts and CSS and find workarounds to call these toast notifications efficiently.
It is now possible to natively integrate such awesome Javascript libraries within your ASP.NET Core Application in a few simple steps that it feels like a part of your actual C# code. The best part is, you never have to deal with Javascript again.
UPDATE - From v1.1.0, Toast Notifications support AJAX Calls / XHRs to make life easier for the developers.
Toast Notifications for ASP.NET Core is a part of the aspnetcorehero family of NuGet packages. As of now, two of the popular JavaScript libraries are integrated within this package (Notyf & Toastify-js). Here is how each of them looks like.
-

Notyf
-

Toastify-js
Pretty Cool Look and Feel, right? All this awesomeness, directly via C# is all you can ask for. These Toast Notifications are also pretty configurable in terms of the duration, colors, and so on.
This Project is Open Sourced and is always under improvement. You can find the project repository here. Do not forget to leave a star Let’s get started.
Getting Started with Toast Notifications in ASP.NET Core
We will build a small demo application whose only purpose is to invoke these toast notifications. You can integrate the mentioned package within your existing application to take advantage of this cool component. For this demonstration, we will be using the Notyf abstraction (my favorite). The other available abstraction, Toastify-Js will also have more or less the same steps to integrate.
Let’s create a new ASP.NET Core 5.0 Web Application (MVC).
Note that the package is also compatible with ASP.NET Core 3.1 Web Applications - both MVC and Razor Pages.
Install the Package
First off, let’s install the required package. Open up your package manager console and run the following command.
Install-Package AspNetCoreHero.ToastNotificationOr, you can download the package directly from NuGet Store - https://www.nuget.org/packages/AspNetCoreHero.ToastNotification/
Add the Component to the View
Once we have installed it, there are a few things to take care of. Firstly, open your _Layout.cshml page or any page where you want the Toast Notifications to appear. _Layout.cshtml is the most ideal place for such a requirement. Add in the following line of code (the highlighted one). Make sure that you put in this line only after you load the jquery library. This way, we have added the Toast Notification component to our View.
<script src="~/js/site.js" asp-append-version="true"></script>@await Component.InvokeAsync("Notyf")@RenderSection("Scripts", required: false)Register the Service
Next, we need to register the package into ASP.NET Core’s Service container. It is here that you can set the global settings of the toast notifications, like dismissal duration, the position of the notification, and so on. Open up Startup.cs and add in the following line to ConfigureServices method.
services.AddNotyf(config=>{ config.DurationInSeconds = 10; config.IsDismissable = true; config.Position = NotyfPosition.BottomRight; });DurationInSeconds - Seconds in which the toast notification will be closed. This is applied to all the notifications you will ever create in this application. You can also choose to override this setting, notification wise.
IsDismissable - add a small close button to your toast notification if set to true.
Position - An enum of where you want the toast notification to appear
That’s almost everything you have to do for initializing the ToastNotification Service. Next, open up the HomeController (or any controller) and let’s inject the required Service to the constructor.
private readonly INotyfService _notyf;public HomeController(INotyfService notyf){ _notyf = notyf;}Out of the box, the package supports 5 different modes based on what your application/context needs. Let’s go through each. I will be adding all these lines to Home Controller’s Index Method.
AJAX / XHR Support
If you are working with Partial Views, JSON Result Views, HTML Rendering Services, you probably need to make sure that your notifications pop up even if there is no actual page reload. To support this, you will need to add the following code snippet to your Configure method in the Startup.cs file.
app.UseNotyf();
What this does is, adds a Middleware to the Pipeline which in turn captures all your notifications that are generated via AJAX calls. Once the Middleware fetches the data from the XHR, few JS functions take over from there and display the notification messages from the pre-set Configurations.
Please note that AJAX/CHR is supported only for the Notyf Library as of now (v1.1.0).
Success, Error, Warning & Information
As mentioned earlier, there are 2 variants of calling the functions - without mentioning any duration (global settings is applied) or by mentioning the duration in seconds.
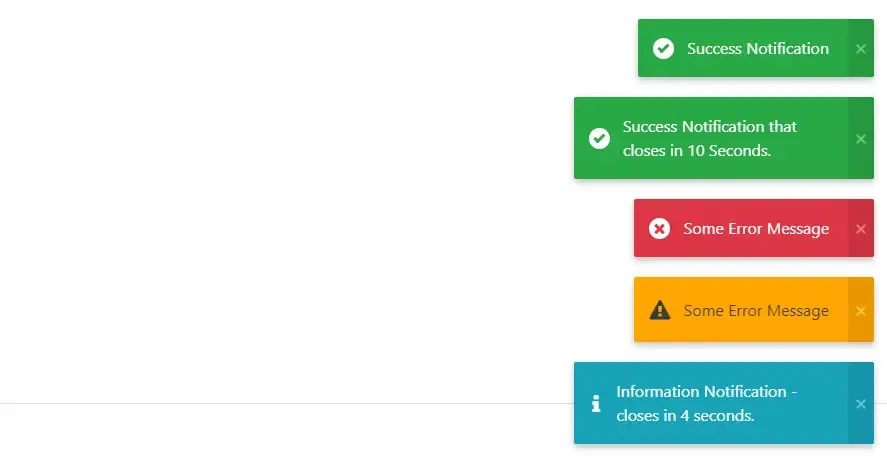
_notyf.Success("Success Notification");_notyf.Success("Success Notification that closes in 10 Seconds.",3);The First notification will be closed in 10 seconds ( the duration we have set in the Startup.cs ) and the second Notification closes down in 3 seconds. Pretty handy, yeah?
Similarly, you can use Error, Warning and Information modes for various purposes.
_notyf.Error("Some Error Message");_notyf.Warning("Some Error Message");_notyf.Information("Information Notification - closes in 4 seconds.", 4);You get the point, yeah? Let’s run the application. Here is what you get to see.

That was quite easy, right? Now, let’s talk more about how to customize this toast notification. Let’s say you want a different background color, and probably another icon. Yes, that’s possible.
Custom Mode
With the Custom mode, you get to customize the toast notification to a much deeper level.
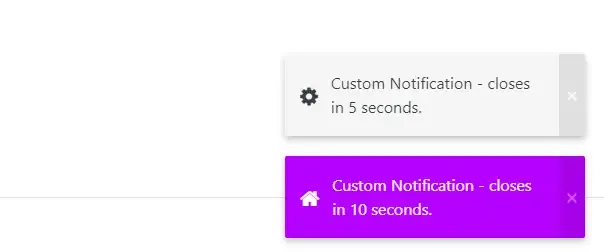
_notifyService.Custom("Custom Notification - closes in 5 seconds.", 5, "whitesmoke", "fa fa-gear");_notifyService.Custom("Custom Notification - closes in 5 seconds.", 10, "#B600FF", "fa fa-home");Note that the package includes FontAwesome Icon reference by default. If you want to use these icons, you just have to pass in the required class name and the package does everything for you seamlessly. Or else, if you choose to use your own icon library, just add a reference of the library to the _Layout.cshtml as you would normally do, and simply pass in the class name to the toast service. You also get to set the background color of the toast notification. It supports both the hex code and color name.

Pretty much simple to control the entire look and feel, yeah? I am adding more features to this library. Feel free to use this library for your upcoming projects and leave a star - https://github.com/aspnetcorehero/ToastNotification .
Let’s wrap up the article. You can find the working solution examples for both the Libraries (Notyf & Toastify-Js) below.
Toastify - (ASP.NET Core 5.0 Razor Pages)
https://github.com/aspnetcorehero/ToastNotification/tree/master/ToastNotification.Toastify
Notyf - (ASP.NET Core 5.0 MVC)
https://github.com/aspnetcorehero/ToastNotification/tree/master/ToastNotification.Notyf
Summary
In this article, we learned about a simple library that can really enhance the User Experience by displaying Toast Notifications in ASP.NET Core Applications. It is possible to work with 2 popular Javascript Toast Libraries with this package, and the best part is that you never have to touch any of the Javascript code. It all works out of the box, yet giving the developer total control.
You can find the entire soure code of the package here . Install the Package to your application from here.
Leave behind your valuable queries, suggestions in the comment section below. Also, if you think that you learned something new from this article, do not forget to share this within your developer community. Happy Coding!


