In this article, let’s go in-depth and understand the functionalities you can achieve with the help of Microsoft Identity. We will build a small yet practical implementation of Custom User Management in ASP.NET Core MVC with Identity. This will cover most of the practical use cases involved while developing User Management in ASP.NET Core. You can find the source code of this implementation on my GitHub.
PRO TIP : This is yet another huge article with around 4600+ words (Probably my longest article till now). Do bookmark this page and continue ?
What we’ll learn?
Here are the major topics we will cover in the article.
- Basics of Identity
- Adding Custom Identity Properties
- Seeding Default Users and Roles
- Role Management
- Assigning Users to Roles
- and much more.
Microsoft Identity - Overview
Every time you build an application, the first point of concern is “How will User Management work”, right? Even though this can get complex at times, the basic essence of the requirement is always the same, which is to register, login, authorize users, roles, and so on. So, to help ease the user management process, Microsoft comes up with a default implementation of User Management. The name is Microsoft Identity, It also has built-in UI to support various user functionalities. So developers who are looking for a faster way to implement User Management, tend to go with Identity. You can learn more about Identity here.
Now, Identity comes with certain basic features out of the box. But in real-time scenarios, we may need much more than what Microsoft offers by default. This includes adding Profile Pictures, UI for Role Management, Custom logic to log in to the user, and much more. This is exactly what we will learn in the course of this article.
Setting up the ASP.NET Core MVC Application
We will start off by creating a new ASP.NET Core 3.1 MVC Project with Authentication Mode selected as Individual User Accounts. This activates Microsoft Identity by default.
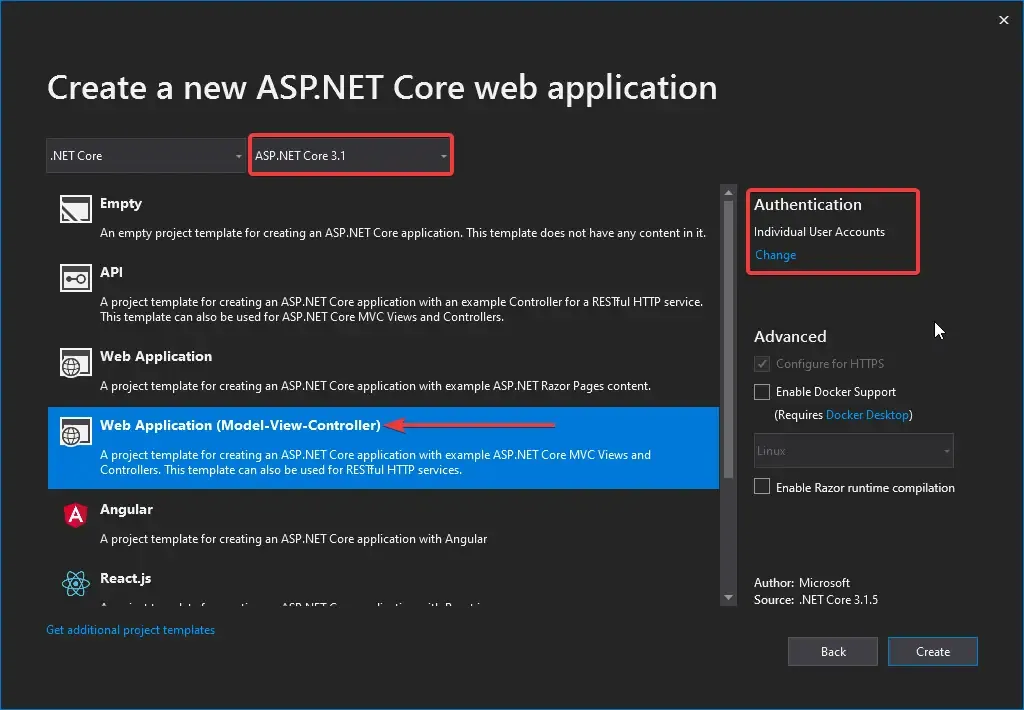
When I got started with Microsoft Identity for the first time in an ASP.NET Core 3.1 Application, the biggest confusion that hit me was, “Where are the Views/Controllers for the Identity? How does the Login page get rendered? Because there is no sign of a login page’s HTML anywhere.” I am sure that most of you have had a similar question somewhere down the line.
So, where are the view and controller located? During the announcement of .NET Core 2, Microsoft made it official that the new project scaffoldings will no longer have the auto-generated code for Identity. Rather, they decided to put all this code and HTML into the Identity DLL. While this is a clean way of going about with identity, it makes it confusing for developers who want to add custom features on top of the Identity.
Scaffolding the Identity UI
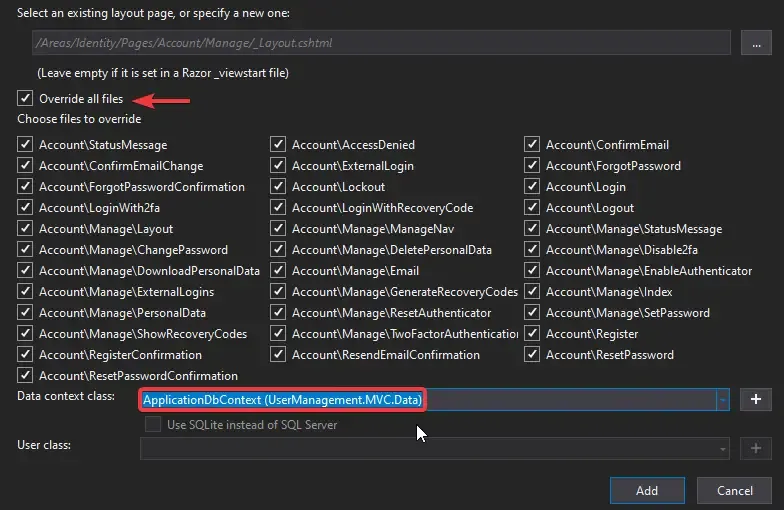
In order to modify the existing Identity, Visual Studio allows you to generate the Identity Pages. You can achieve this by right-clicking the project and Adding a new Scaffolded Item. On the dialog that appears, select the Identity and click Add. After that, you will be presented with a form containing over 50 options to select from! These are the Razor Page Versions of the Identity UI. Here you can choose the files you want to add to your project. For now, let’s select everything. Also, select the default Data context class that was already generated for you while creating the project. Click Add.
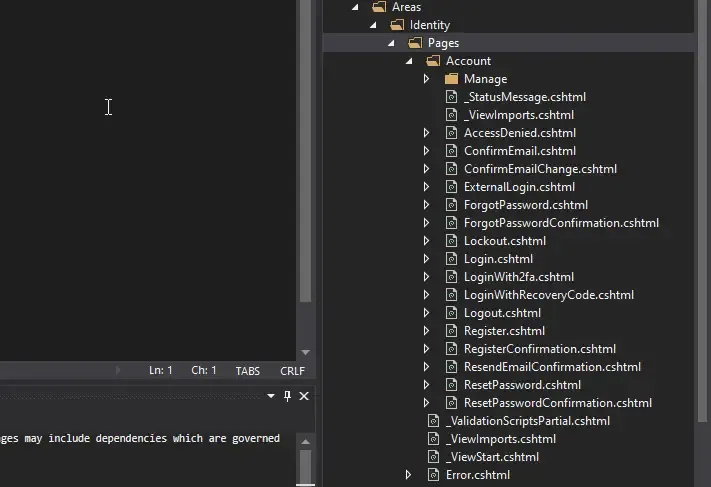
Once it is added, you can see a number of razor pages in the Areas folder. These are files that act as the default Identity UI. Moving further we will learn about customizing Identity to match our requirements.
Renaming the Default Identity Tables and Updating.
Before moving on, let’s update the database. As soon as we created our project, Visual Studio has done the following for us already.
- Added migrations for the Identity Table.
- Generated a default DB Context
- Registered the DB Context in the Startup.cs
- Added a default connection string to appsettings.json (a local DB with the project name and GUID)
PS - You can change the connection string to that of the DBMS of your choice. To keep the article simple, I am going on with the local db connection.
Since everything is set up for us, let’s apply the migrations and update the database. Open up the package manager console and type in the following.
update-databaseOnce that’s done, open up the SQL Server Object Explorer in Visual Studio. You can see our newly generated Identity tables here.
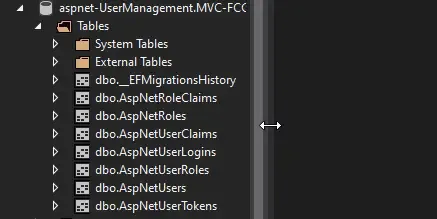
Now, there is one thing that catches the eyes of many. The Table Names. Quite ugly with the ASPNET Naming convention, right? Let’s change that now.
We will delete our new database for now.
drop-databaseAlso, delete the migrations folder (found inside the Data Folder), as we are going to generate a new one. Here is a simple solution. Since we are by default using Entity Framework Core, let’s open up the ApplicationDbContext.cs from the Data Folder. To modify the default ugly names of the Identity Tables, add this override function,
protected override void OnModelCreating(ModelBuilder builder){ base.OnModelCreating(builder); builder.HasDefaultSchema("Identity"); builder.Entity<IdentityUser>(entity => { entity.ToTable(name: "User"); }); builder.Entity<IdentityRole>(entity => { entity.ToTable(name: "Role"); }); builder.Entity<IdentityUserRole<string>>(entity => { entity.ToTable("UserRoles"); }); builder.Entity<IdentityUserClaim<string>>(entity => { entity.ToTable("UserClaims"); }); builder.Entity<IdentityUserLogin<string>>(entity => { entity.ToTable("UserLogins"); }); builder.Entity<IdentityRoleClaim<string>>(entity => { entity.ToTable("RoleClaims"); }); builder.Entity<IdentityUserToken<string>>(entity => { entity.ToTable("UserTokens"); });}Line #4, sets a schema for the database.
Line #7, renames the User Table from ASPNETUsers to Identity.User. Clean enough? Feel free to add tables names that can make more sense to you, Similarly we rename all the table entries.
With that out of the way, let’s add the migrations and update the database.
add-migration "Renamed Identity Table Names"update-databaseLet’s see the DB now.
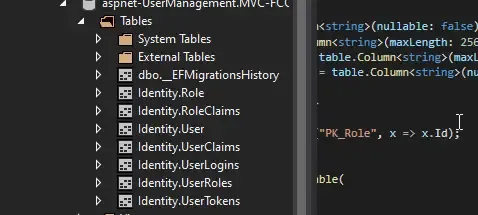
This looks better, doesn’t it?
Adding Custom Fields to Identity User
If you go through the Identity.User Table, you can find over 10-15 columns that are available by default. What if we wanted to add certain user-specific properties like First Name, Image, and so on?
This is where you will need to extend the IdentityUser class with your own properties. In the Models folder, create a new class Models/ApplicationUser.cs and inherit the Identity User.
public class ApplicationUser : IdentityUser{ public string FirstName { get; set; } public string LastName { get; set; } public int UsernameChangeLimit { get; set; } = 10; public byte[] ProfilePicture { get; set; }}Here, we are adding properties like FirstName, LastName, a byte array of Image, and UserNameChangeLimit (we will talk about this particular property later on.)
Since we decided to change the default User class from IdentityUser to ApplicationUser, we would have to make other changes in our existing code as well. Firstly, we will need to change how the User class is being wired up with the DbContext. Navigate to Startup.cs/ConfigureServices method and modify it.
public void ConfigureServices(IServiceCollection services){ services.AddDbContext<ApplicationDbContext>(options => options.UseSqlServer(Configuration.GetConnectionString("DefaultConnection"))); services.AddIdentity<ApplicationUser, IdentityRole>() .AddEntityFrameworkStores<ApplicationDbContext>() .AddDefaultUI() .AddDefaultTokenProviders(); services.AddControllersWithViews(); services.AddRazorPages();}After that comes the hard and time-consuming part. Remember the 40+ Identity pages we imported via scaffolding? Now, each of these 40 pages would have a reference to IdentityUser class. We will have to replace each of them with ApplicationUser. A simple step to get started is to Search for IdentityUser in the entire solution with Visual Studio and to replace it with Application User. But even after that, you would have to manually go to each page to add the namespace reference. Once you have resolved each of the namespace issues, add the final change. Navigate to ApplicaionDbContext and modify the first line of the class to accommodate ApplicationUser.
public class ApplicationDbContext : IdentityDbContext<ApplicationUser>{
}
Next, build the application to check for build errors. If you find any, resolve it by adding the required namespace.
Finally, let’s run the commands and update the database.
add-migration "Added Custom Properties"update-database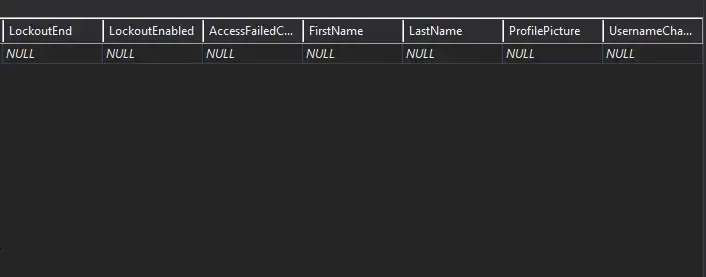
As you can see, we have added additional fields to the Identity Table.
Extending the Registration Form
Now that we have added the extra fields, let’s use them in the registration process. Navigate to Areas/Identity/Pages/Account/Register.cshtml. This is a Razor Page which also holds the Register.cs file within itself.

If you are new to Razor pages, the cshtml holds all the Razor engine contents (C# + HTML) and the cs file contains Controller-like C# code.
Let’s run the application and navigate to the Register Page.
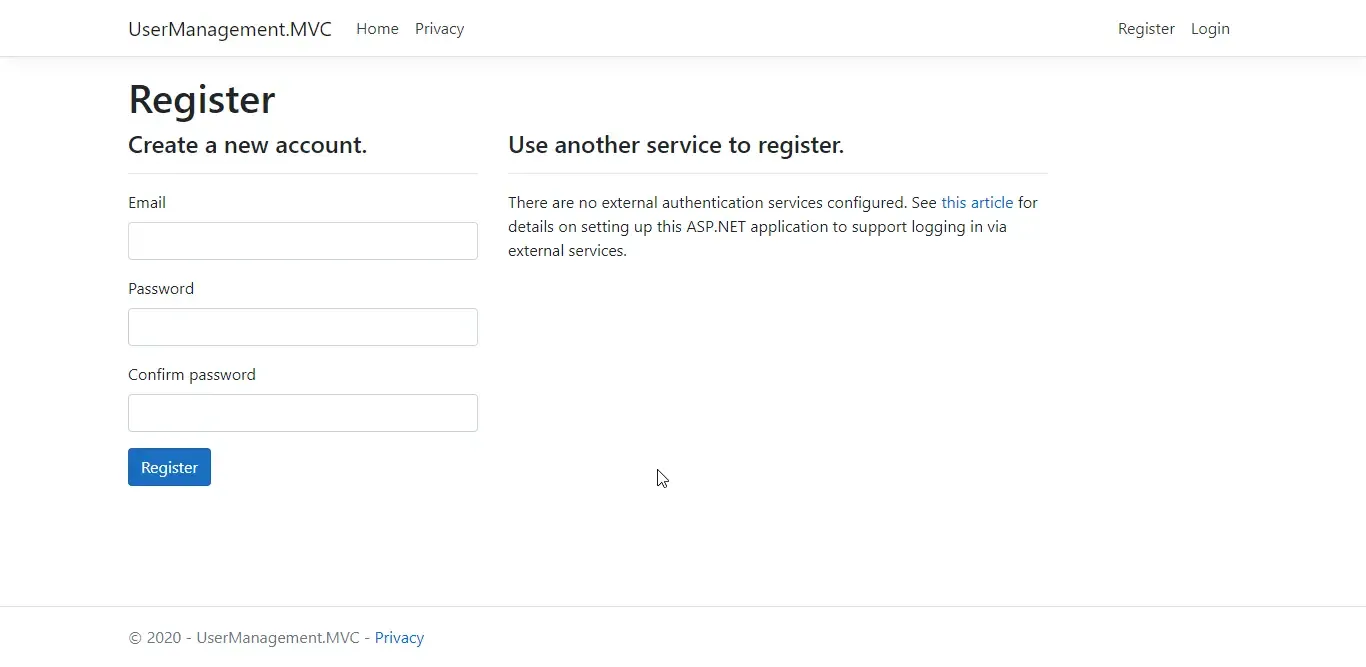
In practical cases, one would have to enter his name while registering. Let’s extend this form and add the First Name and Last name fields. I will split this task into two parts
- Modifying the HTML content to add 2 new fields in the form
- Wiring these forms up with C# code to save them to the database while registering
Let’s first get done with the C# part. Navigate to Register.cs. In the InputModel class, let’s add 2 new properties, First Name, and Last Name.
public class InputModel{ [Required] [Display(Name = "First Name")] public string FirstName { get; set; } [Required] [Display(Name = "Last Name")] public string LastName { get; set; } . . .}PS - I have added dots (.) to denote that we keep the exising code. This is just to keep the code snippets smaller and to the point.
Next, we will need to pass data to these properties and save it to the DB while registering. For this, open up the OnPostAsync method in the Register.cs class.
if (ModelState.IsValid){ MailAddress address = new MailAddress(Input.Email); string userName = address.User; var user = new ApplicationUser { UserName = userName, Email = Input.Email, FirstName = Input.FirstName, LastName = Input.LastName }; . .}Here we are doing 2 things
- Line 5 - 10 Adding new fields to the registration model and linking with C#
- Line 3 - 4 Generating a username from the email address. For example, if the email address entered by the user is
[email protected], the username generated will be admin. You can implement your own logic here.
This is all you have to do with the C# code. Let’s add the fields to the Register.cshtml page.
<div class="form-group"> <label asp-for="Input.FirstName"></label> <input asp-for="Input.FirstName" class="form-control" /> <span asp-validation-for="Input.FirstName" class="text-danger"></span></div><div class="form-group"> <label asp-for="Input.LastName"></label> <input asp-for="Input.LastName" class="form-control" /> <span asp-validation-for="Input.LastName" class="text-danger"></span></div>Let’s check out the result. Build and run the application. Navigate to the Register Page. You can see the new fields now. Add some details to the form and try to register.
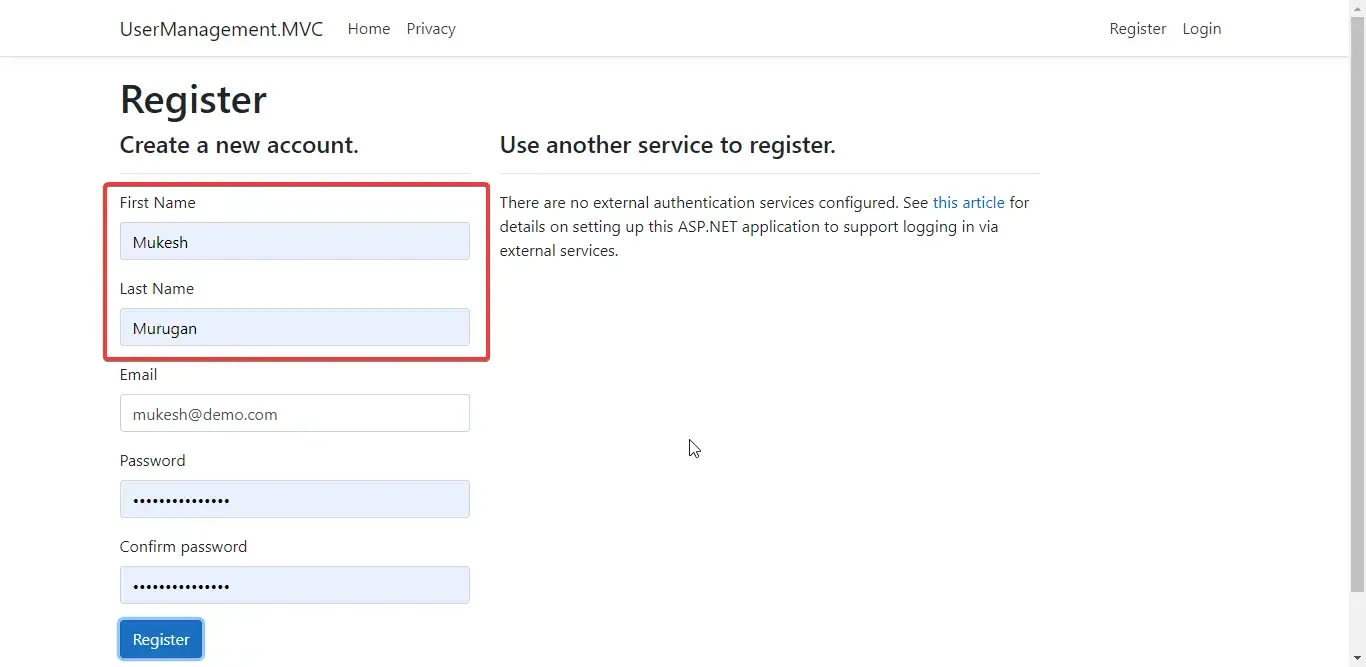
You can see that the application redirects you to the home page. In the navigation menu, you can see the generated username too.
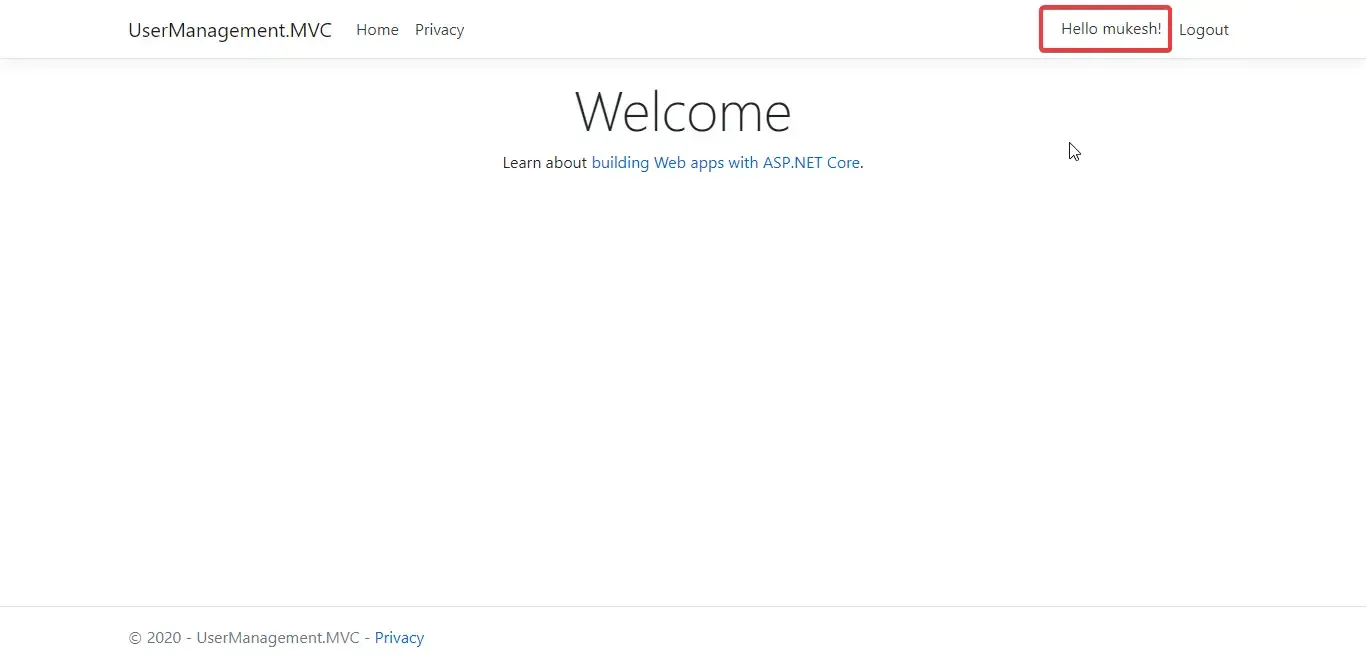
Now try to logout and log in back to the application. You will not be able to. Any Guesses?
By default, in Identity, the username and Email are the same. Now, in the login form, the application expects the username in the email field. But our username is no longer an email id, remember? Let’s fix this next.
Allow Login with both Username and Email
Ideally, you may want to allow your users to log in with both the username and the email id. This is standard practice. Let’s get started. Navigate to Areas/Identity/Pages/Account/Login.cs
public class InputModel{    [Required]    [Display(Name = "Email / Username")]    public string Email { get; set; }
    [Required]    [DataType(DataType.Password)]    public string Password { get; set; }
    [Display(Name = "Remember me?")]    public bool RememberMe { get; set; }}
At the model level, we made the Email Property accept both email ids and plain text.
In the Login.cs , add a new function to check if the entered data is a valid email id or not.
public bool IsValidEmail(string emailaddress){    try    {        MailAddress m = new MailAddress(emailaddress);        return true;    }    catch (FormatException)    {        return false;    }}
public async Task<IActionResult> OnPostAsync(string returnUrl = null){    returnUrl = returnUrl ?? Url.Content("~/");
    if (ModelState.IsValid)    {        var userName = Input.Email;        if (IsValidEmail(Input.Email))        {            var user = await _userManager.FindByEmailAsync(Input.Email);            if (user != null)            {                userName = user.UserName;            }        }        var result = await _signInManager.PasswordSignInAsync(userName, Input.Password, Input.RememberMe, lockoutOnFailure: false);        if (result.Succeeded)        {            _logger.LogInformation("User logged in.");            return LocalRedirect(returnUrl);        }        .        .    }    return Page();}
Line 8 - Checks if the entered data is a valid Email of Not.
Line 9 - 14 - If it’s a valid email, we would want to get the username associated with the particular email id.
Line 10 - Get the User for the EmailId.
Line 13 - From the user object, get the username.
Line 16 - Passes the UserName to the SigninManager.
Build the application and run. You would be able to log in with both the username and the email id now.
PS, Since we are making quite a lot of changes, it is advisable to clean the solution once in a while to rebuild the entire project from scratch. There are chances that Visual Studio would not re-build few of the pages.
Log in to your application and click on the Hello {username} in the top navigation menu. You will be redirected to the “Manage your account” Page. There is quite a lot of basic options here, like changing your phone number, updating the email id, changing the password, and so on. Let’s try to extend these pages in the coming sections.
Adding the Custom User Fields To Profile Settings
Here is my default “Manage your account”. Here, we would like to add the custom fields that we made earlier. First Name, Last Name, Photo, remember?
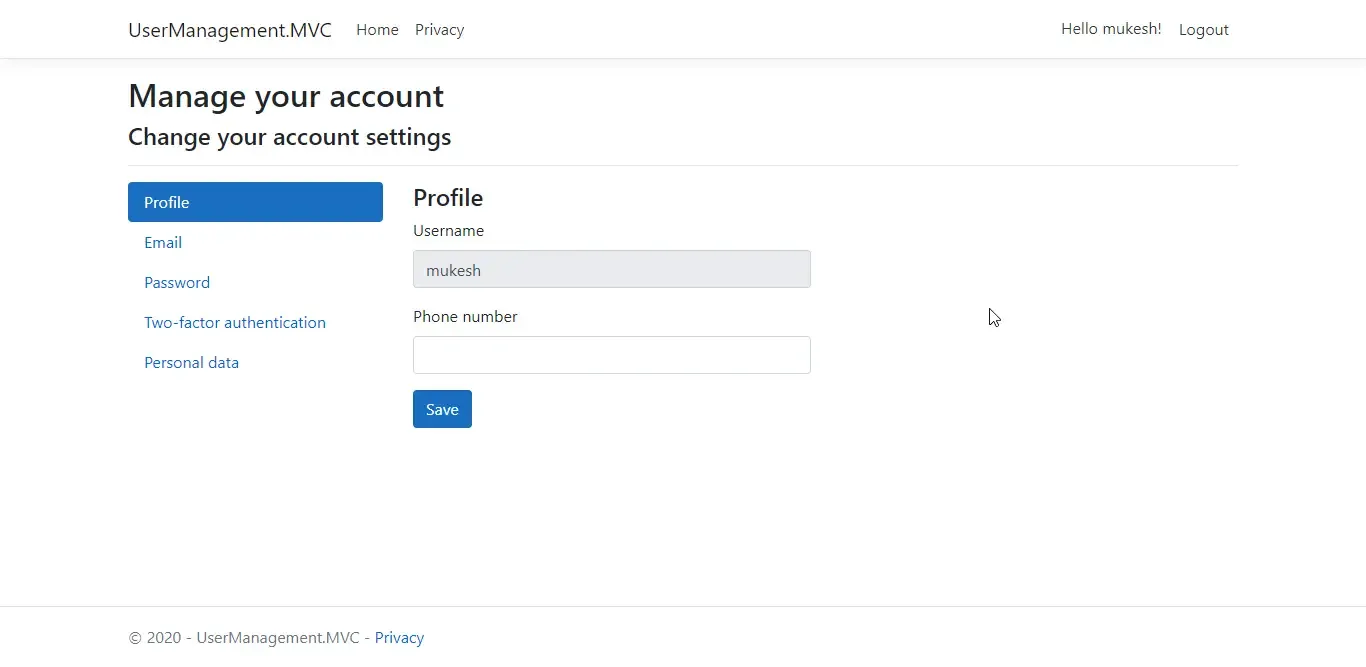
As the first step, let’s try to add the First name and Last name fields to this form. Navigate to Areas/Identity/Pages/Account/Manage/Index.cshtml.cs
Replace the Input Model. Here we added the new fields. (including Profile Picture, although we will implement it in the next section)
public class InputModel{ [Display(Name = "First Name")] public string FirstName { get; set; } [Display(Name = "Last Name")] public string LastName { get; set; } [Display(Name = "Username")] public string Username { get; set; } [Phone] [Display(Name = "Phone number")] public string PhoneNumber { get; set; } [Display(Name = "Profile Picture")] public byte[] ProfilePicture { get; set; }}Next, while loading the form we need to load these data to the memory as well.
private async Task LoadAsync(ApplicationUser user){ var userName = await _userManager.GetUserNameAsync(user); var phoneNumber = await _userManager.GetPhoneNumberAsync(user); var firstName = user.FirstName; var lastName = user.LastName; var profilePicture = user.ProfilePicture; Username = userName; Input = new InputModel { PhoneNumber = phoneNumber, Username = userName, FirstName = firstName, LastName = lastName, ProfilePicture = profilePicture };}Finally, in the OnPostAsync method, add this to update the newly entered FirstName or LastName.
var firstName = user.FirstName;var lastName = user.LastName;if (Input.FirstName != firstName){ user.FirstName = Input.FirstName; await _userManager.UpdateAsync(user);}if (Input.LastName != lastName){ user.LastName = Input.LastName; await _userManager.UpdateAsync(user);}Let’s now add the HTML definition of the form fields. Navigate to the Index.cshtml
<div class="form-group"> <label asp-for="Input.FirstName"></label> <input asp-for="Input.FirstName" class="form-control" /> <span asp-validation-for="Input.FirstName" class="text-danger"></span></div><div class="form-group"> <label asp-for="Input.LastName"></label> <input asp-for="Input.LastName" class="form-control" /> <span asp-validation-for="Input.LastName" class="text-danger"></span></div>That’s it. Build and Run your application. Go to the “Manage your account” page. You will see the changes here.
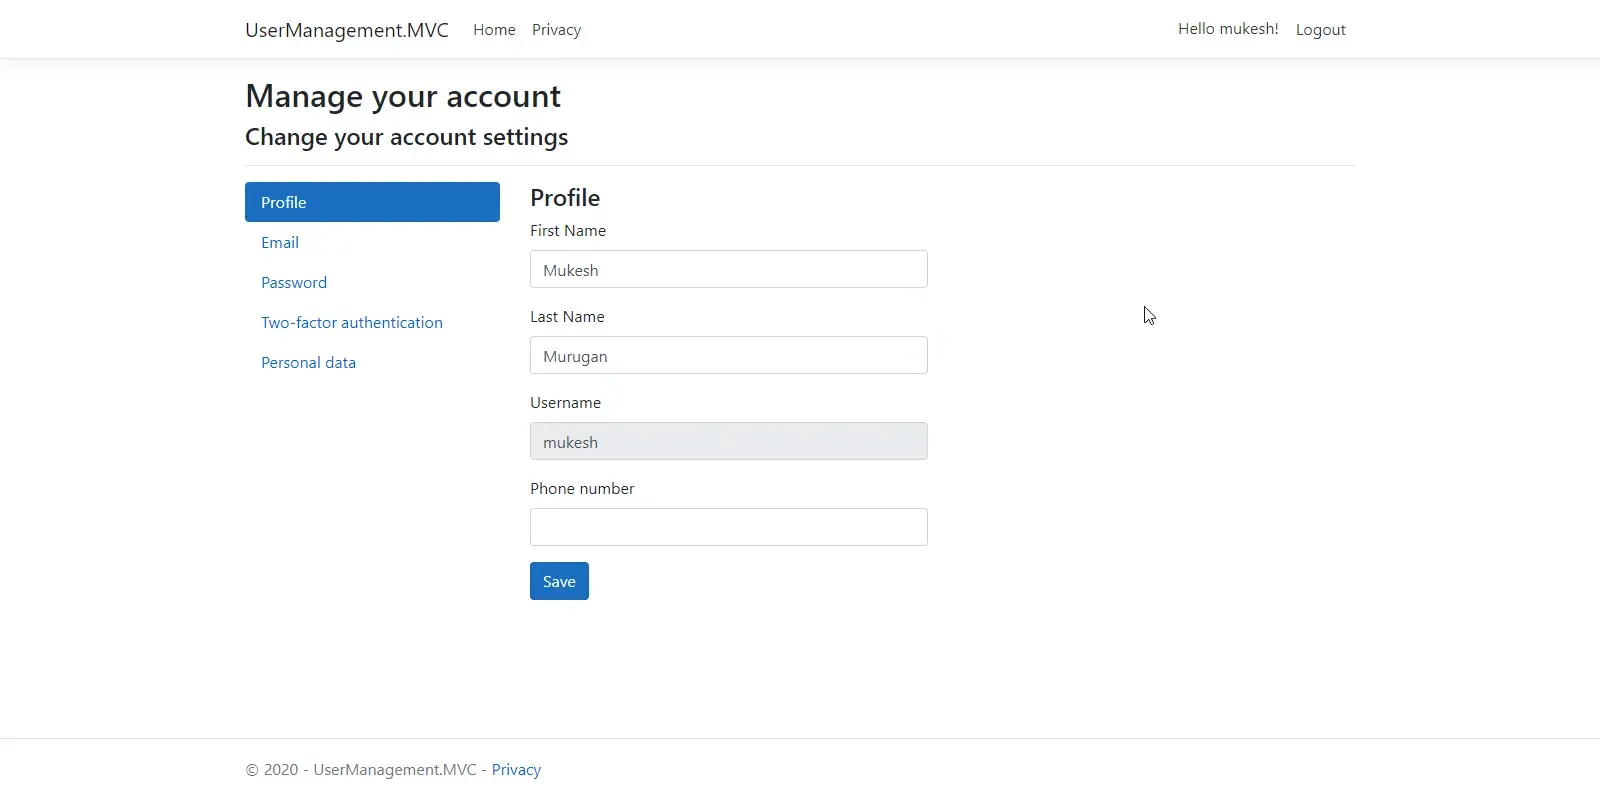
Adding a Profile Picture
As the next step, let’s add a profile picture to our User. Since we have already added the ProfilePicture property in our Input model, let’s configure the saving part.
Remember the part where we added the Update code for FirstName and Lastname? Similarly, in the OnPostAsync method, let’s save the Profile Picture as well.
if (Request.Form.Files.Count > 0){ IFormFile file = Request.Form.Files.FirstOrDefault(); using (var dataStream = new MemoryStream()) { await file.CopyToAsync(dataStream); user.ProfilePicture = dataStream.ToArray(); } await _userManager.UpdateAsync(user);}In this case, we are trying to save our image to the database. Thus we use memory streams to convert the image file to a memory object/byte array. Then we save this array to the Database. If you want to learn more about uploading images/files/multiple-files to the database/file system, I have written a detailed article where I build a small application that can upload files to the database as well as to the file system. Check it out here.
Finally, let’s modify the Index.cshtml to add the container for images. You can have your approach to do this. End of the day, it will be just an Image Input that is bound to the ProfilePicture Property. I have added several customizations to it, which you might be interested in as well.
<form id="profile-form" method="post" enctype="multipart/form-data">    <div class="row">        <div class="col-md-6">            <div asp-validation-summary="ModelOnly" class="text-danger"></div>            <div class="form-group">                <label asp-for="Input.FirstName"></label>                <input asp-for="Input.FirstName" class="form-control" />                <span asp-validation-for="Input.FirstName" class="text-danger"></span>            </div>            <div class="form-group">                <label asp-for="Input.LastName"></label>                <input asp-for="Input.LastName" class="form-control" />                <span asp-validation-for="Input.LastName" class="text-danger"></span>            </div>            <div class="form-group">                <label asp-for="Input.Username"></label>                <input asp-for="Input.Username" class="form-control" />                <span asp-validation-for="Input.Username" class="text-danger"></span>            </div>            <div class="form-group">                <label asp-for="Input.PhoneNumber"></label>                <input asp-for="Input.PhoneNumber" class="form-control" />                <span asp-validation-for="Input.PhoneNumber" class="text-danger"></span>            </div>            <button id="update-profile-button" type="submit" class="btn btn-primary">Save</button>        </div>        <div class="col-md-6">            <div asp-validation-summary="ModelOnly" class="text-danger"></div>            <div class="form-group">                <label asp-for="Input.ProfilePicture" style="width: 100%;"></label>                @if (Model.Input.ProfilePicture != null)                {                    <img id="profilePicture" style="width:350px;height:350px; object-fit:cover" src="data:image/*;base64,@(Convert.ToBase64String(Model.Input.ProfilePicture))">                }                else                {                    <img id="profilePicture" style="width:350px;height:350px; object-fit:cover" src="">                }                <input type="file"                       accept=",.jpg,.jpeg,.gif,.tif"                       asp-for="Input.ProfilePicture"                       class="form-control"                       style="border:0px!important;padding: 0px;padding-top: 10px;padding-bottom: 30px;"                       onchange="document.getElementById('profilePicture').src = window.URL.createObjectURL(this.files[0])" />                <span asp-validation-for="Input.ProfilePicture" class="text-danger"></span>            </div>        </div>
    </div></form>
Line #1- Here, we change the form type to “multipart/form-data”. This is because we not only have plain texts but Image files too.
Line 29-46 - Here is where we define our Image Field.
Line 31-38 - If the user has an image uploaded to the database already, we get the byte array from the model and convert it to an image. This image will be displayed on the page. Else, shows a blank image container.
Line 39 - Defining the Input Button that can load images from our file system.
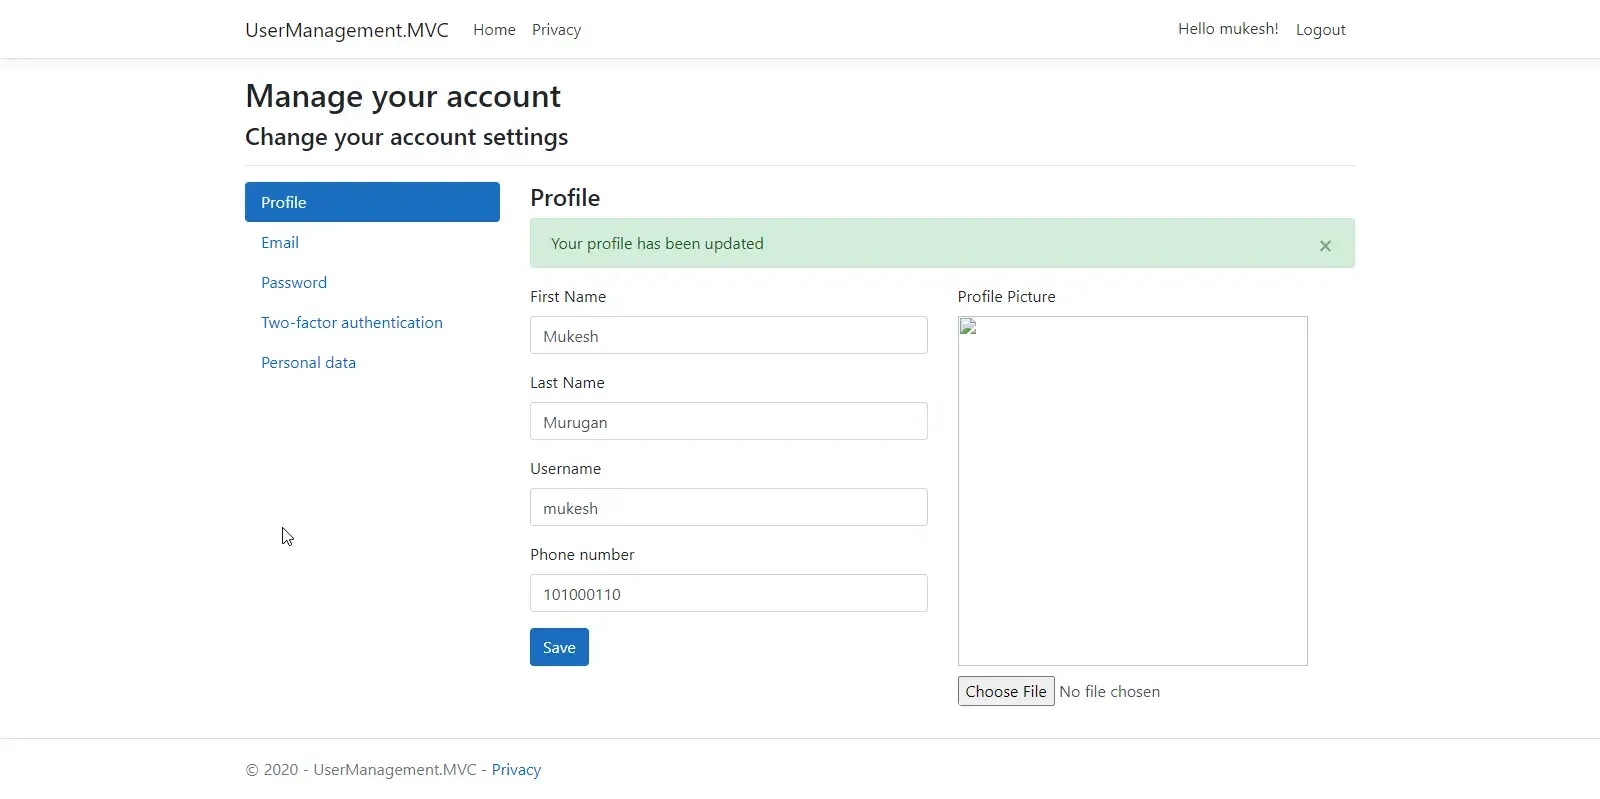
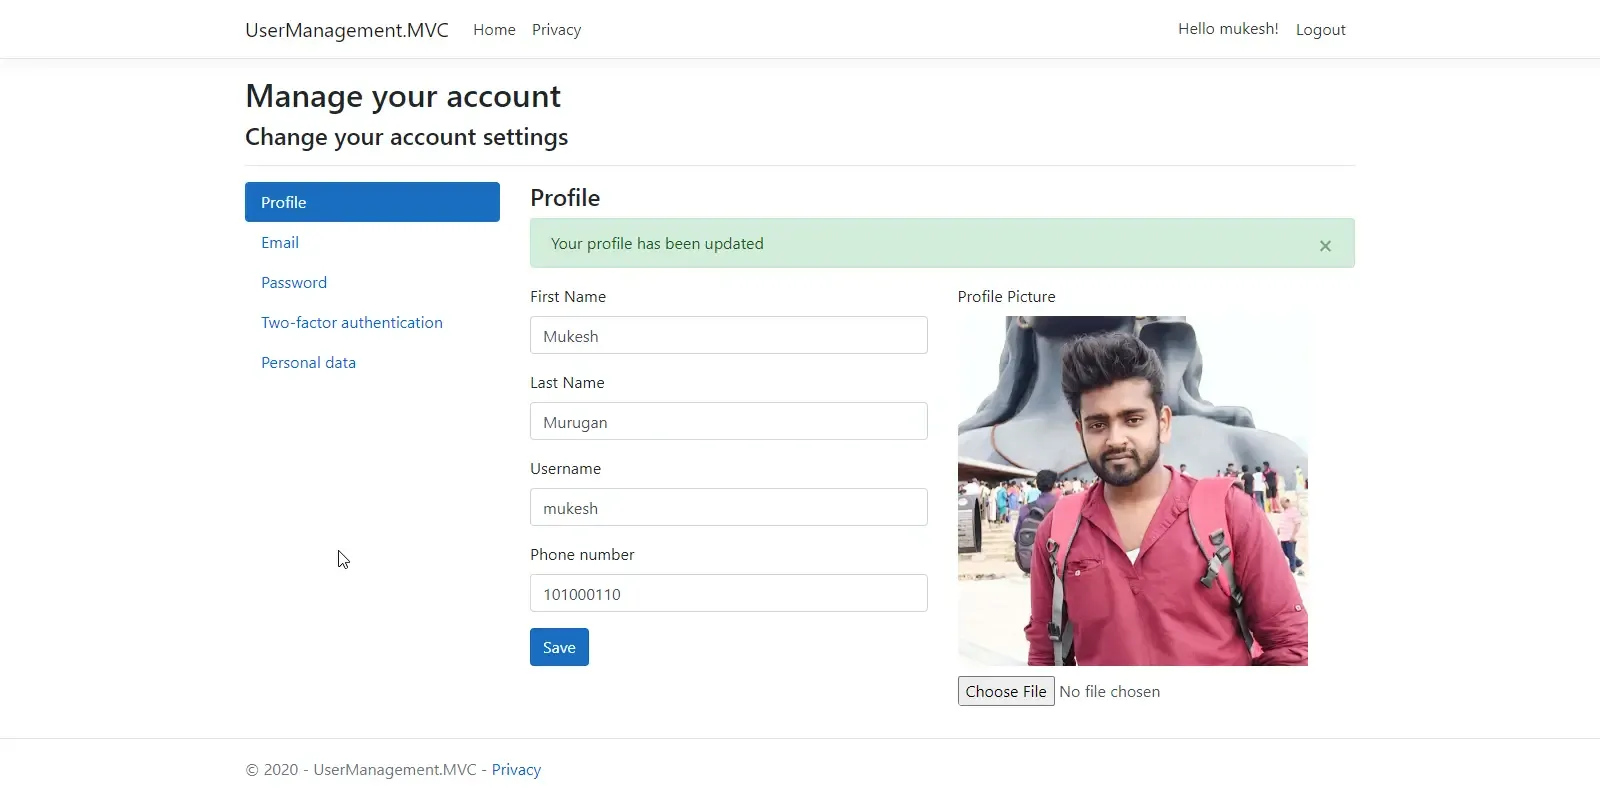
You can see that we are now able to upload images to our profile. Here is a little bonus. We have the image only on the Profile Page. Ideally, websites have the profile pictures somewhere in the navigation menu too, right? Let’s do the same.
Navigate to Views/Shared/_LoginPartial.cshtml and add the highlighted code.
@if (SignInManager.IsSignedIn(User)){ <li class="nav-item" style="align-self: center;"> @if (UserManager.GetUserAsync(User).Result.ProfilePicture != null) { <img style="width:40px;height:40px; object-fit:cover; border-radius:30px" src="data:image/*;base64,@(Convert.ToBase64String(UserManager.GetUserAsync(User).Result.ProfilePicture))"> } </li> . .}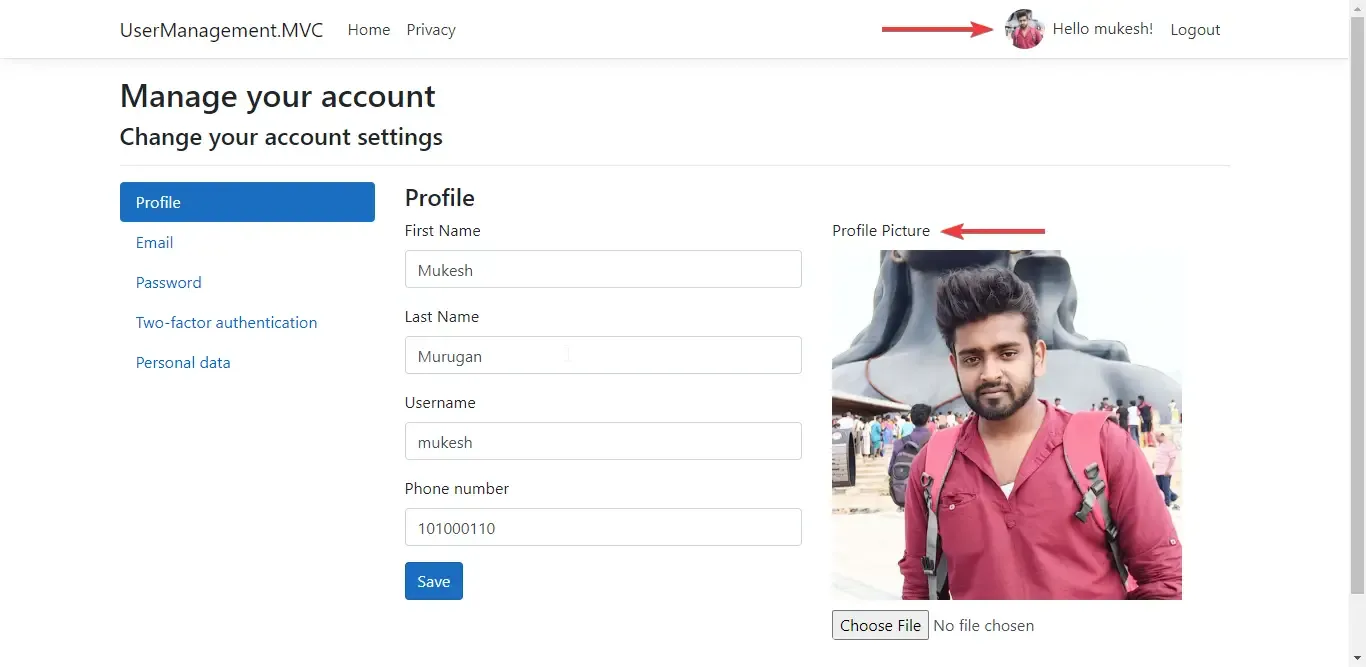
Feel free to change the location of this image.
Setting a Limit to Change Username
This is yet another feature that is not covered in any of the articles about Custom User Management in ASP.NET Core. Usernames are quite vital for any User-based application. Let’s take Facebook for example.
https://www.facebook.com/codewithmukesh
Here, ‘codewithmukesh’ is the username of our Facebook Page. What if we want to change this username to something else. Facebook allows us to do, but only for a specific number of times. Let’s implement this exact feature in our Solution as well.
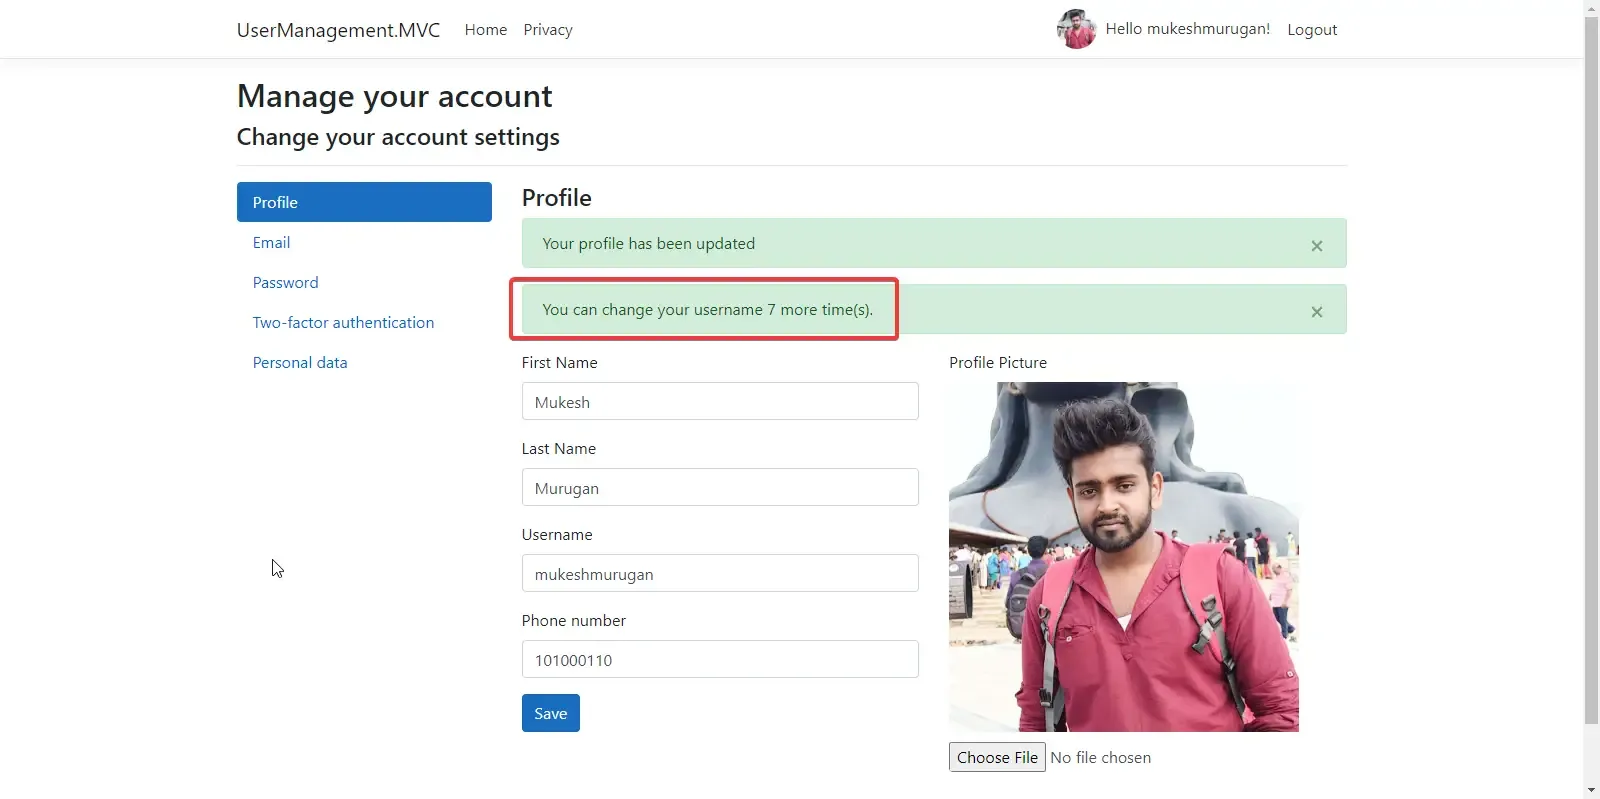
First, we need a container in the HTML page that would hold a message like “You can change your username x more time(s)”. In order to do this, we use TempData, as ‘x’ is a number that gets generated via our C# end. Let’s create this TempData First. Navigate to Index.cshtml.cs, and add a new TempData Property.
[TempData]public string StatusMessage { get; set; }[TempData]public string UserNameChangeLimitMessage { get; set; }[BindProperty]public InputModel Input { get; set; }Now, the logic to calculate the number of attempts left for a user to change his/her username. Like we added the logic to save/update FirstName, LastName and so, we will add the logic to save/update the remaining attempts left for the user.
if (user.UsernameChangeLimit > 0){ if (Input.Username != user.UserName) { var userNameExists = await _userManager.FindByNameAsync(Input.Username); if (userNameExists != null) { StatusMessage = "User name already taken. Select a different username."; return RedirectToPage(); } var setUserName = await _userManager.SetUserNameAsync(user, Input.Username); if (!setUserName.Succeeded) { StatusMessage = "Unexpected error when trying to set user name."; return RedirectToPage(); } else { user.UsernameChangeLimit -= 1; await _userManager.UpdateAsync(user); } }}Line 5 - Check if the username already exists.
Line 6-10 - If the username is already taken, shows an appropriate message.
Line 11 - Else, saves the username to the user object.
Line 19 - Reduces the attempts of the user by 1.
Line 20 - Updates the user.
Modify the OnGetSync Method to load the message by default.
public async Task<IActionResult> OnGetAsync(){ var user = await _userManager.GetUserAsync(User); if (user == null) { return NotFound($"Unable to load user with ID '{_userManager.GetUserId(User)}'."); } UserNameChangeLimitMessage = $"You can change your username {user.UsernameChangeLimit} more time(s)."; await LoadAsync(user); return Page();}Now, let’s link the Tempdata to the HTML. Navigate to Index.cshtml
<h4>@ViewData["Title"]</h4><partial name="_StatusMessage" model="Model.StatusMessage" /><partial name="_StatusMessage" model="Model.UserNameChangeLimitMessage" />Build and Run your application. You will be able to change the username 10 times. After which you will be blocked from doing so. Pretty Nice Feature to have, yeah?
User Roles - Overview
Now that we have added custom fields and Images to the User, let’s move on and talk about User Roles. While Building Custom User Management in ASP.NET Core MVC with Identity, Roles are quite important. For example, If we take the case of Invoice Management Application, it would have User Roles like Manager, Operator, Super-Admin, and so on. User Roles help to define the level of permission for each user.
In the upcoming sections, we will talk about Adding User Roles by default to an Application, Assigning the user Roles to Users, and much more.
Seed Default Roles
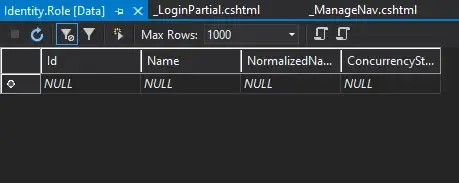
By default, Visual Studio does not create any Roles for you in the Identity Database. In this section, our task is to statically define the possible Roles supported in an Application and insert them into the database on page load. We will be doing this with the help of the SEEDING concept in Entity Framework Core.
Here is the table where the Roles will be stored.
Let’s assume that this application supports 4 User Roles by default.
1.SuperAdmin
2. Admin
3. Moderator
4. Basic
Create an Enum for the supported Roles. Add a new Enum at Enums/Roles.
public enum Roles{ SuperAdmin, Admin, Moderator, Basic}In the data folder, add a ContextSeed.cs class. This class will be responsible for seeding default data to the database. In this case, let’s add a function to seed the User Roles to the database.
public static class ContextSeed{ public static async Task SeedRolesAsync(UserManager<ApplicationUser> userManager, RoleManager<IdentityRole> roleManager) { //Seed Roles await roleManager.CreateAsync(new IdentityRole(Enums.Roles.SuperAdmin.ToString())); await roleManager.CreateAsync(new IdentityRole(Enums.Roles.Admin.ToString())); await roleManager.CreateAsync(new IdentityRole(Enums.Roles.Moderator.ToString())); await roleManager.CreateAsync(new IdentityRole(Enums.Roles.Basic.ToString())); }}Now we need an entry point to invoke the ContextSeed Methods. It depends on your preference, but for this article, we will invoke the method in the Main Function(Program.cs) . That is, every time the application fires up, It would check if the default user roles are present in the database. Else, it seeds the required Roles.
public async static Task Main(string[] args){ var host = CreateHostBuilder(args).Build(); using (var scope = host.Services.CreateScope()) { var services = scope.ServiceProvider; var loggerFactory = services.GetRequiredService<ILoggerFactory>(); try { var context = services.GetRequiredService<ApplicationDbContext>(); var userManager = services.GetRequiredService<UserManager<ApplicationUser>>(); var roleManager = services.GetRequiredService<RoleManager<IdentityRole>>(); await ContextSeed.SeedRolesAsync(userManager, roleManager); } catch (Exception ex) { var logger = loggerFactory.CreateLogger<Program>(); logger.LogError(ex, "An error occurred seeding the DB."); } } host.Run();}That’s it. Just add the required References and Build & Run the Application. Now let’s check our Identity. Role Table and ensure if the default Roles were added.
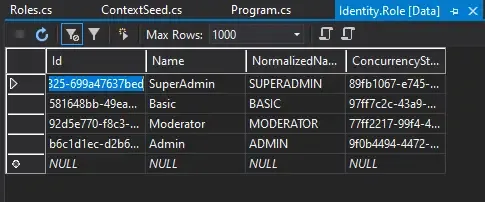
You can see that all our 4 default roles are already added. Simple, yeah? Similarly in the next section, let’s learn to add a default user (super admin) via seeding.
Seed Default Super Admin user
Let me draw out the requirement. We need to seed a default Super-Admin with pre-defined Names and Add this User to all the Roles Available. How would you go about this?
Step 1 - Add a new Method that seeds the default User.
In our ContextSeed class, let’s add a new method.
public static async Task SeedSuperAdminAsync(UserManager<ApplicationUser> userManager, RoleManager<IdentityRole> roleManager){ //Seed Default User var defaultUser = new ApplicationUser { UserName = "superadmin", FirstName = "Mukesh", LastName = "Murugan", EmailConfirmed = true, PhoneNumberConfirmed = true }; if (userManager.Users.All(u => u.Id != defaultUser.Id)) { var user = await userManager.FindByEmailAsync(defaultUser.Email); if(user==null) { await userManager.CreateAsync(defaultUser, "123Pa$$word."); await userManager.AddToRoleAsync(defaultUser, Enums.Roles.Basic.ToString()); await userManager.AddToRoleAsync(defaultUser, Enums.Roles.Moderator.ToString()); await userManager.AddToRoleAsync(defaultUser, Enums.Roles.Admin.ToString()); await userManager.AddToRoleAsync(defaultUser, Enums.Roles.SuperAdmin.ToString()); }
}}Step 2 - Wire up this Method so that it gets invoked at Application Start.
Like we did in the previous section, add the below line of code to the Program.cs/Main Method. This will invoke the Method that seeds the default user to the database.
await ContextSeed.SeedSuperAdminAsync(userManager, roleManager);Build the application and try to log in with the default credentials that we defined.
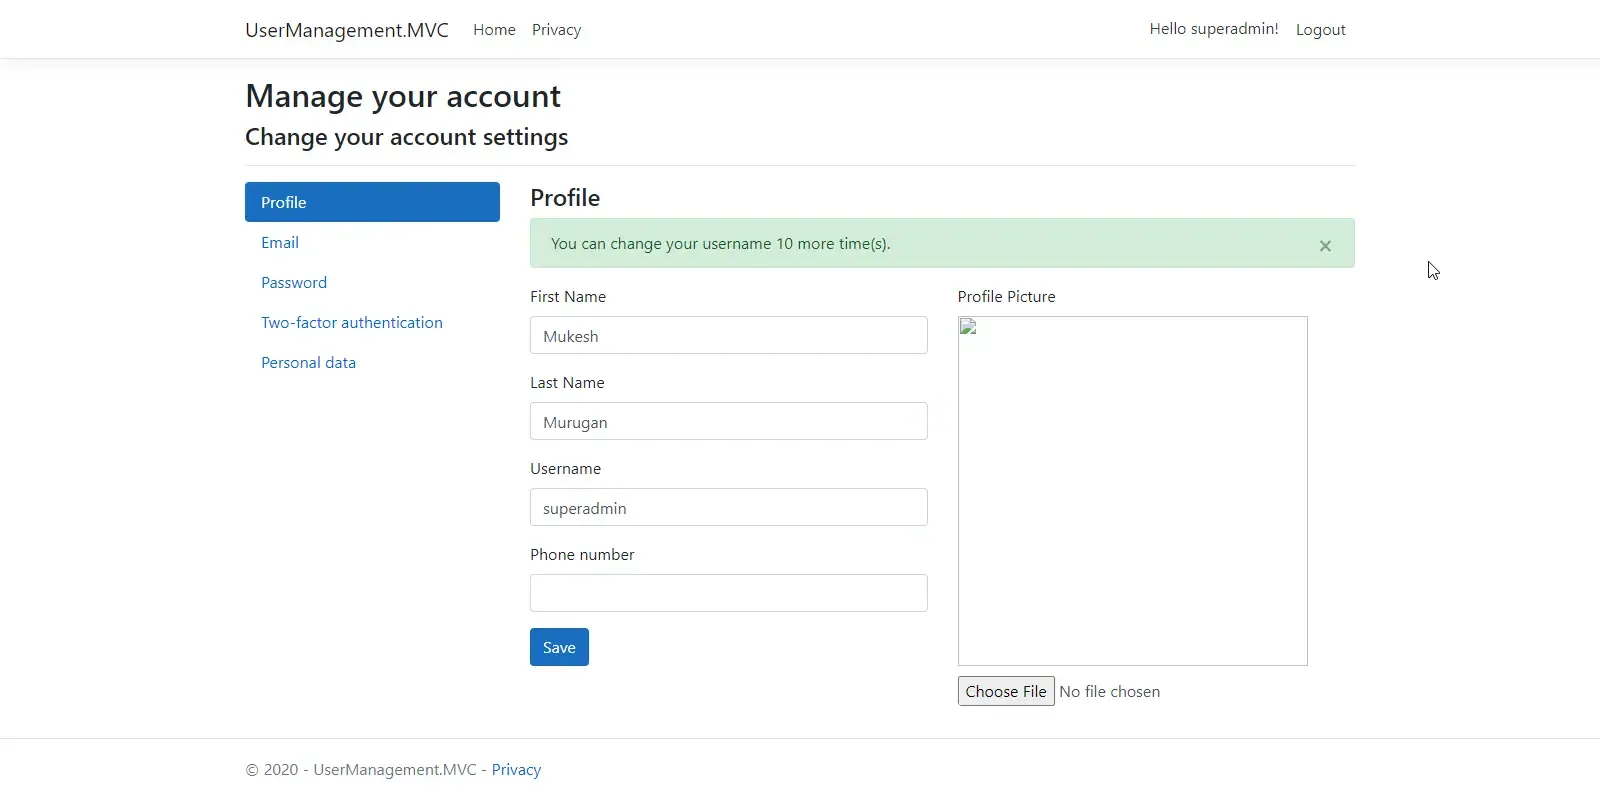
There you go, we have successfully seeded our default user. It was easy, right?
Add A Default Role to Newly Registered User
Now, we know how to seed default roles and users as well. What happens when a user registers himself with the application? What role would he belong to? As of now, None. Let’s add a feature by which any newly registered user automatically gets assigned to the Basic Role.
This will be quite simple as we have already set up the required pieces of code. Navigate to the Register.cs file and add the highlighted line below.
var result = await _userManager.CreateAsync(user, Input.Password);if (result.Succeeded){ _logger.LogInformation("User created a new account with password."); await _userManager.AddToRoleAsync(user, Enums.Roles.Basic.ToString()); var code = await _userManager.GenerateEmailConfirmationTokenAsync(user); . .}Add / View Available Roles
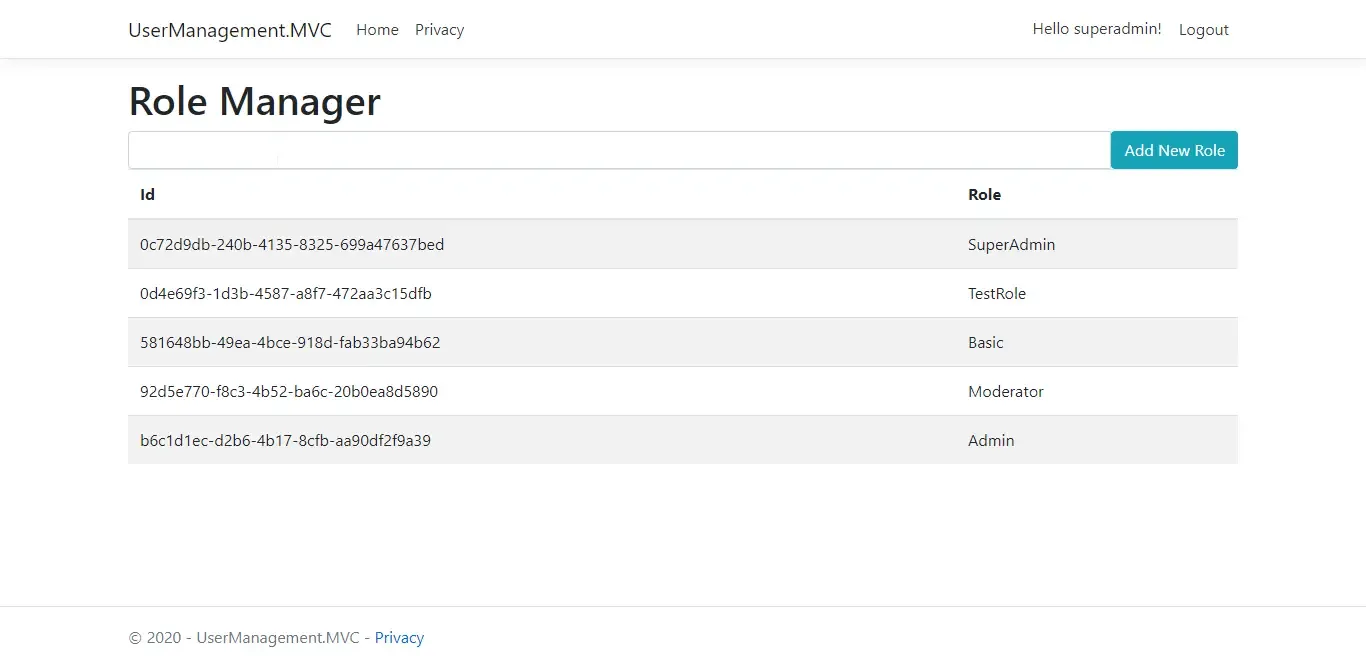
Let’s start building a UI with which we can View and Manage Roles. It will be a simple view that Lists out all the roles available and has a feature to add new roles too.
Start by adding a new Empty MVC Controller to the Controllers folder. Name it RoleManagerController.cs
public class RoleManagerController : Controller{ private readonly RoleManager<IdentityRole> _roleManager; public RoleManagerController(RoleManager<IdentityRole> roleManager) { _roleManager = roleManager; } public async Task<IActionResult> Index() { var roles = await _roleManager.Roles.ToListAsync(); return View(roles); } [HttpPost] public async Task<IActionResult> AddRole(string roleName) { if (roleName != null) { await _roleManager.CreateAsync(new IdentityRole(roleName.Trim())); } return RedirectToAction("Index"); }}Right-click on the Index Method and click on Add View. Name it Index.cshtml. This creates a new View for this Controller. Modify the View as the following.
@model List<Microsoft.AspNetCore.Identity.IdentityRole>@{ ViewData["Title"] = "Role Manager"; Layout = "~/Views/Shared/_Layout.cshtml";}<h1>Role Manager</h1><form method="post" asp-action="AddRole" asp-controller="RoleManager"> <div class="input-group"> <input name="roleName" class="form-control w-25"> <span class="input-group-btn"> <button class="btn btn-info">Add New Role</button> </span> </div></form><table class="table table-striped"> <thead> <tr> <th>Id</th> <th>Role</th> </tr> </thead> <tbody> @foreach (var role in Model) { <tr> <td>@role.Id</td> <td>@role.Name</td> </tr> } </tbody></table>That’s it. Build and Run the application. Navigate to localhost:xxx/RoleManager. Here you will be able to see all the visible Roles and Add New Roles as well.
Listing Users with Corresponding Roles
Now, let’s make an interface that lists all the users along with the Roles associated with them. We will first create a View Model that holds the user details and the roles as a string List. Create a new class in the Models Folders. Models/UserRolesViewModel.cs
public class UserRolesViewModel{ public string UserId { get; set; } public string FirstName { get; set; } public string LastName { get; set; } public string UserName { get; set; } public string Email { get; set; } public IEnumerable<string> Roles { get; set; }}Next, we will create a controller that throws out a view with a list of user details. Essentially it would get all the users from the database and also the roles per user.
public class UserRolesController : Controller{    private readonly UserManager<ApplicationUser> _userManager;    private readonly RoleManager<IdentityRole> _roleManager;
    public UserRolesController(UserManager<ApplicationUser> userManager, RoleManager<IdentityRole> roleManager)    {        _roleManager = roleManager;        _userManager = userManager;    }    public async Task<IActionResult> Index()    {        var users = await _userManager.Users.ToListAsync();        var userRolesViewModel = new List<UserRolesViewModel>();        foreach (ApplicationUser user in users)        {            var thisViewModel = new UserRolesViewModel();            thisViewModel.UserId = user.Id;            thisViewModel.Email = user.Email;            thisViewModel.FirstName = user.FirstName;            thisViewModel.LastName = user.LastName;            thisViewModel.Roles = await GetUserRoles(user);            userRolesViewModel.Add(thisViewModel);        }        return View(userRolesViewModel);    }    private async Task<List<string>> GetUserRoles(ApplicationUser user)    {        return new List<string>(await _userManager.GetRolesAsync(user));    }}
Finally, add a View to the Index Method and Add the Following.
@using UserManagement.MVC.Models@model List<UserManagement.MVC.Models.UserRolesViewModel>@{ ViewData["Title"] = "Index"; Layout = "~/Views/Shared/_Layout.cshtml";}<h1>User Roles</h1><table class="table table-striped"> <thead> <tr> <th>First Name</th> <th>Last Name</th> <th>Email</th> <th>Roles</th> <th>Action</th> </tr> </thead> <tbody> @foreach (var user in Model) { <tr> <td>@user.FirstName</td> <td>@user.LastName</td> <td>@user.Email</td> <td>@string.Join(" , ", user.Roles.ToList())</td> <td> <a class="btn btn-primary" asp-controller="UserRoles" asp-action="Manage" asp-route-userId="@user.UserId">Manage Roles</a> </td> </tr> } </tbody></table>Run the Application and navigate to /UserRoles. Here you can see the list of users along with the assigned Roles. For instance, you can see that the Superadmin has all the roles assigned.

Adding Users to Roles
As for the last section, Let’s try to modify the Roles of Users. We will add a new Method in the UserRolesController named Manage. Before that, let’s add a Model Class that holds the ViewModel Data.
public class ManageUserRolesViewModel{ public string RoleId { get; set; } public string RoleName { get; set; } public bool Selected { get; set; }}Once that is done, we go to the UserRolesController and add HTTP GET and HTTP POST Variants of the Manage Method. The Get Method will be responsible to get the roles per user. Post Method will handle the role-assigning part of the user.
public async Task<IActionResult> Manage(string userId){ ViewBag.userId = userId; var user = await _userManager.FindByIdAsync(userId); if (user == null) { ViewBag.ErrorMessage = $"User with Id = {userId} cannot be found"; return View("NotFound"); } ViewBag.UserName = user.UserName; var model = new List<ManageUserRolesViewModel>(); foreach (var role in _roleManager.Roles) { var userRolesViewModel = new ManageUserRolesViewModel { RoleId = role.Id, RoleName = role.Name }; if (await _userManager.IsInRoleAsync(user, role.Name)) { userRolesViewModel.Selected = true; } else { userRolesViewModel.Selected = false; } model.Add(userRolesViewModel); } return View(model);}[HttpPost]public async Task<IActionResult> Manage(List<ManageUserRolesViewModel> model, string userId){ var user = await _userManager.FindByIdAsync(userId); if (user == null) { return View(); } var roles = await _userManager.GetRolesAsync(user); var result = await _userManager.RemoveFromRolesAsync(user, roles); if (!result.Succeeded) { ModelState.AddModelError("", "Cannot remove user existing roles"); return View(model); } result = await _userManager.AddToRolesAsync(user, model.Where(x => x.Selected).Select(y => y.RoleName)); if (!result.Succeeded) { ModelState.AddModelError("", "Cannot add selected roles to user"); return View(model); } return RedirectToAction("Index");}Finally, add a new View for the Manage Method and Name it Manage.cshtml.
@model List<ManageUserRolesViewModel>@{ ViewData["Title"] = "Manage"; Layout = "~/Views/Shared/_Layout.cshtml";}<form method="post"> <div class="card"> <div class="card-header"> <h2>Manage User Roles</h2> Add/Remove Roles for User / @ViewBag.UserName. </div> <div class="card-body"> @for (int i = 0; i < Model.Count; i++) { <div class="form-check m-1"> <input type="hidden" asp-for="@Model[i].RoleId" /> <input type="hidden" asp-for="@Model[i].RoleName" /> <input asp-for="@Model[i].Selected" class="form-check-input" /> <label class="form-check-label" asp-for="@Model[i].Selected"> @Model[i].RoleName </label> </div> } <div asp-validation-summary="All" class="text-danger"></div> </div> <div class="card-footer"> <input type="submit" value="Update" class="btn btn-primary" style="width:auto" /> <a asp-action="EditUser" asp-route-id="@ViewBag.userId" class="btn btn-primary" style="width:auto">Cancel</a> </div> </div></form>That’s all. Run the Application and go to /UserRoles. Click on the manage button of any User. You will be presented with a checkbox list of assigned User Roles. From here you can do the required modifications and updates. This Redirects you back to the Index method.

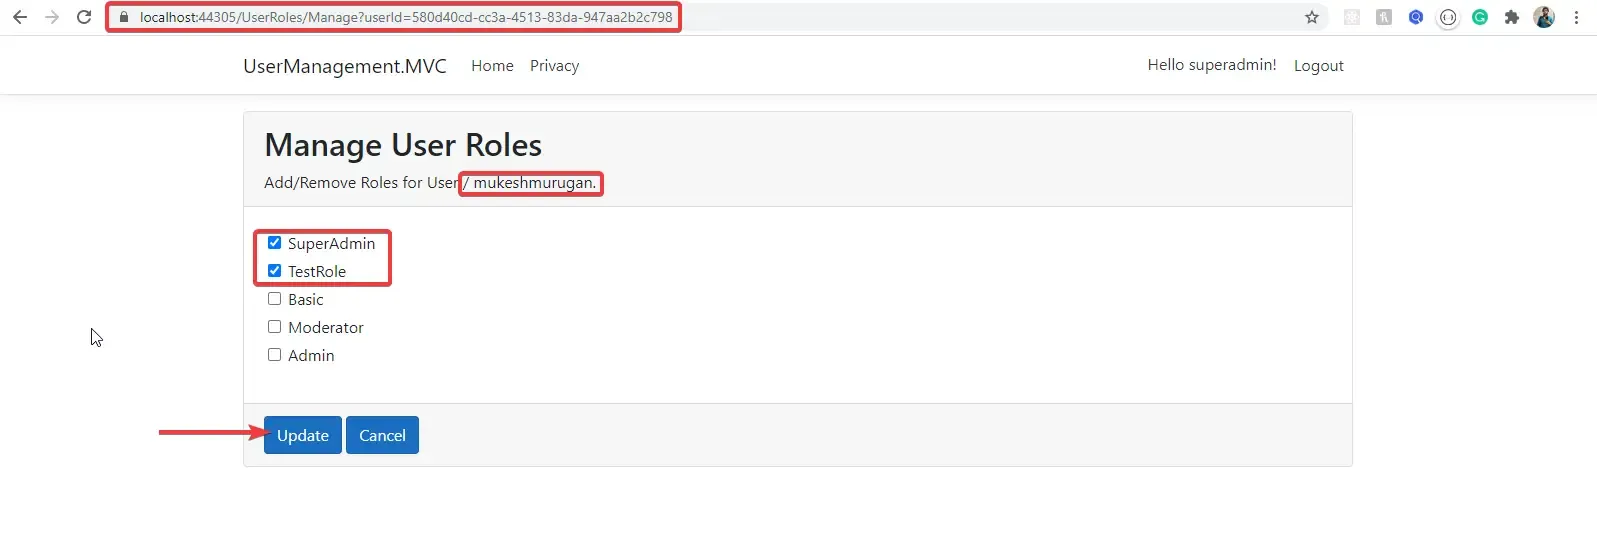

You can see that We have a complete working model of User Role Manager UI for ASP.NET Core MVC. I will wind up this article with this.
Further Improvements
You might have noticed that all the Views are accessible to anyone. You could limit this by adding an Authorize Attribute Decorator over the Controller Methods. To be specific, we don’t want to expose the user Roles Manager to the public, do we? On top of the Manage Method in the UserRolesController, add this.
[Authorize(Roles = "SuperAdmin")]This ensures that only SuperAdmins can Manage User Roles. This is also called Role-based Authentication.
Summary
In this really long article, we have gone through nearly everything that you would need to know to implement Custom User Management in ASP.NET Core MVC with Identity. Here is the complete source code of the above implementations. Do Leave a star if you find it helpful! Did I miss out on something? Comment below and I will try to integrate that too with this article. Leave your suggestions and feedback in the comment section below. Do not forget to share this article within your developer community. Thanks and Happy Coding! :D


