This Guide on Amazon RDS for .NET Developers covers everything you need to know to integrate RDS into your .NET applications seamlessly. From choosing the right database engine (like PostgreSQL) to setting up instances, securely storing database credentials, implementing EF Core for CRUD operations, and scaling with read replicas, this guide equips you with the knowledge and skills to build robust, scalable solutions.
This article is sponsored by AWS. Huge thanks for helping me produce more .NET on AWS content!
What is Amazon RDS? A Quick Overview
Amazon Relational Database Service (RDS) is a fully managed database service provided by AWS. It simplifies the process of setting up, operating, and scaling a relational database in the cloud. For .NET developers, RDS eliminates much of the administrative overhead typically associated with managing a database, allowing you to focus more on building robust applications.
Instead of worrying about installing database software, configuring backups, or applying security patches, you can use RDS to handle these tasks for you automatically. RDS supports several popular database engines, including PostgreSQL, MySQL, SQL Server, MariaDB, Oracle, and Amazon Aurora, making it an excellent choice regardless of your application’s database requirements. In this demonstration, we will work with PostgreSQL Database Engine.
For .NET applications, Amazon RDS offers several advantages:
- Seamless Integration: RDS works smoothly with EF Core, making it easy to implement database operations like CRUD.
- Scalability: As your .NET application grows, RDS allows you to scale your database vertically (by upgrading instance types) or horizontally (using read replicas). More about this in the later sections of this article.
- High Availability: With built-in features like Multi-AZ deployment and automated backups, RDS ensures your database is highly available and resilient.
- Security: RDS provides advanced security options, including VPC isolation, encryption at rest, and IAM-based access control, helping you meet compliance requirements.
By choosing Amazon RDS, .NET developers can save time on operational tasks and focus on optimizing their applications. Whether you’re building a new ASP.NET Core Web API, a Blazor application, or a Minimal API, RDS is an excellent choice to power your application’s relational database needs.
Amazon RDS Pricing
Amazon RDS pricing is determined by instance type, storage, backups, and data transfer. Instances are billed hourly based on the selected class, such as Standard Classes (db.t4g.micro) for cost efficiency or Memory Optimized (db.r5.large) for performance, or the Compute Optimized classes (db.c6gd.large) for better compute.
Storage costs depend on your choice of General Purpose SSD, or Provisioned IOPS for high throughput. Multi-AZ deployments and read replicas incur additional charges for high availability and scalability. Backup storage up to your database size is free, with manual snapshots billed per GB.
To save costs, leverage the AWS Free Tier for development, use Reserved Instances for production, and monitor resources via Amazon CloudWatch. Learn more on Amazon RDS Pricing.
What we’ll build?
We’ll build a simple Car Management .NET 9 Web API using EF Core for database access, powered by an Amazon RDS PostgreSQL instance. To ensure enhanced security, we’ll store database credentials in AWS Secrets Manager and fetch them dynamically at runtime. Along the way, we’ll also explore essential operational tasks, such as scaling the database and configuring high availability, giving you a comprehensive understanding of how to use Amazon RDS effectively in a .NET application.
PreRequisites
- .NET 9 SDK
- AWS Account, even a FREE Tier account is enough.
- Visual Studio IDE
- Development Machine Authenticated to work with AWS Resources - Here is how I configured my machine via AWS CLI Profile to stay authenticated to my AWS Account.
- Hands on PostgreSQL / EFCore Knowledge
- Familiar with AWS Secrets Manager - Read this article
Setting Up Your First Amazon RDS Instance
Setting up your first Amazon RDS instance involves a few straightforward steps in the AWS Management Console. In this section, we’ll walk through the process of creating a PostgreSQL database instance, configuring security settings, and ensuring your .NET application can connect to it securely.
To begin, log in to your AWS account and navigate to the RDS section in the AWS Management Console.
In the RDS dashboard, click on Create database.
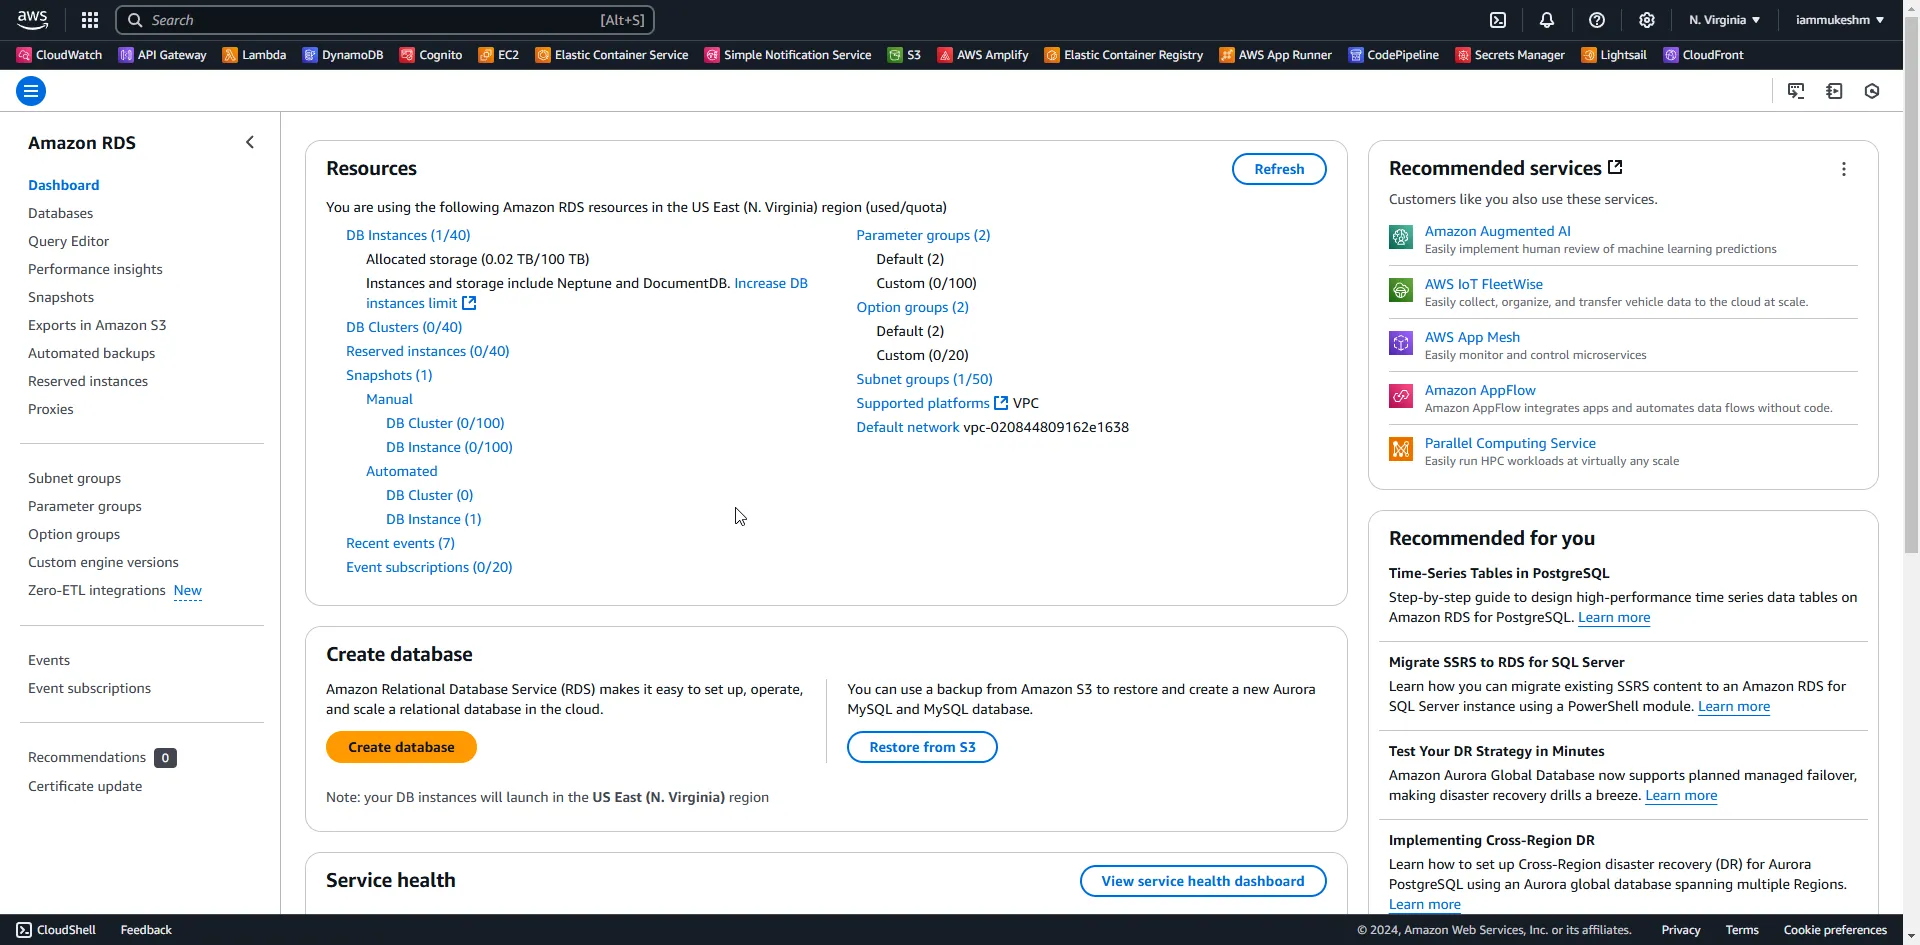
When creating an Amazon RDS instance, the Standard Create option offers more flexibility and control over the configuration compared to the Easy Create option.
With the Standard Create option, you can select a specific version of your desired database engine (e.g., PostgreSQL, MySQL, etc.). This is important if you need to work with a specific version due to compatibility issues with your application or library.
You can also choose to enable certain features available only in specific versions, such as new performance enhancements or security patches. With the Standard Create option, you can enable Multi-AZ deployments and also Read Replicas, which can be quite powerful down the road.
Under Engine options, select PostgreSQL (or any other supported engine if preferred). You’ll be able to use either the latest version or a specific version depending on your project needs.
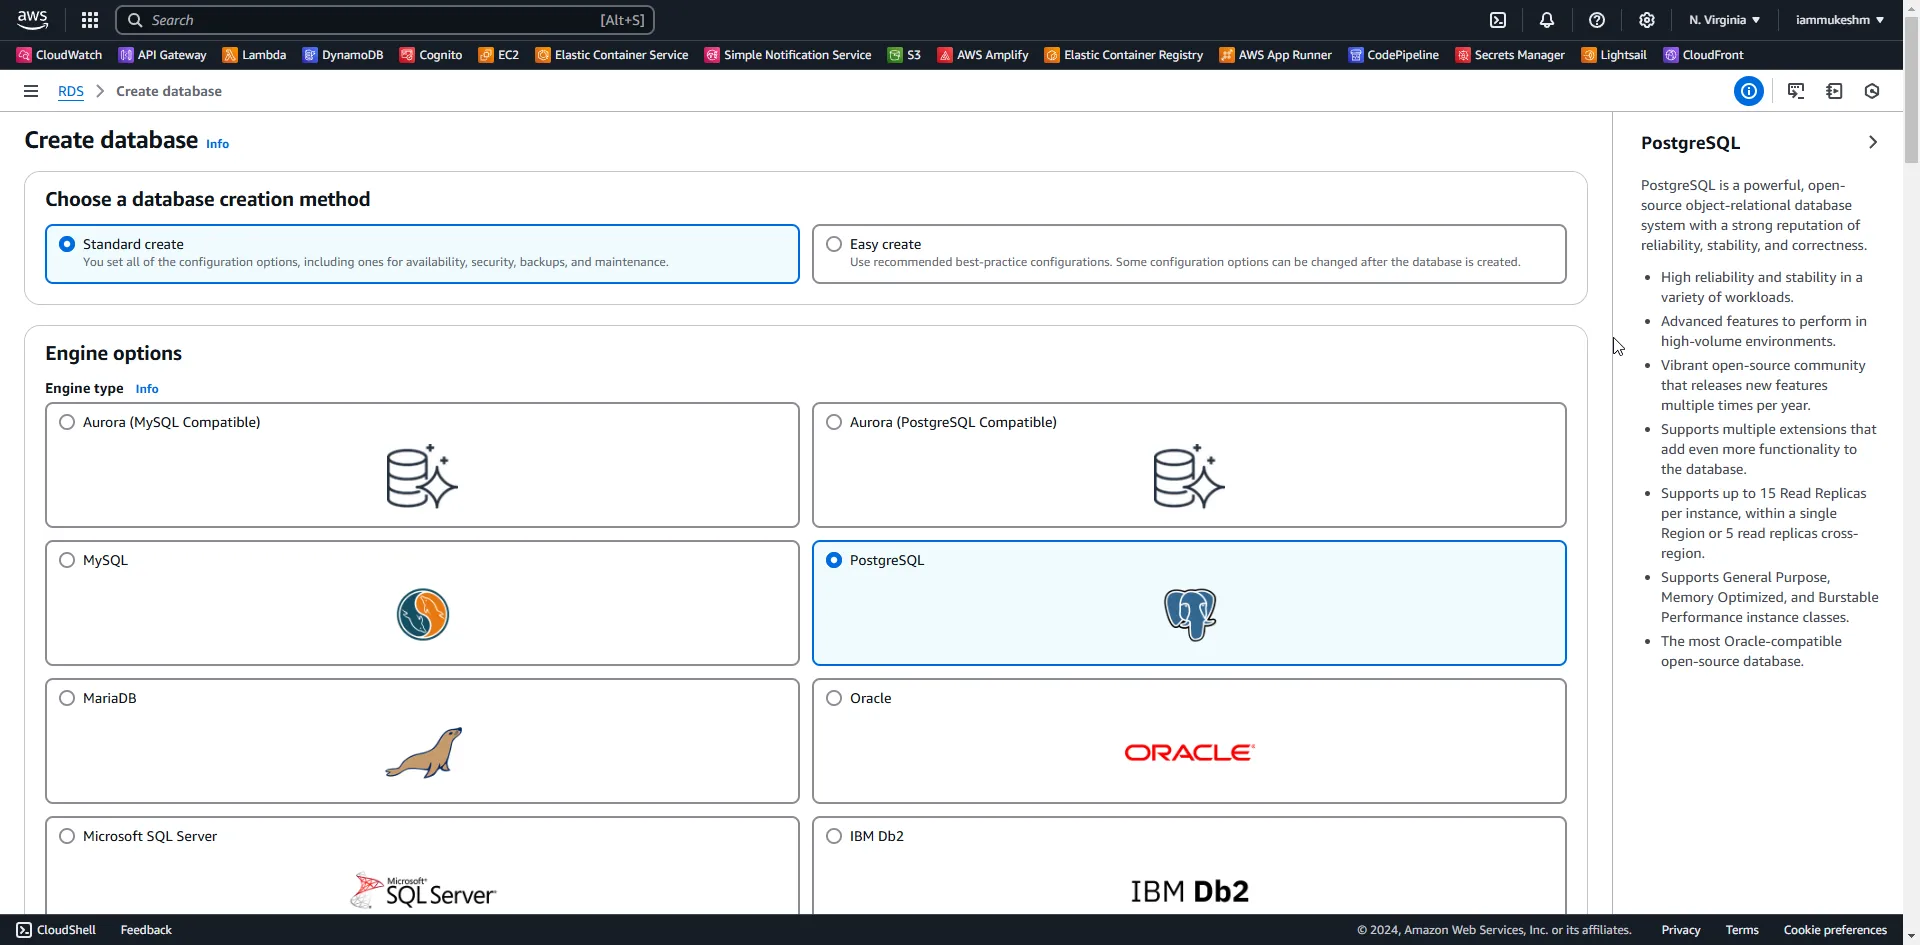
Next, for the engine version, choose the latest version that’s available. At the time of writing this article, the latest available version of the PostgreSQL engine is 17.2-R1.
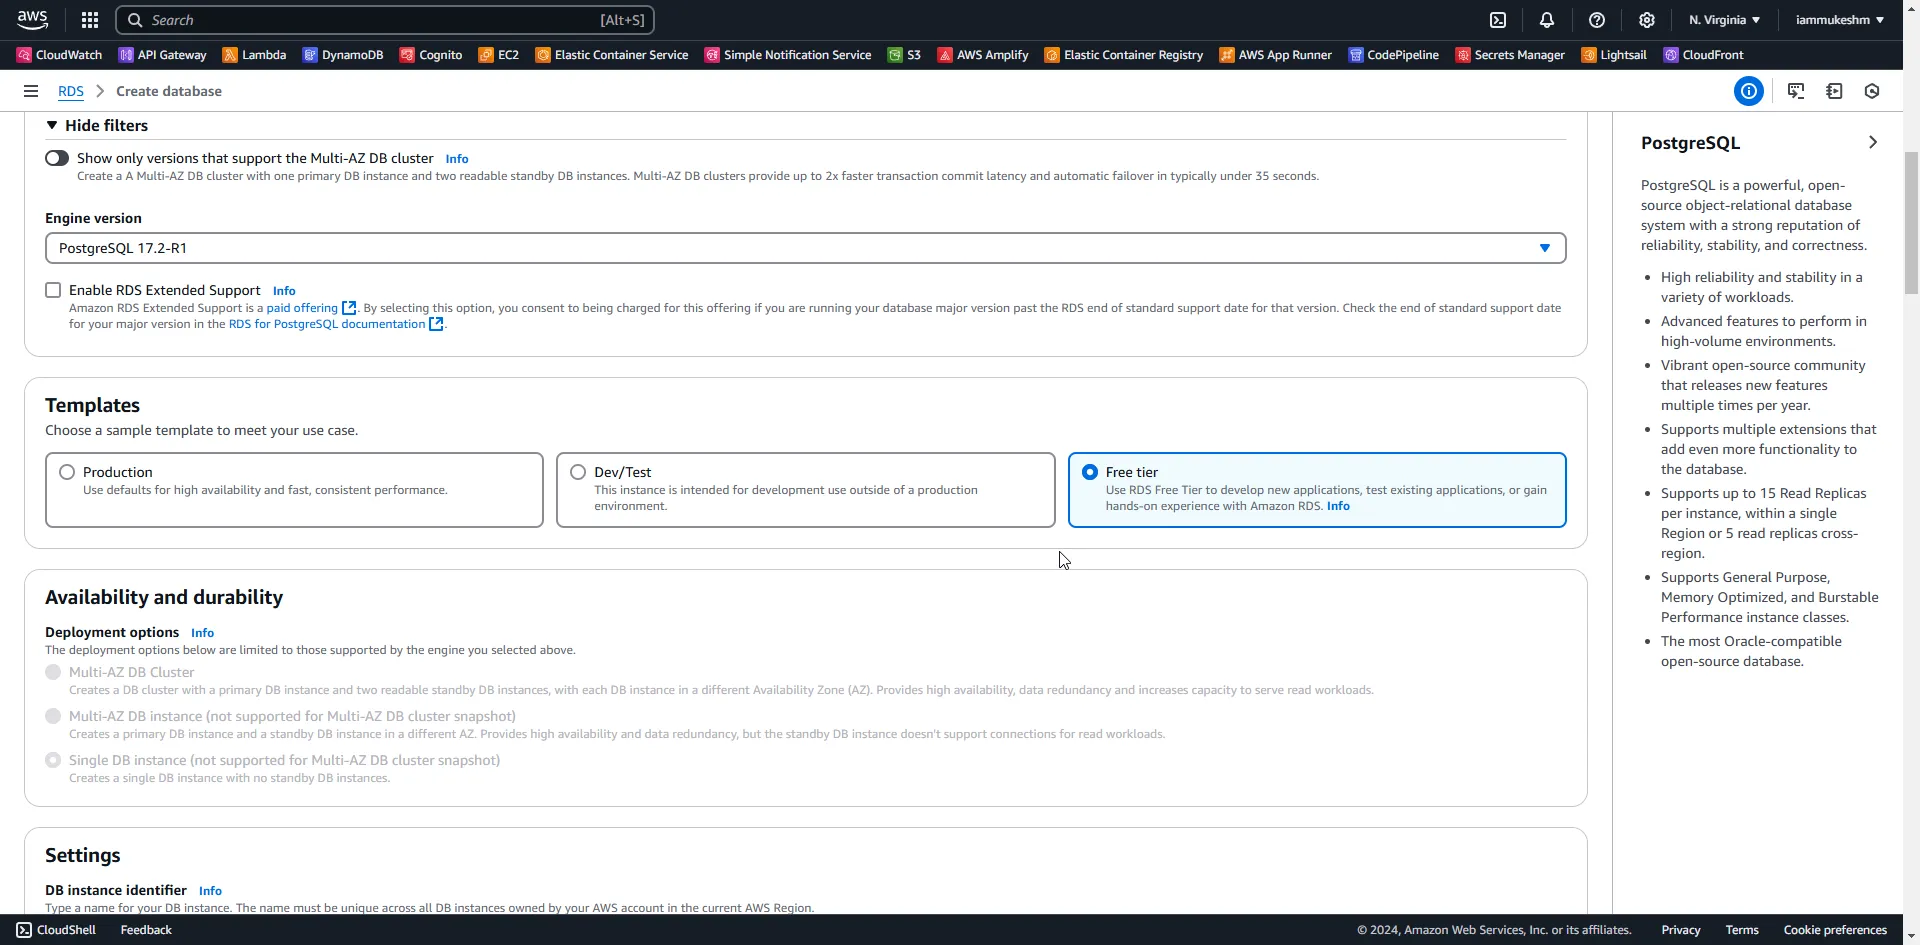
Amazon RDS also gives you templates to choose from, to configure your database better based on your use case. The included templates are
- Production - Choose this template for applications running in a live production environment that require high performance, availability, and durability. It is optimized to support mission-critical workloads.
- Dev/Test - Designed for non-production environments where cost-efficiency is a priority over high availability or durability.
- Free Tier - For beginners or applications with very light workloads, this template allows you to explore Amazon RDS at no cost under the AWS Free Tier.
For this demonstration, we will go with the Free Tier Template. Note that choosing this would disable certain deployment options like Multi-AZ DB Cluster. More about this in a later section of this article.
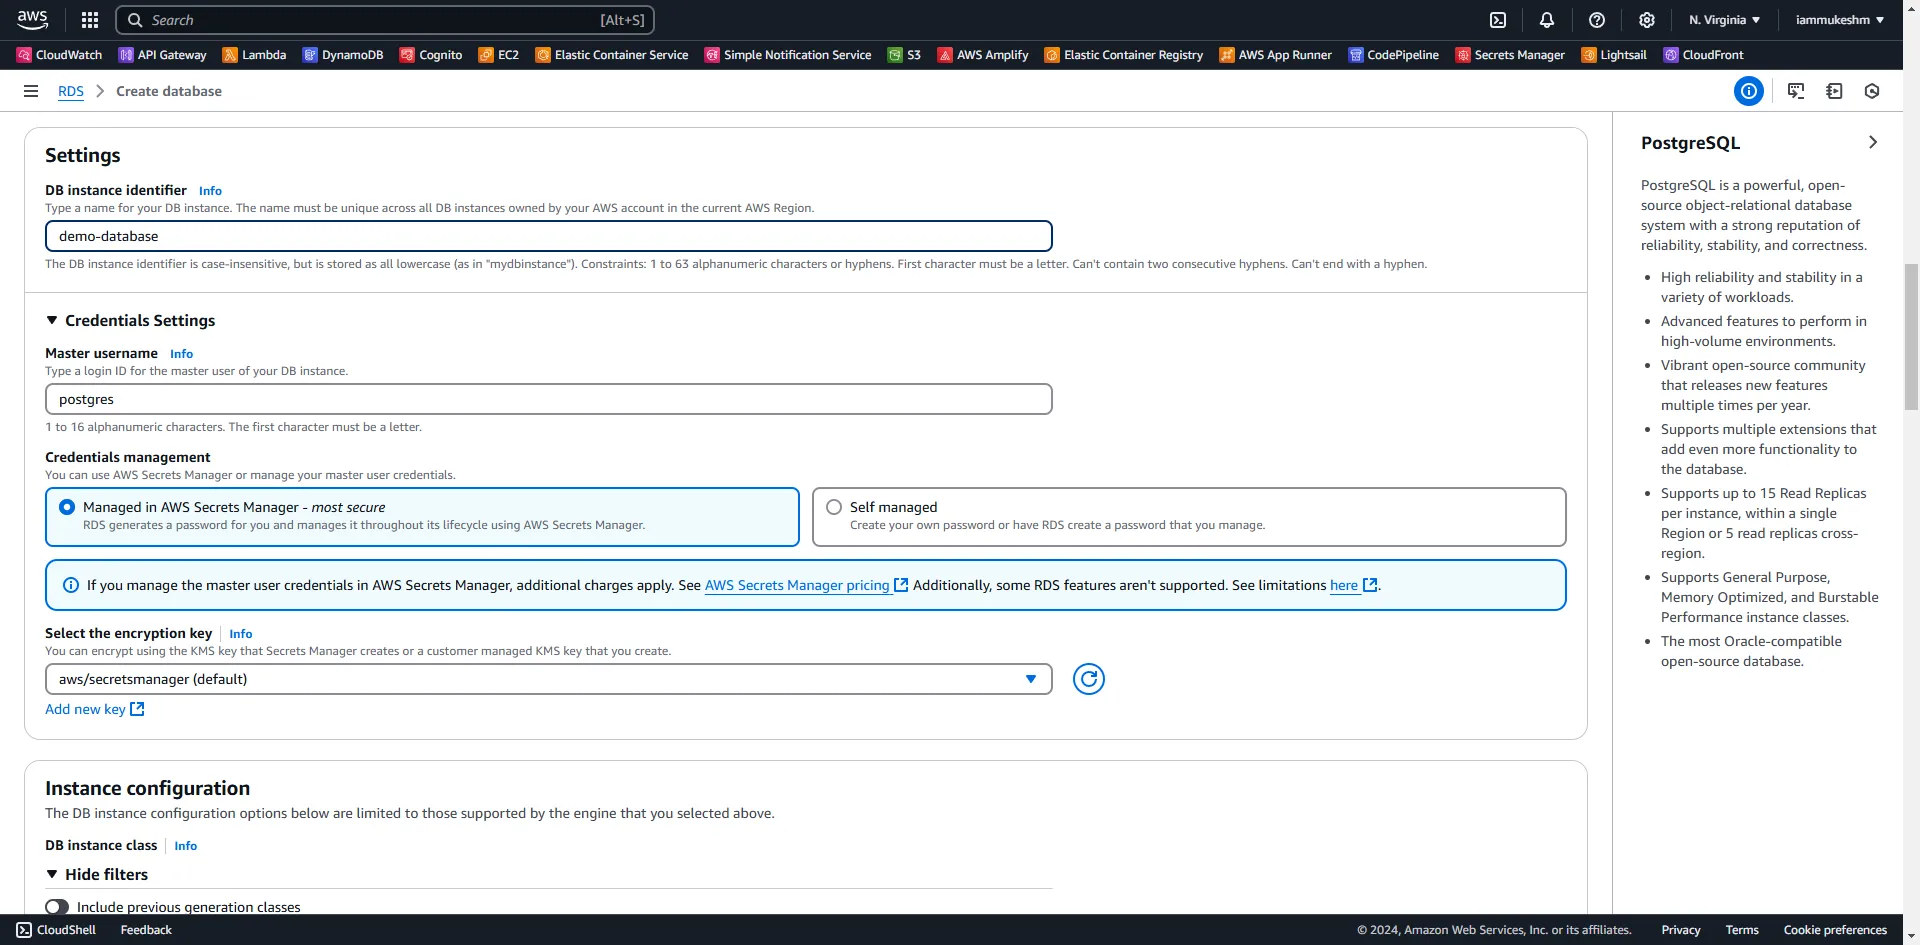
Next up, I have named my database instance identifier as demo-database. And within the Credentials Configuration, I have set the username to be postgres and selected the Credentials Management as Managed in AWS Secret Manager, which is the recommendation and is the most secure way to handle credentials. You can also mention your own custom password by selecting the Self Managed option.
But the recommendation is to go with AWS Secrets Manager. RDS would create a new Secret for you in AWS Secret Manager which has the username and password. You can fetch this secret at runtime in the application from AWS, and build a connection string.
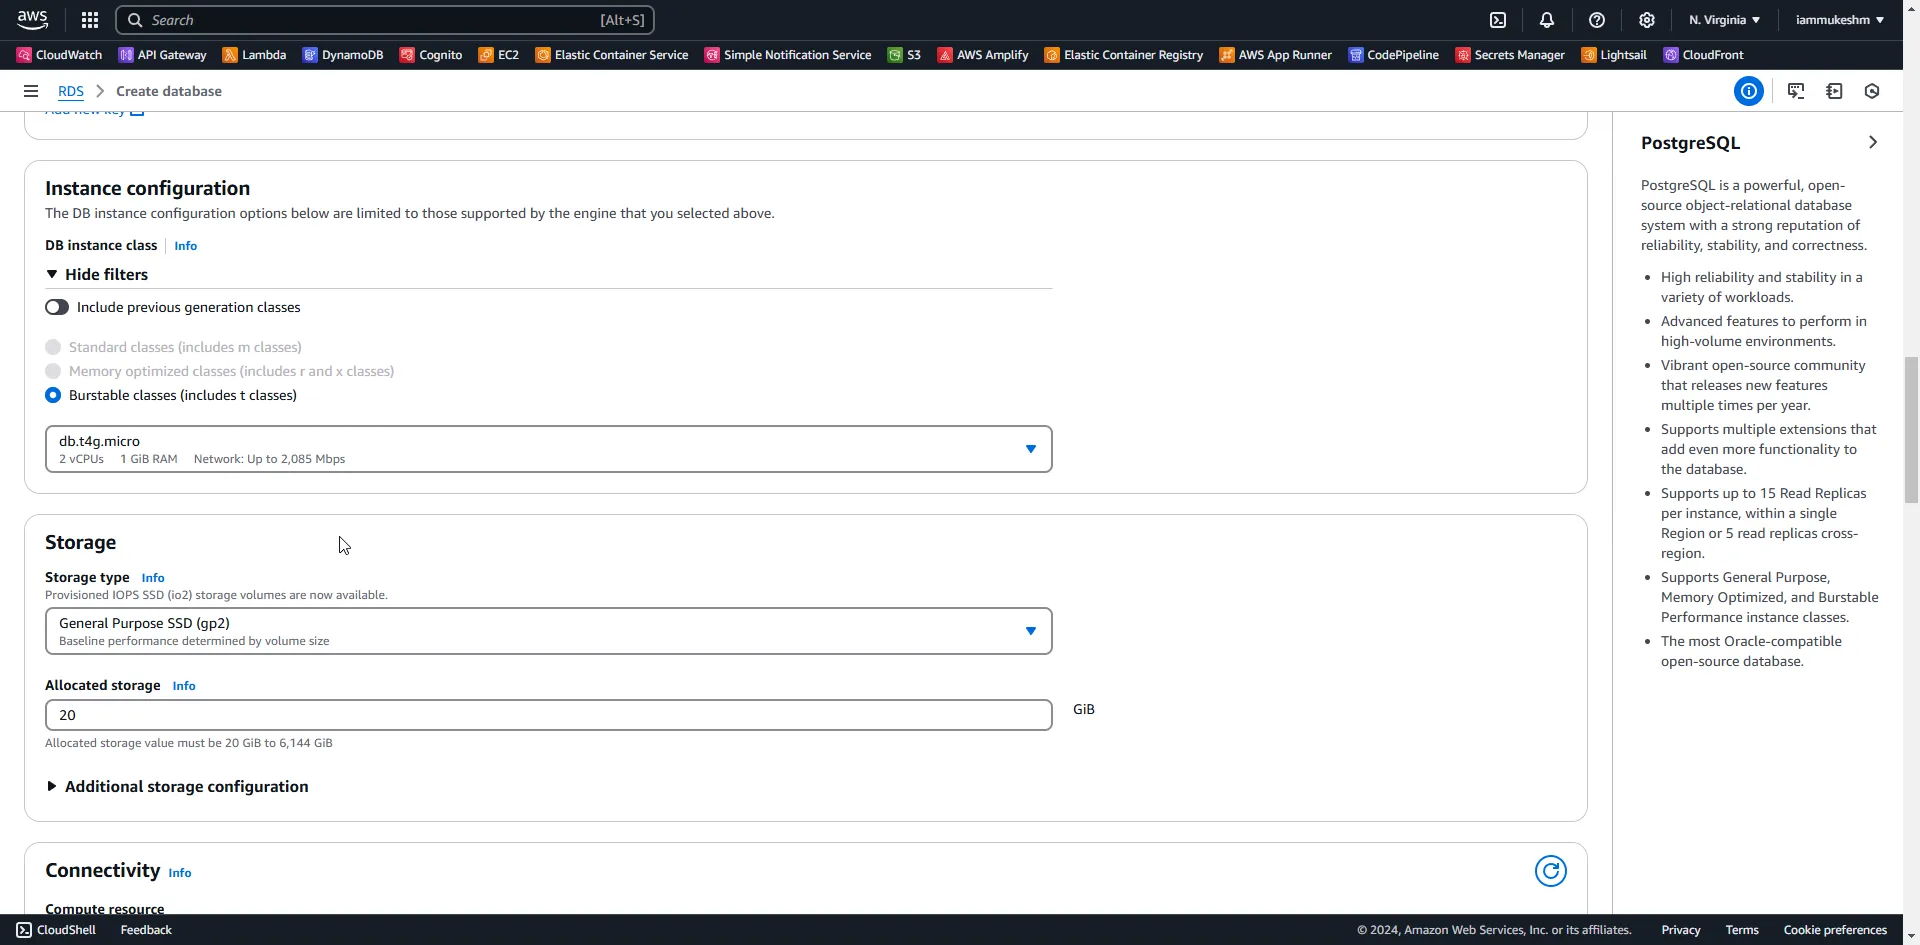
Next, in the instance configuration, I have selected the db.t4g.micro instance which is included in the Free Tier. This should be enough for our simple use case.
I am leaving everything else to the default.
Also, under the connectivity tab, ensure that you have allowed public access to this DB. This is crucial as we are going to be connecting to this DB from our Local machine.
Once configuration is done, Create the Database. It usually takes ~5 mins to provision a Amazon RDS PostgreSQL instance.
Building the .NET Web API
Navigate to Visual Studio IDE and create a new project.
I am creating an ASP.NET Core 9 Web API.
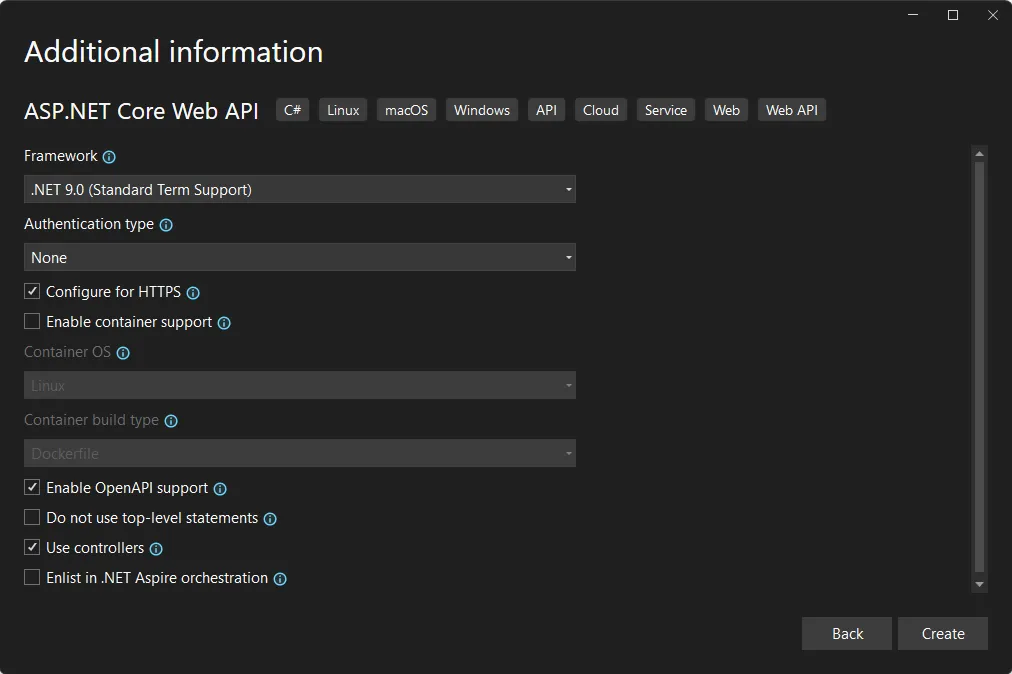
First up, let’s install the required NuGet packages.
dotnet add package AWSSDK.SecretsManagerdotnet add package Microsoft.EntityFrameworkCoredotnet add package Microsoft.EntityFrameworkCore.Designdotnet add package Npgsql.EntityFrameworkCore.PostgreSQLThen, we will add a simple Domain class for Car. Create a new folder named Domain, and add a new class named Car.
public class Car{ public int Id { get; set; } public required string Make { get; set; } public required string Model { get; set; } public required int Year { get; set; }}Next, let’s add the DbContext. Create a new folder named Persistence, and add a new context class called CarDbContext.
public class CarDbContext(DbContextOptions<CarDbContext> options) : DbContext(options){ public DbSet<Car> Cars => Set<Car>();}Here is the fun part. As mentioned earlier, we have configured our RDS instance to manage the database credentials via AWS Secrets Manager. Let’s navigate back to AWS Management Console, and open up AWS Secrets Manager.
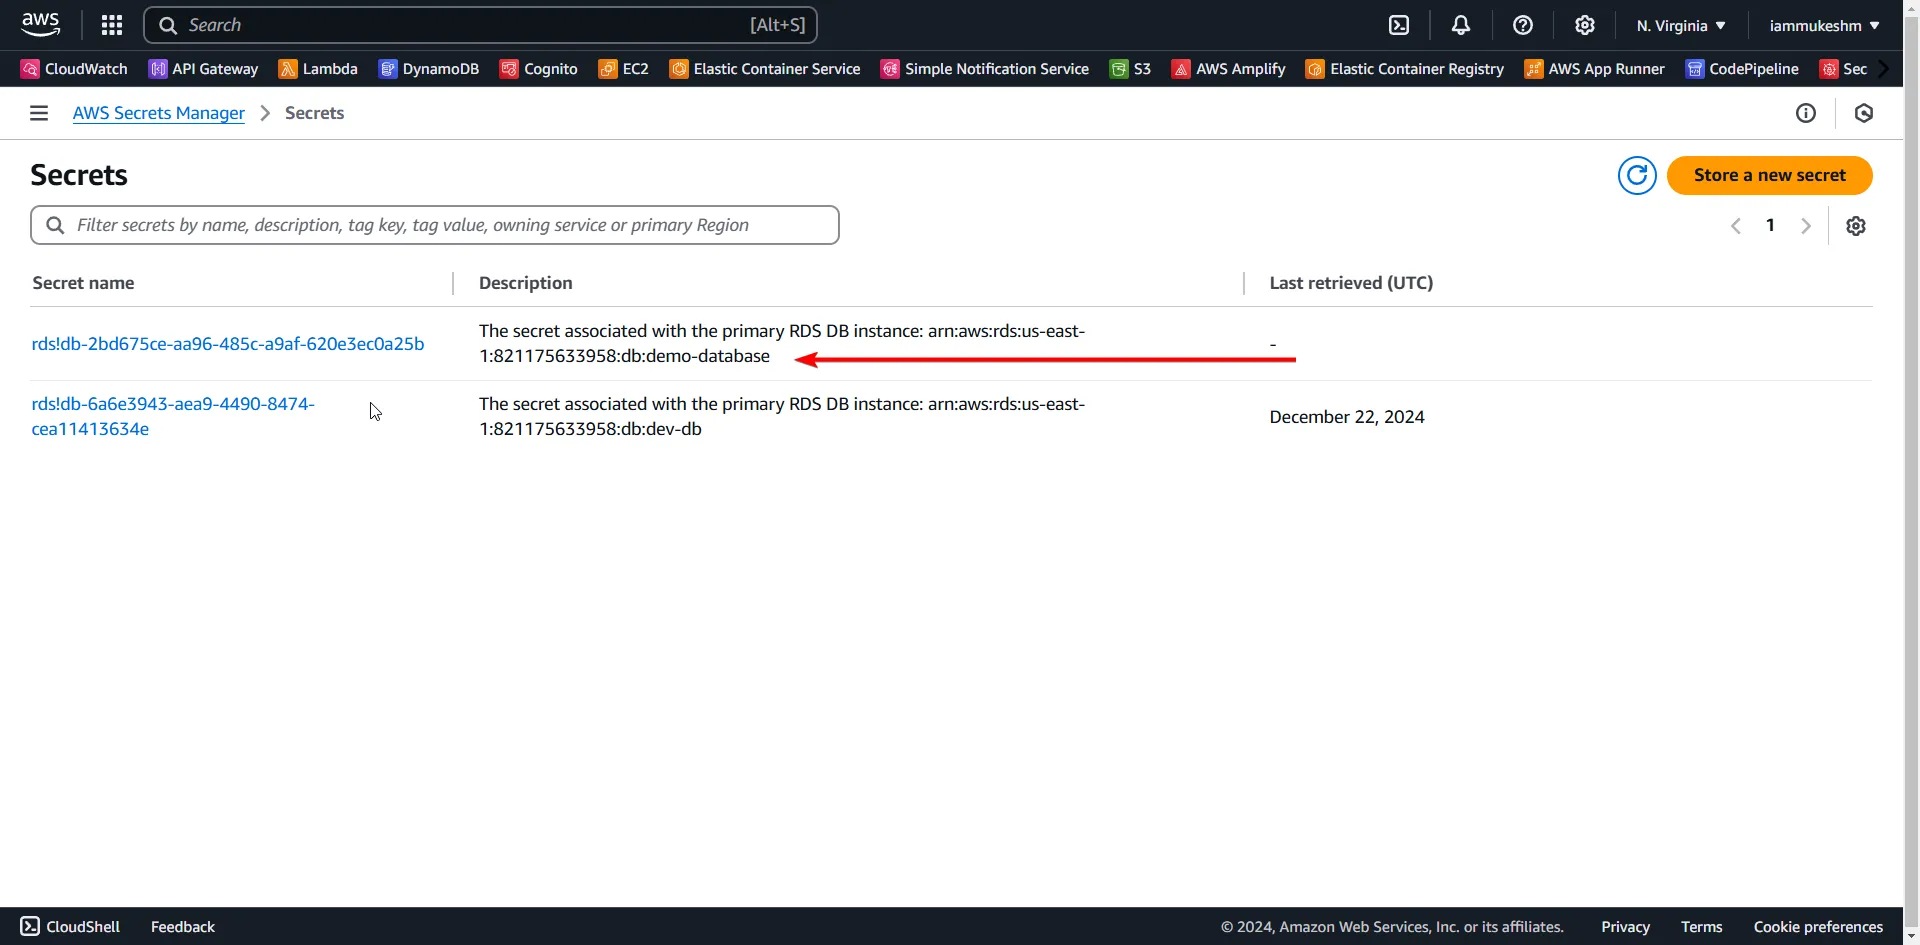
Here, open up the secrets that is related to your newly created database. In my case, it is going to be the first record in the above mentioned list.
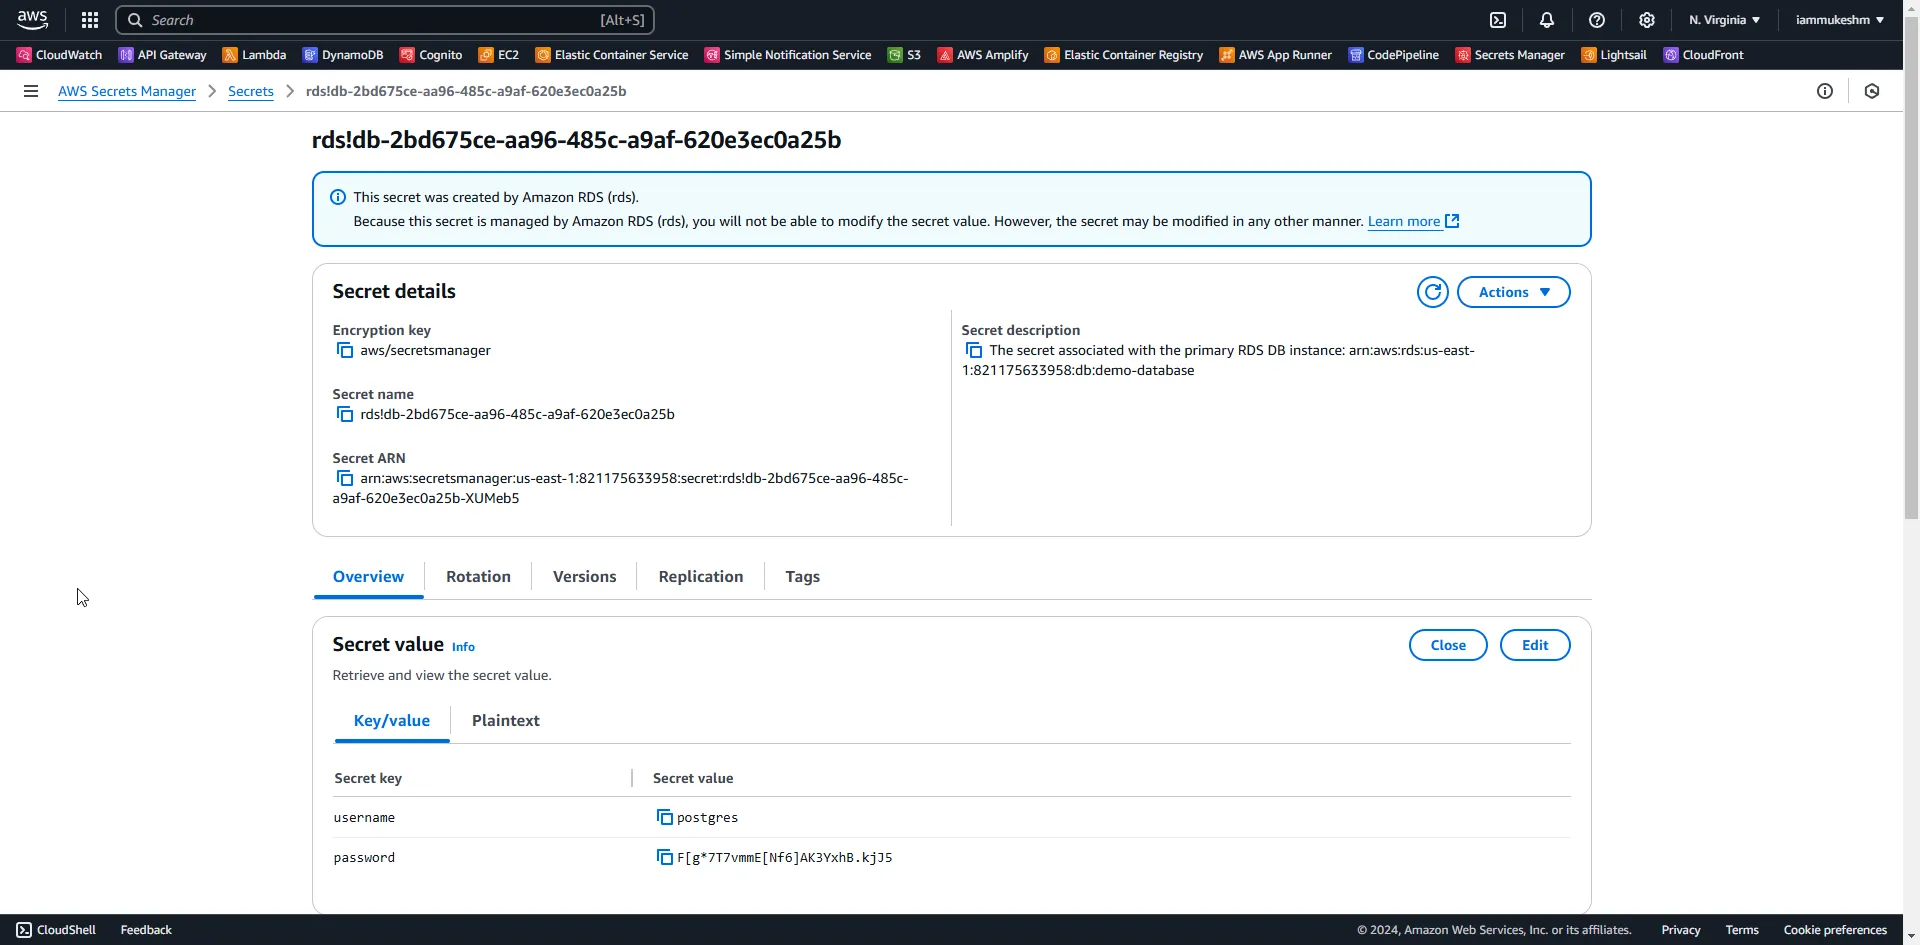
Here, you can see the following parameters, which are important to us.
- Secret Name
- Username
- Password
In addition to this, we also need the host name and database name.
Open up Amazon RDS, and open the newly created RDS instance.
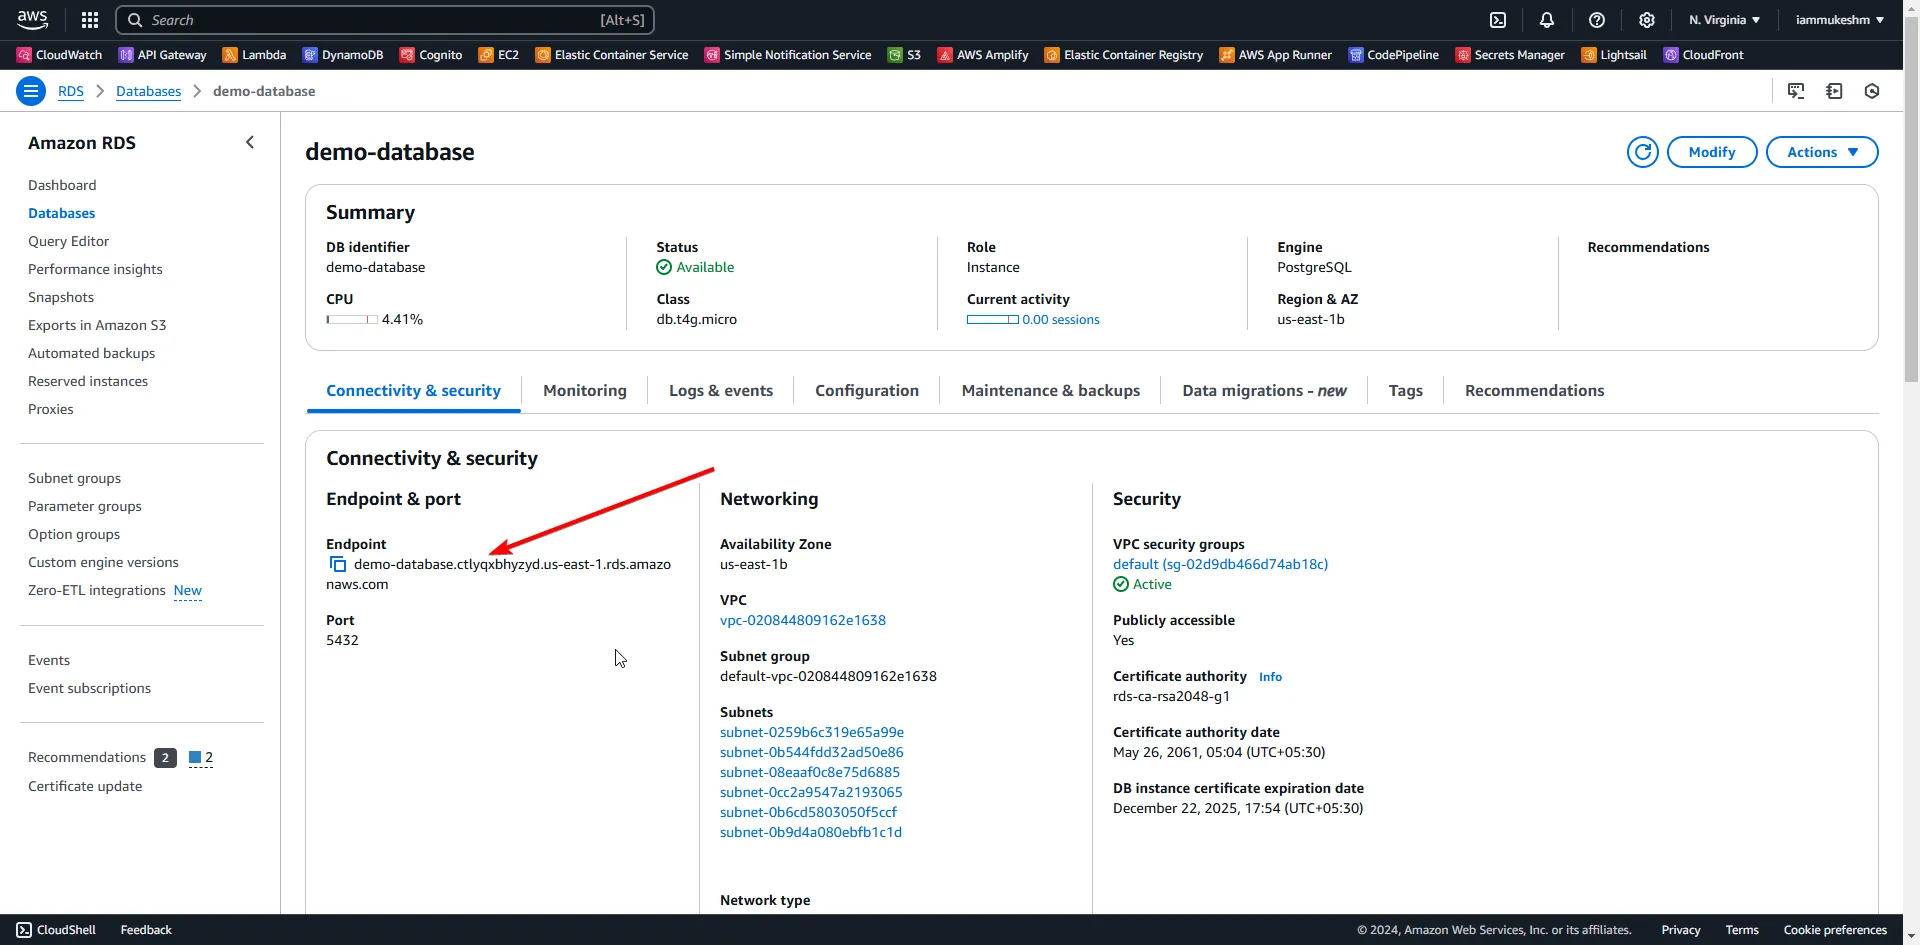
Here is the host name.
Open up appsettings.json and add the following.
"RDSOptions": { "DatabaseSecretName": "rds!db-2bd675ce-aa96-485c-a9af-620e3ec0a25b", // name of the secret against which credentials are stored. "DatabaseName": "car-management", // this can be anything that you want. "HostName": "demo-database.ctlyqxbhyzyd.us-east-1.rds.amazonaws.com" // hostname of the database instance.}Fetching Database Credentials from AWS Secrets Manager
Next, we need a service that can use the above configured Database Secret Name, fetch the secret and build a valid connection string.
Create a new folder named Services and add the following interface IDatabaseCredentialsService.
public interface IDatabaseCredentialsService{ Task<string> GetConnectionStringAsync(string secretName, string databaseName, string hostName, int portNumber = 5432);}Let’s implement this interface. Create a new class in the same folder and name it DatabaseCredentialsService.
public class DatabaseCredentialsService : IDatabaseCredentialsService{ private readonly IAmazonSecretsManager _secretsManagerClient;
public DatabaseCredentialsService(IAmazonSecretsManager secretsManagerClient) { _secretsManagerClient = secretsManagerClient; }
public async Task<string> GetConnectionStringAsync(string secretName, string databaseName, string hostName, int portNumber = 5432) { var secretResponse = await _secretsManagerClient.GetSecretValueAsync(new GetSecretValueRequest { SecretId = secretName });
string secretString = secretResponse.SecretString; var secret = JsonSerializer.Deserialize<Dictionary<string, string>>(secretString); if (secret is null) throw new KeyNotFoundException($"Secret Name {secretName} Not Found or is Empty.");
var username = secret["username"]; var password = secret["password"]; var database = databaseName; var host = hostName; var port = portNumber;
// Construct the PostgreSQL connection string return $"Host={host};Port={port};Database={database};Username={username};Password={password}"; }}Let’s understand this service.
At Line #3 we inject the IAmazonSecretsManager instance.
The GetConnectionStringAsync accepts the secretName, databaseName, hostName, and portNumber(which has a default value of 5432). Within this function, we send a request to AWS Secrets Manager along with the secret name, which fetches the secret. We then deserialize the incoming string to a Dictionary. From here, we can fetch the username and password.
At line #28, we construct a valid PostgreSQL connection string using the fetched username, password, and other details like database name, and host name.
Configuring EF Core & DI
Next, we need to register all the dependencies. This might look a bit complicated. But i will explain the code in some time. Open up Program.cs and add in the following just before the var app = builder.Build();.
// Register AWS Secrets Manager clientbuilder.Services.AddSingleton<IAmazonSecretsManager, AmazonSecretsManagerClient>();
// Register the DatabaseCredentialsServicebuilder.Services.AddSingleton<IDatabaseCredentialsService>(sp => new DatabaseCredentialsService(sp.GetRequiredService<IAmazonSecretsManager>()));
// Add PostgreSQL DbContextbuilder.Services.AddDbContext<CarDbContext>((serviceProvider, options) =>{ var credentialsService = serviceProvider.GetRequiredService<IDatabaseCredentialsService>(); var databaseSecretName = builder.Configuration["RDSOptions:DatabaseSecretName"] ?? throw new ArgumentNullException("RDSOptions:DatabaseSecretName", "Database secret name is missing from configuration."); var databaseName = builder.Configuration["RDSOptions:DatabaseName"] ?? throw new ArgumentNullException("RDSOptions:DatabaseName", "Database name is missing from configuration."); var hostName = builder.Configuration["RDSOptions:HostName"] ?? throw new ArgumentNullException("RDSOptions:HostName", "Database host name is missing from configuration.");
// Return the connection string from the credentials service var connectionString = credentialsService.GetConnectionStringAsync(databaseSecretName, databaseName, hostName).Result;
options .UseNpgsql(connectionString) .UseSeeding((context, _) => { var demoCar = context.Set<Car>().FirstOrDefault(b => b.Id == 101); if (demoCar == null) { context.Set<Car>().Add(new Car { Id = 101, Make = "Tesla", Model = "Model S", Year = 2022 }); context.SaveChanges(); } }).UseAsyncSeeding(async (context, _, cancellationToken) => { var demoCar = await context.Set<Car>().FirstOrDefaultAsync(b => b.Id == 101); if (demoCar == null) { context.Set<Car>().Add(new Car { Id = 101, Make = "Tesla", Model = "Model S", Year = 2022 }); await context.SaveChangesAsync(); } });});Firstly, we will have to register the IAmazonSecretsManager Dependency. I prefer to do this as a Singleton.
Similarly, we register IDatabaseCredentialsService by passing it a instance of the IAmazonSecretsManager. This is also registered with a Singleton lifecycle.
Next, to register the CarDbContext. We will have to call the IDatabaseCredentialsService to generate the connection string. To do this, I am making use of the IServiceProvider that is available as part of the AddDbContext extension. From the provider, you can get the registered instance of IDatabaseCredentialsService.
We also need values from appsettings.json for the secretName, databaseName, and hostName. This can fetched using builder.Configuration["RDSOptions:xxx"]. Once you have the essential details, simply call the GetConnectionStringAsync which returns a valid connection string.
At Line 23, you can use this generated connection string to configure the PostgreSQL provider.
I also need some default data available in the Cars table. To do this, we can use the UseSeeding and UseAsyncSeeding extensions methods which is introduced as part of .NET 9, and is now the recommended way to seed initial data. My seeding logic is simple, if there is no record of a car with ID 101, insert a default data set.
Note that it is necessary to implement both UseSeeding and UseAsyncSeeding although they have the same seed logic.
CRUD Operations
Again, in the Program.cs file, add the following Minimal API Endpoints.
// CRUD Endpoints
// Create a carapp.MapPost("/cars", async (Car car, CarDbContext db) =>{    db.Cars.Add(car);    await db.SaveChangesAsync();    return Results.Created($"/cars/{car.Id}", car);});
// Read all carsapp.MapGet("/cars", async (CarDbContext db) => await db.Cars.ToListAsync());
// Read a specific carapp.MapGet("/cars/{id:int}", async (int id, CarDbContext db) =>{    var car = await db.Cars.FindAsync(id);    return car != null ? Results.Ok(car) : Results.NotFound();});
// Update a carapp.MapPut("/cars/{id:int}", async (int id, Car updatedCar, CarDbContext db) =>{    var car = await db.Cars.FindAsync(id);    if (car is null) return Results.NotFound();
    car.Make = updatedCar.Make;    car.Model = updatedCar.Model;    car.Year = updatedCar.Year;
    await db.SaveChangesAsync();    return Results.NoContent();});
// Delete a carapp.MapDelete("/cars/{id:int}", async (int id, CarDbContext db) =>{    var car = await db.Cars.FindAsync(id);    if (car is null) return Results.NotFound();
    db.Cars.Remove(car);    await db.SaveChangesAsync();    return Results.NoContent();});
I am not explaining the above code, as they are pretty standard. Let me know in the comments section if you want me to expand on the above code.
Adding Migrations
Finally, let’s add the database migrations and update our database. I prefer doing this from a Terminal CLI. Run the following commands.
dotnet ef migrations add "Initial"dotnet ef database updateThis will generate new database migrations, and update the RDS Database for you. Once it’s done, you can verify this by browsing the RDS Database via tools like Azure Data Studio or PG Admin.
I personally use PgAdmin for PostgreSQL data management. You will need to register a new server on pgadmin, and pass details like hostname, username, password, and port number.
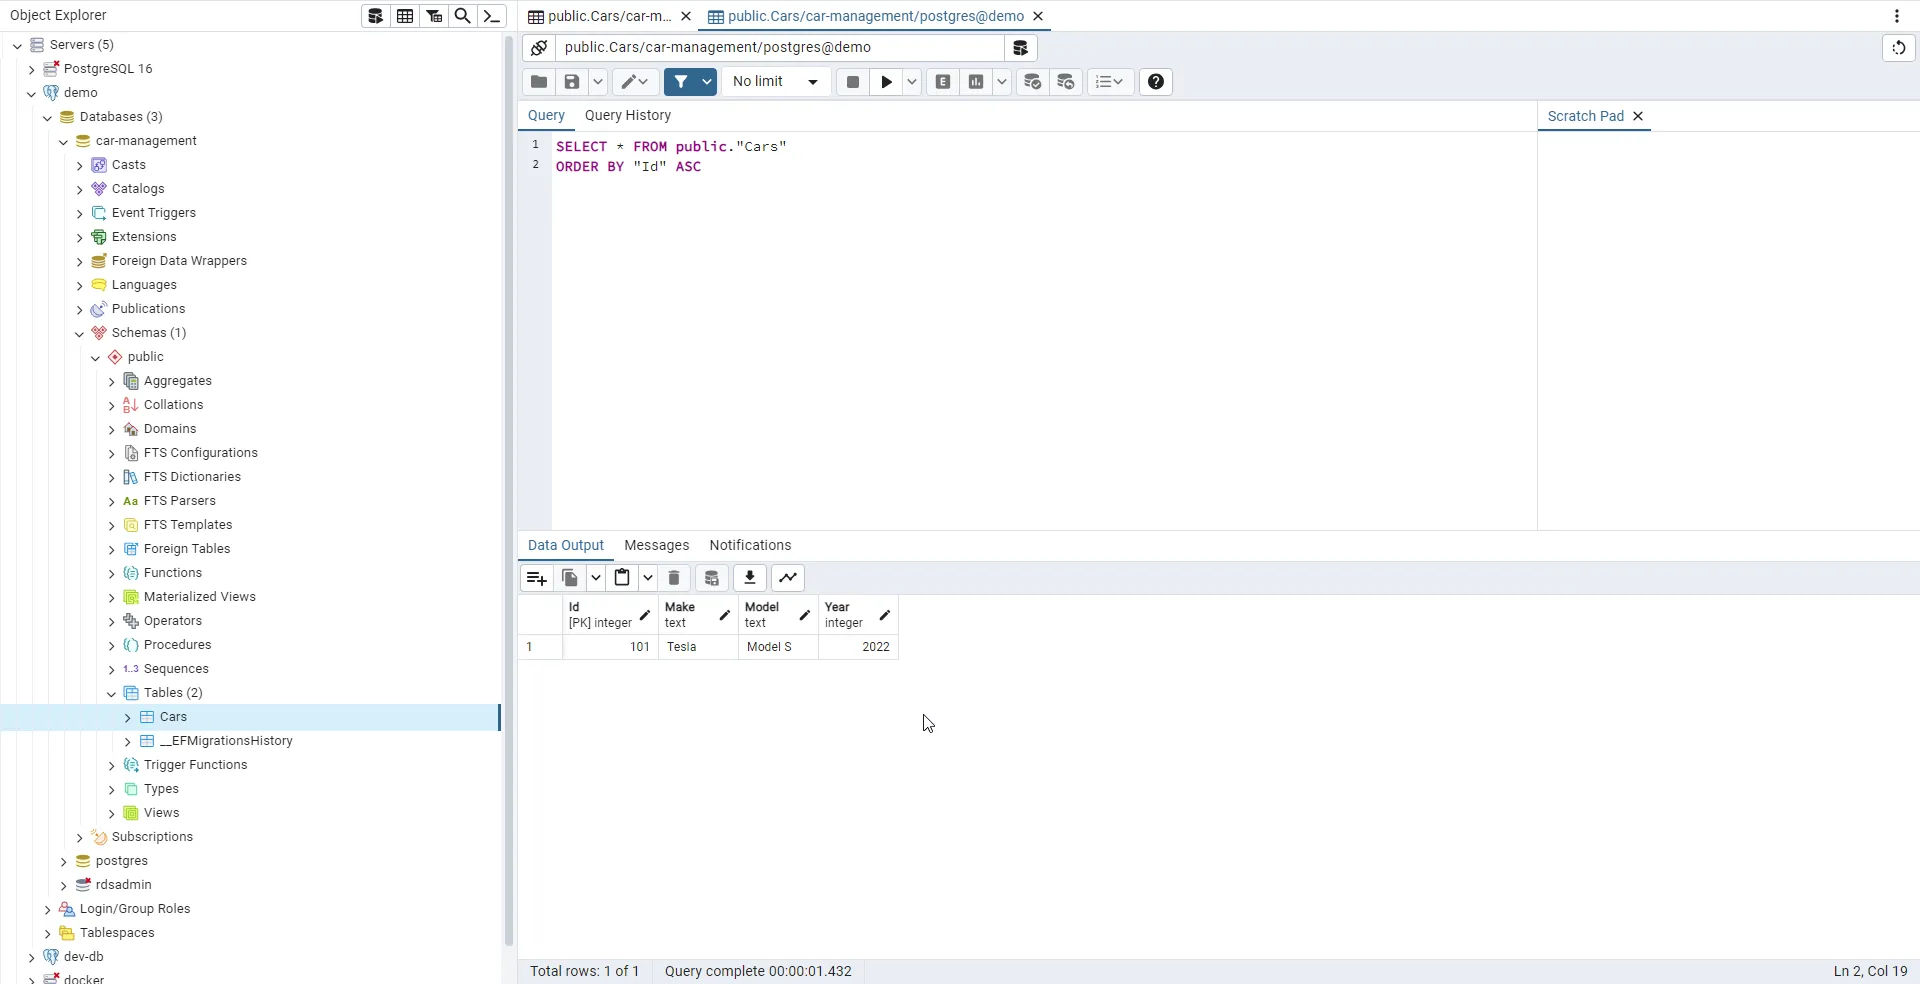
As you can see, we have the required schema and data.
Testing with Postman
Now, to test the CRUD operations, let’s run the WebAPI and open up Postman.
Let me show you a nice tip to generate Postman Request Metadata is a clean way. As you know that Swagger is no longer included in the default .NET project templates, starting from .NET 9, we will have to rely on OpenAPI specs. We can use this specification and feed it to Postman, so that it can generate a collection of requests for you.
Run the WebAPI and navigate to https://localhost:7135/openapi/v1.json.
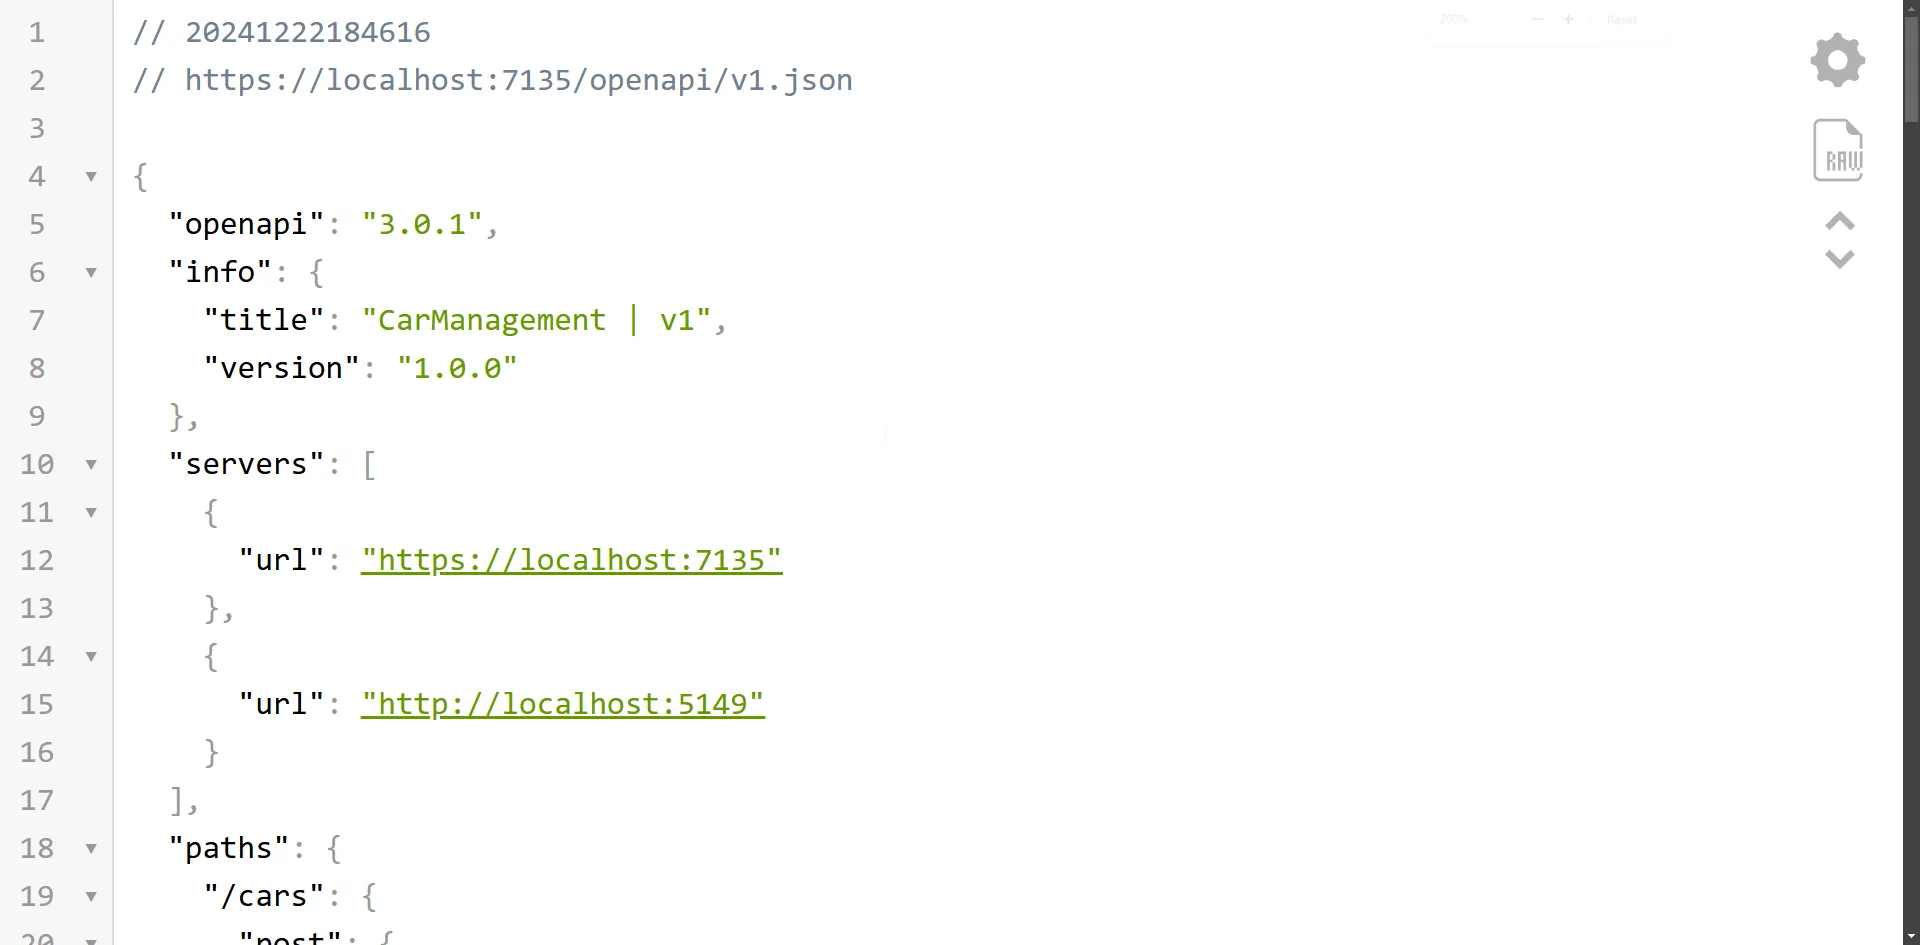
Copy this URL, Open up Postman, and click on import. Here past in the copied URL.
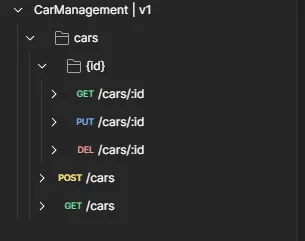
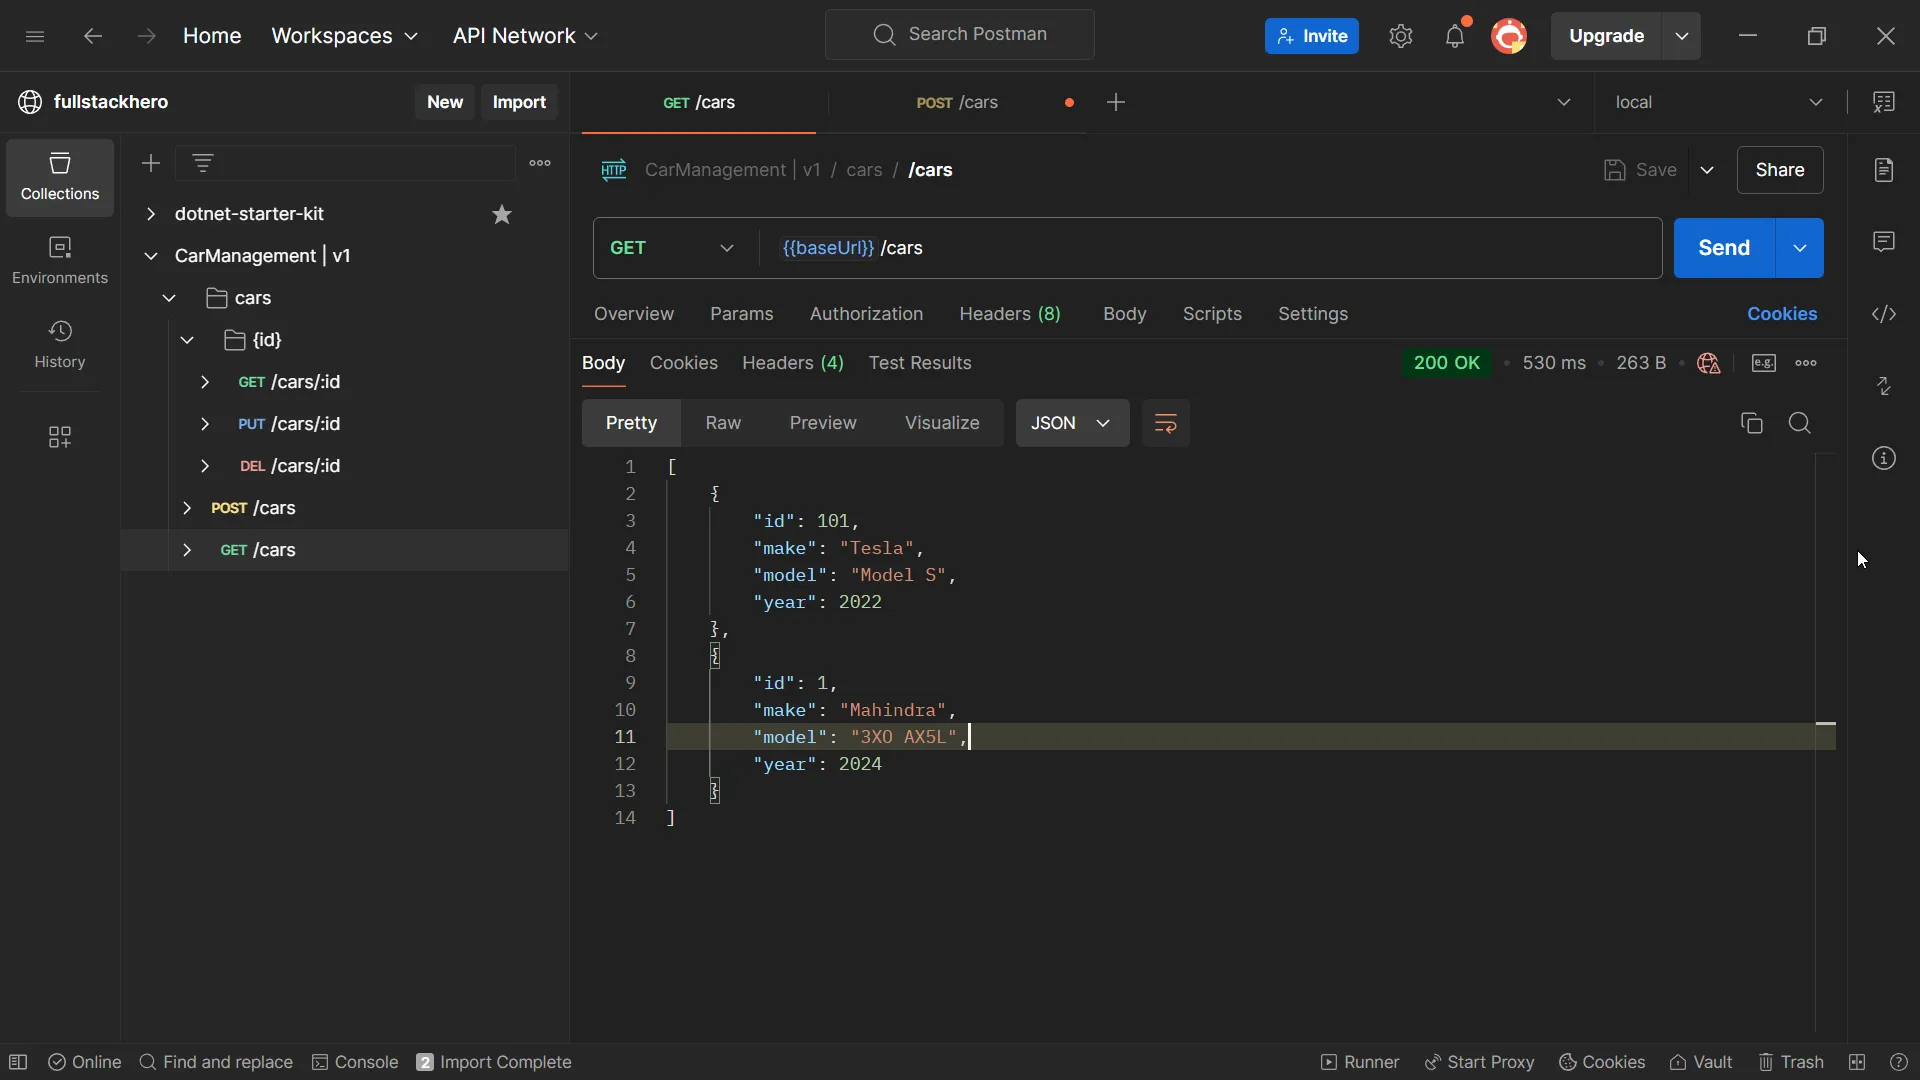
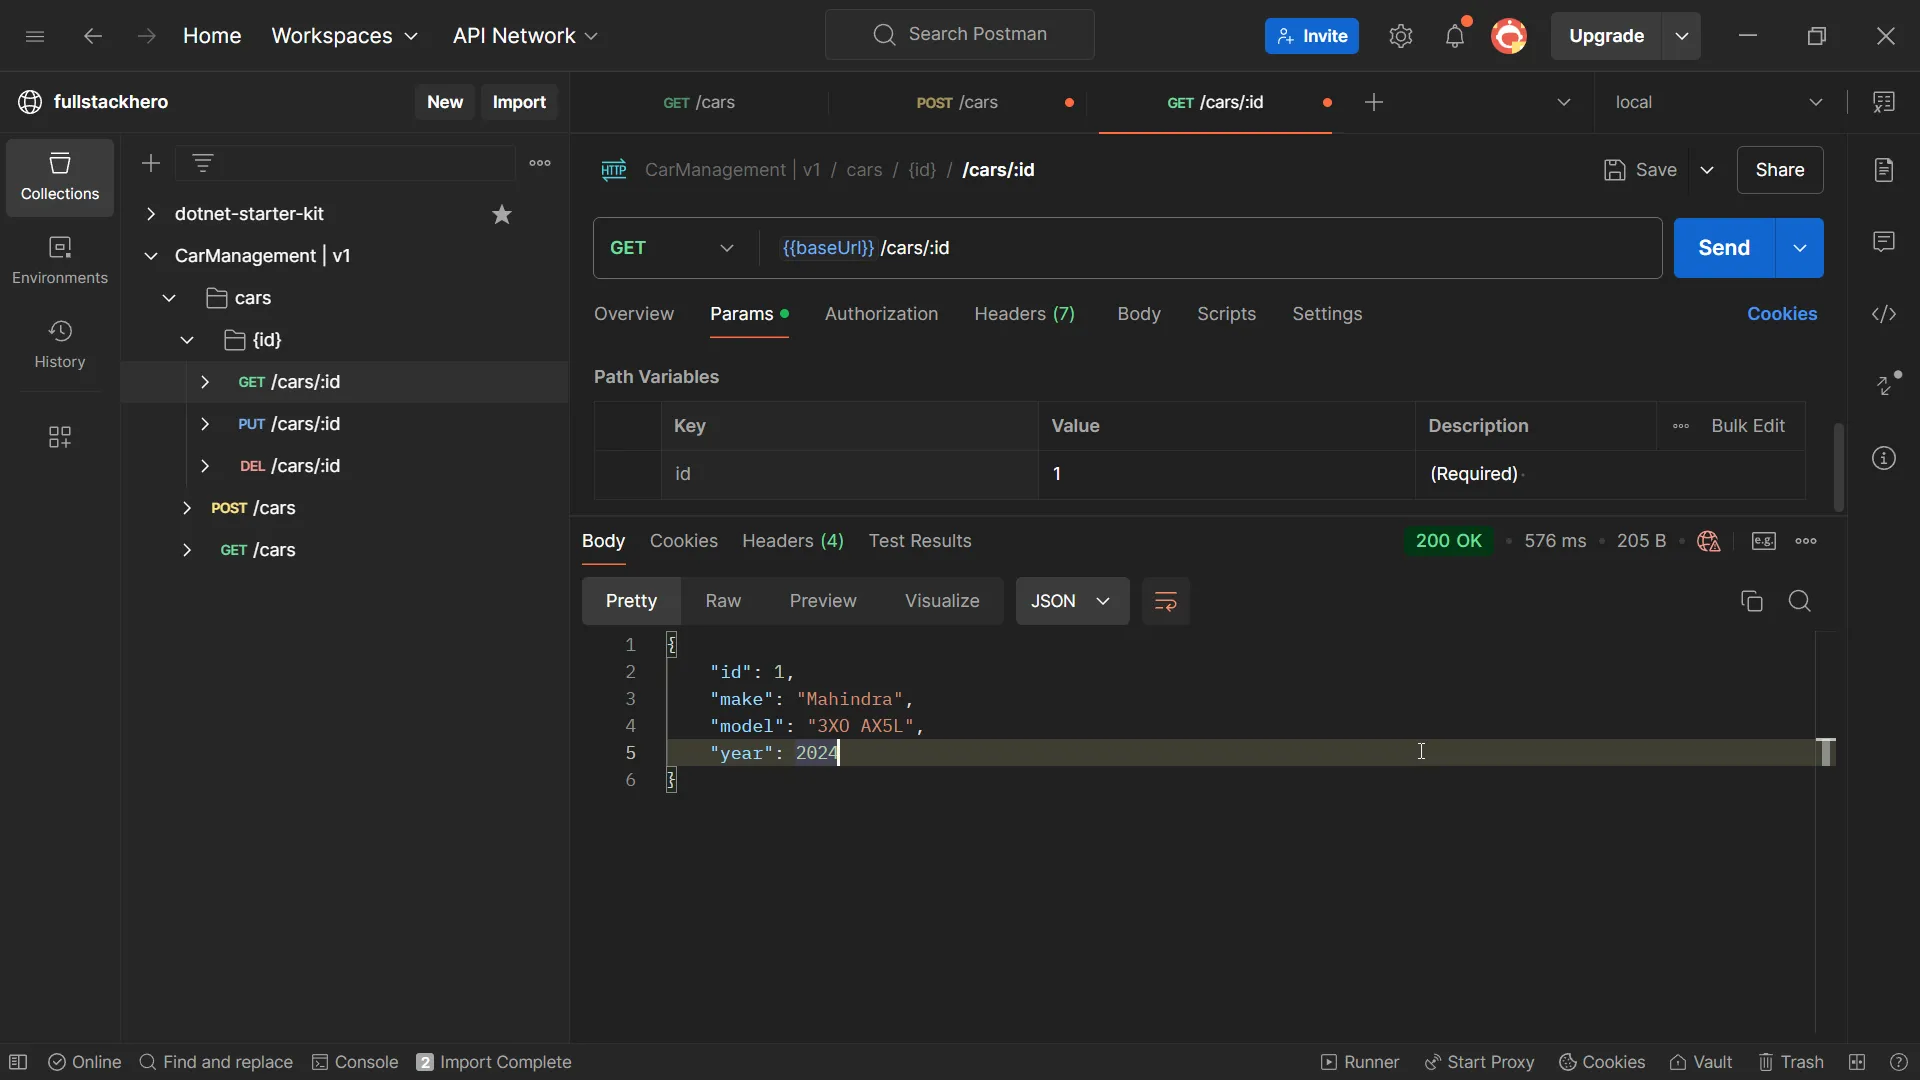
As you can see, we have the entire collection of requests now available. Super easy for us to test the API endpoints. Let’s hit some endpoints.
Create a new car.
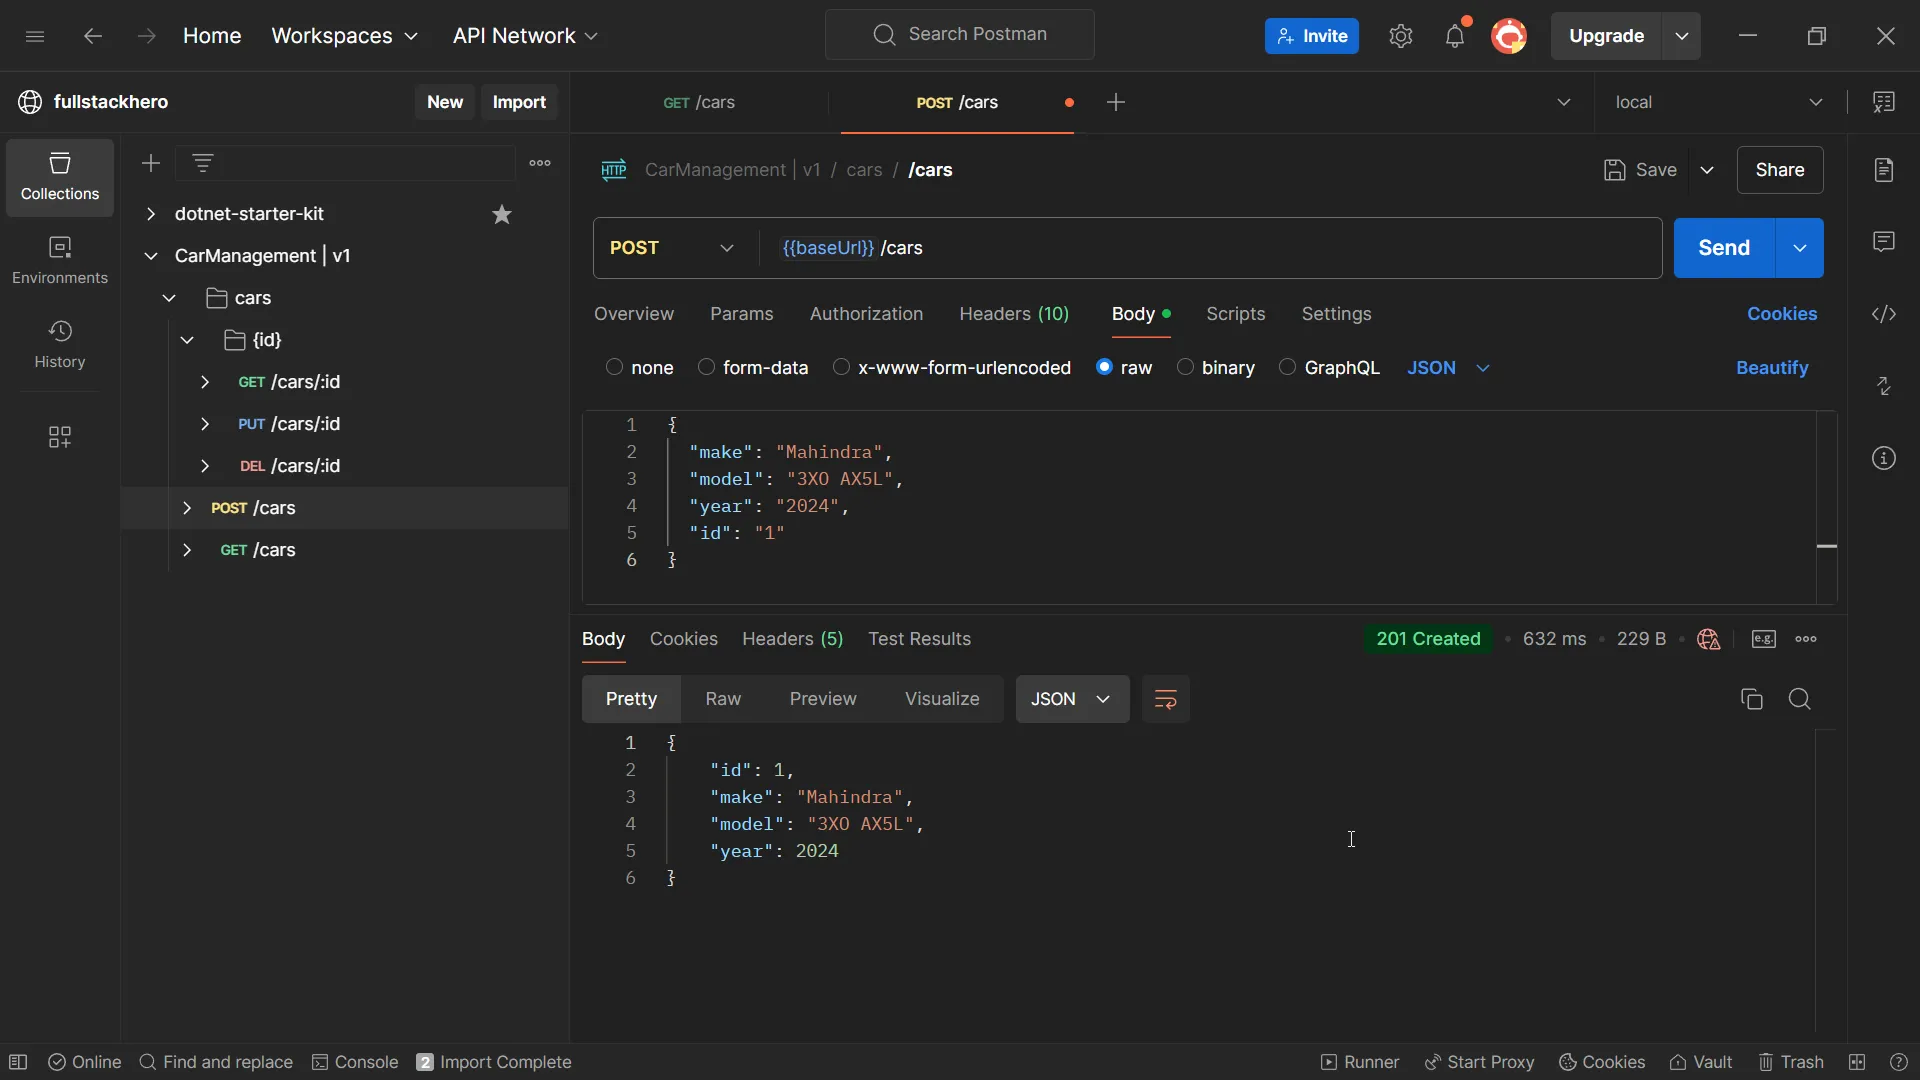
List of all cars available in the database.
Get Car by Id.
Entire source code of this implementation is available over at my GitHub. Link are attached to the end of this article.
Let’s now understand some important concepts and features related to Amazon RDS.
Understanding Multi-Zone Deployments in Amazon RDS
Multi-Zone Deployments (commonly referred to as Multi-AZ Deployments) in Amazon RDS are designed to enhance the availability, reliability, and fault tolerance of your database. By automatically replicating your database across multiple Availability Zones (AZs) within a region, Multi-AZ deployments provide a robust architecture to ensure minimal downtime and data loss.
What Is an Availability Zone (AZ)?
An Availability Zone is a distinct data center within an AWS Region. Each AZ is isolated from others to prevent cascading failures but is interconnected with low-latency, high-throughput networking. This isolation and interconnection make AZs ideal for high availability and disaster recovery setups.
How Multi-AZ Deployments Work
When you enable Multi-AZ for an Amazon RDS instance:
- Primary Instance: A database instance is created in one Availability Zone to handle all read/write operations.
- Standby Instance: A synchronized standby replica is created in a separate Availability Zone. This standby instance automatically replicates data changes from the primary instance in real-time using synchronous replication.
- Automatic Failover: If the primary instance experiences a failure (e.g., hardware issues, network disruption, or maintenance), RDS automatically redirects traffic to the standby instance, ensuring minimal downtime without manual intervention.
Benefits of Multi-AZ Deployments
- High Availability:
- Automatic failover ensures that your database remains accessible during planned or unplanned outages of the primary instance.
- Data Durability:
- Synchronous replication guarantees that the standby instance always has an up-to-date copy of the data, minimizing the risk of data loss.
- Seamless Maintenance:
- During system maintenance (e.g., patching or upgrades), RDS automatically promotes the standby instance to primary to avoid downtime.
- Disaster Recovery:
- Multi-AZ deployments act as a disaster recovery solution within a region, ensuring that your application can recover quickly from failures.
When to Use Multi-AZ Deployments
Multi-AZ deployments are ideal for production environments where database availability and durability are critical. Use cases include:
- Enterprise Applications: Mission-critical systems requiring minimal downtime.
- E-Commerce Platforms: Ensuring database reliability during high-traffic periods.
- Financial Systems: Where data consistency and high availability are paramount.
Considerations for .NET Developers
When building .NET applications, Multi-AZ deployments are especially beneficial because they seamlessly integrate with Entity Framework Core and other .NET database access libraries. Here’s what to keep in mind:
- Connection Strings:
- Use the RDS-provided endpoint, which automatically resolves to the primary instance, even after a failover.
- No code changes are required in your .NET application to handle failover scenarios.
- Failover Time:
- Failovers typically take 1-2 minutes. During this time, your application may experience brief connectivity issues. Implement retry logic in your .NET database access layer to handle transient failures gracefully.
- Cost:
- Multi-AZ deployments are more expensive than Single-AZ setups due to the additional standby instance. Evaluate your application’s availability requirements to determine if the cost is justified.
- Read Workloads:
- Multi-AZ deployments do not improve read performance, as the standby instance is not accessible for read operations. For read-heavy .NET applications, consider Read Replicas instead.
How to Enable Multi-AZ for Your RDS Instance
When creating your RDS instance:
- Select the Production Template (recommended for Multi-AZ).
- Under the Availability & Durability section, choose Multi-AZ deployment.
- RDS will handle the setup and synchronization automatically.
Multi-Zone Deployments in Amazon RDS are a powerful feature for ensuring the high availability and durability of your database. For .NET developers, they simplify the architecture for reliable applications by managing failover and replication transparently. With the right configuration and cost considerations, Multi-AZ deployments can be an indispensable part of a robust .NET application stack.
Read Replicas for High Availability
Amazon RDS Read Replicas enhance the scalability and availability of your database by creating asynchronous copies of your primary database instance. These replicas are ideal for handling read-intensive workloads, distributing read traffic to reduce the load on the primary database.
For .NET developers, Read Replicas can improve application performance when using EF Core or similar ORMs. Simply configure your connection strings to route read operations to the replica endpoints while write operations continue on the primary instance.
Key Benefits:
- Improved Read Performance: Multiple read replicas can handle concurrent read requests, ensuring faster responses.
- High Availability: If the primary instance fails, you can manually promote a read replica to act as the new primary, minimizing downtime.
- Global Reach: Replicas can be deployed in different regions, improving latency for globally distributed applications.
Limitations:
- Read replicas don’t support automatic failover like Multi-AZ setups.
- Writes still occur only on the primary database.
To create a read replica, choose the primary database in the AWS Management Console, select “Create Read Replica” under Actions, and specify the desired configuration. This setup complements Multi-AZ deployments, offering both availability and scalability for .NET applications.
Scaling Your Amazon RDS Instance: Vertical and Horizontal Scaling
Scaling your Amazon RDS instance ensures it can handle growing workloads efficiently. Amazon RDS offers two primary scaling options: vertical scaling and horizontal scaling.
Vertical Scaling (Scaling Up)
Vertical scaling involves upgrading the instance size of your RDS database to increase compute power, memory, and storage.
- Use Case: Ideal when your database requires more resources due to increased application demand.
- Steps:
- Modify the RDS instance in the AWS Management Console.
- Choose a larger instance class (e.g., from
db.t3.microtodb.r5.large). - Apply changes (may require downtime).
Vertical scaling is straightforward but has limitations, as hardware upgrades can only go so far.
Horizontal Scaling (Scaling Out)
Horizontal scaling involves distributing workloads across multiple databases, typically using Read Replicas or sharding.
- Read Replicas: Handle read-heavy workloads by offloading read operations to replica instances.
- Sharding: Split data across multiple databases based on a key (e.g., customer ID).
Horizontal scaling improves scalability without downtime but requires changes in application logic to route traffic efficiently.
By combining vertical and horizontal scaling, you can achieve both performance and reliability for your .NET applications.
Best Practices for Managing Amazon RDS in Production
Effectively managing Amazon RDS in production ensures high availability, performance, and security for your database. Here are the best practices to follow:
- Enable Automated Backups
- Set up automated backups to ensure point-in-time recovery.
- Specify an appropriate backup retention period (7–35 days).
- Use Multi-AZ Deployments
- Enable Multi-AZ for high availability and automatic failover during outages or maintenance.
- Leverage Read Replicas
- Offload read-heavy workloads to Read Replicas for better performance and scalability.
- Use replicas in multiple regions for reduced latency in globally distributed applications.
- Optimize Performance
- Use Provisioned IOPS (PIOPS) for workloads requiring high throughput and low latency.
- Regularly analyze database performance with Amazon CloudWatch metrics and the Performance Insights tool.
- Secure Your Database
- Store credentials securely in AWS Secrets Manager.
- Restrict access using VPC Security Groups and IAM policies.
- Enable encryption at rest and in transit for data security.
- Automate Maintenance
- Enable Auto Minor Version Upgrades to stay updated with the latest database patches.
- Monitor and Scale Proactively
- Use CloudWatch Alarms to monitor resource utilization and set thresholds.
- Scale vertically (larger instance) or horizontally (read replicas) as needed.
By following these practices, you can ensure your RDS instances remain robust, secure, and ready for production workloads.
That’s a wrap for this article. In the next article, I will show you how to improve the Read Performance of Amazon RDS by integrating ElastiCache, while also reducing your AWS Bills. Stay Tuned!
Conclusion
In this comprehensive guide, we went through all the features and concepts related to Amazon RDS, it’s pricing, configurations, instance types and more. We also built a simple .NET 9 Web API with CRUD operations that communicate with the Amazon RDS PostgreSQL instance. We then learnt about ways to scale the database while having minimal downtime. This is almost everything you need to get started with Relational Database in AWS.
Do you use Amazon RDS in your project workload? What’s the most challenging situation you have faced that was very specific to your product requirement? And how did you solve it? If you found this article helpful, I’d love to hear your thoughts! Feel free to share it on your social media to spread the knowledge. Thanks!

