In this article, we will go through the best practices for configuring & managing AWS Credentials for .NET applications. We will walk through various ways to secure the AWS Credentials by using app settings, environment variables, AWS CLI profiles, and IAM Roles.
The AWS Credentials are used to authenticate into various AWS Services such as storage, computing, and databases. In order to access these protected services, developers have to configure their .NET applications/environments with the required set of credentials. This basically includes an access key and a secret key, which are used to authenticate and authorize access to AWS Resources.
In the upcoming sections, we will learn about generating these AWS Credentials and attaching policies/permissions to the credential/user, and we will also explore a couple of ways to configure AWS Credentials for .NET Applications with ease. We will also go through the advantages and disadvantages of each of these approaches. By the end of this article, developers should have a clear understanding of managing AWS Credentials for their .NET Applications.
To view the video version of this content, watch the below video. Do not forget to subscribe!
https://www.youtube.com/watch?v=oY0-1mj4oCo&ab\_channel=MukeshMurugan
Creating IAM User and Generating AWS Credentials
Let’s get started by creating an IAM User and generating credentials for it. Assuming that you already have an AWS Account ( You can get a free account from here ), login to your AWS Management console. Here, in the search bar, type in IAM and open it up.

This should open up the IAM dashboard that shows you an overview of the various IAM resources that are already available, like the users, roles, and related policies.

As you can see, these are the IAM resources set up for me, since I had been playing around with AWS for quite some time now. Let’s start by creating a new user. On the side navigation menu, click on User.

You will be seeing a list of current users in your AWS Account. Here, click on Add Users. Type in the required user name. You can also allow this newly registered user to be able to log in to the AWS Management Console with a password. This is up to you to decide.
I generally use my root email and password for logging in to the AWS Management Console (which is secured by a Multi-Factor Authentication on my mobile device), and for authenticating/authorizing .NET apps, I use the newly created user’s credentials. This way, even if there is a scenario where my access keys are leaked, the root account is always secure and can be used to remove the leaked user / rotate credentials.
For now, I am leaving the Enable Console Access tickbox unchecked.

Next is where we have to define the permissions available for this newly created user to consume.

You can do one of the following:
-
Add the new user to an existing user group, or create a new user group as well. User Groups help when there are a large number of users who should share the same kind of AWS Permissions. For example, if the group has only S3 access defined, any user added to this group will inherit those permissions.
-
Copy permissions from an already existing user.
-
Attach policies directly to the user. This is usually not recommended. You can define permissions for a user directly here. This might seem easy at first. But if you have an ever-growing user base, this might be tough to maintain and manage access.
Thus, the best approach, for now, would be to create a new user group, attach policies to the user group, and add this newly created user to it. Select ‘Add user to group’ and click on ‘create user group’.

Once created, select the newly created group and click on next. Notice that there are 0 users and no policies attached to this group yet.

In the next screen, you can review your modifications, add a couple of new tags if necessary, and click on ‘Create User’. There you go, your new user is created.

Let’s add a couple of policies to this user group. Click on demo.user and navigate to the groups tab. Open up the demo-user-group from here and click on the permissions tabs. We’ll add a couple of permissions here.
One great thing about AWS permissions is that it’s very granular and well-segregated. This helps in clearly setting permission boundaries for users and securing everything else around it.
Click on Add Permissions and Create Inline Policy. This would give you more granularity while selecting service-based permissions. You can also explore attach policies.

Let’s say we currently need our users to have only S3 List bucket permission. Thus, select S3 as the service, and on the Actions, select all the 10 List bucket permissions and create the policy.

You also have the option to specify a particular resource. In this case, I have selected all S3 Resources. Click on next, and give a name for your new policy. I named mine, s3-list-access.

Now, you can see that your new user is attached to the new user group which in turn has the s3-list-access policy attached to it. We will come back to this step to add even more permissions to this new user.
Next, let’s see how to extract the AWS credentials for this user. Open up the user, and hit the Security Credentials tab. Here, you will be seeing a couple of access-related options for your user. Our main goal is to generate AWS Access Keys for this user. Create a new access key.
In the next screen, based on the purpose of why you need the access key, AWS suggests a few alternatives other than generating access keys. But for now, let’s ignore it and create a new access key anyways.

Add a description if needed, and proceed to create the access key. On the next screen, you would be presented with a key and secret. Ensure that you download this CSV file for later use and store it securely. Not that you will not be able to see the secret key once you move away from this page. Thus keep it secured.

Now that we have the credentials and are aware that these sets of credentials have access to the list-buckets API of AWS S3, let’s create a .NET 6 WebAPI that will have an endpoint to connect to this secured AWS s3 API and retrieve a list of buckets in our AWS Account’s S3.
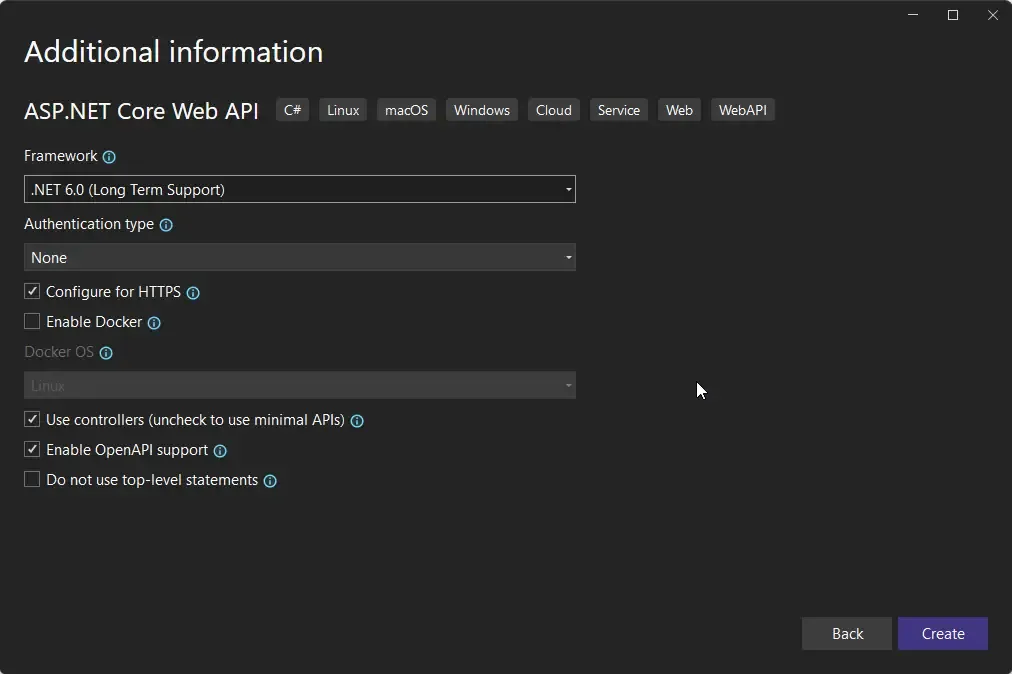
Integrating AWS S3 Package
First up, let’s install the required packages for accessing the S3 service via a client. Install the following packages.
Install-Package AWSSDK.S3Install-Package AWSSDK.Extensions.NETCore.SetupOnce installed, add the following 2 lines in your Program.cs. This will be responsible for loading configurations from appsettings.json (that we will be adding next) and also initializing the internal AWS S3 Client.
builder.Services.AddSwaggerGen();builder.Services.AddDefaultAWSOptions(builder.Configuration.GetAWSOptions());builder.Services.AddAWSService<IAmazonS3>();var app = builder.Build();Open up appsettings.json and add the following. We will add a couple more properties later in this section. For now, we have only defined the AWS Region, which in my case is ap-south-1.
"AWS": { "Region": "ap-south-1"}If you are not aware of getting this detail, please refer to the following screenshot.

Also, make sure that you have at least a couple of S3 buckets already created for this demo. I have written a detailed article about working with AWS S3 and integrating with .NET applications. Refer to the article here.

Hardcoding AWS Credentials
Now that our Solution is set up, let’s add a new API Controller to our project named BucketsController.
[ApiController]public class BucketsController : ControllerBase{ [HttpGet("list")] public async Task<IActionResult> ListAsync() { var s3Client = new AmazonS3Client("ACCESS-KEY", "SECRET-KEY"); var data = await s3Client.ListBucketsAsync(); var buckets = data.Buckets.Select(b => { return b.BucketName; }); return Ok(buckets); }}Here, we have added an endpoint to our bucket controller named /buckets/list [GET]. This would essentially print out a list of available buckets.
At Line 7, we are creating a new instance of an s3 client using our previously generated access and secret keys. Make sure that you add your credentials here. In line 8, we are using the client to call the list-bucket API, the result of which we will be printing in the next few lines. As simple as that.
Let’s run the application and navigate to /api/buckets/list.

There you go, we get the response as required.
Although we get the response, this is not actually how you would be maintaining AWS Credentials in your code.
- Use this approach only if you intend to run the code for demo purposes.
- Never push these changes to your remote repositories as this may prove fatal.
- Also, once you are done with your demo, make sure that you deactivate the access/key and delete them.
- You can do this pretty easily via the AWS Management console.
Adding Credentials to AppSettings
Apart from this, you can also add these credentials to appsettings.json and read the values at runtime into your code. This will be somewhat as below.
public class BucketsController : ControllerBase{ private readonly IConfiguration _configuration; public BucketsController(IConfiguration configuration) { _configuration = configuration; } [HttpGet("list")] public async Task<IActionResult> ListAsync() { var accessKey = _configuration.GetValue<string>("AWS:AccessKey"); var secretKey = _configuration.GetValue<string>("AWS:SecretKey"); var s3Client = new AmazonS3Client(accessKey, secretKey); var data = await s3Client.ListBucketsAsync(); var buckets = data.Buckets.Select(b => { return b.BucketName; }); return Ok(buckets); }}As you can see, you will have to add both AccessKey and SecretKey under the AWS section of your app settings to get this working. Another issue with this is that you should be careful enough to not check-in appsettings.json in your repository.
Using Secrets Manager
In the local development environment, for a more secure way of storing AWS Credentials, you can also make use of Secrets Manager. Right-click on your project and click on Manage User Secrets. This will create a new secrets.json which will be stored at your user profile location locally.

This is what your secrets.json would look like. PS, I have removed the sensitive data. You are also now free to remove both AccessKey and SecretKey from your appsettings.json file!

Using Environment Variables
All of the above approaches are suitable for local development purposes only. Let’s say, you dockerize this application and spin up the docker container. In such cases, using environment variables to set up the AWS Credentials can be a good choice during development.

Install AWS CLI
Apart from this, AWS also has its own Credential Store that is stored locally on your machine. Let’s get started by installing the AWS CLI tool. You can download the tool from here - https://docs.aws.amazon.com/cli/latest/userguide/getting-started-install.html
By default, these credentials are stored in your user profile under the /.aws folder in a file named credentials.

This is what my credentials file looks like this. I have a predefined profile that has complete admin access. Note that this profile is named as default.
Once you have installed AWS CLI, open up a command line terminal and enter the following to verify your installation.
aws --version 
Next, let’s create an AWS profile locally that will hold our access/secret keys. On the same terminal run the following command and enter your keys and location.
In the below command, we are trying to configure/create a new profile locally named demo.
aws configure --profile demo 
You will be asked to enter the AccessKey, SecretKey, and the Default region name, post which you can navigate to ~/.aws/credentials file to see your newly added demo profile.

Now, that we have added the new profile, where exactly can we use this?
Navigate back to our S3 Application code base and make the following changes to the list-bucket endpoint. Firstly, I would remove the credentials stored in the secrets.json file. From now on, we really don’t need to use the secret keys, rather we got to use only the profile. The AWS SDK is smart enough to find the credentials based on the profile name from the credentials file stored in the user profile folder.
public class BucketsController : ControllerBase{ private readonly IAmazonS3 _s3Client; public BucketsController(IAmazonS3 s3Client) { _s3Client = s3Client; } [HttpGet("list")] public async Task<IActionResult> ListAsync() { var data = await _s3Client.ListBucketsAsync(); var buckets = data.Buckets.Select(b => { return b.BucketName; }); return Ok(buckets); }}Here, we inject an IAmazonS3 client instance into the constructor of the controller. Remember, we added certain service registrations to the program.cs at the beginning of this article? This is where it gets used. It will internally load the profile data which are about to add into the appsettings.json, which will be resolved by AWS SDK by pulling the secret key from the local credential store.
You will have to add the Profile parameter under the AWS section of your appsettings.json. As for the value, it should be the name of the profile that we created earlier, which is “demo”.
"AWS": { "Region": "ap-south-1", "Profile": "demo"}Once you run the application, you can see that the response comes back as expected. This is the approach I use while working with AWS Integrations in .NET Applications locally.
Till now, we have discussed applications that would run outside the AWS World. But what about the applications that are going to be hosted within the AWS Infrastructure? For instance, let’s say we have a simple AWS Lambda, which would just be responsible for returning a list of S3 Buckets ( for demo purposes ). How will this Lambda get permission to access the S3 Resources?
Using IAM Roles
For this, let’s create a new AWS Lambda Project, add some basic S3 SDK Calls like we did earlier for the WebAPI and push the Lambda to AWS and see what happens.
Let’s open up Visual Studio and create a new AWS Lambda with a C# project. If you do not already have the AWS Toolkit extension installed on your Visual Studio, please get it installed. Open up Visual Studio, navigate to the extension, and search for AWS. Install the AWS Toolkit for Visual Studio 2022.
Once that’s done, create a new Lambda project and chose the Empty Function blueprint.

If you aren’t very aware of AWS Lambda and how it can be developed using C#, I have written quite a few detailed articles around this topic. You can refer to the following articles:
- AWS Lambda with .NET 6 – Getting Started with Serverless Computing
- Securing Amazon API Gateway with Lambda Authorizer in .NET
- Hosting ASP.NET Core Web API with AWS Lambda
Navigate to the FunctionHandler.cs and replace the method with the below code. Again, what we are trying to do is simply get a list of S3 buckets from AWS against the provided credentials.
public async Task<IEnumerable<string>> FunctionHandler(ILambdaContext context){ var s3Client = new AmazonS3Client(); var data = await s3Client.ListBucketsAsync(); var buckets = data.Buckets.Select(b => { return b.BucketName; }); return buckets;}Now, another interesting aspect to this is that the AWS Lambda Project has a aws-lambda-tools-defaults.json which has parameters for profile and region. By default, these are empty. But at the same time, these values will be overridden by the default profile that I have already configured in my local AWS Credentials store.
Let’s run the Lambda Mock tool. Once the Test tool loads up, you can select the profile with which the request has to be sent to the S3 API. Since we have configured only 2 profiles locally, the default and demo profiles show up. Select one of these, and hit on Execute Function. If things went well, you will be able to see a list of S3 bucket names in the response section of this test tool.

Now that our Lambda is functioning as expected locally, let’s push the Lambda to AWS! With Visual Studio, it’s as simple as right-clicking the AWS Lambda Project and clicking on the Publish to AWS Lambda option.

Here, again you get to see the list of available profiles. I chose the profile which can admin access to my AWS Resources.

In the next screen, select AWSLambdaExecute Role. Note that this role comes with basic permissions like Get / Put S3 Object access, as well as complete access to write application logs to Cloudwatch. Importantly this Role does not have the S3 List Permissions that are needed by our Lambda. Knowing this beforehand, let’s upload the Lambda.

Click on Upload. This would create a default role for your AWS Lambda and upload the package to AWS Lambda. Once done, open up the AWS Management Console and navigate to AWS Lambda. You can see that our .NET 6 package is uploaded as expected.

Open up the Lambda, navigate to the Test tab, and click on the Test button in orange. You can see the below response as expected.

That’s right. Our Lambda does not have permission to access the List-Bucket endpoint of S3. How do we fix this? This is pretty straightforward for AWS Resources.
Especially in the case of this Lambda, navigate to the Configurations tab, Permissions, and open up the role that is associated with this Lambda.

From there, you might have already guessed how to handle this. As we did earlier, we should add some inline policies to this role so that it has all the required permissions to access the required AWS resources.

Once the required policies are added, create a new policy and add it to the role. That’s it!
Re-Test the Lambda. If things went fine, you should be able to see the list of available S3 buckets as the response of the Lambda.

Best Practices for Managing AWS Credentials
So, when applications are hosted in the AWS Infrastructure, it’s always best to attach roles to these resources. You can always add the AWS Secret Keys into the Environment Variables of the AWS Lambda, and the application would still work. But relying on AWS Secrets is not always the ideal approach, at least when you are already inside the AWS World.
IAM Permissions and Roles can be very effective when the hosted application stays with the AWS World. Another tip is that, incase you are to use the AWS Credential keys, ensure that you do a key rotation at least once every few days depending on the sensitivity of the resource you are trying to protect.
So, how to perform key rotation for AWS Credentials? Simple, Create a new set of access keys and switch your application to the new ones. Keep an eye on the last used date of the old key. If the key has not been used, you can proceed and deactivate the old key. Finally, after a couple of weeks after ensuring that the old keys are not used by any other application, you can safely remove the old credentials. This helps reduce the risk of key exploitation if they are leaked to the wrong hands.
Summary - Configuring AWS Credentials for .NET Applications
In this article, we learned in depth about Configuring AWS Credentials for .NET Applications. We mainly went through the process of generating AWS Secret and Access Keys along with creating inline policies for the associated user group, which we later went on to attach to an existing new user. From here, we learned about the ways of integrating AWS Credentials with .NET WebAPI via hard-coding (the least ideal way), environment variables, app settings, secrets manager, AWS credentials store using AWS CLI, and finally discussed using IAM Roles for executing AWS Lambda.
Make sure to share this article with your colleagues if it helped you! Helps me get more eyes on my blog as well. Thanks!
Stay Tuned. You can follow this newsletter to get notifications when I publish new articles – https://codewithmukesh.com/newsletter. Do share this article with your colleagues and dev circles if you found this interesting. Thanks!


What's your take?
Push back, share a war story, or ask the obvious question someone else is wondering. I read every comment.