In this article, we will learn about Securing Amazon API Gateway with Lambda Authorizer in .NET! In previous articles, we started with AWS Lambda with .NET & Deploying Amazon API Gateway, It’s highly recommended to read through these previous articles of this series for a better understanding of concepts.
What’s a Lambda Authorizer in Amazon API Gateway?
Lambda Authorizer is a component/feature of Amazon API Gateways that is responsible for Access to the protected resources of the API Gateway. The Lambda Authorizer is technically an AWS Lambda configured as an Authorizer while setting up the Amazon API Gateway. Lambda Authorizers are vital when you need to build a custom auth scheme. When a client would send a request to the Amazon API Gateway, internally the Gateway calls the attached Lambda Authorizer, which takes the token from the parameter/body, validates it, and returns an IAM policy/indication that the request is authorized or not.
We will be using the project that we created in the previous article, and try to secure the API gateway routes with a brand new Lambda Authorizer. We will be building our own Authentication system making using of JWTs and from the database of users stored in a DynamoDB Table. So this will get you a complete idea of practical usage.
You can find the source code of the implementation here.
Here is a simple flow diagram to help you understand the concepts of the Lambda Authorizer within Amazon API Gateway.
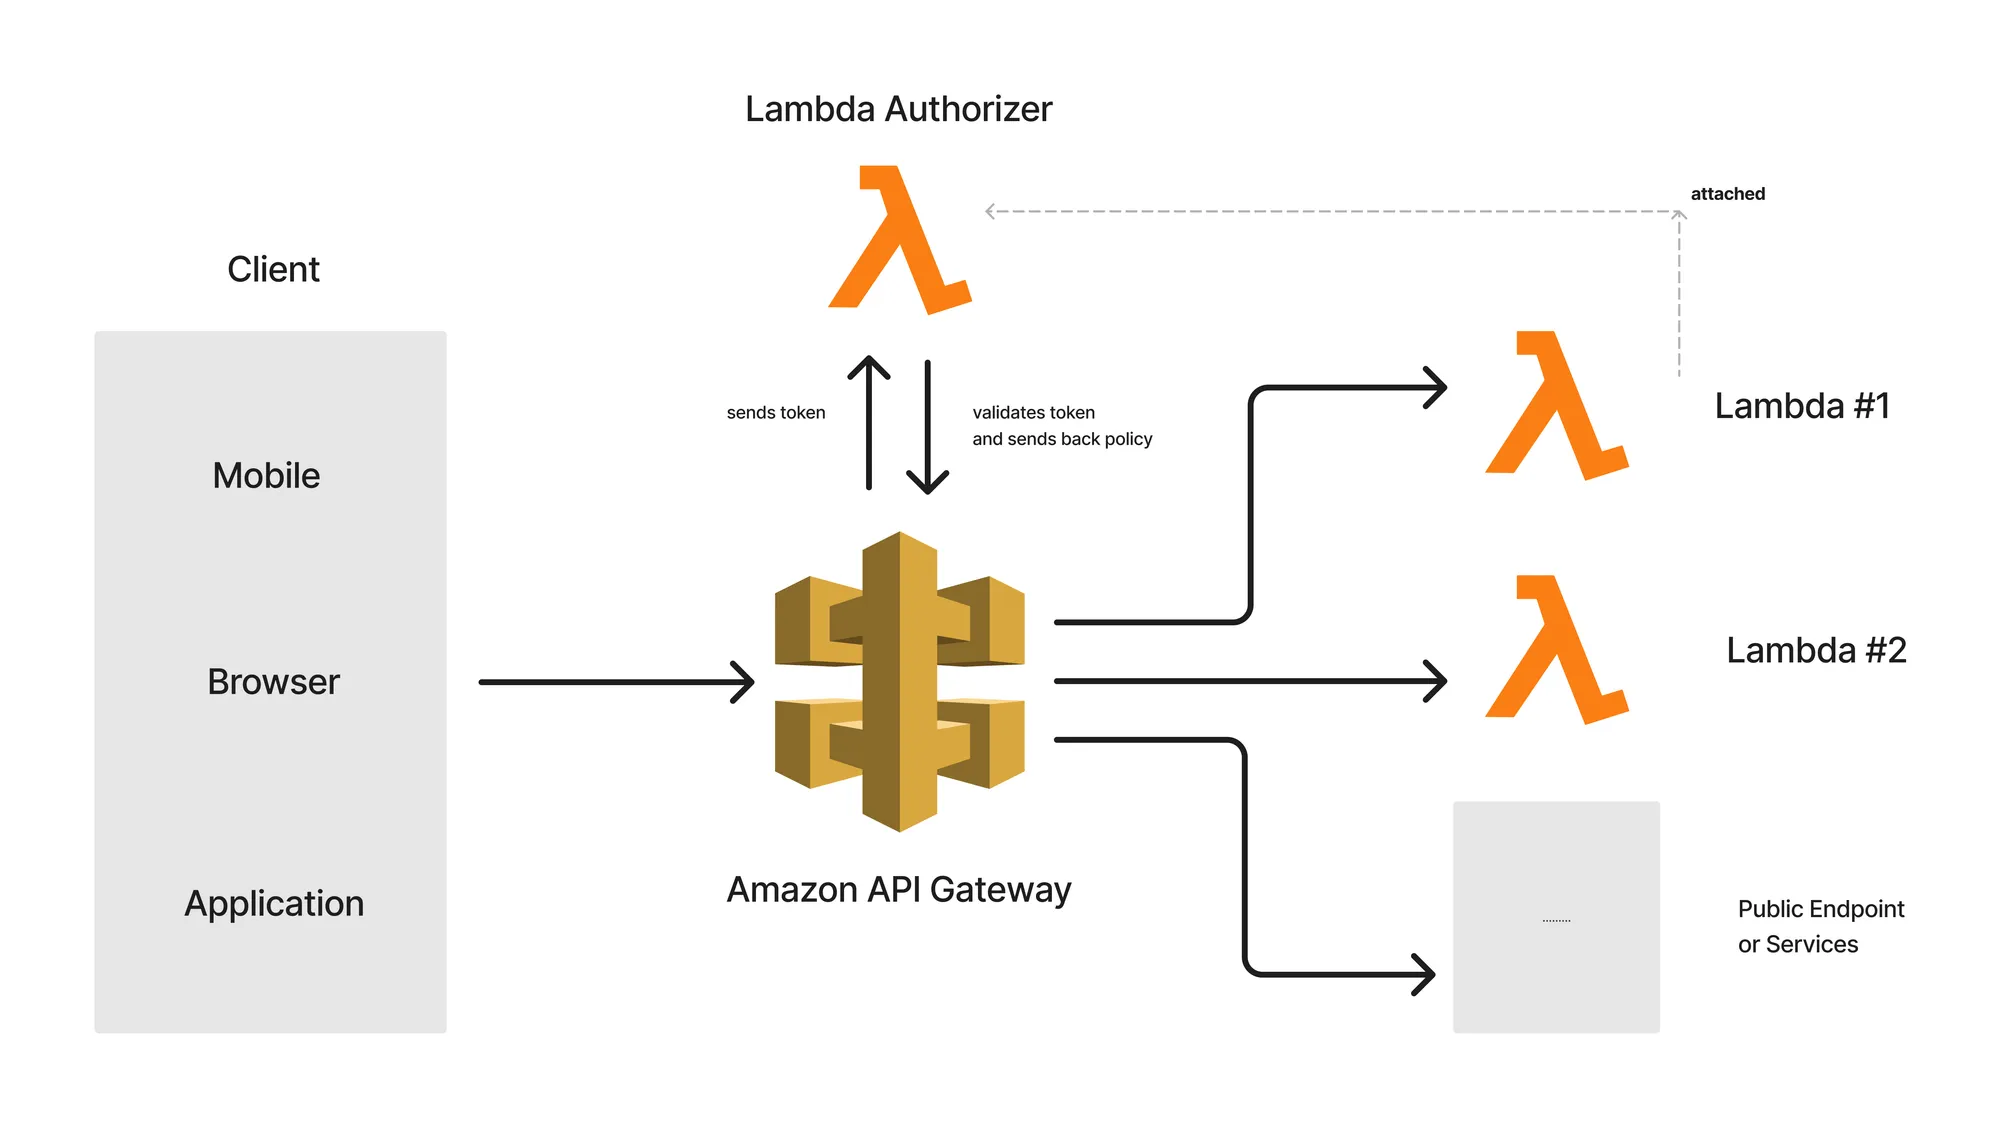
Here are a couple of Lambdas that are added to the route of the Amazon API Gateway. However, these routes are attached to Authorizers, which in our case is a simple Lambda Authorizer. So, to get access to Lambda #1 and #2, the Lambda Authorizer must be provided with valid tokens.
For instance, every time the client sends a request to the protected API route with valid tokens at the request header, this token is passed to the Lambda Authorizer by default, where it validates it and returns an appropriate Access policy. Now, this policy can be set to Allow or Deny based on the validity of the passed token. With that, access is granted to the protected resource. As simple as that.
There are two types of Authorizers available:
- JWT: In this case, we will have to specify Identity providers such as AWS Cognito that can essentially generate JWTs for you.
- Lambda: This is a more flexible mode of Authorization where we can write our own custom logic to steer Identity Authentication. We will be using this Authorizer type to build a system where credentials are stored within a DynamoDB Table, and JWT claims are generated from within our Lambda and can be used as access tokens for protected resources. The API Gateway would then use the response of the Lambda Authorizer to determine whether the requesting client can access the API.
Note that once a Lambda Authorizer is created, it can be attached to multiple routes of an Amazon API Gateway. It also works the other way around. You can build separate Lambda Authorizers for each of the Routes. Totally depends on your use case.
With that said, let’s get started with Securing Amazon API Gateway with Lambda Authorizer in .NET! Let’s first revisit the existing Infrastructure setup on AWS. Note that I am re-using the Lambda / DynamoDB & API Gateway setup/components from the previous article that I wrote. To this setup, I will be adding a Lambda Authorizer in order to secure the pre-existing API Gateway routes.
We have One DynamoDB Table named students that contain student records, Three AWS Lambdas that are responsible for getting all students, getting students by id, and creating a new student record into the DDB. Finally, there is an API Gateway named student, which is basically an HTTP API having 3 routes that invoke each of the mentioned Lambdas. Here are the routes from the API Gateway. We will be securing each of these routes with our Lambda Authorizer.

The idea is that we will be building 2 more AWS Lambdas!
- A Lambda/route that would read the passed credentials (email/password) and validate them. Once validated, the AWS Lambda should return a JSON Web Token that has a particular expiration timestamp. This JWT will be used at the Header of each of the requests sent in by the client. If the token is valid, the request will be authorized.
- A Lambda Authorizer is just another AWS Lambda project written in .NET which will be acting as the Authorizer. The responsibility of this Lambda is to validate the JWT passed in each of the requests. If valid, the Lambda would internally return an IAM policy that will be interpreted by the Amazon API Gateway to authorize/deny requests.
Getting started with Lambda Authorizer in .NET
With that said, let’s start writing some code. I added a new AWS Lambda Project C# and named it AuthLambda. This project will have the handlers for both of the above-mentioned Lambda and we will be deploying both of these Lambdas in the same way we deployed the Student lambdas in the previous article.

Make sure to select an Empty Function.

User Model
With that done, let’s add a new class to hold the User Model. Create a new class at the root of the new LambdaAuth project and name it User.cs
namespace AuthLambda{ [DynamoDBTable("users")] public class User { [DynamoDBHashKey("email")] public string? Email { get; set; } [DynamoDBProperty("username")] public string? Username { get; set; } [DynamoDBProperty("password")] public string? Password { get; set; } }}Since this is just for demonstration purposes, we will be just adding a few properties such as email, username, and password. Note that in production applications you would be probably hashing/storing encrypted passwords.
Token Generation
Next, open up Function.cs, and remove the existing handler. Here we will be adding 2 Handlers for the 2 Lambdas accompanied by some helper methods. First up, let’s write the code that can generate JWTs.
private const string key = "S0M3RAN0MS3CR3T!1!MAG1C!1!";public async Task<string> GenerateTokenAsync(APIGatewayHttpApiV2ProxyRequest request, ILambdaContext context){ var tokenRequest = JsonConvert.DeserializeObject<User>(request.Body); AmazonDynamoDBClient client = new AmazonDynamoDBClient(); DynamoDBContext dbContext = new DynamoDBContext(client); //check if user exists in ddb var user = await dbContext.LoadAsync<User>(tokenRequest?.Email); if (user == null) throw new Exception("User Not Found!"); if (user.Password != tokenRequest.Password) throw new Exception("Invalid Credentials!"); var token = GenerateJWT(user); return token;}public string GenerateJWT(User user){ var claims = new List<Claim> { new(ClaimTypes.Email, user.Email), new(ClaimTypes.Name, user.Username) }; byte[] secret = Encoding.UTF8.GetBytes(key); var signingCredentials = new SigningCredentials(new SymmetricSecurityKey(secret), SecurityAlgorithms.HmacSha256); var token = new JwtSecurityToken(claims: claims, expires: DateTime.UtcNow.AddMinutes(5), signingCredentials: signingCredentials); var tokenHandler = new JwtSecurityTokenHandler(); return tokenHandler.WriteToken(token);}Firstly, we define a constant string that will hold the value for secret bytes, which will be used like a security key by both the JWT generator as well as the validator.
From Line 2 to 13, we have our actual handler, which takes in a request of type APIGatewayHttpApiV2ProxyRequest as you have seen from the previous article as well. It’s expected that the client would pass the email and password to this Handler at the body of the incoming request. In line 4 we decode the incoming JSON body to a class that .NET understands into a User object. To make it cleaner, you could probably add a new DTO class named TokenRequest.cs ,which houses only the email and password as parameters.
In the next couple of lines, we initialize the DBContext for accessing the DynamoDB Tables as needed. First, we check if there is any record in the database with the passed email. If found, the code checks If the incoming password too is a match. In production applications, you would have some mechanism here that would decrypt and compare the passwords in a much more secure way. If the passed email and password are valid, we move ahead to call the GenerateJWT method passing the created user object.
Within the GenerateJWT method, we start by creating claims with the email and username of the user. Next up, we generate tokens by passing the secret key, and claims, and adding a 5 mins expiration time. Once done, the tokenHandler.WriteToken method returns back the expected token. This token is printed as a response to the client.
That’s it, this covers the token generation part of the implementation. Next, let’s write our real Lambda Authorizer that can validate the generated token.
Token Validation - Lambda Authorizer
In the same function.cs class, add another handler named ValidateTokenAsync.
public APIGatewayCustomAuthorizerResponse ValidateTokenAsync(APIGatewayCustomAuthorizerRequest request, ILambdaContext context){ var authToken = request.Headers["authorization"]; var claimsPrincipal = GetClaimsPrincipal(authToken); var effect = claimsPrincipal == null ? "Deny" : "Allow"; var principalId = claimsPrincipal == null ? "401" : claimsPrincipal?.FindFirst(ClaimTypes.Name)?.Value; return new APIGatewayCustomAuthorizerResponse() { PrincipalID = principalId, PolicyDocument = new APIGatewayCustomAuthorizerPolicy() { Statement = new List<APIGatewayCustomAuthorizerPolicy.IAMPolicyStatement> { new APIGatewayCustomAuthorizerPolicy.IAMPolicyStatement() { Effect = effect, Resource = new HashSet<string> { "arn:aws:execute-api:ap-south-1:821175633958:sctmtm1ge8/*/*" }, Action = new HashSet<string> { "execute-api:Invoke" } } } } };}private ClaimsPrincipal GetClaimsPrincipal(string authToken){ var tokenHandler = new JwtSecurityTokenHandler(); var validationParams = new TokenValidationParameters() { ValidateLifetime = true, ValidateAudience = false, ValidateIssuer = false, IssuerSigningKey = new SymmetricSecurityKey(Encoding.UTF8.GetBytes(key)), }; try { return tokenHandler.ValidateToken(authToken, validationParams, out SecurityToken securityToken); } catch (Exception ex) { return null; }}The important point to note here is the Request and Response type of this Handler, APIGatewayCustomAuthorizerRequest, and APIGatewayCustomAuthorizerResponse. Note that the Lambda Authorizers were formerly called Custom Authorizers. As mentioned earlier, the client will be sending in the JWT token at the header of the request. In line 3, we are reading the authorization token into a variable for further processing and validation. Next, we call the GetClaimsPrincipal method to retrieve valid claims from the token. In lines 24-42, we validate the authentication token. If valid, we return the list of claims as claim principal. If the token is invalid, the method returns a null back to the handler method.
Back in our handler, we set the EFFECT to Allow if the Token is valid, else the EFFECT is set to deny. This is a vital part of the entire authentication cycle. Similarly, we set principal ID as the user name if the claims Principal is not null. If null, we define it with a static value. With that done, we return the response of type APIGatewayCustomAuthorizerResponse.
The important properties of this response type are the following:
- Principal ID
- Policy DOcument, which is basically a list of IAM policies. In our case, we will be just sending back a single policy with the following metadata. Effect - based on the validity of the token. Resource - which AWS resource we are talking about here? and Finally Action: what you are trying to perform over the resource?
- Effect - Allow / Deny defines if the request is authorized or not. This is set by the validity of the token as you might have seen from the code.
- Resource - Here, we define the name identifier of the resource in the picture. In our case, it’s the API Gateway itself.
arn:aws:execute-api:ap-south-1:821175633958:sctmtm1ge8/*/***, which can be interpreted asarn:aws:execute-api:<aws-region>:<aws-account-id>:<amazon-gateway-id>/*/***. You can get the amazon-gateway-id from the details of your Gateway (Refer to attached screenshot). The 2 wildcards at the end indicate that we are talking about all the routes defined under the Gateway. You would have to use your own account Id and gateway id for this to work as expected. Here’s a screenshot of the Gateway ID under the Amazon API Gateway home page.

3. Action - In our case, we are trying to execute the API. Thus, here the name of the action is execute-api:Invoke.
Publish to AWS Lambda
These are the required details for the Amazon API Gateway to decide if the request is validated or not. With that done, let’s publish these 2 Lambda functions into AWS from Visual Studio.
Right-click the AuthLambda project on Visual Studio and click on Publish to AWS Lambda. In the popup that comes, let’s modify the Handler, Function name, and Description as below. As you see, we are first publishing the Lambda that is responsible for generating the Access Token.

In the next step, make sure that you are choosing a Role that has valid permissions for Executing the API as well as DynamoDB access permissions the same way we did in the previous article. With that done, click on Upload to Publish to AWS Lambda.
Do the same with the ValidateTokenAsync Handler too. Here also, you will have to modify the Handler, Function Name, and Description parameters. Publish this handler as well.

With the code part done, let’s navigate to the AWS Management Console and set up the Authorizer and Token Generation endpoint.
Integration
Go to the Student’s API Gateway and navigate to Routes. Here, we have to add a new token generation route which should invoke the token-generation lambda.

Make sure to specify the route URL as well as set the Method as GET. Once the route is created, let’s integrate the actual Lambda to the route. Select the /token route and click on Attach Integrations.

Create a new API Gateway integration with the following specifications and choose the required lambda.

Now you can see that the token route invokes the Token Generation lambda as expected.

Let’s do a simple test against the GET /students endpoint to check if things are working. Using postman, I sent a request to the <amazon-url>/students endpoint.

As you can see, the data gets returned as expected.
There’s one more setup to do - Creating the Users DynamoDB Table and feeding some sample credentials. Open up DynamoDB on your AWS Management Console and add a new table with the name as users, and the partition key as email (string). For this demonstration, the properties supported in this table will be email, password and username.
I also entered some sample values for testing purposes.

For the final step, let’s attach our Lambda Authorizer to the other endpoints in order to secure them. Click on a Student Route (Not the token endpoint, we are not going to secure it.) For instance, we chose the GET students endpoint. To this, click on attach authorization.

In the next screen, select the authorizer type as Lambda, since we have already deployed the required Lambda. Give a name to identify this authorizer and select the Lambda Function that should be used to validate tokens.

Since our Lambda Authorizer returns IAM Policy to validate requests, select IAM Policy. Let’s disable caching for now. Keep other things the same, and click create and attach.

When you go back to routes, you can see that the GET endpoint has been attached with an Lambda Authorizer.

Testing
With that done, let’s start testing our implementation. First up, open up Postman and send a request to the /students GET endpoint. You will be getting a 401 UnAuthorized status code from the API Gateway with an Unauthorized message at the response.

As you know, now we need to set the Authorization token to the request’s header in order for the entire Auth setup to work, right? Let’s first generate the JSON Web token using our /token endpoint. Switch back to Postman and send a request to the /token endpoint with valid credentials.

If the provided credentials are valid, Lambda would return you a token that’s valid for 5 mins. Copy down this token and switch to the Tab of the /students request. Here add a new key under the request header named Authorization and paste the JWT in the value. That’s it. Try sending your request again.

This time, you would see the list of students back as the response. This means that our request is not authenticated. After the token is expired, you will be seeing the 401 error again, unless you provide a fresh token again. Feel free to attach the same authorizer to other endpoints. That’s it for this tutorial.
Summary
In this article, we learned about securing Amazon API Gateways with Lambda Authorizer in .NET. We built a system that can read the data from DynamoDB and create JSON Web tokens that can be used for authentication. We secured endpoints with Lambda Authorizer that can validate the token from the request header and return an IAM policy that can help the Amazon API Gateway to decide if the request is authorized or not. In the next article, we will discuss about deploying an ASP.NET Core WebAPI to AWS Lambda / API Gateway both manually as well as with AWS SAM templates and so much more. Stay Tuned.
Do share this article with your colleagues and dev circles if you found this interesting. You can find the source code of the project here. Thanks!


What's your take?
Push back, share a war story, or ask the obvious question someone else is wondering. I read every comment.