This comprehensive Docker Essentials for .NET Developers Guide will cover everything you need to know about Docker, from the basics to advanced concepts. Docker has become an indispensable tool in modern software development, streamlining workflows and boosting productivity, whether you are a .NET developer or work with another tech stack. Whether new to Docker or seeking to deepen your understanding, this guide will provide you with the knowledge and skills necessary to use Docker in your projects effectively. Learn how Docker can revolutionize your development process.
We’ll begin by learning the basics of Docker, its architecture, and how it differs from a Virtual Machine. Next, we’ll install Docker Desktop on our development machine, explore its features, and learn some essential Docker commands. Following that, we will containerize a simple .NET application, expand it with database services, and get introduced to Docker Compose.
This guide will help you build and deploy distributed applications efficiently using Docker.
Let’s imagine that you are all set to deploy your shiny new .NET application to a different environment, whether for QA Testing or even to a customer-facing environment. You would probably expect things to go well since it was working without any issues on your development machine. However, this might not always be the case.
Once deployed, you might encounter several issues that you hadn’t anticipated. Haven’t we all faced this at some point in our careers?

I guess we have all said this to a QA / Tester!
Anyhow, what was the root cause?
- Environment Configuration Differences - Different environments (development, QA, production) may have different configurations, installed software, or operating system versions.
- Dependency Management Issues - Different versions of libraries or dependencies might be installed in different environments, leading to compatibility issues.
- Configuration Settings - Configuration settings such as environment variables, connection strings, and API keys might differ between environments.
- Network Differences - Networking configurations, such as port mappings and network access, might vary between your local machine and the QA environment.
- Resource Availability - Different environments may have varying amounts of CPU, memory, or disk space, affecting application performance.
- Manual Application Specific Configuration Differences.
- And lots of other surprises.
Thus, we need a way to run our applications consistently no matter what environment you put it on, from development to production.
What’s Docker? Why should we use Docker?
Docker is an open-source project that can pack, build, and run applications as containers which are both hardware-agnostic and platform-agnostic. This means that your application can run anywhere consistently. In simpler words, Docker is a standardized way to package your .NET (or any stack) application along with every bit and piece it needs to function, in any environment.
Docker essentially can package your application and all its related dependencies into Docker Images. These images can be pushed to a central repository, for example, Docker Hub or Amazon Elastic Container Registry, and can be run on any server! We will explore more about this in a later section of this article.
It encapsulates all dependencies, configurations, and system libraries, eliminating discrepancies that often arise due to environmental differences. Docker’s automated and reproducible setup processes reduce the risk of manual configuration errors and provide consistent networking, resource management, and security isolation. By adopting Docker, you can achieve a reliable and predictable deployment process, minimizing the “it works on my machine” problem and streamlining the path from development to production. And nowadays, you can simply NOT avoid Docker. It’s a part of almost any scale of Application Build Pipelines.
Now that we understand why we need Docker, let’s learn about the HOW.
How does Docker Work?
To understand how Docker works, let’s go through the building blocks of Docker.
- Docker Images
- Docker Containers
- Dockerfile
- Docker CLI
- Docker Daemon
- Docker Hub
- Docker Compose
- Docker Desktop
- Docker Volumes
- Docker Network
Docker Images
A Docker image is a lightweight, standalone, executable package of software that includes everything needed to run an application: code, runtime, system tools, libraries, and settings. An image is essentially a snapshot of a container. It is built from a series of layers, each representing a step in the build process, and these layers are stacked on top of each other to form the final image.
- Base Image: The starting point of your Docker image, often including the operating system.
- Layers: Each command in a Dockerfile (the script to create an image) adds a new layer to the image. Layers are cached and reused, making builds efficient.
Docker images can be shared across different environments (development, testing, production) ensuring consistency. You can build your own Docker Images using the Dockerfile, or re-use an already available Image as well. More about this in the upcoming sections of this article.
Docker Containers
A Docker container is a runtime instance of a Docker image. Containers are isolated environments that run on a single operating system kernel, sharing the same OS resources but keeping applications isolated from one another.
Dockerfile
A Dockerfile is a file containing instructions to build a Docker Image. It defines the base image, application code, and other dependencies.
Docker CLI
This is the command-line interface used to interact with Docker and manage images, containers, networks, and volumes. We will learn a few essential CLI commands in the next sections.
Docker Daemon
This is the host process that manages Docker containers within your system. It listens to Docker API requests from the CLI client or Docker Desktop and handles Docker objects like images, containers, networks, and volumes.
Docker Hub
So, now we know that we use Dockerfile to build Docker Images, which in turn can be executed as Docker Containers. Docker Hub is a central repository where you can store the Docker Images that you have built. This is a versioned repository, meaning you can store multiple versions of your Image, and pull them as required. Users can pull images from Docker Hub to create containers or push their images to share with others. Note that there are several alternatives to Docker Hub, like Amazon Elastic Container Registry (ECR), and GitHub Packages. I currently tend to use GitHub Packages for my open-source work as it well suits my use cases and is free to use.
Docker Compose
A tool for defining and running multi-container Docker applications. It uses a YAML file to configure the application’s services, networks, and volumes. This is an interesting one. We will be building a Docker Compose file that can run both a .NET Web API and a PostgreSQL instance (which the API connects to).
Docker Desktop
Docker Desktop is an easy-to-install application for your Mac or Windows environment that enables you to build, share, and run containerized applications and microservices. It includes Docker Engine, Docker CLI, Docker Compose, and all essentials. If you are getting started with Docker, get this installed on your machine.
Docker Volumes
Docker volumes are a critical part of Docker’s data persistence strategy. They allow you to store data outside your container’s file system, which ensures that data is not lost when a container is deleted or recreated.
Docker Network
Docker networking is a vital component of Docker, allowing containers to communicate with each other, the host system, and external networks. Docker provides several networking options to meet different needs.
- Bridge Network: Containers on the same bridge network can communicate with each other, but not with containers on different bridge networks.
- Host Network: The container uses the host’s networking directly.
- Overlay Network: Allows containers running on different Docker hosts to communicate.
- None Network: Containers are not attached to any network. Used for security reasons or when a container doesn’t need networking.
This is a bit more complex topic, however, you must understand Docker supports various kinds of networking for its containers.
Docker Workflow
Now that we have gone through all the basics, let’s understand how these components work together to simplify your overall deployment experience.
- The Developer writes a Dockerfile, which is a set of instructions to build a Docker Image.
- As part of the CI/CD pipeline, this Dockerfile will be used to build the Docker Image via the Docker Daemon and CLI commands.
- Once the image is built, it is pushed to a central repository (public/private), from where users can pull the image.
- The client would have to run a pull command, to pull the newly pushed images into the environment where it needs to run.
- Once pulled, you can spin up a Docker Container using this image.
- If you need multiple Docker Containers (that can interact with each other), you would write a Docker Compose file.
Docker Containers vs Virtual Machines.
But, doesn’t Docker Container sound like a VM? It’s correct that both of them give your applications an isolated environment. However, containers are much faster to boot up and are significantly less resource-intensive.
VMs are generally spun to run software applications. It is important to note that both Virtual Machines and Docker containers are resource virtualization technologies, however, the key difference is that VMs virtualize an entire machine including its hardware layer, but containers only virtualize the software layers above the operating system. You can also note that containers are an isolated process/service, whereas VMs are an entire virtual OS running on your machine.
Although VMs do provide complete isolation for applications, they come at a great computational cost due to all of their virtualization. Containers can achieve this at a fraction of the above-used compute power. However, there are solid use cases to go for a Virtual machine instead.
I am currently building a Home Server that uses Virtualization to its fullest. As in, an Ubuntu Server is running as a VM over a hypervisor, and within the VM I have dozens of Docker Containers running. It’s so cool to use such tech at your home lab!
Thus, Containers require significantly fewer resources as compared to the requirements to run a Virtual Machine.
But for our use case, where we need to debug, run, or deploy our .NET applications, a Docker container is the way to go!
Installing Docker Desktop
Let’s get into some action.
Docker Desktop is a GUI tool that helps manage Docker Containers and Images.
You can download Docker Desktop from here for your operating system. Just follow the on-screen instructions and get it installed on your machine.
Make sure to create a free Docker Hub account as well.
Exploring Docker Desktop
Once you have installed Docker Desktop, you will see something like the below.
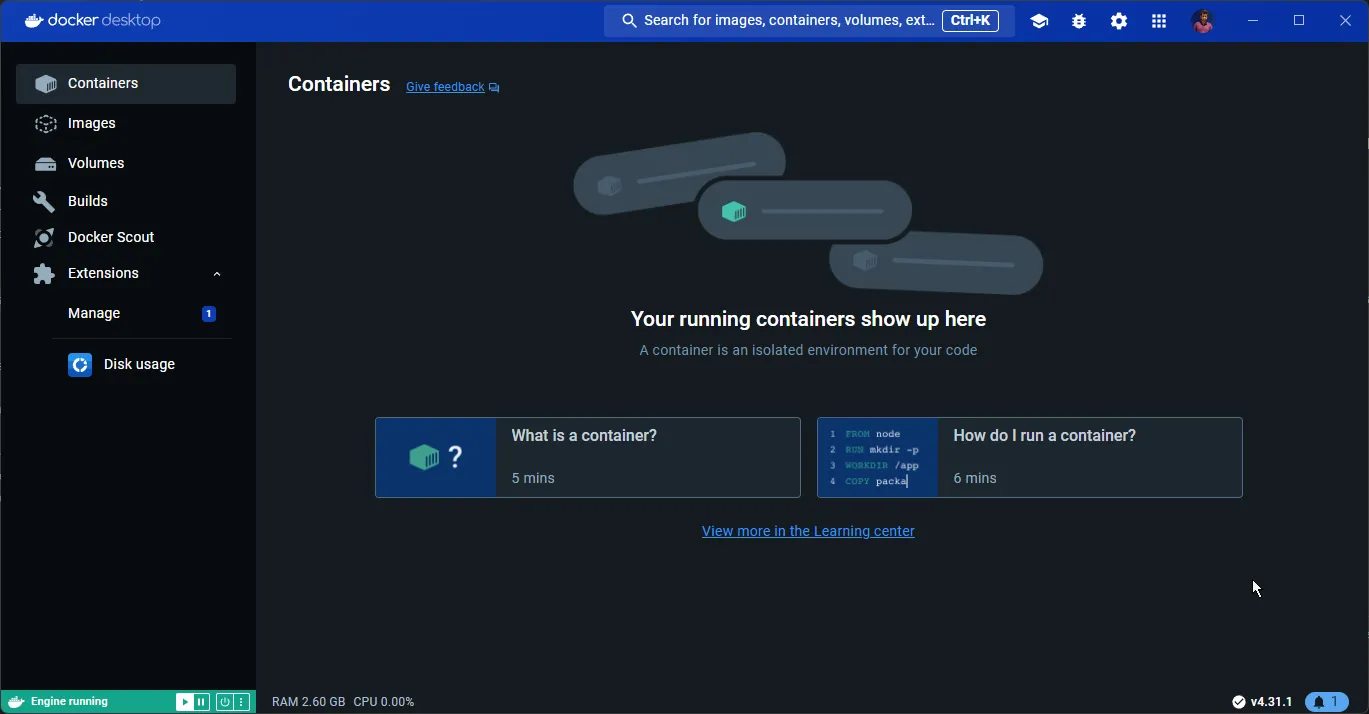
- Containers: Displays a list of containers running on your machine.
- Images: Shows the available images on the machine.
- Volumes: This shows the shared storage space that we have created and assigned for our containers.
Essential Docker CLI Commands
docker version
To get the current version of your Docker instance.
docker -vdocker pull
To pull an image from the docker hub repository. For instance, if I want to pull a copy of the latest Redis image, I should use the following.
docker pull redis:latestHere, redis is the name of the image, and latest is the required version of the image. You can browse other available images here.
docker run
The command to run a container using a docker image. To run an instance of Redis using the image we pulled in the earlier step, run the following command.
docker run --name redis -d -p 6379:6379 redisHere, we instruct Docker to run a new container named redis, and specify its port mapping from 6379 internal port to 6379 at the host network. We also have to pass the name of the image we intend to use.
-d flag stands for detached mode, meaning the container runs in the background. If you don’t use the -d flag, the container runs in the foreground. The terminal will display the output from the container, such as log messages and error outputs. You will need to keep the terminal session open for the container to keep running. You can stop the container by pressing Ctrl+C.
However, if you use the -d flag like we did here, the container runs in the background, and you immediately get your terminal prompt back. To view the logs, you can use docker logs <container-name> or docker logs <container-id>.
docker ps
This lists all the available containers.
docker psdocker images
This lists down all the available images on your machine.
docker imagesdocker exec
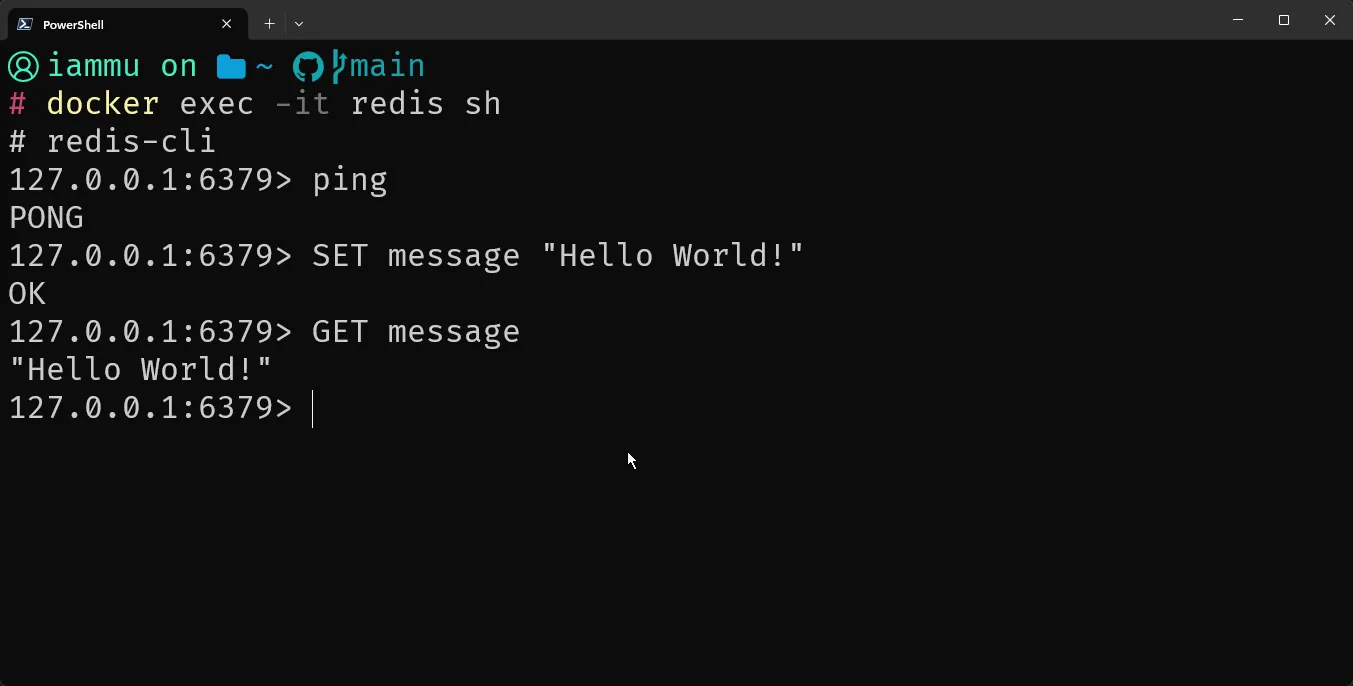
If you want to run a command within the container, use the exec terminal command. For example, since we already have the Redis container up and running, to execute some commands within the Redis container, you would do the following.
docker exec -it redis shAnd here are some Redis CLI commands that I ran against the Docker Container.
docker stop
Stops a specific container.
docker stop redisdocker restart
Restarts a specific container.
docker restart redisThese are the essential CLI commands regarding Docker. However, we missed a crucial one, which is the build command!
In the next section, we will build a sample .NET 8 Application, write a Dockerfile for it, containerize it, build it, and push it to Docker Hub. Let’s get started!
docker prune
Once in a while, I use this command to free up some space by removing unused Docker Images, Containers, Caches, and networks if any. This constantly saves me about 1-2 GB space depending on my usage history.
docker system prune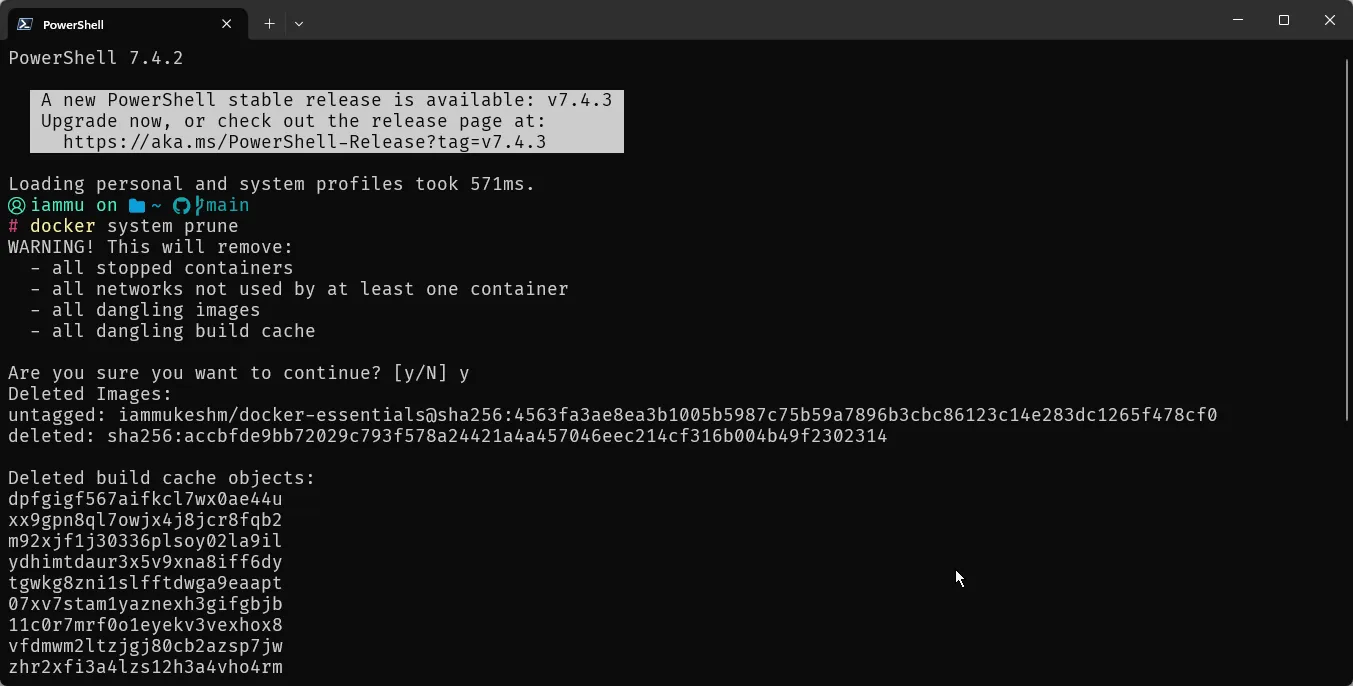
Containerizing .NET Application
From .NET 7 and beyond, Containerizing a .NET application has become a lot simpler. Remember when I told about Dockerfile, and how it contains instructions to build and docker image? Well, from .NET 7 you no longer need a Dockerfile. The .NET SDK is intelligent enough to build a Docker image by just passing a couple of metadata arguments. However, it is still important to learn how Dockerfile functions, since it will be quite handy for certain advanced use cases.
To read about the Built-In Container Support for .NET, starting from .NET 7 and above, you can go through this detailed article.
I would still recommend you go through the Dockerfile approach, as it gives you more hands-on experience and lets you understand how everything works. But before that, let’s set up a .NET 8 sample project.
It would be a simple .NET 8 API with a single endpoint.
app.MapGet("/", () => "Hello from Docker!");For now, this is enough. Along the way, we will add database support as well, and connect it to a PostgreSQL instance(that runs on a separate container).
Let’s Containerize this .NET 8 API now!
Dockerfile
I prefer using VS Code for writing Dockerfile, YAML, and anything apart from C#.
Navigate to the folder where the csproj file exists, and create a new file named Dockerfile.
# Use the .NET SDK image to build and run the appFROM mcr.microsoft.com/dotnet/sdk:8.0
# Set the working directoryWORKDIR /app
# Copy everything to the containerCOPY . ./
# Restore dependenciesRUN dotnet restore
# Build the app in Release configurationRUN dotnet publish -c Release -o release
# Set the working directory to the output directoryWORKDIR /app/release
# Set the entry point to the published appENTRYPOINT ["dotnet", "DockerEssentials.dll"]
Here is a line by line explanation.
- FROM: Specifies the base image to build upon. Here, it uses the official .NET SDK 8.0 image from Microsoft’s container registry (mcr.microsoft.com/dotnet/sdk:8.0). This image includes the .NET SDK necessary to build and publish .NET applications.
- WORKDIR: Sets the working directory inside the container to /app. Subsequent instructions will be executed relative to this directory.
- COPY: Copies the current directory (.) from the host machine (where the Docker build command is run) to the /app directory inside the container. This assumes the Dockerfile is in the root of your project directory.
- RUN: Executes a command (dotnet restore) during the build process. This command restores the NuGet packages required by the .NET application, based on the *.csproj files found in the current directory.
- RUN: Executes another command (dotnet publish) to build the .NET application in Release configuration (-c Release) and publish the output (-o release) to the /app/release directory inside the container. This step compiles the application and prepares it for deployment.
- WORKDIR: Changes the working directory to /app/release inside the container. This prepares for the next step to set the entry point.
- ENTRYPOINT: Specifies the command to run when the container starts. Here, it sets the entry point to execute the .NET application by running dotnet DockerEssentials.dll. Adjust DockerEssentials.dll to match the name of your published application’s DLL.
.dockerignore
Let’s also add another file to improve the build process. Name it .dockerignore.
# Ignore build artifactsbin/obj/
# Ignore Visual Studio files.vscode/.vs/
# Ignore user-specific files*.user*.suo
Ok, so what does this file do exactly?
The .dockerignore file is used to specify files and directories that should be excluded from Docker builds. It works similarly to .gitignore in Git, allowing you to control which files and directories are not sent to the Docker daemon during the build process.
Here is how it helps:
- Optimizing Build Context: When you run the docker build, Docker sends the entire directory (referred to as the build context) to the Docker daemon. This includes all files and directories in that directory. If your project directory contains unnecessary files (e.g., temporary files, logs, large datasets), sending them to the Docker daemon can slow down the build process and increase the size of your Docker image unnecessarily.
- Excluding Unnecessary Files: This reduces the size of the build context, speeding up builds and ensuring that your Docker images only contain necessary files.
- Improving Security: By excluding sensitive files or directories (e.g., configuration files with passwords, SSH keys) from the build context, you reduce the risk of inadvertently including them in your Docker images.
Docker Build
Ok, so now that we have both our Application and the Dockerfile ready, let’s build a Docker Image out of it. Open the terminal at the directory where the Dockerfile exists, and run the following.
docker build -t docker-essentials .docker build: This is the Docker command to build an image from a Dockerfile.-t docker-essentials: The-tflag allows you to tag your image with a name. In this case, the image will be tagged asdocker-essentials..: This specifies the build context. The.indicates that the current directory is the build context, where Docker will look for the Dockerfile.
This should build an image into your local Docker Library. Once completed, switch to Docker Desktop.
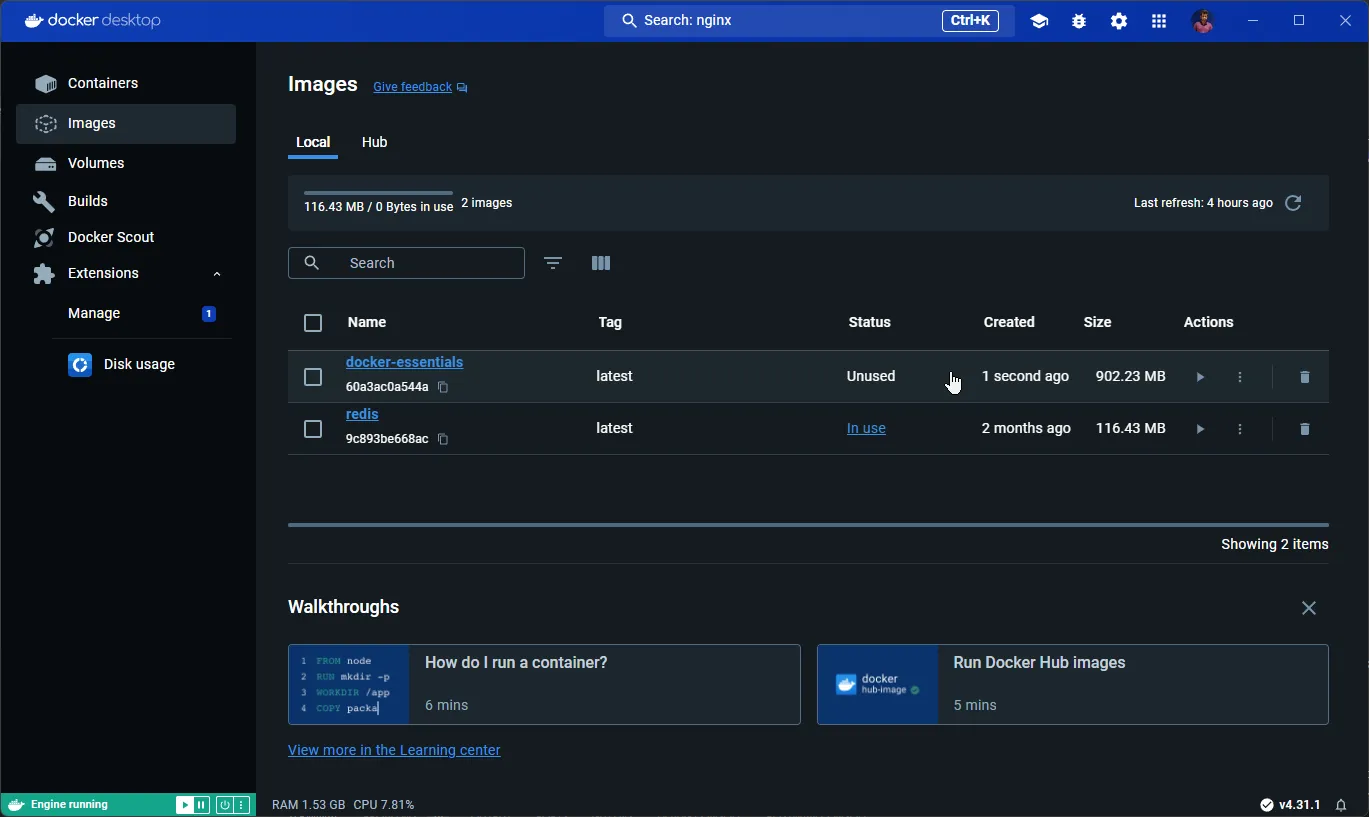
As you can see, we have a new image named docker-essentials. But, do you see the size of the image? A Whooping 902 Mb! But we just had a single GET Endpoint, right? So, what went wrong? And how do we optimize the image size?
Multi-Stage Docker Build - Optimize Image Size
Docker has this awesome feature called multi-stage build, which as the name suggests creates multiple stages during a build process. If you closely see our Dockerfile, we have this following step,
FROM mcr.microsoft.com/dotnet/sdk:8.0Here, dotnet/sdk:8.0 is our base image. SDK images are usually larger is size as it contains additional tools and files to help build/debug code. However, in production, we don’t need the SDK Image. We just need the .NET runtime to make our containers run.
Multi-stage Docker builds help by allowing you to use multiple stages in your Dockerfile to separate the build environment from the runtime environment.
The root cause of larger size of the image is that we have included everything within the SDK to the generated image. This is not required, and the application only needs the .NET Runtime to function.
In a multi-stage build, you define multiple FROM statements in your Dockerfile. Each FROM statement initializes a new build stage. You can then selectively copy artifacts from one stage to another using the COPY --from=<stage> directive.
Let’s optimize our Dockerfile now.
# Stage 1: Build the applicationFROM mcr.microsoft.com/dotnet/sdk:8.0 AS buildWORKDIR /appCOPY . ./RUN dotnet restoreRUN dotnet publish -c Release -o /app/out
# Stage 2: Create the runtime imageFROM mcr.microsoft.com/dotnet/aspnet:8.0WORKDIR /app# Copy the build output from the build stageCOPY --from=build /app/out .ENTRYPOINT ["dotnet", "DockerEssentials.dll"]
I have segregated the Dockerfile into 2 stages,
- Build: Here, we will still use the SDK as the base image, continue to restore the packages, and publish the .NET Application to a specific directory.
- Image Creation: Here is where the magic happens. So, instead of using the SDK as the base image, we will use the
aspnet:8.0as the base image of this stage. This is an image purely with all the tools required for runtime purposes only, and nothing additional. We then copy the output of the previous stage, which contains the binaries of our published .NET application to the root, and run the application.
This way we can completely avoid the unnecessary files and tools that had come as part of the SDK. Let’s run the docker build command now. Before this, make sure to delete the image that we created earlier.
docker build -t docker-essentials .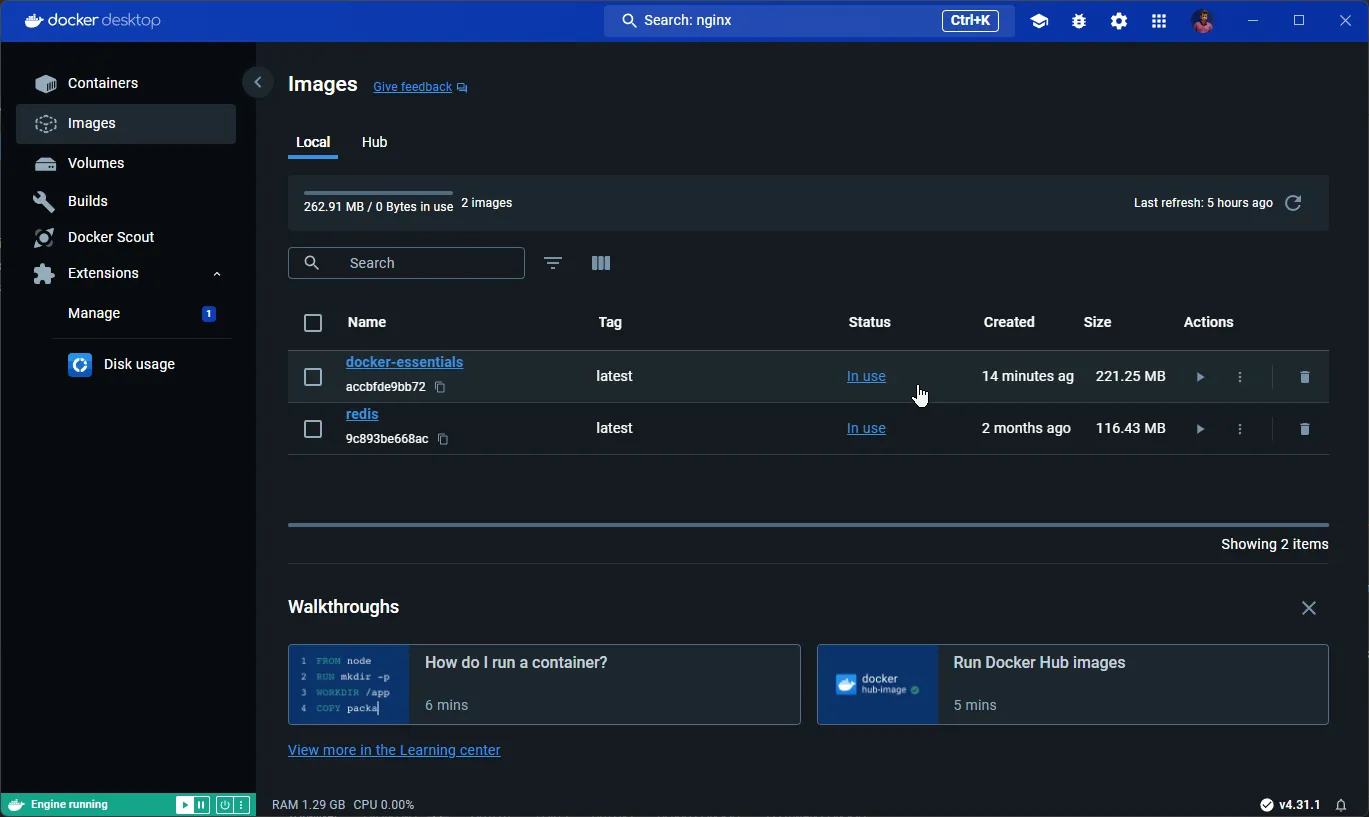
900+ MB down to under 220 MB! Multi-Stage Build for Docker has saved us almost 75% of Size!
Further optimizations are still possible, but it comes at a cost. For most of the use cases, this is a good enough optimization approach.
Run the .NET Docker Image
docker run --name docker-essentials -d -p 5080:8080 docker-essentialsWe will name our docker container as docker-essentials and run it in detached mode. By default, from .NET 8 the exposed port is 8080 and no longer 80. I am mapping the container port 8080 to the localhost port 5080. This means that if we navigate to localhost:5080, we should be able to access our .NET 8 Web API endpoint. Also, ensure to specify the name of the image we intend to run. In our case, the image name is docker-essentials.
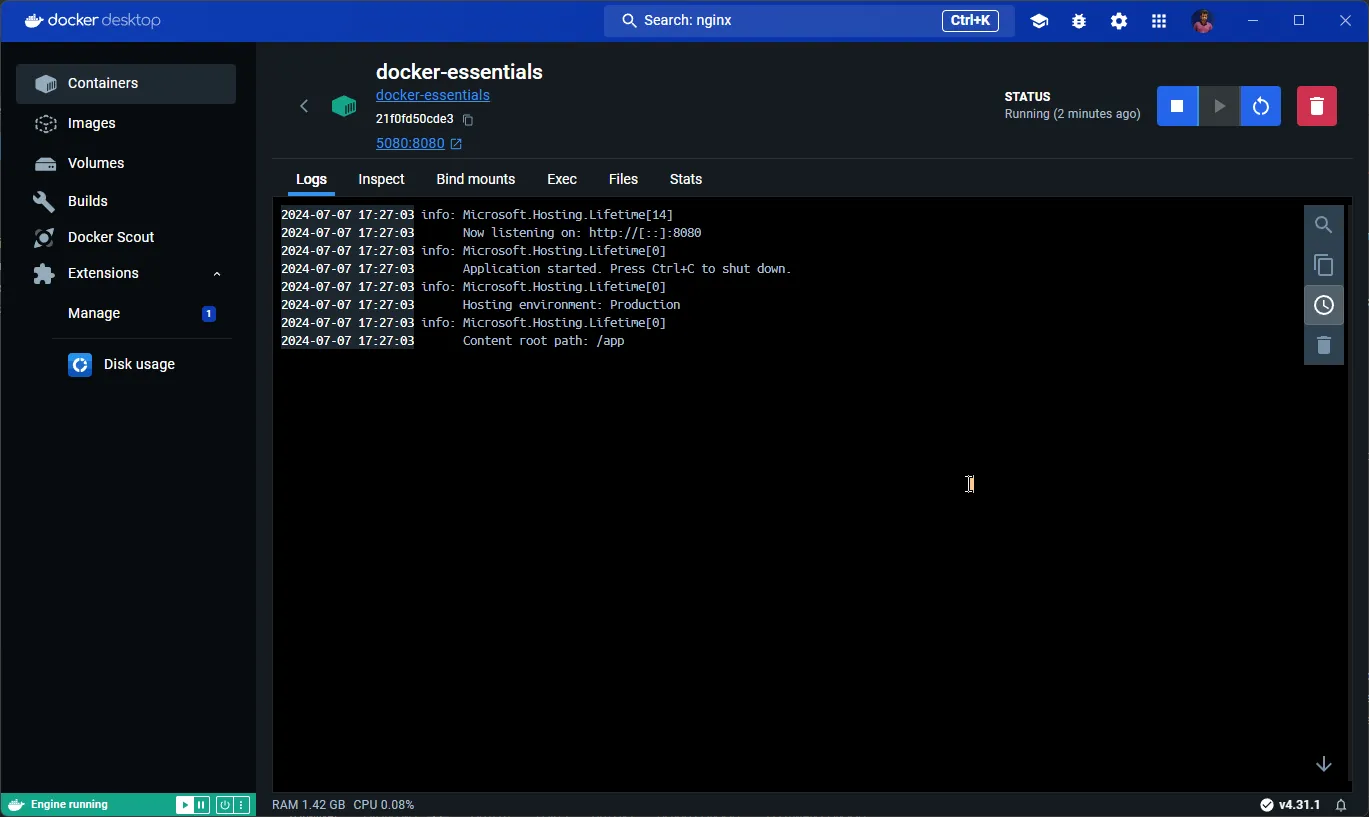
As you can see from the logs, we have our sample .NET app running as a Docker Container at 5080 local port. Let’s try to hit our API.
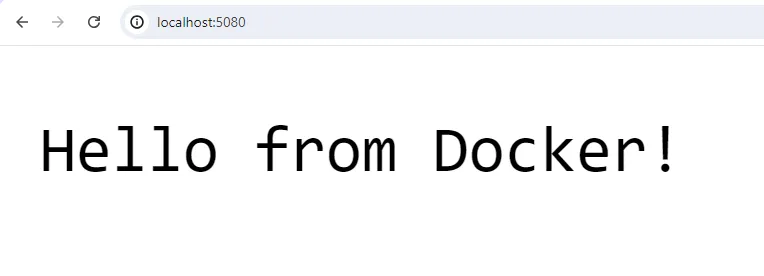
Everything working as expected.
Publish Docker Image
To publish a Docker image to a Docker registry such as Docker Hub, you would typically follow these steps:
- Tag the Docker image: Ensure the image has a tag that follows the format repository/image:tag.
- Login to the Docker registry: Use the docker login command to authenticate.
- Push the image to the registry: Use the docker push command to upload the image.
Here are the required commands.
docker tag docker-essentials:latest <username>/docker-essentials:latestdocker logindocker push <username>/docker-essentials:latest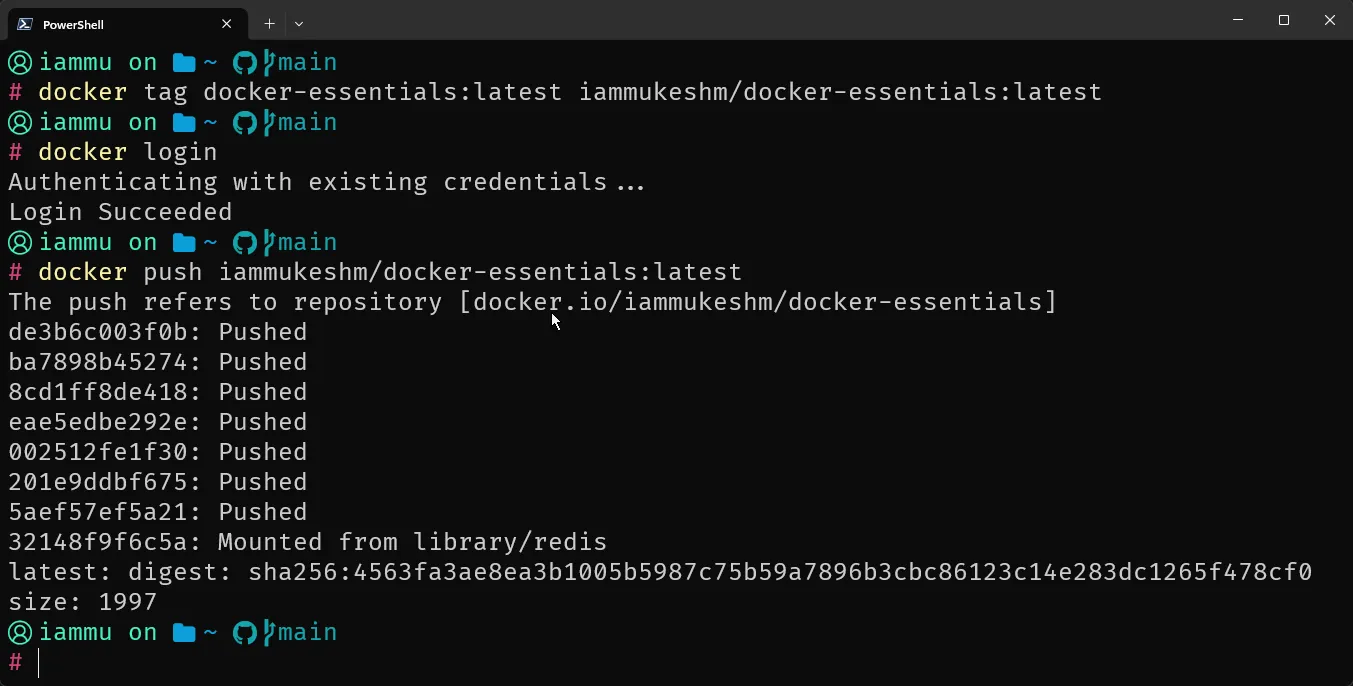
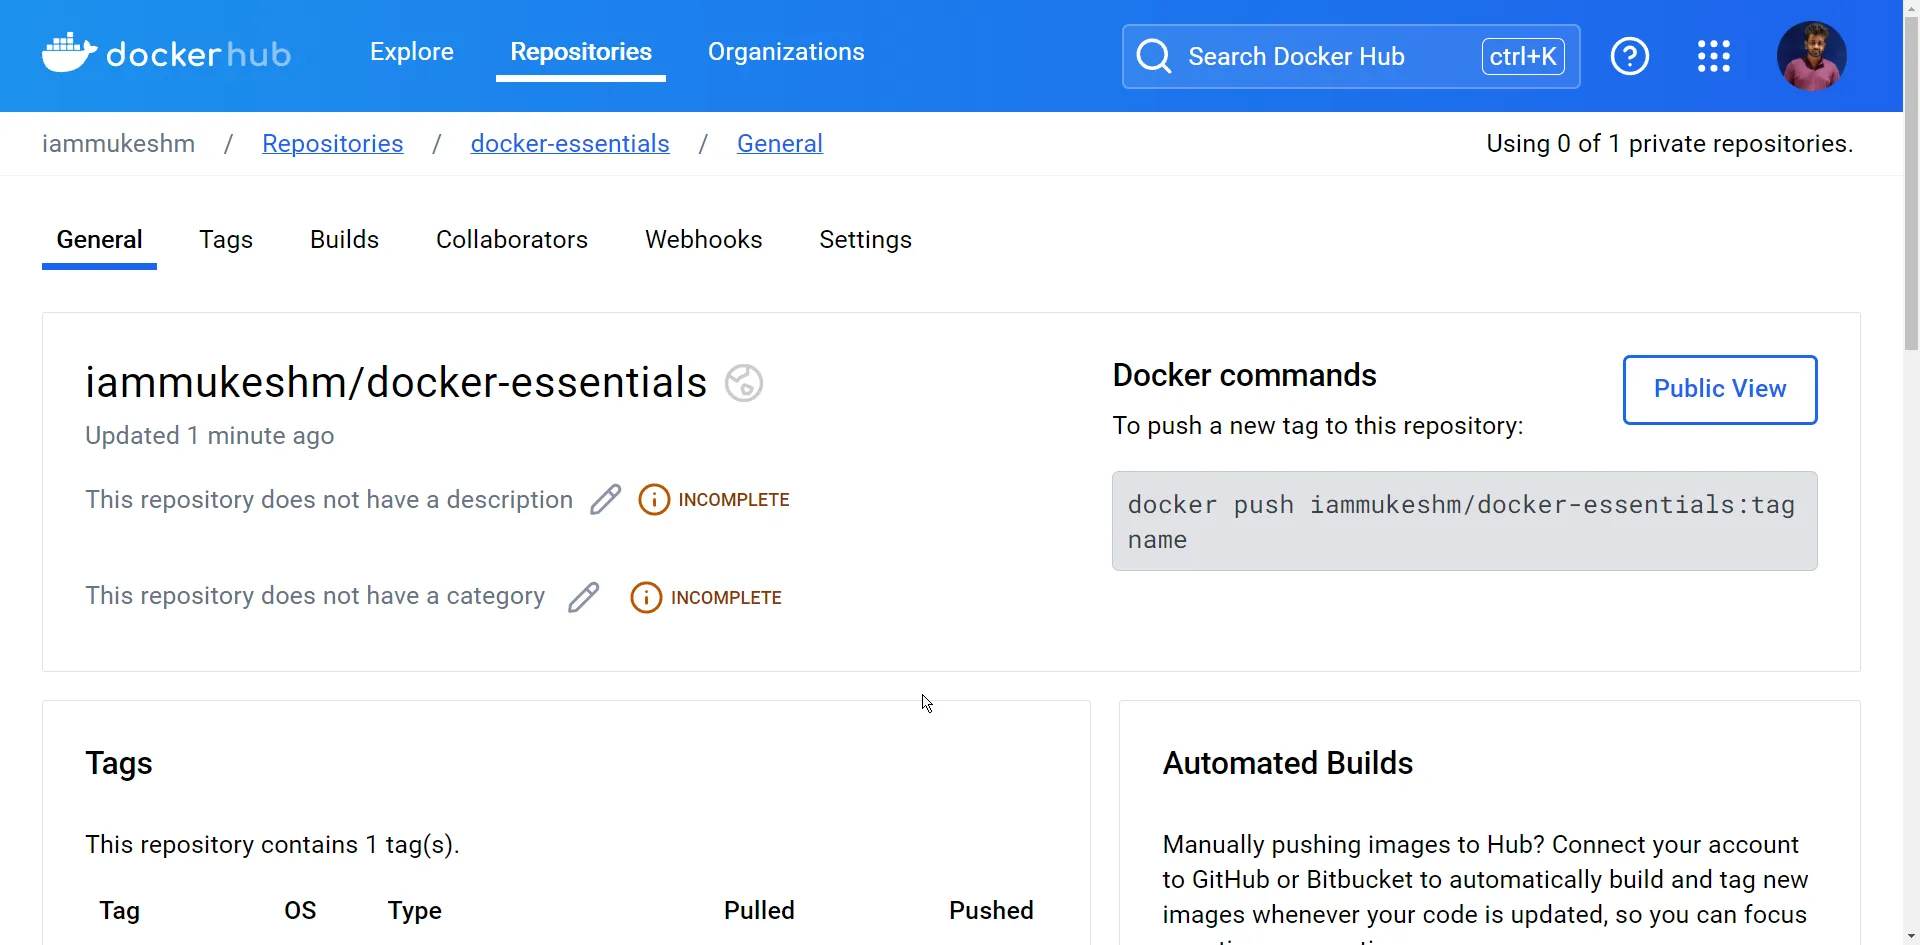
Once the push is completed, log in to your Docker Hub, navigate to repositories, and you can see the newly pushed image.
Docker Compose
Let’s step up the Docker game now! I will add some database interaction to my .NET Sample App. I will use the source code from a previous article, which already has some PostgreSQL database-based CRUD Endpoints. You can refer to this article - In-Memory Caching in ASP.NET Core for Better Performance.
I have made some modifications to remove the caching behavior. However, here is what we have as of now.
- .NET 8 Web API with CRUD Operations.
- Products table.
- Entity Framework Core.
- Connects to local PostgreSQL instance.
So, the ask is to containerize this application and also to include the database as part of the docker workflow.
First, let’s build the Docker Image from our newly updated source code. Once built, let’s tag the image to the latest version, and push it to Docker Hub. You can use the commands that we used in the previous steps.
Now, we will have to write a Docker Compose file that can run 2 containers, that is the .NET Web API, as well as a PostgreSQL instance.
At the root of the solution, create a new folder named compose, and add a new file docker-compose.yml.
version: "4"name: docker_essentialsservices:  webapi:    image: iammukeshm/docker-essentials:latest    pull_policy: always    container_name: webapi    networks:      - docker_essentials    environment:      - ASPNETCORE_ENVIRONMENT=Development      - ConnectionStrings__dockerEssentials=Server=postgres;Port=5433;Database=dockerEssentials;User Id=pgadmin;Password=pgadmin    ports:      - 5080:8080    depends_on:      postgres:        condition: service_healthy    restart: on-failure
  postgres:    container_name: postgres    image: postgres:15-alpine    networks:      - docker_essentials    environment:      - POSTGRES_USER=pgadmin      - POSTGRES_PASSWORD=pgadmin      - PGPORT=5433    ports:      - 5433:5433    volumes:      - postgresdata:/var/lib/postgresql/data    healthcheck:      test: ["CMD-SHELL", "pg_isready -U pgadmin"]      interval: 10s      timeout: 5s      retries: 5
volumes:  postgresdata:
networks:  docker_essentials:    name: docker_essentials
This file includes services for a web API and a PostgreSQL database, setting up their interactions, environment variables, networking, and volumes. Here’s a detailed breakdown:
version: "4": Specifies the version of the Docker Compose file format. Docker Compose v4 is an advanced version, that provides more features and improvements.name: docker_essentials: Sets the name for the Docker Compose application.
We have 2 services defined.
webapi service
image: iammukeshm/docker-essentials:latest: Uses the specified Docker image for the web API service, pulling the latest version.pull_policy: always: Ensures the image is pulled every time the container starts.container_name: webapi: Names the container webapi.networks: Adds the service to the docker_essentials network, enabling communication with other services in the network.environment: Sets environment variables inside the container.ASPNETCORE_ENVIRONMENT=Development:Configures the ASP.NET Core environment to Development.ConnectionStrings__dockerEssentials=Server=postgres;Port=5433;Database=dockerEssentials;User Id=pgadmin;Password=pgadmin: Sets the connection string for the application to connect to the PostgreSQL database which will run as a separate docker container.
ports: Maps port 5080 on the host to port 8080 in the container.depends_on: Ensures the webapi service depends on the postgres service being healthy before starting.condition: service_healthy: Waits for the PostgreSQL service to be healthy before starting the webapi service.
restart: on-failure: Restarts the container if it fails.
postgresql service
container_name: postgres: Names the container postgres.image: postgres:15-alpine:Uses the postgres:15-alpine image, which is a lightweight version of PostgreSQL.networks: Adds the service to the docker_essentials network.environment: Sets environment variables for PostgreSQL.POSTGRES_USER=pgadmin: Creates a PostgreSQL user pgadmin.POSTGRES_PASSWORD=pgadmin: Sets the password for the pgadmin user.PGPORT=5433: Sets the PostgreSQL server to listen on port 5433.
ports: Maps port 5433 on the host to port 5433 in the container.volumes: Mounts the volume postgresdata to persist database data.postgresdata:/var/lib/postgresql/data: Maps the host volume postgresdata to the container path /var/lib/postgresql/data.
healthcheck: Defines a health check to determine if the PostgreSQL service is ready.test: ["CMD-SHELL", "pg_isready -U pgadmin"]: Runs the pg_isready command to check if the PostgreSQL service is ready.interval: 10s: Runs the health check every 10 seconds.timeout: 5s: Sets the timeout for the health check to 5 seconds.retries: 5: Retries the health check up to 5 times before considering the service unhealthy.
With that done, let’s run a new command.
docker compose up -dThis runs all the instructions from the docker-compose.yml file in a detached mode. This command pulls the images as required, and spins up the containers as per the configuration.
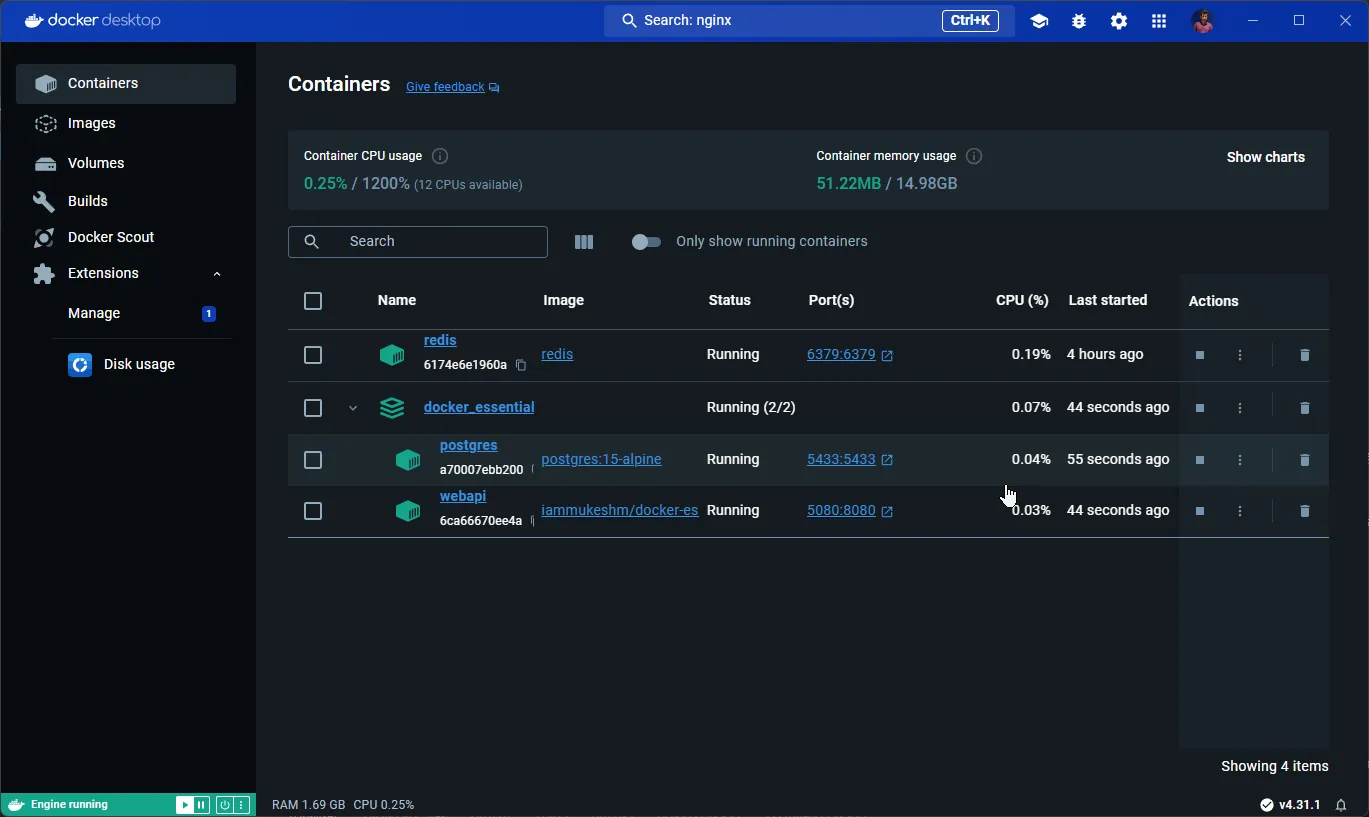
As you can see, we have both the containers up and running! I have also tested the API endpoints, and it works as expected.
Other Docker Compose Commands
Remove Containers
To stop/remove the containers/services related to a specific docker-compose file, run the following.
docker compose downRun Specific Services
To run a specific service from a compose file, run the following.
docker compose up -d postgresThis spins up the postgres container.
That’s it for this guide. Was it helpful?
Closing Thoughts
In this comprehensive Docker Essentials for .NET Developers Guide, we’ve covered nearly everything you need to embark on your Docker journey! We delved into the fundamentals of Docker, exploring how it operates, its building blocks, and its collective functions. We also examined Docker Desktop and learned the most essential Docker CLI commands.
Additionally, we took practical steps by containerizing a .NET 8 Sample Application. This involved crafting a Dockerfile for the application, building the image, and finally publishing our custom image to Docker Hub.
Building on this foundation, we introduced PostgreSQL database interaction with our .NET application. For this, we wrote a Docker Compose file capable of spinning up multiple containers, demonstrating how to manage a multi-container environment effectively.
We covered many other topics throughout this guide, aiming to provide you with a robust understanding of Docker. I hope this guide has significantly expanded your Docker knowledge. Thank you for following along, and please share this guide with your colleagues!

