In this article, we will go through Audit Trail Implementation in ASP.NET Core (.NET 5) using Entity Framework Core. So what’s this Audit Trail about? Well, it’s a handy technique to track changes that are done by your logged-in users. Ever wondered who had updated the value of a certain entity record in your ASP.NET Core Application?
You would want to always keep a record of each and every modification made to your application data. This is quite vital for many businesses as well. The entire source code of this implementation is available on my Github here.
I will show you the exact process that happens in the background while logging the audit trails. We will track the following with our implementation.
- TableName
- Affected Column(s)
- Primary Key / Value of the Table
- Old Values
- New Values
- Type - Create/Delete/Update/Delete
- The user who is Responsible for the modification.
- Date/Time
Here are some Audit Trail logs generated by the .NET 5 Clean Architecture Boilerplate template. You can see that we are also recording the user logged-in / out activities as well.

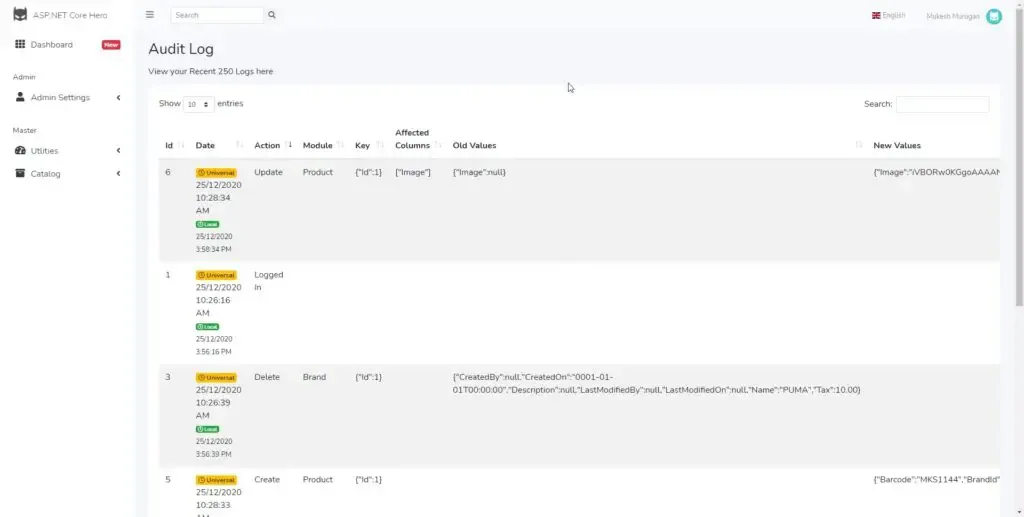
Seems interesting, yeah?. At the end of this article, we will be able to completely secure our data and track any changes associated with it at this detailed level.
Let’s get started with Audit Trail Implementation in ASP.NET Core. So, here is how we will go about the tutorial. I will create a very basic CRUD Application using .NET 5 MVC, Microsoft Identity, and Entity Framework Core. Once this is done, we will start integrating Audit Trail into the Application. I will go through 2 variants, coding everything from the ground up, and using a library to achieve the same. It’s quite important to understand how the process works, thus we will code it up initially.
Scaffolding the CRUD Application.
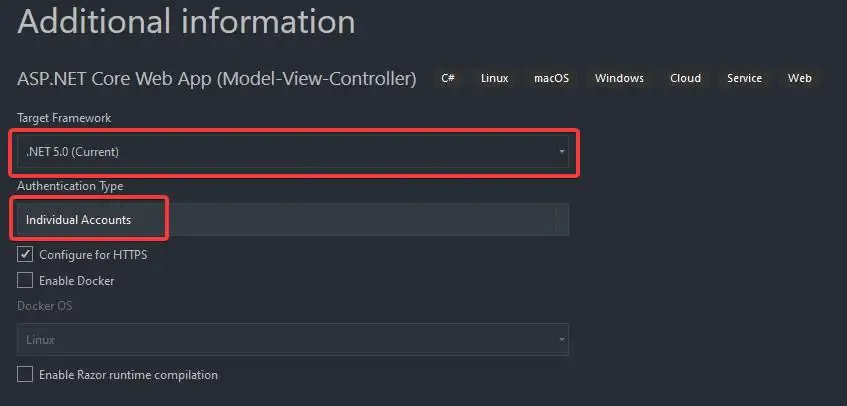
I will be using Visual Studio 2019 Community for this demonstration. Let’s create a new Solution and name it AuditTrail.EFCore.Demo. Make sure to choose the Framework as .NET 5 and the Authentication Type as Individual accounts. This includes the Microsoft Identity / Entity Framework Core package to your application out-of-the-box.
First off, let’s get done with the CRUD Implementation. For this, let’s make a simple Product Data Model and Scaffold the view to auto-generate the CRUD code. We are rushing through this as the primary aim is to learn about Audit Trail Implementation in ASP.NET Core with Entity Framework Core.
In the Models folder, add a new class, Product.cs. This is as simple as it gets :P
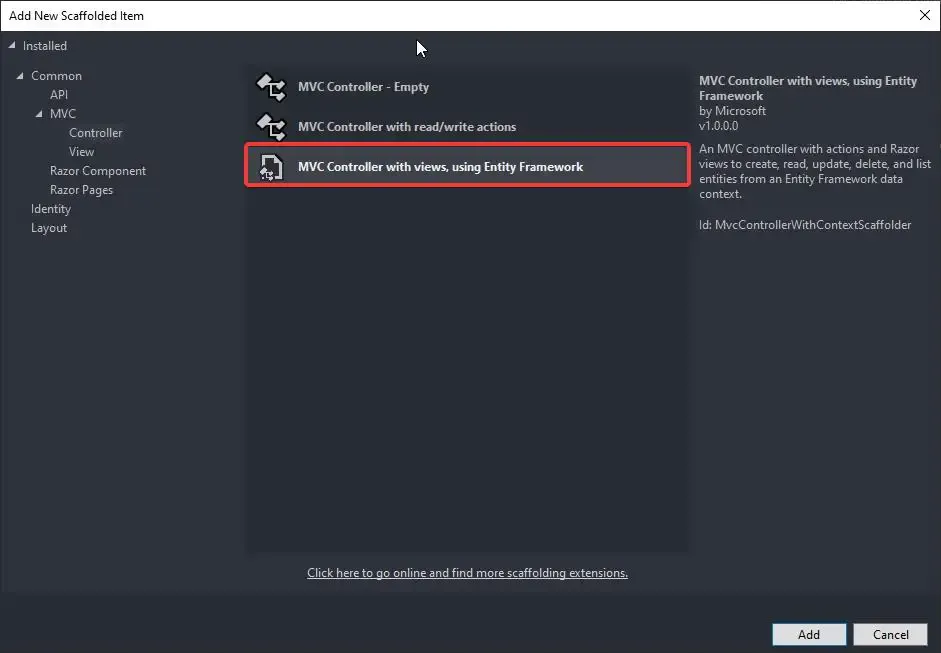
public class Product{ public string Id { get; set; } public string Name { get; set; } public int Rate { get; set; }}Now, let’s scaffold a Controller along with Views. Right-click on the Controllers folder and select Add Controller. In the dialog that appears, select ‘MVC Controller with views using Entity Framework’. The intention here is to quickly create the CRUD application with minimal code.
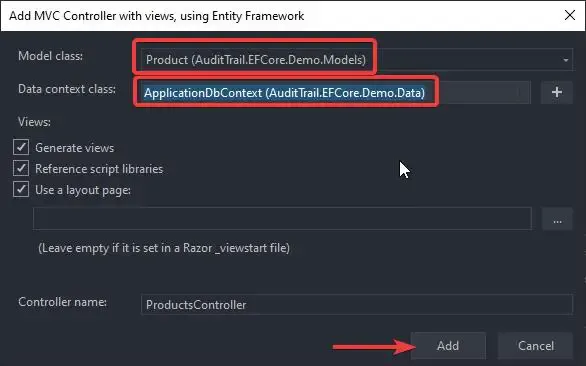
In the next dialog box, select the appropriate Model class (here it is Product), and then select the Context class. Make sure that the Generate Views checkbox is selected and click Add.
Now, Visual Studio does the heavy lifting for you and creates Views and Controllers to Create, Read, Update, and Delete Products. But before continuing, let’s add the Migrations and update our Database. PS, we are using the MSSQL LocalDB instance. You can change it in the appsettings.json/ConnectionStrings.
Open up Package Manager Console and run the following.
add-migration addedProductsupdate-database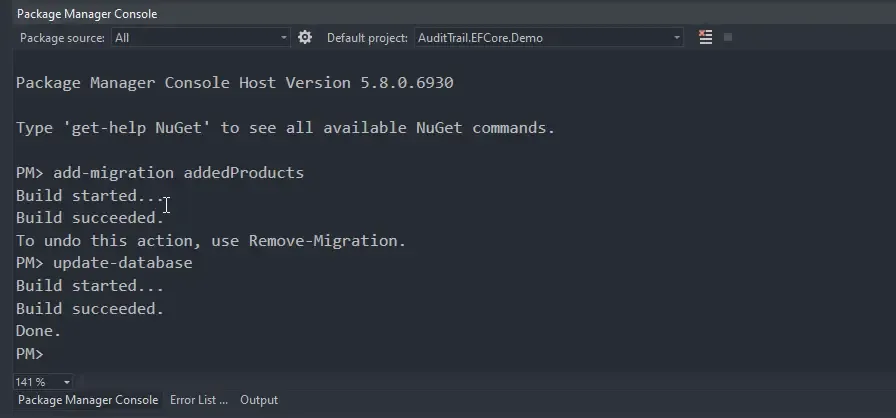
With that done, let’s run the application and navigate to /products to make sure that everything is working fine.

One minor change we will make is to secure the product’s controller so that only Authenticated users can do operations on the product entity. Navigate to the ProductsController.cs and add the [Authorize] attribute.
[Authorize]public class ProductsController : Controller{
}
Run the application again and navigate to /products. This time you will be prompted to log in. Let’s register a new account and log in.

Getting Started with Audit Trail Implementation in ASP.NET Core
Now, let’s get started with the actual audit trail implementation. The idea is quite simple. We will be creating an abstract Context class that inherits from the DBContext / IdentityDbContext of Entity Framework Core / Identity. In this context class, we will add the Model of AuditTrail and override the SaveChangesAsync base function so that, every time any change occurs, we are able to track it using Entity Framework’s powerful ChangeTracker. But there is one catch. We will be using SaveChangesAsync(userId) instead of SaveChangesAsync(). This ensures that we get the related user as well.
First, create a new class under the Models folder and name it Audit.cs. These are the properties and data that we are going to track with the implementation. It covers pretty much all the vital property fields.
public class Audit{ public int Id { get; set; } public string UserId { get; set; } public string Type { get; set; } public string TableName { get; set; } public DateTime DateTime { get; set; } public string OldValues { get; set; } public string NewValues { get; set; } public string AffectedColumns { get; set; } public string PrimaryKey { get; set; }}We talked about tracking the type of change associated with the DB. This includes creating, updating, and deleting. Let’s make an Enum class for this. I created a new folder name Enums and added a new enum, AuditType.cs.
public enum AuditType{ None = 0, Create = 1, Update = 2, Delete = 3}Next, we will make a simple abstraction over the previous DB Model (Audit). This is more like a DTO object for essential mappings and type conversions. In the Models folder, add another class and name it AuditEntry.cs
public class AuditEntry{ public AuditEntry(EntityEntry entry) { Entry = entry; } public EntityEntry Entry { get; } public string UserId { get; set; } public string TableName { get; set; } public Dictionary<string, object> KeyValues { get; } = new Dictionary<string, object>(); public Dictionary<string, object> OldValues { get; } = new Dictionary<string, object>(); public Dictionary<string, object> NewValues { get; } = new Dictionary<string, object>(); public AuditType AuditType { get; set; } public List<string> ChangedColumns { get; } = new List<string>(); public Audit ToAudit() { var audit = new Audit(); audit.UserId = UserId; audit.Type = AuditType.ToString(); audit.TableName = TableName; audit.DateTime = DateTime.Now; audit.PrimaryKey = JsonConvert.SerializeObject(KeyValues); audit.OldValues = OldValues.Count == 0 ? null : JsonConvert.SerializeObject(OldValues); audit.NewValues = NewValues.Count == 0 ? null : JsonConvert.SerializeObject(NewValues); audit.AffectedColumns = ChangedColumns.Count == 0 ? null : JsonConvert.SerializeObject(ChangedColumns); return audit; }}The constructor of the AuditEntry class accepts EntityEntry, which provides access to track the changes within the context. You can see that at Line 15 we are converting AuditEntry to Audit class. Here you can see that we serialize the old and new values so that they get saved to the database as JSON strings. Now let’s see the main class that provides data to the DTO and DB Model class.
Under the Data Folder (Or where you store your DBContext class), add a new class and name it AuditableIdentityContext.
public abstract class AuditableIdentityContext : IdentityDbContext{ public AuditableIdentityContext(DbContextOptions options) : base(options) { } public DbSet<Audit> AuditLogs { get; set; } public virtual async Task<int> SaveChangesAsync(string userId = null) { OnBeforeSaveChanges(userId); var result = await base.SaveChangesAsync(); return result; } private void OnBeforeSaveChanges(string userId) { ChangeTracker.DetectChanges(); var auditEntries = new List<AuditEntry>(); foreach (var entry in ChangeTracker.Entries()) { if (entry.Entity is Audit || entry.State == EntityState.Detached || entry.State == EntityState.Unchanged) continue; var auditEntry = new AuditEntry(entry); auditEntry.TableName = entry.Entity.GetType().Name; auditEntry.UserId = userId; auditEntries.Add(auditEntry); foreach (var property in entry.Properties) { string propertyName = property.Metadata.Name; if (property.Metadata.IsPrimaryKey()) { auditEntry.KeyValues[propertyName] = property.CurrentValue; continue; } switch (entry.State) { case EntityState.Added: auditEntry.AuditType = Enums.AuditType.Create; auditEntry.NewValues[propertyName] = property.CurrentValue; break; case EntityState.Deleted: auditEntry.AuditType = Enums.AuditType.Delete; auditEntry.OldValues[propertyName] = property.OriginalValue; break; case EntityState.Modified: if (property.IsModified) { auditEntry.ChangedColumns.Add(propertyName); auditEntry.AuditType = Enums.AuditType.Update; auditEntry.OldValues[propertyName] = property.OriginalValue; auditEntry.NewValues[propertyName] = property.CurrentValue; } break; } } } foreach (var auditEntry in auditEntries) { AuditLogs.Add(auditEntry.ToAudit()); } }}Line 6 - We add a DbSet of Audit Model. Thus remember to add migrations and update the database once we are done with this implementation.
Line 7 to 12 - Here is where we create the SaveChangesAsync method similar to the base class, but the method would accept userId as the parameter. Note that we will be updating the Product Controller class to adapt to this method and provide the currently logged-in user id.
Line 15 - Scans the entities for any changes.
Line 17 - Loops through the collection of all the Changed Entities. In our case, the loop will always have ONE iteration only. In the instance where we are trying to update multiple entities at a time, the loop would be of prime importance.
Line 22- Get the Table Name from the entity object.
Line 25 - Loops through all the properties of the Entity. In our demonstration, it is going to be the Product Entity.
Line 27 - If the current property is a primary key, then add it to the PrimaryKey Dictionary and skip it.
Line 33-52 - This is where the real magic happens. We use a switch case to detect the state of the entity (Added, Deleted, or Modified). If the entity is created, we assign the Create enum to the AuditType property and add the property to the NewValues dictionary.
Otherwise, if it is a Delete operation, the data is added to the OldValues Dictionary. If the Entity State is Modified, we add the current property name to the ChangedColumns Property and fill in the Old (Original) and New (Updated) Values into the dictionary.
Finally in Line 57, we cover all the AuditEntries to Audits and save the changes at Line 10.
That was quite easy and understandable, yeah? Just a few lines of code and you have a robust ChangeTracker implemented into your solutions.
Note that I am inheriting from the IdentityDbContext class. This ensures that the Identity Tables get generated along with the Audit Class. You can inherit from the DbContext as well, based on your requirements.
As the final steps, let’s navigate to the ProductsController to make the changes that can accommodate our ChangeTracker. Remember, we need to provide the Current logged-in user ID, yeah?
Let’s start with the Create (POST) method. The only thing to care about is, to add the currently logged-in user id. Identity makes it quite easy for us. User?.FindFirst(ClaimTypes.NameIdentifier).Value returns the UserId with ease :D Add this to the SaveChangesAsync method as I have done in line 4 below.
if (ModelState.IsValid){ _context.Add(product); await _context.SaveChangesAsync(User?.FindFirst(ClaimTypes.NameIdentifier).Value); return RedirectToAction(nameof(Index));}return View(product);BONUS - Cleaner way to Update Entities via EFCore.
Now, for the update method, there will be one more change. This is some kind of BONUS you will be getting from this article. The one issue with the normal update method of the EFCore Context is that it literally updates each and every column of the table even though most of the column data remains unchanged. I will make it clearer with an example. Let’s say we are working with a Student entity that has the following columns.
- Id
- Age
- Class
- Name
Now, we run an update command to change the Student’s Class. What we usually would do is _dbContext.Update(student); . Now the issue with this is that it generates a SQL statement that looks something like this.
Update Students Set Age = 25, Class = 12, Name = ‘Mukesh’ where Id = 1;
Do we really need to update the column that is already the same? We require a SQL command like this..
Update Students Set Class = 12 where Id = 1;
Does this make sense? A lot more efficient and cleaner, yeah? Let’s now see how to address this issue in the world of Entity Framework Core. In the Edit (Post) method, make the changes mentioned in the snippet below (Lines 9 and 10).
if (id != product.Id){ return NotFound();}if (ModelState.IsValid){ try { var oldProduct = await _context.Product.FindAsync(id); _context.Entry(oldProduct).CurrentValues.SetValues(product); await _context.SaveChangesAsync(User?.FindFirst(ClaimTypes.NameIdentifier).Value); } catch (DbUpdateConcurrencyException) { if (!ProductExists(product.Id)) { return NotFound(); } else { throw; } } return RedirectToAction(nameof(Index));}return View(product);What we did is, get the original record using the Find By Id method. using this record, we use the SetValues method of the Context class. In this way, the unchanged properties get ignored and only the changed values make it into the generated SQL Update Query! This will help a lot in the long run.
Next, in the Delete (POST) method, at Line 3 add the userId as well. That’s it.
var product = await _context.Product.FindAsync(id);_context.Product.Remove(product);await _context.SaveChangesAsync(User?.FindFirst(ClaimTypes.NameIdentifier).Value);return RedirectToAction(nameof(Index));Finally, let’s add the migrations and update our database. Open up the Package Manager Console and run the following command.
add-migration auditupdate-databaseWith that done, let’s run our application and navigate to the /products page. Try to add/update and delete a few products. If things went well, we would be able to see these changes in the AuditLogs Table in the Application Database. Let’s check our AuditLogs Table.

There you go. We are able to see all the changes we performed on the Product Entity. As for the scalability, you can really add all kinds of data here. Let’s say the IP Address of the user, Browser Details, and much more.
An Alternative - NuGet package.
As mentioned earlier, I created a compact library out of the above implementation, so that I get to modularize my Web Projects. Feel free to use the package as well. .NET 5 Clean Architecture Template also makes use of this package out-of-the-box!
Install-Package AspNetCoreHero.EntityFrameworkCore.AuditTrailFor now, let’s wrap up this article.
Summary
In this article, we learned about Audit Trail Implementation in ASP.NET Core (.NET 5) using Entity Framework Core. This is quite handy when you start working with applications that are used by multiple users and so on.
You can find the entire source code of the implementation here.
Leave behind your valuable queries and suggestions in the comment section below. Also, if you think that you learned something new from this article, do not forget to share this with your developer community. Happy Coding!


