This article will talk about Automapper in ASP.Net Core Applications and how we can implement it with ease. We will go through the features of Automapper and the problems it solves by practical use cases. I will also leave the link to my GitHub Repository for the source code used in this guide.
The Problem
To maintain a separation of concern between various of your layers in an ASP.NET Core Project, it is advisable to have different models / Data transfer objects that are associated with a specific layer. This is a very good practice.
Let’s say we have 2 classes to be mapped, one is a domain object and another one is a view model object.
public class Developer{   public string Name {get; set;}   public int Experience {get; set;}}
public class DeveloperDTO{   public string Name {get; set;}   public int Experience {get; set;}}
Now, we need to link these objects to transfer the data between layers. So we start writing lines of code that say devDTO.Name = dev.Name and so on. This will be fine for one or a few classes. What if you have 100 classes in your application with multiple properties. At a point, this is will become a tedious task with repeated code. Do you get the point? It is also likely that you may even miss a property and end up with a null exception. This is quite a scenario that you would wish to avoid.
The Solution
What if there was a library that could handle this for you? Maps your objects to other objects automatically for you? All you would need to worry about is how to consume these objects and work with them. That is quite a lot of stress taken out for you in the longer run. This is where Automapper comes in.
What is Automapper?
Automapper is an object-to-object, convention-based mapping library that doesn’t need too much configuration. In simpler terms, it is a tool that transforms an object of Type T1 to an object of T2 (and back) with ease. It certainly makes a developer’s life easy.

Getting Started
For this tutorial, I will work on an ASP.NET Core 3.1 API to demonstrate the features of the Automapper. I use Visual Studio 2019 Community as my IDE (Best IDE for C# Development)
How to use Automapper in ASP.NET Core Application?
Installing the Automapper Package
You would just need to install this package which has a dependency on the main Automapper package. Thus both of them will get installed into your ASP.NET Core Application.
Install-Package AutoMapper.Extensions.Microsoft.DependencyInjectionConfiguring the Service
Now that we have installed the required packages, let’s configure them. Navigate to Startup. cs/Configuration method and add in the below line.
services.AddAutoMapper(AppDomain.CurrentDomain.GetAssemblies());Creating a Model and Data Transfer Object
We will create a very simple model and a DTO class.
public class Developer{    public string FirstName { get; set; }    public string LastName { get; set; }    public string Email { get; set; }    public decimal Experience { get; set; }}
public class DeveloperDTO{    public string FirstName { get; set; }    public string LastName { get; set; }    public string Email { get; set; }    public decimal Experience { get; set; }}
Creating a Mapping Profile
Now that our classes are ready, we will need Mapping Profiles to let the application know which object is linked.
What are Mapping Profiles?
Mapping profiles allow you to group mapping configurations. A better way to organize your mapping is by using Mapping Profiles. For each entity / Area, you could create a Mapping Class that inherits from Profile.
When the application fires up, it initializes Automapper services that will look for classes that inherit from the Profile base class and loads the specified mapping configurations.
Add a new class, Mappings/MappingProfile.cs
public class MappingProfile : Profile{ public MappingProfile() { CreateMap<Developer, DeveloperDTO>(); //Map from Developer Object to DeveloperDTO Object }}Developer Controller
To see how it works, let’s wire up a controller that takes in a Developer Model from the API endpoint and maps it to a DeveloperDTO Object. Let’s see how it’s done.
IMapper is an interface from Automapper that helps us use the library via dependency injection.
Create a new Controller, Controllers/DeveloperController.cs
[Route("api/[controller]")][ApiController]public class DeveloperController : ControllerBase{ private readonly IMapper _mapper; public DeveloperController(IMapper mapper) { _mapper = mapper; } public async Task<IActionResult> Post(Developer developer) { var developerDtoMapped = _mapper.Map<DeveloperDTO>(developer); return Ok(developerDtoMapped); }}Line #12 means that using the IMapper interface, we map the incoming object of type Developer to type DeveloperDTO.Let’s open up Postman to test this endpoint by sending a Developer model in the request body.
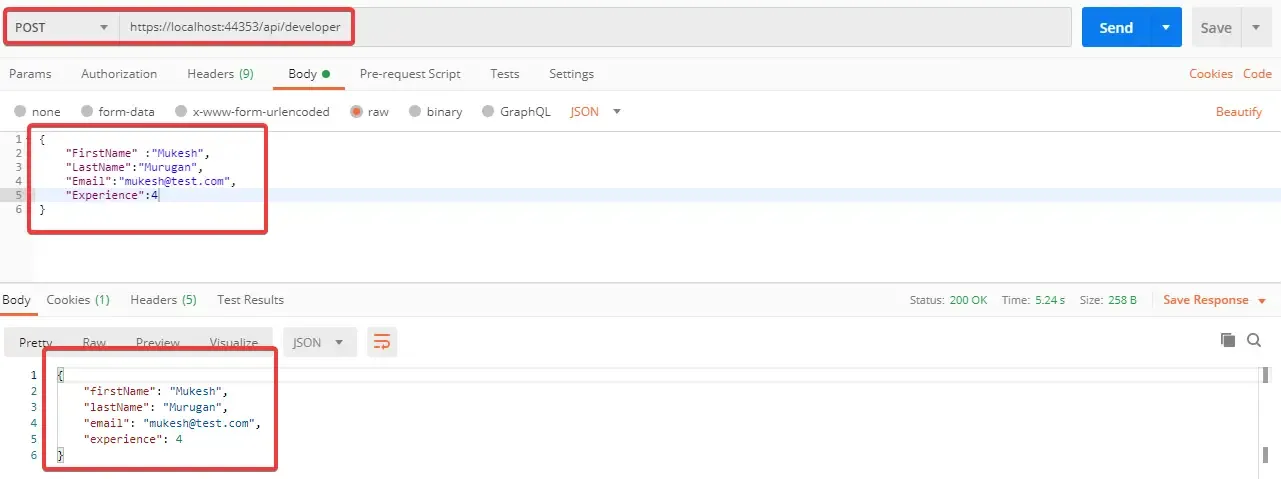
This is quite a simple mapping. Let’s do some more practical mappings. What are the properties to be mapped that did not have the same names?
Mapping Properties with Different Names
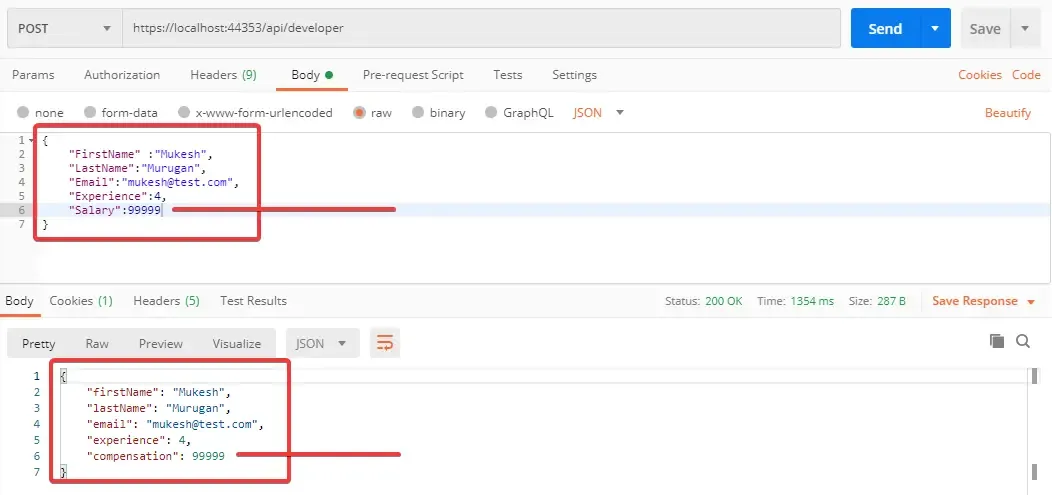
Automapper is a convention-based mapping, which means that the properties have to match so that the library can map them for you. But this is not the case always. In real-world applications, property names may vary. This is quite a good practical use case of Automapper in ASP.NET Core Applications. Let’s add a new property Salary and Compensation property to each of our models.
In DeveloperDTO.cs
public decimal Compensation { get; set; }In Developer.cs
public decimal Salary { get; set; }Now we need to explicitly tell Automapper that, ‘Every other property names match except one, so I need you to map Salary to Compensation’. Let’s see how we can do it. For this, open up your Mapping Profile and modify it as below.
public MappingProfile(){ CreateMap<Developer, DeveloperDTO>() //Map from Developer Object to DeveloperDTO Object .ForMember(dest => dest.Compensation,source => source.MapFrom(source => source.Salary)); //Specific Mapping}At Line #4, we have mentioned that for the destination member Compensation ( from DeveloperDTO), we have to map from the source member Salary. Here is the result.
Conditional Mapping
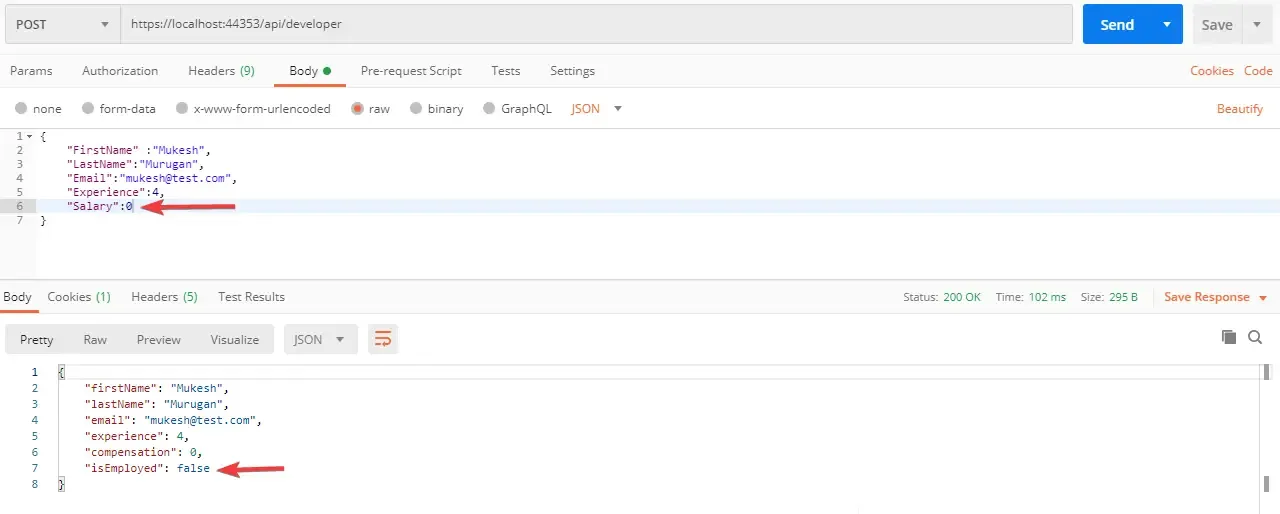
Let’s try to add some conditions to our mappings. I will add a new boolean property, IsEmployed to our Developer DTO. This is my requirement. If the developer has a salary above 0, set the IsEmployed to true, else false. It’s quite easy to achieve this with Automapper.
In DeveloperDTO.cs
public bool IsEmployed { get; set; }Modify the Mapping Profile as well.
public MappingProfile(){ CreateMap<Developer, DeveloperDTO>() //Map from Developer Object to DeveloperDTO Object .ForMember(dest => dest.Compensation, source => source.MapFrom(source => source.Salary)) //Specific Mapping .ForMember(dest => dest.IsEmployed, source => source.MapFrom(source => source.Salary > 0 ? true : false));//Conditional Mapping}Line #5 is similar to Line 4, except that we have introduced a condition factor to it. The code is quite self-explanatory. Run the application and open up Postman. This is what you get. Conditional Validation is done.
Reverse Mapping using Automapper
Now, in another use case scenario, you want to convert the DeveloperDTO back to the Developer model as well for specific requirements. Automapper supports bi-directional mapping as well. This is mostly best used in CQRS where you need to map objects in a reverse manner, especially while updating objects.
To enable Bi-Directional mapping, use ReverseMap() function in your Mapping Profile.
public MappingProfile(){ CreateMap<Developer, DeveloperDTO>() //Map Developer Object to DeveloperDTO Object .ForMember(dest => dest.Compensation, source => source.MapFrom(source => source.Salary)) //Specific Mapping .ForMember(dest => dest.IsEmployed, source => source.MapFrom(source => source.Salary > 0 ? true : false))//Conditional Mapping .ReverseMap();}Mapping Complex Objects
Till now we have only worked with strings and ints to map properties. We will have done a bit more configuration when we have a Complex Object, like a nested class.
Let’s add an Address Class and DTO and insert it to the Developer Classes as well.
public class Address{    public string City { get; set; }}
public class AddressDTO{    public string City { get; set; }}
public class Developer{    public string FirstName { get; set; }    public string LastName { get; set; }    public string Email { get; set; }    public decimal Experience { get; set; }    public decimal Salary { get; set; }    public Address Address { get; set; }}
public class DeveloperDTO{    public string FirstName { get; set; }    public string LastName { get; set; }    public string Email { get; set; }    public decimal Experience { get; set; }    public decimal Compensation { get; set; }    public bool IsEmployed { get; set; }    public AddressDTO Address { get; set; }}
Yep, you guessed it right. You will just have to create a map for Address class to AddressDTO class. Quite simple. Your MappingProfile.cs would like this now.
public MappingProfile(){ CreateMap<Developer, DeveloperDTO>() //Map from Developer Object to DeveloperDTO Object .ForMember(dest => dest.Compensation, source => source.MapFrom(source => source.Salary)) //Specific Mapping .ForMember(dest => dest.IsEmployed, source => source.MapFrom(source => source.Salary > 0 ? true : false))//Conditional Mapping .ReverseMap(); CreateMap<Address, AddressDTO>();}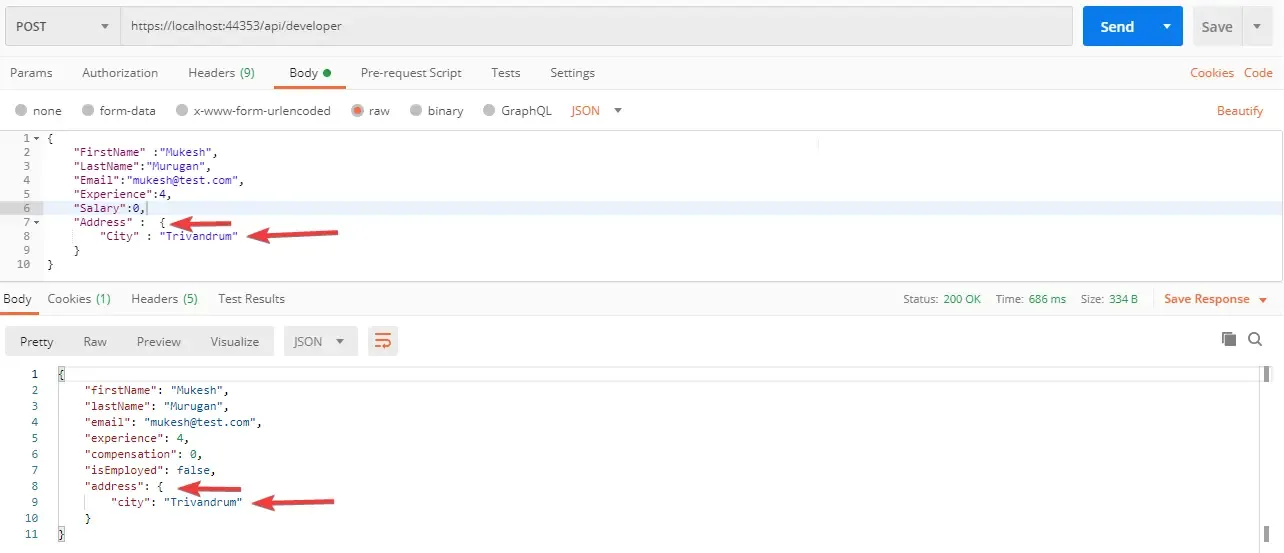
We are now able to perform mappings for Nested Classes with Automapper in ASP.NET Core applications.
Summary
We have learned how to use Automapper, the problem it solves, and how to implement automapper in ASP.NET Core Applications with ease. This is a sample demonstration/guide, whereas I am planning to build a boilerplate template for ASP.NET Core Web Applications that would help you get started with the best code practices and patterns for your new web application. I will keep you posted. Subscribe to be updated.

