Terraform is a powerful tool for automating infrastructure deployment and management across multiple cloud providers. Whether you are new to infrastructure as code or looking to deepen your Terraform expertise, this guide will provide you with the knowledge and skills necessary to effectively manage infrastructure in your projects, regardless of the technology stack you work with. Terraform is the tool I use at work and other personal projects to get my app infrastructure onto the AWS Cloud with ease.
This article is sponsored by AWS. Huge thanks for helping me produce more .NET on AWS content!
Infrastructure as Code (IaC)
So, you have decided to offload all your application’s infrastructure needs to the cloud. Great choice! A way better option that to click around forever to get things deployed. The next step is managing and provisioning that infrastructure efficiently, which is where Infrastructure as Code (IaC) comes in. IaC allows you to automate the creation, configuration, and management of your cloud resources using code. This approach ensures consistency, repeatability, and scalability, making infrastructure management more reliable and less error-prone.
You don’t want to be clicking through the Management Console and creating new AWS resources whenever a new environment has to be deployed. Instead, you can choose to automate the entire management process.
With IaC, you can describe your cloud infrastructure in human-readable configuration files. These files can be versioned, shared, and reused just like application code, providing a seamless and automated workflow for provisioning infrastructure across environments. Whether you need to spin up a simple web application or orchestrate a complex multi-tier architecture, IaC empowers you to define, deploy, and manage it all with ease.
And out of the available IaC tools, Terraform is the most popular one, and the most obvious choice.
Important: It’s recommended to learn Terraform only if you are well aware of how to manually create resources on AWS / Azure or Other Cloud Providers. Terraform is just a way to automate your manual operation of creating resources on the cloud. It would make a lot of sense if you are already familiar with the process so that your knowledge can help you in debugging any issues that may occur.
Introducing Terraform
Terraform is one of the most popular IaC tools available today, allowing you to manage infrastructure across multiple cloud providers with a unified syntax. Whether you’re working with AWS, Azure, Google Cloud, or on-premise infrastructure, Terraform’s declarative language enables you to define your resources and dependencies in a way that is scalable and maintainable.
In this guide (and upcoming ones), we will go through how to leverage Terraform effectively in your projects, from understanding the basics to implementing advanced practices that streamline your cloud infrastructure management. I am personally using Terraform for the FullStackHero .NET Starter Kit project too!
Installing Terraform
Let’s first get Terraform installed on your machine. Please follow the instructions over at this documentation to get it installed. I always prefer installing such tools using Chocolatey which has been a lifesaver.
If you are on Windows and want to go through the Chocolatey route, install Chocolatey by running the following commands with Administrator Privileges,
Set-ExecutionPolicy Bypass -Scope Process -Force; [System.Net.ServicePointManager]::SecurityProtocol = [System.Net.ServicePointManager]::SecurityProtocol -bor 3072; iex ((New-Object System.Net.WebClient).DownloadString('https://community.chocolatey.org/install.ps1'))Once Chocolatey is installed, let’s get Terraform installed,
choco install terraformYou can verify the installation by running terraform --version on the CLI.

At the time of writing this article, the latest stable version available is 1.9.5.
We will be primarily using Visual Studio Code Editor to work with Terraform, as it’s the best experience for writing such scripts. That said, ensure that you have the following extensions installed to improve your developer experience.
- HashiCorp Terraform
This will give add-ons like syntax highlighting, validation, and suggestions, making it way smoother to write terraform files.
Agenda
Since this is a beginner’s guide, we will keep the scope very limited, but go through the core concepts of terraform and everything you would want to know. We will just focus on Terraform providers, variables, outputs, the necessary CLI commands to deploy, plan, and destroy, and state management (local and cloud-based). Once these core topics are covered, we will write Terraform files that can deploy an S3 Bucket and an EC2 Instance. Nothing Fancy, just to the point.
In the next article, we will dive deeper and get a .NET 8 Web API deployed to an ECS instance, along with an RDS PostgreSQL database, and all the other networking components. But first, let’s learn the basics!
Terraform Providers
Terraform Providers are like Plugins that instruct Terraform to use a particular cloud provider like AWS, Azure, GCP, etc. Please not that Multi-Cloud Architecture is also definitely possible with Terraform. But for this guide, we will keep things simple.
For instance, if you need to deploy an AWS S3 Bucket, you need to use the AWS Terraform Provider for this purpose. The AWS Provider offers a set of resources that correspond to the AWS Resources such as ECS, VPN, and everything else. There are over 200 AWS Services available as of today.
First, create a providers.tf file, and add in the following.
terraform {  required_version = "~> 1.9.5"  required_providers {    aws = {      source  = "hashicorp/aws"      version = "~> 5.64.0"    }  }}
provider "aws" {  region = "us-east-1"  default_tags {    tags = {      Environment = "staging"      Owner       = "Mukesh Murugan"      Project     = "codewithmukesh"    }  }}
In the terraform block, we will define the required version and set it to 1.9.5, which is the current latest version of terraform. Next, we will define the version of the terraform aws provider which is 5.64.0, which again is the latest available version of the aws provider.
In the provider block, we will set the region to us-east-1 and mention some default tags that will be added to every resource we create. We will be adding tags such as Environment, Owner, and Project. This instructs Terraform to use AWS as the provider and deploy the resources to the us-east-1 region.
Writing Your First S3 Bucket on Terraform
Now that we have added the provider, let’s write our first resource, which is an AWS S3 Bucket. Create a buckets.tf and add the following.
resource "aws_s3_bucket" "codewithmukesh" { bucket = "codewithmukesh-bucket"}Let’s examine this simple piece of code.
The resource name in Terraform for S3 Bucket is “aws_s3_bucket”, and the identifier of this particular resource is “codewithmukesh”. Within this resource block, we can define the supported S3 Bucket properties such as name and other configurations. You can learn about the other supported properties for this resource by visiting this link.
So this is how you would add any resource. Here are the steps.
- You decide to create Resource A.
- You should be well aware of how to create Resource A on the cloud, manually, and every nuance related to it. This experience is mandatory.
- Navigate to Terraform Docs, and search for the resource you need under the appropriate provider, which in our case is AWS.
- Make modifications based on the documentation.
No Developer or DevOps Engineer would remember (or is expected to) every resource script. Rather, the documentation is to be always treated as the single point of truth, as they are subject to changes as new versions come by. Do not try to memorize terraform resources and syntaxes, just know how to adapt them from the documentation.
If you want to learn about writing SNS-related resources on Terraform, you simply search for it in the Terraform documentation, as simple as that.
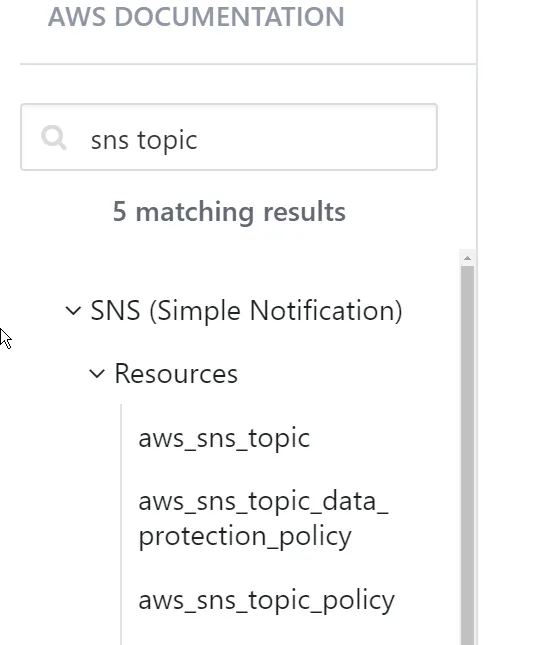
For instance, if I wanted to deploy an ECS Service via Terraform, I would refer to https://registry.terraform.io/providers/hashicorp/aws/latest/docs/resources/ecs_service.
Till now, we have written the terraform resource to get an AWS S3 Bucket deployed, but haven’t deployed it yet. Before that, we need to get familiar with Terraform CLI commands and Lifecycle.
Terraform Lifecycle & CLI Commands
Terraform follows a specific lifecycle for managing infrastructure as code. Here are the key steps and corresponding CLI commands:
terraform init
This command initializes the Terraform working directory. It downloads the necessary provider plugins, installs them locally, and prepares the project for further commands. Use this command first in a new project directory or after making changes to the provider or module configurations.
terraform plan
This command creates an execution plan, showing you what Terraform will do when you apply the changes. It compares the current state with your desired state (defined in .tf files) and lists the actions needed to reach the desired state. This is very crucial for analysis and debugging to an extent.
terraform apply
This command applies the planned changes to the infrastructure. Terraform will prompt you to approve the execution plan before proceeding with the actual changes. I tend to use terraform apply -auto-approve to skip the prompt. However, use this with caution.
terraform show
This command displays the current state or the details of the saved plan. It’s useful to review the changes after applying them.
terraform destroy
This command destroys the managed infrastructure defined in your Terraform files. It is used when you no longer need the resources.
terraform state
This set of commands is used for advanced state management tasks like moving resources, removing resources, or manipulating the state.
terraform fmt
This command formats your Terraform configuration files to a standard style.
terraform validate
This command checks whether the configuration files are syntactically valid and internally consistent.
terraform output
This command displays the values of output variables defined in the configuration. More about this in the next section.
Workflow
Thus, in a normal workflow, this is how you would get your resources deployed.
- Init the Terraform repository by running
terraform init. - Run a plan command to see what resources will be modified/added or deleted.
terraform plan. - Once you are satisfied with the results of the
plancommand, you would want to apply these changes to your actual infrastructure by running theterraform applycommand. - To destroy the resources, run the
terraform destroycommand.
Authenticate Terraform to Manage Resources in AWS
Now, there are multiple ways to ensure that Terraform is authenticated to manage the resources of AWS on your behalf. You can either modify the providers block to include the AWS Credentials (Secret Key & Access Key) or make use of the AWS CLI Profile to ensure that your development machine is authenticated.
- Via the Provider Block.
provider "aws" { region = "us-west-2" access_key = "my-access-key" secret_key = "my-secret-key"}Although this is a fairly simple approach, there are a lot of security concerns as you are now exposing the AWS Secret Key to the public. However, you can use this approach if you are just testing our things, and not necessarily pushing any of this code to a Version Control System like GitHub or GitLab.
- AWS CLI Profile
This is the recommended way to work with Terraform from your local machine. Simply configure your AWS CLI Profile with the secret key/access key and refer to the AWS Profile within the AWS Provider block in Terraform.
provider "aws" { region = "us-west-2" profile = "mukesh"}In the above scenario, I have configured an AWS CLI Profile named mukesh and referred to it under the provider block. This allows Terraform CLI to use the AWS Profile configuration and authenticate into AWS to manage resources.
You can read more about AWS CLI Profile Configuration from here.
Deploy S3 Bucket
Now that we have an idea about what the workflow would be like, let’s try to get our first S3 Bucket deployed.
- Let’s first initialize our Terraform script by running
terraform init.
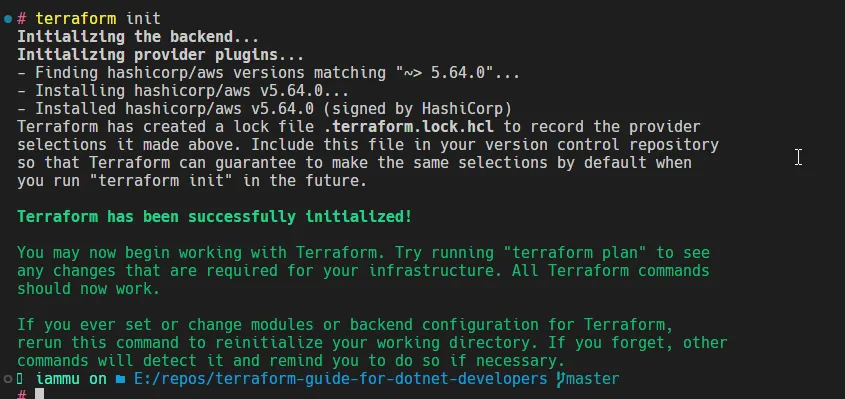
This will pull down the AWS Provider, and create some essential terraform files like lock and the state files.
- Next up, run the
terraform plancommand.

This would display the details of the changeset, as in, what would be added/modified or destroyed. In our case, it says that aws_s3_bucket.codewithmukesh will be created along with its internal properties.
The terraform plan command is used to create an execution plan, which is essentially a preview of the changes Terraform will make to your infrastructure. Terraform retrieves the current state of your infrastructure (from the state file or the actual infrastructure) and compares it to the desired state defined in the configuration files. Based on the comparison, Terraform determines the actions needed to align the current infrastructure with the desired state. These actions can include creating, updating, or deleting resources. terraform plan only generates the plan; it does not make any changes to the infrastructure. It simply shows you the proposed changes, allowing you to review them before applying.
- Once you are fine with the output of
terraform plan, run aterraform applyto apply your infrastructure changes. In the next prompt, type inyesto confirm the deployment. I usually useterraform apply -auto-approveto skip this confirmation prompt.

As you can see, the S3 Bucket has been provisioned. You can cross-check this on your AWS Management Console too!

Now that we have successfully deployed our first AWS Resource via Terraform, let’s learn about variables and outputs on Terraform.
Terraform Variables
Variables in Terraform allow you to make your configuration files more flexible and reusable. By using variables, you can parameterize values like resource names, region, or instance types. This way, you avoid hardcoding values and can easily modify configurations without changing the actual .tf files.
Types of Variables
Terraform supports different types of variables, such as:
- String: A single line of text.
- Number: Numeric values like integers or floats.
- Bool: Boolean values (
trueorfalse). - List: An ordered sequence of values (e.g.,
["a", "b", "c"]). - Map: A set of key-value pairs (e.g.,
{key1 = "value1", key2 = "value2"}).
Defining Variables
Variables are defined in a .tf file using the variable block. Let’s learn this by implementing it. Create a new file named variables.tf and add in the following.
variable "region" { description = "The AWS region to deploy resources in" type = string default = "us-east-1"}You can reference variables in your Terraform configuration using the syntax var.{variable_name}. In our case, the right place to use the region variable would be the providers.tf file, where we have hard-coded the region property to us-east-1. You can modify the provider block as follows.
provider "aws" { region = var.region default_tags { tags = { Environment = "staging" Owner = "Mukesh Murugan" Project = "codewithmukesh" } }}Setting Variables
There are multiple ways to set variable values:
- Default values: Define in the variable block, as we have done above.
- Command-line flags: Set using the -var option. This can be done by running
terraform apply -var="region=us-east-1". - Environment variables: Use a
TF_VAR_<variable_name>environment variable. Runexport TF_VAR_region="us-east-1". - Variable files: Use a .tfvars file to specify variables and use it at runtime by executing
terraform apply -var-file="variables.tfvars".
Using the Variable files is my go-to approach when working with huge Terraform Infrastructure Code.
Terraform Output
Outputs in Terraform are used to extract and display useful information from your configuration. They help you see key results after Terraform creates or updates your infrastructure, such as resource IDs, endpoints, or connection strings.
Defining Outputs
You define outputs using the output block in your configuration. For example, in our case, simply create a new output.tf file with the below code.
output "bucket_name" { description = "The name of the S3 bucket" value = aws_s3_bucket.my_bucket.id}Outputs are displayed soon after the terraform apply command is completed. Here is what shows up after I apply my Terraform changes.

You can also use the terraform output command to retrieve outputs at any time.
By leveraging variables and outputs, you can create more dynamic, reusable, and modular Terraform configurations. This enhances the maintainability and scalability of your infrastructure as code.
State Management
Terraform uses a state file to track the resources it manages. The state file stores metadata about your infrastructure and acts as a source of truth for Terraform. When you run commands like terraform plan or terraform apply, Terraform compares the real-world infrastructure to the state file to determine what changes are necessary.
You might have already noticed that there are additional files in your terraform directory like, terraform.tfstate, terraform.tfstate.backup, and so on.
Why is the State Important?
- Tracking Resources: Terraform needs the state file to map real resources to your configuration.
- Performance: Terraform uses the state file to efficiently calculate changes rather than querying every resource from the cloud provider.
- Collaboration: When working in teams, managing the state correctly is critical to ensure consistency across infrastructure changes.
Remote Backend with S3 & DynamoDB
By default, Terraform stores its state file locally. However, for production environments or team collaboration, storing state remotely in a backend is more reliable. One of the most common backends is Amazon S3. When you store the state in S3, it becomes shareable among team members and protected from accidental local deletions. The most common option is storing the state in Amazon S3, with DynamoDB used for state locking to prevent concurrent operations that could corrupt the state.
Setting Up a Remote Backend with S3 & DynamoDB
- Create an S3 Bucket
First, create an S3 bucket in AWS to store your Terraform state file. The bucket should be private and versioning should be enabled to allow for rollbacks in case of state corruption. I am going to manually create a new bucket named cwm-tfstates for this purpose.
- Create a DynamoDB Table for State Locking
To prevent multiple Terraform processes from modifying the state at the same time, we use DynamoDB for state locking. DynamoDB ensures that only one operation can run at a time, helping to avoid state corruption. I created a new DynamoDB table named cwm-state-locks with the partition key as LockID (string) using the Management Console. This table will handle locking, ensuring safe, concurrent use of the state.
- Resource Cleanup
Run a terraform destroy command that your resources are cleaned up, and delete the terraform.tfstate files.
- Configure the Backend in Terraform:
In your Terraform configuration, use the backend block to define the S3 bucket as your remote backend. Create a new file named main.tf and add in the following.
terraform { backend "s3" { bucket = "cwm-tfstates" key = "demo/beginners-guide/terraform.tfstate" region = "us-east-1" dynamodb_table = "cwm-state-locks" encrypt = true }}- The bucket attribute specifies the S3 bucket where the state file will be stored.
- The key attribute specifies the path and name of the state file inside the bucket.
- The region defines where the bucket and DynamoDB table are located.
- The dynamodb_table attribute ensures that state locking is handled by DynamoDB.
- The encrypt attribute ensures that the state file is encrypted at rest in S3.
- Initialize the Backend
After defining the backend in your configuration, you need to initialize Terraform to set up the remote backend. This can be done by running the terraform init command. But before that, run a terraform destroy command that your resources are cleaned up, and delete the terraform.tfstate files.

As you can see, our S3 Backend is now successfully configured along with the DynamoDB table. From now on, when you run a terraform plan or terraform apply, terraform will cross-check the state file present in the remote backend (s3 & dynamodb) to decide on how the resource has to be modified. With every terraform apply command, the state file available on S3 is updated.
Benefits of Remote State Management with S3 and DynamoDB
- Collaboration: Multiple team members can access and modify the state file without conflicts, thanks to the centralized storage in S3 and state locking in DynamoDB.
- Consistency: The state is stored in a reliable and secure remote location, reducing the chances of data loss or accidental deletions.
- Security: S3 allows you to enable encryption and versioning for your state file, while DynamoDB ensures safe state operations by locking the state during use.
- Auditing: Versioning in S3 enables rollbacks to previous states, making it easy to audit infrastructure changes and recover from issues.
This approach to state management is essential for production environments, where you need to ensure that your infrastructure is consistently managed and safe from concurrency issues. Using S3 and DynamoDB together creates a robust system for managing and locking your Terraform state.
Deploy EC2 Instance
Now that we have all the essential concepts clear, let’s have a small exercise to deploy a new EC2 instance via Terraform. Create a new file called ec2.tf and try to find out the required code from the terraform documentation.
You would have to add the following,
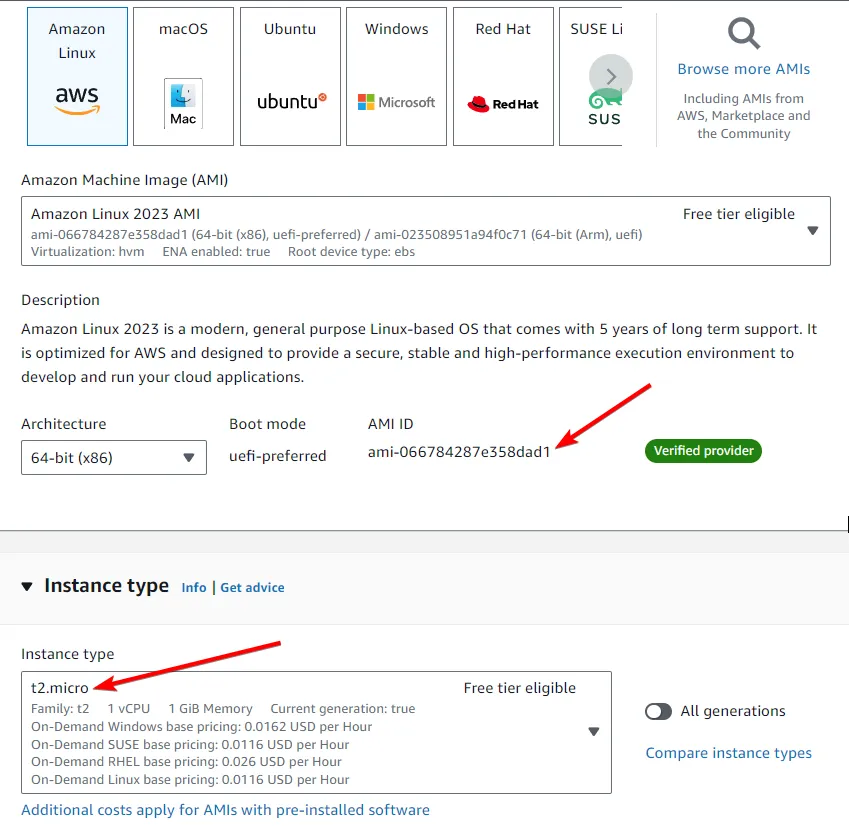
resource "aws_instance" "demo" { ami = "ami-066784287e358dad1" instance_type = "t3.micro"}You can find your required AMI and Instance Types directly from the AWS Management Console. To keep things simple and small, I have gone with the tiniest EC2 instance available in the free tier.
Try applying your terraform changes.
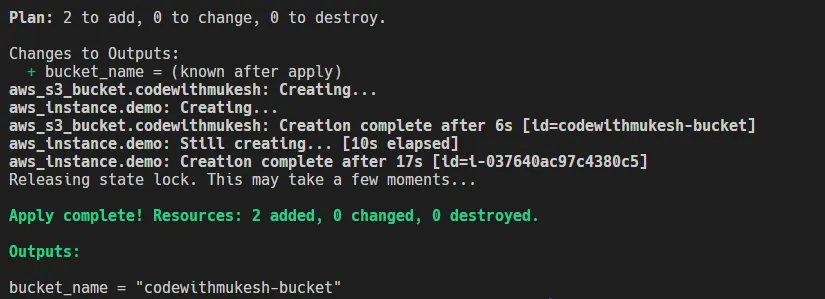
As you can see, both our S3 Bucket and the EC2 instance have been deployed.
Destroy Resources
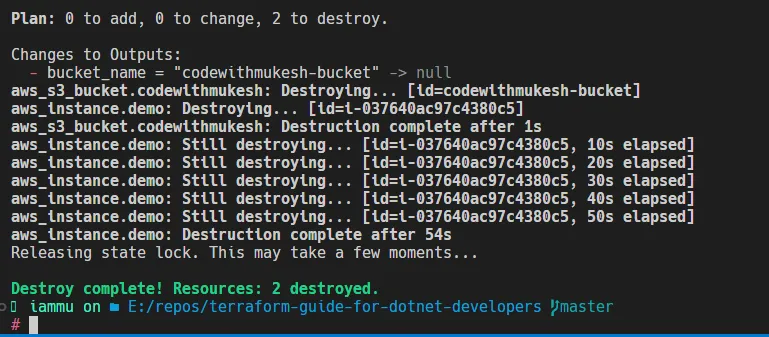
That’s a wrap for this article. To keep your AWS Bills under control, it’s recommended to destroy the resources you created for testing purposes. Run a terraform destroy to destroy all the resources created via terraform for the current state.
What’s Next?
Till now we have gone through the core concepts to build a working knowledge with Terraform. This is a must-have skill for developers who work with cloud infrastructure, and surely not limited to just DevOps engineers. In the next article, we will learn about Terraform Modularization, and deploy a complete .NET application to the ECS Fargate instance along with a PostgreSQL RDS instance with all the networking components, and maybe a SSL-protected domain too! I will be using the FullStackHero .NET Starter Kit Web API for the next demonstration. Do let me know if you have any suggestions or recommendations.

