In this article, we will get started with learning about using AWS Lambda with .NET 6 and deploying this serverless function to AWS. Further, we will discuss the use cases of AWS Lambda, Installing the extensions and CLI template to ease the creation of AWS Lambda C# projects, configuring the AWS CLI with credentials, and some basics of Cloudwatch Logging. This is the first article on the ” AWS Serverless Application with .NET 6 Series ”.
In a previous article, we discussed Working with AWS S3 using ASP.NET Core where we built a Web API that can manage the S3 Object. Read it here.
This article is sponsored by AWS. Huge thanks for helping me produce more .NET on AWS content!
You can find the entire source code of the implementation here.
Serverless Applications - What?
As you might have noticed, the new trend is to move existing applications into Serverless Architectures. Many companies are already in the process or have already migrated their applications. Serverless doesn’t actually mean that there are no servers involved, but the responsibility of managing the servers is taken up by the cloud providers, not you or your team. This means that we have to focus only on writing the code. You no longer have to worry about the infrastructure, scaling servers, provisioning, or configuring them.
This solution follows a pay-as-you-go model, meaning that you will be billed only for the time when your code is actually being used. Yep, you won’t be charged anything if your application is not actually being used or invoked. This is probably the biggest selling point of the Serverless concept. But there are a few catches to this as well. We will discuss this in the later section of this article.
Now, AWS provides a bunch of services like AWS Lambda, AWS API Gateways, DynamoDB, Athena, and so on that help you in building serverless applications. For this tutorial, we will start with AWS Lambda which is the building block of any AWS-related Serverless application! In the upcoming tutorials, we will explore the other Serverless Services provided by AWS.
Initially, Serverless was started off by AWS Lambda, but over time it also includes all of the other managed AWS Services as well like database, storage, messaging, and so on.
Here are the major reasons why you should consider serverless applications:
- Readily Available - Serverless applications have built-in availability and fault tolerance. You do not need to architect for these capabilities since the services running the application provide them by default
- Auto Scalers - Applications can be configured to automatically scale as and when required.
- Close to Zero Operational Management
- Minimized Cost - Follows a pay-as-you-go model.
Update: Checkout my YouTube video on Getting Started with AWS Lambda for .NET Developers - https://www.youtube.com/watch?v=WaZn_8_2RTQ

What is AWS Lambda?
AWS Lambda is a serverless compute service provided by AWS. It’s the basic building block of an AWS Serverless Application. It allows you to execute code without provisioning any servers. All you need to do is to write code in one of the languages supported by AWS. In the case of .NET, the currently supported Runtime is .NET 6.0. AWS has this policy to support up to the latest LTS version of a programming language, which in our case is .NET 6.
So, the idea is that you write your code into an AWS Lambda project in your preferred programming language. These are also called Lambda Functions, which will be deployed to AWS. AWS Lambda then runs your function when invoked and scales automatically when needed. Lambda Functions can be leveraged to integrate with numerous other AWS Services which is another added advantage. These functions can be invoked by API Gateways (we will cover this in a future article), or as a response to other AWS Services.
Lambda is best suited for shorter, event-driven workloads since Lambda functions run for up to 15 minutes per invocation.
Read more about AWS Lambda here.
This article assumes that you already have an AWS account registered. If not, feel free to search for “AWS Free Tier” and get your free account. This Tier gives you almost everything that you would need to test out the AWS Services.
Access Keys and Profiles - Local AWS CLI Setup
Before getting started with the implementation, make sure that you have an AWS Profile setup in your local machine. If not, you would have to install the AWS CLI on your machine. AWS Profile is a configuration file that is stored locally on your machine that contains the required Access Keys and Settings. It’s more or less like a Key Store.
Follow these steps to configure AWS to use your credentials in a secure fashion.
-
Install AWS CLI from here.
-
Login to your AWS Console and Navigate to IAM.
-
Create a new user and attach the Administrator Role to it. Read instructions here. Note that here I have just attached the S3 Permissions, but for this tutorial, you would need to add in the Administrator Role.
-
Once the user is created, you will be getting Access Key ID and Secret Key. Save this CSV to your machine.
-
Open up the terminal and type in the following
aws configure —profile aws-admin -
Note that you can name the profile as you wish. In my case, I named it aws-admin
-
Enter your details as required. Make sure to enter the region that is geographically close to you. In my case, it was ap-south-1

Note that you need this configuration for almost all kinds of development tasks you do on your machine related to AWS Services.
AWS Lambda with .NET 6
Now that everything is set up, let’s get started with Integrating AWS Lambda with .NET 6! Visual Studio doesn’t have the AWS project templates by default. There are 2 ways to install the required AWS Templates on your machine: via the Visual Studio Extension Toolkit, or via the Command Line Interface for .NET.
Let’s walk through both of them.
Installing the AWS Toolkit Extension for VS 2022
This is the Most User-Friendly way to do it. Open up Visual Studio 2022 and click on Continue without Code. Navigate to Extensions -> Manage Extensions. Here, search for AWS.
Install the AWS Toolkit For Visual Studio 2022. The IDE would prompt you to restart itself to complete the installation of the extension.
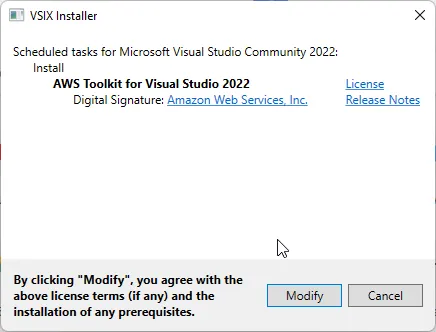
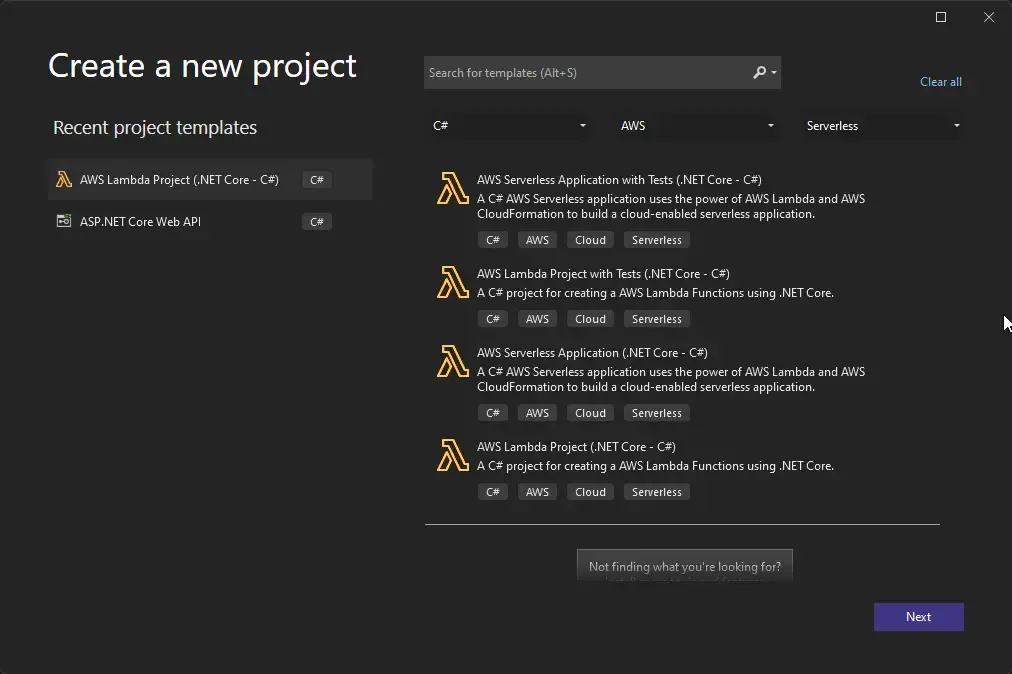
That’s it, Open up Visual Studio again and click on Create a new project. You can see the newly installed AWS Lambda Templates.
Close Visual Studio, let’s see how to install the templates for your dotnet CLI.
Installing the .NET CLI Templates for AWS
Simply run the following command on your terminal. But make sure .NET SDK tools are installed on your machine.
dotnet new -i Amazon.Lambda.TemplatesWith that command executed, you can now see a list of AWS Lambda Templates installed for you.
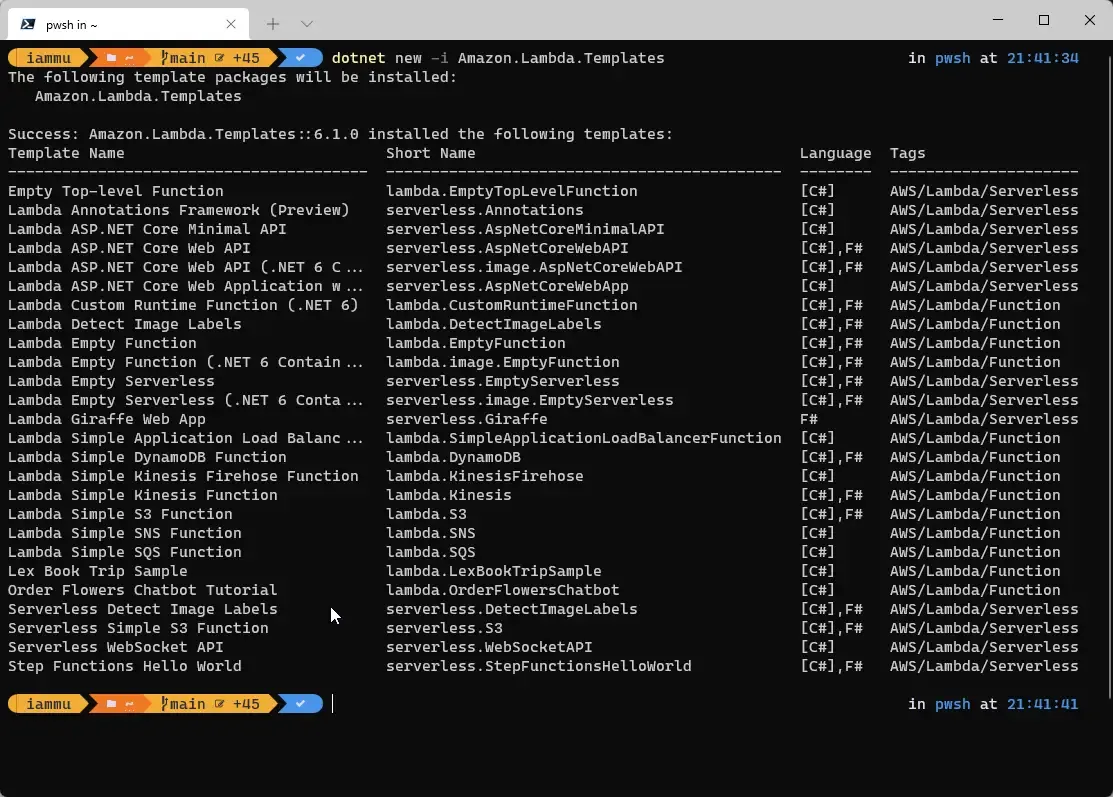
Read more about the .NET CLI Commands for AWS Lambda templates here.
Creating your First AWS Lambda with .NET 6
Now that we got an idea about AWS Lambda Templates, let’s create our first AWS Lambda Project in .NET 6. You can use both Visual Studio 2022 and the dotnet CLI to create the AWS Lambda Project. For this article, let’s primarily use Visual Studio 2022.
Using Visual Studio
Open up Visual Studio 2022, and click on Create New Project. Search for AWS Lambda, Select the below highlighted project type, and click Next.
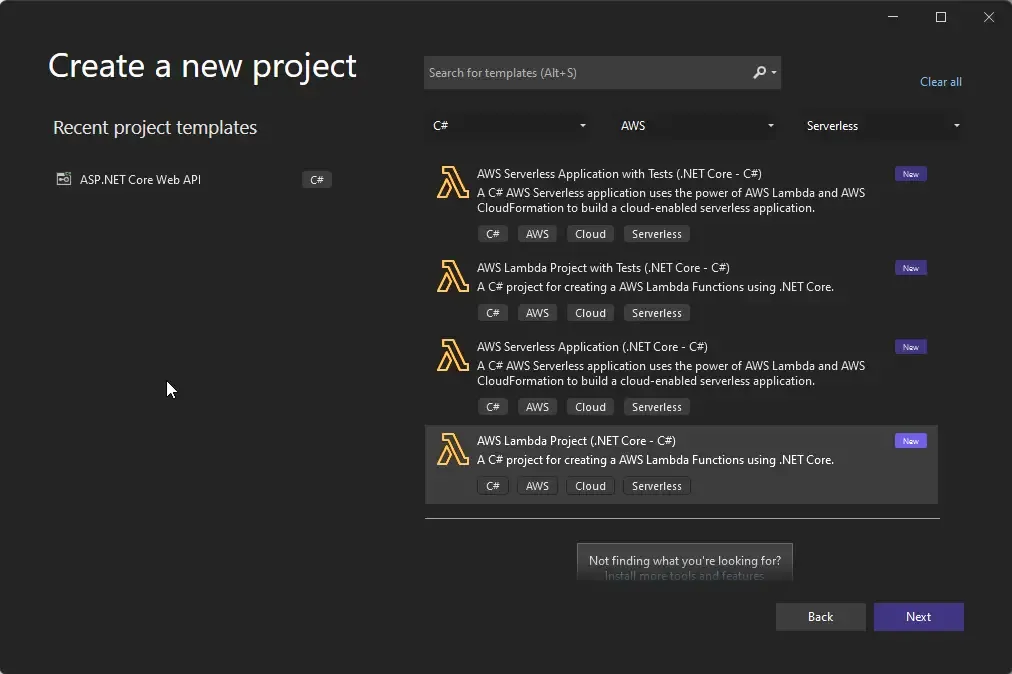
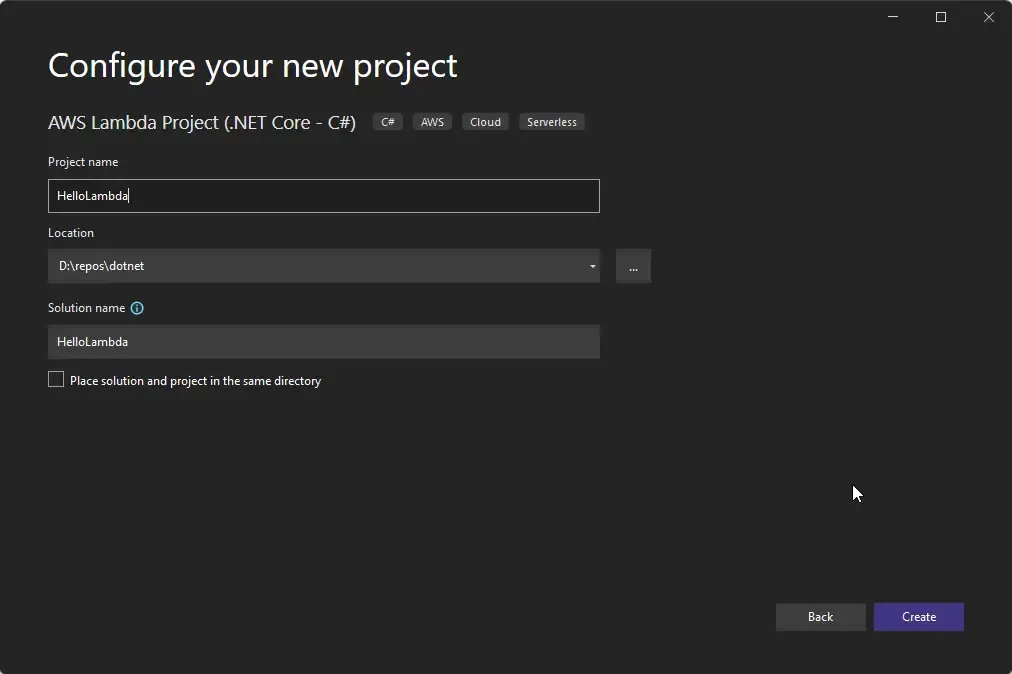
On the next screen, give an appropriate name to your project. I named mine ‘HelloLambda’
On the next screen, you will be prompted to select a Blueprint for your new C# AWS Lambda Function. For the sake of understanding, let’s proceed with an Empty Function. Click on Finish.
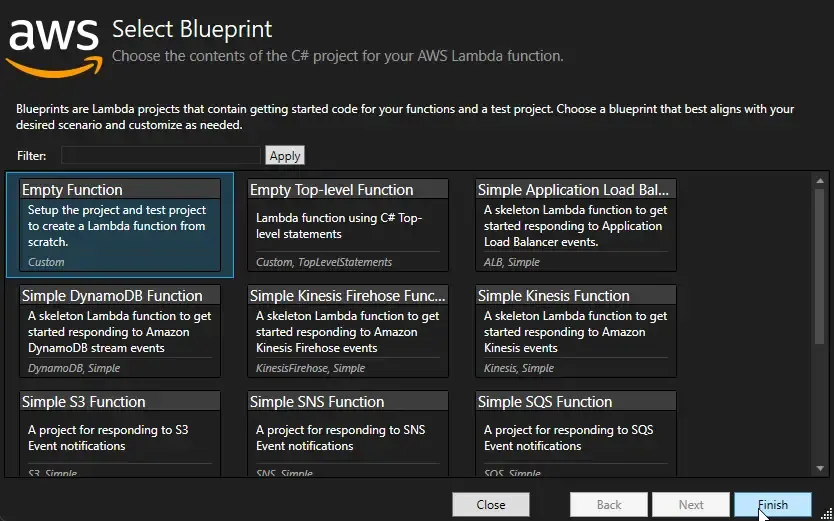
Using CLI Commands
You can also create Lambda projects via the CLI. The advantage here is that you can specify various parameters that are going to be stored in the configuration file of your project. For example, in the below screenshot I have added the profile name (the one that we already set up via the AWS CLI, Remember?). Moving forward, you would need your AWS Profile name handy.

AWS Lambda Project Structure & Files
Let’s go through the basic structure of the AWS Lambda Project. The major 2 components of this project is the configuration file and the actual function.
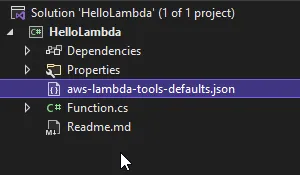
aws-lambda-tools-defaults.json contains details of the profile, preferred region, runtime (which in our case is .NET 6), and the location of the actual function code. Make sure to modify the profile property so that it matches the local AWS profile that we created earlier with AWS CLI.
To keep the naming clean while publishing to AWS, I have added another property to this JSON named function-name and set it to FirstLambda.
{ "Information": [ "This file provides default values for the deployment wizard inside Visual Studio and the AWS Lambda commands added to the .NET Core CLI.", "To learn more about the Lambda commands with the .NET Core CLI execute the following command at the command line in the project root directory.", "dotnet lambda help", "All the command line options for the Lambda command can be specified in this file." ], "profile": "aws-admin", "region": "ap-south-1", "configuration": "Release", "function-runtime": "dotnet6", "function-memory-size": 256, "function-timeout": 30, "function-handler": "HelloLambda::HelloLambda.Function::FunctionHandler", "function-name": "FirstLambda"}Now, coming to Function.cs, it’s just a simple method. The class Function has a method named FunctionHandler. As for the default code in this Function, it just takes in a string and returns it in Uppercase. Note that the name of the method is actually mentioned in the JSON file under function-handler. Without making any changes, let’s see how to debug the existing function locally on our machine via Visual Studio 2022.
How to Debug AWS Lambda Function - C#
First, install the Lambda test tool using the following CLI command.
dotnet tool install -g Amazon.Lambda.TestTool-6.0While creating the Project, the template also created a new Launch Profile for us. You can see this under Properties -> launchSettings.json. This profile is named Mock Lambda Test Tool. This helps you debug your Function code locally before deploying it to AWS.

Let’s run the project in Debug Mode using the newly created Launch Profile. Click on Mock Lambda Test Tool.

You can see that the Test Tool opens up at http://localhost:5050/. The port number is also configurable via launchSettings.json.
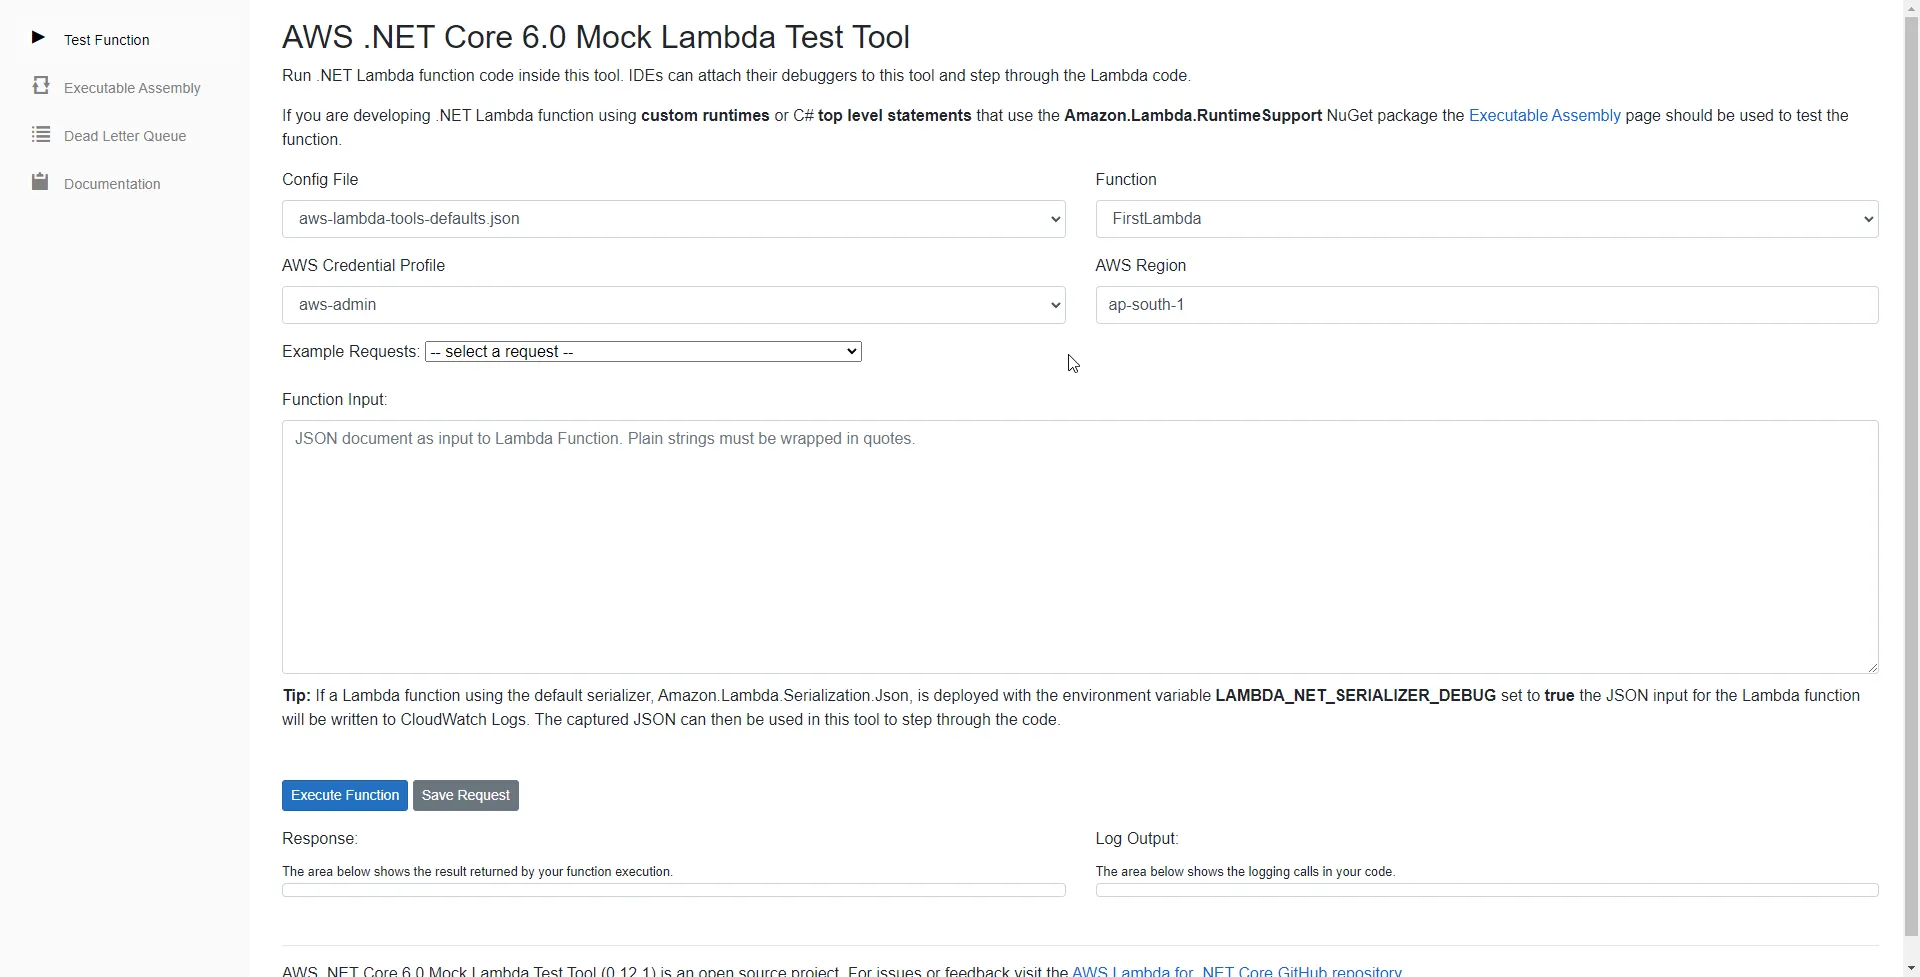
The important fields to note are the Config File, Function Name, Profile, and Region.
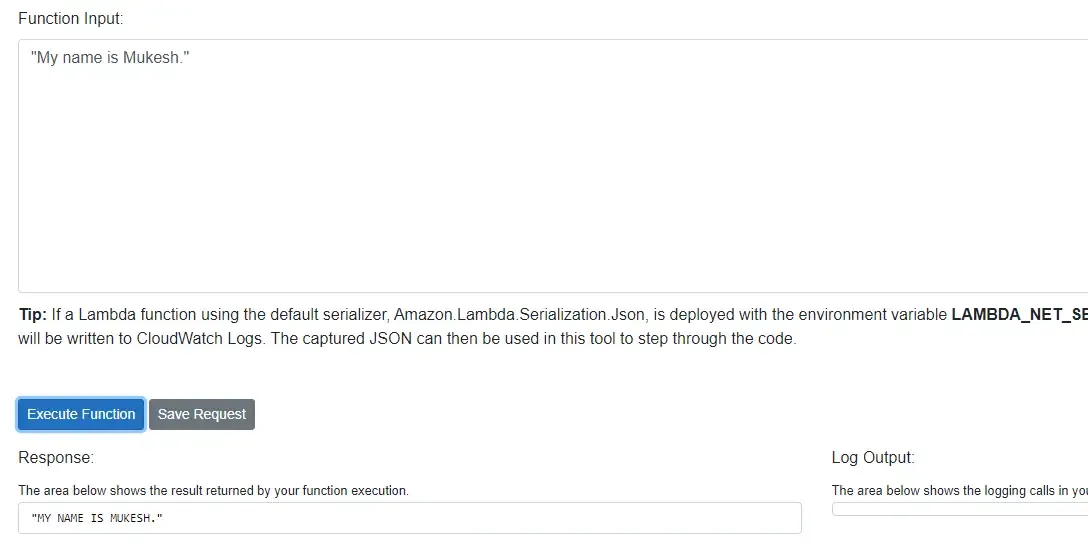
As for our testing, let’s write a simple string with double quotes into the Function Input. This is because our FunctionHandler expects a string as input. Now click on Execute Function. You can see that your string is now returned back in Uppercase in the Response section of the test tool.
Deploying the Lambda Function to AWS
For now, let’s not do any changes to the existing function which just converts the input string to Uppercase. Let’s try to deploy this function to AWS.
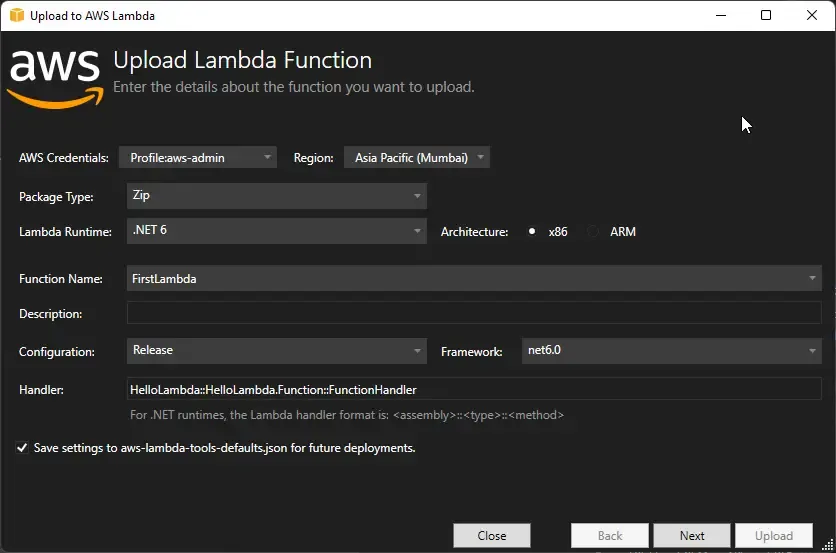
Right-click on your Project and click on Publish to AWS Lambda.
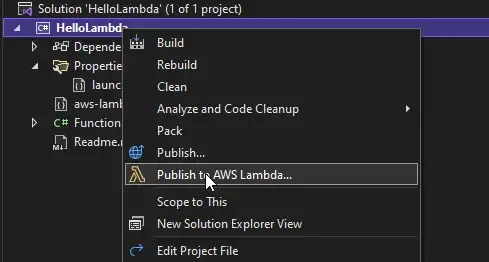
In the next dialog, make sure that you have selected the right AWS Credentials profile and Region. Click Next.
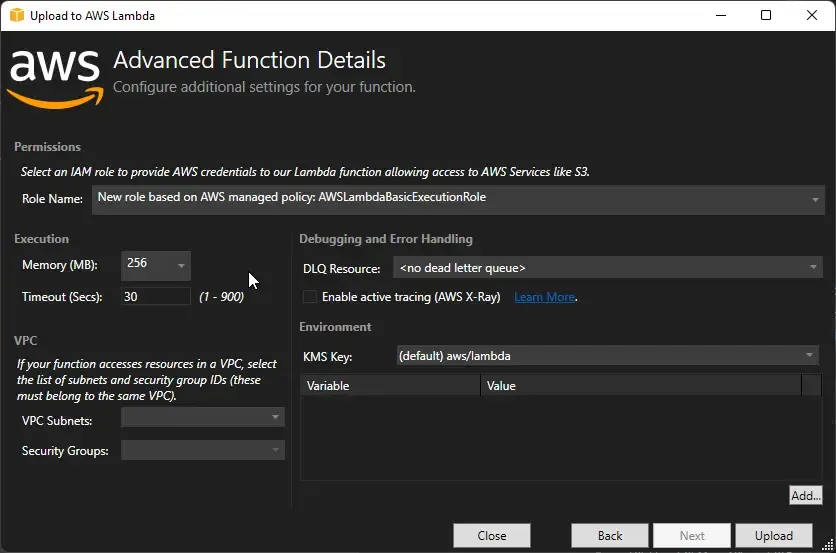
Here, Make sure you create a new Role by selecting AWSLambda Basic Execution Role. Keep everything else the same and hit upload.
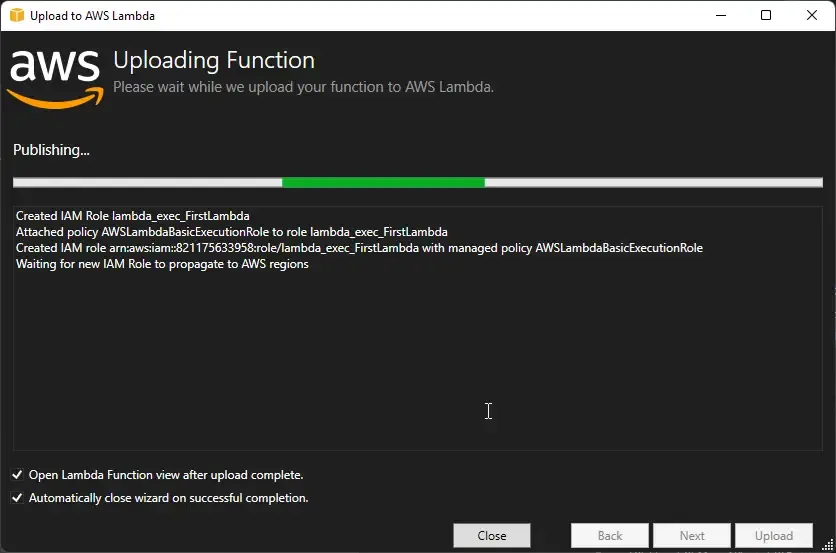
Visual Studio will start building your project and creating the required resources on AWS. It would take probably under 10 to 20 seconds to completely upload your Function to AWS Lambda. Make sure that you have both checkboxes selected. This would help in testing the uploaded function straight from Visual Studio 2022.
Testing
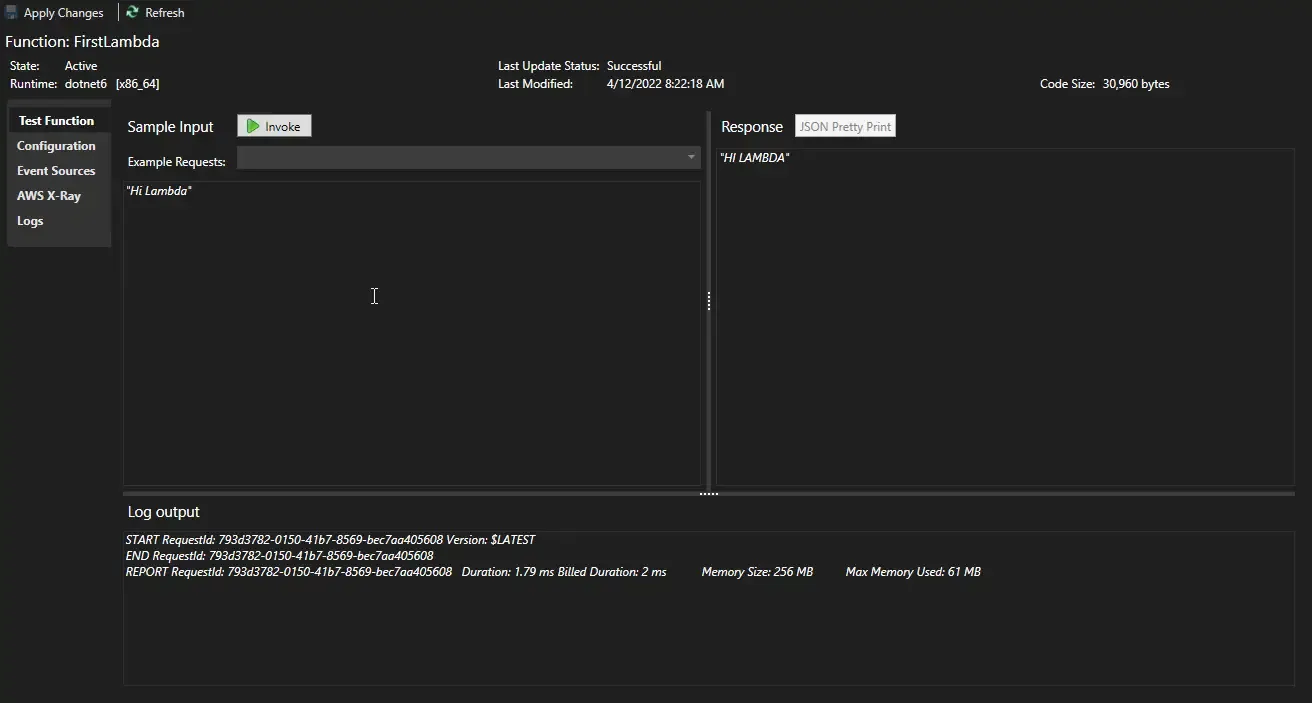
So, as soon as the upload to AWS Lambda is completed, Visual Studio will open up a tool to test your function. This would directly invoke the AWS Lambda from your local machine. In the below screenshot, I have entered my Input as “Hi Lambda”. Click on Invoke. You can see the Uppercase response from AWS Lambda.
Let’s log in to AWS Console and search for Lambda. In the AWS Lambda Homepage, you can see that our function count is 1 now. Click on it to open.
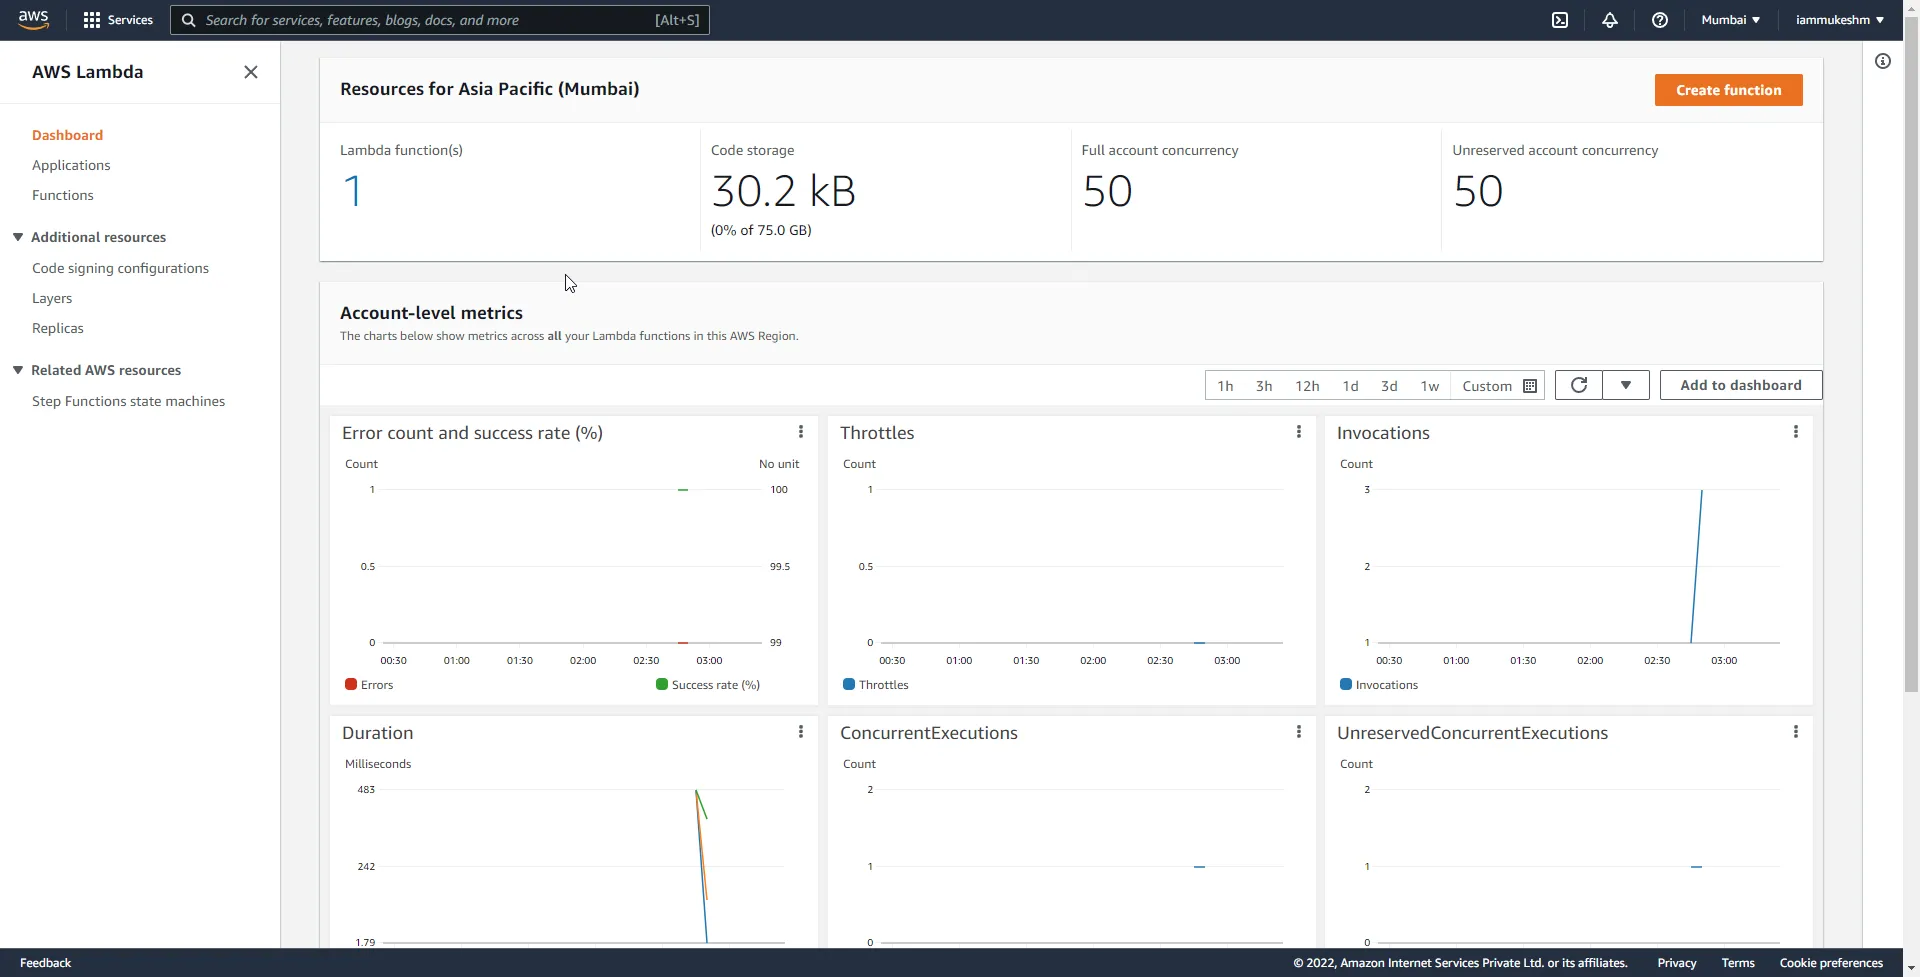
You can see that our .NET 6 Lambda is now available here. Open it up.

Here, under the Code tab, you can find some important details about the Lambda Function including the package size, Runtime details, and the Function Handler name.
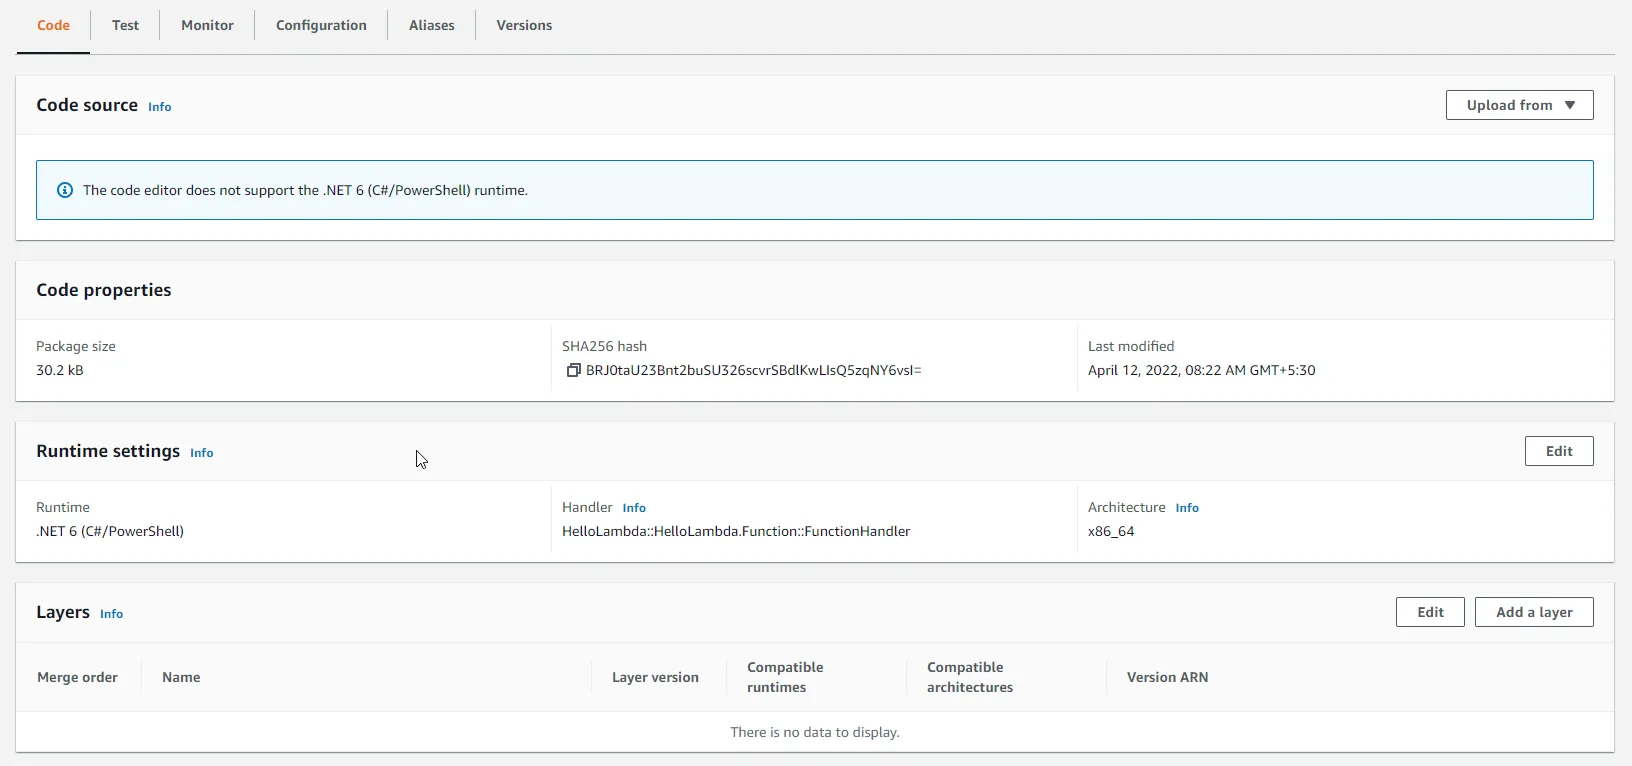
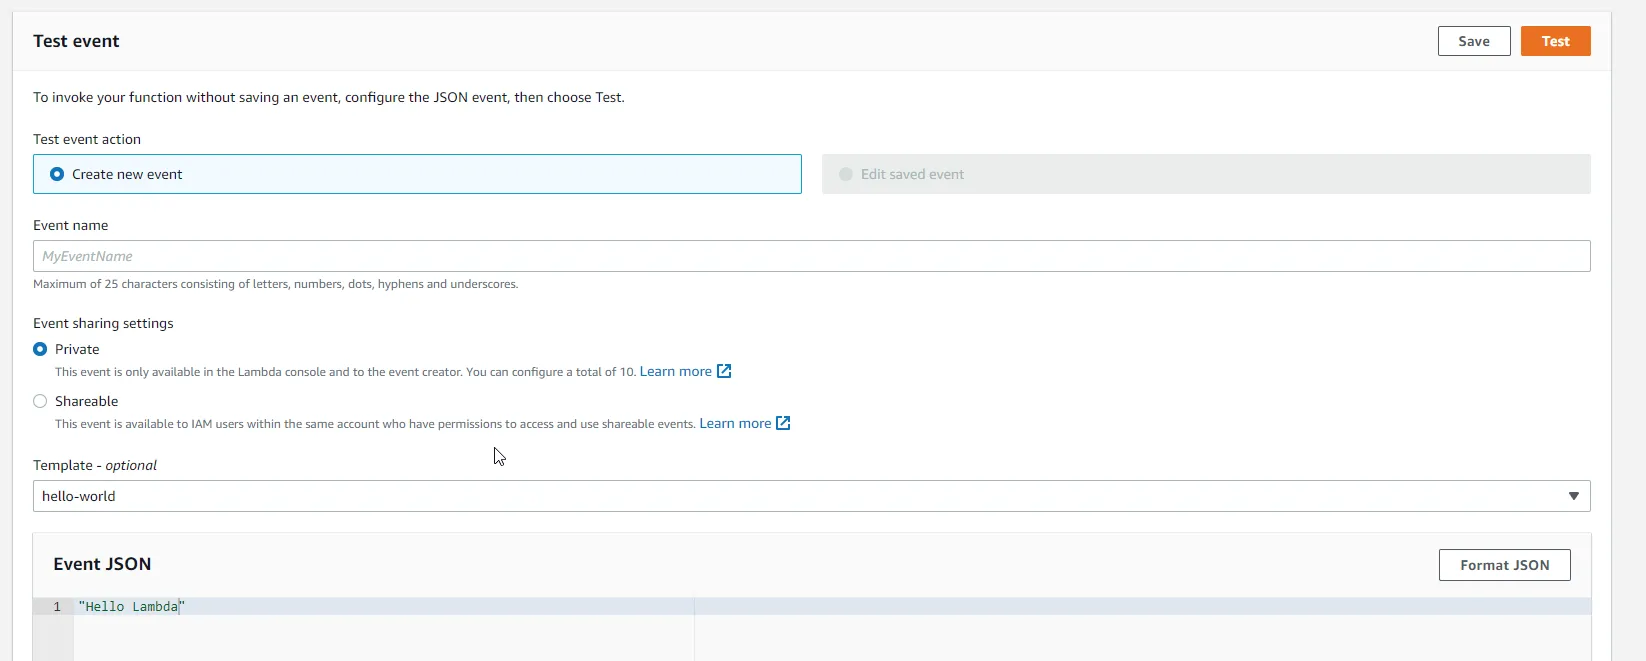
Switch to the Test Tab and under the event JSON, enter in a string and click on Test.
You can see that it returns the response as expected.
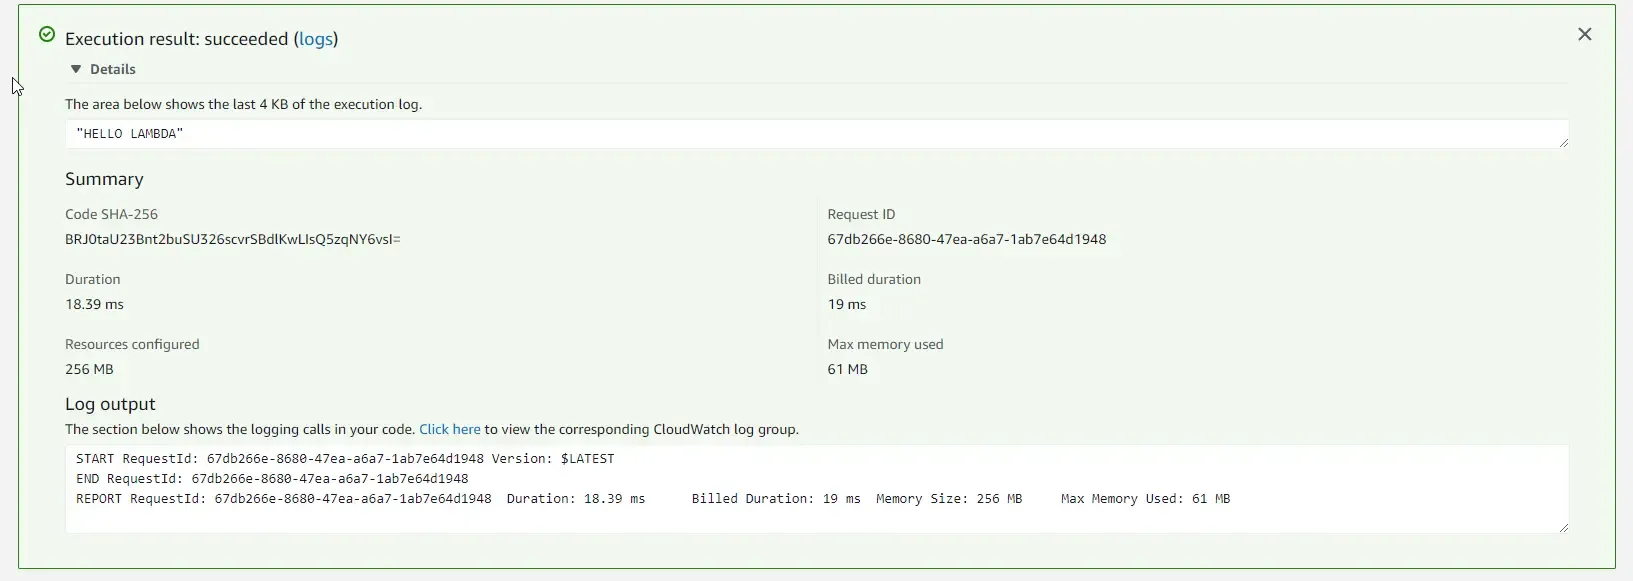
There you go, We have successfully uploaded our First C# AWS Lambda Function into AWS!
Re-Publishing the AWS Lambda Function (via Command Line)
Now, just for demonstration purposes, let’s do some minor tweaks to this Lambda Function code and re-publish it to AWS Lambda. But this time, we will be publishing the Function from the command line and not from Visual Studio 2022.
So, here is the dummy code I added. This time, the request body will be a class named CreateProductRequest where we pass in the Name and Description of the Product, which can be saved to the database (imaginary) and returns a new class along with Product ID.
public class Function{ /// <summary> /// A simple function that takes a string and does a ToUpper /// </summary> /// <param name="input"></param> /// <param name="context"></param> /// <returns></returns> public CreateProductResponse FunctionHandler(CreateProductRequest input, ILambdaContext context) { // Assume Product is Saved to DB var response = new CreateProductResponse(); response.ProductId = Guid.NewGuid().ToString(); response.Name = input.Name; response.Description = input.Description; return response; } public class CreateProductRequest { public string? Name { get; set; } public string? Description { get; set; } } public class CreateProductResponse { public string? ProductId { get; set; } public string? Name { get; set; } public string? Description { get; set; } }}That’s the small change we will make to our Lambda Function. Let’s now understand how to publish this Function to AWS Lambda using the CLI.
First up, make sure that you have the Lambda Tools installed on your machine. Run the following command on your terminal.
dotnet tool install -g Amazon.Lambda.ToolsNavigate to the folder where your .csproject file resides and open it up on your command terminal. In my case it’s D:\repos\dotnet\HelloLambda\HelloLambda.
Note that the .json file also has to be available in this directory so that the AWS Profile, Regions, and other properties could be accessed.
dotnet lambda deploy-function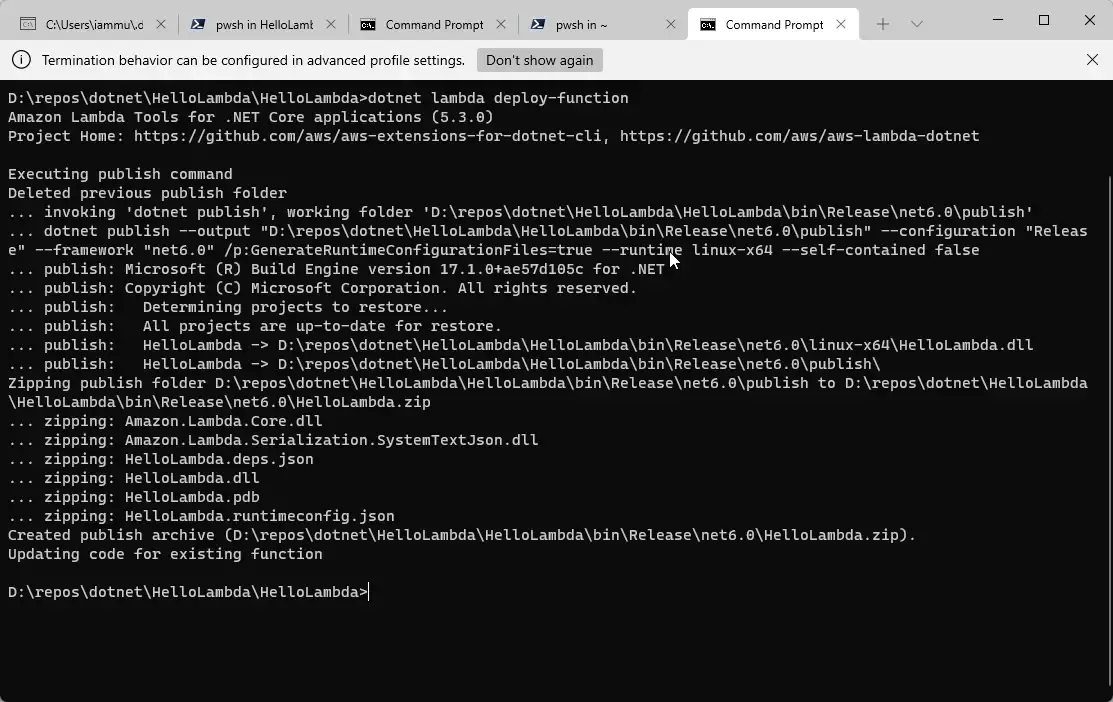
It would probably take almost 2 to 5 seconds to push this code into AWS Lambda. It also depends on how large your source is.
Next, open up AWS Console and Navigate to Lambda. You can see that our FirstLambda Function has been modified recently. This means that we successfully published the modified code to AWS Lamba via the CLI. Easy, right?

Cloudwatch Logging - Basics
Another important aspect of AWS Lamba is the logging mechanism. So, AWS Services have a dedicated Logging system known as Cloudwatch.
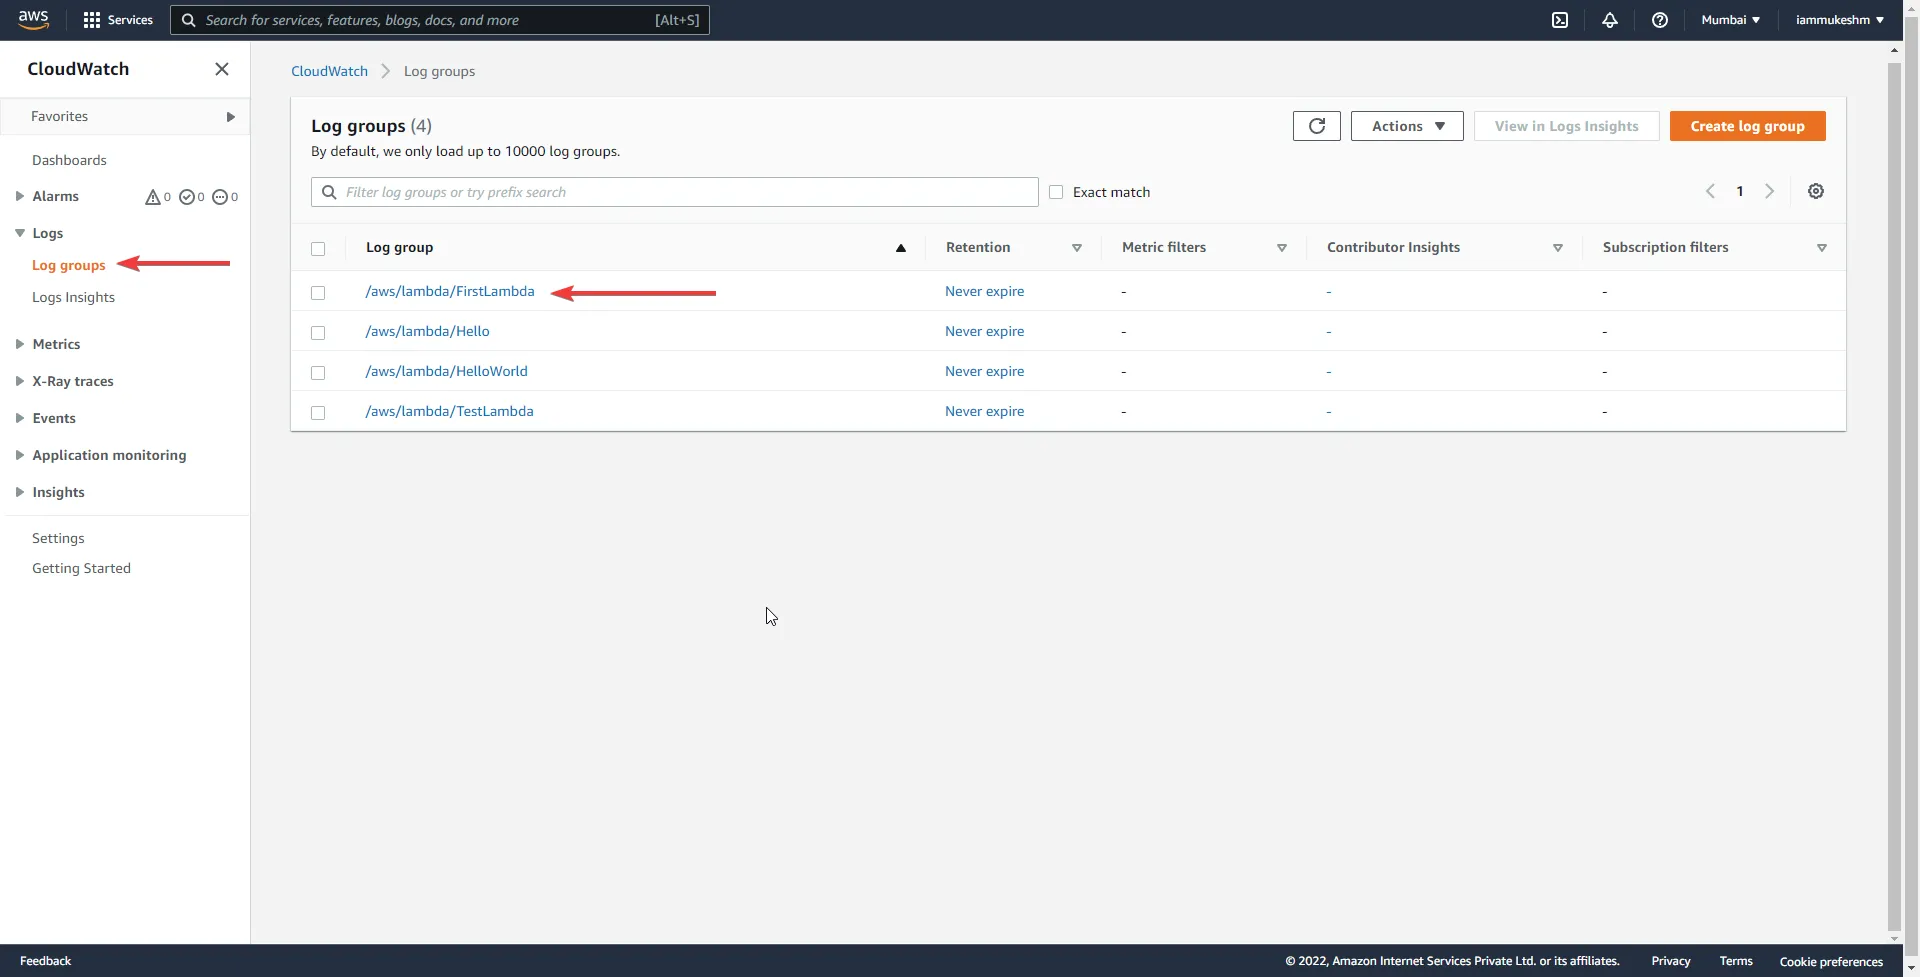
Navigate to AWS Console Home and Search for Cloudwatch. Open it up and click on Log Groups. Each of your AWS Service Logs would show up here.
In my case, I was testing around with a few Lambda functions for this article. FirstLambda is our current function.

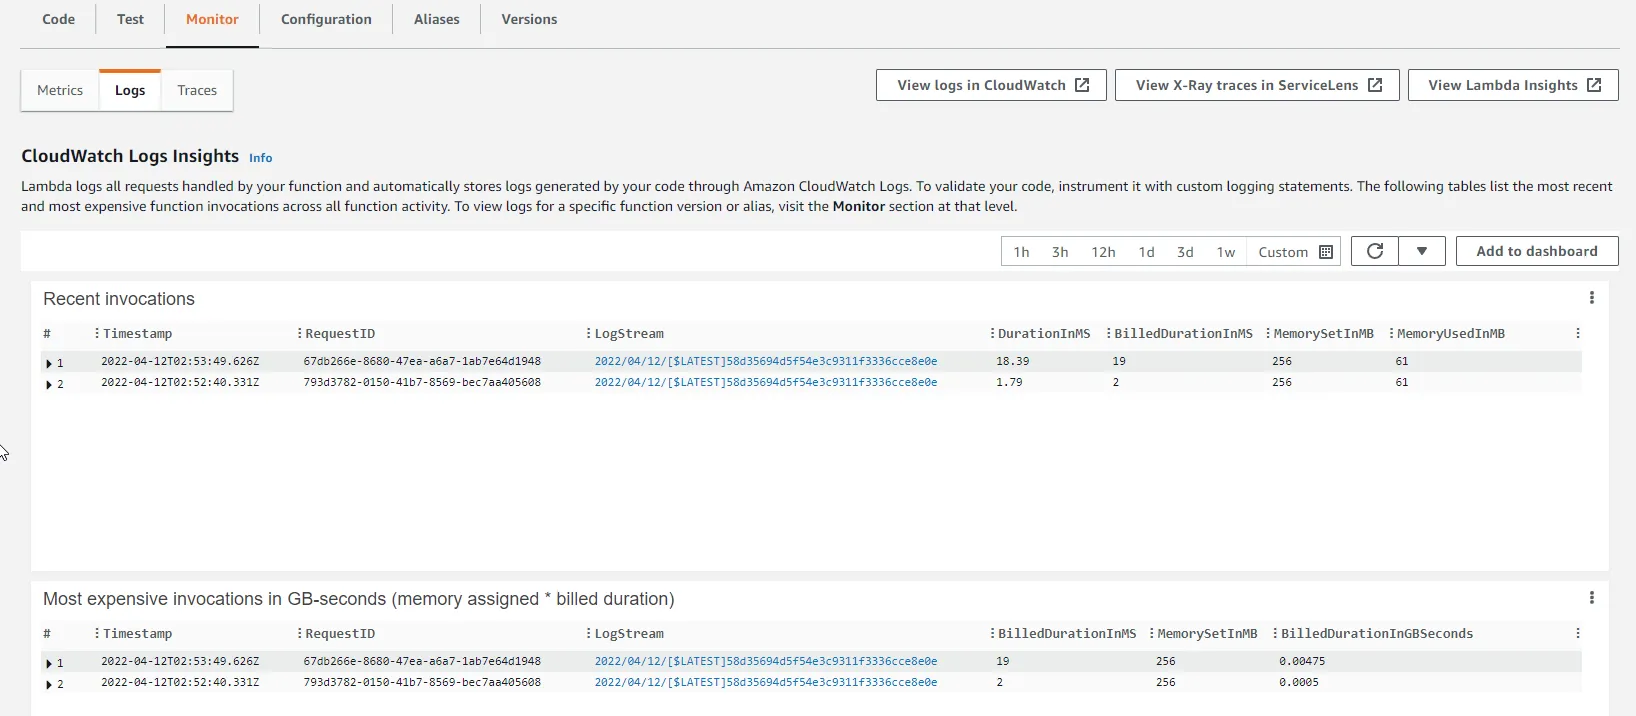
You can also see the Lambda Logs straight from the AWS Lambda Dashboard. Simply select the Lambda function and click on Monitor. In the next Tab, select Logs, all your Cloudwatch Logs would be populated here.
Final Testing
Now that our Function was published to AWS Lambda, let’s retest it.
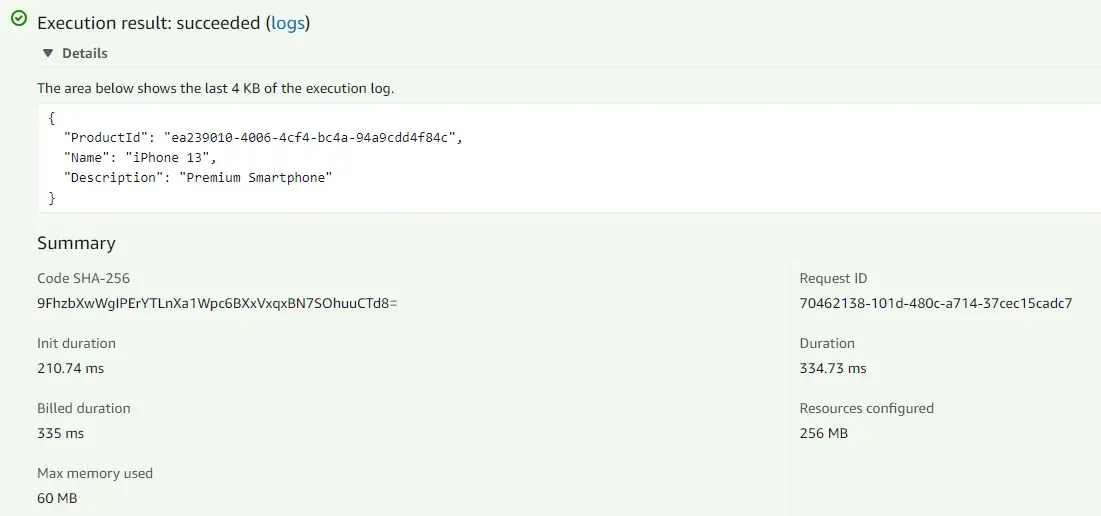
Open up the Lambda Function on AWS Lambda and switch to the Test Tab. Below is my sample request. Run the Test.
{ "Name": "iPhone 13", "Description": "Premium Smartphone"}As expected, here is our response from AWS Lambda Function along with the generated Product Id!
When to Use AWS Lambda?
AWS Lambda is often a better choice compared to spinning up a whole EC2 instance that is always running. As mentioned earlier, AWS Lambda doesn’t need you to manage any servers and runs only when required. AWS Lambda is best for running functions that don’t have an execution time of more than 10-15 minutes. So basically almost all the use cases can be handled with AWS Lambda. Note that scaling is automated here. The FREE tier of AWS allows you to use up to 1 Million AWS Lambda Requests and up to 400,000 Gbs of computing time, which is more than enough unless your app’s traffic blows up.
A few examples of Real-Life use cases of AWS Lambda is to build a function that can convert/ optimize images as soon as they are uploaded to AWS S3. So, S3 can trigger AWS Lambda functions since it’s event-driven. Running CRON jobs is also another good use case of AWS Lambda.
When to Not Use AWS Lambda?
Each Lambda Function can only run for 15 Minutes (Reference). Thus, executing long-running functions (> 15 mins compute time) with Millions of records may not be a good idea with AWS Lambda. Significant waiting time per function may also increase your monthly bills. So, keep it simple and neat with the AWS Lambda function.
That’s all for this Article. In the next article, we will learn about Amazon API Gateway in AWS, where we will build and expose API endpoints that can send in requests to these Lambda Functions. Imagine a CRUD Functionality where we have the standard Read Write Operations. In that case, there will be separate Lambda Functions for each of the CRUD operations, which all will be ultimately tied together with the help of API Gateways. And that’s a standard example of a Serverless Application in AWS. Let’s save the rest for the next upcoming AWS Article.
Update: Read the next article on Amazon API Gateway with .NET here.
Summary
In this article, the first of the “AWS Lambda with .NET 6” Series, we learned about the basics of Serverless Applications in AWS and in general, all about Lambda Functions, Installing the Visual Studio Templates for AWS Lambda, Testing the Lambda Functions locally, Publishing them to AWS Lambda and so much more!
Do share this article with your colleagues and dev circles if you found this interesting. You can find the source code of the project here. Thanks!


