In this article, we are going to be deploying ASP.NET Core Web API to AWS Elastic Beanstalk using AWS CodePipeline. In the process, we will learn the basics of AWS Codepipeline, AWS CodeBuild, and AWS Elastic Beanstalk. This article is going to be a bit different from the other ‘Deploy .NET to AWS’ we had gone through earlier, as this will also get you started with CI/CD Pipelines on AWS! In previous articles, we have seen various other ways to deploy ASP.NET Core Applications to the AWS Infrastructure using Lambdas and ECS Tasks.
First up, we will try to understand what each of the above-mentioned AWS Services is designated to do and how they work.
You can find the source code of this implementation here.
What’s AWS Elastic Beanstalk?
AWS Elastic Beanstalk is an easy-to-use service for deploying and scaling web applications and services developed with .NET, Python, and other technologies. This would be as simple as uploading your code and the Elastic Beanstalk service automatically handles the deployment, load balancing, autoscaling, health monitoring of your application and so much more! This eradicates the complexity of provisioning and managing the cloud infrastructure. More time to code, thanks to the PAAS feature! This way we can concentrate more on the code, rather than how it’s hosted or managed. So, this is the service that will be responsible for running our .NET 6 Web API on the cloud in this article.
Here are some key concepts of the AWS Elastic Beanstalk:
- Application: The actual published version of the application.
- Environment: The environment needed for the application to run.
- Environment Configuration: Parameters entered while creating the environment. This can be updated on the go, including the basic Environment variables of the application.
Note that we will be adding an extra file to our .NET WebAPI project to get the AWS Elastic Beanstalk up and running.
Pricing: There is NO additional pricing for this service since it helps us ease the process of provisioning other services. You will be only charged for the services that are provisioned by your AWS Elastic Beanstalk environment, like EC2 instances or any related database services.
For details, visit https://aws.amazon.com/elasticbeanstalk/
What’s AWS CodePipeline?
CD or Continuous Deployment in the AWS Cloud is made possible with the AWS Code pipeline, which is a fully managed continuous delivery service that helps automate release pipelines for faster and more reliable applications and infrastructure updates. This is super important if you need to automate the code release process from local development to the production environment.
Continuous delivery is a software development practice where code changes are automatically built, tested, and prepared for a release to production. AWS FAQs
With this awesome service, you can model the full release cycle of your application, ie, building the code, running the test cases to catch bugs within the pipeline, deploying to Customer Testing Environments, and releasing it to production. AWS Codepipeline can build, test and deploy your application according to the defined workflow seamlessly. By enabling this, you can increase the speed and quality of your software updates by running all new changes through a consistent set of quality checks.
We will learn about the scope of our implementation in the next sections.
Pricing: AWS Free Tier offers one free active pipeline every month. Beyond that, each new pipeline is charged USD 1.00 per active pipeline per month. Note that you will be only charged only if the pipeline has existed for more than 30 days and has at least one code change that ran through it. Basically, it’s another super affordable service from AWS!
For details, visit https://aws.amazon.com/codepipeline/
What’s AWS CodeBuild?
This is yet another service of AWS to cater to the Continuous Integrations needs of the Software Development process. AWS Codebuild is a fully managed continuous integration service that can compile/build source code, run tests and publish production-ready software artifacts. This eliminates the need for you to have separate servers running for compiling, testing, and publishing software packages that are ready to be deployed.
You will just have to specify the location of your source code and configure the build settings in form of a YAML file ( which we will be looking into in the article as well), and the CodeBuild service would execute the build scripts for compiling, testing and packaging your code.
That said, this is a very integral part of the entire CodePipeline and the CI/CD process. Read more about this service here - https://aws.amazon.com/codebuild/
Understanding CI/CD with AWS
Now that we had a quick glance at each of the mentioned AWS services, let’s see how we will be deploying our sample ASP.NET Core Web API to AWS Elastic Beanstalk using AWS CodePipeline with Continuous Delivery.
- We will be creating a sample ASP.NET Core Web API application in our Development Environment (Visual Studio 2022), making some very minor changes/additions, and pushing the code to a GitHub Repository.
- From here, AWS takes it over. We will first ensure that we have a new AWS Elastic Beanstalk Application and Environment ready which is waiting to serve our web API.
- Once the AWS Elastic Beanstalk is configured, we create a new AWS CodePipeline, where we would have to mention the following configurations.
- Source -> which is our GitHub repository. We will have to give permission to AWS to read from our personal GitHub repository.
- Create a new AWS CodeBuild Project which will have the environment ( .NET 6 ) to build our application. This particular step would be responsible for pulling the source code from Github, building it using the .NET 6 runtime, and packaging our Web API to executable DLLs (or whatever is mentioned in the buildspec file that we will be adding)
- Finally, choose where to deploy the published application to. Here we will be selecting the previously created AWS Elastic Beanstalk Application & Environment.
If things go well, you should be already having your application deployed to the cloud with a publicly accessible endpoint!
Here is a diagram representing the above-mentioned flow.
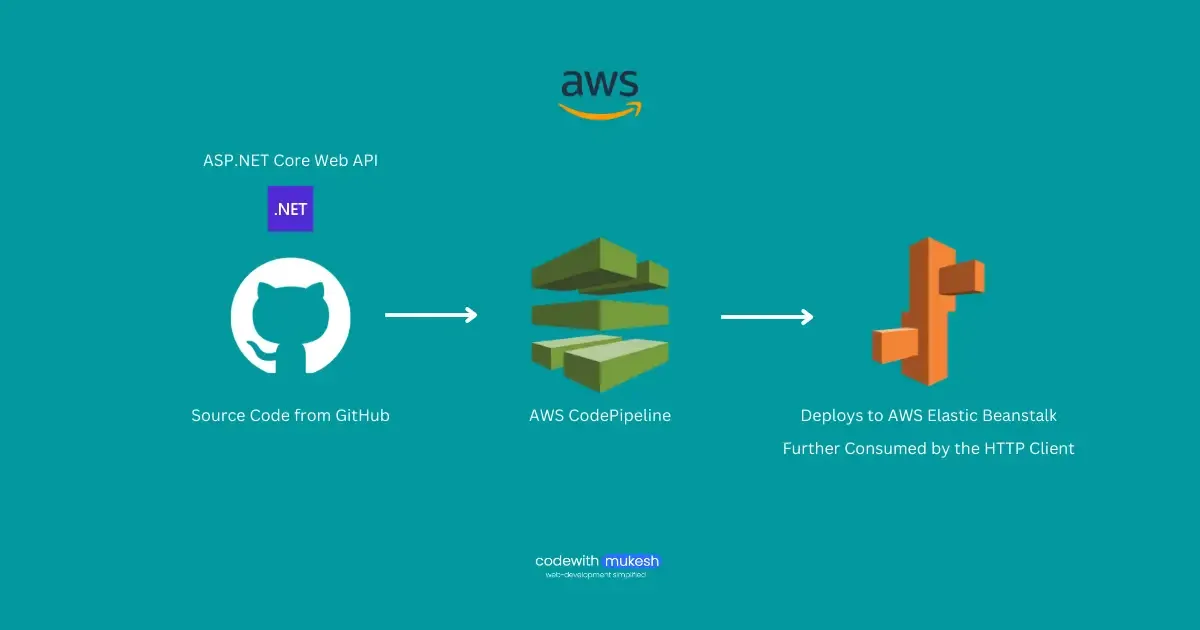
The idea is that every time there is a new code push to our GitHub repository ( to a particular branch, usually the main/master), the above configured AWS CodePipeline would be triggered automatically and the new ASP.NET Core WebAPI with the newer changes would be deployed into the AWS Elastic Beanstalk! This pipeline can be improvised in various other ways too, like maybe if you want to containerize your application into docker images and push it to ECR / DockerHub, that too can be done easily. For now, let’s keep things simple and understand the process.
Let’s start coding!
Prerequisites
- AWS Account - Free Tier is enough
- Visual Studio or your favorite IDE
- .NET 6.0+ SDK installed on your machine
- GitHub Account
Deploying ASP.NET Core Web API to AWS Elastic Beanstalk using AWS CodePipeline
As mentioned earlier, we will be using Visual Studio Community 2022 for our development process. Open it up and create a new project with the ASP.NET Core Web API template. I am naming the project and solution as AWSCodePipelineDemo.
Creating a sample ASP.NET Core WebAPI 6.0

In the next step, ensure that you are selecting .NET 6 as the target framework since it’s the latest long-term support variant. We will also keep the default Open API support for later testing of the application once it’s deployed.

Once Visual Studio creates a default ASP.NET Core Web API for you, there are a couple of minor changes that we will have to. Firstly, at the root of the solution ( not the project), create 2 new files named buildspec.yml and Procfile.
Here are the contents of the buildspec.yml file.
version: 0.2phases: install: runtime-versions: dotnet: 6.0 pre_build: commands: - dotnet restore AWSCodePipelineDemo/AWSCodePipelineDemo.csproj build: commands: - dotnet build AWSCodePipelineDemo/AWSCodePipelineDemo.csproj post_build: commands: - dotnet publish -c Release -o ./app/ AWSCodePipelineDemo/AWSCodePipelineDemo.csprojartifacts: files: - '**/*'Let’s understand this. Firstly, why this file? where will it be used?
So, as mentioned earlier, these are the set of build and publish instructions that will be read by the AWS CodeBuild project in order to build and publish DLLs that can be deployed to our AWS Elastic Beanstalk. Since YAML is very sensitive to indentation, make sure you get the spaces and tabs right on spot.
Basically, these sets of instructions have 4 Phases.
- Install, where the runtime will be set up. Here we are using .NET 6.0
- Prebuild commands - This is usually where the .NET restore commands would go. Here we are trying to restore the NuGet packages related to our project. Also, be careful about the location of the csproj file.
- Build Command - The normal dotnet build command.
- Post Build - You can add the publish command here, as well as any test commands if you have some unit test projects ready. Note that here, we are publishing the application in Release mode to the app folder of the root directory.
Finally, the artifacts will point to the root directory. Whatever is available in the artifact-specified directory will be available for use by the next stage, which is the AWS Elastic Beanstalk.
Next, create another file named Procfile, without any file extension, and copy over the below content.
web: dotnet ./app/AWSCodePipelineDemo.dllThis particular file is used by AWS Elastic Beanstalk to determine the entry point of the application when there are multiple DLLs present at the root of the application source bundle. It’s recommended to always include the Procfile at the root of the application. In our case, AWSCodePipelineDemo.dll will be the entry point to the application. And, app is the folder to which the code build will publish the dlls. You can also notice this is the build step of our buildspec.yml file.
Apart from this, I have also added one line of code to the Program.cs that maps a simple message to the root endpoint of the Web API. Open up your Program.cs and add this line above the app.Run();
app.MapGet("/", () => "Hello World!");This would simply print out a Hello World message once the root endpoint of the API is invoked.
Pushing to GitHub
After adding the required files and changes, let’s push this code to a brand new GitHub repository. Since I have already configured my Visual Studio to be integrated into my personal GitHub account, I just right-click my Solution and select Create Git Repository. I have made it a public repository and pushed the code.

You can check out my git repository here.
Now that the required application code is pushed to the GitHub Repository at the master branch, let’s navigate to AWS Management Console to get started with the pipelines.
Creating an AWS ElasticBeanstalk Environment & Application
Log into your AWS account and navigate to AWS Elastic Beanstalk. Here, click on Create Application. Here, just give a nice name for your web application.

Make sure to select the below platforms and branches. I have chosen .NET Core on the Linux Platform. This will be used to set up the environment of our new AWS Elastic Beanstalk application.

That’s it. This will take almost 5 minutes to complete provisioning the required resources, ie, the EC2 instance, load balancers, auto scalers, security groups, and other essential resources.
After the provisioning is completed, you will be getting a URL. Here is where your ASP.NET Core Web API would be available once we have completed the entire process. For now, if you open this URL there will be a sample application running on the server.

Here is what you will be seeing by default once you access the provided URL.

Apart from this, just for the purpose of understanding how AWS Elastic Beanstalk works, check out its logs. You can clearly see each of the resources being created. You can navigate to each of these services individually too for cross-checking.

Creating an AWS Codepipeline - Step by Step
Now that we have our Elastic Beanstalk application up and running, let’s create the Pipeline that will be able to deploy the published DLLs to the Beanstalk environment.
Open up AWS CodePipeline. Here, click on Create Pipeline. Here, give a nice name for your new pipeline. Leave all other settings to default and click next.

Next comes the interesting part where we connect to GitHub and link our repository to the pipeline. Make sure to select GitHub version 2. Next, click on Connect to GitHub (if you are doing this for the first time). You will have to give permission to AWS to access your GitHub profile.

You will get a prompt from GitHub to allow access. For now, I have given access to all repositories. You can choose specific repositories as well.

Once connected, you will get to see a list of repositories under your GitHub account. Select our newly created repository which holds the .NET 6 Web API code. Select the default branch, which is the master.
More importantly, ensure that you have selected the ‘Start the pipeline on source code change’. This makes sure that whenever there is a code change pushed to the master branch of your repository, the pipeline will be re-triggered! Click Next.

Next, is where we define the build stage of the pipeline. Here, select the provider as AWS CodeBuild. Create a new AWS CodeBuild project by clicking Create Project.

There will be a new popup for creating a new build project. Give it a name.

Under the environment configuration, select Ubuntu, Runtime as standard, and Image as standard 6.0 which is the latest one.

Under the Buildspec configuration, select use a buildspec file. Also, you get an option to directly add the yml command into the AWS CodeBuild. This will be handy for debugging purposes for larger applications. But, if you want to maintain the buildspec.yml file within the source control, it’s always better to use a buildspec file. Since we have already added the file to our repository, let’s select it and mention the name/location of our buildspec file, which is ./buildspec.yml

Leave the remaining as the default, and create ‘continue to pipeline’. This would create a new CodeBuild project, close the popup and load the newly created project details into the code pipeline setup.

As you can see, the project name is loaded. That’s it. Click on Next.

Next comes the deploy stage. Here, select the provider as Elastic Beanstalk. There are other options as well like ECS and stuff. We will explore them in another article. For now, let’s select Beanstalk as it’s a far simpler way of deployment. Make sure to select the app and environment that we had already created in the first step.

Done, click on next. You will be presented with a Review Page. Mainly ensure that the repository, branches, and your beanstalk applications are selected properly and click next.


Exploring the AWS CodePipeline
As soon as you had clicked Create Pipeline, you will be redirected to the new pipeline. Here, before anything, let’s go through what all this has. First thing is, this pipeline has 3 different stages
- Source - Fetch code from GitHub
- Build - Build & Publish the application using the instructions from buildspec.yml
- Deploy - Deploys the published application to the selected AWS ElasticBeanstalk.
Failures in any of the stages would block the next stage from execution. You can experiment with this by purposely introducing a compile time error in your .NET application. It would potentially fail the Build Stage and stop the Deploy stage from getting executed. As of now, since our application is pretty simple, the entire pipeline would be completed in a matter of 2 minutes or so.

Our Pipeline is green! When the Deploy stage is green, it means that our application should be already live at the ElasticBeanstalk URL that we had seen earlier. Let’s open up AWS ElasticBeanstalk

Click on the URL.

There you go, everything is working as expected!

Try to navigate to the Swagger page at /swagger. It would probably throw a 404 exception. This can be understood if you read through the Program.cs code. Swagger is by default only available in the Development Environment. So, how do we set the Environment variable in this AWS Elastic BeanStalk?
Setting Environment Variable in AWS Elastic Beanstalk
The requirement is to set the ASPNETCORE_ENVIRONMENT variable for the AWS Elastic Beanstalk Environment as Development. This will give us access to Swagger.

Navigate to the environment, and select Configuration. Here, click on the Edit Action beside the Software category.
Scroll to the Environment properties, and add the new key-value pair here.
ASPNETCORE_ENVIRONMENT : Development

Once added, click on Apply. This would validate the configurations and update the Environment, which would take around 30 seconds to complete.

With that done, navigate to your app url, /swagger. You can now see the Swagger UI visible!

Try to test your weather API in this. It should work as expected.
As the last step to this, let’s push a new code change to Github and check how our CodePipeline reacts to it. Let’s do a simple change. I changed the Hello World! message to Hello World v2! and pushed the code to the GitHub repository.
There you go! The pipeline is under process.

So, what to understand is, every time there is a new code push to the repository, specifically to the master branch, the linked pipeline will be triggered. This will internally create a new Pipeline execution ID, which will be flown through each of the pipeline stages.
Apart from this, if you click on the below-highlighted URL under the source stage, you will be taken to the GitHub Repository’s commit which triggered the current Pipeline execution.

Once the execution is completed, you should be able to use the updated version of the ASP.NET Core Web API! Let’s test.

That’s how easy it can be to set up your own nice CI/CD Pipeline. Add some test projects to this mix, you will have an almost production-like Pipeline for your Software Delivery process. Interesting, right? That’s it for this article.
Summary
In this article, we got introduced to 3 AWS Services, which are the AWS CodePipeline, AWS CodeBuild, and AWS Elastic Beanstalk. We learned about Deploying ASP.NET Core Web API to AWS Elastic Beanstalk using AWS CodePipeline in a very streamlined process. We have created a Pipeline that can automate our code releases into production-ready deployments in a matter of seconds using AWS CodePipeline.
You can find the source code of this implementation here. Make sure to share this article with your colleagues if it helped you! Helps me get more eyes on my blog as well. Thanks!
Stay Tuned. Do share this article with your colleagues and dev circles if you found this interesting. Thanks!

What's your take?
Push back, share a war story, or ask the obvious question someone else is wondering. I read every comment.