In this article, we will go through a less-talked about topic in the ASP.NET Core Community. We will discuss in detail, Globalization and Localization in ASP.NET Core Application and go through various approaches on changing the Culture of the Application via Request. We will also do some advanced configuration where we store the Selected Language Information to the Cookie in the client browser. You can see the complete source code of this implementation on my Github.
While starting to build an ASP.NET Core application, or any other application, There are few considerations to take care of. One of them is, “Will our Application be Multi-Lingual?”. According to me, it is highly important to make your application Multi-Lingual, if you are not able to anticipate the future of your application. Down the line, there can be an instance where you have already completed the application, but suddenly it needs to be multilingual as well. Trust me, you do not want to be in that place.
To be on the safer side, it’s good to build your applicaiton with multi-language support right from the beginning, yeah?
What we’ll Learn?
In brief, here are the topics that we will cover in this article.
- Basics of Globalization & Localization
- Building a MultiLingual ASP.NET Core Application (Web-API and MVC)
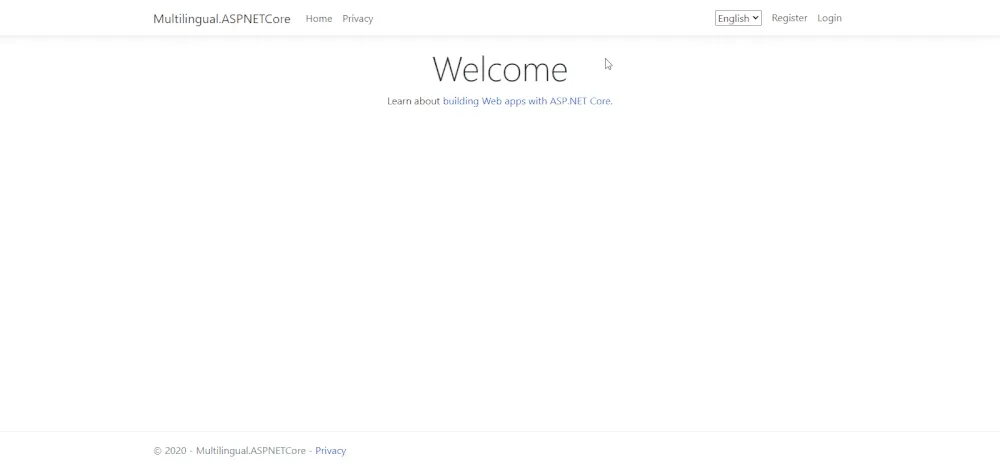
Here is a small demo of what we will build.
What is Globalization?
Globalization is a process by which develoeprs make a product supported in multiple languages. This mostly involves improving the backend of web applications, which ultimately contributes to the SEO of the website. This includes meta-data, file names, labels and even the website URLs.
What is Localization?
Localization is the process to transalate the content to fulfil the demands of a particular culture / language. This does not limit to just transalting the texts, but also numbers, date and time formats, currency , symbols and so on.
Read the Official Documentation from Microsoft here.
Building a Multi-Lingual ASP.NET Core Application
We will build an ASP.NET Core MVC Application and try to implement Localization to it. I wil be using Visual Studio 2019 as my IDE. So in this application, for better demonstration of the implementation, we will work with both Views and API Controllers. In the Views, we will localize the Content of the UI and in the API part, let’s work on the messages thrown by the API.
We will be working with Resource files to store the transalations for various languages. Let’s create a new ASP.NET Core 3.1 MVC Application.
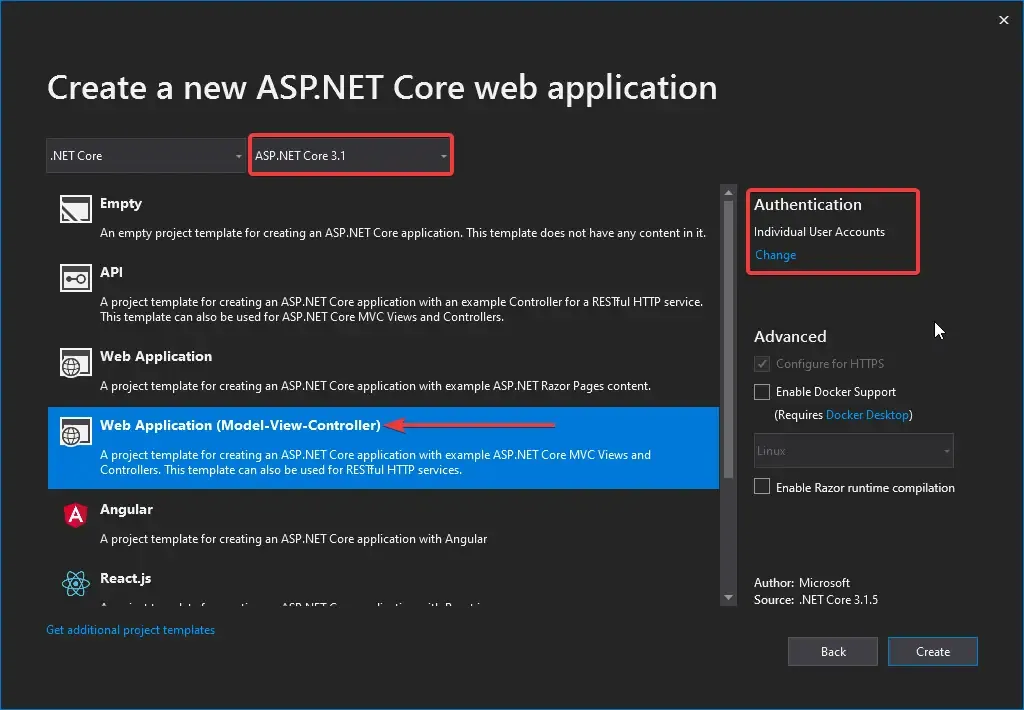
PS, Selecting Authentication is Optional.
Registering the Required Services and Middleware
Let’s register the Service required for Localization in our ASP.NET Core Applicaiton. Navigate to Startup.cs/ConfigureServices method.
services.AddLocalization(options => options.ResourcesPath = "Resources");services.AddMvc() .AddViewLocalization(Microsoft.AspNetCore.Mvc.Razor.LanguageViewLocationExpanderFormat.Suffix) .AddDataAnnotationsLocalization();Now, let’s add the Localization Middleware to the HTTP Pipeline. Navigate to Configure Method of Startup.cs and add in the following.
var cultures = new List<CultureInfo> { new CultureInfo("en"), new CultureInfo("fr")};app.UseRequestLocalization(options => { options.DefaultRequestCulture = new Microsoft.AspNetCore.Localization.RequestCulture("en"); options.SupportedCultures = cultures; options.SupportedUICultures = cultures;});Line 1 - Here, we specify the Cultures that our Application will support. For now, it supports English and French. You could make it more specific by adding something like “en-US” and “fr-FR”. In this line we define a collection of supported cultures for later use.
Line 5 - Everytime your Application get’s a request, How will the application know which culture to use? Here is where we define it.
Line 6 - If the request contains no culture information or cultures that we don’t yet support, the user will be served with English Resources.
Line 7 - This will indicate how we format numbers, currencies etc.
Line 8 - Used when we retrieve resources.
Localizing the API Endpoint.
Once we have registered the required services and middlewares, let’s try to use Localization in an API endpoint. In this section, we will create a Random API endpoioint that generates a GUID with a message, and try to switch languages between English and French. We will also go through 2 of the 3 ways to switch locales for the incoming request.
Create a New Folder in the Controllers and name it API. Here, add a new Empty API Controller and name it LanguageController.
using Microsoft.AspNetCore.Mvc;using Microsoft.Extensions.Localization;using System;using System.Threading.Tasks;namespace Multilingual.ASPNETCore.Controllers.API{ [Route("api/[controller]")] [ApiController] public class LanguageController : ControllerBase { private readonly IStringLocalizer<LanguageController> _localizer; public LanguageController(IStringLocalizer<LanguageController> localizer) { _localizer = localizer; } [HttpGet] public async Task<IActionResult> Get() { var guid = Guid.NewGuid(); return Ok(_localizer["RandomGUID", guid.ToString()].Value); } }}Line 11 - IStringLocalizer is used to generate Localized String based on the key. Here we are going to inject this Service to the constructor of the Controller.
Line 19 - Random GUID Generation.
Line 20 - We use the Localizer Object to get the appropriate message that has a Key “RandomGUID” in our Resource File. You can see that we are also passing the GUID to the object. But we have not yet created a Resource File right?
Resource File Naming and Folder Convention.
This is one of the cleaner approaches by Microsoft. Ideally Resources for each View/API Controller/Models has to seperated with a smiliar folder structure.
In our case, the Language Controller is located at Controllers/API/LanguageController.cs. Remeber the Resource Folder we created in the beginning? Here is where you would place the Resources. Create a similar folder structure within the Resource Folder.
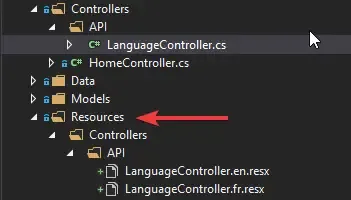
Understand the convention? We need resources for the Language Controller, hence we split the LanguageController to both en and fr resource files having corresponding resources.
RandomGUID is the key that we specified in the API Controller right? Let’s add values to this particular key in both of the Resource Files.

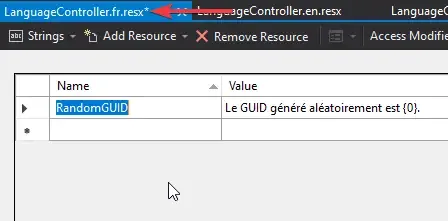
Get the point, yeah? This seems a cleaner way to seperate resources based on the Folder Structure. What’s your opinion about this?
Now, let’s build and run our application. I will use postman to test this endpoint, as I will change certain Request Headers too.
First, send a GET request to localhost:xxx/api/language.
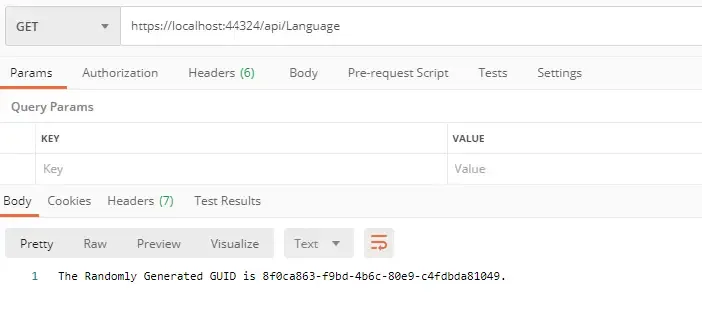
You can see that our implementation works right out of the box. As we mentioned earlier, if the request doesnt have information about the requested culture, the response would revert back to our default culture, that is, English. Now, let’s try to request with the fr culture. There are 3 ways to do this.
- Specify the Culture in the Request Query String.
- Specify the Culture in Request Header,
- and store the preference culture in a cookie.
In this section, we will cover the first 2 ways to request for a particular culture.
Query String Based Culture Request
As you might have already guessed, in this approach we will just need to append a specific query to our request. Switch back to Postman and send a GET request to localhost:xxxx/api/Language**?culture=fr**
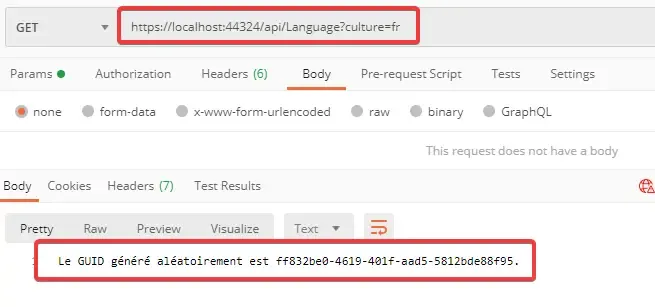
Easy, yeah? Like we talked about earlier let’s change the culture to ‘ar’ an check the response.
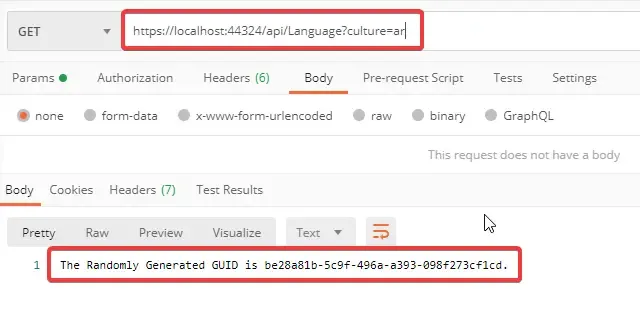
As expected, we get a response with our default selected Culture, English.
Request Header Based Culture Request
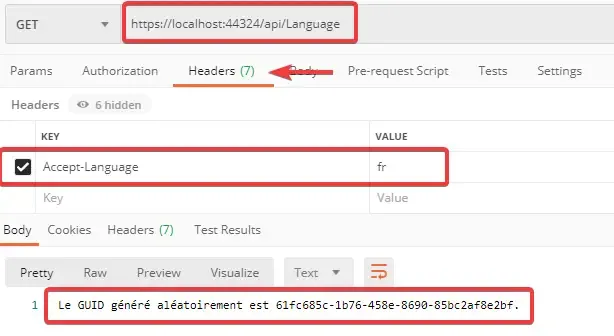
Now, let’s add the culture info to the header of the request. It’s quite simple to do in POSTMAN. Click on the Headers and add the key “Accept-Language” and change the value to ‘fr’. You can receive the expected response.
Now that we learnt how to localize API response, let’s implement the same in the Views too. Although the concept is same, there are slight variations that we will go through.
Localizing the Views
In this section, I will localize the HomePage View (Views/Home/Index.cshtml). To keep things simple, let’s just implement this feature to transalte the Welcome and caption texts of this view.

Navigate to Views/Home/Index.cshtml and modify the following.
@inject Microsoft.AspNetCore.Mvc.Localization.IViewLocalizer localizer@{    ViewData["Title"] = "Home Page";}
<div class="text-center">    <h1 class="display-4">@localizer["Welcome"]</h1>    <p>@localizer["LearnMore"]</p></div>
Line 1 - Previously for the controller we use a String Localizer. But here in the views, inorder to support HTMLs too, we use this IViewLocalizer Interface.
Line 7,8 - Like before, we use the localizer object and specify the key of the resource we need.
Finally, let’s create the Resource. Remember the Folder convention that we used earlier? Make something similar here too.
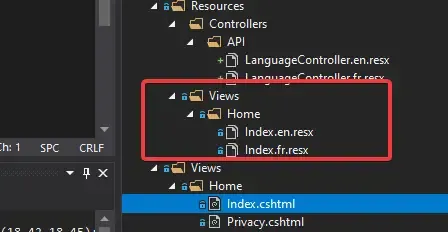
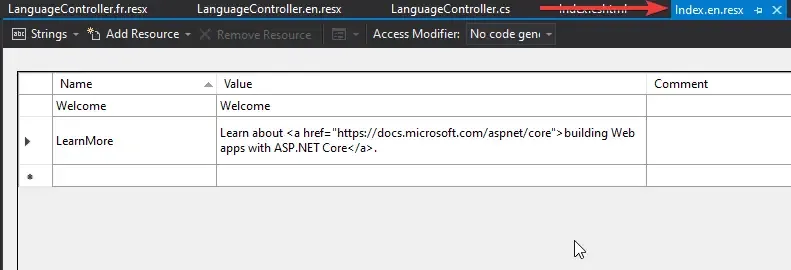

Pretty self explanatory I guess. The only difference is that, here we use the HTML content too. Let’s run the Application and see the Home Page.

The English Resources work. Let’s add a query string here to change the culture to French.

Store the Culture Preference in a Cookie
Adding Query Strings or changing the Reuqest Headers may look like a convinient way while tsesting the application. But in practical / production scenarios, they are a big NO-NO. What would be better is to have the preferred Culture stored somewhere in the client machine, preferrably the client Browser as a cookie, right?
So, here is how it will work. In our Shared Layout, we will introduce a drop down which contains a list of available cultures. Once the user changes the DropDown Value, it should trigger a controller action that would set the selected culture on to a cookie, which would then reflect back on to our UI.
Before that we need to change our Service Registrations since we need a IOptions list of RequestCultures. Navigate to the Configure Services in the Startup class and add the following.
services.Configure<RequestLocalizationOptions>(options=>{ var cultures = new List<CultureInfo> { new CultureInfo("en"), new CultureInfo("fr") }; options.DefaultRequestCulture = new Microsoft.AspNetCore.Localization.RequestCulture("en"); options.SupportedCultures = cultures; options.SupportedUICultures = cultures;});Then, in the Configure method, comment out all that we had added earlier and add this new line of code.
//var cultures = new List<CultureInfo> {// new CultureInfo("en"),// new CultureInfo("fr")//};//app.UseRequestLocalization(options =>//{// options.DefaultRequestCulture = new Microsoft.AspNetCore.Localization.RequestCulture("en");// options.SupportedCultures = cultures;// options.SupportedUICultures = cultures;//});app.UseRequestLocalization(app.ApplicationServices.GetRequiredService<IOptions<RequestLocalizationOptions>>().Value);Next, let’s create a partial view to hold the combobox (select) component. I had refered Microsoft’s documentations for this. Under the Views/Shared Folderm add a new View and name it _CulturePartial.cshtml
@using Microsoft.AspNetCore.Builder@using Microsoft.AspNetCore.Localization@using Microsoft.AspNetCore.Mvc.Localization@using Microsoft.Extensions.Options
@inject IViewLocalizer Localizer@inject IOptions<RequestLocalizationOptions> LocOptions@{    var requestCulture = Context.Features.Get<IRequestCultureFeature>();    var cultureItems = LocOptions.Value.SupportedUICultures        .Select(c => new SelectListItem { Value = c.Name, Text = c.Name })        .ToList();    var returnUrl = string.IsNullOrEmpty(Context.Request.Path) ? "~/" : $"~{Context.Request.Path.Value}{Context.Request.QueryString}";}<div title="@Localizer["Request culture provider:"] @requestCulture?.Provider?.GetType().Name">    <form id="selectLanguage"          asp-controller="Culture"          asp-action="SetCulture"          asp-route-returnUrl="@returnUrl"          method="post"          class="form-horizontal nav-link text-dark"          role="form">        <select name="culture"                onchange="this.form.submit();"                asp-for="@requestCulture.RequestCulture.UICulture.Name"                asp-items="cultureItems">        </select>    </form></div>
Line 6,7 - Here, we are introducing the IOptions of the Request Localizer.
Line 16 - We are adding a form that would trigger the SetCulture Method of the CultureController (we will add this Controller in some time)
Now that we have created the partial view, let’s add it to the Navigation bar. Open up the Views/Shared/_LoginPartial.cshtml and add this highlighted code.
<li class="nav-item"> @await Html.PartialAsync("_CulturePartial")</li>@if (SignInManager.IsSignedIn(User)){ <li class="nav-item"> <a class="nav-link text-dark" asp-area="Identity" asp-page="/Account/Manage/Index" title="Manage">Hello @User.Identity.Name!</a> </li> <li class="nav-item"> <form class="form-inline" asp-area="Identity" asp-page="/Account/Logout" asp-route-returnUrl="@Url.Action("Index", "Home", new { area = "" })"> <button type="submit" class="nav-link btn btn-link text-dark">Logout</button> </form> </li>}We have not added the Controller yet. But. let’s just run the application to check if we are able to render the select component within our layout.

With that working, let’ add the Controller and Actions. We will also add resource for this Partial View so that ‘en’ appears as English, ‘fr’ as French asd so on. Get the point, yeah?
First, I will add the required Resources.

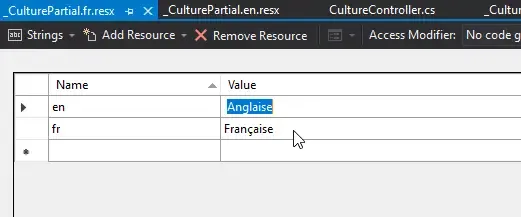
We have to make a slight change in the Partial View also.
@{ var requestCulture = Context.Features.Get<IRequestCultureFeature>(); var cultureItems = LocOptions.Value.SupportedUICultures .Select(c => new SelectListItem { Value = c.Name, Text = Localizer.GetString(c.Name) }) .ToList(); var returnUrl = string.IsNullOrEmpty(Context.Request.Path) ? "~/" : $"~{Context.Request.Path.Value}{Context.Request.QueryString}";}Here, we use the Localizer Object to get the transalated string from the corresponding resource file. Next, add a new Controller, CultureController.
using Microsoft.AspNetCore.Http;using Microsoft.AspNetCore.Localization;using Microsoft.AspNetCore.Mvc;using System;namespace Multilingual.ASPNETCore.Controllers{ public class CultureController : Controller { [HttpPost] public IActionResult SetCulture(string culture, string returnUrl) { Response.Cookies.Append( CookieRequestCultureProvider.DefaultCookieName, CookieRequestCultureProvider.MakeCookieValue(new RequestCulture(culture)), new CookieOptions { Expires = DateTimeOffset.UtcNow.AddYears(1) } ); return LocalRedirect(returnUrl); } }}Line 10 - Here we add a new POST Method that will be invoked by the change in the Combobox.
Line 12-15, we create a new cookie with the selected culture information. We also set an expiration of 1 year to the cookie.
Let’s Run the Application.


You can see that our implementation works well. Quite easy to implement Globalization and Localization in ASP.NET Core, right? We will finish this article here.
Summary - Globalization and Localization in ASP.NET Core
We learnt all about Globalization and Localization of ASP.NET Core Application following several recommended approaches. We covered topics like IStringLocalizer, View Localizer, Query based Culture, Request based Culture, and storing the Culture into the Cookie, and creating a select component to help the user select the prefered Culture. You can find the completed source code here. I hope you learnt something new and detailed in this article. If you have any comments or suggestions, please leave them behind in the comments section below. Do not forget to share this article within your developer community. Thanks and Happy Coding! :D


