In this article, we will start learning about IdentityServer4 in ASP.NET Core and ways to integrate it to build secure solutions. We will be creating a Working Solution up from scratch taking you across various concepts and implementations of this awesome OpenID Framework. This is Part 1 of the IdentityServer4 in ASP.NET Core Series. You can find the complete source code of the implementation here.
What is IdentityServer4?
IdentityServer4 is a FREE, Open Source OpenID Connect and OAuth 2.0 framework for ASP.NET Core. In other words, it is an Authentication Provider for your Solutions. It is a framework that is built on top of OpenID Connect and OAuth 2.0 for ASP.NET Core. The main idea is to centralize the authentication provider. Let’s say you have 5 APIS / Microservices. You really don’t have to define the Authentication Logics in each and every Application. Rather, with IdentityServer4 you get to centralize the Access Control so that each and every APIs are secured by the Central IdentityServer.
Another cool feature is when a client (Web Application) wants to access a secured API, IdentityServer4 generates access tokens seamlessly to make this possible. We will talk about this further in the article.
Identity Server Concept
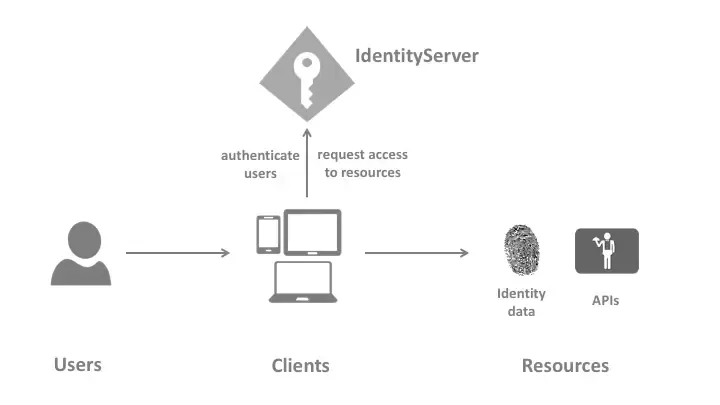
The idea is quite simple and straight forward. Users use the Clients (Let’s say ASP.NET Core MVC) to access the data. Users will be authenticated by IdentityServer to use the client. Once the users are authenticated to use the Client, the client sends in a request to the API Resource. Remember that both the Client and API Resources are protected by a single entity, the IdentityServer. Client requests for an access token with which it can access the API Responses. This way we are centralizing the Authentication Mechanism to a single server. Quite Interesting, yeah?
Here is a flow as described by IdentityServer documentation.
Responsibilities of IdentityServer4
Identity Server is an all in one Security Solution for your Projects. Here are it’s major features and responsibilities.
- protect your resources
- authenticate users using a local account store or via an external identity provider
- provide session management and single sign-on
- manage and authenticate clients
- issue identity and access tokens to clients
- validate tokens
IdentityServer4 Templates
There are a couple of ways to fire up IdentityServer4 Projects. The most commonly used one is Templates. This is more of a quick start solution where you install the IdentityServer4 templates using your CLI and select a template that automatically creates an implemented project for you.
PS - We will NOT be using this approach in our article, as it hides most of the complexity and you end up not knowing what actually happens behind the scene. We will implement the Server from scratch. Once you are familiar with it’s working, you are ready to use these templates.
Open your Powershell / Command Prompt on a working directory and run the following command which installs the IdentityServer4 templates globally for you.
dotnet new -i identityserver4.templates
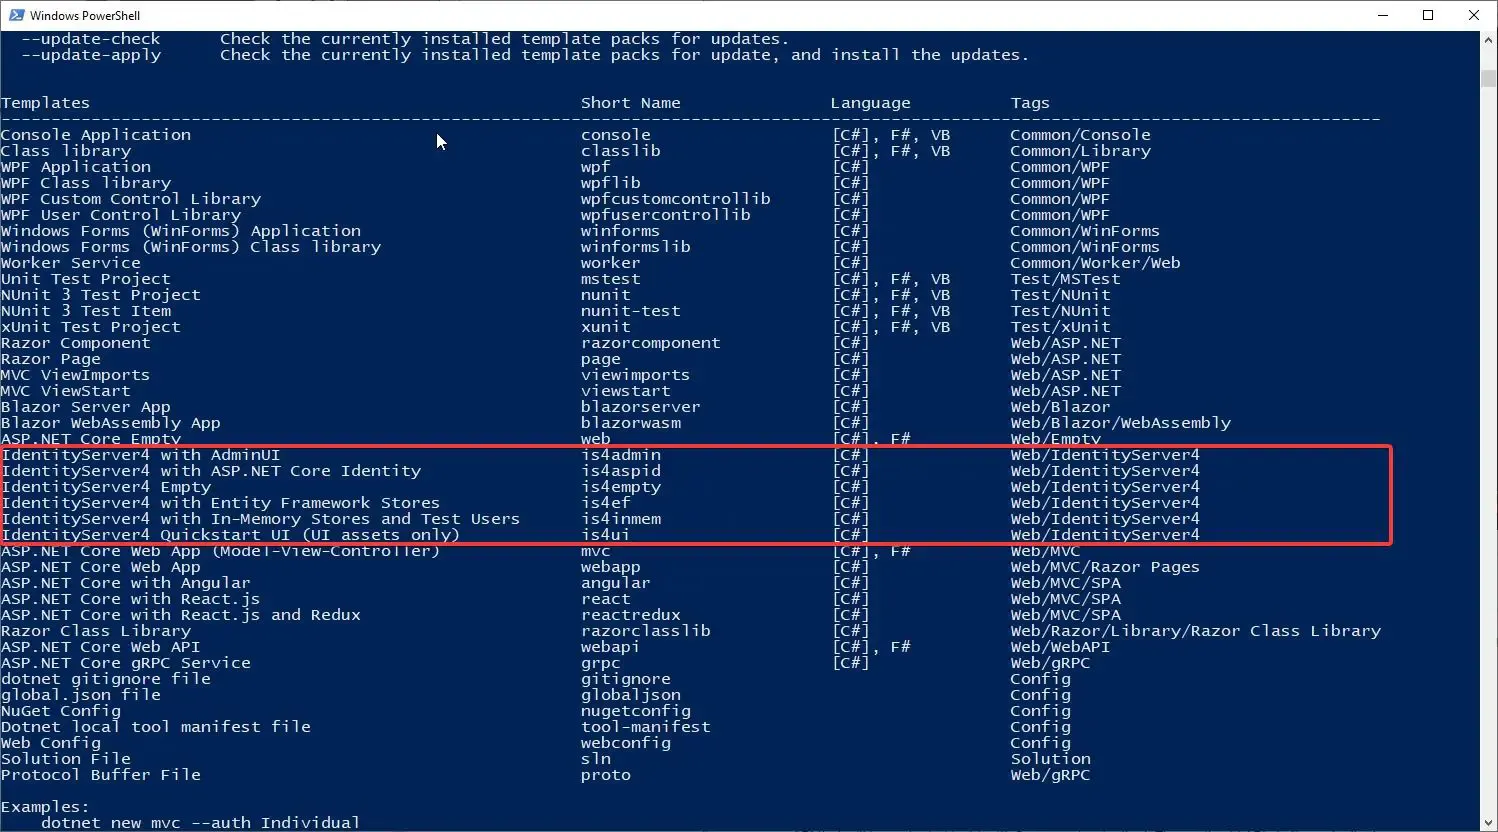
You can see the installed IdentityServer4 templates. Now, to create a new project based off a template, run the following.
dotnet new is4inmemThis creates an implementation of IdentityServer4 in ASP.NET Core using In-Memory User and Configurations. But there will be a lot of code we will not need / understand for our learning purpose. Thus, let’s create it all from scratch so that we understand each and every part of IdentityServer4 implementation.
What we will be Build?
- Create an IdentityServer4 Host Project with In-Memory Users & Stores (For Test Purposes)
- Build an ASP.NET Core API (This is the Resource to be protected by IdentityServer4)
- Build a Web Client that consumes the AP
Getting Started with IdentityServer4 in ASP.NET Core
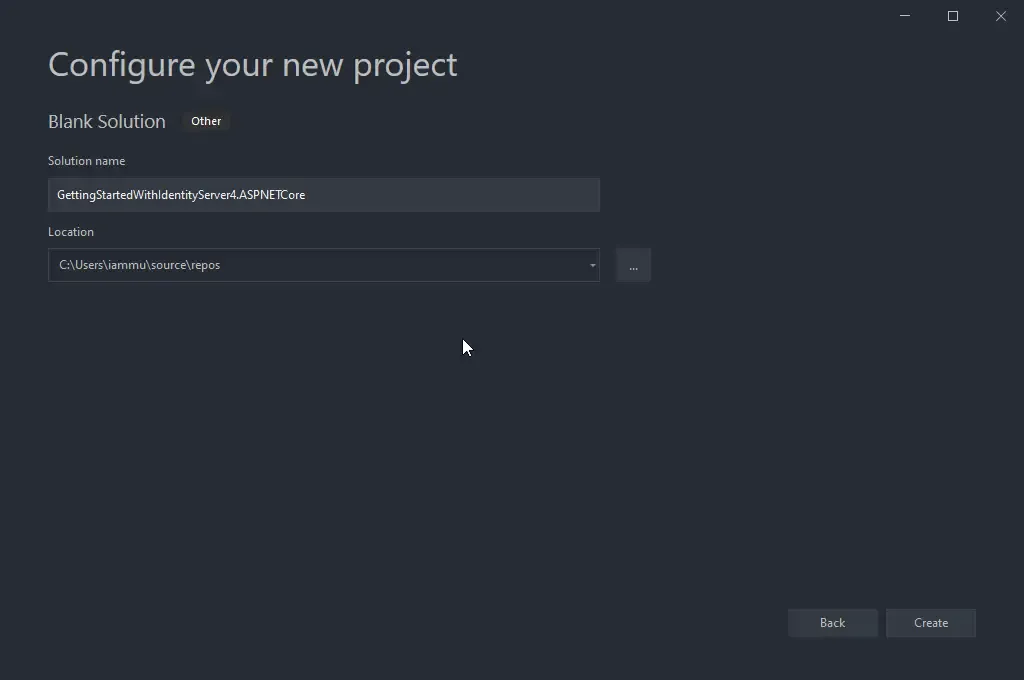
Let’s start by creating a Blank Solution in Visual Studio 2019 Community.
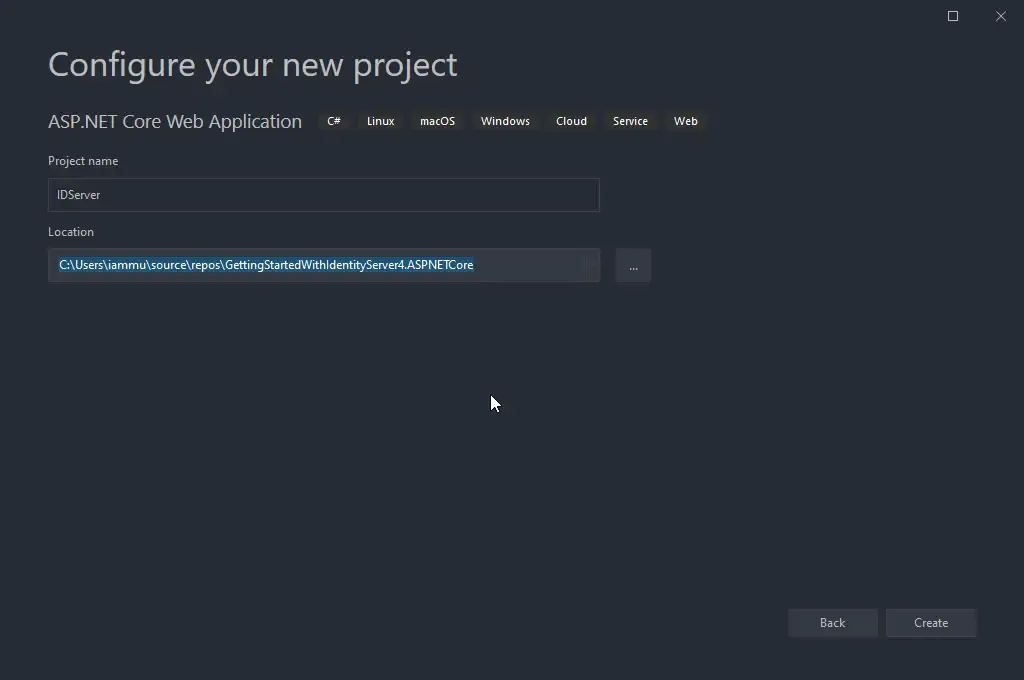
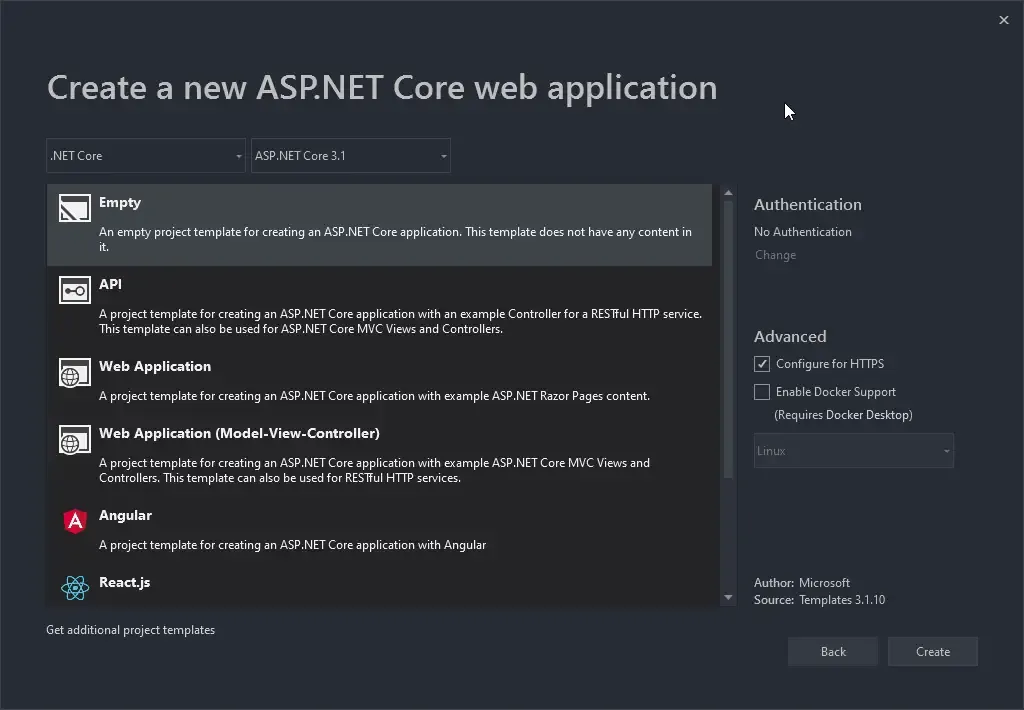
Now, into the blank solution add in a new ASP.NET Core Empty Project. Ensure that you have selected the Empty Template. This is project which will host the actual IdentityServer.
Installing IdentityServer4 Package to ASP.NET Core Project
To the newly created project, let’s install the IdentityServer4 Package. Run the following command on the Package Manager Console.
Install-Package IdentityServer4Adding In-Memory Configuration
We will be adding all the Configuration within our code for demonstration purposes. Note that this will not be the case when you integrate IdentityServer4 in production. This is an easier way to understand each and every component. To the root of the IdentityServer Project, add a new class and name it IdentityConfiguration.cs
public class IdentityConfiguration{}Test Users
Let’s add a test user to our Configuration File. For demonstration purposes, we will define the user data in code. In another article, we will learn how to integrate Entity Framework and ASP.NET Core Identity to manage users over a database. But for now let’s keep things simple and understand the contexts.
Add in the following to the IdentityConfiguration class. This snippet returns a TestUser with some specific JWT Claims.
public static List<TestUser> TestUsers => new List<TestUser> { new TestUser { SubjectId = "1144", Username = "mukesh", Password = "mukesh", Claims = { new Claim(JwtClaimTypes.Name, "Mukesh Murugan"), new Claim(JwtClaimTypes.GivenName, "Mukesh"), new Claim(JwtClaimTypes.FamilyName, "Murugan"), new Claim(JwtClaimTypes.WebSite, "http://codewithmukesh.com"), } }};Identity Resources
Identity Resources are data like userId, email, a phone number that is something unique to a particular identity/user. In the below snippet we will add in the OpenId and Profile Resources. Copy this code on to your IdentityConfiguration class.
public static IEnumerable<IdentityResource> IdentityResources => new IdentityResource[] { new IdentityResources.OpenId(), new IdentityResources.Profile(), };API Scopes
As mentioned earlier, our main intention is to secure an API (which we have not built yet.). So, this API can have scopes. Scopes in the context of, what the authorized user can do. For example, we can have 2 scopes for now - Read, Write. Let’s name our API as myAPI. Copy the below code to IdentityConfiguration.cs
public static IEnumerable<ApiScope> ApiScopes => new ApiScope[] { new ApiScope("myApi.read"), new ApiScope("myApi.write"), };API Resources
Now, let’s define the API itself. We will give it a name myApi and mention the supported scopes as well, along with the secret. Ensure to hash this secret code. This hashed code will be saved internally within IdentityServer.
public static IEnumerable<ApiResource> ApiResources => new ApiResource[] { new ApiResource("myApi") { Scopes = new List<string>{ "myApi.read","myApi.write" }, ApiSecrets = new List<Secret>{ new Secret("supersecret".Sha256()) } } };Clients
Finally, we have to define who will be granted access to our protected resource which in our case is myApi. Give an appropriate client name and Id. Here we are setting the GrantType as ClientCredentials.
public static IEnumerable<Client> Clients => new Client[] { new Client { ClientId = "cwm.client", ClientName = "Client Credentials Client", AllowedGrantTypes = GrantTypes.ClientCredentials, ClientSecrets = { new Secret("secret".Sha256()) }, AllowedScopes = { "myApi.read" } }, };Registering IdentityServer4 in ASP.NET Core
Let’s register IdentityServer4 in ASP.NET Core DI Container. Open up Startup.cs and add the following to the ConfigureServices method. Here will be using all the Static Resources, Clients, and Users we had defined in our IdentityConfiguration class.
services.AddIdentityServer() .AddInMemoryClients(IdentityConfiguration.Clients) .AddInMemoryIdentityResources(IdentityConfiguration.IdentityResources) .AddInMemoryApiResources(IdentityConfiguration.ApiResources) .AddInMemoryApiScopes(IdentityConfiguration.ApiScopes) .AddTestUsers(IdentityConfiguration.TestUsers) .AddDeveloperSigningCredential();In-Memory configuration stores
As mentioned earlier, we will be hard-coding the configurations of Identity Server to keep things simple to understand. There are a few in-memory stores to be configured. These configurations are hardcoded in the HOST Project and are loaded only once when the Application starts-up. This is mostly used for development and prototyping phases. Saying that this approach may also be valid for production scenarios if the configuration rarely changes with time,
Signing Credentials
Basically, IdentityServer needs certificates to verify it’s usage. But again, for development purposes and since we do not have any certificate with us, we use the AddDeveloperSigningCredential() extension. You can read more about it here.
Finally, in the Configure method, add the following line to add the IdentityServer Middleware.
app.UseRouting();app.UseIdentityServer();app.UseEndpoints(endpoints =>{ endpoints.MapGet("/", async context => { await context.Response.WriteAsync("Hello World!"); });});Running IdentityServer4
After configuring IdentityServer4, let’s build and run it.
Make sure to note the Post at which your IdentityServer runs. For me it is 44322. You can set your a custom port by modifying the launchsettings.json found under the Properties folder of your ASP.NET Core Project.
OpenID Discovery Document
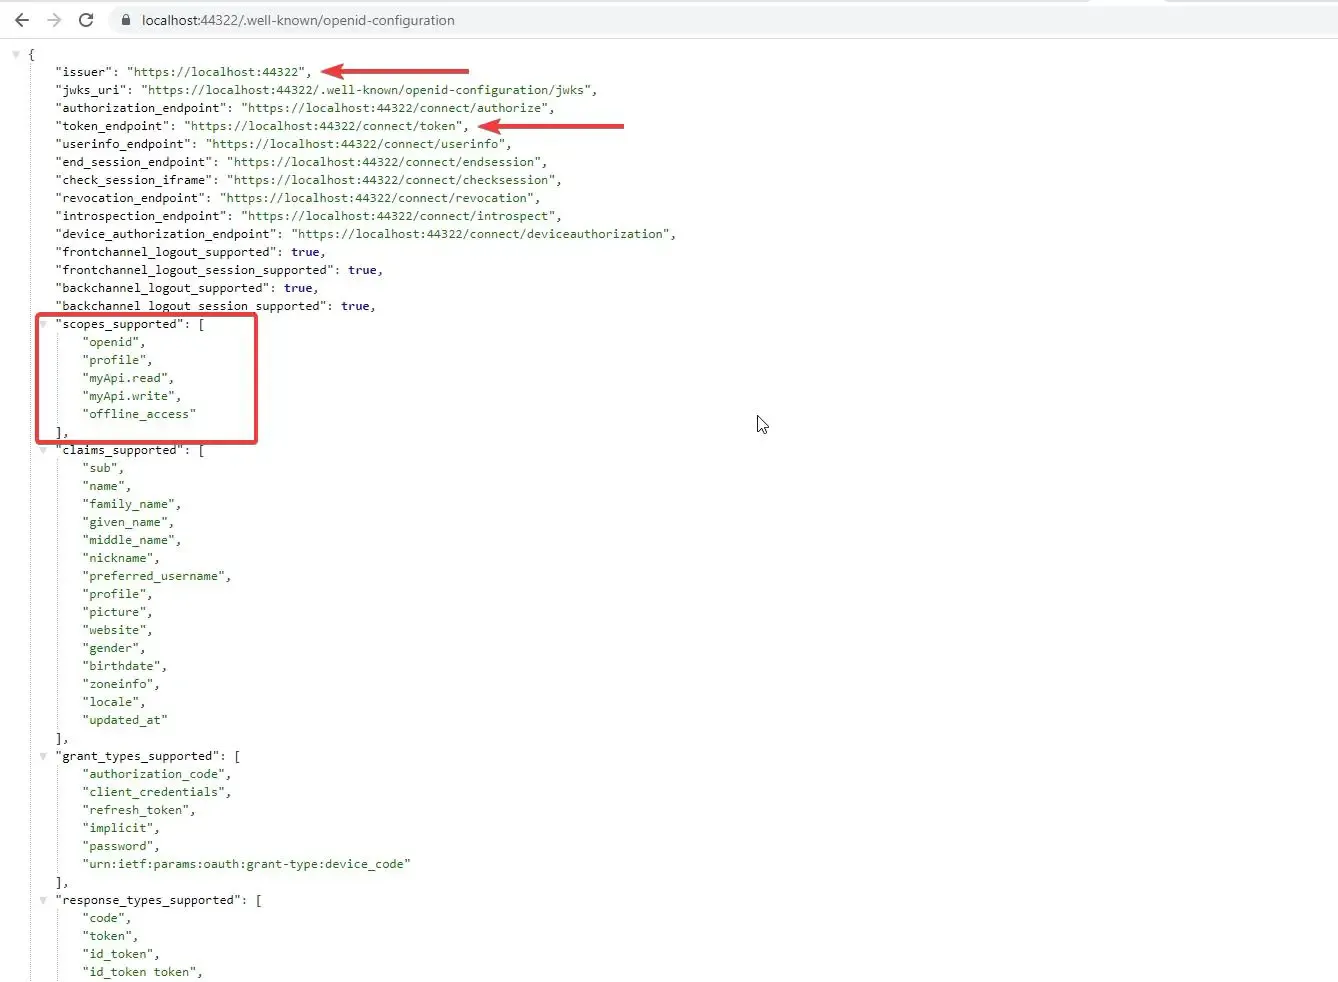
The OpenID Connect Discovery Document is available for all OpenID Providers at /.well-known/openid-configuration. This document contains the definition of your IdentityServer such as the token endpoint (the endpoint that you POST to, to retrieve access tokens), supported scopes, the URL of the running IdentityServer, and so on.
To know more about this standardization, read here.
https://localhost:44322/.well-known/openid-configuration
Fetching Access Tokens with POSTMAN
From the Discovery Document you can know about the configured endpoint to retrieve the access token. Open up POSTMAN and send a POST request to the access token endpoint. Make sure that you have the below parameters in your Request body.
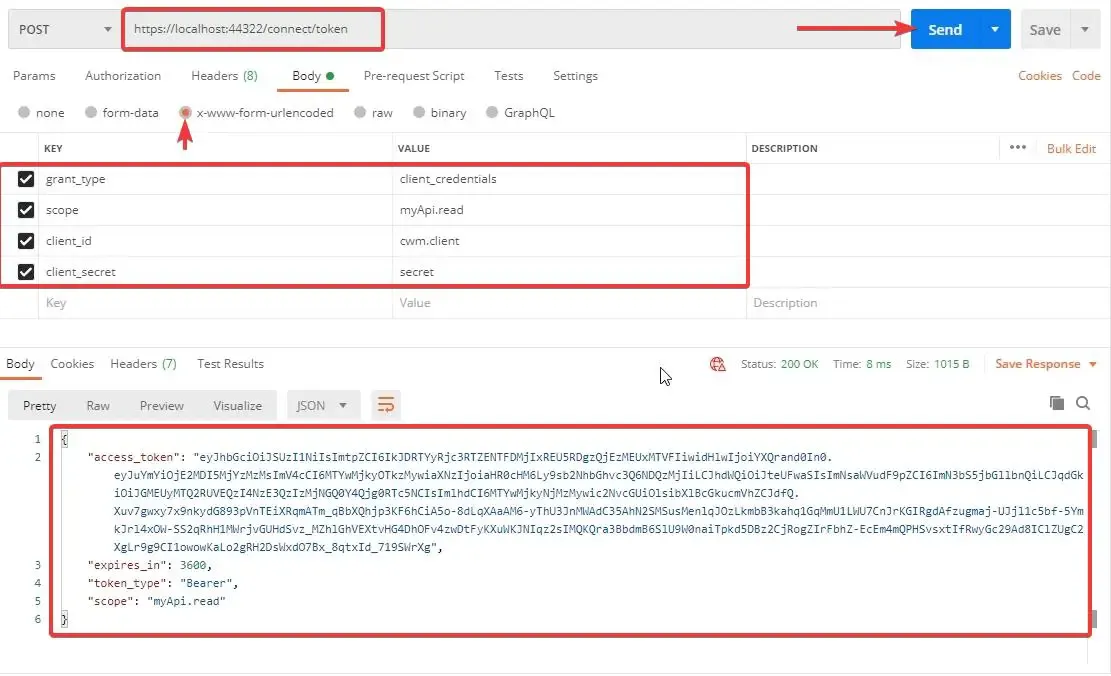
Once successfully authorized, IdentityServer4 returns you with an access token that is valid for 3600 seconds or 1 hour.
Note that we have passed in parameters like grant_type, scope of the usage, client id and secret.
Understanding the Token
Now that we have a valid access token. let’s head over to jwt.io to decode the Access Token. As another point, Any JWTokens can be decoded, thus make sure to never add any sensitive data like password, etc on to your tokens.
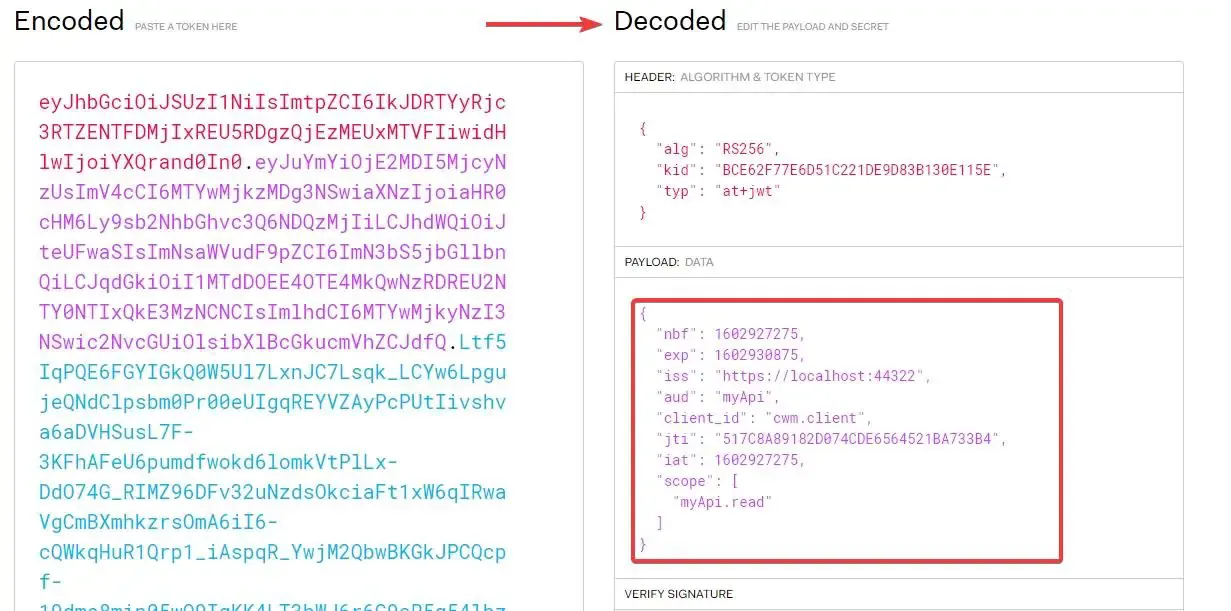
You can see that all the data we set are available in our Access Token. The concept, as we mentioned earlier is that we will be using this token to access the API that is protected by Identity Server.
Securing an ASP.NET Core WebAPI with IdentityServer4
In this section, we will learn how to secure an ASP.NET Core WebAPI with IdentityServer4 and access a protected endpoint using an access token.
Add a new ASP.NET Core WebAPI Project to the Solution. Please note that ideally, we would have to keep the Identity Server on a separate Solution. But for demonstration purposes, we will club it all into a single solution.
Also, ensure that while you run the solution, the first project to run is IdentityServer4. To enable multi startup projects, right click the solution and hit on properties.
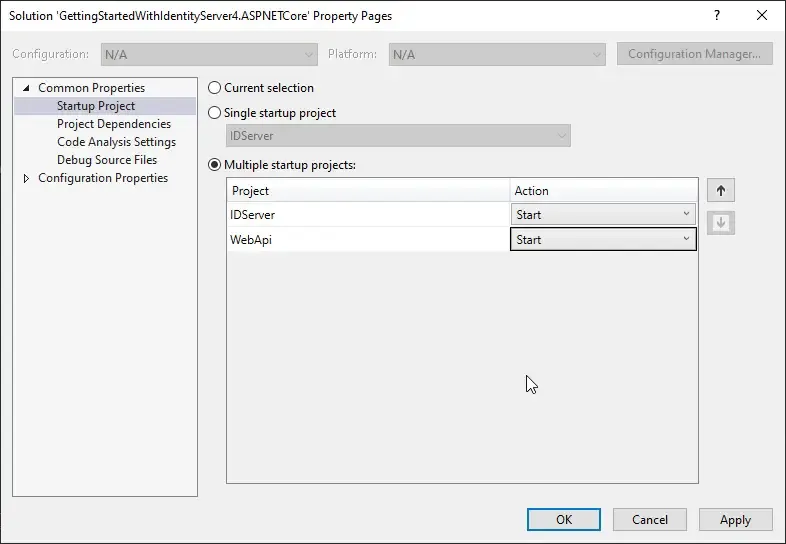
Note the order at which the Projects Start.
Let’s run the Solution. On the WebAPI’s Browser, navigate to /weatherforecast. This is the default Controller that ships in with ASP.NET Core. We will use this Endpoint and secure it with IdentityServer4.
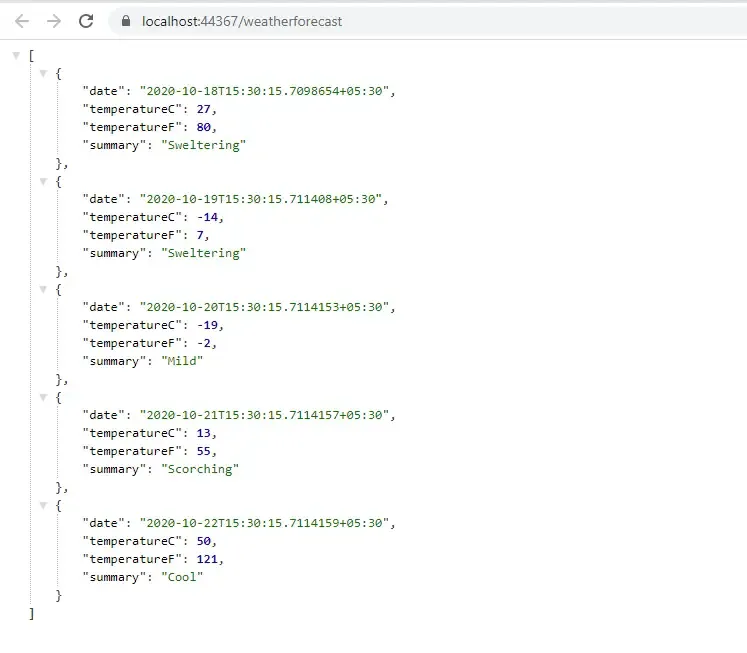
Now, go back to the WebAPI Project and install the following package via Package Manager Console.
Install-Package IdentityServer4.AccessTokenValidation
Let’s start adding the Authentication Middleware to the Pipeline. Open up Startup.cs of the WebAPI Project and add the following to the ConfigureService method.
services.AddAuthentication("Bearer") .AddIdentityServerAuthentication("Bearer", options => { options.ApiName = "myApi"; options.Authority = "https://localhost:44322"; });Line 4 determines the name of the WebAPI Resource. Remember we had already defined this name in the Server Project Configuration?
Line 5 Suggests the URL on which the IdentityServer is up and running. It’s important to RUN IdentityServer First and then the WebAPI project followed by a client if any exists. (We will be adding a client Web project later in this article)
Finally in the Config method, add the following. Make sure that the order at which the Middleware are defined is same,
app.UseAuthentication();app.UseAuthorization();Now go to the default WeatherController and add an Authorize Attribute to the Controller. In this way, we have secured our WebAPI Endpoint.
[ApiController][Route("[controller]")][Authorize]public class WeatherForecastController : ControllerBase{
}
Fetching the Token
Open POSTMAN and send a GET Request to the weatherforecast endpoint. Ideally you should be getting a 401 Unauthorized Error.
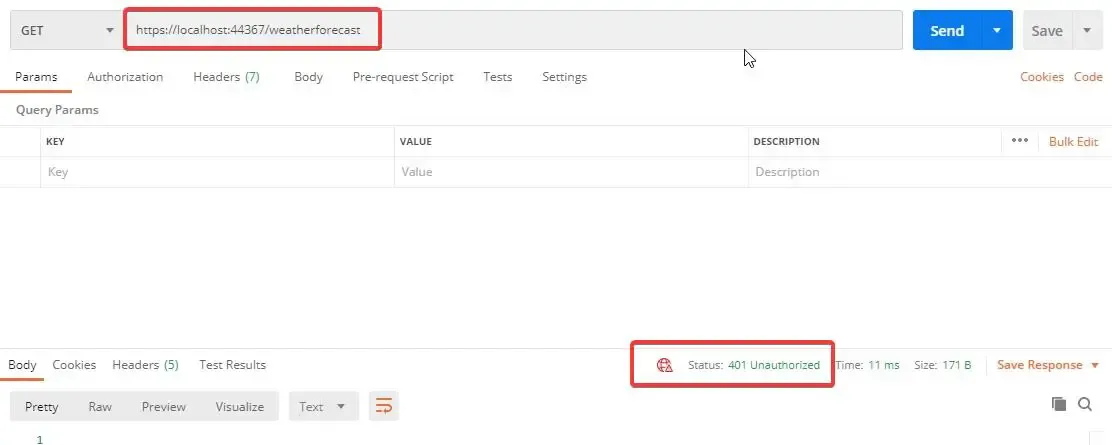
Send a GET Request to the IdentityServer token endpoint with valid parameters. This gets you an Access Token. Remember we did this earlier? Now, we will use this token to access the Secured API Controller.
Accessing the API with Access Token
Again, Send a GET Request to the weatherforecast endpoint but this time, with an additional Authorization Header. In POSTMAN switch to the Authorization Tab and Select the Bearer Token from DropDown and paste in the Access Token that you received from IdentityServer4. Now click on Send. 200 OK
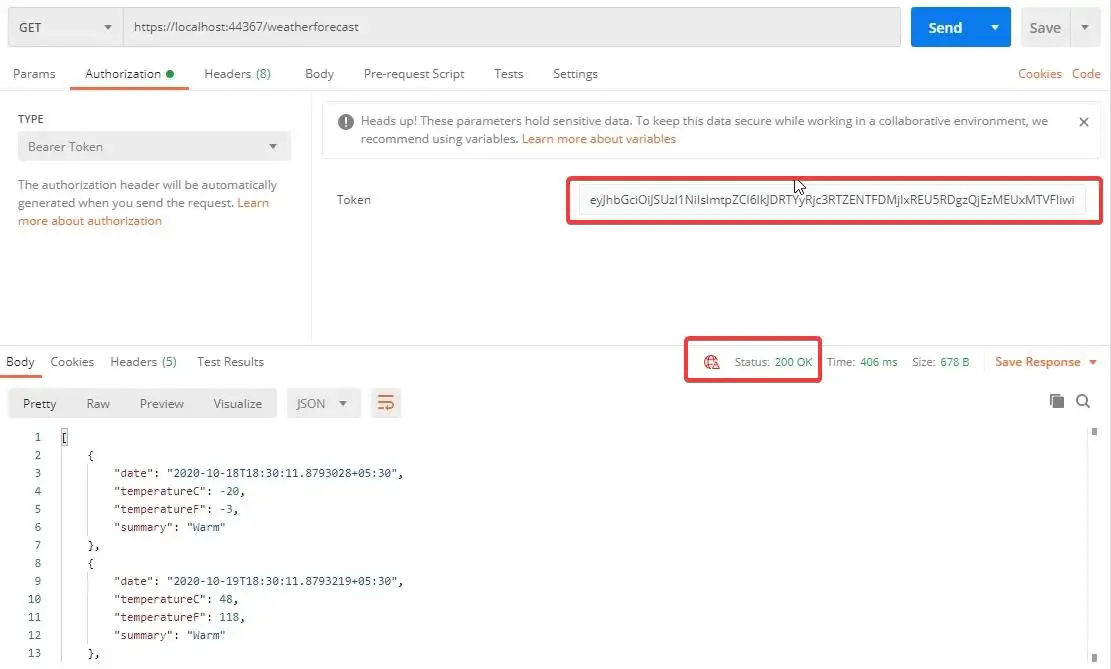
So, our API is secured using IdentityServer4. Now, we will stop using POSTMAN as our client. Instead let’s introduce a Web Project as the Client that will try to access our secured API Controller. This is going to be the most common use case of IdentityServer4. Let’s see how to achieve this.
Building a Web Client to access the Secured API
Firstly, create a new project in our solution and name it WebClient. We will be using a MVC Project with NO Authentication.
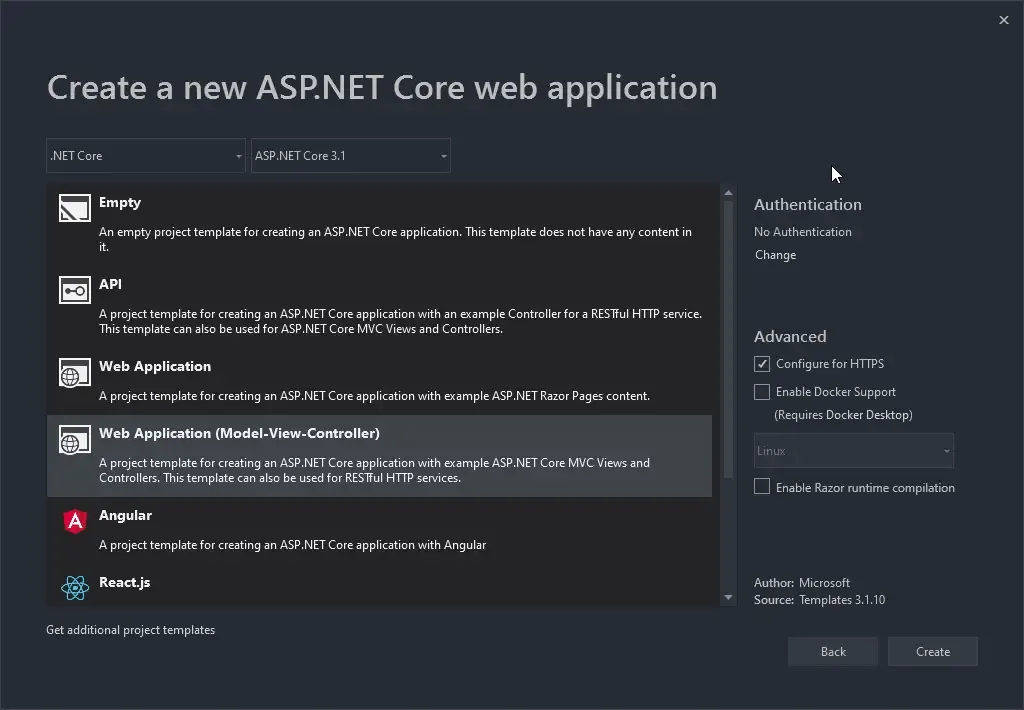
First off, install the following package.
Install-Package IdentityModelNext, we need a service that can talk to the IdentityServer4 and request for an access token with which the MVC Project can access the API data. Get it?
In the WebClient Project. add a new folder and name it Services. here let’s add the TokenService Interface and implementation. Note that the input parameter will be a string of scope content.
public interface ITokenService{    Task<TokenResponse> GetToken(string scope);}
public class TokenService : ITokenService{    private DiscoveryDocumentResponse _discDocument {get;set;}    public TokenService()    {        using(var client = new HttpClient())        {            _discDocument = client.GetDiscoveryDocumentAsync("https://localhost:44322/.well-known/openid-configuration").Result;        }    }    public async Task<TokenResponse> GetToken(string scope)    {        using (var client = new HttpClient())        {            var tokenResponse = await client.RequestClientCredentialsTokenAsync(new ClientCredentialsTokenRequest            {                Address = _discDocument.TokenEndpoint,                ClientId = "cwm.client",                Scope = scope,                ClientSecret = "secret"            });            if(tokenResponse.IsError)            {                throw new Exception("Token Error");            }            return tokenResponse;        }    }}
Line 3, Here is the DiscoveryDocumentReponse class that comes with the package that we installed earlier.
Line 4 to 10, in the constructor we use the HTTPClient to get the Document data from the IdentityServer OpenID Configuration endpoint. Note that we are hardcoding the URLs here. Ideally, we will have to define them in appsettings.json and use IOptions pattern to retrieve them at runtime.
Remember we added some Client to our IdentityServer4 Configuration? We will be using that data here. Line 17 to 20, we define the address, clientId, Scope and Client Secret.
Now, we are expecting Weather data from our API. Thus, let’s create a new Model class to accommodate the data. In the WebClient Project. add a new class under the Models folder and name it WeatherModel. Add in the following snippet.
public class WeatherModel{ public DateTime Date { get; set; } public int TemperatureC { get; set; } public int TemperatureF => 32 + (int)(TemperatureC / 0.5556); public string Summary { get; set; }}Next, in the HomeController add in a new Method that basically will talk to the Secured API and get data from it. At the high level, what this controller action will do is the following -
- Use the Token Service , talk to the IdentityServer4 and retreive a valid access token.
- Set the Access Token to the HttpClient’s JWT Header.
- Use the Http Client and talk to the Secured API to get the weather data. Since we are adding in the JWT Token, we should not have any problem in authenticating the WebClient to use the WebAPI, right?
Add in the following action method.
public async Task<IActionResult> Weather(){ var data = new List<WeatherModel>(); var token = await _tokenService.GetToken("myApi.read"); using (var client = new HttpClient()) { client.SetBearerToken(token.AccessToken); var result = await client.GetAsync("https://localhost:44367/weatherforecast"); if(result.IsSuccessStatusCode) { var model = await result.Content.ReadAsStringAsync(); data = JsonConvert.DeserializeObject<List<WeatherModel>>(model); return View(data); } else { throw new Exception("Failed to get Data from API"); } }}Next, add a new view for the Weather Method. It will be a simple View where there will be a Table that displays a list of WeatherModel data. This data will be passed to the View by the Controller.
@model List<WeatherModel>@{ ViewData["Title"] = "Weather";}<h1>Weather</h1><table class="table table-striped"> @foreach (var weather in Model) { <tr> <td>@weather.Date</td> <td>@weather.Summary</td> <td>@weather.TemperatureC</td> <td>@weather.TemperatureF</td> </tr> }</table>Finally, in the Startup.cs of the WebClient Project add in the following at the ConfigureServices method to register the TokenService within the ASP.NET Core DI Container.
services.AddSingleton<ITokenService, TokenService>();That’s about everything you have to do to Authorize your client. Now, build and run all the 3 Projects in the Following Order -> IdentityServer, WebAPI, and finally the WebClient. At the WebClient’s browser, navigate to ./home/weather. If everything goes well, you will be seeing the actual data from our Secured WebAPI.
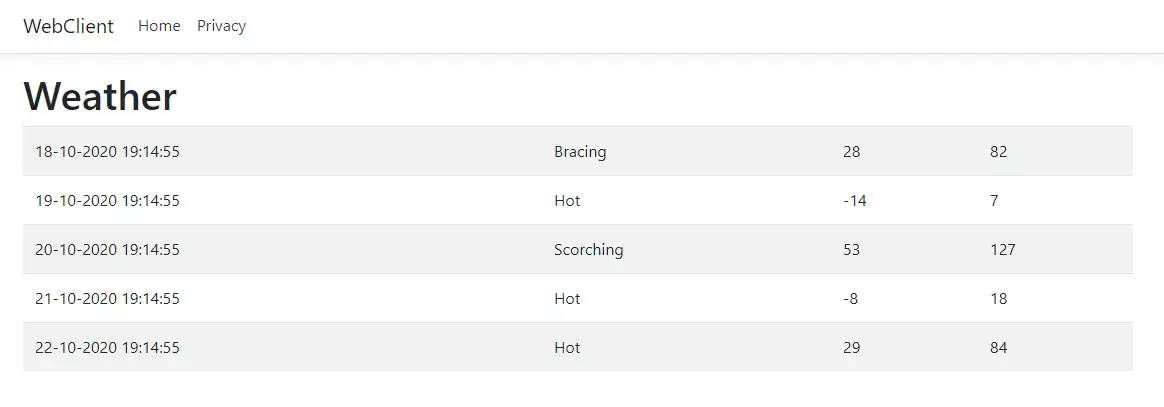
Ok, so how do you verify that your client is actually authorized? Simple, open up a new Tab on Postman, and send a GET request to the WebAPI Endpoint. Now if your client is actually authorized, it means that POSTMAN should shout at you with a 401 Error. Thus, it’s quite evident that IdentityServer is securing our API Endpoint and authorizing our WebClient Application to consume the WebAPI. Quite Awesome, yeah?
We will wrap the article for now. In the next installment of this series, we will cover more advanced topics and implementation of IdentitySevrer4. We will be going through concepts like Adding IdentityServer4 UI to the Server Project, Securing the Client Project with IdentityServer4, Removing In-memory Stores, and Replacing them with Actual Database, Adding ASP.NET Core Identity to manage Users more efficiently, and much more. I will update the link to the next article here as soon as it becomes available. Stay Tuned.
Summary
In this detailed article, we got started with IdentityServer4 in ASP.NET Core and covered basic concepts and terminologies like Resources, Test Users, Clients. Additionally, we also built a working solution with 3 Project (Authentication Server, WebAPI, WebClient ) where the WebAPI was protected by the IdentityServer and issued tokens to a valid WebClient. You can find the entire source code of the implementation here.
Leave behind your valuable queries, suggestions in the comment section below. Also, if you think that you learned something new from this article, do not forget to share this within your developer community. Happy Coding!

