In this article, we will talk about Logging with NLog in ASP.NET Core. We will cover topics like NLog, Integrating NLog in ASP.NET Core, Injecting NLog within ASP.NET Core, using the ILogger, Common Targets of NLog, Configuration File of NLog, Log Levels and much. By the end of the article, you will have enough knowledge about NLog, so that you can start using NLog in a full-fledged manner for your next ASP.NET Core Project.
Amongst the Popular Logging Frameworks for .NET, NLog surely makes it into the Top 3. In a previous article, We learned all about Serilog (my Current go-to logging framework for ASP.NET Core). That being said, NLog is as powerful as Serilog in terms of functionality and ease of setup. Let’s get started with NLog.
What is NLog?
NLog is a reliable and robust logging library for .NET. NLog makes the developer’s life easy by supporting various write targets like database, file, console, email, and so on. This makes it easily into the list of ‘Best Logging Frameworks for .NET in general.’ There are various awesome configurations that come with NLog, which takes logging to the next level. Also, the flexibility that NLog offers is great when it comes to customizing the way you want your messages to be logged.
Core Features of NLog
- Simple to get started - it takes just 3-4 lines of code to get you started with this popular logging framework.
- Template Rendering - Complete control to structure the logging messages via your own defined templates.
- FREE - NLog is an Open Source Project, completely FREE to use.
- Structured Logging at it’s best.
- Well maintained documentation - You can never get stuck while using this framework. They have an above-decent documentation with almost everything packed up.
Setting up the ASP.NET Core Project
For this article, we will implement the NLog Library on to an ASP.NET Core 3.1 WebAPI Project. Since the only aim to learn about this awesome library, we will keep the implementation simple and straight-forward. I will be using Visual Studio 2019 Community as my IDE. You can find the Project Source code on this Github Repository.
Installing the Required Packages
Install these packages via NuGet Package Manager Console.
Install-Package NLog.Web.AspNetCoreInstall-Package NLog.ConfigNLog Configuration
While installing the NLog packages, a configuration file gets created for you in the root of the project. NLog uses this configuration file to load the settings.
IMPORTANT - Make sure the Nlog.config gets copied to the build directory every time you build the application. To ensure this, right-click on NLog.config and click properties. Here, make sure that the ‘Copy to output directory’ is set to either ‘Copy Always’ or ‘Copy if newer’.
Let’s go through a very simple configuration setup and understand how it works.
<?xml version="1.0" encoding="utf-8" ?><nlog xmlns="http://www.nlog-project.org/schemas/NLog.xsd" xmlns:xsi="http://www.w3.org/2001/XMLSchema-instance" xsi:schemaLocation="http://www.nlog-project.org/schemas/NLog.xsd NLog.xsd" autoReload="true" throwExceptions="false"> <targets> <target xsi:type="ColoredConsole" name="consoleTarget" layout="${longdate} ${uppercase:${level}} ${message}" /> </targets> <rules> <logger name="myLogger" minlevel="Debug" writeTo="consoleTarget" /> </rules></nlog>Line #5 - AutoReload - This is a property that enables the ASP.NET Core Application to reload the config file during runtime on any detected changes in the settings. It’s ideal to keep it set to true.
Line #6 - throwExceptions - Let’s say there is a badly configured Nlog.config file. The host application may npt be able to load such config files. Thus, we have an option to throw exceptions for such scenarios. However it is advised to set this to false in the productive environment.
Targets
Targets are where you write your logs. It can be as simple as a plain old text file, as well as an email that can notify the team when a critical error occurs. With NLog, you get the options to write to the following targets. We can configure NLog to write to multiple targets at a time.
- Files
- Console & Colored Console
- Event Log
- Database
- and much more.
Line #7 - #9 - We defined a single target here, Colored Console. It is a variant of console logging, but as the name suggests, adds a bit more color contrasts to the entire Console :P Make sure to give a name for the target, here I call it ‘consoleTarget’. As mentioned earlier, layout is where you can define how you want to structure your log message.
Layout
layout="${longdate} ${uppercase:${level}} ${message}"
This above lines formats your message in this way - 2020-08-19 22:47:54.4697 INFO Hello World!
You get the point, yeah? There are a quite a lot of layout renderers supported by NLog. Here are the popular ones.
${level}- Specifies the Log Level${exception}- Gets the passed exception message${logger}- Gets the related logger name${newline}- Adds a new line to the log${stacktrace}- Returns the stacktrace${date}- Current Date and Time${hostname}- Current machine name${processname}- Current Process Name- For more, refer to https://nlog-project.org/config/?tab=layout-renderers. They have quite a lot of definitions.
About Log Levels
Log Levels are the level of severity of each logged message. It is crucial for Business Intelligence and Debugging purposes. This allows you to segregate the messages in a more orderly fashion.
Similiar to other Logging Frameworks, NLog has the following log levels.
- Trace - The entire trace of the codebase.
- Debug - useful while developing the application.
- Info - A general Message
- Warn - Used for unexpected events.
- Error - When something breaks.
- Fatal - When something very crucial breaks
Setting up the log level properly is quite important as it helps you in the long run to a great extent.
Rules
Here is where we can configure the rules of loggers. The minimum and max level of logs for each logger can be configured here along with the targets.
Global Diagnostics Context
What if you want to pass dynamic values from C# to NLog (other than the Layout Renderers) ? Global Diagnostics Context class helps you set values within the NLog context throughout the lifetime of the application. Such values can be application names, versions, usernames, machine-name and so.
To set a value globally for NLog to use, use the following.
GlobalDiagnosticsContext.Set(“Application”, “ASP.NET Core Clean Architecture”); GlobalDiagnosticsContext.Set(“Author”, “John Doe”);
Once set in C#, the only task remaining is to access the value in NLog. The following layout renderers are how you can achieve it.
${gdc:item=Application}${gdc:item=Author}Configuring NLog in ASP.NET Core
With these basic ideas of NLog, let’s configure NLog in ASP.NET Core. The idea is to make NLog available through the application via Dependency Injection. That’s always the best way to go, right?
But before that, let’s change our NLog.config as follows.
Adding the Configuration
<?xml version="1.0" encoding="utf-8" ?><nlog xmlns="http://www.nlog-project.org/schemas/NLog.xsd" xmlns:xsi="http://www.w3.org/2001/XMLSchema-instance" xsi:schemaLocation="http://www.nlog-project.org/schemas/NLog.xsd NLog.xsd" autoReload="true"> <targets> <target xsi:type="File" name="fileTarget" fileName="${basedir}/logs/${shortdate}.log" layout="${longdate} ${uppercase:${level}} ${message}" /> <target xsi:type="ColoredConsole" name="consoleTarget" layout="${longdate} ${uppercase:${level}} ${message}" /> </targets> <rules> <logger name="*" minlevel="Trace" writeTo="consoleTarget" /> <logger name="Microsoft.*" maxlevel="Info" final="true" /> <logger name="*" minlevel="Trace" writeTo="fileTarget" /> </rules></nlog>Here we defined the rules in such a way that all the Logs get printed to the console, and everything Except Microsoft logs get written to the File system.
Next, Navigate to Program.cs and make the following changes.
public class Program{    public static void Main(string[] args)    {        var logger = NLog.Web.NLogBuilder.ConfigureNLog("NLog.config").GetCurrentClassLogger();        try        {            logger.Debug("Application Starting Up");            CreateHostBuilder(args).Build().Run();        }        catch (Exception exception)        {            logger.Error(exception, "Stopped program because of exception");            throw;        }        finally        {            NLog.LogManager.Shutdown();        }    }
    public static IHostBuilder CreateHostBuilder(string[] args) =>        Host.CreateDefaultBuilder(args)            .ConfigureWebHostDefaults(webBuilder =>            {                webBuilder.UseStartup<Startup>();            })            .ConfigureLogging(logging =>            {                logging.ClearProviders();                logging.SetMinimumLevel(Microsoft.Extensions.Logging.LogLevel.Trace);            })            .UseNLog();}
Line #5 - Loads the NLog Configuration
Line #8 - Application Starting Message.
Line #30 - Clear the existing logging providers if any. We are building an application that uses only NLog. Thus we need to remove the default ASP.NET Core Logging Provider.
Line #33 - Finally, we set NLog as the default Logging Provider throughout the application.
Let’s run the Application. What we expect? Console Log and a File Log.
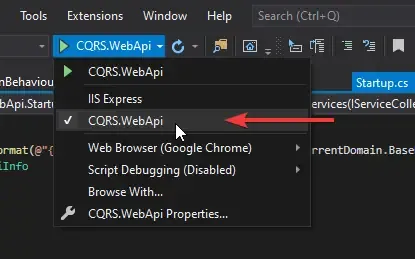
But before that, make sure you run your application via the Kestrel Server. This allows you to see the console while the application runs. To switch to Kestrel from IIS, do the following. Click on the arrow and select your project name. This makes your application via Kestrel Web Server.
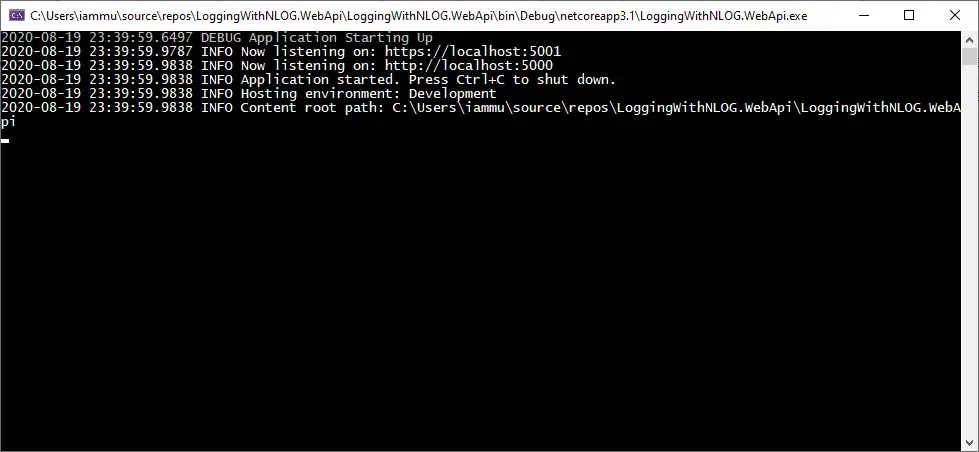

You can see that all the Microsoft based messages get printed only at the console, while the applciation logs get written to the text file.
Wiring it up with a Controller
To make some random exceptions,I will just make a simple API endpoint for demonstration purpose. I created a new API Controller , Controllers/RandomController.cs. Here is how my controller looks like.
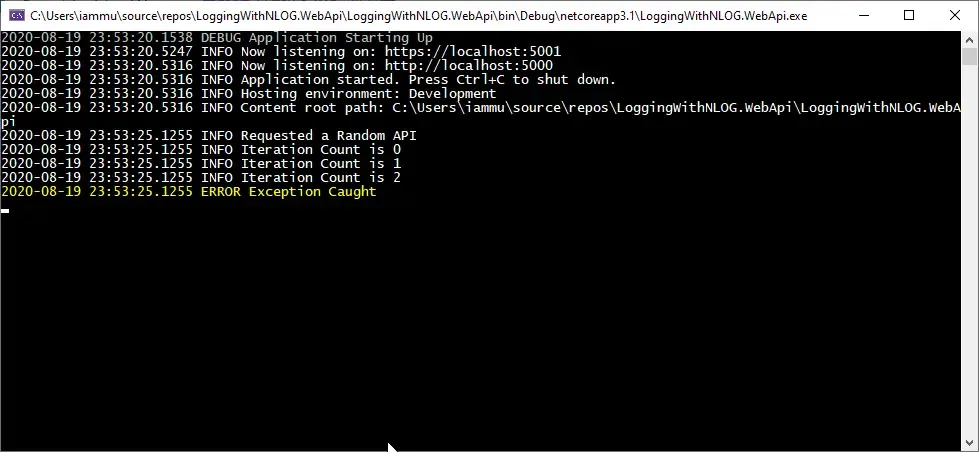
[Route("api/[controller]")][ApiController]public class RandomController : ControllerBase{ private static ILogger<RandomController> _logger; public RandomController(ILogger<RandomController> logger) { _logger = logger; } [HttpGet] public void Get() { _logger.LogInformation("Requested a Random API"); int count; try { for (count = 0; count <= 5; count++) { if (count == 3) { throw new Exception("Random Exception Occured"); } else { _logger.LogInformation("Iteration Count is {iteration}", count); } } } catch (Exception ex) { _logger.LogError(ex, "Exception Caught"); } }}Line 5 - 9 , We are injecting ILogger<Controller> to the Controller’s Constructor. Note that this is an ideal way to use the NLogger throughout the application.
In the Get method, we will be using our _logger object 3 times,
- To log every time there is a request- Info
- If the iterated count is 3, throw an exception with message “Random Exception Occurred” - Error
- Else, log the iteration count - Info
Let’s run the application and navigate to ../api/random
Check the Console and the File Log.

Logging to Database with NLog
This is where everything comes to. The cleanest way to log is to log it into your database. There are several advantages to this.
Logging to Databases can help filter out crucial data that can help debug critical errors. We can filter by the log-level, the exact time/day when an error occurs, the logger name, and also trace the error with ease. Additionally, you can integrate the Log Table to other External Tools to maybe visualize the log stats and so on.
Let’s start by creating a Log table in our SQL Sever. Execute the following scripts.
CREATE TABLE [dbo].[MyLogs]( [Id] [int] IDENTITY(1,1) NOT NULL, [When] [datetime] NOT NULL, [Message] [nvarchar](max) NOT NULL, [Level] [nvarchar](10) NOT NULL, [Exception] [nvarchar](max) NOT NULL, [Trace] [nvarchar](max) NOT NULL, [Logger] [nvarchar](max) NOT NULL CONSTRAINT [PK_MyLogs] PRIMARY KEY CLUSTERED( [Id] ASC)WITH (PAD_INDEX = OFF, STATISTICS_NORECOMPUTE = OFF, IGNORE_DUP_KEY = OFF, ALLOW_ROW_LOCKS = ON, ALLOW_PAGE_LOCKS = ON) ON [PRIMARY]) ON [PRIMARY]As you see we will store the datetime, message, error level, exception, trace and the logger name into this table.
Next, go to NLog.config and add a new Database Target. This target is quite different from the usal file and console targets. We will be providing the connection string to the Log Table and also a basic SQL command to log the NLog variables to the created table.
<target xsi:type="Database" name="dbTarget" connectionString="Data Source=DESKTOP-QCM5AL0;Initial Catalog=DevelopmentDatabase;Integrated Security=True;MultipleActiveResultSets=True" commandText="INSERT INTO [MyLogs](When,Message,Level,Exception,Trace,Logger) VALUES (getutcdate(),@msg,@level,@exception,@trace,@logger)"> <parameter name="@msg" layout="${message}" /> <parameter name="@level" layout="${level}" /> <parameter name="@exception" layout="${exception}" /> <parameter name="@trace" layout="${trace}" /> <parameter name="@logger" layout="${logger}" /></target>Line 1 - We set the type to Database
Line 2 - Give a logical name to the target, we will be using this later while defining the rules.
Line 3 - Your connection string here. You can also use the Connection string name as defined in appsettings.json
Line 4 - A plain old Insert Command that takes in NLog variables as input.
Line 5 - 9 - Various Layout Renderers of NLog.
Finally add this new rule to the end of the Rules Collection. This will be responsible for logging all the errors to the database.
<logger name="*" minlevel="Error" writeTo="dbTarget" />Important - There can be scenarios where NLog is not possible to Log to your Database for some unknown reason. I personally got stuck while implementing this article :D To debug the issue, just check the internal logging of NLog. I have configured it in NLog.config
internalLogLevel=“Info”
internalLogFile=“c:\temp\internal-nlog.txt”
You can check the Internal log for debugging the issue. Technically, you can use NLog to debug NLog :P
Let’s run the application and navigate to the api/random endpoint. Open up Management Studio, and check your log table.
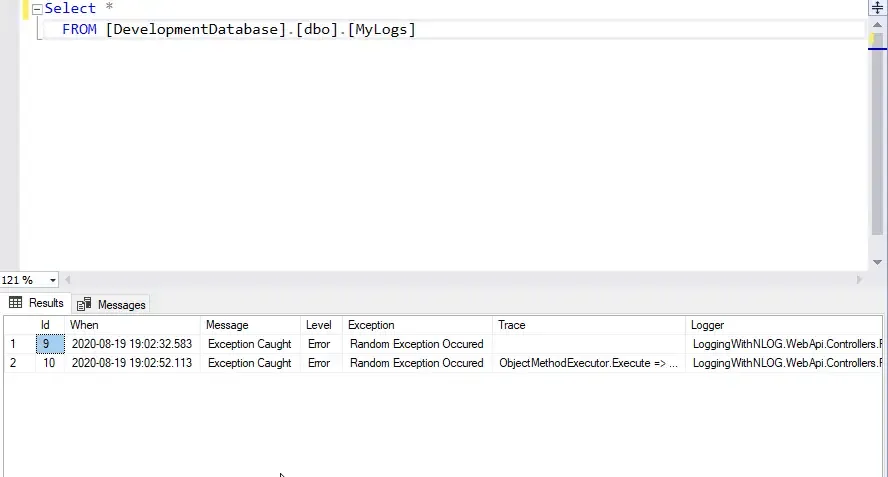
You can see that the logging is working fine with several additional information that makes debugging easy for the dev-team.
That’s it for this article.
Summary
In this detailed article, we have gone through one of the most popular Logging Framework for ASP.NET Core Applications. We went through concepts like Basics of NLog, NLog Configuration, Layout Renderers, Rules, Logging to Database, and much more. This can help you get started with this awesome Logging Framework. You can find the source code of this implementation here. Leave behind your queries, suggestions in the comment section below. Also, if you think that you learned something new from this article, do not forget to share this within your developer community. Happy Coding!


