Let’s go through a popular way of Building Applications - Microservice Architecture in ASP.NET Core. In this detailed article, we will try to understand what really Microservice architecture is. , How does it compare to the traditional way of building applications? And also some advanced concepts like API Gateways with Ocelot, Unifying several Microservices, Health Checks, and much more.
We will be building a Simple Microservice Application for demonstrating various Concepts including Microservice Architecture in ASP.NET Core, API Gateways, Ocelot, Ocelot Configuration and Routing, and much more. You can find the completed source here.
This is a beginner friendly article, which means that if you have absolutely NO idea about Microservices, I can guarentee you that you would gain enough knowledge by the end of this article and you would probably be confident enough to start building your own simple Microservice Architecture in ASP.NET Core.
PRO TIP! Bookmark This Page for Future References.
Microservice Architecture in ASP.NET Core - Overview
Before getting started with the Microservices, let’s talk a bit about the traditional way of building applications that you are probably using right now in your current Solutions. It is called as Monolith Architecture.
Monolith Architecture - Basics
Monolith Architecture is the traditional and widely used architectural pattern while developing applications. It is designed in a way that the entire application components is ultimately a single piece, no matter how much you try to de-couple them by using Patterns and Onion / Hexagonal Architecture. All the services would be tightly coupled with the Solution. The major point to note is that while publishing the application, you would have to deploy it to a single server only.
While it is still an awesome way to build applications, there are a few drawbacks associated with the Monolith Architecture. Any Small to Mid Scaled Applications would do just fine with this Architecture, but when you suddenly start to scale up even further, you would have to make a few compromises as well as face certain downtimes while deploying new versions/fixes.
Here is a very simple diagrammatic representation of the Monolith Architecture.
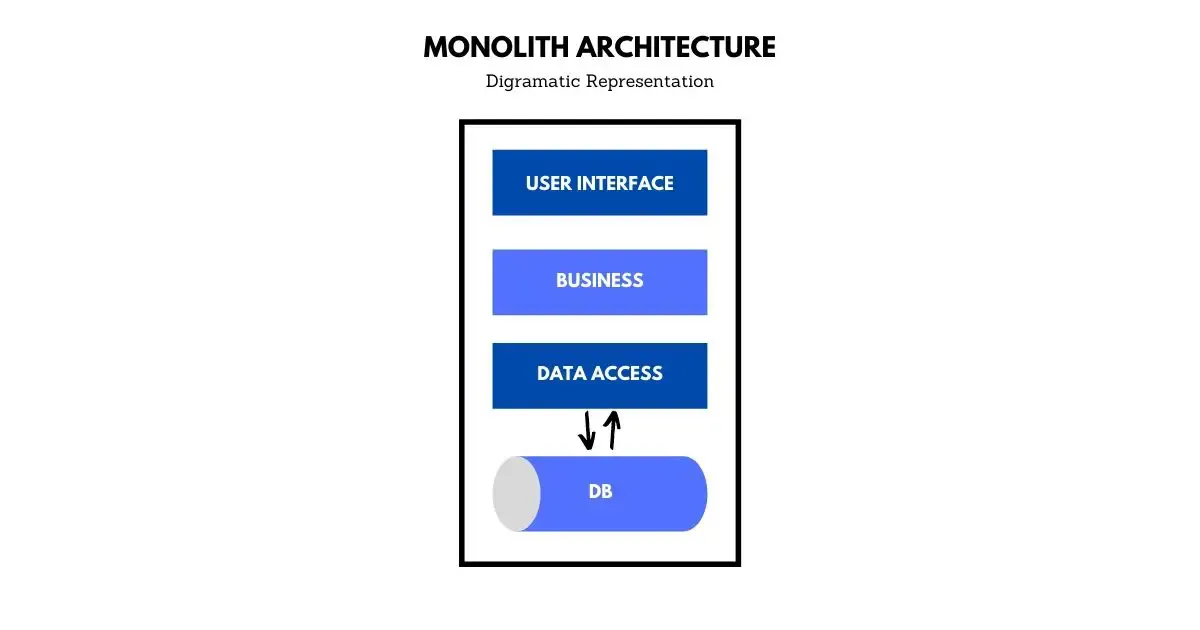
From the diagram, it is quite evident that whatever logic or infrastructure you want to integrate with your application, it ends up being physically a part of the application itself. For larger applications, this may have un-desired effects in the longer run.
So, What is a Microservice Architecture?
Microservice architecture is an architecture where the application itself is divided into various components, with each component serving a particular purpose. Now these components are called as Microservices collectively. Get it? The components are no longer dependent on the application itself. Each of these components is literally and physically independent. Because of this awesome separation, you can have dedicated Databases for each Component, aka Microservices as well as deploy them to separate Hosts / Servers.
To Make it clear, Let me take a small example. Imagine we are going to build an e-commerce application in ASP.NET Core. Let’s segregate it more practically. Imagine we need to build an API for the eCommerce Application. How would you go about it?
A traditional approach would be to Build a Single Solution on Visual Studio and then separate the Concerns via Layers. Thus you would probably have Projects like eCommerce.Core, eCommerce.DataAccess and so on. Now these seperations are just at the level of code organization and are efficient only while developing. When you finish the application, you will have to publish them to a single server where you can no longer see the separation in the production environment, right?
Now, this is still a cool way to build applications. But let’s take a practical scenario. Our eCommerce API has, let’s say, endpoints for customer management and product management, pretty common, yeah? Now down the road, there is a small fix/enhancement in the code related to the Customer endpoint.
If you had built using the Monolith Architecture, you would have to redeploy the entire application again and go through several tests that guarantee that the new fix/enhancement did not break anything else. A DevOps Engineer would truly understand this pain.
But if you had followed a Microservice Architecture, you would have made Separate Components for Customers, Products, and so on. That means you have 2 API Projects that are specific to what a Customer Endpoint needs and what a Product Endpoint needs. Now, these Microservices can be deployed anywhere in the Web and need not go along with the Main Application. In this way, we create a clean separation and physically decouple the Application into various parts.
This may sound easy to achieve, but it is quite a complex architecture. Some complexities that can arise is, ’ How can you make the Microservices interact with each other? , What about the authentication? and so on. That is exactly why the knowledge of Microservice Architecture is in great demand.
Here is what a Microservice Architecture would look like.
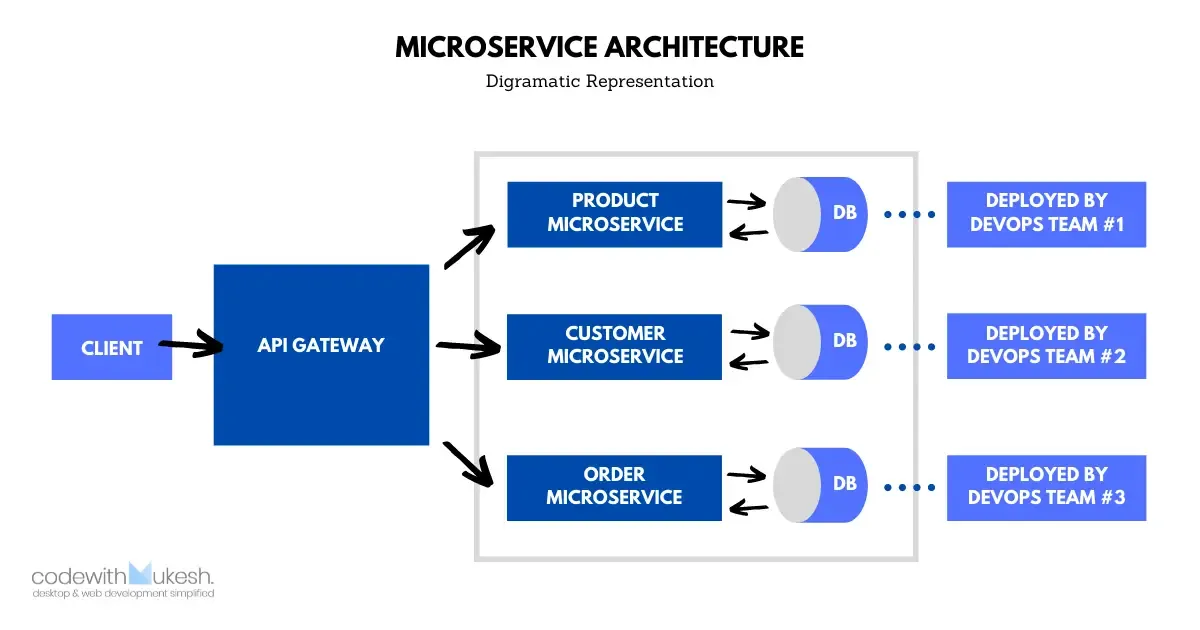
Let’s go through this Diagram and certain Keywords.
As mentioned earlier, we are trying to build an ASP.NET Core API Solution for an eCommerce Application. Now, we identified the possible components that make sense to be a Microservice. The Components identified are Products, Customers, and orders. Now each of these microservices will be a Standalone WebApi Project. Clear? This means we will have 3 ASP.NET Core WebApis in the picture as Microservices. This is the central black that you can see in the diagram.
These components/microservices DO NOT have to be built on ASP.NET Core itself. It can be highly Flexible where the Customer Microservice is built using Node & Express.js connected to a MongoDB and the other services could be built using ASP.NET Core, depending on the availability of the Team. This Architecture makes things quite simple and flexible, yeah?
Microservices are free enough to use a shared database or even have a dedicated database of their preference.
Now that we have the Microservices, let’s think about its deployment. Ideally, you don’t need a single DevOps team to be responsible for the entire deployment. But you have multiple units of DevOps teams who are responsible for one / many Microservices.
Let’s say Product Microservice is deployed to localhost:11223, Customer Microservice to localhost:22113, and so on. In this diagram, the client denoted the Main Application. In our case, the eCommerce Application. You do not want to confuse the client by presenting so many Microservices upfront. Imagine having 50 Microservices and the client has to know about each of them. Not Practical, yeah?
To overcome this, we introduce an API Gateway placed right in between the client and the Microservices. This gateway re-routes all the api endpoints and unifies it under a single domain so that the client no longer cares about the 50 Microservices.
localhost:11223 will be re-routed to localhost:40001/api/product/
localhost:22113 will be re-routed to localhost:40001/api/customer/
Where localhost:40001 is the location of your API Gateway. In this way, your client connects to the gateway, which in turn re-routes the data / endpoints to / from the Microservices. This is quite enough for now. We will go into more detail later in this article, once we get started with the development. I hope that the Diagram makes quite a lot of sense now.
What we will Build?
As mentioned earlier, here is the requirement. We will have to build a simple Microservice Architecture in ASP.NET Core with API Gateways. For starters, let’s have 2 Microservice WebAPIs that perform CRUD Operations for Customers and Products. We will also need an API Gateway that is responsible for re-directing the incoming request from the client (Here, a browser or Postman would be the client) to and from the Microservices. To be more clear, the client has to access the API Gateways and perform the operation over the Microservices.
Getting Started with the Implementation
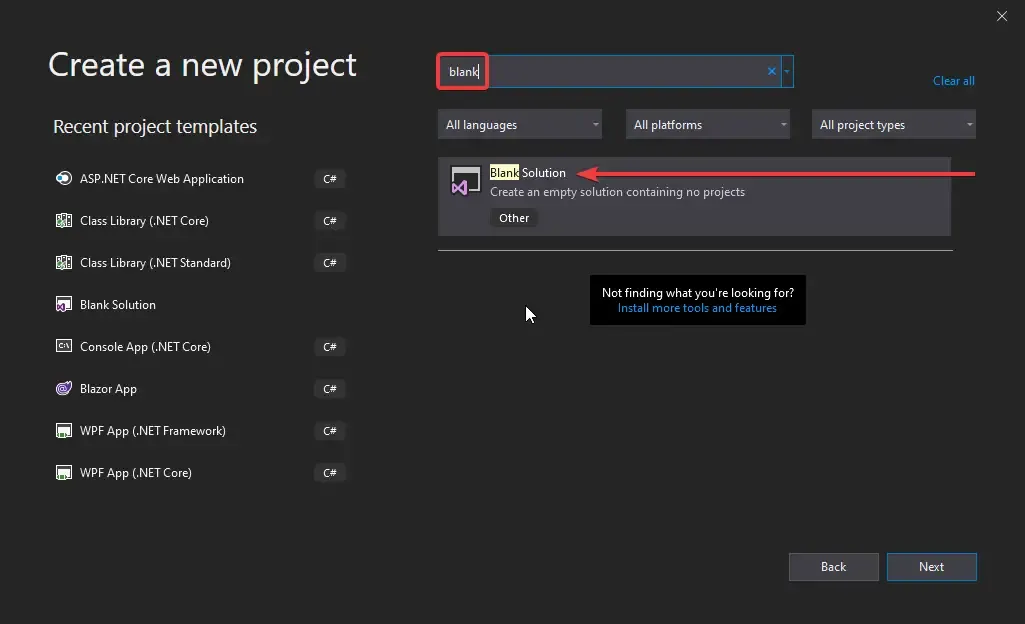
We will be building this Implementation completely with ASP.NET Core 3.1. Open up Visual Studio 2019 and Create a New Blank Solution. You can search for Blank Solution and Click Next.
Make sure that you build the Solution with ASP.NET CORE 3.1 and above only.
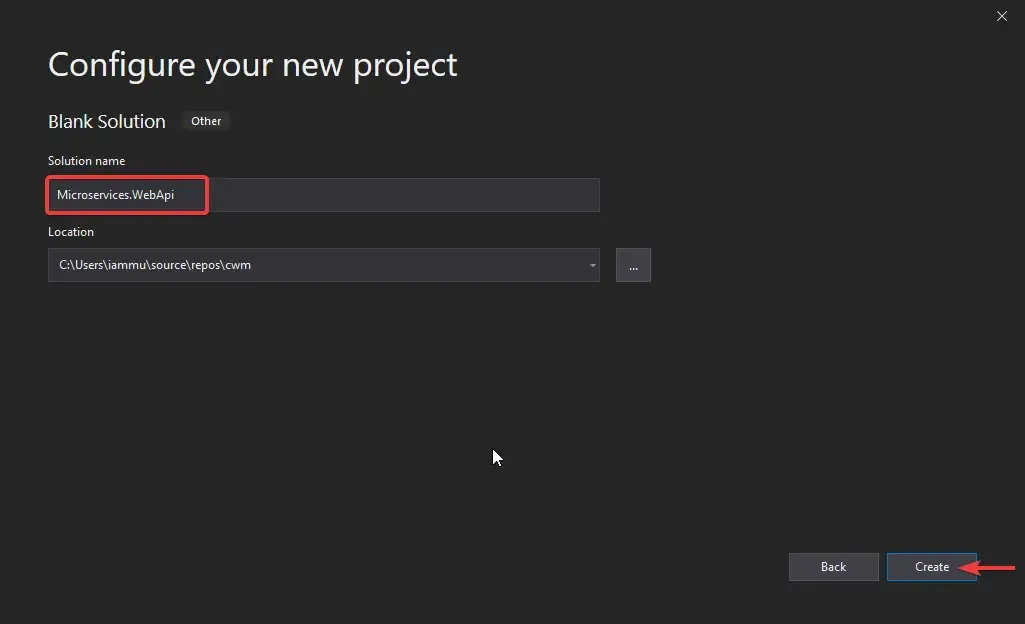
In the next Dialog, let’s name our Solution as Microservices.WebApi.
Visual Studio Creates a new Blank Solution for you. Here, Add a New Folder and Name it Microservices. This is the folder where we will add all the Microservices. Right-click on the Microservices folder and add a new Project. Let’s add the Product Microservice First. This is going to be an ASP.NET Core WebApi Project. I will name it Product.Microservice.
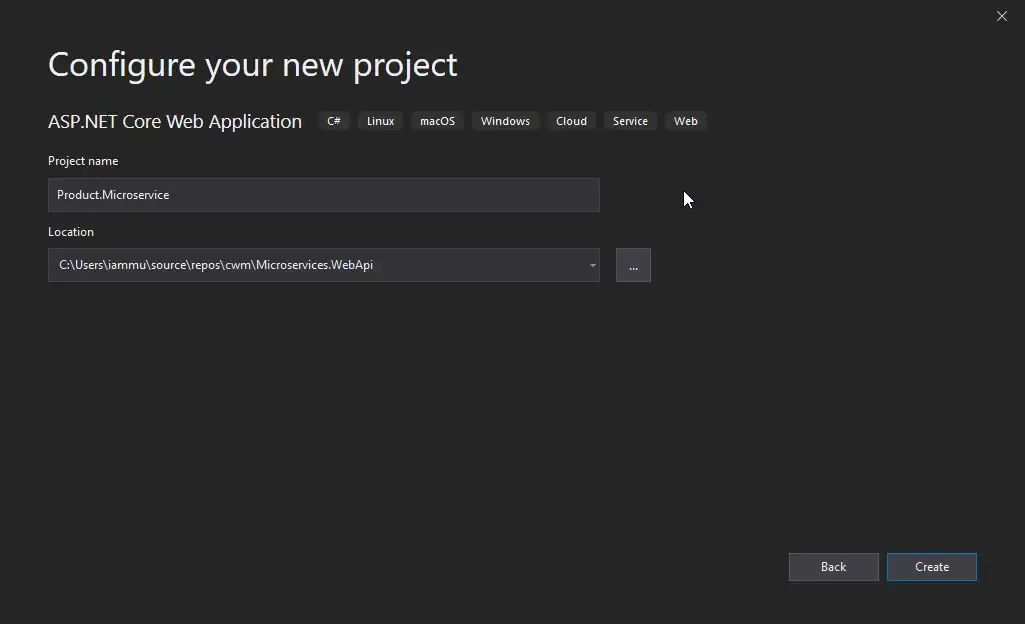
Similarly, create a Customer.Microservice Project. Next, let’s add the API Gateway.
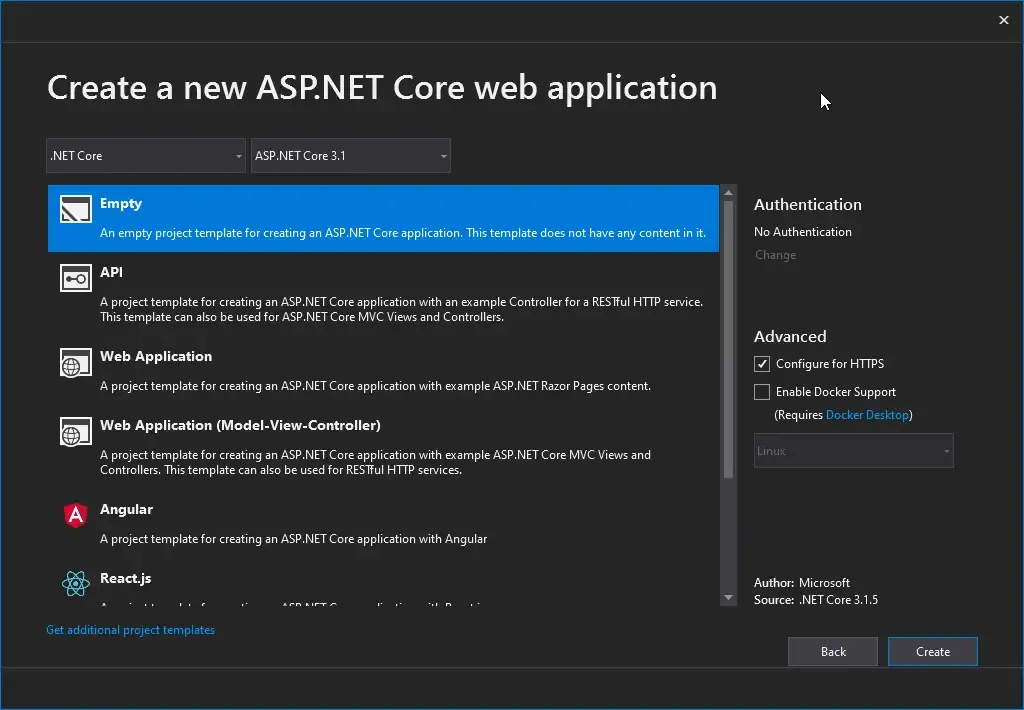
In the root of the Solution, add a new ASP.NET Core Project and name it Gateway.WebApi. This will be an Empty Project, as there will be not many things inside this gateway.
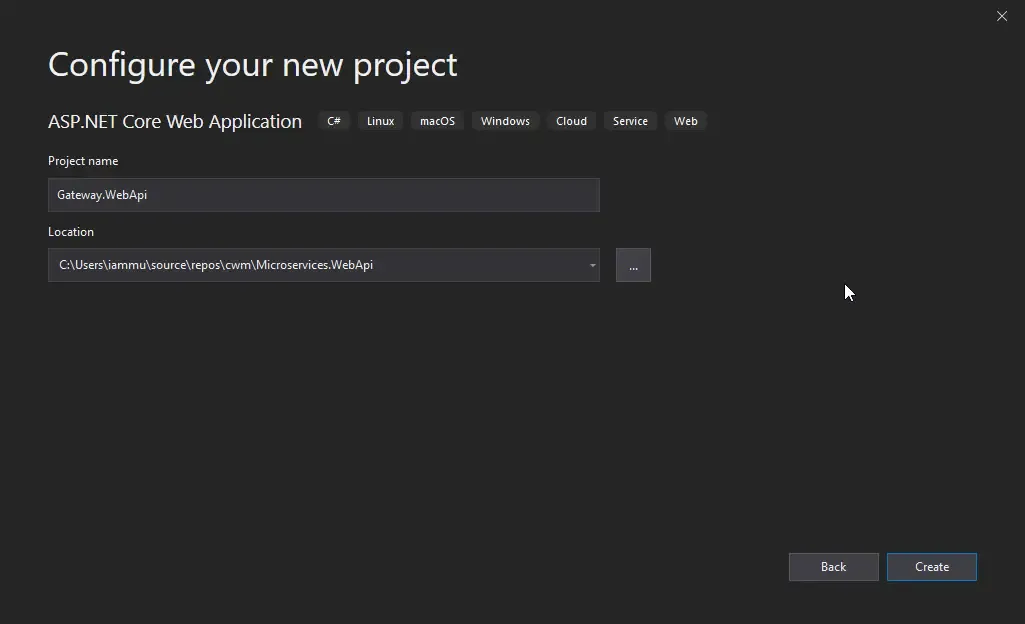
This is how your folder structure will look like.
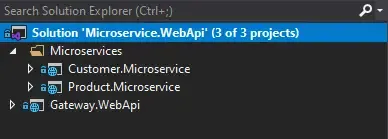
Basically, all the CRUD Operations related to the Customer go to the Customer.Microservice and everything related to the Products goes to the Product.Microservice. The Client will be accessing the gateway’s URL to use the Customer and Product Operations. Ideally, the Microservices will be something internal and will not be accessible by the public without the help of the API Gateway.
Setting up the Microservices
Let me quickly set up a simple CRUD Operation for both the Microservices. I will be using Entity Framework Core as the Data Access Technology along with a Dedicated Database for each service. Since Creating a CRUD Api is out of scope for this article, I will skip the steps and come to a point where I have both the Microservices ready with CRUD endpoints. It’s also recommended to set up Swagger.
If you want a detailed guide on building an ASP.NET Core WebApi, I strongly suggest you read the following articles.
-
Getting Started with Entity Framework Core in ASP.NET Core - Read here
-
CQRS and MediatR Pattern in ASP.NET Core - Read here
One thing that we need is different database connections for both the Microservices. It’s not mandatory, but it allows you to understand the implementation of Microservices. Here is how the Swagger UI for both the microservices look.
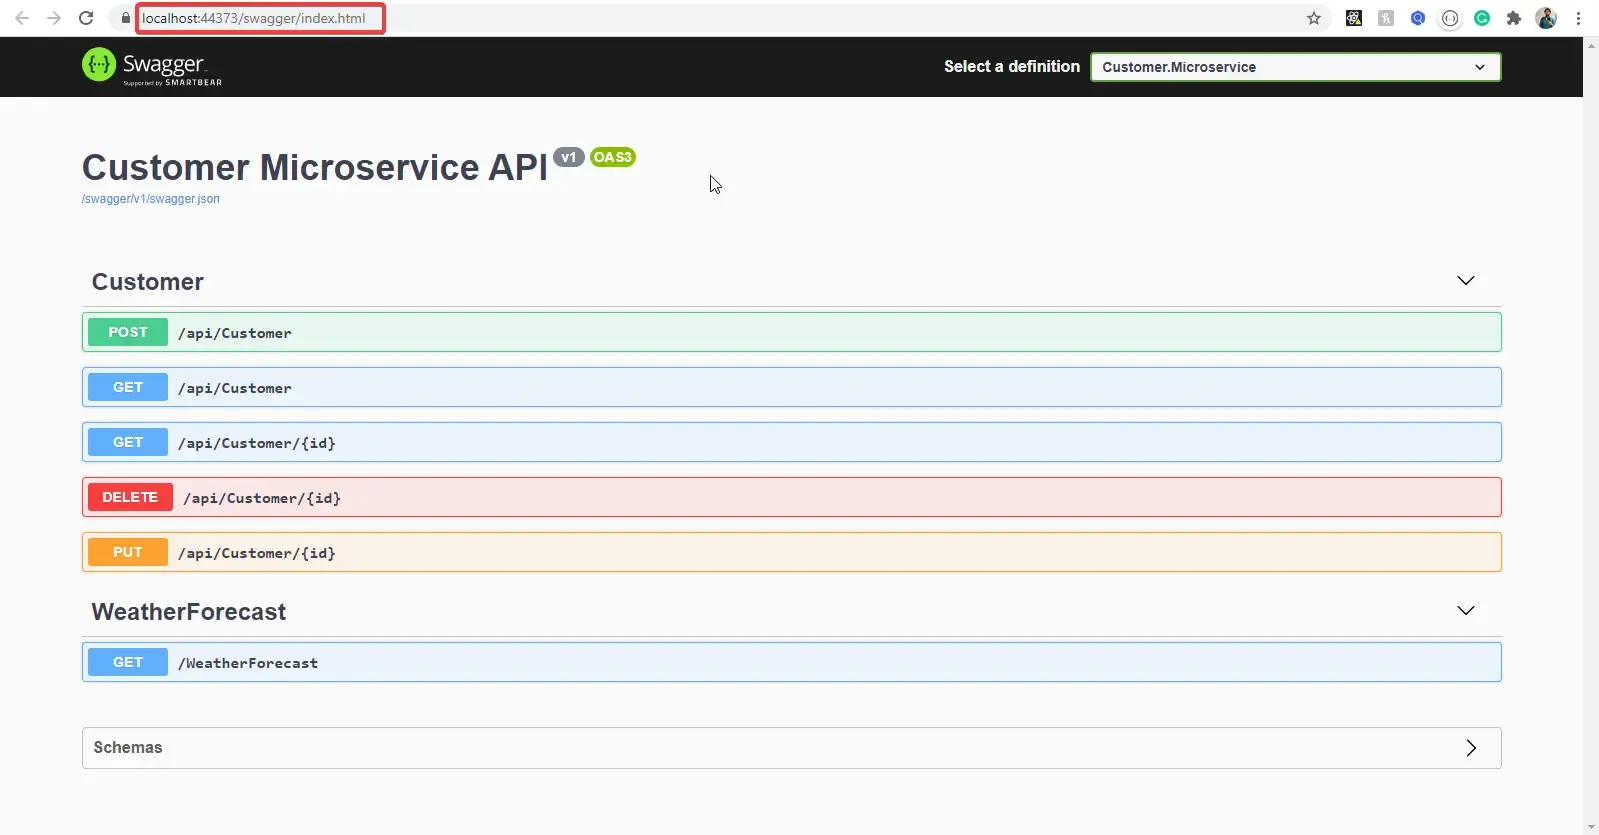
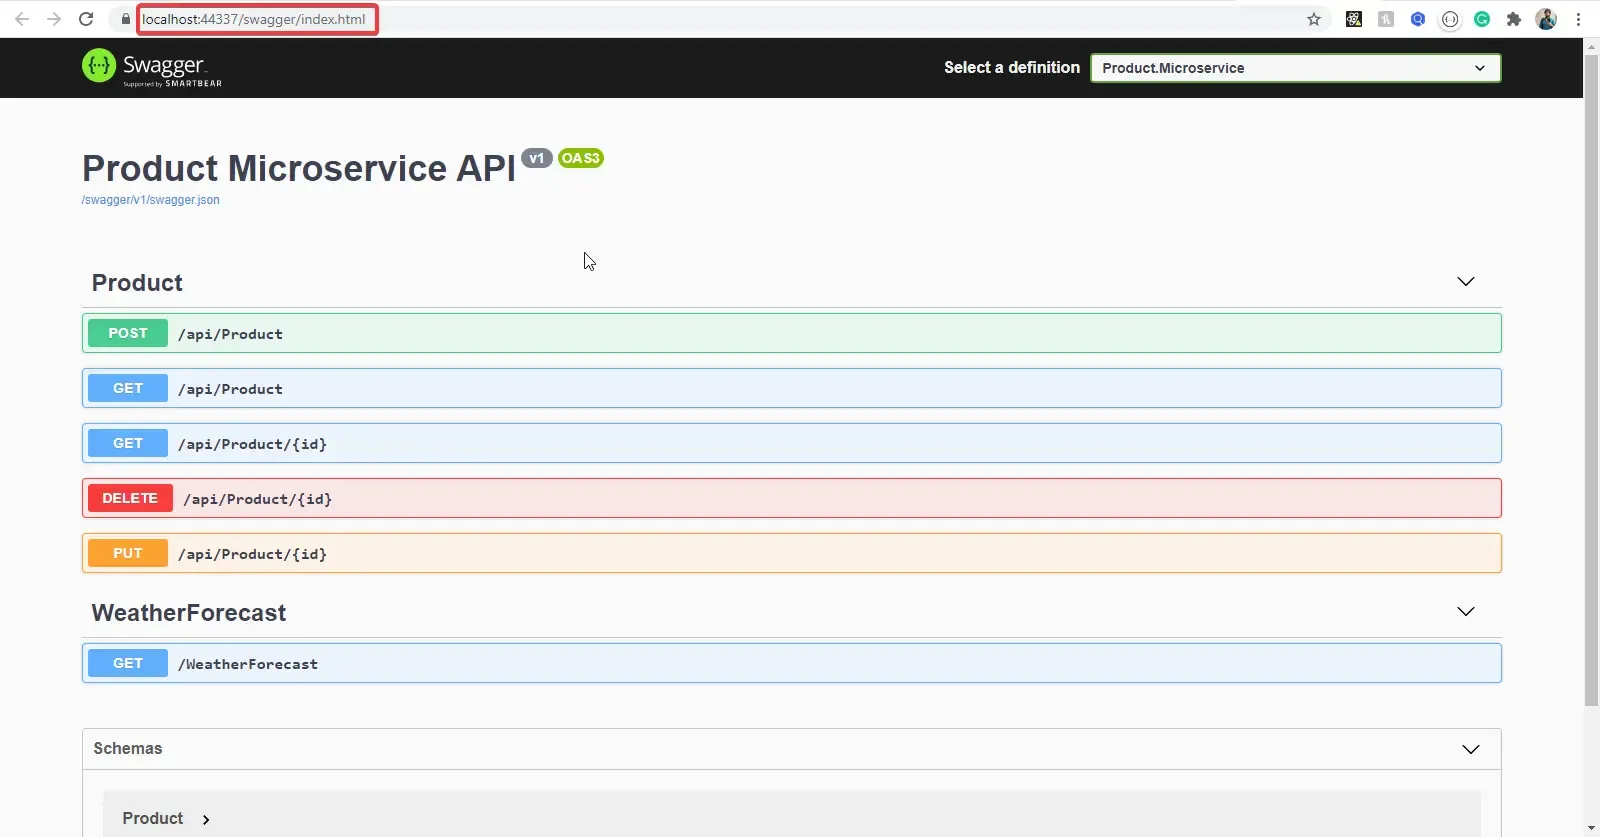
Note down the URLs of both the Applications. We will need them in the next steps.
Remember API gateways? Let’s talk more about it now.
Introduction to Ocelot API Gateway
Ocelot is an Open Source API Gateway for the .NET/Core Platform. What it does is simple. It unifies multiple microservices so that the client does not have to worry about the location of each and every Microservice. Ocelot API Gateway transforms the Incoming HTTP Request from the client and forwards it to an appropriate Microservice.
Ocelot is widely used by Microsft and other tech giants as well for Microservice Management. The latest version of Ocelot targets ASP.NET Core 3.1 and is not suitable for .NET Framework Applications. It will be as easy as installing the Ocelot package to your API Gateway project and setting up a JSON Configuration file that states the upstream and downstream routes.
Upstream and Downstream are 2 terms that you have to be clear with. An upstream Request is the Request sent by the Client to the API Gateway. Downstream request is the request sent to the Microservice by the API Gateway. All these are from the perspective of the API Gateway. Let’s see a small Diagram to understand this concept better.
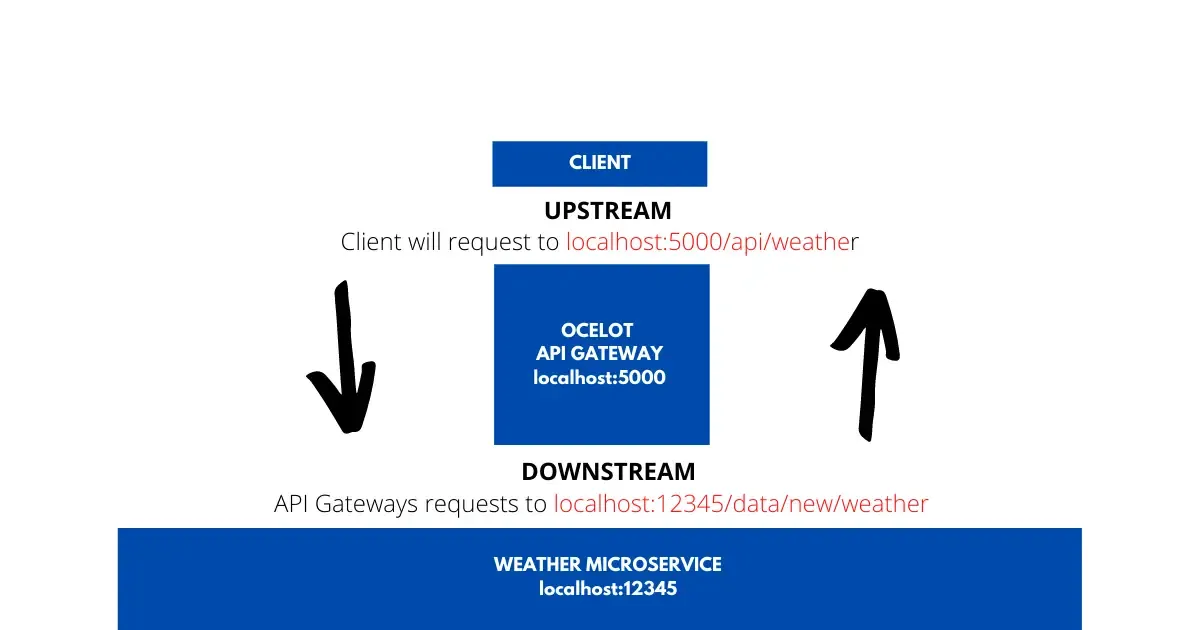
This will help you understand even more. The API gateway is located at port 5000, whereas the Microservice Port is at 12345. Now, the client will not have access to port 12345, but only to 5000. Thus, the client sends a request to localhost:5000/api/weather to receive the latest weather. Now what the Ocelot API Gateway does is quite interesting. It takes in the incoming request from the client and sends another HTTP Request to the Microservice, which in turn returns the required response. Once that is done, the Gateway sends the response to the client. Here is localhost:5000 is the upstream path that the client knows of. localhost:123456 is the downstream path that the API Gateways knows about. Makes more sense now, yeah?
In this way, Ocelot API Gateway will be able to re-route various requests from clients to all the involved Microservices. We will have to configure all these routes within the API Gateway so that Ocelot knows how and where to route the incoming requests.
Here are a few noticeable Features of Ocelot
-
Routing the Incoming Request to the required Microservice
-
Authentication
-
Authorization
-
Load Balance for Enterprise Applications.
Building an Ocelot API Gateway
Navigate to the Gateway.WebApi Project that we had created earlier.
Firstly, let’s install the Ocelot package.
Install-Package Ocelot
Let’s configure Ocelot to work with our ASP.NET Core 3.1 Application. Go to the Program.cs of the Gateway.WebApi Project and change the CreateHostBuilder method as follows.
public static IHostBuilder CreateHostBuilder(string[] args) =>Host.CreateDefaultBuilder(args) .ConfigureWebHostDefaults(webBuilder => { webBuilder.UseStartup<Startup>(); }).ConfigureAppConfiguration((hostingContext, config) =>{ config .SetBasePath(hostingContext.HostingEnvironment.ContentRootPath) .AddJsonFile("ocelot.json", optional: false, reloadOnChange: true);});Since Ocelot reads its route configuration from a JSON config file, Line #11 adds the new JSON file so that the ASP.NET Core 3.1 Application is able to access these settings. Note that we have not yet created the ocelot.json file. We will be doing it once we have configured the Ocelot Middleware.
Next, Navigate to the Startup.cs of the same Gateway.WebApi Project and add Ocelot to the ConfigureServices method.
public void ConfigureServices(IServiceCollection services){ services.AddOcelot();}Finally, go to the Configure method and make the following changes. This adds Ocelot Middleware to the ASP.NET Core 3.1 Application’s Pipeline.
public async void Configure(IApplicationBuilder app, IWebHostEnvironment env){ if (env.IsDevelopment()) { app.UseDeveloperExceptionPage(); } app.UseRouting(); app.UseEndpoints(endpoints => { endpoints.MapControllers(); }); await app.UseOcelot();}Configuring Ocelot Routes
This is the most important part of this article. Here is where you would configure the Upstream / Downstream routes for the API Gateways, which helps Ocelot to know the routes.
Let’s add basic route settings so that we understand how it works. We will start with Product Microservice. Let’s say the client wants to get all the Products via the API Gateway.
First, Using the Swagger UI of the Product Microservice, I will add some products randomly. Once that is done, let me check the GET ALL Request via Swagger.
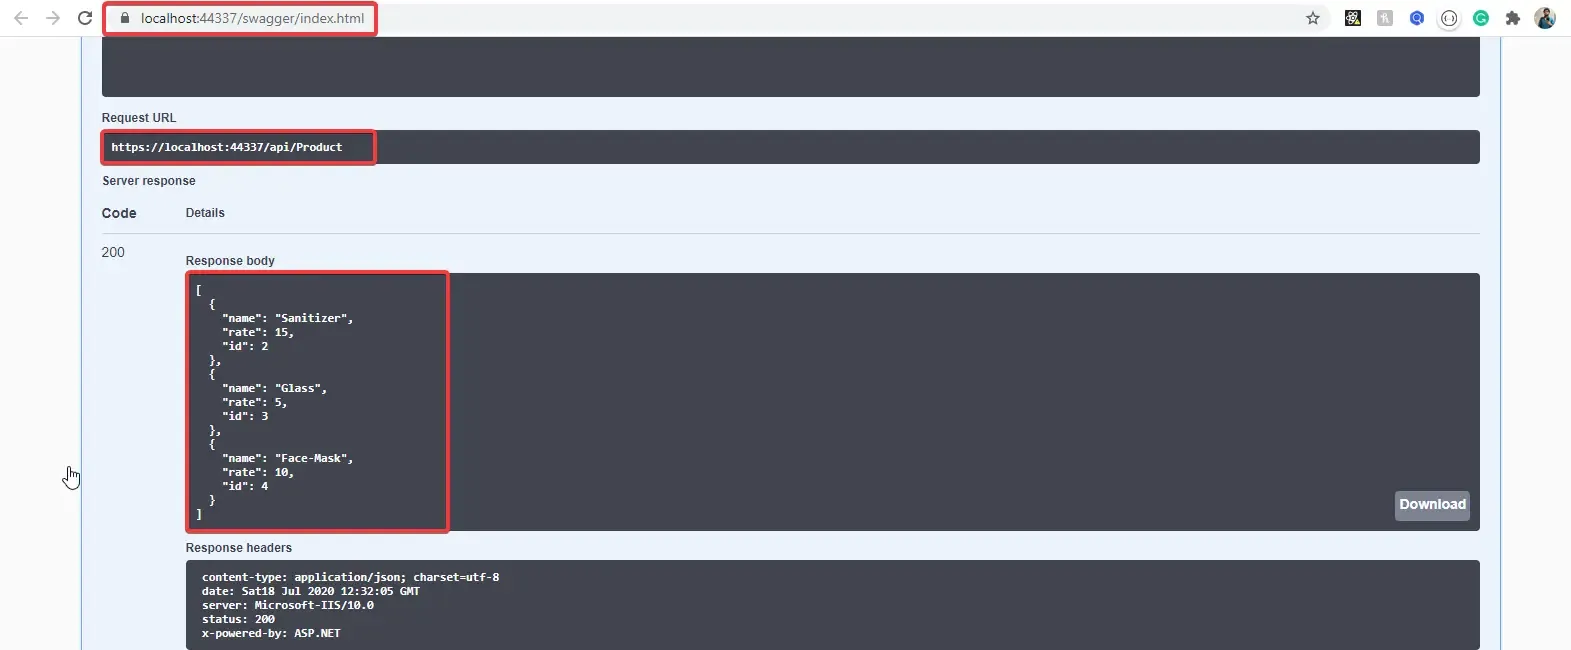
Note the URL of the Product Microservice and here is the result as well. For now, we have 3 products coming from the Product Database via Product Microservice.
Create a new JSON file in the root of the Gateways.WebApi Project. This file would contain the configurations needed for Ocelot. We will name this file as ocelot.json , as we have already registered this name back in the Program.cs file, remember?
{ "Routes": [ { "DownstreamPathTemplate": "/api/product", "DownstreamScheme": "https", "DownstreamHostAndPorts": [ { "Host": "localhost", "Port": 44337 } ], "UpstreamPathTemplate": "/gateway/product", "UpstreamHttpMethod": [ "POST", "PUT", "GET" ] } ]}Ocelot takes in an Array of Route Objects.
As the first element in the array, let’s configure the Product Microservice’s Get All, Update, and Insert Endpoints.
DownstreamPathTemplate denotes the route of the actual endpoint in the Microservice.
DownstreamScheme is the scheme of the Microservice, here it is HTTPS
DownstreamHostAndPorts defines the location of the Microservice. We will add the host and port number here.
UpstreamPathTemplate is the path at which the client will request the Ocelot API Gateway.
UpstreamHttpMethod is the supported HTTP Method to the API Gateway. Based on the Incoming Method, Ocelot sends a similar HTTP method request to the microservice as well.
Let’s test it now. As per our configuration, we have to request to the Gateway.WebApi which is located at localhost:44382 at the route localhost:44382/gateway/product and we are expecting to get the results directly from the microservice (which is located at localhost:44337).
PS, you can see the Gateway.WebApi’s Launch URL is the launchsettings.json file found under the Properties drill-down in the Gateway.WebApi project.
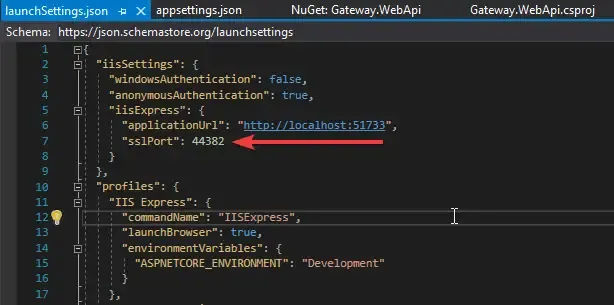
Build the solution to ensure that there are no errors. Now, there is one thing to change. We have 3 APIs now. Let’s configure the Solution so that all the 3 APIs get fired when you run the application. This is because we will need all the APIs online.
To enable Multiple Startup Projects, Right-click on the solution and click on Properties. Here, select the Multiple Startup Projects options and enable all the projects.
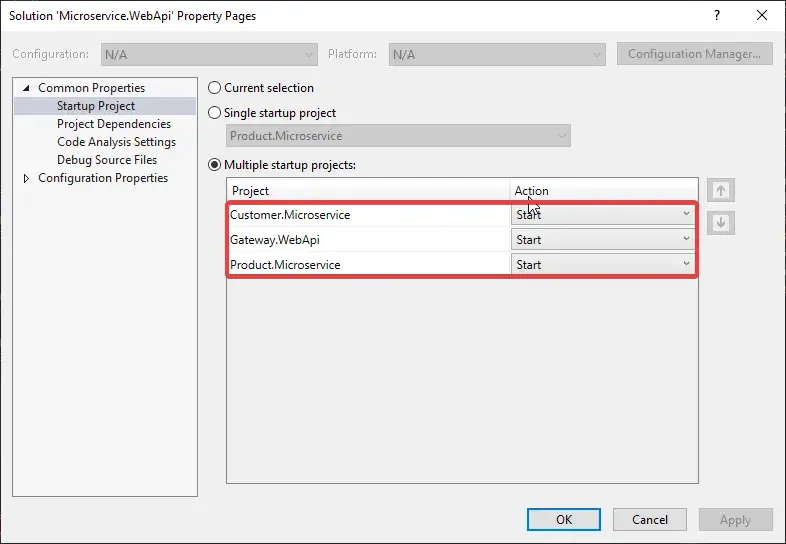
Run the Solution and navigate to localhost:44382/gateway/product
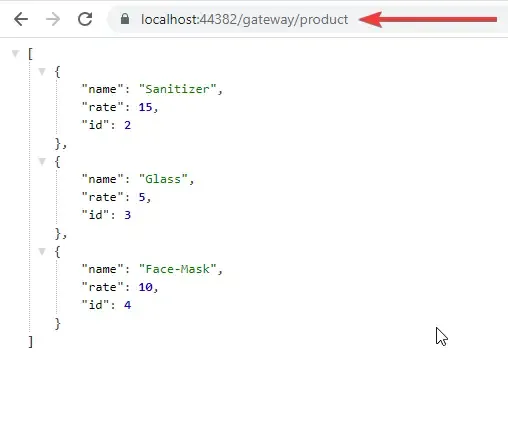
Great, we have successfully implemented API Gateways and made a simple Microservice Architecture in ASP.NET Core for ourselves.
With POSTMAN, you can test the POST and UPDATE methods as well.
But we are still missing the GetById and Delete HTTP Methods. We will have to add another route for this because we are also passing an ID parameter to these endpoints. Understand?
This is what the next route will look like. This is more of a parameter-based route with other settings similar to the previous one.
{ "Routes": [ { "DownstreamPathTemplate": "/api/product", "DownstreamScheme": "https", "DownstreamHostAndPorts": [ { "Host": "localhost", "Port": 44337 } ], "UpstreamPathTemplate": "/gateway/product", "UpstreamHttpMethod": [ "POST", "PUT", "GET" ] }, { "DownstreamPathTemplate": "/api/product/{id}", "DownstreamScheme": "https", "DownstreamHostAndPorts": [ { "Host": "localhost", "Port": 44337 } ], "UpstreamPathTemplate": "/gateway/product/{id}", "UpstreamHttpMethod": [ "GET", "DELETE" ] } ]}Line 16 and 24 - We are accepting an ID Parameter in the route.
Line 25 - We restrict the methods to just GET and DELETE
Let’s test now. Navigate to localhost:44382/gateway/2
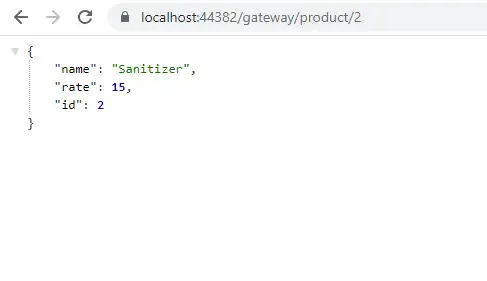
Works perfectly! yeah?
That’s it. We are done with configuring Ocelot API Gateway to support the Product Microservice. I will leave the configuration of the Customer Microservice to you as a small practice. You can find the finished ocelot.json here for reference.
We will wind up this article here. I hope you have learned quite a lot in relation to the Microservice Architecture in ASP.NET Core.
If you found this article helpful, consider supporting it.
Summary
In this article, we have learned all about Microservice Architecture in ASP.NET Core with Ocelot, Concepts of API Gateway, Basics of Ocelot and Ocelot Configuration, and much more. You can find the completed source code here.
We will cover other advanced concepts like Logging, JWT Authentication, Identity Servers, and so on in another article. But for starters, this is quite enough information to help you understand how the Microservices work.
I hope you learned something new and detailed in this article. If you have any comments or suggestions, please leave them behind in the comments section below. Do not forget to share this article with your developer community. Thanks and Happy Coding!?

