In this article, we will learn about working with MongoDB in ASP.NET Core. We will be building a WebAPI Project that can manage customer data. Along the way we will cover various concepts including Introduction to NoSQL Database, What is MongoDB, Installing MongoDB Locally and on the Cloud, Integrating with ASP.NET Core and much more. In general, you will be getting a complete working knowledge with MongoDB and probably set enough to start implementing MongoDB in your next ASP.NET Core Project. The source code of the application that we will be building is available here.
We will be working with ASP.NET Core 3.1 WebAPI, Visual Studio 2019 IDE and MongoDB. Let’s begin!
What are NOSQL Databases?
If you are new to NoSQL Databases, it mean exactly what it sounds like. NOSQL or Non SQL Databases contrary to the SQL Databases, store the data in forms that not in any way similar to Relational Tables. A very common misconception is that, NOSQL Databases cannot store relationship data. It can store the relationship data as well, but just in a different way that is nothing similar to how SQL Databases works.
Querying a SQL Database may be complicated for specific usecases. Imagine having to search for a particular user data that is available only after Joining Multiple Tables. If the number of records are high, the query performance may be on the weaker side at times. With NOSQL Databases, you get to store all the user data under one document / dictionary. Thus, while querying, the application has to just look under one document. This can noticabley improve the performance.
Note that, this doesnt mean SQL Databases is no longer recommended. You could have both SQL and NOSQL Databases under a single application. An example of such an use case is , You could NOSQL Databases as a secondary Database that can be used to Search purposes as we know that it can outperform SQL DB.
The advantages with using NOSQL Databases are as follows.
- Scalable
- Affordable and Easy to setup.
- Quick
- Flexible
- Lightweight
Now, there a quite a lot of types of NOSQL Databases. This includes the following
- Document Database - These databases allows you to store data in the form of JSON objects. MongoDB is the most popular Document Database out there. It can be used to store a large amount of complex data which can in turn be easily queried without any compromise to the performance / response times. We will be talking extensively on MongoDB in this article.
- Graph Database - A more complicated form of NOSQL DBs which stores data in nodes and edges.
- Dictionary Databases - Redis is a great example of Key-Value Database. Such Database are not very complication. They just have a key and value. This is an excellent choice when you want to store tons of data that are very simple like user preferences, application language texts, country informations. Caching is a perfect use case of such databases. You get the point, yeah?
How NOSQL differs from SQL Databases?
To get a better understanding, let’s take a very simple example. The requirement is to design a datastore to store the data of User. The user will have fields like FirstName, LastName, Date Of Birth, multiple addresses etc.
Here is the ideal way to design it on a SQL Database. Make 2 tables, namely dbo.Users and dbo.Adresses. Users table will include fields like UserId, FirstName, LastName, DateofBirth. The Address table will include fields like AddressId, UserId, Country, PhoneNumber where UserId is a foreign key relationship to the User table. Right? Although this can be easily queried with a single INNER JOIN, what happens when the complexity increases or the number of users grow drastically? It would not be recommended to make several Joins.
Let’s see how a Document based NOSQL Db can handle it. As mentioned earlier, Document databases work with JSON objects. Here the data of the user as well as the address data will be stored in a single JSON object, which ultimately makes it much simpler and quicker to retreive the data. Makes more sense, yeah?
Here is a small sample of the how the object get’s saved in MongoDB.
{ "_id": "123456789", "firstname": "Mukesh", "lastname": "Murugan", "address": { "street": "Street 123", "city": "TVM", "state": "Kerala", "zip": "112233" }, "hobbies": ["coding", "coding"]}However, this doesnt take away anything from SQL databases. There are certain instances where NOSQL can outperform a SQL Database performace. Finding the optimal use-case and deciding which kind of Database to use is the real challenge that can draw a line between a fast application and a low application. Get it?
When to use NOSQL Databases?
Making this choice is quite challenging when you are getting started. When the question comes to NOSQL or SQL, the recommended answer is to use both, obviously depending on the growth potential of your solution. You could use SQL for your Business data and use NOSQL for caching, quick searches.
Here are a few scenarios to consider using NOSQL Databases.
- NOSQL Databases driven applications can developed much more faster than the SQL counterpart. This is solely because the developers are in total control of the Database structures, and do not have to depend on the SQL Admin to make changes who then has to verify if the structure change affect the sanity of the database schema.
- Much more affordable. When you are going to deal with Millions of records of raw data, NOSQL is always a better way out. Extra engineering might be needed on SQL Databases to optimize for huge amounts of data.
Although NOSQL Database tech has shown a drastic growth in the industry, SQL databases are still a great choice for Enterprise applications. Given that SQL has been around for quite a lot of time, it attributes to the widespread adaption by various tech companies, a massive community that can help you out with almost any issue you can ever face.
What is MongoDB?
MongoDB is one of the most popular Document based NOSQL Database with all the flexibility and scalability that your application would ever need. MongoDB is extensively used by large tech giants for storing high volumes of data. Instead of using the traditional SQL Tables and Rows, MongoDB stores data in JSON objects which is much more efficient than the traditional row/column approach.
“As a programmer, you think in objects. Now your database does too.”
-Here is a cool quote that I found over at their page. Makes a lot of sense suddenly :D
MongoDB in ASP.NET Core - Getting Started
MongoDB is highly cross platform and can just work with about everything. As our point of concern, MongoDB can be seamleslly integrated with ASP.NET Core to take the maximum advantage of this awesome document based NOSQL Database. Let’s walkthrough step by step on working with MongoDB in ASP.NET Core. We will be setting up MongoDB Server and ultimately building a ASP.NET Core 3.1 WebAPI that does CRUD operations on a MongoDB Instances.
Setting up MongoDB
There are a bunch of ways to get started with MongoDB. You can either have the MongoDB Server installed locally on your machine or use the cloud version of MongoDB. We will go through each of them. You can setup MongoDB the way you want. Utltimately the only thing you would require is a valid connection string.
Installing MongoDB Server Locally
MongoDB allows you to host your own instance locally in your infrastructure. They offer Enterprise as well as community editions of their installable server. Community, the free edition is more than enough for development purposes of individuals. You will have to install both the server and a GUI Application (MongoDB Compass) to manage the MongoDB, very similar to SQL Management Studio. I will be installing it on my Windows 10 machine. Links may vary with your setup, however it’s quite straightforward for installing on to any kind of machine. Let’s get started.
Download the MongoDB Server from here and install it. The latest available version is 4.4.0 at the time of writing this article. It’s about 250mb in size.
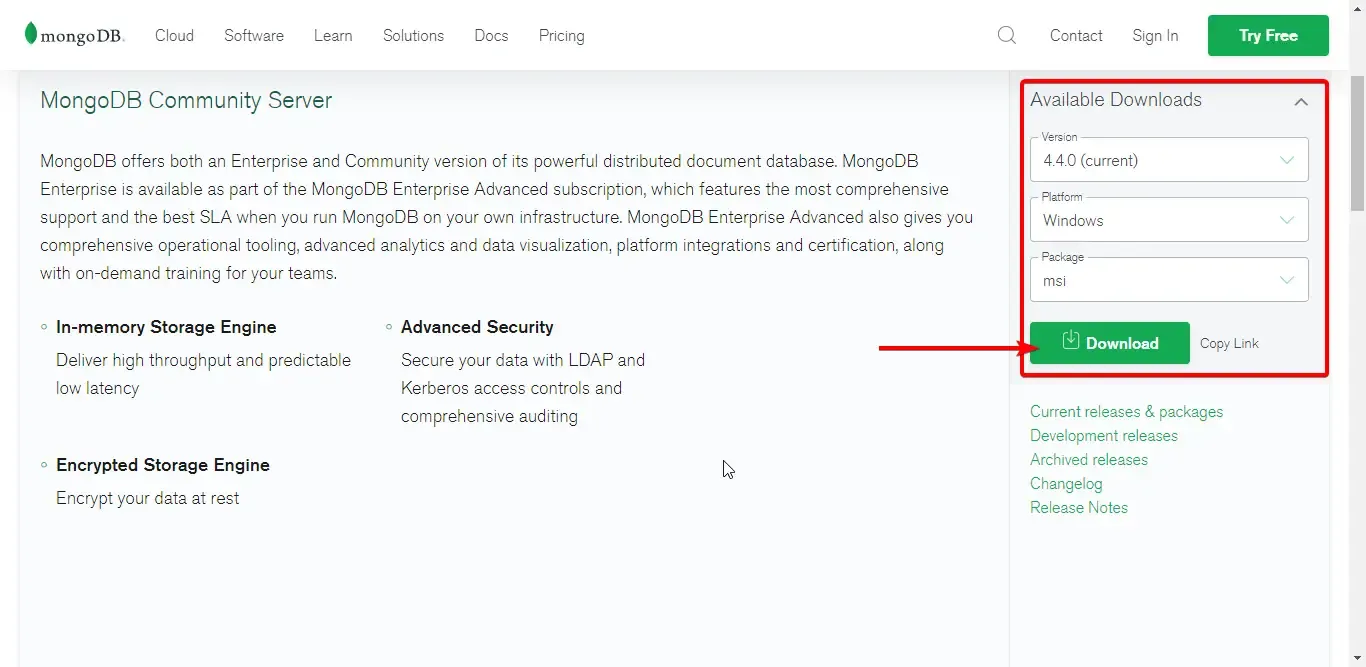
You do not have to download anything additional for the GUI Application. You will have to check the “Install MongoDB Compass” while installing the server.
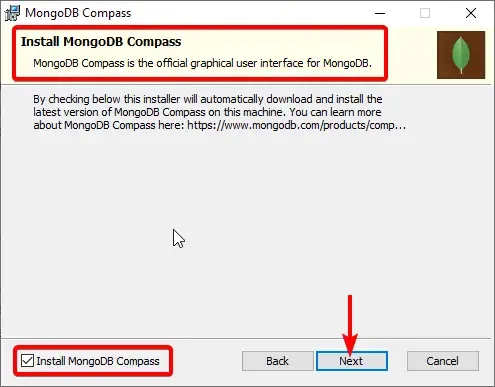
For some reason, MongoDB Compass was not installed for me by default. I had to manually download and install their executable. If you face any such issue, here is the download center link - https://www.mongodb.com/try/download/compass . That’s another 150MB or so.
Once you are done with the installation, you may have to restart your machine to ensure that the MongoDB Service is properly configured.
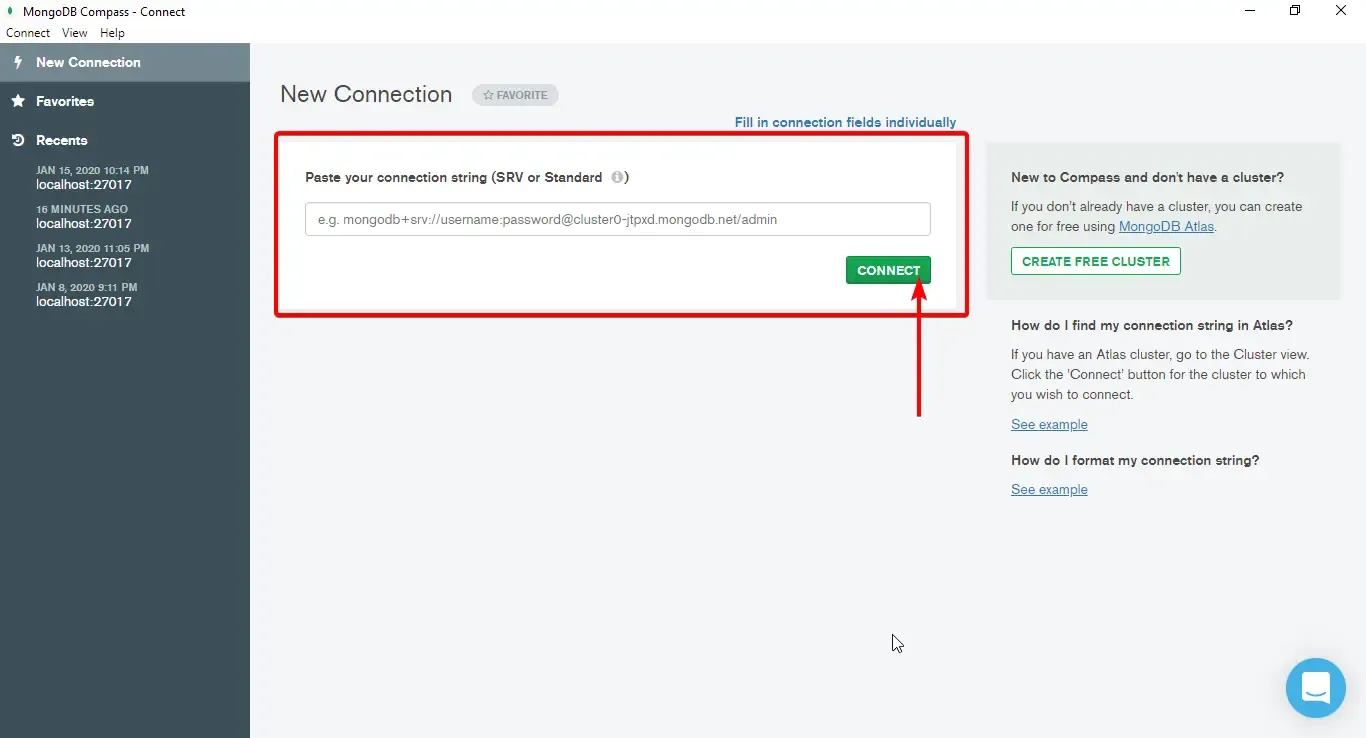
Open up MongoDB Compass. With Compass, you could specify the connection string to any authorized server and start broswing the database quite easily, But since we have no connection string with us, we can connect to the local MongoDB Server. For this you don’t have to specify the connection string, just press CONNECT.
This gets you connected to the localhost:27017 port where your default mongodb service is running.
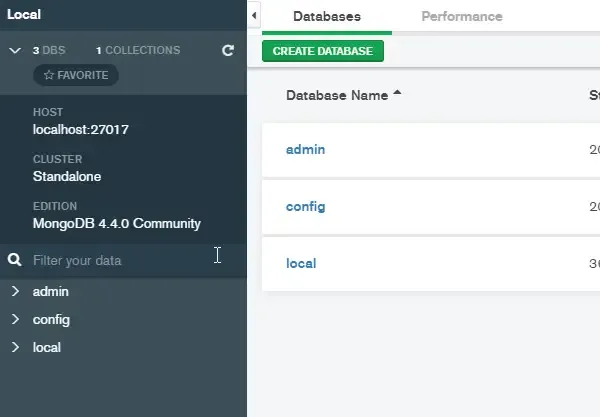
Let’s create a new database to understand how MongoDb works. Click on Create Database.
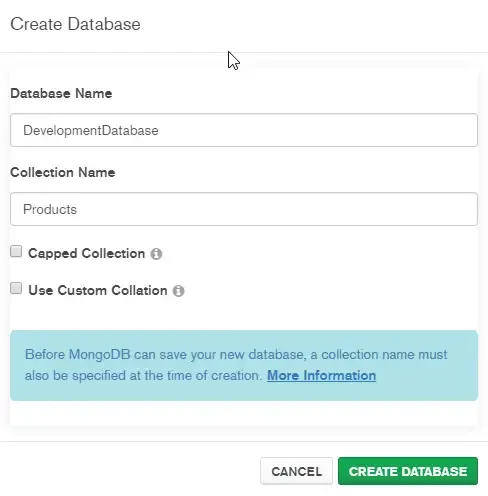
Think about a MongoDB Database much similar to a random RDMS Database. Properties may differ though.
What’s a Collection? You could relate Collections to Tables inside a Database.
In the above screenshot, I have added a Database named DevelopmentDatabase with a Collection, Products. You can add N number of collections to a Database.
What’s inside a Collection? Similar to SQL, Collections contain data. With regards to MongoDB Collections have Documents in them. Documents refer to plain old JSON Objects. The concept is quite clear yeah?
Let’s try to add a new Document to the Products Collection. Select the Products Collection and Add Data -> Insert Document.
{ "name": "DELL G3 Gaming i5 10th Gen", "type": "Laptop", "cost": "79,000"}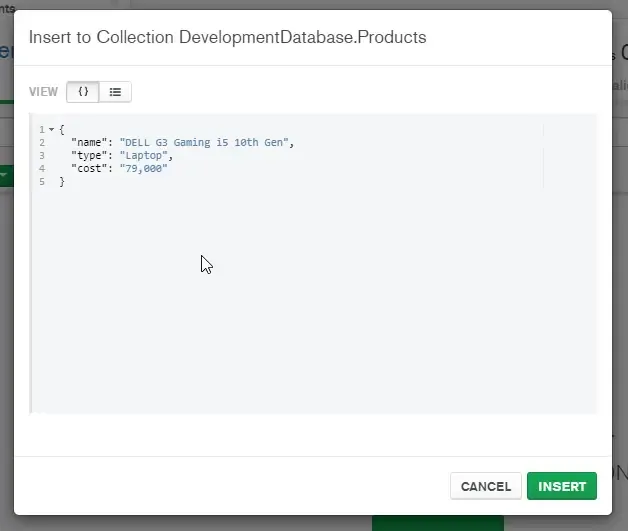
You can see that the document is inserted into the Products Collection. No predefined Schema, No restriction. Just tons of possibilites to scale applications. :D You can note that the ID gets generated automatically with a random GUID. You have control over this as well.

Setting up MongoDB Cloud Atlas
Alternatively, you can also host your database on the cloud , thanks to MongoDB Cloud. You can create you FREE account here. Everything that we did with the MongoDB Compass applies to the Cloud variant as well.
Setting up the ASP.NET Core 3.1 WebAPI Project
Open up Visual Studio and Create a new ASP.NET Core 3.1 WebAPI Project. As mentioned earlier we will be building a simple application that connects to our MongoDB Server and performs CRUD Operations on Customer Entity.
First, let’s install the MongoDB Package. Open up Package Manager Console and install the following package. That’s literally all that you would need to take advantage of this awesome NOSQL Document based Database.
Install-Package MongoDB.Driver
Next, Let’s create the Customer Model. Note the extra annotations we are going to add.
public class Customer{ [BsonId] [BsonRepresentation(BsonType.ObjectId)] public string Id { get; set; } [Required(ErrorMessage = "First name is required")] public string FirstName { get; set; } public string LastName { get; set; } [BsonElement("PhoneNumber")] public string Contact { get; set; } [Required(ErrorMessage = "Email is required")] public string Email { get; set; }}For the Id Property, we are seting it as the Primary key of the MongoDB Document. This is represented by BsonId. Why ObjectId? MongoDB recognizes ObjectId and not string/int as the primary key. Thus we have to manually set the property so that MongoDB converts the string to ObjectId.
For the Contact Property, we need to save it with a different name in the Document Design. The BsonElement(“PhoneNumber”) annotation save the property as PhoneNumber in the document.
Finally we are adding validators to the FirstName and Email Property to make them Mandatory Fields.
Next, Let’s add the connection string information to the appsettings.json file.
"DeveloperDatabaseConfiguration": { "CustomerCollectionName": "Customers", "ConnectionString": "mongodb://localhost:27017", "DatabaseName": "DevelopmentDatabase " },This configuration will be specifically for the Development Database Only (Th eone that I had created earlier using the MongoDB Compass). As we talked earlier, this database can have multiple Collections. For now, we will work with only the Customer Collection. The Connection string is that of our local MongoDB Server Instance.
We will need to access these values via Dependencty Injection later on. Hence, we add a Configuration Model with same exact names as the property of the Class. Create a new Folder and name it Configurations. Add a new Class named DeveloperDatabaseConfiguration.
public class DeveloperDatabaseConfiguration{ public string CustomerCollectionName { get; set; } public string ConnectionString { get; set; } public string DatabaseName { get; set; }}Customer CRUD Service
Let’s start building a service that can perform CRUD operations over the Customer Collection. Create a new Class under Services/CustomerService.cs
public class CustomerService{    private readonly IMongoCollection<Customer> _customer;    private readonly DeveloperDatabaseConfiguration _settings;
    public CustomerService(IOptions<DeveloperDatabaseConfiguration> settings)    {        _settings = settings.Value;        var client = new MongoClient(_settings.ConnectionString);        var database = client.GetDatabase(_settings.DatabaseName);        _customer = database.GetCollection<Customer>(_settings.CustomerCollectionName);    }
    public async Task<List<Customer>> GetAllAsync()    {        return await _customer.Find(c => true).ToListAsync();    }
    public async Task<Customer> GetByIdAsync(string id)    {        return await _customer.Find<Customer>(c => c.Id == id).FirstOrDefaultAsync();    }
    public async Task<Customer> CreateAsync(Customer customer)    {        await _customer.InsertOneAsync(customer);        return customer;    }
    public async Task UpdateAsync(string id, Customer customer)    {        await _customer.ReplaceOneAsync(c => c.Id == id, customer);    }
    public async Task DeleteAsync(string id)    {        await _customer.DeleteOneAsync(c => c.Id == id);    }}
Line #3 - Defining the MongoCollection of Customers.
Line #4 - Since we are using the IOptions Pattern to read our MongoDB Connection Configuration from the appsetting.json, we will have to inject the configuration class to the constructor.
Line #6 - Injecting the IOptions of the Configuration to the constructor.
Line #9-11 - Getting the Configuration Information and initializing the customer collection.
The Service methods are all similar to any other REST CRUD Service. The only difference is that we are using the MongoDB Collection to perform CRUD operations.
With that done, navigate to Startup.cs. We will have to register our Services class with the ASP.NET Core Service Container. make the following changes.
public void ConfigureServices(IServiceCollection services){ services.Configure<DeveloperDatabaseConfiguration>(Configuration.GetSection("DeveloperDatabaseConfiguration")); services.AddScoped<CustomerService>(); services.AddControllers();}This will Add the Customer Service to the container as well as register the Configuration of MongoDB Collection that will make it possible to access the appsettings.json data from within the application using IOptions.
Wiring up the Customer Controller
With the Service class done, Let’s add a new Empty API Controller at the Controllers folder and name it CustomerController. This controller will expose the API endpoints needed to utilize the Service Class CRUD Methods.
[Route("api/[controller]")][ApiController]public class CustomerController : ControllerBase{    private readonly CustomerService _customerService;
    public CustomerController(CustomerService customerService)    {        _customerService = customerService;    }
    [HttpGet]    public async Task<IActionResult> GetAll()    {        return Ok(await _customerService.GetAllAsync());    }
    [HttpGet("{id:length(24)}")]    public async Task<IActionResult> Get(string id)    {        var customer = await _customerService.GetByIdAsync(id);        if (customer == null)        {            return NotFound();        }        return Ok(customer);    }
    [HttpPost]    public async Task<IActionResult> Create(Customer customer)    {        if (!ModelState.IsValid)        {            return BadRequest();        }        await _customerService.CreateAsync(customer);        return Ok(customer.Id);    }
    [HttpPut("{id:length(24)}")]    public async Task<IActionResult> Update(string id, Customer customerIn)    {        var customer = await _customerService.GetByIdAsync(id);        if (customer == null)        {            return NotFound();        }        await _customerService.UpdateAsync(id, customerIn);        return NoContent();    }
    [HttpDelete("{id:length(24)}")]    public async Task<IActionResult> Delete(string id)    {        var customer = await _customerService.GetByIdAsync(id);        if (customer == null)        {            return NotFound();        }        await _customerService.DeleteAsync(customer.Id);        return NoContent();    }}
Testing with POSTMAN
Build and Run the WebAPI Project. It’s time to test our API Responses with POSTMAN. Open up Postman.
Creating a New Customer
Send a POST Request with the following JSON body to /api/customer endpoint.
{ "firstName" : "Mukesh", "lastName" : "Murugan", "contact" : "12345678",}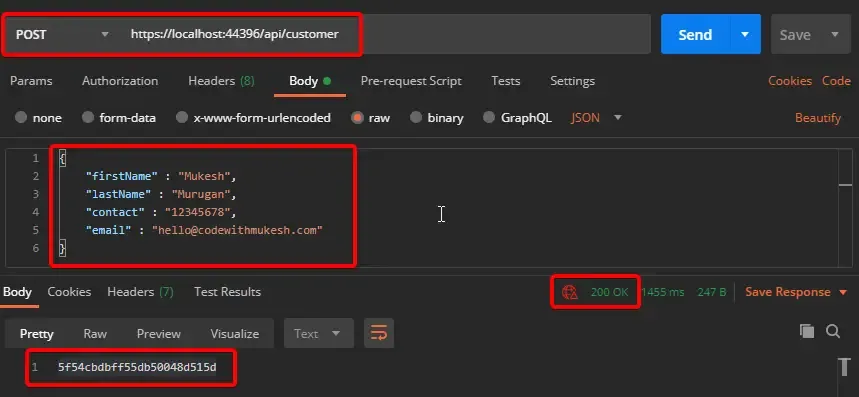
You can see that the response is the Id of the Customer that was just created. I will add one more customer in the same way.
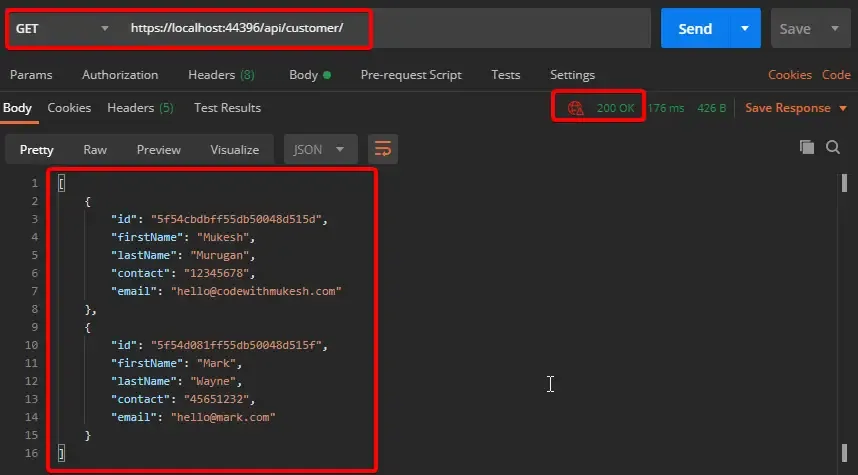
Get All Customers
To get all the customers available in the Collection, send a GET request to the same endpoint.
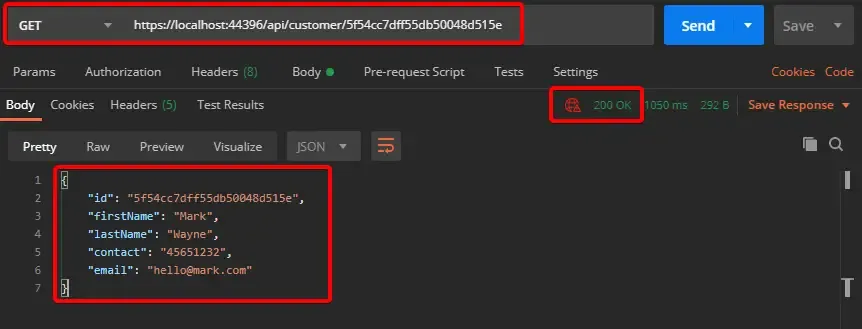
Get Customer by Id
Now, To get a Customer by Id, send a GET Request to the same endpoint, but with an additional parameter, the customer id.
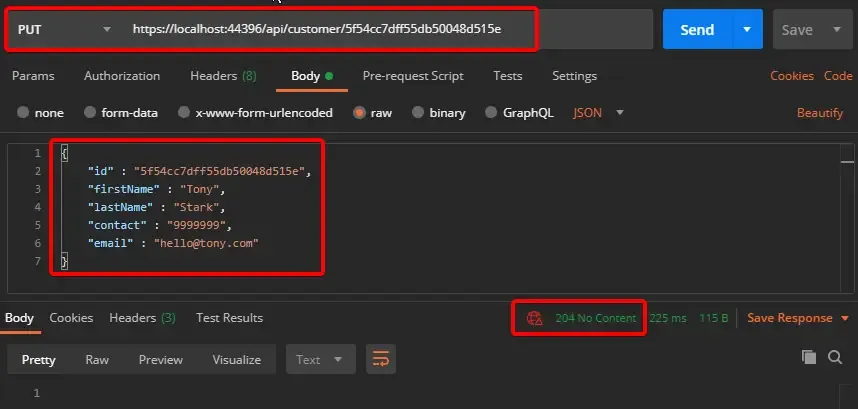
Update Customer
Send the customer id as the parameter of the endpoint and also the customer data to be updated. This will be a PUT method.
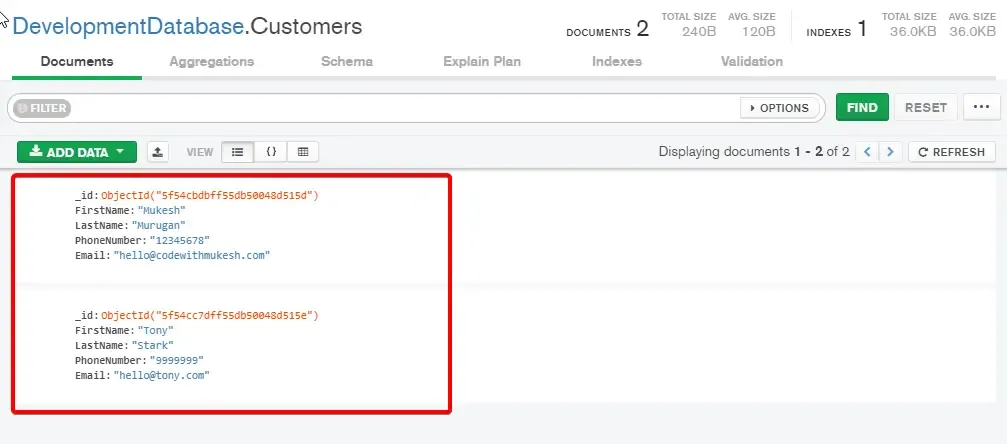
You can verify the change in our MongoDB Compass under the Customer Collection.
Delete Customer
Similary, to delete a customer, simply send in the id as the parameter with DELETE Request.

That’s it for the article. Let’s look into some advanced concepts of MongoDB in another one.
Summary
In this article, we covered the basic concepts of NOSQL Databases, When to use them, Introduction to MongoDB, Installing MongoDB locally on your machine as well as working with the cloud variant. We built an ASP.NET Core 3.1 WebAPI that demonstrates the integration of MongoDB in ASP.NET Core seamlessly. You can find the complete source code here.
Leave behind your valuable queries, suggestions in the comment section below. Also, if you think that you learned something new from this article, do not forget to share this within your developer community. Happy Coding!


