In this tutorial, we will learn a clean and simple way to implement Razor Page CRUD in ASP.NET Core with jQuery AJAX and Bootstrap Modal. The ultimate aim is to build an Entity Management Set of Operations (CRUD) that doesn’t reload pages. We will be achieving this with the help of ASP.NET Core Razor Page, Razor Partial View, JQuery AJAX calls so that you would never have to see your page reload again but everything would just work flawlessly. You can find the complete source code here.
So everything started when I was building the ASP.NET Core Hero - Boilerplate Template. My requirement was quite simple. In the UI Layer, which is ASP.NET Core Razor Pages, I wanted to implement CRUD with the User Experience of a SPA. Meaning, never reload the page but load partial views and modals, you get the point, yeah? Rich User Experience and Blazing Fast Speeds were what I had in mind. But guess what, there was absolutely no other tutorials or references that matched to what I actually wanted. And I ended up researching over it for a couple of days and finally got it to work. So, I decided to document it for others to refer to.
PRO TIP - This is an in-depth article with steps that can get you started from scratch to a complete application which covers many related concepts. Do not forget to bookmark this page for future reference.
Scope
These are the things we will be implementing in our CRUD Application. Note that this will be a Customer Management Application.
- Data Annotations for Validations
- jQuery Validations and Unobstructive Validations - Client Side Validation
- Bootstrap Modals
- Dynamic Loading of Partial Views via AJAX Calls
- Repository Pattern with Unit of Work
- Onion Architecture Solution
- jQuery Datatables
The Architecture
To Keep things Simple and Clean we will be using Onion Architecture with Inverted Dependencies. We will have 3 Layers out of which the Primary one is an ASP.NET Core Web Application with Razor Pages and the other two are the Core and Infrastructure Layer. Core Layer will have the Interfaces and Entities while the Infrastructure Layer will have Entity Framework Core, Repository and Unit Of Work Implementations. At the Web Project we will use jQuery Ajax and Partials Views along with jQuery Datatable to build a super cool CRUD Application. Let’s get started!
If you are interested to read about Onion Architecture in depth, please refer to this article - Onion Architecture In ASP.NET Core With CQRS – Detailed . Also, there is a full-fledged WebAPI Clean Architecture template with which you can install and build API projects in no time (Open Source). Get it here.
Getting Started with Razor Page CRUD in ASP.NET Core
Let’s create the required projects first. I am creating the Web Project first.
Setting up the Projects
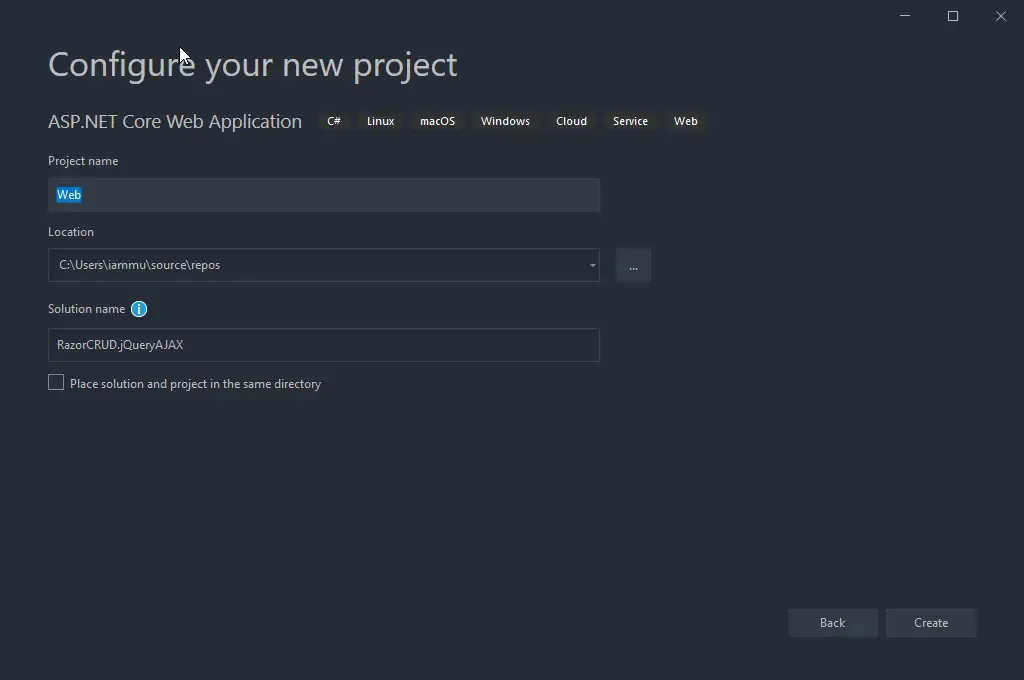
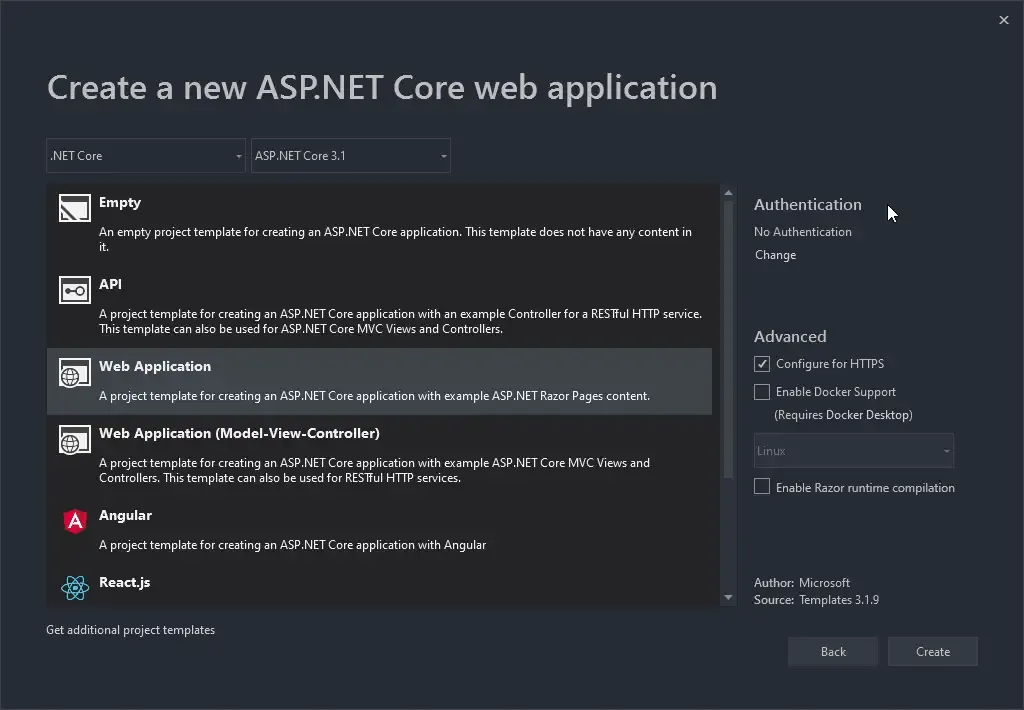
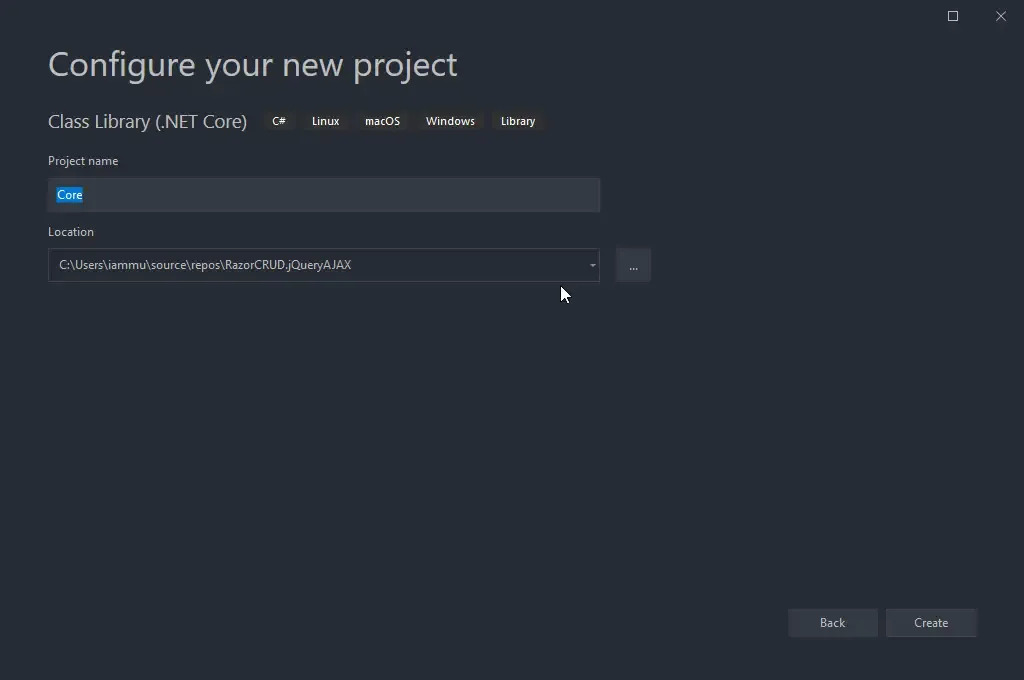
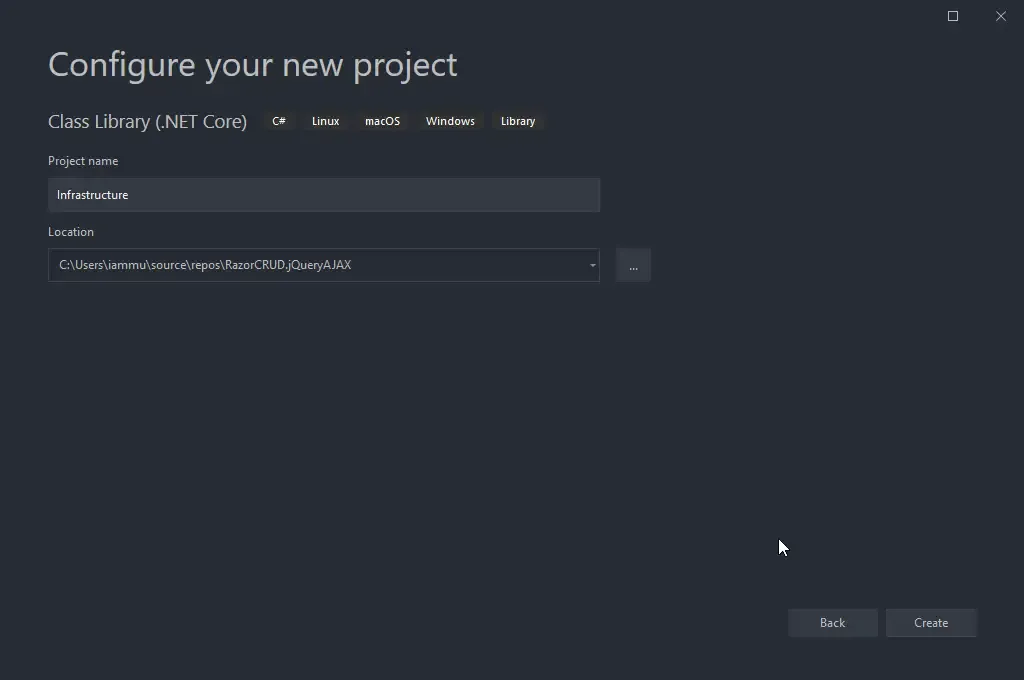
After that I am adding in the Core and Infrastructure projects to the same solution. Note that these are .NET Core 3.1 Library Projects.
Setting up the Core Layer
Let’s add the Entity and Interfaces as required in the Core Project.
Add a new Folder in the Core Project and name it Entities. Here let’s add the Customer Entity.
public class Customer{ public int Id { get; set; } [Required] [MinLength(2)] public string FirstName { get; set; } public string LastName { get; set; } [Required] [EmailAddress] public string Email { get; set; } [Required] public string PhoneNumber { get; set; } public string Company { get; set; }}With that done, let’s start adding the Interfaces. Create a new Folder in the Core Project and Name it Interfaces. Since we will be following Repository Pattern, add a IGenericRepositoryAsync Interface.
To learn more about Repository Pattern with Unit Of Work, refer here - Dapper in ASP.NET Core with Repository Pattern
public interface IGenericRepositoryAsync<T> where T : class{ Task<T> GetByIdAsync(int id); Task<IReadOnlyList<T>> GetAllAsync(); Task<T> AddAsync(T entity); Task UpdateAsync(T entity); Task DeleteAsync(T entity);}Okay, so we have a generic repository interface. Now to use this generic interface for a specific entity like customer along with extra methods, let’s add another interface and name it ICustomerRepositoryAsync.
public interface ICustomerRepositoryAsync : IGenericRepositoryAsync<Customer>{}Finally, add the Unit of Work Interface.
public interface IUnitOfWork : IDisposable{ Task<int> Commit();}That’s nearly everything you need to add in the Core Layer. Let’s go to the Infrastructure layer.
Setting up the Infrastructure Layer
Install the required packages on the Infrastructure layer.
Install-Package Microsoft.EntityFrameworkCoreInstall-Package Microsoft.EntityFrameworkCore.ToolsInstall-Package Microsoft.EntityFrameworkCore.SqlServerInstall-Package Microsoft.EntityFrameworkCore.DesignInstall-Package Microsoft.VisualStudio.Web.CodeGeneration.DesignNow that you have Entity Framework Core installed at the Infrastructure Layer, let’s add the ApplicationDbContext in-order to access the database. (We will be setting the connection string to the database later in this article at the Web Layer.)
Create a new Folder in the Infrastructure Layer and name it Data. Here add a new Class and name it ApplicationDbContext.cs
public class ApplicationDbContext : DbContext{ public ApplicationDbContext(DbContextOptions<ApplicationDbContext> options) : base(options) { } public DbSet<Customer> Customers { get; set; }}Remember we created a bunch of Interfaces back in the Core Layer? The Infrastructure Layer is where you would want to implement those interfaces. This is the core concept of Onion Architecture. We call it Inversion of Dependency. In this way, the Application no longer depends on the Repository / Data Layers. Rather the dependency is inverted. Pretty cool, yeah?
Add a new folder in the Infrastructure layer and name it Repositories. Here add a new class, GenericRepositoryAsync.cs
public class GenericRepositoryAsync<T> : IGenericRepositoryAsync<T> where T : class{ private readonly ApplicationDbContext _dbContext; public GenericRepositoryAsync(ApplicationDbContext dbContext) { _dbContext = dbContext; } public virtual async Task<T> GetByIdAsync(int id) { return await _dbContext.Set<T>().FindAsync(id); } public async Task<T> AddAsync(T entity) { await _dbContext.Set<T>().AddAsync(entity); return entity; } public Task UpdateAsync(T entity) { _dbContext.Entry(entity).State = EntityState.Modified; return Task.CompletedTask; } public Task DeleteAsync(T entity) { _dbContext.Set<T>().Remove(entity); return Task.CompletedTask; } public async Task<IReadOnlyList<T>> GetAllAsync() { return await _dbContext.Set<T>().ToListAsync(); }}As you can see from the above , almost all the CRUD operations ever needed for any entity is covered. T could be any class and you already have an entire class that could Perform Create, Read, Update and Delete Operations on the T Entity. But also see that we are not saving anything directly to the database via the Repository Implementation. Rather we will have a seperate class that is responsible for Commiting changes to the database. You should have heard about Unit Of Work, yeah?
Create another new class and name it UnitOfWork.cs in the Infrastructure layer.
public class UnitOfWork : IUnitOfWork{ private readonly ApplicationDbContext _dbContext; private bool disposed; public UnitOfWork(ApplicationDbContext dbContext) { _dbContext = dbContext ?? throw new ArgumentNullException(nameof(dbContext)); } public async Task<int> Commit() { return await _dbContext.SaveChangesAsync(); } public void Dispose() { Dispose(true); GC.SuppressFinalize(this); } protected virtual void Dispose(bool disposing) { if (!disposed) { if (disposing) { _dbContext.Dispose(); } } disposed = true; }}Finally add the last implementation that is going to be responsible for performing CRUD operations specific to Customer Entity.
public class CustomerRepositoryAsync : GenericRepositoryAsync<Customer>, ICustomerRepositoryAsync{ private readonly DbSet<Customer> _customer; public CustomerRepositoryAsync(ApplicationDbContext dbContext) : base(dbContext) { _customer = dbContext.Set<Customer>(); }}Setting up the ASP.NET Core Project
So, by now we already have all the CRUD Operations figured out at the Repository level . The only task ahead is to make the UI/UX cool and also other minor stuff. Let’s first install the packages required and add the migrations.
Install-Package Microsoft.EntityFrameworkCoreInstall-Package Microsoft.EntityFrameworkCore.ToolsInstall-Package Microsoft.EntityFrameworkCore.SqlServerInstall-Package Microsoft.EntityFrameworkCore.DesignInstall-Package Microsoft.VisualStudio.Web.CodeGeneration.DesignWith that done, open up the Startup.cs. Here we will have to add the services / dependencies to our ASP.NET Core Container. Navigate to the ConfigureServices method and add in the following. Note that you would have to fix the reference warnings that may occur.
services.AddDbContext<ApplicationDbContext>(options => options.UseSqlServer( Configuration.GetConnectionString("DefaultConnection"), b => b.MigrationsAssembly(typeof(ApplicationDbContext).Assembly.FullName)));#region Repositoriesservices.AddTransient(typeof(IGenericRepositoryAsync<>), typeof(GenericRepositoryAsync<>));services.AddTransient<ICustomerRepositoryAsync, CustomerRepositoryAsync>();services.AddTransient<IUnitOfWork, UnitOfWork>();#endregionWe have registered ApplicationDbContext and other Repositories to the service container. But we are missing the most vital part, the connection string. For this, open up your appsettings.json and add in the following with your own connection string details.
"ConnectionStrings": { "DefaultConnection": "Data Source=LAPTOP-7CS9KHVQ;Initial Catalog=RazorCRUD;Integrated Security=True;MultipleActiveResultSets=True" },Note that you will have to add the references as you require to and from the 3 Projects. But always remember that with Onion Architecture, the Core Layer is always at the center of the design. So, the Core layer will never depend on any other Layer.
Let’s add our migrations and update the database with the Customer table. Open up Package manage console and run the following command. Note that you have to set the Web Project as the default project and the Infrastructure project as the default project in the package manager tab.
add-migration Initialupdate-databaseYou will probably receive an OK message from Visual Studio. After that, let’s check our database. You can see that the customer table as well as the entire database is created for you.
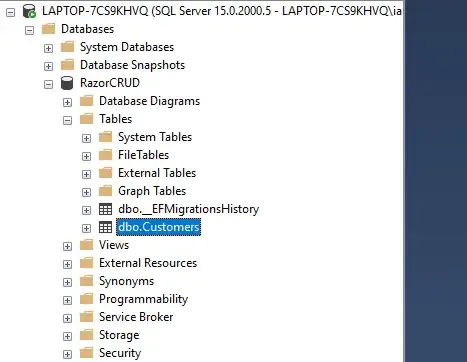
We essentially have everything figured out for the CRUD operations. Let’s work on the UI now. Luckily we chose Razor pages, which is blazing fast. But, to provide a better User Experience, we need to use some client-side technologies as well such as jQuery Datatables, AJAX calls, and so on. Let’s get started.
By default, every time you create a new ASP.NET Core project, Visual Studio includes the following javascript libraries/stylesheets for you in the new project
- jquery.js - Responsible for executing jQuery scripts
- jquery.validate.js - Client-side validation
- jquery.validate.unobtrusive.js - Client-side validation
- site.js (which will be empty by default) - This is where we will add our JQuery script to open modals and perform CRUD over AJAX.
- and all stylesheets and js files related to bootstrap.
You can find all these libraries / sheets in the wwwroot folder.
Now, we will have to include an additional client-side library as well, the jQuery datatable. Right-click on the lib folder under the wwwroot folder and click on Add Client-Side Library. Search for datatables and get it installed. At the time of writing, the latest version is 1.10.21
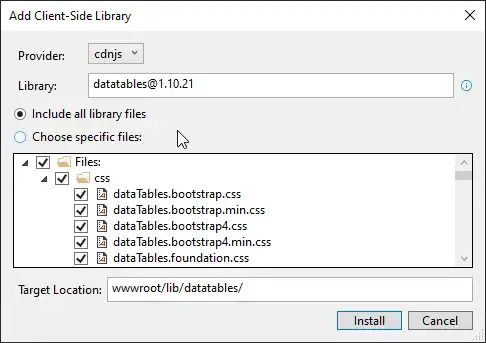
After installing the library, we will have to add it’s reference to the entire site, yeah? For this, navigate to _Layout.cshtml under the Pages/Shared/ Folder.
Let’s add the stylesheets first. Just before the head tag closes, add the following.
<link href="~/lib/datatables/css/dataTables.bootstrap4.min.css" rel="stylesheet" />Since we are already here, let’s also add the skelton of the Bootstrap Modal that we are going to use further in the article. Above the footer tag, add the HTML for the Modal. Note that the Modal Body is empty. This is because we will be filling it dynamically via jQuery AJAX with Razor Partial Views.
<div class="modal fade" tabindex="-1" role="dialog" data-backdrop="static" data-keyboard="false" id="form-modal"> <div class="modal-dialog modal-lg" role="document"> <div class="modal-content"> <div class="modal-header"> <h5 class="modal-title"></h5> <button type="button" class="close" data-dismiss="modal" aria-label="Close"> <span aria-hidden="true">×</span> </button> </div> <div class="modal-body"> </div> </div> </div></div>Finally, the scripts. Right above the @RenderSection(“Scripts”, required: false), add in the following.
<script src="~/lib/datatables/js/jquery.dataTables.min.js"></script><script src="~/lib/datatables/js/dataTables.bootstrap4.min.js"></script><script src="~/lib/jquery-validation/dist/jquery.validate.js"></script><script src="~/lib/jquery-validation-unobtrusive/jquery.validate.unobtrusive.js"></script>It’s important to maintain the order in which the scripts are defined. ALWAYS have your jquery.min.js at the top. If there is another JS file above it, it would probably won’t work because every JQuery operation needs that the jquery.min.js is already loaded into the webpage. Understand, yeah?
Now, open up the site.js. This is usually found under the wwwroot/js/. It is not mandatory to use the site.js, but since it’s already made available throughout the website via the _Layout.cshtml we will be using it.
So, here is where we will be defining jQuery functions that is responsible for making AJAX calls to our ASP.NET Core Razor Pages and returning the partial-views to the divs so that we never notice a page reload. Makes sense? Let’s divide the entire CRUD into 3 different functions (not 4). These are as follows.
- GetAll - Loads all the customers from the database to the jQuery Datatable.
- CreateOrEdit - We will be combining the Add / Edit as the character remains more or less the same.
- Delete - Delete the customer from the datatable dynamically.
We will be building C# class for the above functions as well. But let’s build the associated jQuery functions first, yeah? Add the following to the site.js file.
$(document).ready(function () { jQueryModalGet = (url, title) => { try { $.ajax({ type: 'GET', url: url, contentType: false, processData: false, success: function (res) { $('#form-modal .modal-body').html(res.html); $('#form-modal .modal-title').html(title); $('#form-modal').modal('show'); }, error: function (err) { console.log(err) } }) return false; } catch (ex) { console.log(ex) } } jQueryModalPost = form => { try { $.ajax({ type: 'POST', url: form.action, data: new FormData(form), contentType: false, processData: false, success: function (res) { if (res.isValid) { $('#viewAll').html(res.html) $('#form-modal').modal('hide'); } }, error: function (err) { console.log(err) } }) return false; } catch (ex) { console.log(ex) } } jQueryModalDelete = form => { if (confirm('Are you sure to delete this record ?')) { try { $.ajax({ type: 'POST', url: form.action, data: new FormData(form), contentType: false, processData: false, success: function (res) { $('#viewAll').html(res.html); }, error: function (err) { console.log(err) } }) } catch (ex) { console.log(ex) } } return false; }});NOTE that these JQuery methods NOT only work for Customer but also any other entity you throw at it. It’s written with re-usability in mind. So, it’s just one time and forget about it. Don’t really be overwhelmed with the fact that there is jQuery. It’s going to be something very generic. :D
There are three functions, GET, POST and Delete. As mentioned earlier, these functions will talk to our ASP.NET Core Razor Page which will then return partial views / html string that will be dynamically loaded on to the view of the WebApplication.
jQueryModalGet - Line 2 to 22
This particular function is responsible for rendering the particular view that has all the customers from the database filled into the jQuery Datatable. It sends a GET Ajax call to the razor page mentioned in the calling form (We will see this later.) However this is the partial view that the Get method renders.
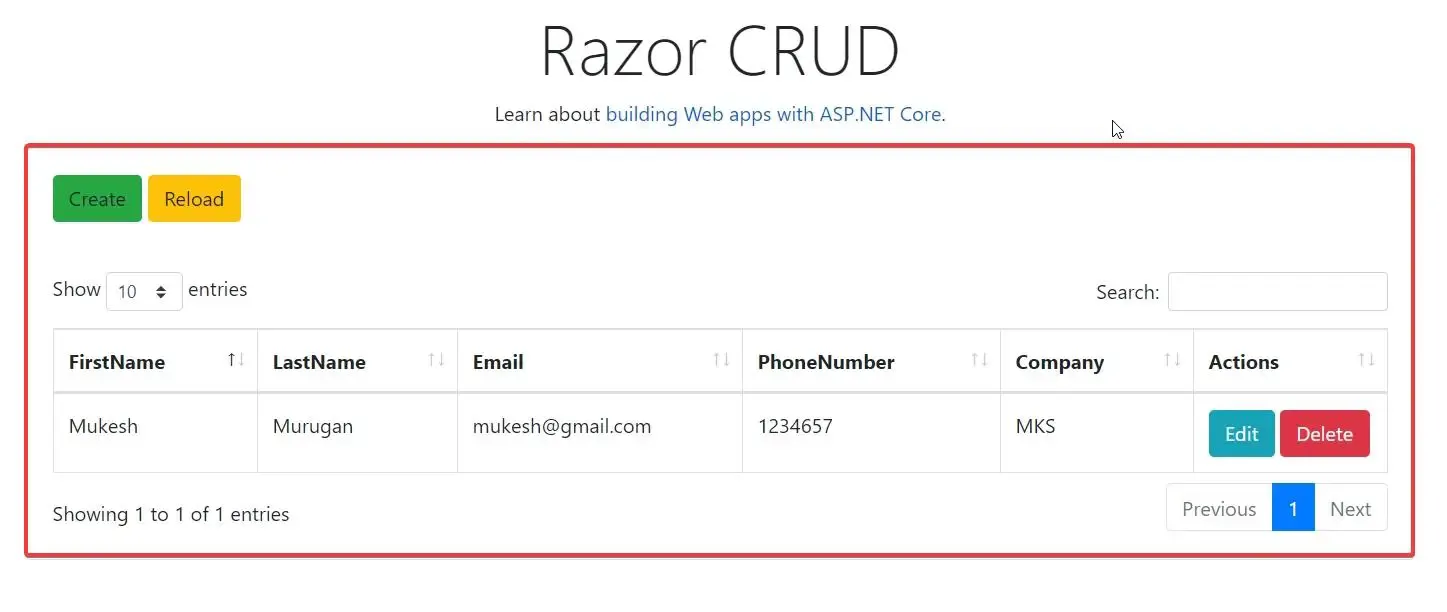
Similarly, jQueryModalPost from Line 23 - 45
This function is responsible to display the bootstrap modal which contains the form to edit/create records. This also renders the validation errors. So, it’s a POST method that talks to a handler back in our ASP.NET Core Razor Page (We have not implemented it yet). And if the model state is valid, it closes the bootstrap modal, else displays the validation error. Get it? Here is the Crete/Edit Bootstrap Modal.
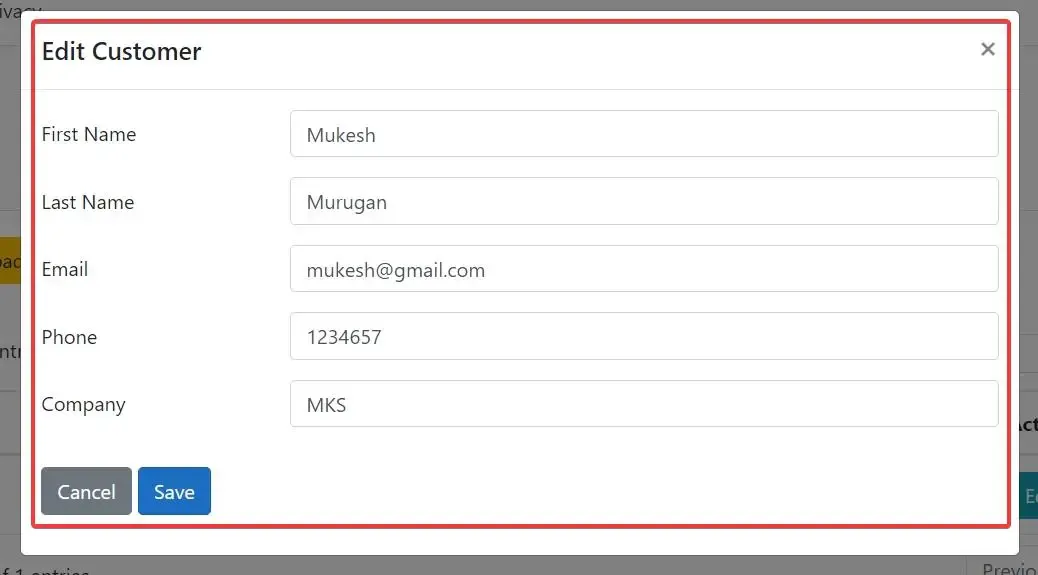
Finally, jQueryModalDelete from Line 46 to 67.
This is a very simple alert box that confirms if you want to delete the record. If yes, it sends a POST request to the delete handler of the ASP.NET Core Application and refreshes the customer table with the latest data. Everything without a single page reload. Cool, yeah?
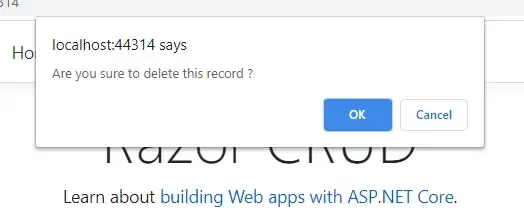
That’s all the Generic jQuery you have to write. Now the missing pieces to the puzzle are as follows.
- Razor Partial View to Hold the jQuery Datatable.
- Razor Partial View to Add / Edit Customer.
- A way to convert Razor Views to String, so that jQuery AJAX can fetch this string and simply overwrite the existing div / DOM object on the HTML. (This was particularly tough to figure out.)
- And finally, our C# Handler methods that will return the partial views as requested by the AJAX calls.
Let’s start with the _ViewAll.cshtml. This will hold the html table definition and also the script needed to activate jQuery Datatable. Under Pages folder in the Web Project, Create a new Razor View (Empty) and name it _ViewAll.cshtml.
Ideally you would want to have a CustomerViewModel class at the Web project to keep things cleaner. But for the sake of demonstration we will refer directly to the Core Layer and use the existing customer model.
@using Core.Entities@model IEnumerable<Customer><table class="table table-bordered" id="customerTable"> <thead> <tr> <th> FirstName </th> <th> LastName </th> <th> Email </th> <th> PhoneNumber </th> <th> Company </th> <th> Actions </th> </tr> </thead> <tbody> @if (Model.Count() != 0) { @foreach (var customer in Model) { <tr> <td> @customer.FirstName </td> <td> @customer.LastName </td> <td> @customer.Email </td> <td> @customer.PhoneNumber </td> <td> @customer.Company </td> <td text-right"> <a onclick="jQueryModalGet('?handler=CreateOrEdit&[email protected]','Edit Customer')" class="btn btn-info text-white"> Edit</a> <form method="post" asp-page="Index" asp-route-id="@customer.Id" asp-page-handler="Delete" onsubmit="return jQueryModalDelete(this)" class="d-inline"> <button type="submit" class="btn btn-danger text-white"> Delete</button> </form> </td> </tr> } } </tbody></table><script> $(document).ready(function () { $("#customerTable").DataTable(); });</script>I guess the above snippet doesn’t really need an explanation. It’s the definition of table using the Model Customer from the appropriate namespace. But the points to note here is as follows.
Line 48 - An Edit button that talks to CreateOrEdit Handler passing the customer Id as a parameter and ‘Edit Customer’ as the title of the Bootstrap Modal. This will return the details of the customer selected in Edit mode via the Bootstrap Modal.
Line 49 - Similarly a delete button that POSTs to the Delete handler with the current customer Id.
Line 60 is where you activate the JQuery Datatable.
Currently, we are working with jQuery Datatable with Client-Side Processing. For scalable systems, it is better to use Server-side processing. You can find a detailed article on JQuery Datatable in ASP.NET Core – Server-Side Processing here.
Next, Let’s create the Form, CreateOEdit that will have all the fields we require. This is again a straight forward piece of code snippet. Create a new Razor Page View (Empty) and name it _CreateOrEdit.cshtml and add in the following.
@using Core.Entities@model Customer<form id="create-form" method="post" asp-page="Index" asp-route-id="@Model.Id" asp-page-handler="CreateOrEdit" onsubmit="return jQueryModalPost(this);">    <div class="form-group row">        <label class="col-md-3 col-form-label">First Name</label>        <div class="col-md-9">            <input type="text" autocomplete="off" asp-for="FirstName" name="FirstName" class="form-control">            <span asp-validation-for="FirstName" class="text-danger"></span>        </div>    </div>    <div class="form-group row">        <label class="col-md-3 col-form-label">Last Name</label>        <div class="col-md-9">            <input type="text" autocomplete="off" asp-for="LastName" name="LastName" class="form-control">            <span asp-validation-for="LastName" class="text-danger"></span>        </div>    </div>    <div class="form-group row">        <label class="col-md-3 col-form-label">Email</label>        <div class="col-md-9">            <input type="email" autocomplete="off" asp-for="Email" name="Email" class="form-control">            <span asp-validation-for="Email" class="text-danger"></span>        </div>    </div>    <div class="form-group row">        <label class="col-md-3 col-form-label">Phone</label>        <div class="col-md-9">            <input type="number" autocomplete="off" asp-for="PhoneNumber" name="PhoneNumber" class="form-control" />            <span asp-validation-for="PhoneNumber" class="text-danger"></span>        </div>    </div>    <div class="form-group row">        <label class="col-md-3 col-form-label">Company</label>        <div class="col-md-9">            <input type="text" autocomplete="off" asp-for="Company" name="Company" class="form-control" />            <span asp-validation-for="Company" class="text-danger"></span>        </div>    </div>    <div class="form-group row">        <div class="col-md-3">        </div>    </div>    <div class="form-group justify-content-between">        <button type="button" class="btn btn-secondary close-button" data-dismiss="modal">Cancel</button>        <button type="submit" class="btn btn-primary save-button">Save</button>    </div>
</form><script type="text/javascript" language=javascript>    $.validator.unobtrusive.parse(document);</script>
Line 3 - Here we are defining the Form with the ASP Handlers set to CreateOrEdit, which we will be creating later on.
Line 45 - Submit button.
Line 50 - This activates the Validation on the Client Side.
NOTE - If you stuck at any point, you can always refer to the source code of this CRUD Application. Please find it here.
Okay, so now we have the required partial views. Let’s wire them up in our Razor Page. Let’s use the Index.cshtml page for this. Open up the Index.cshtml and add in the following.
@page@model IndexModel@{    ViewData["Title"] = "Home page";}<div class="card">    <div class="col-sm-12" style="padding:20px">        <a onclick="jQueryModalGet('?handler=CreateOrEdit','Create Customer')" class="btn bg-success">            Create        </a>        <a id="reload" class="btn bg-warning">            Reload        </a>    </div>    <div id="viewAll" class="card-body table-responsive"></div></div>@section Scripts{    <script>        $(document).ready(function () {            $('#viewAll').load('?handler=ViewAllPartial');
        });        $(function () {            $('#reload').on('click', function () {                $('#viewAll').load('?handler=ViewAllPartial');            });        });    </script>}
As you can see, we will have a create button, a reload button, and finally an empty DIV over which the jQuery AJAX will fill with the Razor View (_ViewAll.cshtml).
Rendering Razor Partial View to String
Now, the question is, We have Razor Partial Views and AJAX, how do you convert Razor Partial Views to Strings / HTML. The answer is create a service that can do so. In the Web Project add a new Folder and name it Services. And in it, create a new class and name it RazorRenderService.cs
public interface IRazorRenderService{    Task<string> ToStringAsync<T>(string viewName, T model);}public class RazorRenderService : IRazorRenderService{    private readonly IRazorViewEngine _razorViewEngine;    private readonly ITempDataProvider _tempDataProvider;    private readonly IServiceProvider _serviceProvider;    private readonly IHttpContextAccessor _httpContext;    private readonly IActionContextAccessor _actionContext;    private readonly IRazorPageActivator _activator;    public RazorRenderService(IRazorViewEngine razorViewEngine,        ITempDataProvider tempDataProvider,        IServiceProvider serviceProvider,        IHttpContextAccessor httpContext,        IRazorPageActivator activator,        IActionContextAccessor actionContext)    {        _razorViewEngine = razorViewEngine;        _tempDataProvider = tempDataProvider;        _serviceProvider = serviceProvider;
        _httpContext = httpContext;        _actionContext = actionContext;        _activator = activator;    }    public async Task<string> ToStringAsync<T>(string pageName, T model)    {        var actionContext =            new ActionContext(                _httpContext.HttpContext,                _httpContext.HttpContext.GetRouteData(),                _actionContext.ActionContext.ActionDescriptor            );        using (var sw = new StringWriter())        {            var result = _razorViewEngine.FindPage(actionContext, pageName);            if (result.Page == null)            {                throw new ArgumentNullException($"The page {pageName} cannot be found.");            }            var view = new RazorView(_razorViewEngine,                _activator,                new List<IRazorPage>(),                result.Page,                HtmlEncoder.Default,                new DiagnosticListener("RazorRenderService"));            var viewContext = new ViewContext(                actionContext,                view,                new ViewDataDictionary<T>(new EmptyModelMetadataProvider(), new ModelStateDictionary())                {                    Model = model                },                new TempDataDictionary(                    _httpContext.HttpContext,                    _tempDataProvider                ),                sw,                new HtmlHelperOptions()            );            var page = (result.Page);            page.ViewContext = viewContext;            _activator.Activate(page, viewContext);            await page.ExecuteAsync();            return sw.ToString();        }    }    private IRazorPage FindPage(ActionContext actionContext, string pageName)    {        var getPageResult = _razorViewEngine.GetPage(executingFilePath: null, pagePath: pageName);        if (getPageResult.Page != null)        {            return getPageResult.Page;        }        var findPageResult = _razorViewEngine.FindPage(actionContext, pageName);        if (findPageResult.Page != null)        {            return findPageResult.Page;        }        var searchedLocations = getPageResult.SearchedLocations.Concat(findPageResult.SearchedLocations);        var errorMessage = string.Join(            Environment.NewLine,            new[] { $"Unable to find page '{pageName}'. The following locations were searched:" }.Concat(searchedLocations));        throw new InvalidOperationException(errorMessage);    }}
As an overview, the above service takes in the partial view name and model as the input parameters, tries to find the Razor View, renders it to HTML String and returns the string.
Let’s add this service to the DI Service Container. Open up Startup.cs/ConfigureServices and add the following to the end.
services.AddHttpContextAccessor();services.AddTransient<IActionContextAccessor, ActionContextAccessor>();services.AddScoped<IRazorRenderService, RazorRenderService>();This is the final part of the puzzle. The actual Index.cs. Open it up and add the following.
public class IndexModel : PageModel{    private readonly ICustomerRepositoryAsync _customer;    private readonly IUnitOfWork _unitOfWork;    private readonly IRazorRenderService _renderService;    private readonly ILogger<IndexModel> _logger;
    public IndexModel(ILogger<IndexModel> logger, ICustomerRepositoryAsync customer, IUnitOfWork unitOfWork, IRazorRenderService renderService)    {        _logger = logger;        _customer = customer;        _unitOfWork = unitOfWork;        _renderService = renderService;    }    public IEnumerable<Customer> Customers { get; set; }    public void OnGet()    {    }    public async Task<PartialViewResult> OnGetViewAllPartial()    {        Customers = await _customer.GetAllAsync();        return new PartialViewResult        {            ViewName = "_ViewAll",            ViewData = new ViewDataDictionary<IEnumerable<Customer>>(ViewData, Customers)        };    }    public async Task<JsonResult> OnGetCreateOrEditAsync(int id = 0)    {        if (id == 0)            return new JsonResult(new { isValid = true, html = await _renderService.ToStringAsync("_CreateOrEdit", new Customer()) });        else        {            var thisCustomer = await _customer.GetByIdAsync(id);            return new JsonResult(new { isValid = true, html = await _renderService.ToStringAsync("_CreateOrEdit", thisCustomer) });        }    }    public async Task<JsonResult> OnPostCreateOrEditAsync(int id, Customer customer)    {        if (ModelState.IsValid)        {            if (id == 0)            {                await _customer.AddAsync(customer);                await _unitOfWork.Commit();            }            else            {                await _customer.UpdateAsync(customer);                await _unitOfWork.Commit();            }            Customers = await _customer.GetAllAsync();            var html = await _renderService.ToStringAsync("_ViewAll", Customers);            return new JsonResult(new { isValid = true, html = html });        }        else        {            var html = await _renderService.ToStringAsync("_CreateOrEdit", customer);            return new JsonResult(new { isValid = false, html = html });        }    }    public async Task<JsonResult> OnPostDeleteAsync(int id)    {        var customer = await _customer.GetByIdAsync(id);        await _customer.DeleteAsync(customer);        await _unitOfWork.Commit();        Customers = await _customer.GetAllAsync();        var html = await _renderService.ToStringAsync("_ViewAll", Customers);        return new JsonResult(new { isValid = true, html = html });    }}
Line 3 - 14 Constructor Injection of all the required Interfaces like Customer Repository, Unit Of work, Logger, and the Razor Render Service.
Line 19 - 27 Here we will have our Get All Functionality. Note that this method actually returns a PartialViewResult which will be then loaded to the viewAll DIV on the Index.cshtml by jQuery. So what happens here is you access the repository, get all the customers, and create a new partial view result with the view name and the fetched customers.
Line 28 - 37 , OnGetCreateOrEditAsync takes in the ID as the parameter and send out a JSON result that has a body with isValid and html propertly. If the Create button is clicked, the ID is 0, and the method would return the _CreateOrEdit view with a new Customer Model. If the Edit Button is clicked, it returns a view with the customer model of the particular ID.
Line 38-61, OnPostCreateOrEditAsync takes in the ID and Customer model when the Save Button on the Modal is clicked. If it was on Create Mode, it adds a new customer, else updates the existing customer. Pretty Simple and Straight forward, yeah?
Line 62-70, OnPostDeleteAsync takes in the customer ID, get the customer object and tries to delete it. After that it reloads the entire Customer dataset from database and refreshes our DataTable immediately.
There you go, that’s everything.
Pretty Seamless and already gives you some rich User Experience. This is more of a Hybrid of ASP.NET Core with Client-Side Technology. You usually expect to see such Buttery smooth interfaces via React.JS / Angular Applications. But you can achieve the awesome here as well.
That’s a wrap for this tutorial!
Summary
In this article, we learned in-depth right from setting up a solution following Clean Architecture / Onion Architecture, setting up EF Core, the Interfaces, Repository Pattern with Unit Of Work, Data Annotations, jQuery Datatables, jQuery AJAX Calls to render Razor Partial Views, Converting Razor Pages to HTML Strings, Reloading Data without ever reloading the page, Buttery smooth CRUD Operations, Bootstrap Modal and so much more. You can find the complete source code of the CRUD Application here. Do follow me as well over at Github :)
Leave behind your valuable queries, suggestions in the comment section below. Also, if you think that you learned something new from this article, do not forget to share this within your developer community. Happy Coding :D

