In our previous article, we learned about Securing ASP.NET Core API with JWT Authentication. Now, let’s go through Refresh Tokens in ASP.NET Core APIs that use JWT Authentication. We’ll be using the codebase that we built in the previous article and add functionalities that support Refreshing JWT Tokens.
Disclaimer: This is a quite detailed guide with more than 2500 words. Do not forget to grab a beer/coffee and bookmark this page before continuing! ?
The Problem
Now, JWT or JSON Web tokens are by far one of the secure ways to protect APIs. But there are slight flaws too, like any other system. Let me present to you a few scenarios that can help you understand the so-called limitations with JWT.
What if an attacker gets hold of your JWT Token? With this token, he could potentially access a secured API mimicking your usage, and compromise the entire service if he wants to. This is bad.
With JWT Token, it is advised that they must expire is less than a day (due to the above security concern). Usually, the standard is a few hours tops. So what happens when the token expires? The user get’s logged out of the system and is prompted to log in again with his/her credentials. Now that is bad user experience in today’s world. When was the last time you actually typed in your credentials on Facebook? Neither do I remember. It always stays logged in, helping me save those moments where I try to remember passwords! So how does this work?
What are Refresh Tokens? - The Solution
In simpler terms, it means that you pass in your credentials to the Authentication API endpoint, the API validates the credentials and returns you a JWT which is likely to expire in a few hours or less, and a Refresh token that can stay active for months.
Using Refresh Tokens, one can request for valid JWT Tokens till the Refresh Token expires. Hence the above-mentioned problems are addressed easily with the concept of Refreshing JWT Tokens. They carry the information needed to acquire new access tokens (JWT). A refresh token allows an application to obtain a new JWT without prompting the user.
Implementing Refresh Tokens in ASP.NET Core APIs
For this demonstration, we will use the solution that we have already built in our previous guide. I will implement refresh tokens over the previous solution.
IMPORTANT
If you have not read my article on Build Secure ASP.NET Core API with JWT Authentication – Detailed Guide , GO READ IT NOW.
Let’s go step by step with the implementation part. Now by theory, this is how the system should work. We will have an endpoint, which we request with valid credentials. In turn, the endpoint returns a response with JWT and Refresh Token. This JWT Token will expire is let’s say 2 minutes. So, we use the Refresh Token (which is stored as cookies) to obtain a new JWT by requesting another endpoint.
We will also implement a way to see all the refresh tokens of a user, and an endpoint to revoke (cancel) a refresh token so that it cannot be used further to generate new JWTs.
First, create a Refresh Token Model to Entities/RefreshToken.cs. This will be the entity with the details of refresh tokens. This model will have the token itself, the expiry date of the token, the created date, and a flag to check if it is active.
[Owned]public class RefreshToken{ public string Token { get; set; } public DateTime Expires { get; set; } public bool IsExpired => DateTime.UtcNow >= Expires; public DateTime Created { get; set; } public DateTime? Revoked { get; set; } public bool IsActive => Revoked == null && !IsExpired;}Now, for testing purposes let’s reduce the expiry duration of our JWT token to 1 minute. You can find these settings at appsettings.json/JWT. Change DurationInMinutes to 1. This means that our JWT will expire in a minute after creation. This is set to 1 minute so that we get to wait less while testing.
"JWT": { "key": "C1CF4B7DC4C4175B6618DE4F55CA4", "Issuer": "SecureApi", "Audience": "SecureApiUser", "DurationInMinutes": 1 }Now, let’s modify Models/AuthenticationModel.cs.
using System.Text.Json.Serialization;using System;using System.Collections.Generic;using System.Linq;using System.Threading.Tasks;
namespace JWTAuthentication.WebApi.Models{    public class AuthenticationModel    {        public string Message { get; set; }        public bool IsAuthenticated { get; set; }        public string UserName { get; set; }        public string Email { get; set; }        public List<string> Roles { get; set; }        public string Token { get; set; }        [JsonIgnore]        public string RefreshToken { get; set; }        public DateTime RefreshTokenExpiration { get; set; }    }}
JSONIgnore is an attribute that restricts the property from being shown in JSON results. This is the model that will be returned to the client on request with valid credentials. Now, add the RefreshToken to our ApplicationUser class, so that we can relate / link refresh tokens with specific users on our database.
public class ApplicationUser : IdentityUser{ public string FirstName { get; set; } public string LastName { get; set; } public List<RefreshToken> RefreshTokens { get; set; }}Adding Migrations & Updating the Database
Since we have made changes to our model classes, let’s make sure that our database is updated with these schemas.
add-migration "added refresh tokens"update-databaseGenerating a Refresh Token
Refresh tokens are nothing but random numbers. You can add your own logic to generate the random string. To enhance security, many devs generate these token using the IP address of the client browser. It’s up to you to choose a mechanism. I will use a built-in Crypto Function to generate a 32-byte string.
Let’s build a function that can return a RefreshToken object with properties like Token, Expiration Data and Created Data. You can see the function below.
private RefreshToken CreateRefreshToken(){    var randomNumber = new byte[32];    using(var generator = new RNGCryptoServiceProvider())    {        generator.GetBytes(randomNumber);        return new RefreshToken        {            Token = Convert.ToBase64String(randomNumber),            Expires = DateTime.UtcNow.AddDays(10),            Created = DateTime.UtcNow        };
    }}
Saving the Refresh Token
Now that we have a method to generate Refresh Tokens, let’s think about storing it somewhere. An optimal way is to store these tokens as cookies. Let’s build another helper function that can take in the refresh token as the parameter and store it as a browser cookie.
private void SetRefreshTokenInCookie(string refreshToken){ var cookieOptions = new CookieOptions { HttpOnly = true, Expires = DateTime.UtcNow.AddDays(10), }; Response.Cookies.Append("refreshToken", refreshToken, cookieOptions);}Here, we set the expiration to 10 days and the name of the cookies as refreshToken.
Authentication
In the previous tutorial, we built an endpoint to generate an AuthenticationModel object that includes the JWT itself. Let’s try to modidy the endpoint so as to return a Refresh Token as well.
Go to Services/UserServices.cs, and modify the GetTokenAsync method.
public async Task<AuthenticationModel> GetTokenAsync(TokenRequestModel model){    var authenticationModel = new AuthenticationModel();    var user = await _userManager.FindByEmailAsync(model.Email);    if (user == null)    {        authenticationModel.IsAuthenticated = false;        authenticationModel.Message = $"No Accounts Registered with {model.Email}.";        return authenticationModel;    }    if (await _userManager.CheckPasswordAsync(user, model.Password))    {        authenticationModel.IsAuthenticated = true;        JwtSecurityToken jwtSecurityToken = await CreateJwtToken(user);        authenticationModel.Token = new JwtSecurityTokenHandler().WriteToken(jwtSecurityToken);        authenticationModel.Email = user.Email;        authenticationModel.UserName = user.UserName;        var rolesList = await _userManager.GetRolesAsync(user).ConfigureAwait(false);        authenticationModel.Roles = rolesList.ToList();

        if (user.RefreshTokens.Any(a => a.IsActive))        {            var activeRefreshToken = user.RefreshTokens.Where(a => a.IsActive == true).FirstOrDefault();            authenticationModel.RefreshToken = activeRefreshToken.Token;            authenticationModel.RefreshTokenExpiration = activeRefreshToken.Expires;        }        else        {            var refreshToken = CreateRefreshToken();            authenticationModel.RefreshToken = refreshToken.Token;            authenticationModel.RefreshTokenExpiration = refreshToken.Expires;            user.RefreshTokens.Add(refreshToken);            _context.Update(user);            _context.SaveChanges();        }
        return authenticationModel;    }    authenticationModel.IsAuthenticated = false;    authenticationModel.Message = $"Incorrect Credentials for user {user.Email}.";    return authenticationModel;}
Line #22 checks if there are any active refresh tokens available for the authenticated user.
Line #24-26 sets the available active refresh token to our response.*
Line #30-35 If there are not active Refresh Token available, we call our CreateRefreshToken method to generate a refresh token. Once generated, we set the details of the Refresh Token to the Response Object. Finally, we need to add these tokens into our RefreshTokens Table, so that we can reuse them.
Now, modify our controller at Controllers/UserController.cs
[HttpPost("token")]public async Task<IActionResult> GetTokenAsync(TokenRequestModel model){ var result = await _userService.GetTokenAsync(model); SetRefreshTokenInCookie(result.RefreshToken); return Ok(result);}Line #5 - Let’s save our refreshTokens as cookies.
Open up Postman and request for JWT token by providing the valid credentials like I have. Click on Send. You will find a new Property, RefreshTokenExpiration, which states the validity period of our newly created Refresh Token.
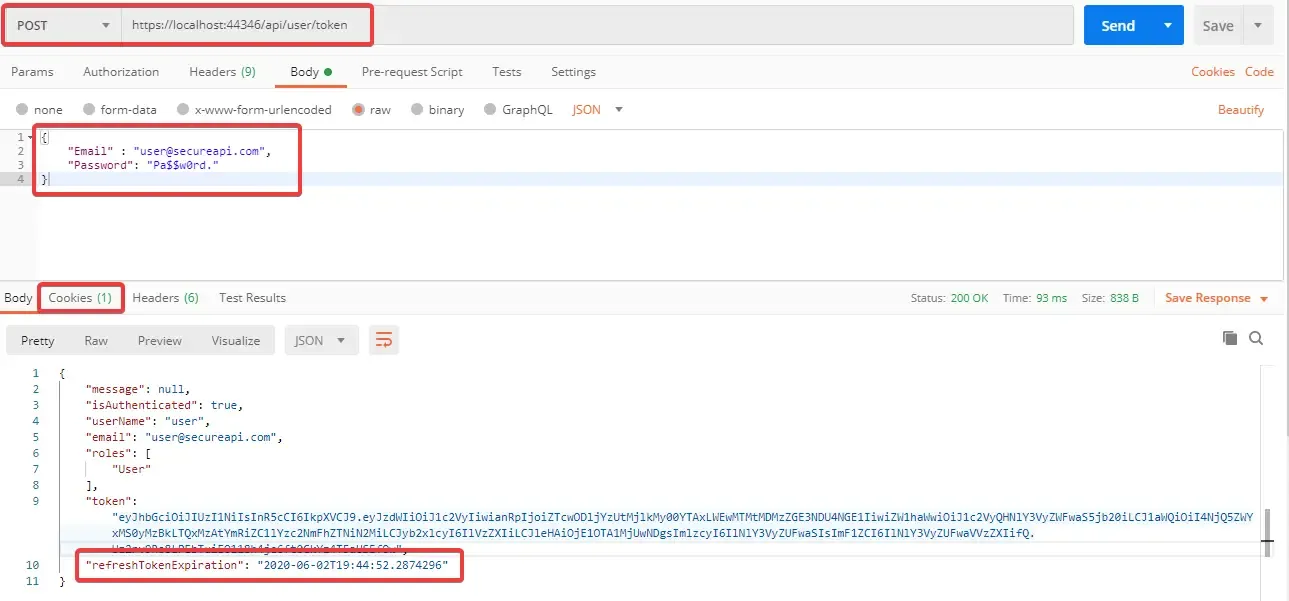
Now where is our actual Refresh Token? Remember we configured our controller to set it to the cookie? On Postman open the Cookies Tab. You will be able to see our refresh token as a cookie with expiration date. Cool right?

Remeber that we set the expiration time of our JWT to 1 min ? By now, your JWT would have expired. So let’s request for a new JWT again using the password and username. Don’t worry, we will get to the refresh token in a while. Once you receive the JWT, make a call to a secured endpoint which in our case is …/api/secured

You can see that we are authenticated. Now wait for a minute and try to request again.

Gone! Your JWT token has expired. Now, let’s see this is a practical point of view. Requesting for JWT with username/password everytime is not a good User experience. This is why we generated Refresh Tokens. We’ll start using the refresh tokens, but before that we’ll have to build endpoint to help refresh our jwt tokens.
Refreshing the Expired JWT Token
Add a definition to Services/IUserService.cs
Task<AuthenticationModel> RefreshTokenAsync(string token);Let’s implement the method in Services/UserService.cs
public async Task<AuthenticationModel> RefreshTokenAsync(string token){    var authenticationModel = new AuthenticationModel();    var user = _context.Users.SingleOrDefault(u => u.RefreshTokens.Any(t => t.Token == token));    if (user == null)    {        authenticationModel.IsAuthenticated = false;        authenticationModel.Message = $"Token did not match any users.";        return authenticationModel;    }
    var refreshToken = user.RefreshTokens.Single(x => x.Token == token);
    if (!refreshToken.IsActive)    {        authenticationModel.IsAuthenticated = false;        authenticationModel.Message = $"Token Not Active.";        return authenticationModel;    }
    //Revoke Current Refresh Token    refreshToken.Revoked = DateTime.UtcNow;
    //Generate new Refresh Token and save to Database    var newRefreshToken = CreateRefreshToken();    user.RefreshTokens.Add(newRefreshToken);    _context.Update(user);    _context.SaveChanges();
    //Generates new jwt    authenticationModel.IsAuthenticated = true;    JwtSecurityToken jwtSecurityToken = await CreateJwtToken(user);    authenticationModel.Token = new JwtSecurityTokenHandler().WriteToken(jwtSecurityToken);    authenticationModel.Email = user.Email;    authenticationModel.UserName = user.UserName;    var rolesList = await _userManager.GetRolesAsync(user).ConfigureAwait(false);    authenticationModel.Roles = rolesList.ToList();    authenticationModel.RefreshToken = newRefreshToken.Token;    authenticationModel.RefreshTokenExpiration = newRefreshToken.Expires;    return authenticationModel;}
Line #3 creates a new Response object.
Line #4 checks if there any matching user for the token in our database.
Line #5 -10 If no matching user found, pass a message “Token did not match any users.”
Line #12 - Get the Refresh token object of the matching record.
Line #14-19 Checks is the selected token is active, if not active, send a message “Token Not Active.”
Line #22 - For security reasons, we can use the Refresh Token only once. So, every time we request a new JWT, we have to make sure that we replace the refresh token with a new one. Let’s set the Revoked property to the current time. This makes the refresh token inactive.
Line #25 - 28 Generates a new Refresh token and updates it into our database.
Line #31 - 40 Let’s generate another JWT for the corresponding user and return the response object, along with the new Refresh Token.
Now, let’s wire up this service method to our controller.
[HttpPost("refresh-token")]public async Task<IActionResult> RefreshToken(){ var refreshToken = Request.Cookies["refreshToken"]; var response = await _userService.RefreshTokenAsync(refreshToken); if (!string.IsNullOrEmpty(response.RefreshToken)) SetRefreshTokenInCookie(response.RefreshToken); return Ok(response);}Line #4 gets the Refresh Token from our cookies. Remember setting it there?
Line #5 Returns the response object from the Service Method.
Line #6 - 7 Sets the new Refresh Token to our Cookie.
Switch to Postman and POST to the ../api/user/refresh-token endpoint. You can see that we got a new JWT and a new Refresh token in the cookies.
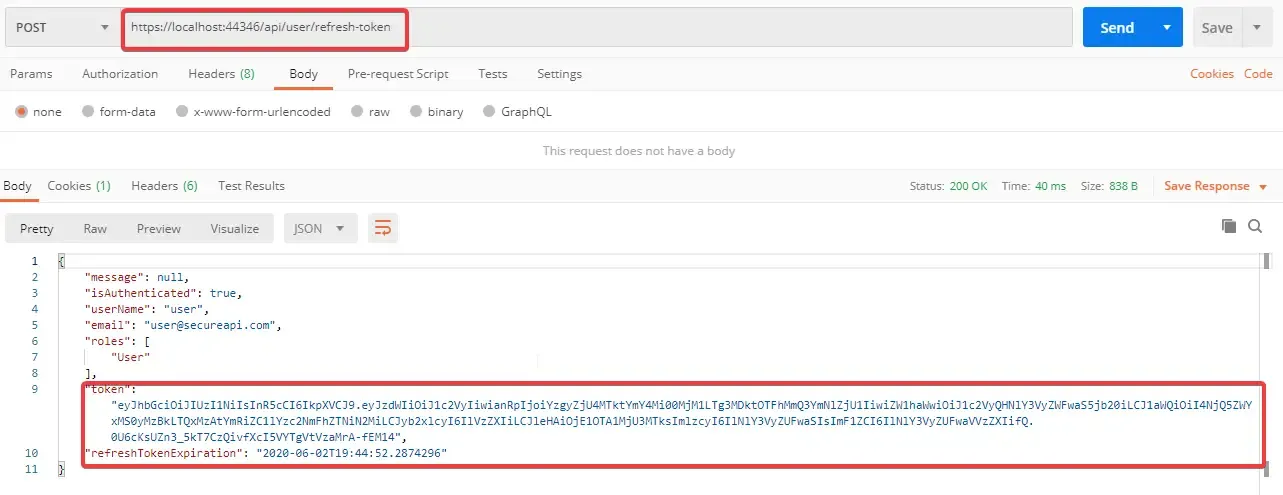
Using this JWT, try to request to a secure endpoint. You can see that you are able to access.

Getting the User’s Refresh Tokens
Now, we need an endpoint where an authenticated user can request along with his / her user id and we get to see all the refresh tokens that were generated for the particular user. Add a definition to Services/IUserService.cs
PS - Feel free to change this implementation as it is totally optional.
ApplicationUser GetById(string id);Simple Implementation at Services/UserService.cs
public ApplicationUser GetById(string id){ return _context.Users.Find(id);}Add a new Action method in our Controller at Controllers/UserController.cs that returns all the refresh tokens.
[Authorize][HttpPost("tokens/{id}")]public IActionResult GetRefreshTokens(string id){ var user = _userService.GetById(id); return Ok(user.RefreshTokens);}Now , go to your database and copy the required User Id from the AspNetUsers Table.
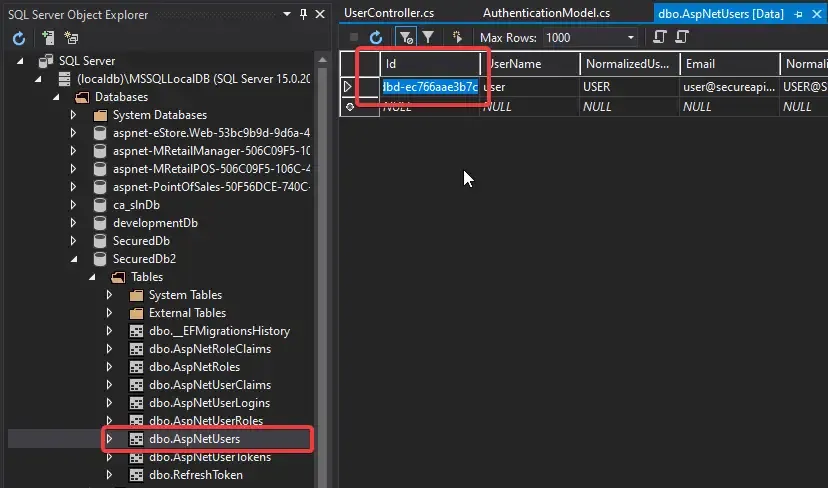
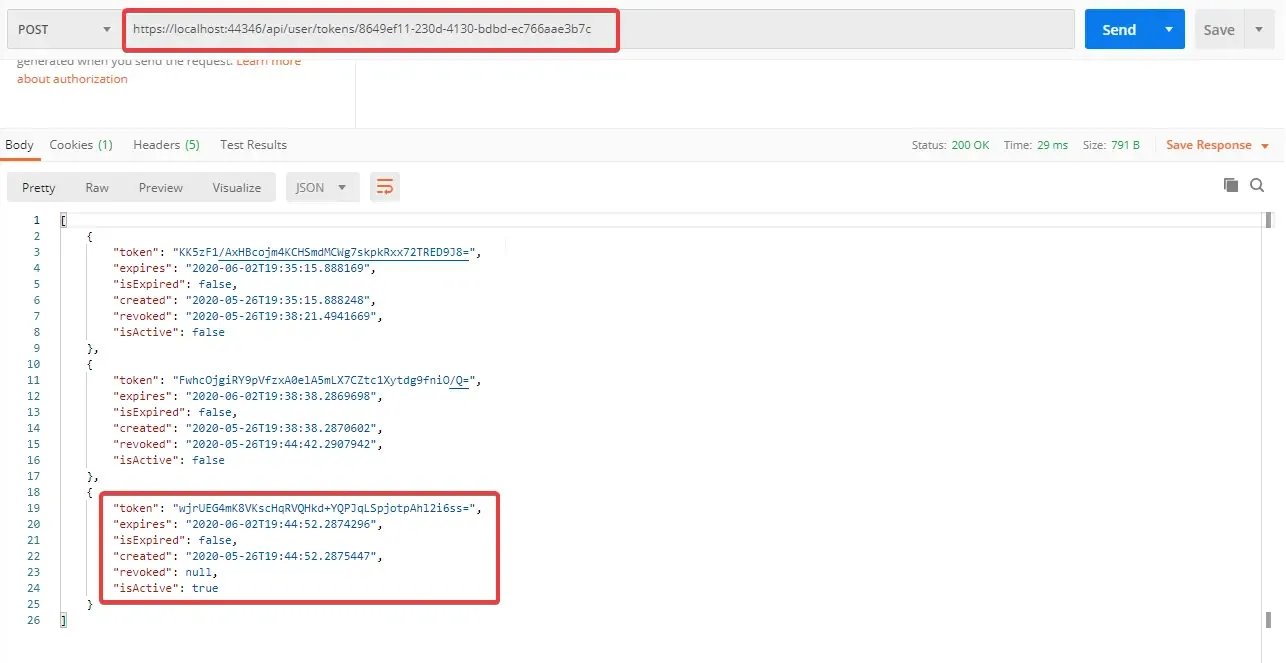
In Postman, POST to ../api/user/tokens/<user id here>. You would see a list of all the refresh tokens ever generated for the user along with several other information.
Revoking a Refresh Token
With Refresh Tokens, it is a never ending cycle of expiration and generation of JWTs. What if in certain cases, we need to manually revoke (cancel) a Refresh token, so that it cannot be used to generate a valid JWT.
Let’s see how to build such an endpoint. Now the user needs to pass the token to this endpoint so that we can revoke it. Create a model in Models/RevokeTokenRequest.cs that has a token property.
public class RevokeTokenRequest{ public string Token { get; set; }}Add another definition to Services/IUserService.cs
bool RevokeToken(string token);Implement it at Services/UserService.cs
public bool RevokeToken(string token){    var user = _context.Users.SingleOrDefault(u => u.RefreshTokens.Any(t => t.Token == token));
    // return false if no user found with token    if (user == null) return false;
    var refreshToken = user.RefreshTokens.Single(x => x.Token == token);
    // return false if token is not active    if (!refreshToken.IsActive) return false;
    // revoke token and save    refreshToken.Revoked = DateTime.UtcNow;    _context.Update(user);    _context.SaveChanges();
    return true;}
Line #14 - If the passed refresh token is valid, we revoke it here and save to the database.
Now, add a Action Method in Controllers/UserController.cs
[HttpPost("revoke-token")]public async Task<IActionResult> RevokeToken([FromBody] RevokeTokenRequest model){    // accept token from request body or cookie    var token = model.Token ?? Request.Cookies["refreshToken"];
    if (string.IsNullOrEmpty(token))        return BadRequest(new { message = "Token is required" });
    var response = _userService.RevokeToken(token);
    if (!response)        return NotFound(new { message = "Token not found" });
    return Ok(new { message = "Token revoked" });}
Line #5 - Gets the Refresh Token from the Cookies or the Passed Object.
Line #10 - Revokes the Token.
Let’s test it out with Postman. ( This is the last endpoint. I Promise :P )
POST to ../api/user/revoke-token with the Refresh Token (the latest one. You can get the latest active token using the previous endpoint.). you will see a message saying “Token Revoked”!
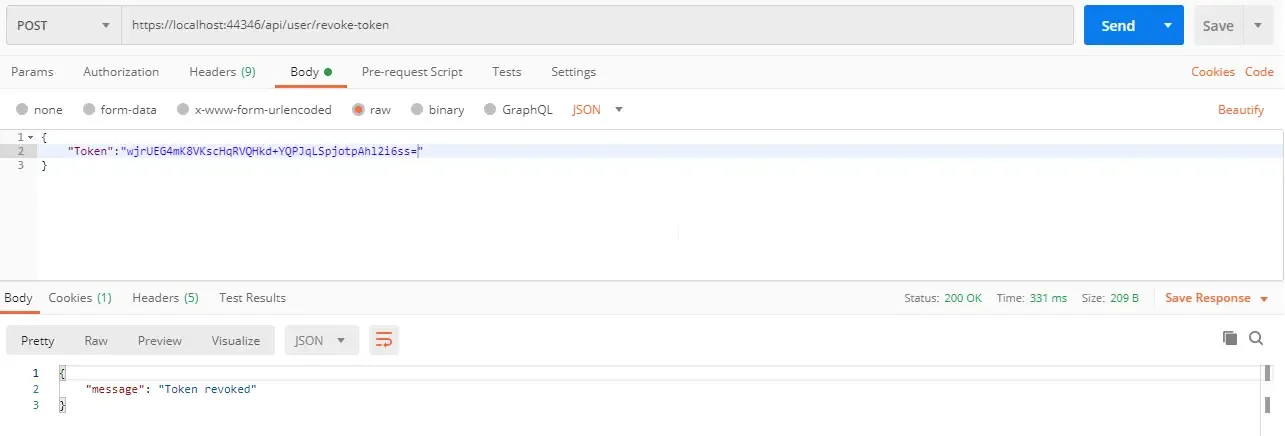
Now check all the tokens generated for the user. You can see that all of them are not active. It means that we have successfully revoked the token.
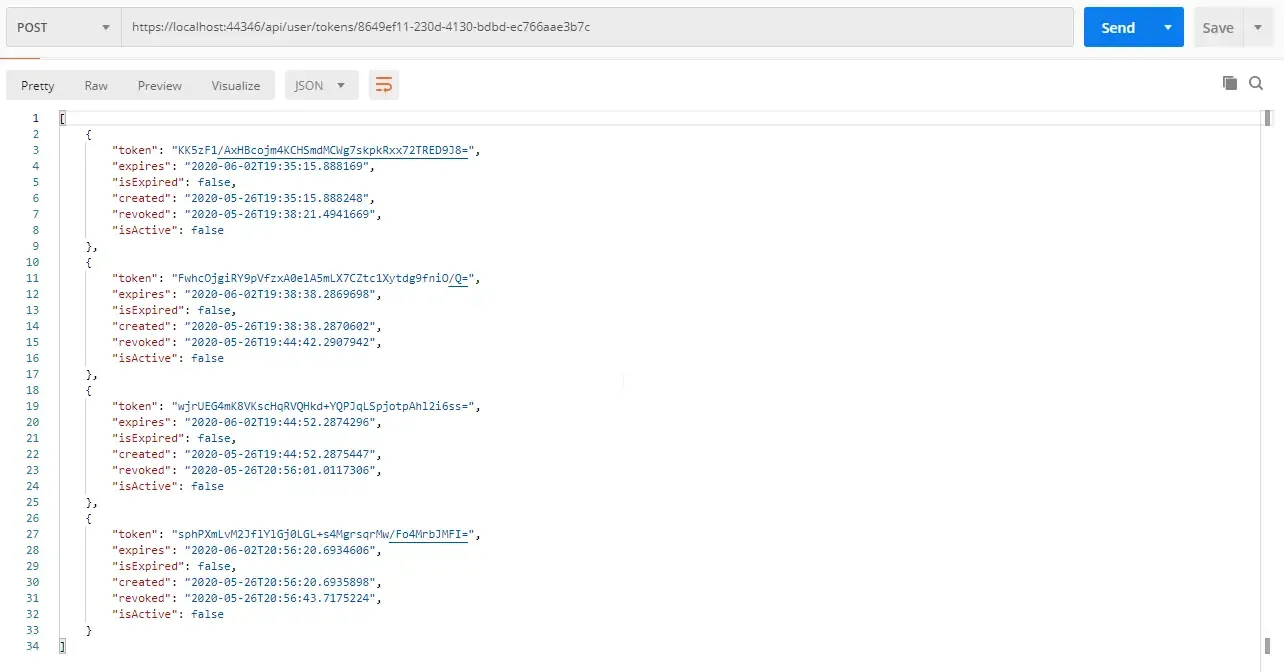
Now request to the refresh token endpoint. You can find that your Refresh Token is no longer Valid and hence you can no more Generate a JWT unless you request with username/password!

Pretty much Secure right? This is all I have got for you in this Guide. Hope things are clear. I will be linking to GitHub repository where you can find the complete source code of this implementation.
Summary
In this detailed guide on Refresh Tokens in ASP.NET Core API, we have learned the basics of Refresh Tokens, it’s importance, how to implement them in ASP.NET Core, generating the refresh token, refreshing jwt tokens, revoking them and more. Have I missed out anything? Feel free to leave below your comments and suggestion. Do not forget to share this article within your developer community. Happy Coding :D

