Let’s learn how to Schedule AWS Lambda with Amazon EventBridge Scheduler using rate and cron expressions. This is part of my ongoing .NET on AWS series, where we explore and learn about various AWS Services that can benefit you, as a .NET Developer. This is yet another piece of article where we learn about the serverless scheduler that Amazon offers. In simple words, Amazon EventBridge Scheduler helps you build event-driven applications, schedule tasks within the AWS ecosystem, and more.
Where would you use this? Almost every time you have an actual production setup! This includes data backups, access key rotations, some kind of recurring tasks, and QA Database cleanup, there are so many use cases for this!
What is Amazon EventBridge Scheduler?
Amazon EventBridge Scheduler is a highly available, easy-to-use scheduler which is a serverless offering from AWS. This helps you to build highly scalable scheduling systems within the Amazon ecosystem and is a part of the EventBridge Service collection. It allows you to create, run, and manage tasks from a central dashboard.
And it’s not only the AWS Lambda that can be invoked using the Amazon EventBridge Scheduler but also almost all the AWS Services! This includes more than 200+ AWS services, along with over 6,000 API operations (every service that has an API). That’s huge! We will see this in the upcoming sections of this article.
The Scheduler also allows you to define when the service has to be invoked flexibly. Meaning, that you get to schedule your tasks in normal ways, like daily, weekly, one-time tasks, recurring tasks, etc, and also have a custom CRON-based schedule that defines the time to invoke. This way it’s easy to schedule your executions at very flexible times.
Additionally, Amazon EventBridge Scheduler also supports retries ensuring at least one delivery is succeded to the invoke target.
Summing up, here are the features of the Amazon EventBridge Scheduler
- Can invoke over 200+ AWS Services.
- 6000+ AWS APIs that can be invoked.
- Flexible Form of Building Schedulers.
- CRON-based support.
- Over 1 Million Schedulers per account.
- Supports One Time Schedules.
- Supports Recurring Schedules.
If you are going to need to schedule any of the AWS Services in a serverless and reliable way. Amazon EventBridge Scheduler is what you are looking for.
Pricing
So, this is almost free of charge. You get up to 14 Million Invocations per month in the free tier of AWS. If for some reason, you cross the 14M limit, you will be charged 1$ per every million scheduler invocation. This makes it super affordable to use! Read more about the pricing here, https://aws.amazon.com/eventbridge/pricing/
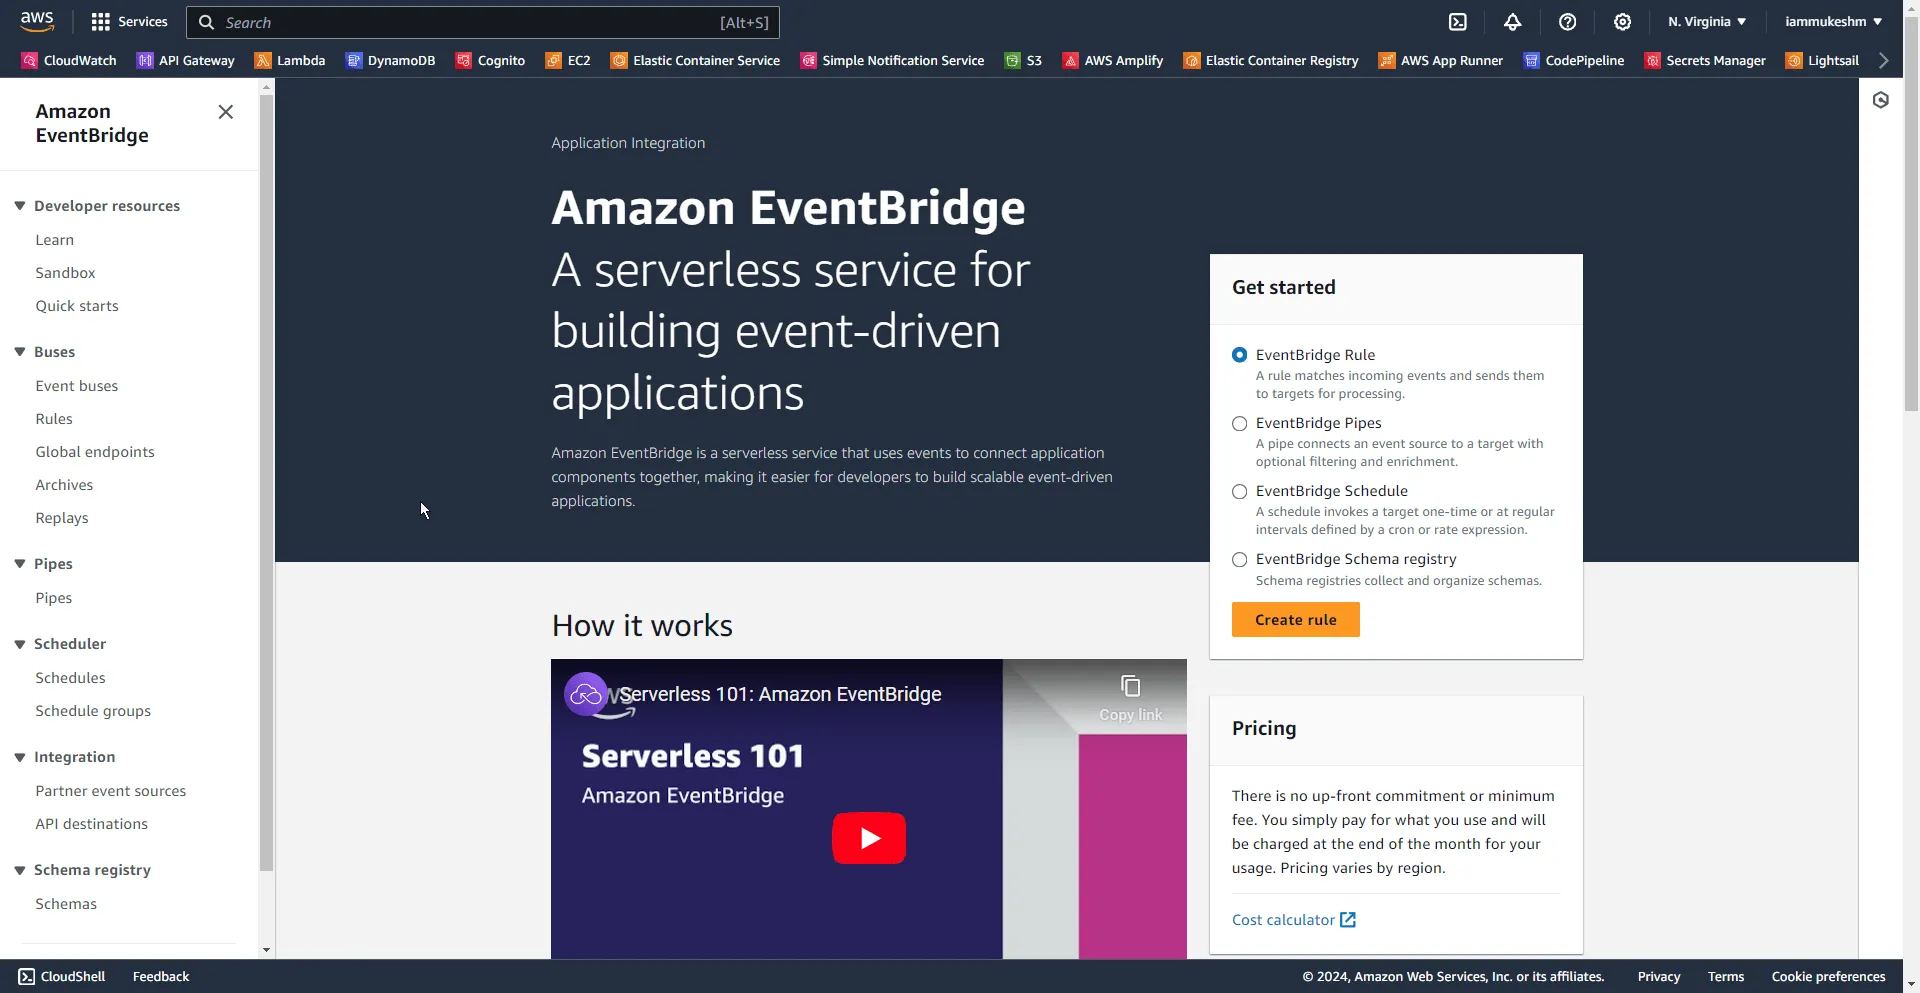
Exploring Amazon EventBridge Scheduler via Management Console
Let’s first explore AWS Management Console to understand how to work with Amazon EventBridge Scheduler. Eventually, we will also point this scheduler to run a simple Hello World Lambda. (maybe from our previous articles). For now, let’s log in to the Management Console and search for EventBridge.
Here, under the Scheduler section, click on Schedules.
From here, click on Create Schedule.

You get to configure multiple steps to set up your custom scheduler.

So, in this first section, provide a name and description that best defines the purpose of your scheduler. As for the group, there will be a default group into which all your new schedulers will be automatically placed. This is just for organization purposes only.
Schedule Patterns
The next section is where the actual fun lies. Schedule Pattern is what we will have to modify based on our requirements. You get to choose one of the options:
- One Time Schedule: where the tasks are fired just once based on the date and time you provide.
- Recurring Schedule is how you can configure your tasks to be invoked multiple times based on rate / cron expressions.
First, a quick brief about One Time Schedule. When you need to invoke let’s say a Lambda on a very specific date and time, you will have to use this occurrence type. Very self-explanatory naming. You get to choose the date and time, and even the time zone.
So, what’s this Flexible Time Window in Amazon EventBridge Scheduler? It ensures that your scheduler is triggered within the defined window. For example, you can choose anywhere from 0 minutes to 4 hours. The use case of this is when your application trigger is not very crucial, and it also helps AWS save some resources against a sudden surge of requests I believe.

Next up is the Recurring Schedule, where we further have two types. Ideally, this is what you would need if you need a flexible form of setting schedules.
- CRON Based Schedules
- Rate Based Schedules
CRON Expressions
This is a CRON-based schedule where you would have to define an expression that decides when your scheduler will run. If you need really specific control over when you need your scheduler to run, this is what you have to go with.
For example, if you need to run the Amazon EventBridge Scheduler every Monday at 10 am, you can achieve it easily with CRON Expressions. You can get more such examples and details from here: https://docs.aws.amazon.com/eventbridge/latest/userguide/eb-cron-expressions.html
In short, for very advanced use cases, CRON expression will help.

Rate Expressions
This is a lot simpler way of setting up schedules. You will just have to define at what rate you need your scheduler to be run. For example, every 12 hours or so.

In addition to all this, you will also have the option to restrict the scheduler by defining the start and end date of your scheduler.

For our demonstration, I will use the Rate Based Recurring Schedule, and configure it to run every 2 minutes. Make sure to select the flexible time window to be Off.

Various Targets for Amazon EventBridge Scheduler
In this next step, you get to select the target API that has to be invoked by your Scheduler. These are the most popularly used APIs, like AWS Lambda, Amazon SQS, SNS, and so on.

But if you still need more options, just click on the “All APIs” tab, and you will have a pool of over 6000 APIs to select from!

Schedule AWS Lambda with Amazon EventBridge Scheduler
For this demonstration, we will choose to trigger an AWS Lambda with Amazon EventBridge Scheduler. But before this, you need to have a Lambda deployed to your AWS account, yeah? Let’s build a simple AWS Lambda.
Building and Deploying a .NET AWS Lambda
Here is a simple AWS Lambda written on C#.
If you are new to AWS Lambda, I have written an entire article around this covering from the basic concepts up to deploying your AWS Lambda from Visual Studio. Feel free to read it from here.
public string FunctionHandler(string input, ILambdaContext context){ var message = $"Hello {input.ToUpper()}"; Console.WriteLine(message); return message;}The Lambda just returns a message based on the input parameter given to it. I have uploaded this Lambda to AWS.
Once that is done, go back to your Amazon EventBridge Scheduler creation page, and select the target as AWS Lambda (Invoke).

Here, select your newly uploaded Lambda. Another interesting feature of the Scheduler is that you can define what kind of payload you need to pass to your invoked service. Since our C# Lambda expects a string as the input parameter, I will give it a string value with my name. So, if you refer back to the AWS Lambda C# code, we expect the Lambda to print out Hello MUKESH every 2 minutes.
If you are building a bit complex AWS Lambda, then in the Paylod section you can choose a custom JSON input if you want.
One practical use case of this is when you want to programmatically create Schedulers from AWS .NET SDK using the IAmazonScheduler interface. Whenever a new user registers into your .NET application, you can schedule a welcome email by using the Amazon EventBridge Scheduler (One Time Scheduler) which then triggers a lambda that does some app-specific registration operation and sends the welcome email to the user. This way you can build scalable, decoupled serverless applications on the cloud!
Click on Next.
Amazon EventBridge Scheduler’s settings will come up for configuration. Here, ensure that you have enabled the scheduler. Also, it’s important to set the action after the scheduled invocations have been completed. This is very crucial when your Scheduler is set to One Time Schedule Type.
The problem is that AWS doesn’t automatically delete your schedulers even after it has completed all its executions. This might lead to multiple schedulers stagnating on your AWS accounts.
To handle this, set the action to DELETE. This ensures that the schedulers will be deleted once they have completed their designated last invocation.

Retry Policy
Another crucial feature of Amazon EventBridge Scheduler is its retry policy. If for some reason, the scheduler is not able to invoke your configured target, by default it would retry for up to 24 hours or 185 times. This is completely configurable based on your requirements.
If the Scheduler has exhausted the retry limit, you have the option to push this message to a Dead Letter Queue from where you can pick, analyze, and re-invoke the target, if needed.

Leave everything as default and create your shiny new scheduler.
Now, this means that your .NET AWS Lambda will be invoked every 2 minutes forever until you decide to delete/disable the scheduler.
Navigate to Amazon Cloudwatch Logs. Here you can see that we have a new log group created, under which we can see the Lambda output logs as well!

Amazon EventBridge Scheduler vs EventBridge Rules: How is it Different?
EventBridge Rules also are quite similar to Amazon EventBridge Scheduler, but how is it different? Why would you prefer to use Amazon EventBridge Scheduler?
- EventBridge Rules allow you to have only 300 schedules running at a time per account per region. However, Amazon EventBridge Scheduler allows you to create almost 1 Million schedules per account, which is huge!
- The throughput is much higher in the case of Amazon EventBridge Scheduler.
- There are over 6000 APIs and close to 300 AWS Services that can be invoked via the Amazon EventBridge Scheduler. But with EventBridge Rules, you are restricted to about just 20+ targets.
- Supports Day Light Savings.
- Previously with EventBridge Rules, there was no support for Timezones. Every task runs at server times. But now, with Amazon EventBridge Scheduler, the Timezones can be selected while configuring the scheduler.
- One Time Schedules are also now possible with Amazon EventBridge Scheduler.
With all these significant differences, it easily makes Amazon EventBridge Scheduler the better choice for scheduling tasks in AWS!
That’s it for this article. I hope you now have a clear-cut understanding of how to Schedule AWS Lambda With Amazon EventBridge Scheduler.
IMPORTANT: Also make sure that you have deleted your Scheduler after your testing is done so that it doesn’t indefinitely trigger your Lambda forever!
What other use cases can you think of, to use the Amazon EventBridge Scheduler?
In one of the next articles, I will build an AWS Lambda that can Rotate IAM Access Keys, and attach it to a Scheduler so that the keys are periodically rotated automatically (age not greater than 90 days). I will also attach Amazon SES to the mix so that we can send emails to the user whenever a key is created, destroyed, or deactivated. This is a pretty cool use case of what we have learned in this series till today.

What's your take?
Push back, share a war story, or ask the obvious question someone else is wondering. I read every comment.