In this comprehensive article, we will be learning Amazon API Gateway with .NET stack to expose AWS Lambdas as API routes to the external world quite easily. Previously, we learned about working with AWS Lambda using .NET, which is a vital point for getting started with Serverless applications. Although we built and deployed those Lambdas onto AWS, we never really discussed how we would expose them to be invoked by the external world.
Further in this comprehensive guide, we will be building a complete serverless application that integrates seamlessly between Amazon API Gateway, Lambda, DynamoDb for Persistence, and Cloudwatch for logging purposes.
This article is sponsored by AWS. Huge thanks for helping me produce more .NET on AWS content!
You can find the source code of the implementation here.
What is Amazon API Gateway?
Amazon API Gateway is a fully managed service that lets you create Gateways, which essentially serves as a door into your world of business logic for your application. With this service, you basically expose endpoints that on accessing connect to AWS Lambdas, public endpoints, and various other AWS Services depending on the way you build Amazon API Gateway.
Let’s say some application running on the internet needs access to the business logic that stays within your lambda. These client applications would connect to Amazon API Gateway, which internally would redirect the request to the associated AWS Lambda or other services that you would have configured.
Let’s look into a diagrammatic representation of what a common request flow would look like through an API Gateway.
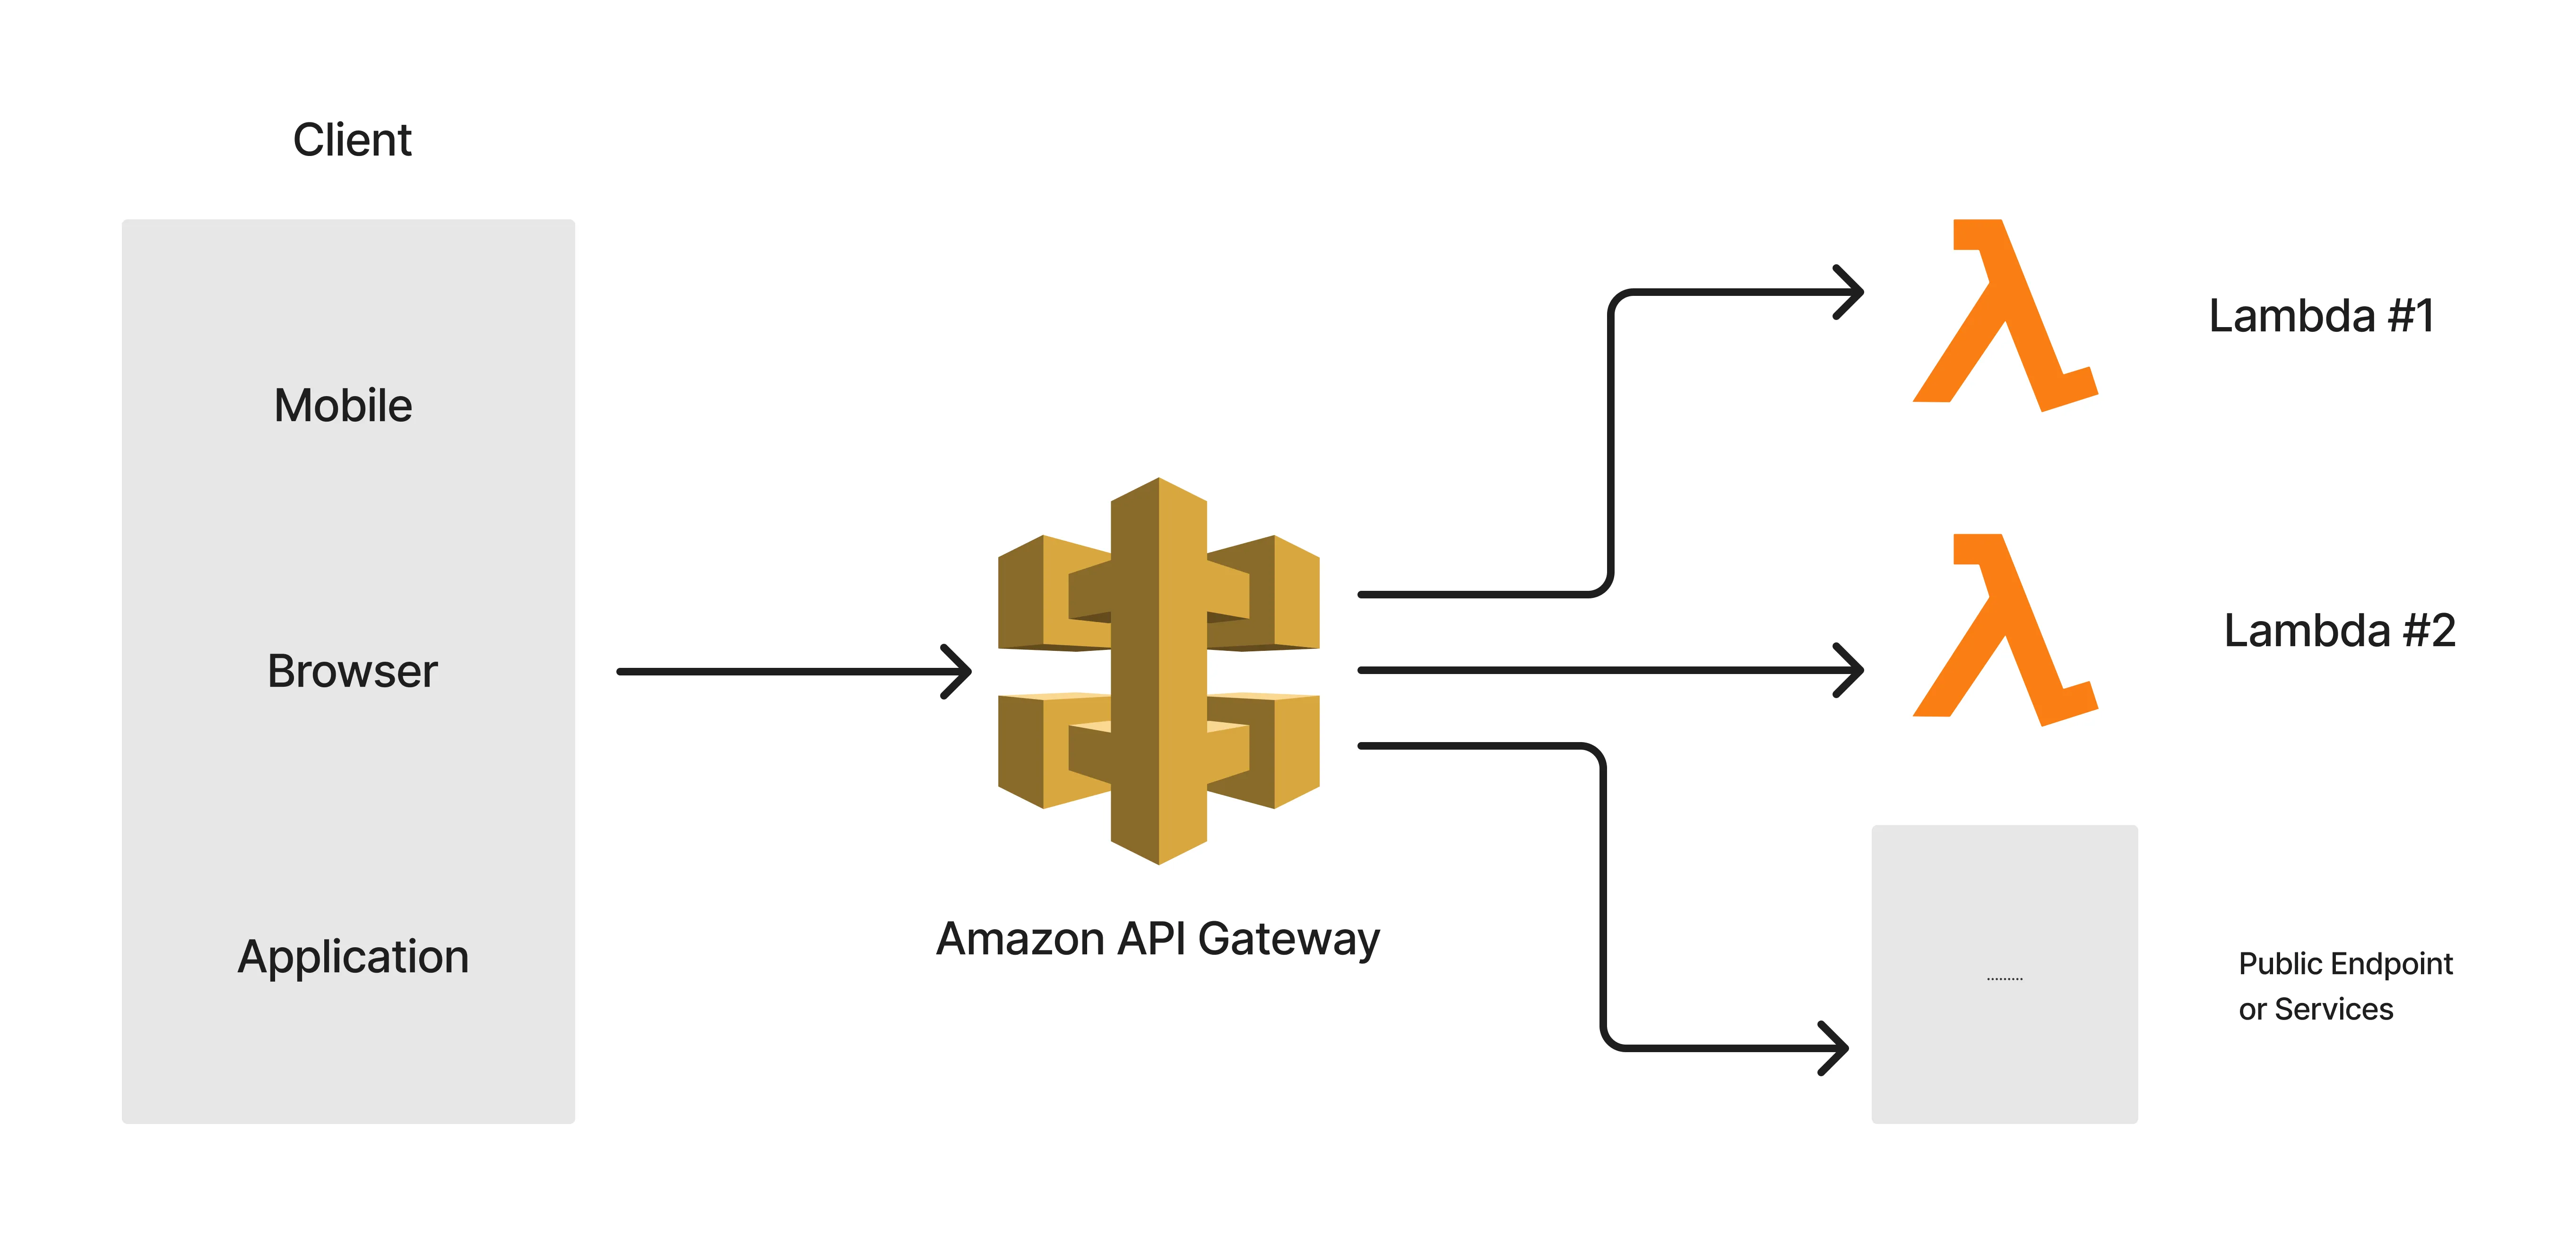
As you can see, clients access the Gateway which is internally wired up to a service. For example,
www.<url-of-aws-gateway>/test-> would redirect to a lambda named test-lambdawww.<url-of-aws-gateway>/get-students-> would redirect to a lambda that returns a list of studentswww.<url-of-aws-gateway>/weather?city=trivandrum-> would redirect to a public weather API endpoint which would return the weather data of Trivandrum city.
Now, API Gateways is often a vital part of the entire AWS Serverless ecosystem as it makes it pretty cool and easy to access our AWS Services at any scale.
Update: I have uploaded a new video on my YouTube channel about this topic, Watch it here: https://www.youtube.com/watch?v=OGpQnNyAYyY
AWS REST API vs. HTTP API
AWS supports two versions of the API Gateway Services. The initial release was for the REST API variant which includes tons of features to design, develop, and maintain your API Gateway. Later, around 2019, AWS introduced HTTP APIs which simplified the Gateway creation and deployment. Do not get confused with the naming, both of these versions are built on HTTP protocol following the REST conventions. Internally AWS names them as v1 (REST API), and v2 (HTTP API)
There are quite a lot of significant differences between these versions including performance, pricing, and development experience. In short, HTTP Apis wins in almost all departments and should be your choice most of the time.
- First up, HTTP APIs are meant to be better in performance and are almost 10-15 % more performant compared to the REST API.
- In terms of pricing, for the first 300 Million requests per month, HTTP APIs would cost you just 1 USD, whereas, for the same volume, REST APIs cost around 3.5 USD. This is a huge difference. Note that the AWS Free Tier includes 1 Million APIs (REST & HTTP) per month for the first 12 months absolutely free. Enough time to explore both these cool techs, right?
- The User experience offered by the AWS console while developing these gateways is completely different from each other.
- REST API supports edge-optimized endpoints which ensure that your endpoints are highly distributed across the globe, while HTTP endpoints support only regional deployments, which might contribute to a slight delay in responses.
- Both of these are highly secure in nature.
- Canary deployments are included with REST API and not with HTTP APIs if this is a huge deal for your deployment strategy.
For more comparison, refer to the AWS’s developer guide that compares both these versions. Although HTTP APIs are cheaper than REST, there are certainly quite a lot of features included in the REST API that justify the price difference.
As for our demonstration, we will be using HTTP APIs. Maybe in a later article, we will explore REST APIs. Concept-wise, both of these are almost the same. We will be using Visual Studio 2022 Community along with the AWS SDK Kit extension as we did in the previous article on Lambda to develop, test, mock, and publish our Lambdas to the AWS Cloud.
It’s important that you have already gone through the previous article on AWS Lambda on .NET, where we have set up the AWS Credentials via the CLI and installed the AWS Toolkit on Visual Studio Code. If not, refer to this blog post.
Building & Publishing an AWS Lambda with .NET
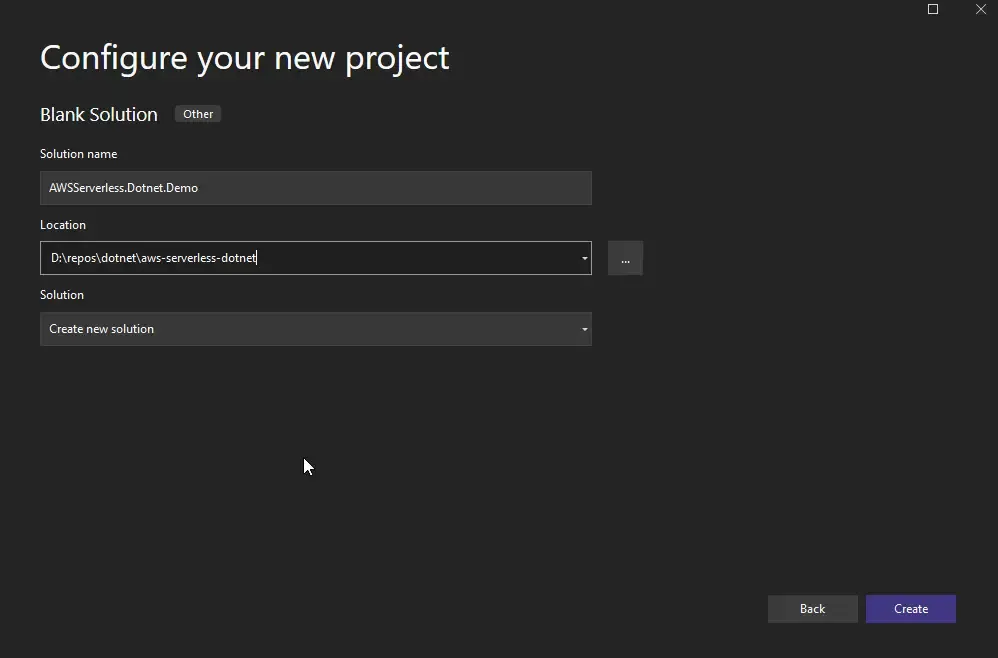
First up, let’s open up Visual Studio 2022 and create a blank solution. I named my solution as AWSServerless.Dotnet.Demo. Basically, we will have 2 Lambda projects in this, which we will gradually add.
- A dummy Lambda that returns a Hello message. This lambda will be used to introduce Amazon API Gateway integration basics and stuff.
- A Student Lambda, to which we will add multiple Function handlers that can possibly perform some basic CRUD operations against DynamoDB. (PS, I have written an article about Getting started with DynamoDB using .NET. Do check it out as well.)
Before continuing, ensure that you have the following already in place.
- AWS Credentials are set via the AWS CLI.
- AWS Toolkit installed on your Visual Studio Installation.
- Have an AWS Account. A Free Tier would be more than enough.
You can get more info related to the above steps in my previous articles about AWS Serverless Applications with .NET.
Let’s add our first Lambda project to our Blank Solution. Right-click on the Solution at Visual Studio and hit Add New Project. Assuming that you have already installed the AWS Toolkit on your Visual Studio Instance, you can search for AWS Lambda in the ‘Add a new project’ popup that appears.
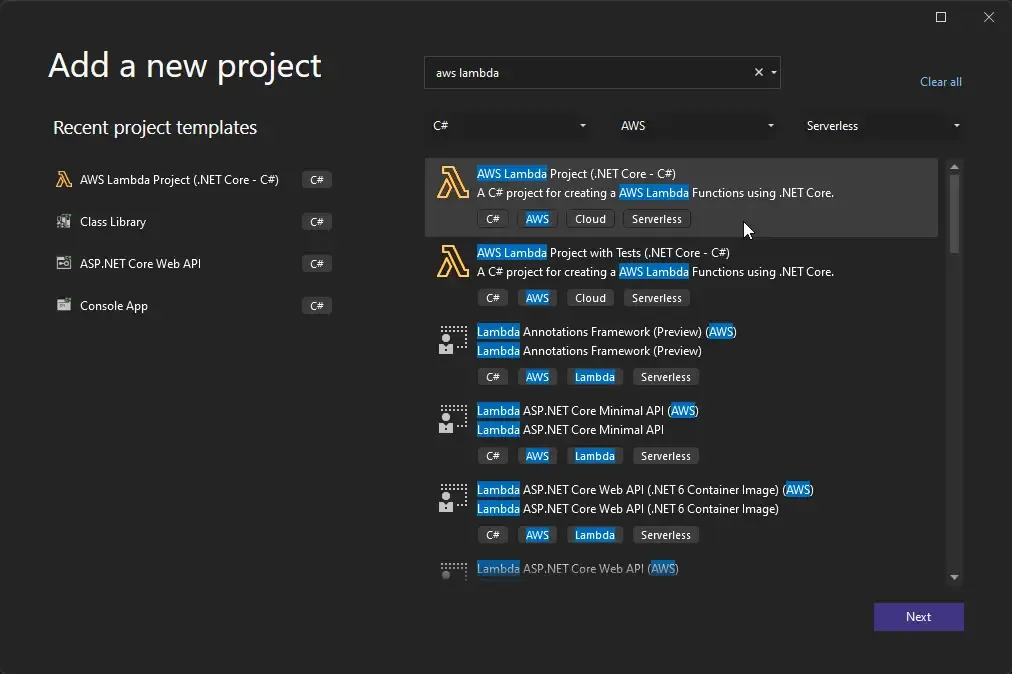
Click on Next. Here let’s name the lambda HelloLambda. As mentioned earlier, this will be a simple lambda that would help us understand what the entire integration with Amazon API Gateway with .NET would look like. When you are prompted to select a blueprint for your new lambda, select Empty Function. This gives us a clean slate to start building our simple Lambda.
You would be already familiar with the folder structure of the AWS Lambda Project. If not, go through this article. Open up the Function.cs / FunctionHandler. Now that we are going to attach this Handler with our API Gateway, we need to make some tiny modifications to the signature of this method. But before that let’s install a package to this Lambda project that contains the contracts. You can open up the Package Manager Console and run the following to get the package installed.
Install-Package Amazon.Lambda.APIGatewayEventsLet’s go and change our FunctionHandler now.
public APIGatewayHttpApiV2ProxyResponse FunctionHandler(APIGatewayHttpApiV2ProxyRequest request, ILambdaContext context){ request.QueryStringParameters.TryGetValue("name", out var name); name = name ?? "John Doe"; var message = $"Hello {name}, from AWS Lambda"; return new APIGatewayHttpApiV2ProxyResponse { Body = message, StatusCode = 200 };}APIGatewayHttpApiV2ProxyRequest represents the incoming request from an HTTP API. If you think about it, or if you look back into the first flow diagram that we had, the request that Lambda receives is not directly from the client, but a request from the Amazon API Gateway itself. So in this case, the API Gateway sends a request to the Lambda with the APIGatewayHttpApiV2ProxyRequest type. Similarly, APIGatewayHttpApiV2ProxyResponse is the type of response Lambda gives back to the Amazon API Gateway. You can also skip this response part and instead return some crucial data as the business requirement, like a list of Students, which we will be doing while we build our next Lambda further in this guide.
So these were the major changes in the Lambda to support the whole API Gateway integration thing. Apart from that, the Function handler now returns a message that states “Hello {name}, from AWS Lambda”. Another thing here is that, from within the Lambda, you get to access the incoming context, which includes Query Strings, Path Parameters, Routes, and so on. For this Lambda, I expect the incoming request would have a Query parameter of name (…/hello?name=Mukesh), which will be then added to the message it ultimately returns.
If the Query Parameter doesn’t exist, it goes forward with the default name, which is John Doe. Note that we are returning the response as type APIGatewayHttpApiV2ProxyResponse, where the Body is the actual message, and we provide a status code of 200 SUCCESS.
That’s it for our First Lambda. Let’s publish it to AWS and mock-test it locally within Visual Studio. Right-click on the HelloLambda project and click on Publish to AWS Lambda. You will see the following popup.
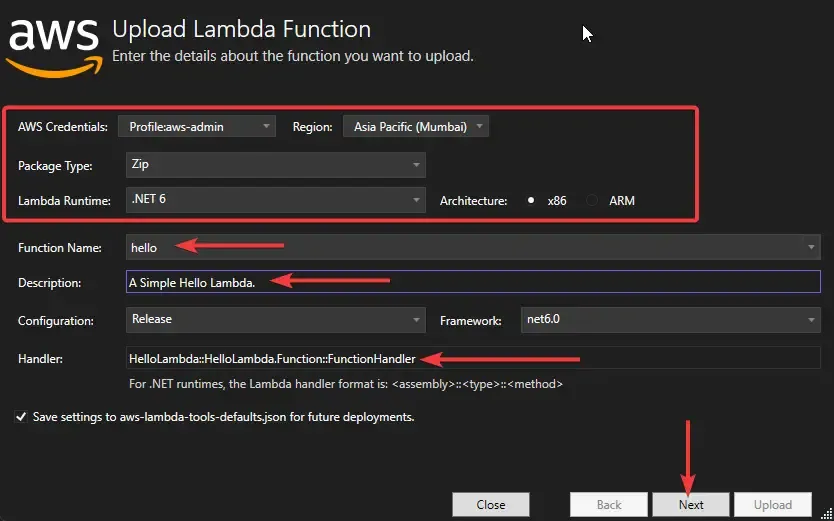
The first few details are filled in automatically by the tool, given that you have set up your local AWS Credentials, Region, and profile.
- The function name is the name with which the Lambda will be identified over at your AWS account.
- Description - as the name suggests.
- Handler is kind of important here. Let’s say your Function.cs can potentially have multiple Handler methods. This Handler method maps to the exact function you need your Lambda to be pointing to. In our case, it’s HelloLambda::HelloLambda.Function::FunctionHandler. Keep this in mind, as we will be making use of this field later in our article.
Click Next.
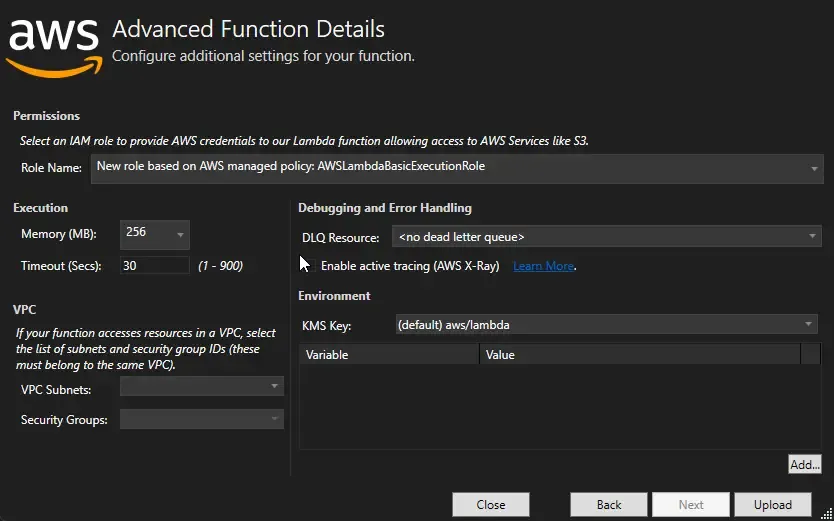
In the next screen, the only change you will have to make is to select the correct role needed. In our case, it’s the AWSLambdaBasicExecutionRole. This comes with permissions for writing Logs into AWS Cloudwatch. That’s it. Click Upload. AWS starts creating the required Roles, runs some commands to build and release your Lambda locally, Zips up the published libraries, and uploads it to AWS which ultimately creates your new shiny Lambda.
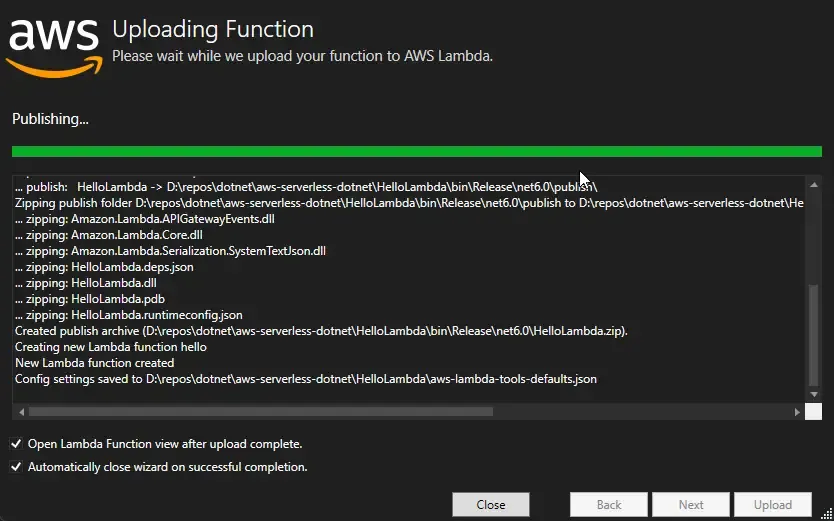
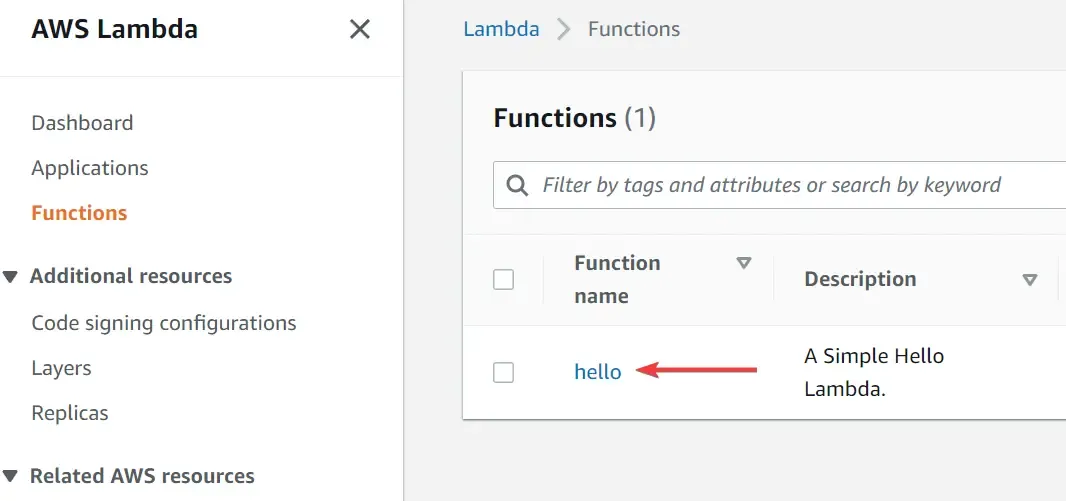
Once done, you can open up the AWS Management Console, navigate to Lambdas, and verify that our new Lambda is created.
Back at Visual Studio, you can see that the Publish Wizard would have opened up a small tool that helps test our Lambda Straight from Visual Studio. Oh, and if you aren’t already aware, you can also simply run the Lambda application in Debug mode, and Visual Studio would fire up a Mock Tool that essentially helps test and debug your Lambda code.
For now, let’s explore the tool built into the Visual Studio interface. Here is a screenshot below.
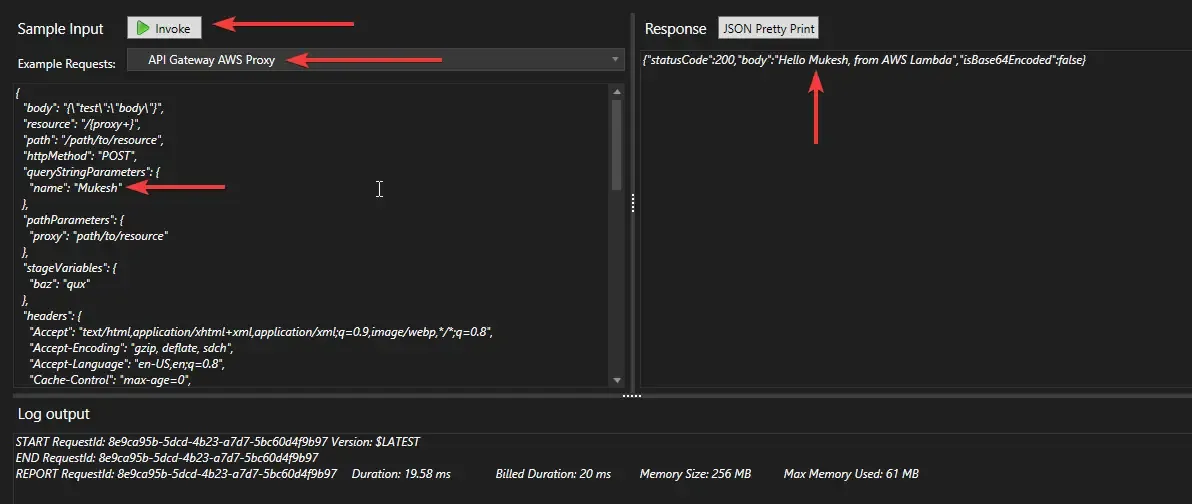
First up, this interface allows you to send mock requests straight to your Lambda that’s been deployed to AWS. Click on the Example Request drop-down, and select API Gateway AWS Proxy. The tool would fill a sample request. Here, as I did, you can add a name key/value to the Query string parameters. There are quite a lot of properties to fiddle around here. Once you click on Invoke, the response will have our message in it with a Status code of 200.
Now, although the Lambda is ready, we really don’t have a way to access this function other than from VS debug tools. So, we need a link/endpoint to which we send a request, and we expect a similar request back from Lambda. This is where Amazon API Gateway comes into the picture.
Creating Amazon API Gateway with .NET
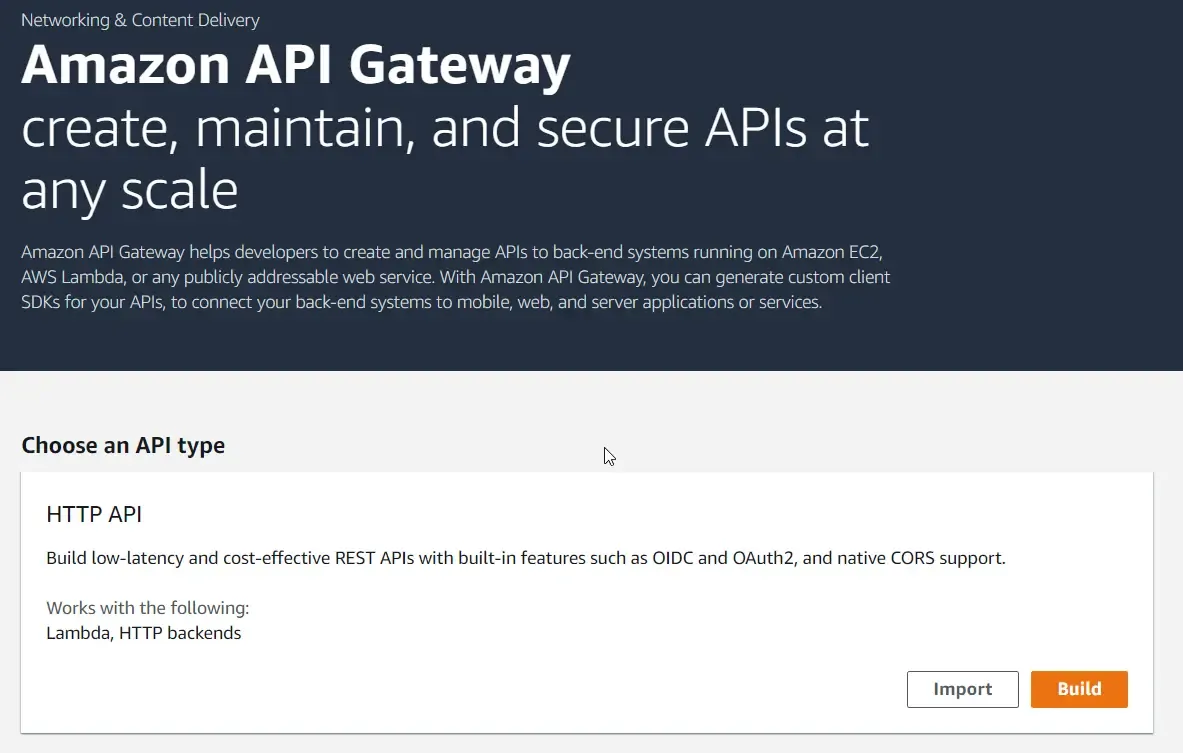
Let’s start designing our First Amazon API Gateway. Search for API Gateway in the search bar you see in the AWS Management Console. You will see the default landing page for Amazon API Gateway. Here you will be presented with choices to select an API Type. Since we will be using HTTP API, let’s click on the Build button associated with it.
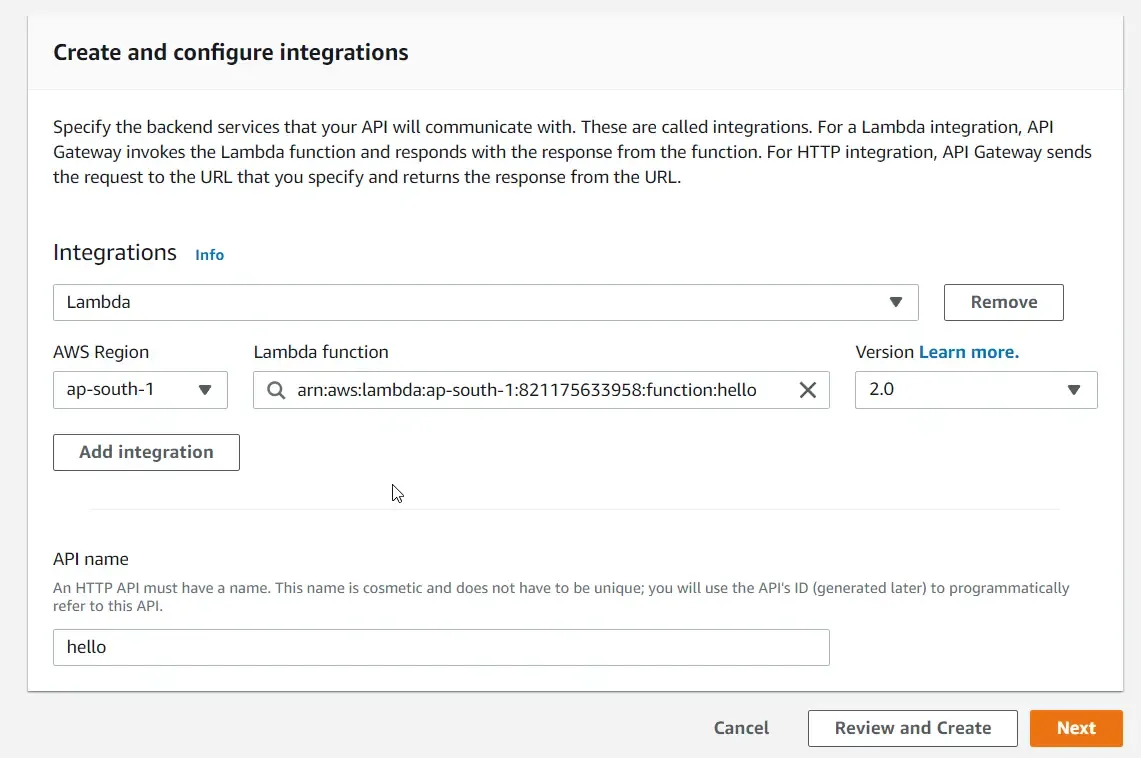
Given that our Lambda is successfully created, you can select the Integration type as Lambda and choose our hello Lambda function. Make sure we stick to Version 2.0 of the payload since it’s the latest. Also, ensure to select the right AWS region. In my case, it’s ap-south-1. With that done, click next.
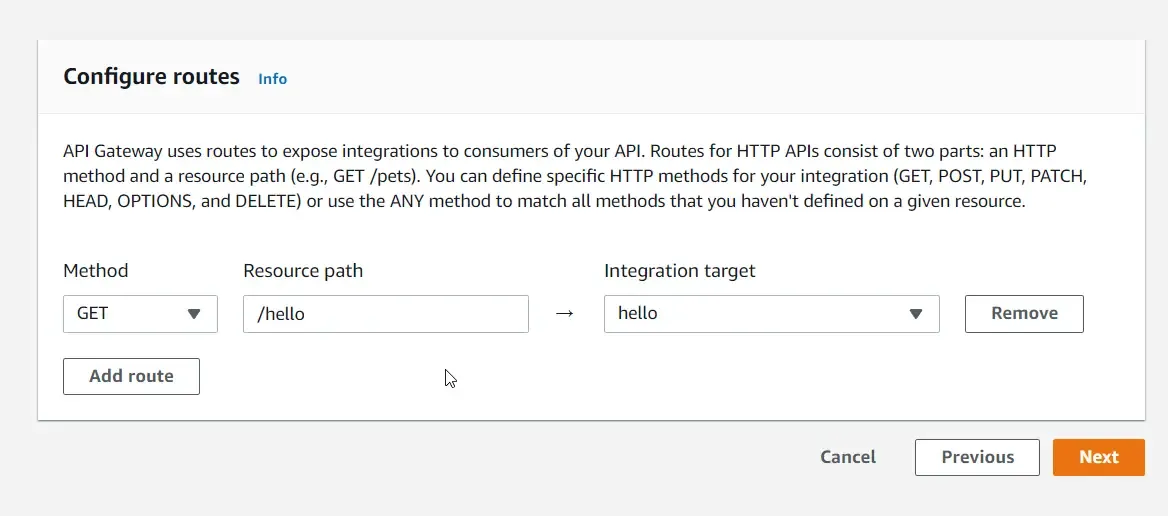
Next comes an interesting part, where we configure the actual routes that can invoke our hello Lambda. You can see that I have made it a GET method which will have an endpoint of /hello and will target the Hello Lambda. So basically, once we create the API Gateway, AWS would provide us with an Endpoint URL, to which if we add a /hello and send a GET method with appropriate query parameters will trigger the Lambda and return the intended Response.
Note that you can multiple routes and integrations here. We will explore this when we create our Full Fledged API Gateway later in this article.
Next up, the Wizard will ask us to create stages. This will be handy if we want to deploy our Amazon API Gateway to different stages like dev, prod, and staging. But for now, let’s keep it as the default value which is `$default`, and click on Next.
Here you can review your changes and Deploy your Gateway. That’s it, as simple as that.
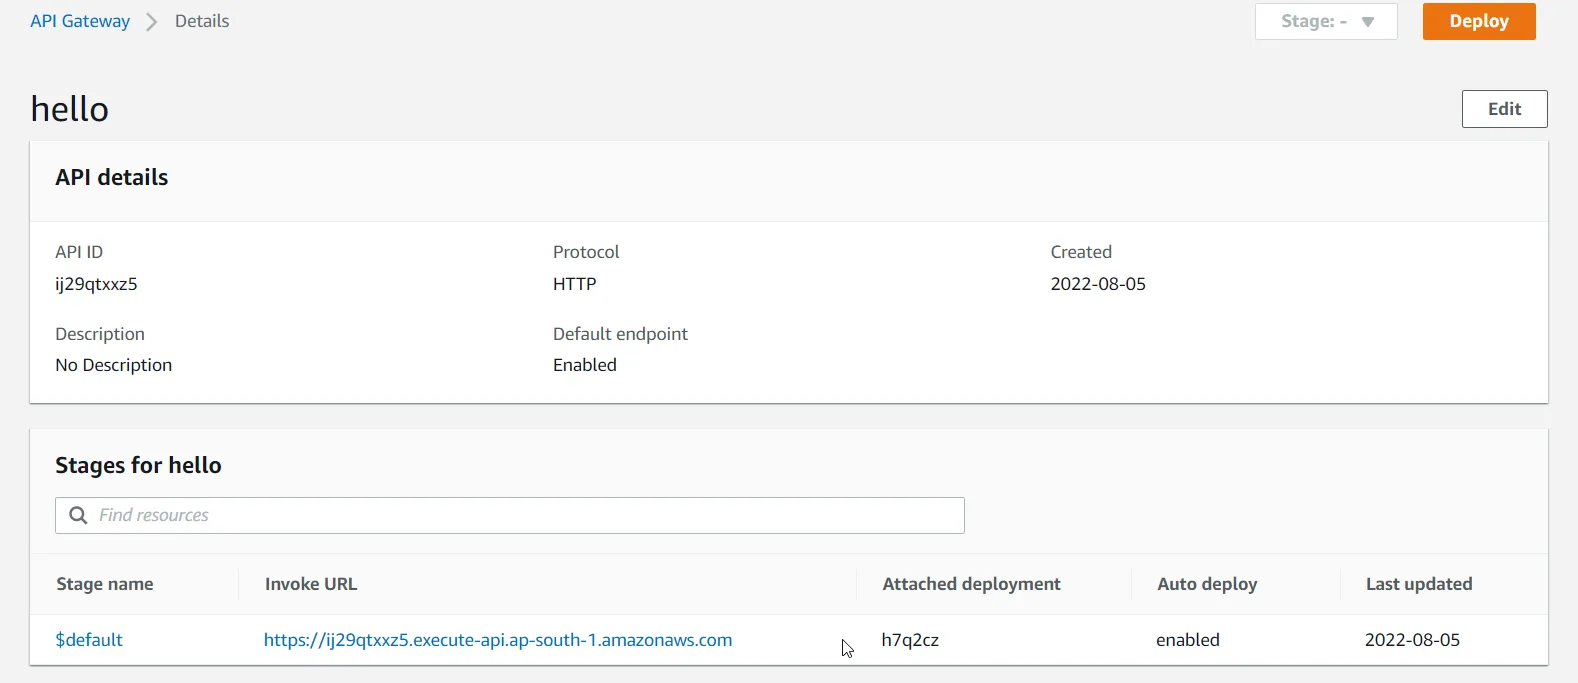
In the below screen, you can see the URL of the Amazon API Gateway that we just created. Copy this and open up Postman or any API testing tool you use. Also since it’s just a GET method, you are free to even use the Browser to test our Gateway.
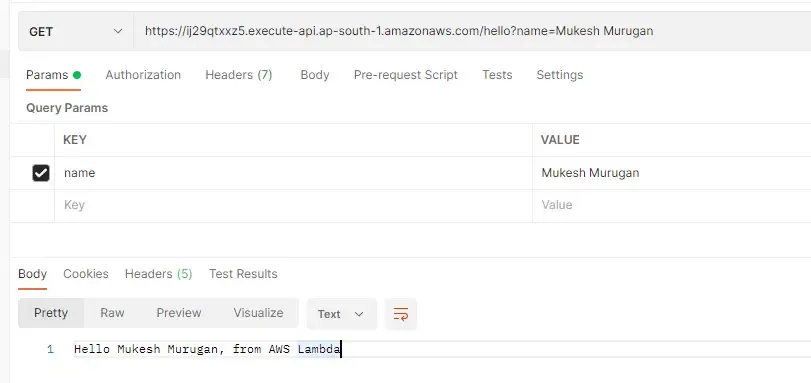
Let’s test how our API Gateway would respond. I will be using Postman for testing. Make sure that it’s a GET method, or else the Gateway will shout that such an endpoint is not found.
In the below screenshot, you can see that I sent a request to the /hello endpoint, and passed the query parameter name as my Name, and you can see the expected response from Lambda as well. Quite simple, right? Feel free to fiddle with the Hello Lambda to understand more about it.
Exploring Amazon API Gateway Console Interface
Now that we have created our first Amazon API Gateway with .NET-powered AWS Lambdas, let’s explore the Interface and Features provided on the Amazon API Gateway.
On the homepage, you get to see a list of Gateways created by you in a specific AWS Region.

Once you go into a specific API Gateway, you get access to a bunch of cool features to tweak your Gateway.
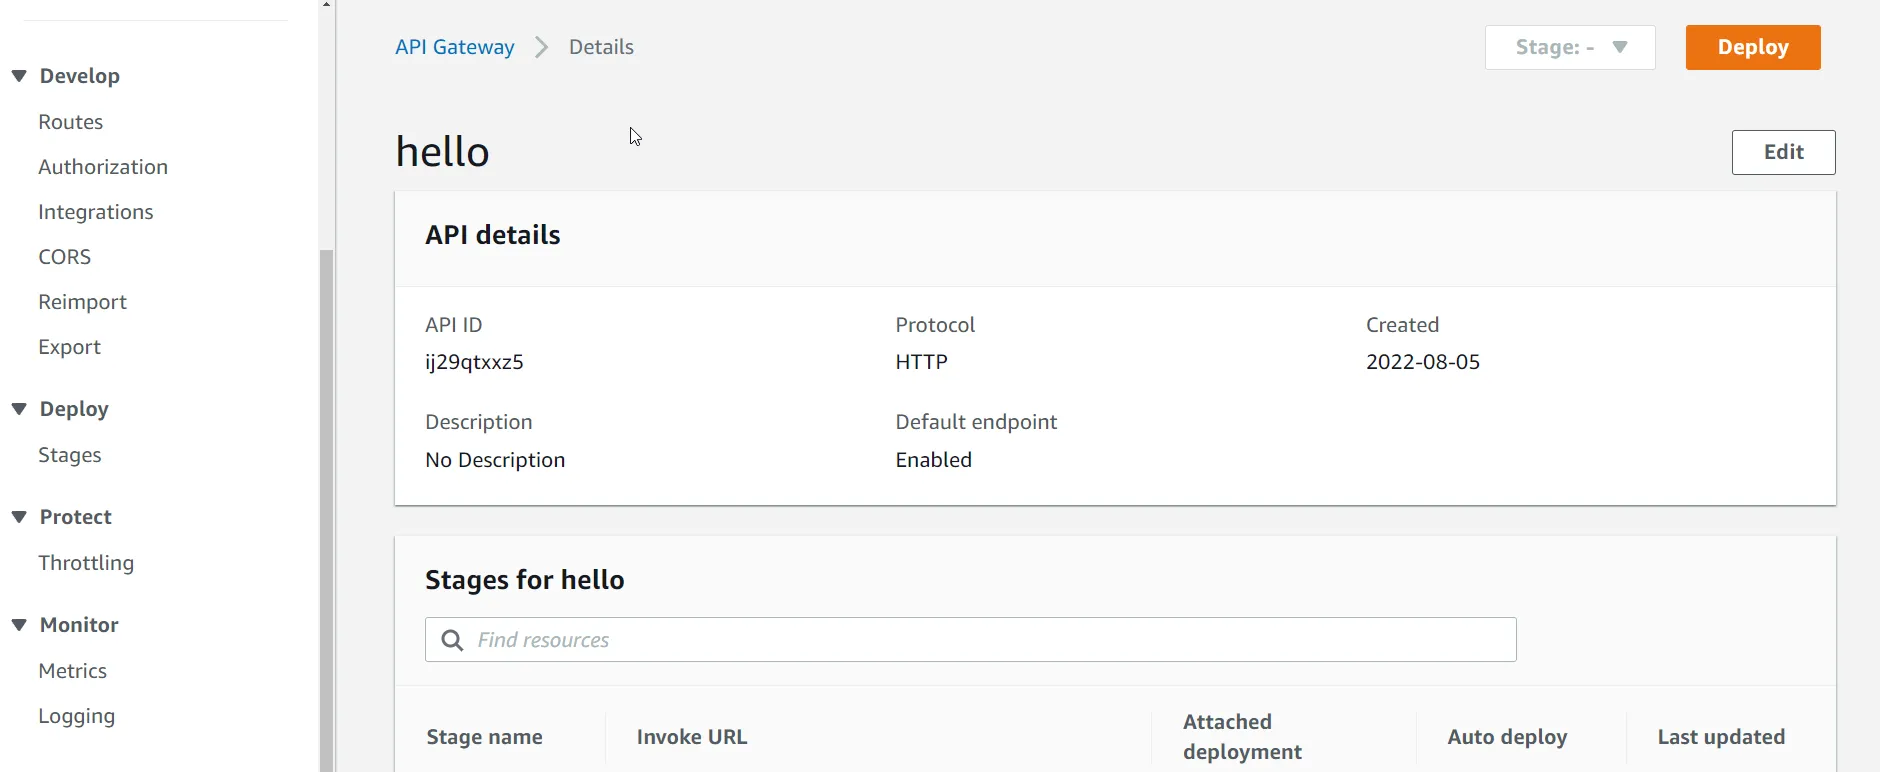
From here, you get to :
- Add more routes to an existing Amazon API Gateway.
- Securing Amazon API Gateway using Lambdas and JWTs. We will be diving deep into this in the next article!
- Manage Integrations and Lambdas.
- Configure CORS Policies.
- Export / Import OpenAPI definitions.
- Write Access Logs if needed. So, every time there is a request sent through the API gateway, the request is logged into Cloudwatch. You will have to specify a Log Group destination for this. We will look into this later in the article.
- Manage / Create Stages and so on.
Now that we have had a basic understanding of how the Amazon API Gateway with .NET works, let’s now build a more advanced Serverless application that makes use of AWS Lambda, multiple Function Handlers, Cloudwatch, and DynamoDB for storing data, and finally integrates all of these Lambdas using an Amazon API Gateway.
Building Students Management AWS Lambda with .NET
We will be building a simple API that can get all student details, get student by ID, and create a new Student record. Add a new Lambda project to our Solution and name it StudentLambda. And yes, we will be creating multiple Lambdas from a single Lambda Project. You are free to create separate projects for each of the functions. But for the current scope of the application and requirement, it’s not really necessary. We will stuff all the 3 Lambda functions into a single .NET Lambda project and make use of FunctionHandlers to separately deploy all the Lambdas to AWS.
Before getting started, make sure to install the following NuGet packages to your StudentLambda project via the Package Manager Console.
Install-Package Amazon.Lambda.APIGatewayEventsInstall-Package AWSSDK.DynamoDBv2Install-Package Newtonsoft.JsonAs you know, the first package is specifically for using the Amazon API Gateway contracts within our .NET Lambda.
The DynamoDB package lets our Lambda communicate with our DynamoDB. If you aren’t aware of how DynamoDB works, I have written a complete guide around it here. I have built a simple CRUD ASP.NET Core WebAPI that stores data in an AWS DynamoDB table.
Next, let’s define the Student Model. With the root of the StudentLambda project, add a new class and name it Student.cs
namespace StudentLambda{ [DynamoDBTable("students")] public class Student { [DynamoDBHashKey("id")] public int? Id { get; set; } [DynamoDBProperty("first_name")] public string? FirstName { get; set; } [DynamoDBProperty("last_name")] public string? LastName { get; set; } [DynamoDBProperty("class")] public int Class { get; set; } }}Now navigate to AWS DynamoDB and create a new table there like the following.
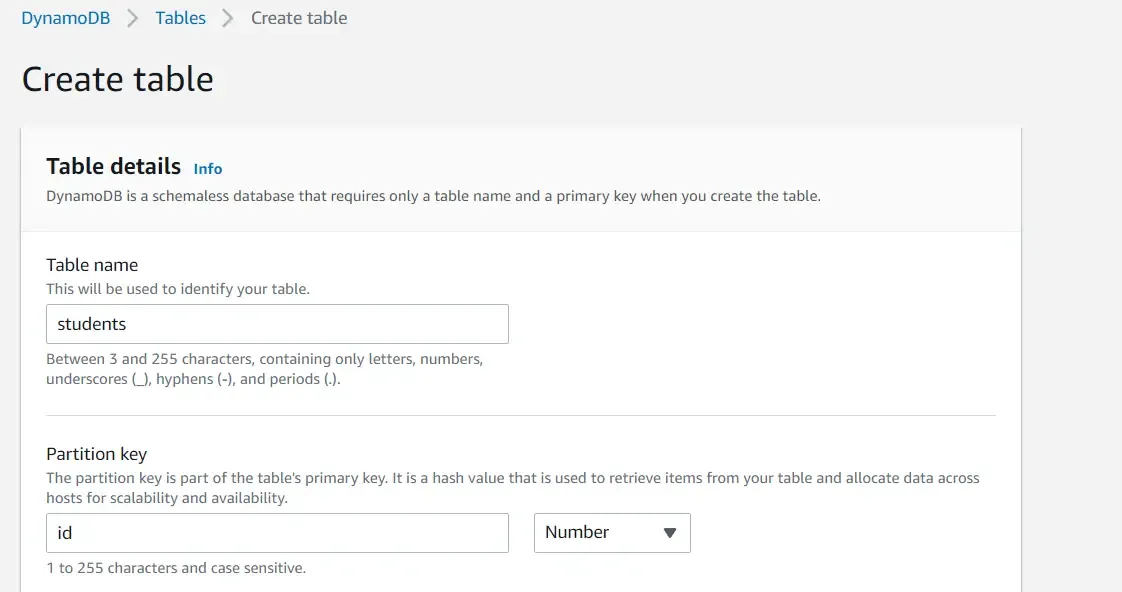
Once you create the table, AWS will take a couple of seconds to provision the Table to the cloud. Let’s add a sample record to this table. Open up the Table, and hit Explore Table Items -> Create Item.
Switch to JSON view and add a sample record like the following. Note that the properties I have used are exactly the same as the ones we defined in our Student.cs class. Click Create.
{ "id": 1, "first_name" : "Mukesh", "last_name" : "Murugan", "class" : 10}
Getting All Students
Let’s write some code to return a list of all students from the DynamoDB table. Open up the Function.cs class of the StudentLambda. Remove the default FunctionHandler method. and add the following function.
public async Task<List<Student>> GetAllStudentsAsync(APIGatewayHttpApiV2ProxyRequest request, ILambdaContext context){ AmazonDynamoDBClient client = new AmazonDynamoDBClient(); DynamoDBContext dbContext = new DynamoDBContext(client); var data = await dbContext.ScanAsync<Student>(default).GetRemainingAsync(); return data;}So this function essentially scans the entire DynamoDB Table names students and returns a list of Students. As simple as that. Note that we will be creating a couple of DynamoDB Client and Context to access our data from the AWS Lambda.
We will be deploying these Lambdas once all the 3 are completed. Ideally, the endpoint for this Lambda will be <amazon-url>/students [GET] Method.
Create Student
Next, to the Same Function.cs of the Student Lambda, let’s add another method that will be responsible for creating new student records. Below is the function.
public async Task<APIGatewayHttpApiV2ProxyResponse> CreateStudentAsync(APIGatewayHttpApiV2ProxyRequest request, ILambdaContext context){ var studentRequest = JsonConvert.DeserializeObject<Student>(request.Body); AmazonDynamoDBClient client = new AmazonDynamoDBClient(); DynamoDBContext dbContext = new DynamoDBContext(client); await dbContext.SaveAsync(studentRequest); var message = $"Student with Id {studentRequest?.Id} Created"; LambdaLogger.Log(message); return new APIGatewayHttpApiV2ProxyResponse { Body = message, StatusCode = 200 };}So, here we expect the client to send a JSON body with details of the student.
Line #3, we deserialize the incoming request body into a Student object. Then we create a DB context for accessing the dynamoDb table and Save the student record to our database. With that done, we will be returning a success message back to the client as a response with a status code of 200.
At Line #8 you can notice that we are using a LambdaLogger instance to log the message to the Cloudwatch LogGroup of the Lambda. This endpoint will be ideally <amazon-url>/students [POST] method.
Get Student By ID
Moving forward to our Last lambda Function, let’s add in a function that can return students based on the ID sent in the request. This will be a somewhat different Function, as we will have to fetch the ID from the Path Parameter of the request. For example, this endpoint of deployment would look like <amazon-url>/students/{id}.
Copy Paste the following Method to Function.cs of the Student Lambda project.
public async Task<Student> GetStudentByIdAsync(APIGatewayHttpApiV2ProxyRequest request, ILambdaContext context){ AmazonDynamoDBClient client = new AmazonDynamoDBClient(); DynamoDBContext dbContext = new DynamoDBContext(client); string idFromPath = request.PathParameters["id"]; int id = Int32.Parse(idFromPath); var student = await dbContext.LoadAsync<Student>(id); if (student == null) throw new Exception("Not Found!"); return student;}In Line #5, we are extracting the student-id from the path parameters property of the request. Once we fetch it, we convert it to an integer and pass it to the dynamoDb method to get the student by ID. This student record is returned to the client as a response.
Now, all of the Lamda functions are created. Let’s deploy them to AWS.
On Visual Studio, right-click on the StudentLambda project and click on Publish to AWS Lambda. We will deploy each of the 3 functions, one after the other.
There are 2 points to note on the below screen. The function name is ‘get-all-students’ and the Handler points to the GetAllStudentsAsync method. This is how we separately publish all of the 3 Lambda. You must have got the idea by now. Once these fields are changed, click on Next.
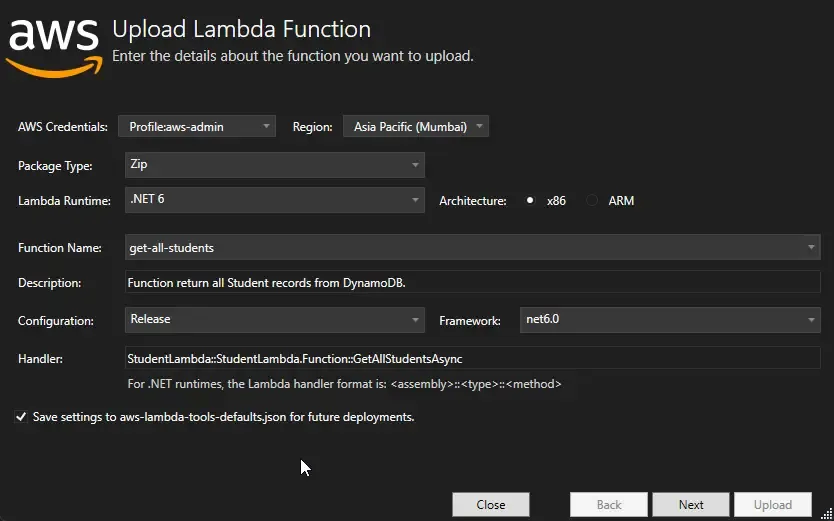
In the next screen, you will need to select the role associated with this Lambda. For starters, it can be AWSLambdaBasicExecution Role. However, there is one issue with this. This particular role provides access only to execute the Lambda and write the logs to Cloudwatch. But there is no permission to access our DynamoDB table, right? We will fix this after deploying all the Lambdas.
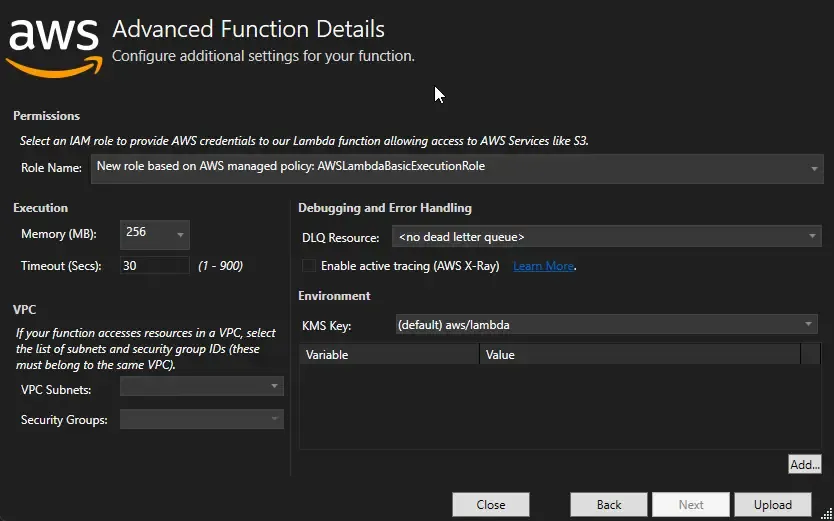
That’s it, upload the get-all-students Lambda.
Repeat similar steps to deploy the remaining Lambdas. Make sure that you choose the already created Role for each of these 2 AWS Lambda.
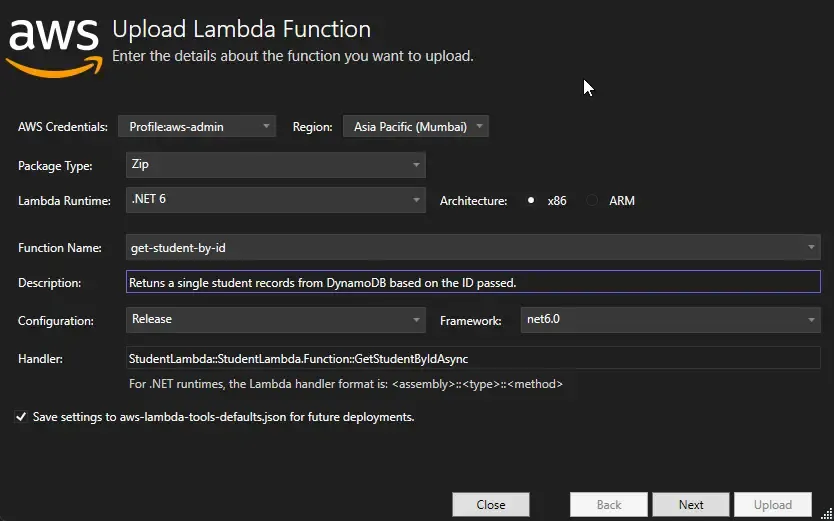
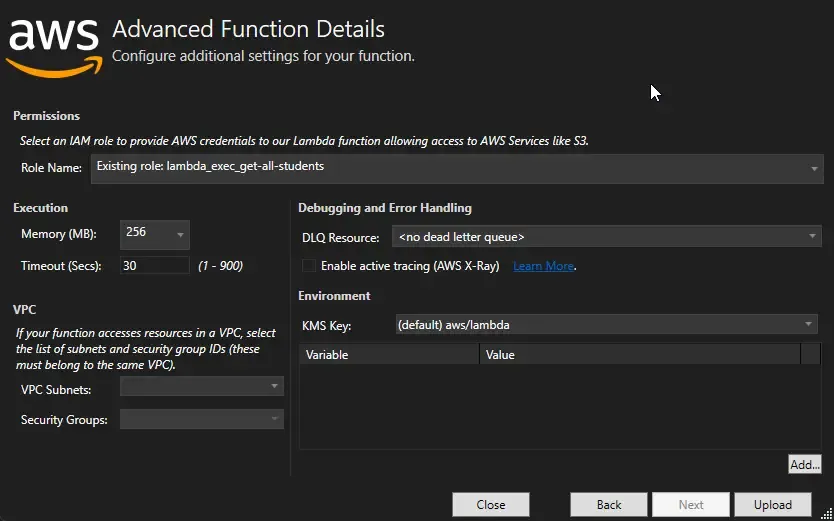
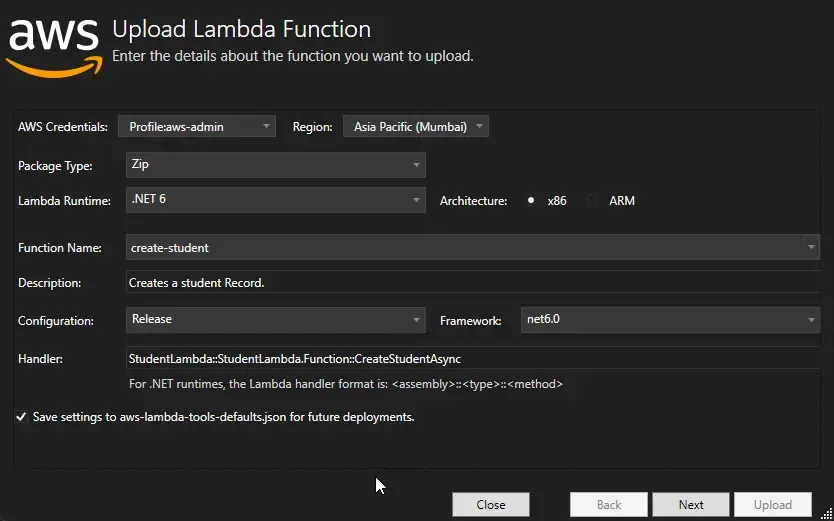
That’s it! Here are the Lambdas we created till now.
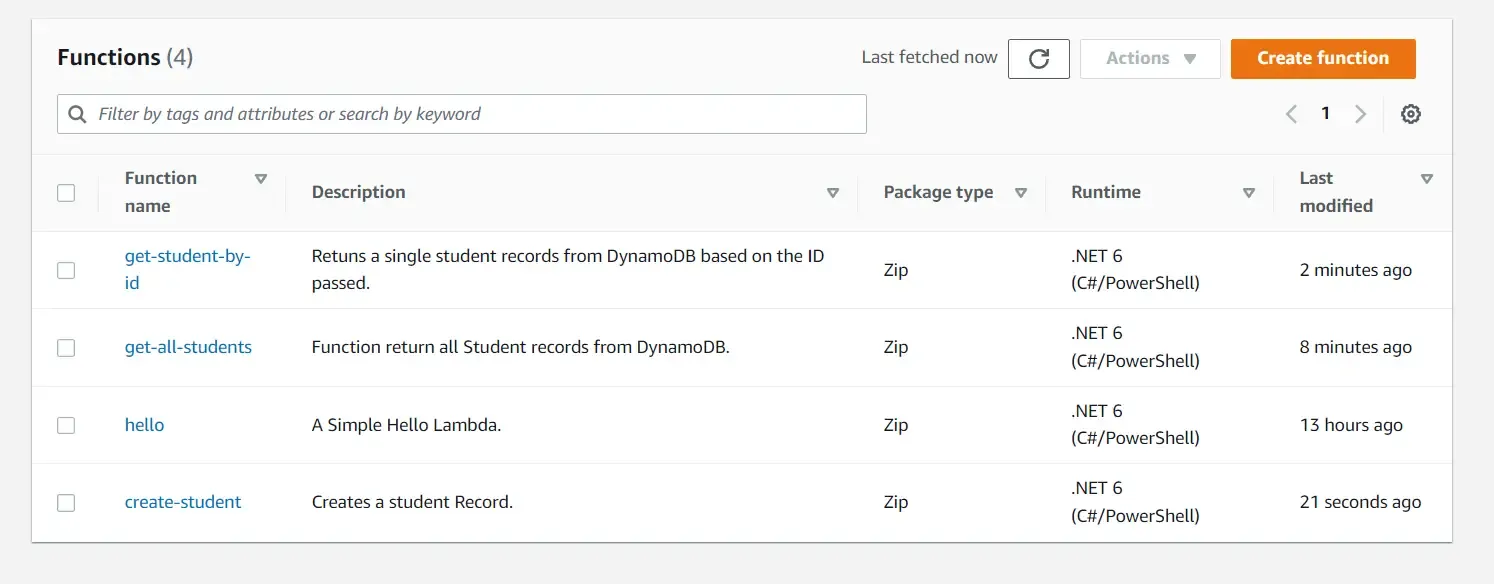
Adding DynamoDB Permissions.
As mentioned, let’s add the required DynamoDB Permissions to the role that we created. Navigate to AWS IAM. Go to Policies and create one with the following specifications. As you see here, we have selected DynamoDB as the AWS Service and allowed all of the DynamoDB actions as well as all the resources.
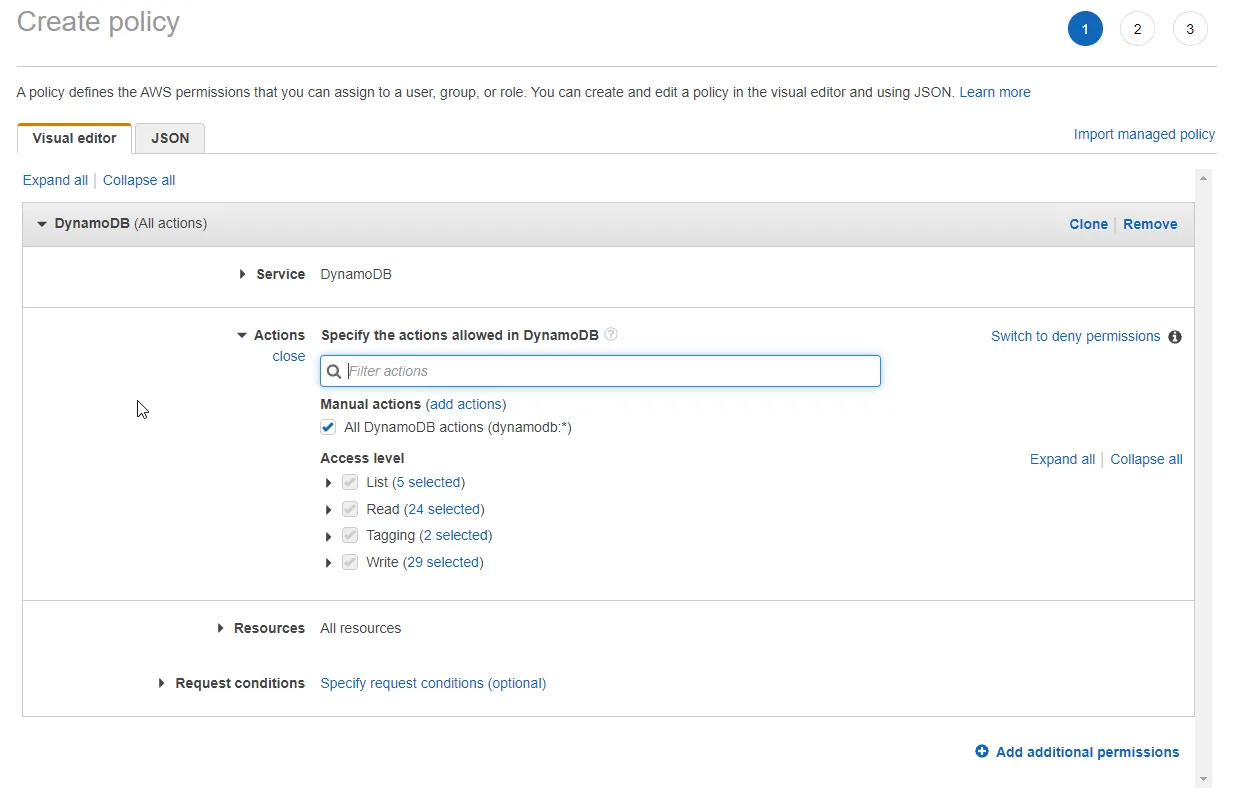
Note that it’s not always a good idea to grant complete permissions to a particular role. But to keep things simple, we are doing so. You should not be doing this for production applications. Give only the permissions that are really required.
On the next page, give a name to the policy and create it.
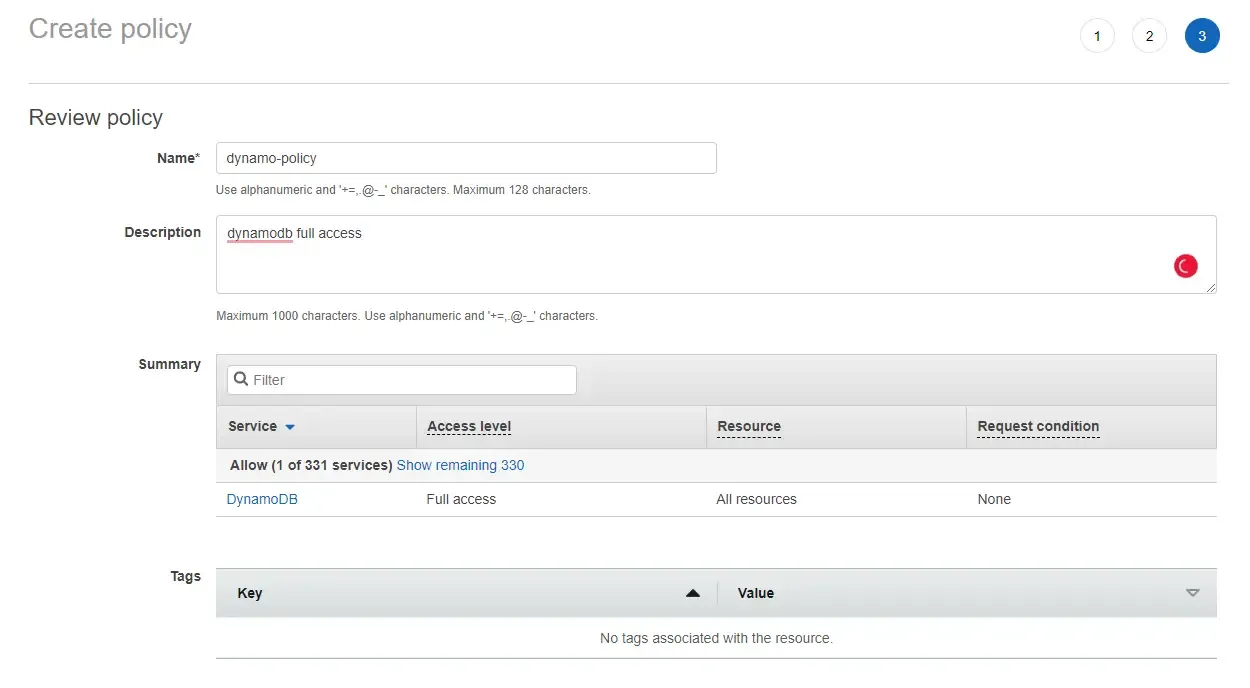
Now that we have created the policy, let’s attach it to our Roles. Select the newly created policy from the list, and click on attach. On the next page, you will have to select the role/user/group you want to attach this policy to.

In our case, it’s lambda_exec_get-all-students

There you go. We have successfully attached the policy to the role that is used by our AWS Lambda. Now the Lambda should have enough permissions to work with DynamoDb.
Wiring up Amazon API Gateway with .NET AWS Lambda
Next comes the crucial part of the guide, to actually build an API Gateway that triggers each of these lambdas. Open up Amazon API Gateway from AWS Management Console.
So far we have created only one API Gateway which is hello. Create a new API Gateway. As usual, select the HTTP API type and hit Build.
We named our Gateway as students and added all of the 3 Lambdas as Integrations. Simple, right?
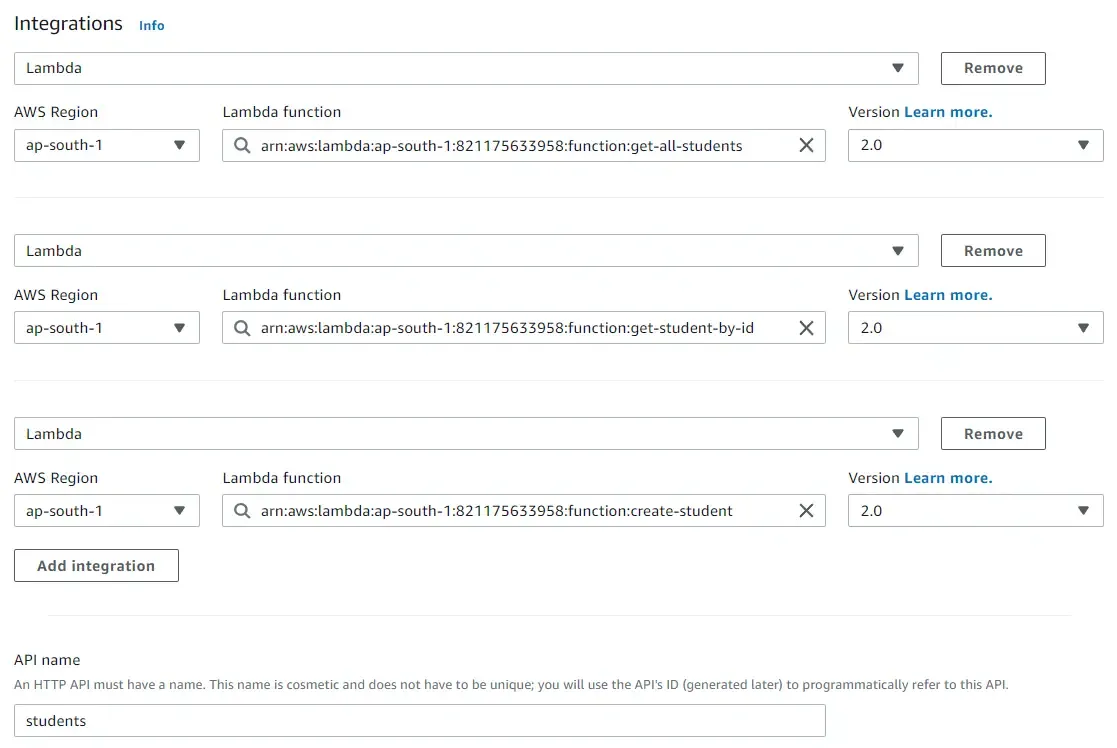
In the next page, we will be configuring our routes. We will be changing the default values and adding the below configuration.
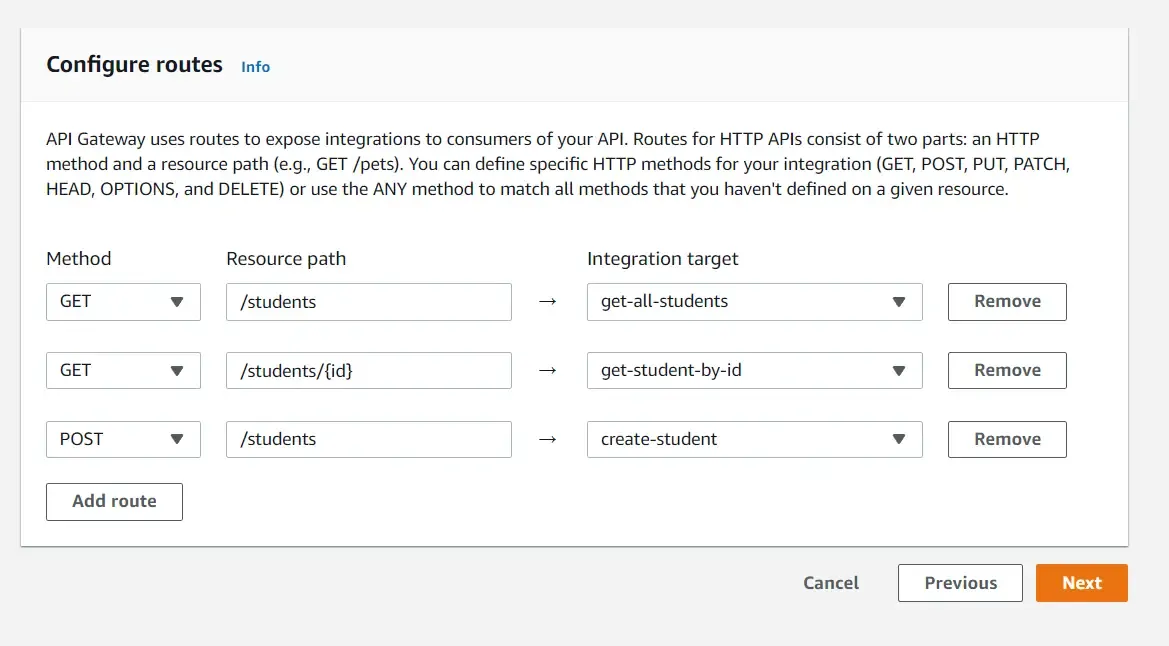
- GET
/studentswould invoke the get-all-students - GET
/students/{id}would invoke the get-student-by-id where id is the path parameter of the request. For example, /students/1 - Finally, the POST
/studentswould create a new student, given that we have passed the details of the new student as a JSON payload of the request.
Leave the stage as default and continue to create the Gateway.
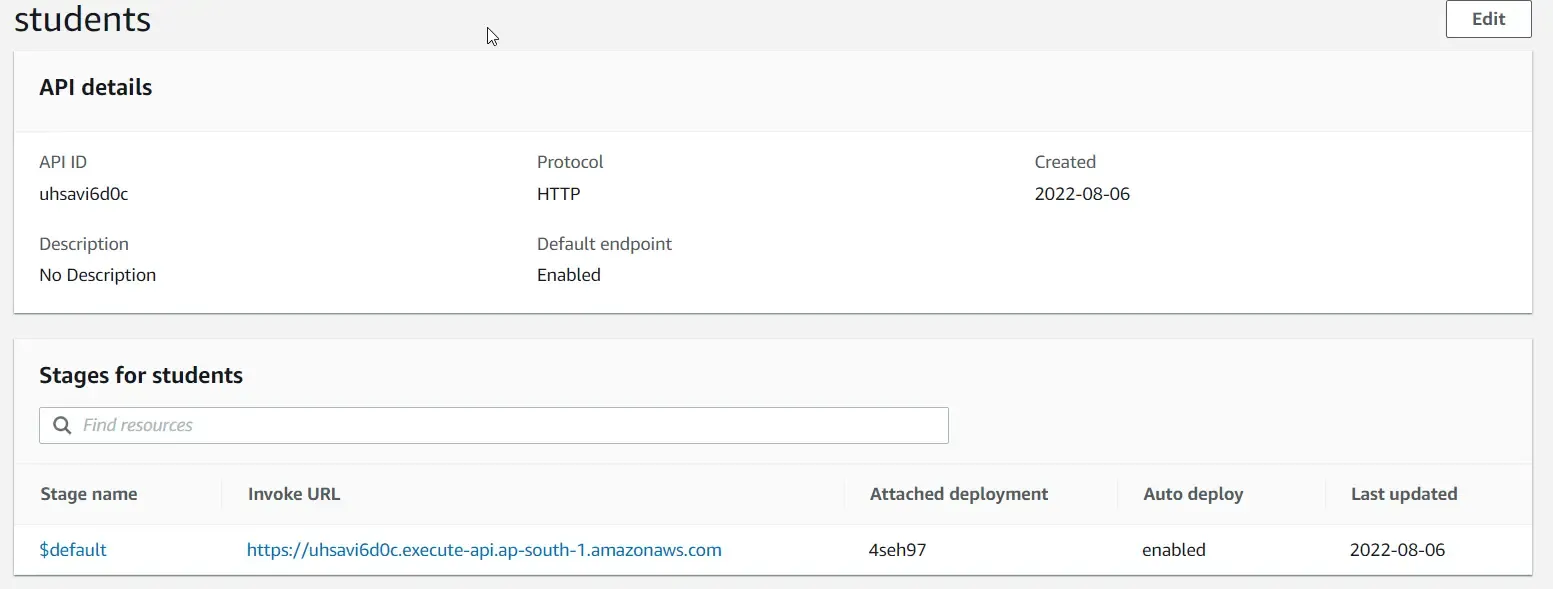
There you go, that’s it. Let’s test this endpoint with Postman.
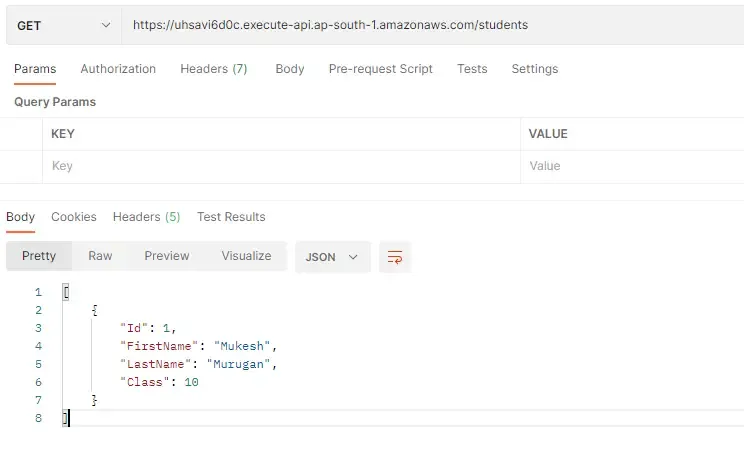
Firstly, I am testing the get-al-students Lambda. I sent a GET request to <url>/students. As expected you see a list of students as the response. For now, we have only one record in our database.
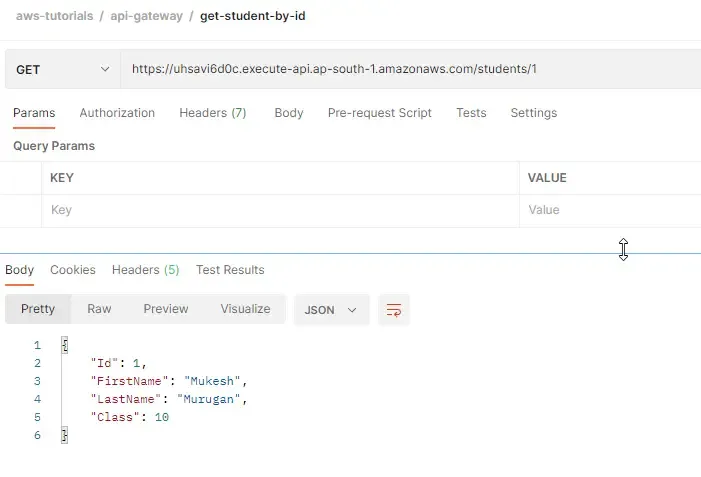
Next, let’s test the get-student-by-id Lambda. I sent a GET request to the <url>/students/1. And rightly it returns the details of the student with ID 1.
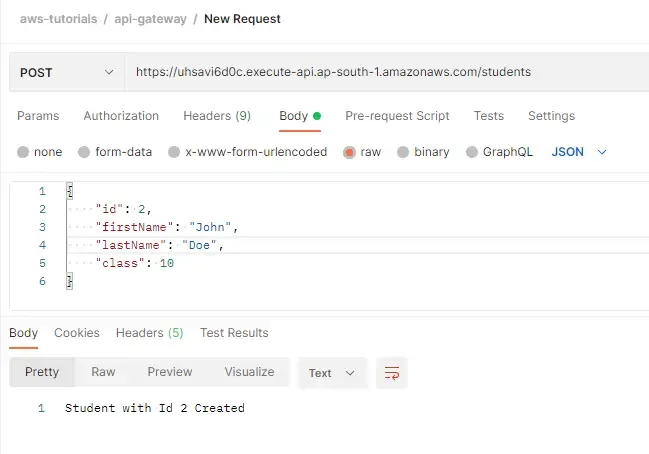
Finally, let’s create a new student. Sent a POST request to the <url>/students endpoint along with the student details. And the response is that our Student is created with ID 2!
Also, remember that we wrote a small Logger in our Create-Student Lambda? Let’s navigate to Cloudwatch / Log Groups / create-student and check the logs.
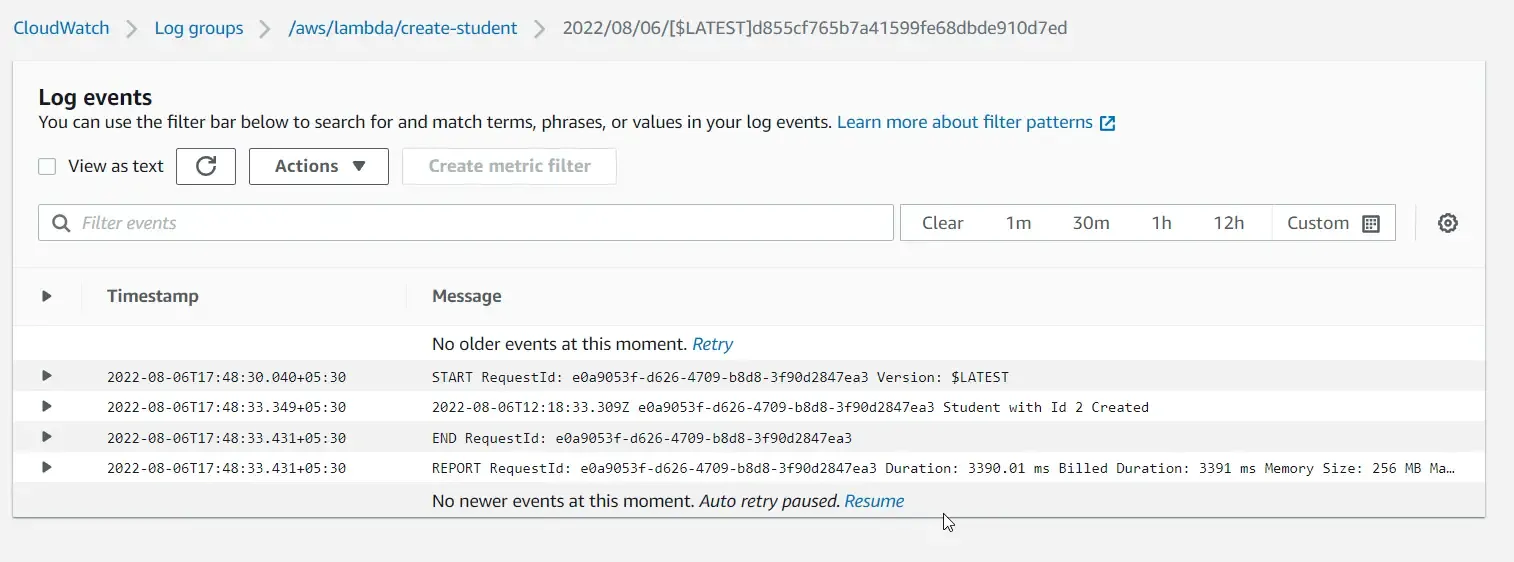
You can see that our log message is also printed here.
That’s a wrap for this Comprehensive article. In the next article, we will learn about securing the API Gateway with Lambda Authorizer! For now, the API gateway that we created is a public endpoint.
Important TIP: Make sure that you always delete the AWS Resources that you created once you are done exploring them. This helps reduce the Costs Incurred, although the FREE Tier provides you with a pretty decent amount of FREE requests to work with.
Summary
In this article, we learned about getting started with Amazon API Gateway with .NET. Here we learned about creating basic Lambdas that are compatible with Amazon API Gateway, integrating them to DynamoDB, adding Multiple Lambdas to a particular Gateway, Logging and so much more. This will give you a solid idea for working with AWS Serverless application. As the next part of this AWS Serverless application with .NET, we will explore how to secure the API Gateways, and working with SAM and so much more. Stay Tuned.
Do share this article with your colleagues and dev circles if you find this interesting. You can find the source code of the project here. Thanks!

