In this article, we will learn about Amazon SQS and ASP.NET Core including its key concepts, architecture, how you will integrate it with .NET applications, and its use cases. If you’re a .NET developer like me, you know the importance of building scalable and reliable message queues for your ASP.NET Core applications. And that’s where Amazon SQS comes in. As a flexible and powerful message queue service, AWS SQS is a popular choice for developers looking to build message queues for web and mobile applications.
I’ll guide you through the process of implementing Amazon SQS in your ASP.NET Core application, step-by-step. You’ll learn how to create queues, send and receive messages, and optimize your system for performance and reliability. I’ll also share tips and best practices that I’ve learned from my own experience building message queues for .NET applications. By the end of this article, you’ll have a comprehensive understanding of Amazon SQS and how to use it to build robust, efficient message queues for your ASP.NET Core applications. So, let’s get started and explore the power of Amazon SQS and .NET together!

What is Amazon SQS, or Amazon Simple Queue Service?
Amazon Simple Queue Service (SQS) is a fully managed serverless, highly available, scalable, and cost-effective message queueing service of AWS that can be used in microservices, other decoupled systems, and applications that rely on event-driven architecture ( which every application has to adapt to eventually!)
Let’s analyze how a Messaging Queue can outperform an API call within systems. For example, in any system, if one component has to notify the other component that a particular task/event is completed, it would have to perform an API call to the second system. This introduces a dependency on the API calls, and network timeouts which can be fatal to the application at times. With queues, this concept has changed. Now the first service would just have to publish a message to the queue, which will be listened to/polled by the second service.
You can get the complete source code of this implementation on my GitHub Repository here.
Core Concepts of Queues & Amazon SQS
Queue
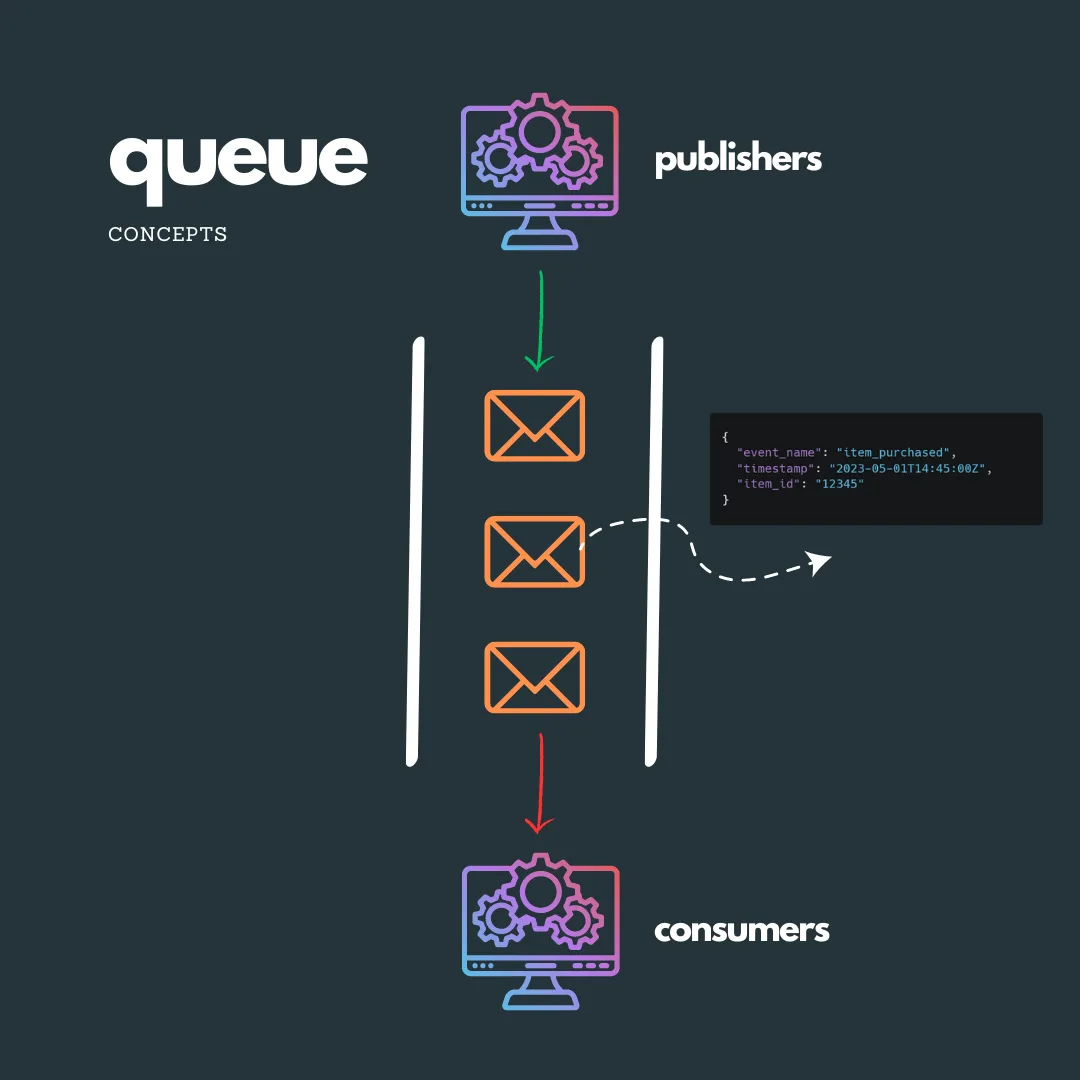
Imagine a coffee shop line, where the people are serviced based on who came first. This is the same concept of Queues in Computer Engineering as well. Queues follow the FIFO style of processing, which is First In First Out. Later in the section of the article, where we talk in-depth about SQS, we will also come across Standard Queues where the FIFO style is not enforced.
A queue is just a holding entity that contains messages within it. Messages are usually in JSON format as you can see from the diagram above. As you can see from the diagram, System 1 will send messages to the Queue, which is being continuously polled and consumed by System 2.
Let’s make it simpler to understand, using a practical example related to Amazon SQS. Let’s say we have a PizzaOrderService service that can get orders from various clients like the actual store, mobile application, and other delivery applications. Once the order is received, this service would do some basic activities and publish a message to an Amazon SQS queue called pizza-order-queue, which will be polled by another service called, PizzaMakerService.
Essentially, the middleman that facilitates the communication between both these services is our queue, which in our case can also be the Amazon SQS. There will be multiple threads polling the queues. Once a thread receives the message, it disappears from the queue so that it’s only available for that specific thread. This happens over and over again. If the service is able to process the incoming message, it will be deleted from the queue.
In case the service doesn’t respond, the message will re-appear on the queue and will be retried. We will learn about this in the next sections.
Note that the maximum allowed size per message is 256 KB. In case your messages are well beyond this limit, you can opt to dump your messages as objects into an S3 bucket and pass the object id/name as part of the SQS message. This way, you will never really hit the size limit. Pretty hacky, but definitely works!
Message Processing
Two different threads cannot receive the same message from a Queue. This is the most vital concept of queues. Essentially, when a single thread receives a message from the SQS queue, the message is locked out of visibility from other threads. This way, only one thread has access to a single unique message.
Here, there is a concept of visibility timeout which gets activated as soon as a message is locked. This means that if there is no response from the thread that was processing the message after a given amount of duration (which is the visibility timeout), the queue unlocks the message and puts it back into the queue, allowing other threads to poll to process it again. Not that the Visibility timeout is set for every single message. The default visibility timeout for a message in Amazon SQS is 30 seconds. The minimum is 0 seconds. The maximum is 12 hours.
If a message is properly processed, it is deleted from the queue once and forever. And in case the visibility timeout is expired (when there is no response back from the thread), the message is unlocked and put back into the queue. This message will be picked up by some other thread and retried.
Pricing
The Amazon SQS Free tier gives up to 1 Million free SQS requests every month, which is almost everything you need unless you have a super viral application. This should be more than enough for you to get started with this awesome queue service. Amazon SQS Free Tier is free forever*, not just the first 12 months.

In case you have already consumed your first 1 Million SQS requests per month, the next 1 Million calls will cost you about 0.40 USD, which is again quite cost-effective. Review the current Amazon SQS pricing.
Advantages of Amazon SQS
- Fully Managed
- Highly Scalable
- Very Cost Effective - Almost free for most cases.
- Build Decoupled Systems - Services will never know about each other, since they are decoupled. The services will only have to publish messages to the queue, and not worry about any other additional dependencies.
- Guaranteed Processing Ensured - Thanks to the Visibility Timeout, the messages are retried if there is no response from the polling thread after a period of time.
Types of Queues
Amazon SQS provides two types of queues based on your requirements.
- Standard Queues
- FIFO Queues
Standard Queues are the first type that was released initially. In systems where the order of processing messages is not important, standard queues can be used. When there are multiple messages in the standard queue, it tries to push them out in order, but the maintenance of the order is not guaranteed. So when the published puts messages 1,2,3,4,5 into this queue, the consumer may get the messages in order 3,2,4,1,5. There is also another limitation that there can be duplicate messages within the queue. But the throughput of such queues is quite high, almost unlimited.
First In First Out queues ensures that the messages are processed in sequence. And it’s also guaranteed that each message appears only once in the queue. As a limitation, there is slightly reduced throughput. FIFO queues support up to 300 messages per second. You can chain this with batches. When you batch 10 messages per request, the queue will now support almost 300*10 messages per second, which is again quite massive.
Another point to note is that this queue is slightly more costlier than the Standard Queue. But again, it will barely cost you well under 1 USD per month for the second Million requests. The first 1M is always free!
Amazon SQS and ASP.NET Core
In this demonstration, we will be building 2 ASP.NET Core applications. One that will produce a Message and place it in the SQS queue, and another one that will poll this SQS queue and process the incoming message within a Background Service. I will be using Visual Studio 2022 Community for this implementation.
Prerequisites
As usual, ensure that you have the following configured/installed.
- .NET 7+ SDK
- Ensure that you have an AWS Account. A Free Tier is also enough. Get it here.
- AWS CLI Profile should be configured in your development machine. This will help you access AWS Services seamlessly from your machine. Watch the Video about it here.
- Visual Studio / Code.
Creating an Amazon SQS via Console
First up, let’s create the SQS Queue via the Management Console. Login to your AWS Management Console and open up Amazon SQS. Click on Create Queue.

Here, you will be allowed to configure your queue. As we learned earlier, these are the types of SQS queues available, the standard and FIFO. For this demonstration, I will be creating a Standard queue and naming it demo-queue.

Next, you get to configure other aspects like the following.
- Visibility Timeout - The period in which, once a message is read by a consumer, it gets locked from other consumers to read it. The default visibility timeout setting is 30 seconds.
- Delivery Delay - There can be specific requirements where the message, although appears in a queue can be set for delayed consumption by the consumers. This can be somewhere between 0 seconds to 15 minutes.
- Retention Period - The amount of time that a message that is not yet deleted gets retained. This can be up to 14 days.
- Receive message wait time - is the maximum duration polling will wait for messages to be available.

Let’s keep everything as the default value and create our Amazon SQS Queue.
That’s it. You Queue should be created for you.

You can send messages to this Queue directly from the AWS Management console as well. Simply open up your queue, and click on send and receive messages.

As you see, you can send a message to this queue with delay seconds, and also poll for it, and eventually delete it as well.
Now that we are familiar with the Management Console side of Amazon SQS, let’s jump into some .NET Code.
Amazon SQS - .NET Development
Let’s try to mimic microservices for this. We will create 2 Web API Projects.
- Consumer.API - .NET 7 Web API, This will hold the background service that can poll and process messages from an SQS Queue.
- Producer.API - .NET 7 Web API, will publish messages to an SQS Queue based on the user input.
- Messages - A Shared Class Library, which will hold the message classes used by both the other API projects.
Here is what the solution setup would look like. You can get the complete source code on my GitHub Repository here.

With that, let’s install the required SQS .NET packages. Ensure to install the packages into both of the WebAPI projects, by running the following commands.
Install-Package AWSSDK.SQSInstall-Package AWSSDK.Extensions.NETCore.SetupShared Events Library
First, let’s create the Event Contract. Let’s assume that we are working with OrderService Microservice (our producer), which will spit out an OrderCreatedEvent to notify the Consumer API.
Under the Events Library project, create a new class named OrderCreatedEvent.
Note that this class will be shared by both the producer and consumer APIs.
public interface IEvent{}public class OrderCreatedEvent : IEvent{ public Guid OrderId { get; } public Guid CustomerId { get; } public DateTime CreatedDate { get; } public OrderCreatedEvent(Guid orderId, Guid customerId) { this.OrderId = orderId; this.CustomerId = customerId; CreatedDate = DateTime.UtcNow; }}This class will take in an orderId and customerId. CreatedDate will be automatically initialized.
Sending Message to Amazon SQS Queue using .NET SDK
Let’s start with the Producer API. Given that we have already installed the required packages into this project, let’s do the service registration for the SQS Client. Open up Program.cs and add the following registration code.
builder.Services.AddDefaultAWSOptions(builder.Configuration.GetAWSOptions());builder.Services.AddAWSService<IAmazonSQS>();Next, update your appsettings.json by adding the following configuration section.
"AWS": { "Profile": "default", "Region": "ap-south-1"}With that done, we will have to create a new API Controller that will house a CreateOrder endpoint, which will create an order and publish a message to our Queue. For the simplicity of code, we will skip the part where an order is created. For now, we are just interested in creating the OrderCreatedEvent and publishing it to Amazon SQS.
Create a new blank API Controller under the Controllers folder and name it OrdersController.
namespace Producer.API.Controllers{    [Route("api/[controller]")]    [ApiController]    public class OrdersController : ControllerBase    {        private readonly IAmazonSQS _sqsClient;        private readonly ILogger<OrdersController> _logger;        private const string OrderCreatedEventQueueName = "order-created";
        public OrdersController(IAmazonSQS sqsClient, ILogger<OrdersController> logger)        {            _sqsClient = sqsClient;            _logger = logger;        }        [HttpPost]        public async Task<IActionResult> CreateOrderAsync()        {            //assume that this method accepts a request with valid json body like customerId,itemDetails and so on.            //order details validation            //save incoming order to database            //create event            var @event = new OrderCreatedEvent(Guid.NewGuid(), Guid.NewGuid());            //send message to queue            var queueUrl = await GetQueueUrl(OrderCreatedEventQueueName);            var sendMessageRequest = new SendMessageRequest()            {                QueueUrl = queueUrl,                MessageBody = JsonSerializer.Serialize(@event)            };            _logger.LogInformation("Publishing message to Queue {queueName} with body : \n {request}", OrderCreatedEventQueueName, sendMessageRequest.MessageBody);            var result = await _sqsClient.SendMessageAsync(sendMessageRequest);            return Ok(result);        }        private async Task<string> GetQueueUrl(string queueName)        {            try            {                var response = await _sqsClient.GetQueueUrlAsync(queueName);                return response.QueueUrl;            }            catch (QueueDoesNotExistException)            {                _logger.LogInformation("Queue {queueName} doesn't exist. Creating...", queueName);                var response = await _sqsClient.CreateQueueAsync(queueName);                return response.QueueUrl;            }        }    }}
In lines 1-15, we are injecting the required dependencies into our controller’s constructor. IAmazonSQS is the core interface that we are going to use in this implementation.
We define the name of the queue to be created in Line 9, which in our case is order-created.
Next, we have our CreateOrderAsync Action method, which is a POST Request type. For simplicity’s sake, I am not passing in any request to this API Endpoint. I have left comments in the code regarding our assumptions. So, once our order creation is done, we will create a new Event object with orderId and customerId.
In Line 25, we are attempting to Get the QueueUrl. Here we call the GetQueueUrl method, which will use the SQS client object to get the QueueUrl. If no such queues exist, the client will throw a QueueDoesNotExistException exception. We will catch this exception and create a queue in this case. We will be using the CreateQueueAsync method of the client. I wonder why there is no lightweight API to check if a Queue exists, rather than relying on exception handling to create queues.
A Queue URL looks like - https://sqs.{aws-region}.amazonaws.com/{account-id}/{queue-name}
So, once the Queue URL is returned, we will create a new SendMessageRequest in lines 26-29, where we pass the queueUrl and serialized form of our OrderCreatedEvent.
Once the request is created, we can use the SQS client to push it to the queue. This is done in line 32.
That’s it for the Producer API. Looking back, we will now have an API endpoint, localhost:xxxx/api/orders [POST]. Once this endpoint is hit, it will push a new message to our SQS Queue. Note that this will also be responsible for creating the required queue if it doesn’t exist in our AWS account.
Other Request Parameters
Apart from the standard request parameters, you can also include Delay Seconds in the request.
var sendMessageRequest = new SendMessageRequest(){ QueueUrl = queueUrl, MessageBody = JsonSerializer.Serialize(@event), DelaySeconds = 10};As mentioned earlier, setting the delay seconds will delay the message processing, if you have such specific requirements.
Consuming Messages from Amazon SQS Queue using .NET SDK
Now, let’s go to our Consumer.API and create a new background service that will continuously poll for messages in the order-created queue of Amazon SQS using the SQS client.
Create a new class named OrderCreatedEventConsumer and inherit it from the BackgroundService class.
public class OrderCreatedEventConsumer : BackgroundService{    private readonly ILogger<OrderCreatedEventConsumer> _logger;    private readonly IAmazonSQS _sqsClient;    private const string OrderCreatedEventQueueName = "order-created";
    public OrderCreatedEventConsumer(ILogger<OrderCreatedEventConsumer> logger, IAmazonSQS amazonSQS)    {        _logger = logger;        _sqsClient = amazonSQS;    }
    protected override async Task ExecuteAsync(CancellationToken stoppingToken)    {        _logger.LogInformation("Polling Queue {queueName}", OrderCreatedEventQueueName);        var queueUrl = await GetQueueUrl(OrderCreatedEventQueueName);        var receiveRequest = new ReceiveMessageRequest()        {            QueueUrl = queueUrl        };        while (!stoppingToken.IsCancellationRequested)        {            var response = await _sqsClient.ReceiveMessageAsync(receiveRequest);            if (response.Messages.Count > 0)            {                foreach (var message in response.Messages)                {                    _logger.LogInformation("Received Message from Queue {queueName} with body as : \n {body}", OrderCreatedEventQueueName, message.Body);                    //perform some processing.                    //mock 2 seconds delay for processing                    Task.Delay(2000).Wait();                    await _sqsClient.DeleteMessageAsync(queueUrl, message.ReceiptHandle);                }            }        }    }
    private async Task<string> GetQueueUrl(string queueName)    {        try        {            var response = await _sqsClient.GetQueueUrlAsync(queueName);            return response.QueueUrl;        }        catch (QueueDoesNotExistException)        {            _logger.LogInformation("Queue {queueName} doesn't exist. Creating...", queueName);            var response = await _sqsClient.CreateQueueAsync(queueName);            return response.QueueUrl;        }    }}
Note that I have repeated the GetQueueUrl method in this API as well. This is not recommended in practical use cases. To keep code clean, make sure that you have a shared helper class for this so that multiple other projects can reuse this.
Here also we are injecting the IAmazonSQS service into the controller’s constructor.
In lines 17 to 20, we are creating a new ReceiveMessageRequest using the queue Url.
Since this is a Background service, we will be using the CancellationToken to loop, as you can see in line 21. Inside this while loop, we will be sending a receive request to our Queue URL using the .NET SQS client. If there is a message in the queue, the message content will be logged to the console, processed, and deleted from the queue. To mock some processing I have added a delay of 2 seconds before the message is deleted from the queue.
That’s all for our Background service. Let’s open up Program.cs and register all the required services including the SQS client as well as the Background Service! Do not forget to add the AWS-related configurations to your appsettings.json as well.
builder.Services.AddDefaultAWSOptions(builder.Configuration.GetAWSOptions());builder.Services.AddAWSService<IAmazonSQS>();builder.Services.AddHostedService<OrderCreatedEventConsumer>();Additional Request Parameters
Here are a couple of other request parameters that you can send in with the ReceiveMessageRequest call.
var receiveRequest = new ReceiveMessageRequest(){ QueueUrl = queueUrl, VisibilityTimeout = 50, WaitTimeSeconds = 10, MaxNumberOfMessages = 10};Similarly, you can also set the Visibility Timeout (the duration where a message can be locked by a specific consumer), WaitTimeSeconds (Seconds the poller will wait before it returns a response), and finally the max number of messages to be returned as part of the response from the queue client.
Postman Testing
With that done, let’s run both our APIs and open up Postman.
In Postman, send a POST request to https://localhost:7116/api/orders, where 7116 is the port of the Producer.API instance.
Here is the response you will get back from the producer API.

And here are our producer and consumer logs in action! As you can see from the first terminal, the published message is logged. And the second terminal shows that it has received the message that was published by the producer into the order-created SQS queue!

Use Cases of Amazon SQS
Now that we have an end-to-end understanding of Amazon SQS, let’s jot down a couple of practical use cases in systems.
- If an external system is pushing its messages as notifications using Amazon SNS, etc, you need to have an SQS queue that is essentially subscribed to the SNS. This helps in fault tolerance and brilliant retries. This is a very common pattern used in microservices.
- Background Scheduled jobs can also make use of this. Assume, we need to fire a Database Backup job every 24 hours. You can use a scheduler service to send out notifications to a particular SQS queue, which in return will be consumed by an AWS Lambda that is responsible for triggering backups. This way, backups are never missed.
- What else can you think of? Let me know in the comments section, and I will add them here.
That’s it for this article. Hope you found it interesting and helpful.
Summary
In this article, we learned about Amazon SQS and ASP.NET Core. We explored all the core concepts related to queues and Amazon SQS. Apart from this, we also looked into the Management Console of AWS to create new SQS queues. Coming to the coding section of the article, we built a couple of APIs that can produce and consume messages to/from the SQS queue. We have used the .NET SQS client for this.
Make sure to share this article with your colleagues if it helped you! Helps me get more eyes on my blog as well. Thanks!
Stay Tuned. You can follow this newsletter to get notifications when I publish new articles – https://codewithmukesh.com/newsletter. Do share this article with your colleagues and dev circles if you found this interesting. Thanks!

What's your take?
Push back, share a war story, or ask the obvious question someone else is wondering. I read every comment.