In this article, we will learn about AWS SAM CLI for .NET Developers, using which one can quickly build complete serverless applications. It is a handy option when you want to automate serverless application deployment into multiple AWS accounts, reducing manual efforts.
In previous articles, we learned about building Lambdas, Gateways, S3 Buckets, DDB, and a couple of other services as part of our serverless application on .NET series. But every time, we created the resource manually via the AWS Management Console or via Visual Studio’s Context Menu (using the AWS Toolkit), right? Using AWS SAM CLI, C# developers can define the Infrastructure (AWS Services) as code, and then let this excellent Framework manage the deployment for you!
The AWS SAM CLI Tool, also known as Serverless Application Model CLI is an open-source CLI tool that assists us in developing serverless applications and deploying them to the cloud, hassle-free. In other words, these are CLI commands that use Serverless Application Model templates (which you might have already seen earlier) that define what services are required by a particular application and deploy them all together into the cloud, rather than needing us to create services on AWS manually. That’s the beauty of AWS SAM CLI, everything is automated. It basically helps developers to write Infrastructure as code, as opposed to going into the AWS Management Console to do so.
This article is sponsored by AWS. Huge thanks for helping me produce more .NET on AWS content!
The Major Features of this CLI tool are as follows:
- Bootstrap Serverless Applications in Seconds using a single line of command.
- Compile, Develop and Package
- Test
- Guided Deployment
- Logging
I am sure that you would love the workflow of AWS SAM CLI and how easy it makes life for developers.
Prerequisites
Make sure that you have the following ready,
- AWS Account. Free Tier would do.
- Visual Studio / VSCode or any IDE. Most of the work for this article will be executed over the command prompt/terminal itself.
- AWS CLI Installed and Credentials setup. (Here’s how)
- Docker Installed (optional). This is needed if you want to run your application locally.
- A strong understanding of AWS Lambdas and Amazon API Gateway is preferred. Refer to my previous articles that demonstrate each of these services for .NET Developers in detail.
Getting Started with AWS SAM CLI for .NET Developers
Firstly, let’s understand SAM. AWS SAM a.k.a AWS Serverless Application Model is an Infrastructure as Code Tool for deploying various Serverless Applications powered by AWS.
Let’s install the AWS SAML CLI Tool. Please refer to https://docs.aws.amazon.com/serverless-application-model/latest/developerguide/serverless-sam-cli-install.html.
You can find the installation package links on the page. Make sure that you have your AWS CLI setup along with Credentials. Docker installation is optional.
Once AWS SAM CLI is installed, run the following command to verify your installation.
sam --versionAlso, do make sure that GIT is installed on your development machine and is authenticated. This is because, behind the scenes, the SAM CLI actually clones repositories from the AWS handle based on the configuration and creates a new project for us. You will learn about this in the next few sections of this article.
Here is what we will be doing as part of this demonstration. We will be using SAM CLI to generate application templates for us, which in the background uses serverless templates that will be uploaded to S3. From there, Cloud Formation will pick this up and create the resources that we have defined in our template files. The best part is that all of this is completely managed by SAM CLI.
In this article, we will set up a very basic REST API using Amazon API Gateway and Lambda. Before that, let me show you how quickly you can get up and running with the SAM workflow.
I will be using Visual Studio Code for this demonstration. Nowadays, I prefer IDE as it’s more RAW and pretty lightweight as compared to the feature-rich Visual Studio. Leave a comment below if you want me to write an article around Visual Studio Code for .NET Development.
Open up the terminal from the location where you save your repositories locally. First up, let’s ensure that we have essential tools installed on our machines. Run the following.
dotnet --versionsam --version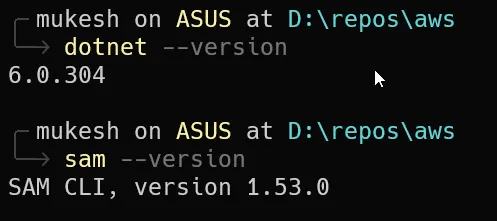
Once we make sure that we have both of these CLI tools available in our machine, let’s proceed.
sam initThis particular command allows us to generate a SAM Project from the Templates that we choose. Below I will mention the various options you get after running the sam init command.
- Which template source would you like to use? Here, let’s choose 1, which is AWS Quick Start Templates
- Choose an AWS Quick Start Template. Here, choose 1, a simple example that will allow us to understand the workflow. After understanding this, later in the article, we will be building a Serverless API using SAM CLI.
- Use the most popular runtime (Python). ? Definitely NO! We are .NET folks :D Type in ‘n’
- Which runtime would you like to use? Choose 1, which is dotnet6.
- What package type would you like to use? For now, let’s go with 1, which is Zip. This Zip will be uploaded to your AWS account’s S3 Bucket.
- Would you like to enable X-Ray? For now, let’s opt-out of this by typing in ‘n’, as this may incur costs and is really not needed for us at this point in time.
- Project Name? Type in HelloWorld
Here are the screenshots of the terminal.
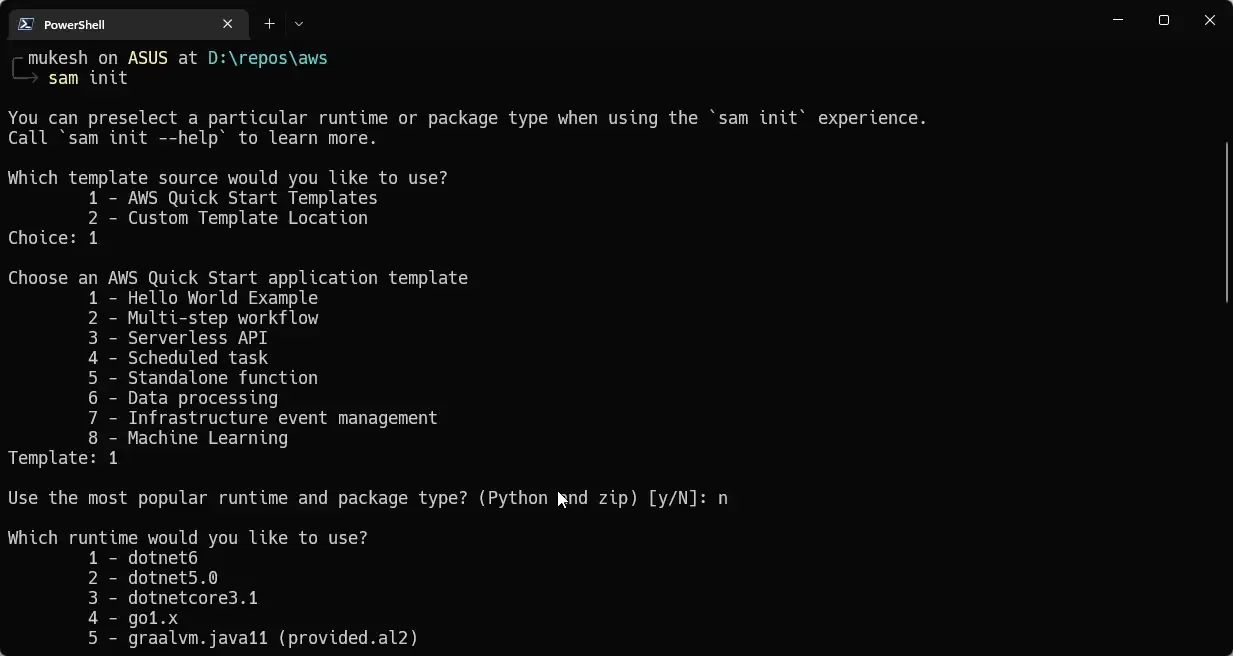
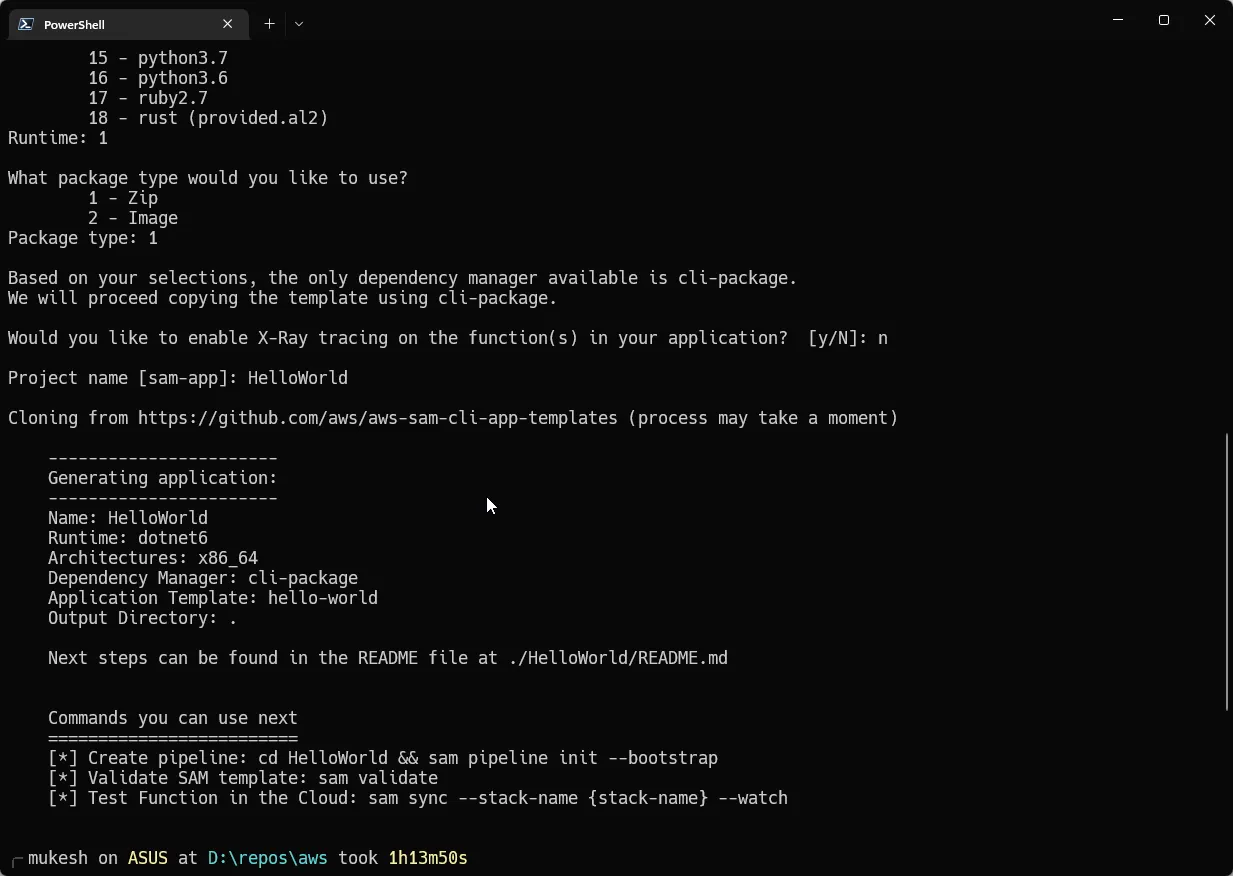
Once you have specified all your requirements, SAM CLI generates an application for you using SAM Templates (which it pulls from the AWS repository).
Next, let’s navigate into the project folder and open up Visual Studio Code pointing to this location. Here are the commands that you enter into the same terminal window.
cd HelloWorldcode .This would navigate into the HelloWorld directory and open up Visual Code. Let’s explore the project files.
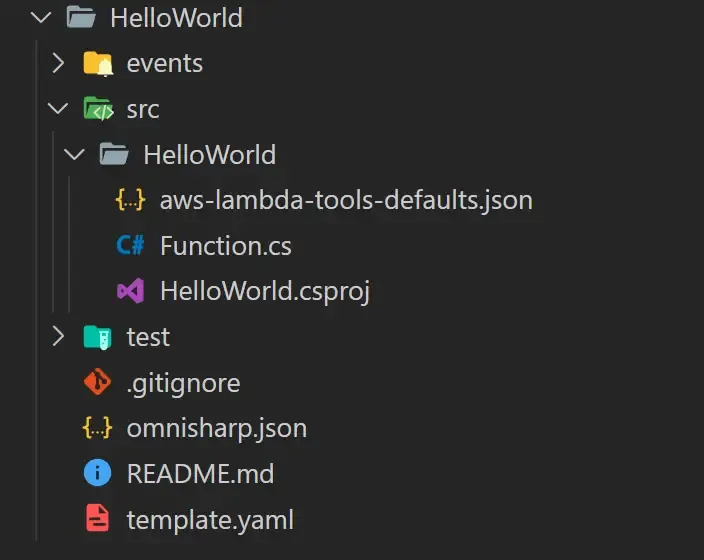
As you can see, SAM gives us a predefined CSPROJ for the source as well as generates a nice test project for us. This is accompanied by other vital files such as the template.yaml file and the default JSON files.
First up, let’s see the core of the Project, the template.yaml file where we define the required AWS Resouces to be deployed. This template goes through to Cloudformation which in turn sets up all the required AWS resources for us.
Here is the default template.yaml created for us.
AWSTemplateFormatVersion: '2010-09-09'Transform: AWS::Serverless-2016-10-31Description: >  Sample SAM Template for HelloWorld
# More info about Globals: https://github.com/awslabs/serverless-application-model/blob/master/docs/globals.rstGlobals:  Function:    Timeout: 10
Resources:  HelloWorldFunction:    Type: AWS::Serverless::Function # More info about Function Resource: https://github.com/awslabs/serverless-application-model/blob/master/versions/2016-10-31.md#awsserverlessfunction    Properties:      CodeUri: ./src/HelloWorld/      Handler: HelloWorld::HelloWorld.Function::FunctionHandler      Runtime: dotnet6      Architectures:        - x86_64      MemorySize: 256      Environment: # More info about Env Vars: https://github.com/awslabs/serverless-application-model/blob/master/versions/2016-10-31.md#environment-object        Variables:          PARAM1: VALUE      Events:        HelloWorld:          Type: Api # More info about API Event Source: https://github.com/awslabs/serverless-application-model/blob/master/versions/2016-10-31.md#api          Properties:            Path: /hello            Method: get
Outputs:  # ServerlessRestApi is an implicit API created out of Events key under Serverless::Function  # Find out more about other implicit resources you can reference within SAM  # https://github.com/awslabs/serverless-application-model/blob/master/docs/internals/generated_resources.rst#api  HelloWorldApi:    Description: "API Gateway endpoint URL for Prod stage for Hello World function"    Value: !Sub "https://${ServerlessRestApi}.execute-api.${AWS::Region}.amazonaws.com/Prod/hello/"  HelloWorldFunction:    Description: "Hello World Lambda Function ARN"    Value: !GetAtt HelloWorldFunction.Arn  HelloWorldFunctionIamRole:    Description: "Implicit IAM Role created for Hello World function"    Value: !GetAtt HelloWorldFunctionRole.Arn
From line 11 onwards we define the required resources. In our cases, we opted to create a simple HelloWorld Lambda function.
- In line 12, we declare the name of the Function.
- In line 13, the type of the resource. In our case, it will be a serverless function, which will include both a lambda function as well as an Amazon API Gateway.
- Next, we define the properties of this resource, which majorly includes the CodePath / CodeUri which would point to the directory where our main csproj file lives. SAM uses this path to build and deploy our .NET application.
- As you might remember from our Lambda Article, we also would have to define the Handler method for this Lambda, which will be HelloWorld:FunctionHandler. This can be changed as required.
- Apart from that, we have some standard parameters configured like runtime, architecture, memory size, and ENV Variables.
- From line 24, we define events, which in our case are actually the routes of the Amazon API Gateway. Here, we define that any request to the path /hello would trigger this lambda function.
- The output section is just where we define what message should be written on to the console when each of the resources is created. You can ignore this section for now. You can also remove the entire output section, as it won’t affect our workflow. The reason I have included this is that, once the deployment is done, SAM would print the URL of the deployed API Gateway directly onto the terminal, which is quite helpful.
With that done, the other file that you have to be aware of is, /src/HelloWorld/aws-lambda-tools-defaults.json. This file basically has configurations related to the Lambda Deployments, including the location of the yaml template file that we looked into earlier. You might have come across this file from our previous Lambda-based articles.
Apart from that, we have the source code under the src folder, which is a simple .NET application (Lambda Function). You can go ahead and make any minor changes to the code.
Building
After that, the first thing you need to do is to build the project. Open up the command terminal at the root of the solution, or wherever the template.yaml file exists, and run the following command.
sam buildThis would basically build your entire SAM project and make it ready for deployment and create the zip package that’s needed for deployment. Just the normal compile-time error checks. Behind the scenes, SAM CLI actually executes the `dotnet publish` against the Code URI that’s mentioned in our template.yaml’s resource section. Once published, the files and zipped into a nice little package. You can see the entire steps as such if you look into the terminal logs after running the build command.
Deployment
Next let’s jump to the exciting part, Deployment! Run the following command to deploy the code to AWS,
sam deploy --guidedNotice the guided flag? This is what is going to make your Deployment experience a breeze. It’s recommended to use this flag if you working with SAM CLI for the first time or when you are in the process of creating/deploying a project for the first time. Like before, the SAM CLI is going to ask you for a couple of configurations that would help it deploy your code to the cloud.
- Stack Name: So, every time you deploy with SAM CLI, it creates a stack for you in CloudFormation. A Stack is a collection of resources related to the entire project. Because internally SAM is going to convert the template.yaml into cloud formation templates which in turn creates AWS resources. Here, I would name it HelloWorld, for obvious reasons.
- AWS Region: Since we have our AWS CLI setup, it would automatically pick up the configured region, which in my case is ap-south-1. I just had to hit enter.
- Confirm changes before deployment: Type in ‘y’.
- Allow SAM CLI role creation: Again, type in ‘y’.
- Disable Rollback: Type in ‘n’.
- HelloWorldFunction may not have authorization defined, Is this okay? : Yes!
- Save arguments to the configuration file: Yes again.
- For the next couple of configurations, just hit enter, so that SAM CLI assumes the default values.
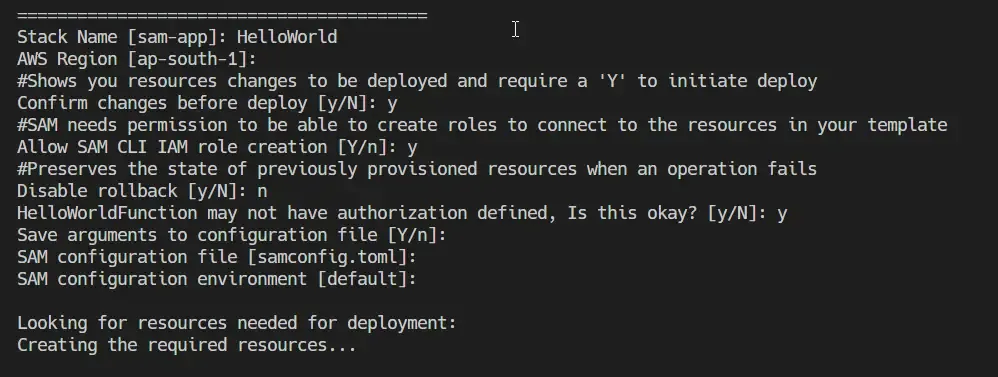
With all that done, SAM CLI would create an S3 bucket for you where the code zip will be uploaded to and parallelly saves the above-mentioned configurations so that you don’t have to do it again while trying to deploy.
Next, what the tool does is, connects to your AWS Account, checks which all resources have to be deployed, and displays you with a list of the changeset, something like the below.
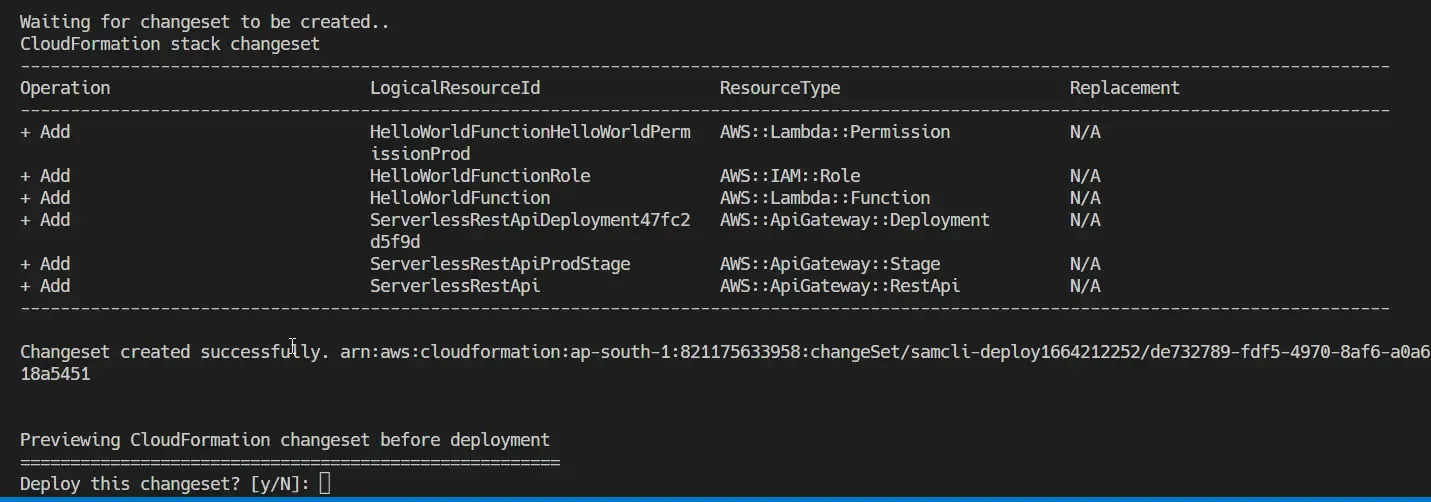
As you can see, for this particular template (where we used a simple HelloWorld Quick Template) these are the resources to be created, a couple of role/permissions, the actual lambda function along with an API gateway, and so on. The SAM CLI tool would ask for a confirmation to deploy these resources into a new Cloudformation stack. Simply Hit ‘y’. With that, all the events related to the resource creations start getting logged on to the terminal console. Give it a couple of minutes for the provisioning of AWS resources to be completed.
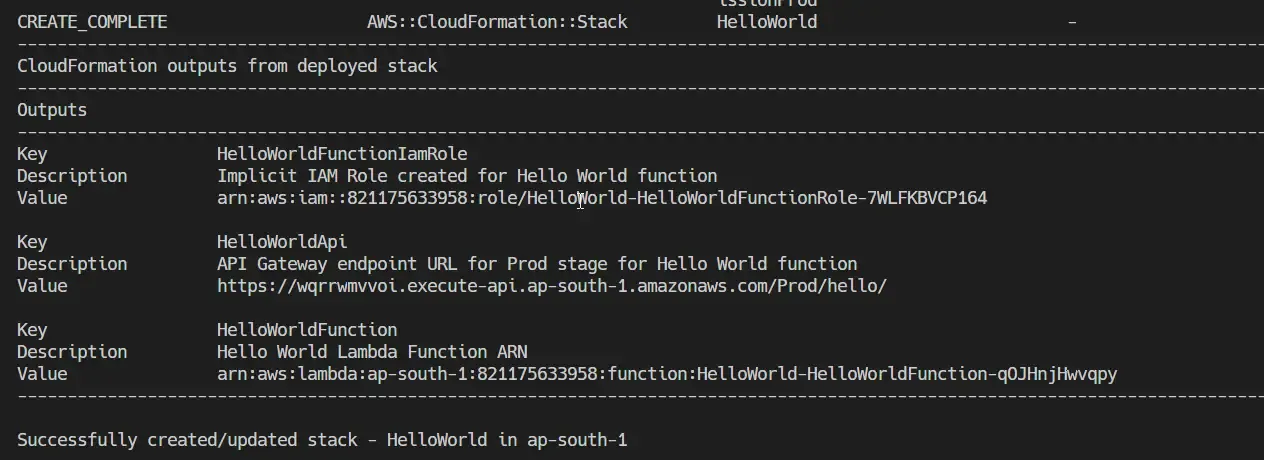
Now, navigate to your AWS Management Console and check if the resources are created. Ideally, let’s go into the Cloudformation Service of AWS. You can see that our HelloWorld stack is created.
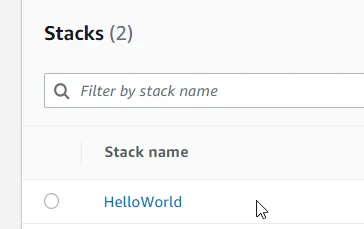
Click on it to view the associated resources.
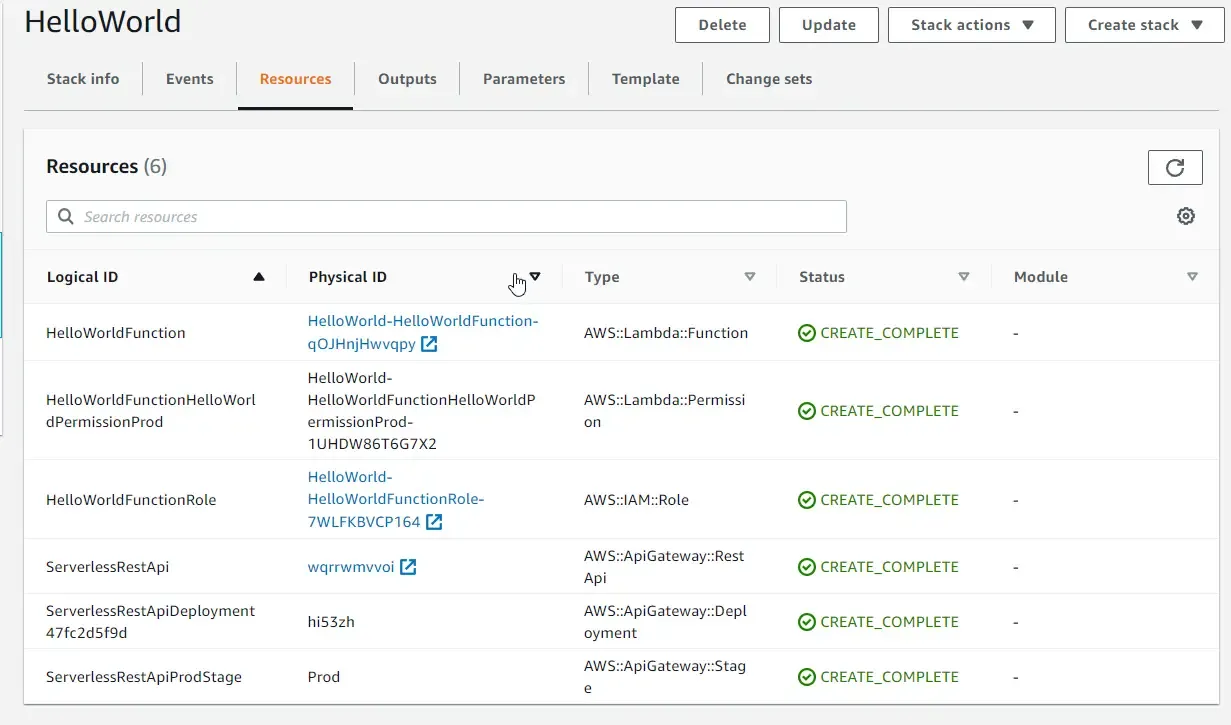
Under the resources tab, you can see all the AWS Services that was created by SAM CLI as part of application deployment. You can add more resources to this by modifying the template.yaml file.
Going back to Visual Code’s terminal, you might see the outputs of the deploy command, which contains the URL to the created API Gateway. Let’s navigate to the URL, and test our Lambda function.

There you go! See how easy everything was, with the help of SAM CLI?
ReDeployment
Next, let’s make some changes to our Lambda and try to redeploy the code. I would just change the Hello World message to something else to keep things simple. So ideally, what you need to do is to, build the project again and deploy it. Once you are done with the changes, open up the terminal and run the following.
sam buildThis, as you know would publish our .NET application and ZIP it up, ready for deployment. Next, run the following command.
sam deploy --stack-name HelloWorldSo, this command is a bit different in terms of parameters compared to the first time we deployed. SAM needs to know which stack the current deployment associates to. Once mapped, SAM would pick up the existing configurations and proceed with deployment.

As you see, the redeployment process is completed. Let’s test it again.

Sync
Here is another feature from SAM, that lets it redeploy automatically by watching the changes. Not something that I would use all the time, but for smaller Lambdas, where the changes are quite minimal, this could help us save time a bit.
Run the following command to get the Sync working.
sam sync --stack-name HelloWorld --watchRunning this would first publish your changes, and try to redeploy to make sure that your Cloudformation stack is already in sync with your local changes. Once it’s synced, let’s add another change to the message and save the file.
You can see the SAM CLI automatically builds and deploys the changes for you. Quite a refined process, yeah? That’s it. Your changes would be already live before you know it. This is a really handy feature depending on your use case.
Stack Deletion
End of the day, when your development/testing is over, it’s usually recommended to delete your Resources to keep your AWS Bill minimal. It might consume a lot of time if you were to go into AWS Console and take down services one by one. SAM now features a delete command which can delete resources based on the Stack Name. As we are done with exploring SAM, let’s clean up the stack by running the following command.
sam delete --stack-name HelloWorld
That’s a very basic walkthrough of how SAM CLI helps in the development/deployment cycle.
Similarly, you can go through the various other templates that come along with the AWS Quickstart templates and test them with SAM CLI Tool to deploy your application to the cloud. That’s a wrap for this article!
Summary
In this article, we went through AWS SAM CLI for .NET Developers! You would have seen how easy it is to manage AWS resources using the powerful AWS SAM CLI Tool. We learned how SAM CLI works internally, how to create SAM Application using the init command, how AWS Quick Templates work, and much more. Later we went ahead with building the application and deploying it directly to AWS using the sam deploy command in a guided manner, updating, syncing, and finally destroying the newly created stack.
Stay Tuned. You can follow this newsletter to get notifications when I publish new articles – https://newsletter.codewithmukesh.com. Do share this article with your colleagues and dev circles if you found this interesting. Thanks!

