Previously, we discussed implementing CRUD Operations in Blazor without any component library. In this article, we will demonstrate implementing Blazor CRUD using Mudblazor Component Library with a more polished way to achieve the CRUD functionalities. Mudblazor is without any doubt one of the coolest and complete looking Blazor Component Libraries out there. Kudos to the Mudblazor Team! You can find the entire source code of the CRUD Implementation here.
Introducing Mudblazor
Mudblazor, as its tagline suggests, is a component library for Blazor to ease up the web development without struggling with CSS and Javascript. The biggest perk of this library is that it’s completely written on C#, with close to zero dependency on Javascript. The popularity of this library, as I have noticed is quite low for the amount of awesomeness it packs. It won’t be surprising to see a lot of Blazor Developers adapting to this Material Inspired Component Library in the near future. The team has documented the library in a very intuitive way. You can check out the Mudblazor documentation here.
What We’ll Be Building?
As usual, our approach would be quite simple. We will be building a straightforward CRUD application that manages customers in our database. For ease of development, we will be using Blazor .NET 5 Server Project. You can use this tutorial for developing with Web Assembly project as well, with minimal changes, especially while using the MudBlazor library (mentioned in their documentation’s getting started section). With our application, we would be able to get a list of customers, add new customers, edit and delete existing customers with a really cool and fluid-looking material UI thanks to the MudBlazor Library.
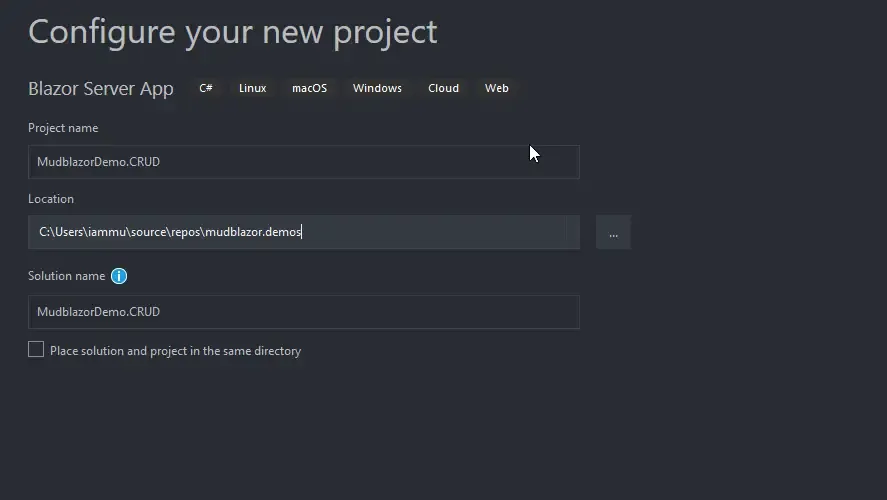
Let’s get started by creating a new Blazor Server App in Visual Studio 2019 IDE (Here’s how to install VS 2019 Community). Click Next.
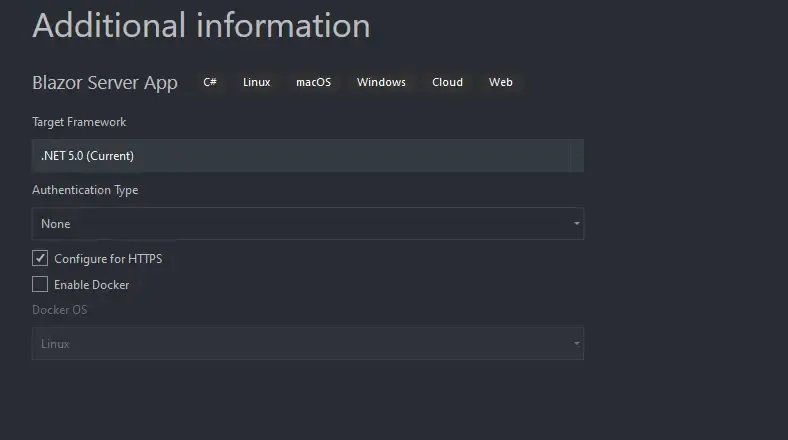
In the Next Screen make sure to select .NET 5.0 from the drop-down. Click Create.
Once Visual Studio has finished setting up your new solution, let’s add some basic NuGet packages that we will be using in our CRUD Application. This includes a few of the packages of Entity Framework Core, which will be our Data Access Tool. Open up the Package Manager Console and run the following commands.
Install-Package Microsoft.EntityFrameworkCoreInstall-Package Microsoft.EntityFrameworkCore.SqlServerInstall-Package Microsoft.EntityFrameworkCore.ToolsInstalling and Configuring Mudblazor
Setting up Mudblazor is pretty much easy to go forward with. Open up the package manager console and run the following command to install the Mudblazor package into your project.
Install-Package MudBlazorWith the package installed, open up the Startup.cs and paste in the following code within the ConfigureServices() method. This adds the common services that are required by the Mudblazor components to the DI Container of the ASP.NET Core Application.
services.AddMudServices();Now that we have added the services into the application, we need to take care of the static files from MudBlazor. Yes, the CSS and js files. Navigate to the Pages/_Host razor page and add in the reference of the CSS and js files of mudblazor. Just below the existing CSS references add the following highlighted line.
<link rel="stylesheet" href="css/bootstrap/bootstrap.min.css" /><link href="css/site.css" rel="stylesheet" /><link href="MudblazorDemo.CRUD.styles.css" rel="stylesheet" /><link href="https://fonts.googleapis.com/css?family=Roboto:300,400,500,700&display=swap" rel="stylesheet" /><link href="_content/MudBlazor/MudBlazor.min.css" rel="stylesheet" />Next, below the blazor.server.js reference add the MudBlazor.min.js reference.
<script src="_framework/blazor.server.js"></script><script src="_content/MudBlazor/MudBlazor.min.js"></script>
@using MudBlazor
As the next step to setup Mudblazor, open up the _Imports.razor file and add the following to the end. This ensures that you get to use all the Mudblazor components throughout the project without adding a reference to Mudblazor on every page you work with. This is almost everything you need to do to get Mudblazor configured. Let’s start implementing Blazor CRUD using Mudblazor.
Once that’s done, open up the Shared/MainLayout.razor page and add the following code to the end of the file.
<MudThemeProvider/><MudSnackbarProvider/>What’s Snackbar? It’s a toast-like notification inspired by Material UI (usually found on google devices). You will see it in action quite soon.
Adding the Context & Models for EfCore
As expected, we will be using Entity Framework Core to play with the data in our Blazor Application. Remember, we have already installed the required packages earlier. Let’s get started by first defining our Customer Model. Under the Data folder, create a new class and name it Customer. We will be defining the basic properties only to keep the article/implementation easy to follow.
public class Customer{ public int Id { get; set; } public string FirstName { get; set; } public string LastName { get; set; } public string PhoneNumber { get; set; }}Next, let’s add the DbContext class to our application. This will help us to access the Customer table in the database via our application. Create a new folder DbContexts and add in a new file ApplicationDbContext. Here we will be defining a DbSet of Customer. This is more or less a C# representation of the actual database.
public class ApplicationDbContext : DbContext{ public ApplicationDbContext(DbContextOptions<ApplicationDbContext> options) : base(options) { } public DbSet<Customer> Customers { get; set; }}Here is the important part of configuring Entity Framework Core - Defining the connection string. In your appsettings.json file, add in the following.
"ConnectionStrings": { "MudblazorDemo": "Data Source=(localdb)mssqllocaldb;Initial Catalog=MudblazorDemo;Integrated Security=True;MultipleActiveResultSets=True"}PS, the Connection string varies with user preference and the DB Provider you are actually using. For this article, we are working with SQL Server. This is the reason that we had to install EFCore’s SQL Server package.
Now, let’s configure the dbcontext and add them to our application’s service container. In the startup.cs/ConfigureServices method, add in the following code at the bottom.
services.AddDbContext<ApplicationDbContext>(options => options.UseSqlServer(Configuration.GetConnectionString("MudblazorDemo")));services.AddControllersWithViews();Finally, let’s add the migrations and update our database. PS, I am using a Localdb instance of SQL Server Database. Again, in the package manager console, run the following.
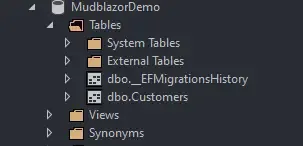
add-migration initialupdate-databaseYou can see that our database and the customer table has been created.
With the database configuration done, let’s prepare a service layer that can communicate with the DB context class and fetch/write data to the/from the databse. We will be using an interface-implementation model for this. Create a new Folder Services and add in a new interface ICustomerService. This basically defines what our Customer Service is supposed to perform. (create,read, update, delete)
public interface ICustomerService{ List<Customer> GetCustomers(); Customer GetCustomerById(int id); void SaveCustomer(Customer customer); void DeleteCustomer(int id);}Within the same Service folder, add a new class, this time the implementation of the previous interface and name it CustomerService. Here, we will be defining the CRUD implementations of our Blazor project.
public class CustomerService: ICustomerService{ private readonly ApplicationDbContext _dbContext; public CustomerService(ApplicationDbContext context) { _dbContext = context; } public void DeleteCustomer(int id) { var customer = _dbContext.Customers.FirstOrDefault(x => x.Id == id); if(customer!=null) { _dbContext.Customers.Remove(customer); _dbContext.SaveChanges(); } } public Customer GetCustomerById(int id) { var customer = _dbContext.Customers.SingleOrDefault(x => x.Id == id); return customer; } public List<Customer> GetCustomers() { return _dbContext.Customers.ToList(); } public void SaveCustomer(Customer customer) { if (customer.Id == 0) _dbContext.Customers.Add(customer); else _dbContext.Customers.Update(customer); _dbContext.SaveChanges(); }}Line 3-7: DI Injection of the ApplicationDb context into the constructor of the Customer Service.
Line 8-16: This Delete method takes in customer id as the parameter. It first checks if any customer exists against the provided customer id. If found, the corresponding customer is deleted.
Line 17-21: Retrieves a particular customer by the provided customer id.
Line 22-25: Fetches all the available customers from the database.
Line 26-31: This is dual purpose method. It can both save a new customer as well as update an existing customer record. If the passed customer model has an id of 0, it means that it is probably a new record, and hence save this as a new customer. If the passed model has an id other than 0, it means that it is an update command. Thus, the passed customer model is updated over the existing record of the same id.
This should make things clear. Now to finish off with the service layer, all we have to do is to register the interface and implementation into the application. For this, open up the Startup.cs/ConfigureServices() method and add the following.
services.AddScoped<ICustomerService, CustomerService>();Building the UI with Mudblazor Components
As we are done with the data retrieval part, let’s concentrate on the UI and MudBlazor implementation. To keep things simple, we will use the Pages/Index.razor page. I will split the code into 3 sections - Namespace references, the C# part, and Mudblazor components usage. These sections essentially belong to the Index.razor file, separated into 3 code snippets for better understanding the working.
In the first section below, you can find the namespace references and Dependency injections. The Data namespace is used to reference the customer model. The Customer Service interface is used for the most obvious data manipulation of the customer entity. And finally, the ISnackbar interface is used to display those awesome toast notifications, thanks to Mudblazor.
@using MudblazorDemo.CRUD.Data@inject MudblazorDemo.CRUD.Services.ICustomerService customerService@inject MudBlazor.ISnackbar snackBarBefore going into the code further, let me explain how our UI would look like. We will have a form where the user can enter in new customer details/edit existing customer details, a save button to save/update customer records. And finally, a Datagrid which lists all the available customers. This Datagrid will have search support as well as pagination. Each record will have corresponding buttons to edit and delete the record. Get the idea, yeah? You can see the visual implementation below:
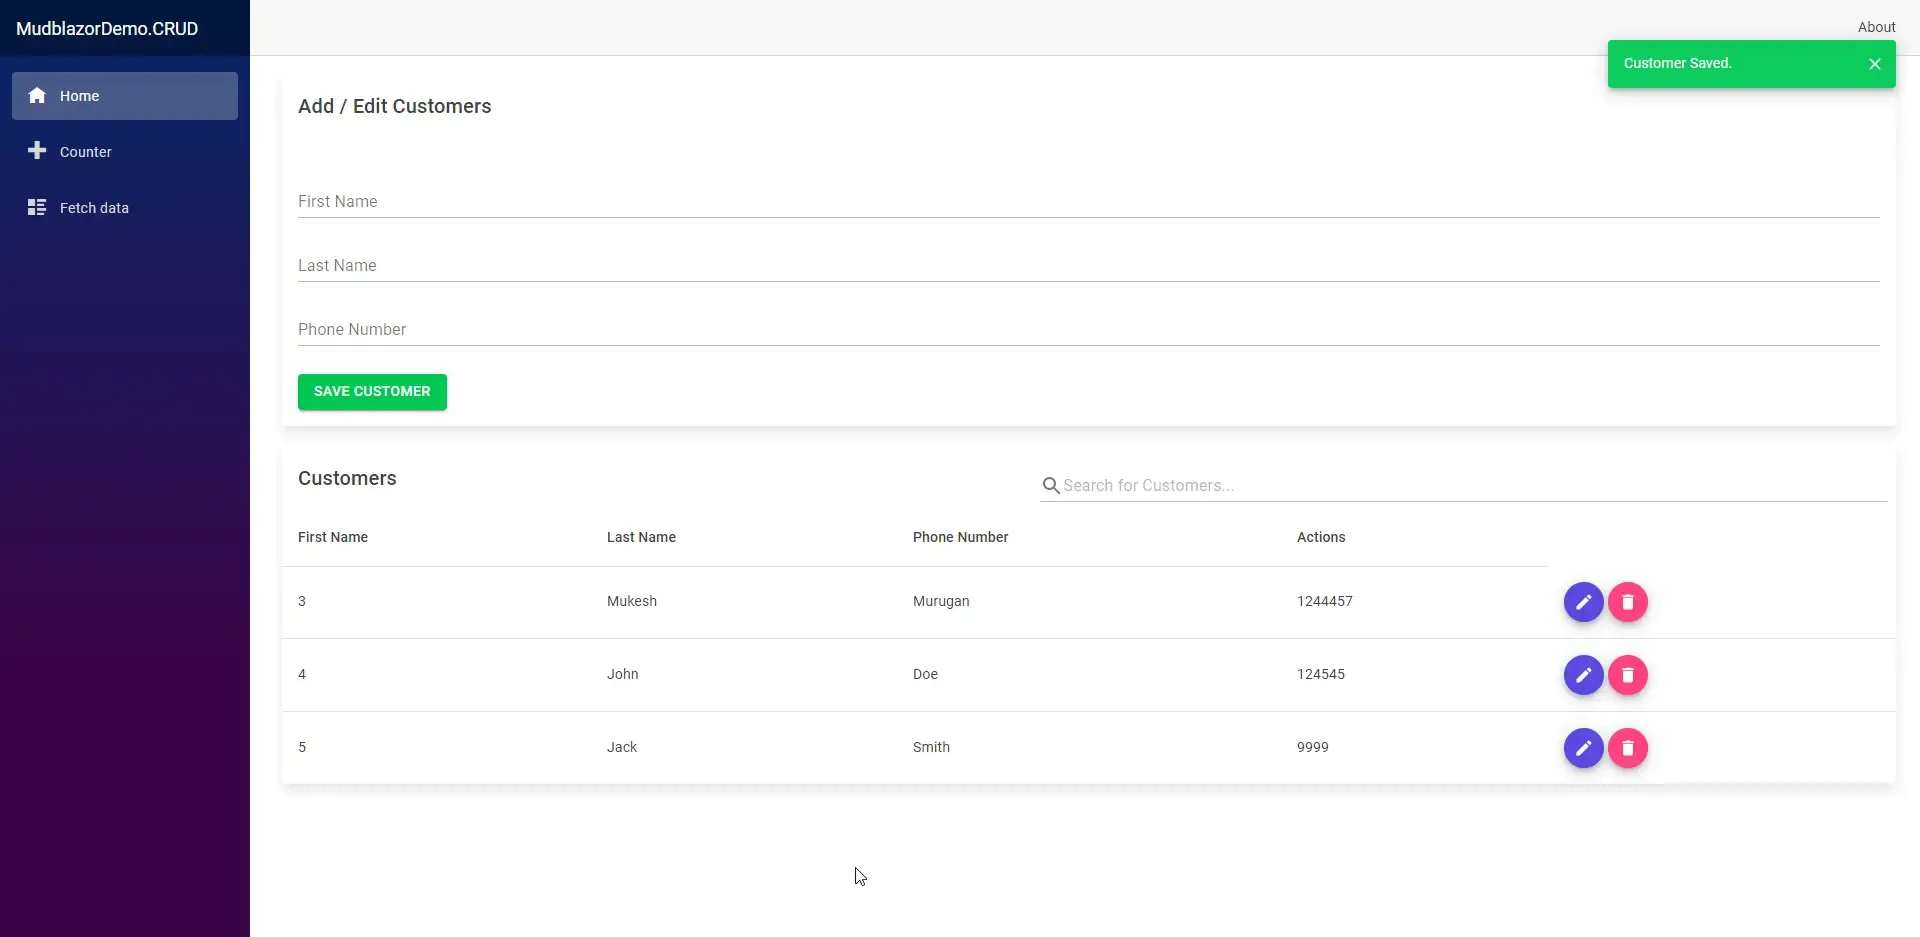
Below, in the next snippet, is where we consume the service instance and invoke the CRUD operations.
@code{ private string searchString = ""; private Customer customer = new Customer(); private List<Customer> customers = new List<Customer>(); protected override async Task OnInitializedAsync() { GetCustomers(); } private List<Customer> GetCustomers() { customers = customerService.GetCustomers(); return customers; } private bool Search(Customer customer) { if (string.IsNullOrWhiteSpace(searchString)) return true; if (customer.FirstName.Contains(searchString, StringComparison.OrdinalIgnoreCase) || customer.LastName.Contains(searchString, StringComparison.OrdinalIgnoreCase) || customer.PhoneNumber.Contains(searchString, StringComparison.OrdinalIgnoreCase)) { return true; } return false; } private void Save() { customerService.SaveCustomer(customer); customer = new Customer(); snackBar.Add("Customer Saved.", Severity.Success); GetCustomers(); } private void Edit(int id) { customer = customers.FirstOrDefault(c => c.Id == id); } private void Delete(int id) { customerService.DeleteCustomer(id); snackBar.Add("Customer Deleted.", Severity.Success); GetCustomers(); }}Here is a brief explanation of the above snippet.
Line 2&3: We declare a new customer object and list of customers.
Line 5-13: As soon as the page is loaded, the OnInitializedAsync method is invoked by default. We override this method and load the list of customers from our service instance.
Line 14-24: This is more of a Mudblazor specific method that gets invoked when the user types in something on the search bar and hits enter. It basically checks if any of the searched keywords is contained in either the first name, last name or phone number of any customer.
Line 25-31: Ideally when the user enters data into the form and click on the save button, this method is supposed to be fired. Here too you can notice that we are using the injected service instance. In Line 29, we make use of the snack bar service to display a ‘customer saved’ notification to the user.
Line 32-35: Retrieve the customer record when the user clicks the edit button corresponding to a customer in the data grid.
Line 36-41: Similarly, when the delete button is clicked, this method is supposed to be fired which used the service instance to delete the selected customer. Once deleted, we have to reload the available customer again.
Finally, let’s actually start defining the MudBlazor components that we will be using. As mentioned earlier, we need a form and a data grid, a couple of buttons, a bunch of text fields to enter in the customer details. To keep it more aesthetic, we will have a Card component (very similar to the Bootstrap card) where our form elements are defined. And then a table component that comprises rows and corresponding buttons to edit and delete.
<MudCard Elevation="25"> <MudCardHeader> <CardHeaderContent> <MudText Typo="Typo.h6">Add / Edit Customers</MudText> </CardHeaderContent> </MudCardHeader> <MudCardContent> <MudTextField @bind-Value="customer.FirstName" Label="First Name" Variant="Variant.Text" Margin="Margin.Normal"></MudTextField> <MudTextField @bind-Value="customer.LastName" Label="Last Name" Variant="Variant.Text" Margin="Margin.Normal"></MudTextField> <MudTextField @bind-Value="customer.PhoneNumber" Label="Phone Number" Variant="Variant.Text" Margin="Margin.Normal"></MudTextField> <br /> <MudButton Variant="Variant.Filled" Color="Color.Success" OnClick="Save">Save Customer</MudButton> </MudCardContent></MudCard><br /><MudTable Elevation="25" Items="GetCustomers()" Filter="new Func<Customer, bool>(Search)" @bind-customer="customer"> <ToolBarContent> <MudText Typo="Typo.h6">Customers</MudText> <MudToolBarSpacer /> <MudTextField @bind-Value="searchString" Placeholder="Search for Customers..." Adornment="Adornment.Start" AdornmentIcon="@Icons.Material.Filled.Search" IconSize="Size.Medium" Class="mt-0"></MudTextField> </ToolBarContent> <HeaderContent> <MudTh>First Name</MudTh> <MudTh>Last Name</MudTh> <MudTh>Phone Number</MudTh> <MudTh>Actions</MudTh> </HeaderContent> <RowTemplate> <MudTd DataLabel="Id">@context.Id</MudTd> <MudTd DataLabel="FirstName">@context.FirstName</MudTd> <MudTd DataLabel="LastName">@context.LastName</MudTd> <MudTd DataLabel="PhoneNumber">@context.PhoneNumber</MudTd> <MudTd DataLabel=""> <MudFab @onclick="@(()=>Edit(@context.Id))" Color="Color.Primary" Icon="@Icons.Material.Filled.Edit" Size="Size.Small" IconSize="Size.Small" /> <MudFab @onclick="@(()=>Delete(@context.Id))" Color="Color.Secondary" Icon="@Icons.Material.Filled.Delete" Size="Size.Small" IconSize="Size.Small" /> </MudTd> </RowTemplate></MudTable>Line 8-10: These are the textfield component of mudblazor that are bound to the customer object’s name and phone properties.
Line 12: The save button which invokes the Save function on click.
Line 16-38: Table component of mudblazor.
Line 20: The Search bar changes the value of the searchString variable, which in turn triggers the Search method.
Line 22-27: All the headers of the Datagrid will be mentioned here.
Line 29-32: here, we get to bind each of the available customer properties to each corresponding column.
Line 34-34: These are the Edit and Delete buttons respectively.
That’s how to build Blazor CRUD using Mudblazor and Entity Framework Core with ease. Quite simple and looks elegant, yeah?
Huge shoutout to the MudBlazor Team!
Summary
In this article, we learned about implementing Implementing Blazor CRUD using Mudblazor Component Library in .NET 5. You can find the source code of the complete implementation here. Do you want me to add more articles around Mudblazor? Do let me know in the comments section. If you enjoyed this article, make sure that you share it with your colleagues and blazor developers. This helps me reach a wider audience and stay motivated to produce more content regularly.
Leave behind your valuable queries, suggestions in the comment section below. Also, if you think that you learned something new from this article, do not forget to share this within your developer community. Happy Coding!


