Building a CRUD Application is like the Hello World for Intermediate Developers. It helps you understand the most common operations of any particular stack. In this tutorial, let’s build a Client-side Blazor CRUD Application that uses Entity Framework Core as it’s Data Access Layer. In our previous articles, we discussed Blazor basics and it’s folder structures.
Blazor is the new popular kid in town. It’s quite important for a .NET Developer to be aware of what this Awesome Tech packs within itself. What more would make you understand it’s abilities other than learning how to implement CRUD Functions using Blazor and Entity Framework Core?
This is part 3 of my Blazor Blog Series, where we learn together various concepts and implementations of Microsoft’s latest tech, Blazor. Here are the contents of my Blazor Blog Series.
- Getting Started with Blazor
- Exploring Blazor Project Structure
- Blazor CRUD with Entity Framework Core - (You are here)
- Implementing Blazor CRUD using Mudblazor Component Library in .NET 5 – Detailed Guide
PS, I recommend using Visual Studio 2019 Community as my IDE. Also, To get Blazor onto your machine, please go through Part 1 of the Blazor Blog Series where the pre-requisites are mentioned.
What we will be Building
I thought it would be nice if I showed you guys what we are going to build before jumping into the tutorial so that you get a good idea of the scope of this tutorial and we will be covering. We will have a simple Blazor CRUD implementation on the Developer entity using Blazor WebAssembly and Entity Framework Core. I will also try to demonstrate certain best practices while developing Blazor CRUD Applications.
Note: Let’s build a complete Blazor Application step by step. I will upload the source code of the Application (Blazor.Learner) over at GitHub. We will be reusing and building on top of this application in our future articles as well. Make sure you guys follow me at GitHub to stay posted.
Creating the Blazor CRUD Project
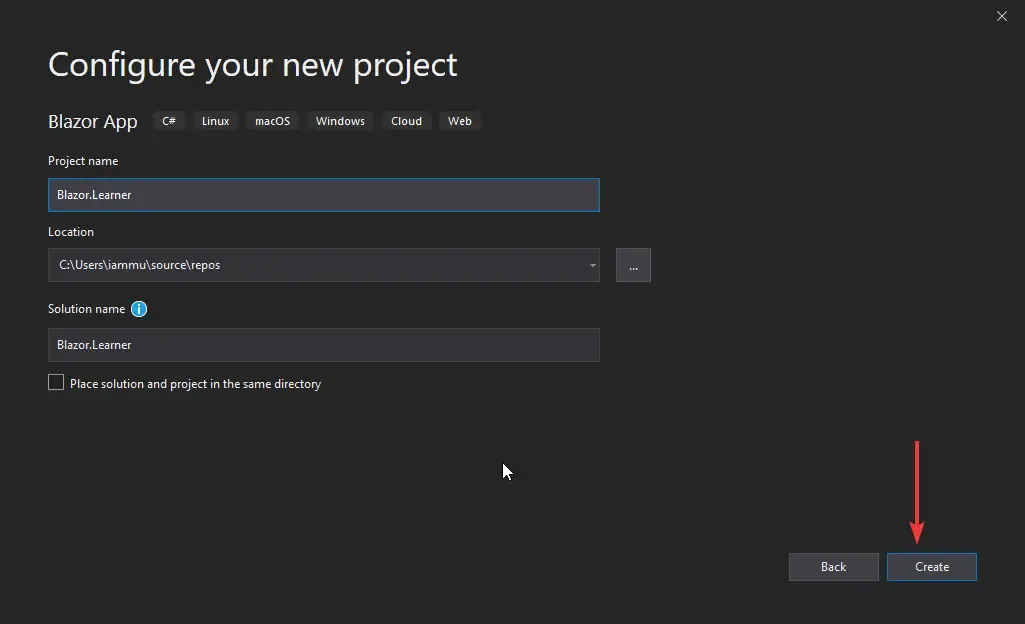
Let’s get started with the Blazor WebAssembly CRUD application by creating a new Blazor App. Follow the screenshots below.
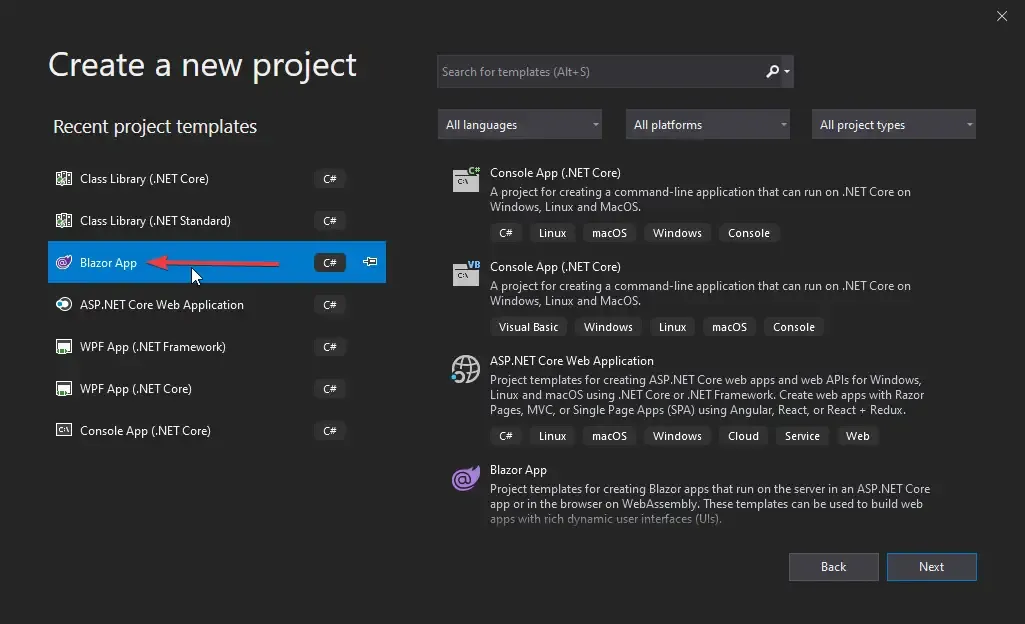
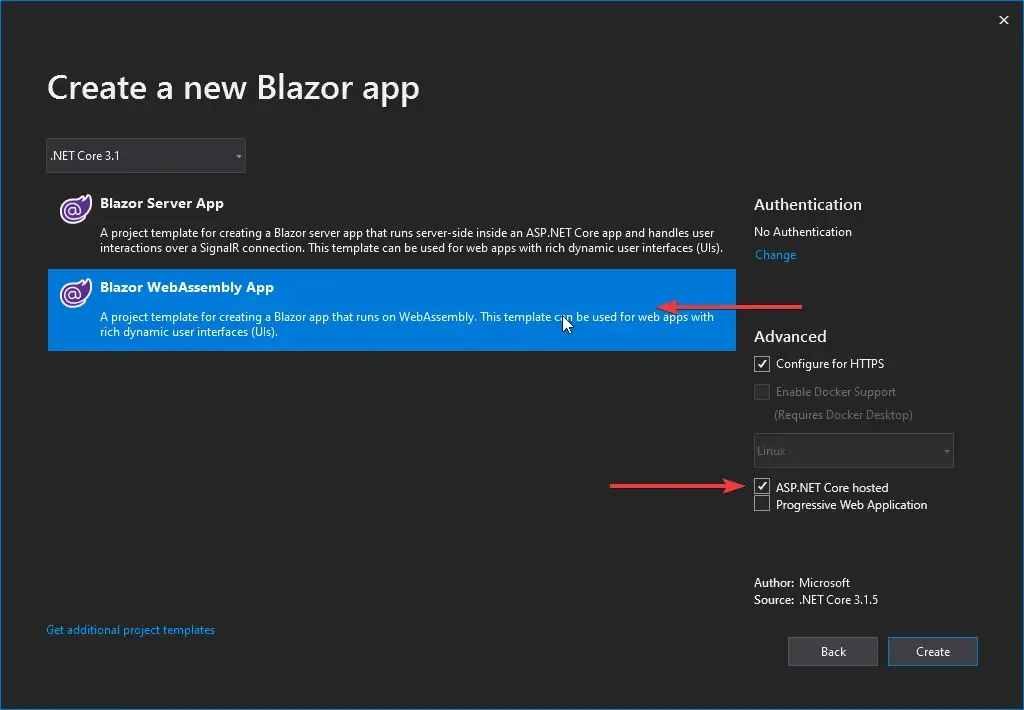
Make sure to check the ASP.NET Core Hosted option. So, we are building a client-side aka Blazor WebAssembly project. But there can be instances where we need the features of an ASP.NET Core Application to support the Blazor Application, like using external APIs for data, Application-specific database, etc. For such requirements, we use the ASP.NET Core Hosted hosting model.
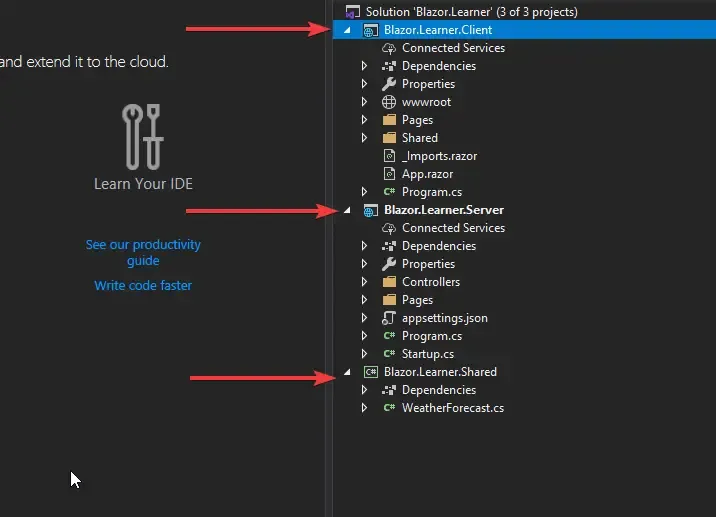
You can see that Visual Studio automatically generates 3 different projects, i.e, Client, Server, and Shared.
- Client - Where the Blazor Application lives along with the Razor components.
- Server - Mostly used as a container that has ASP.NET Core Features (We use it here for EF Core, Api Controllers, and DB).
- Shared - As the name suggests, all the entity models will be defined here.
So basically, the Server will have API endpoints that can be accessed by the Client Project. Please note that this is a single application and runs on the same port. Hence the need for CORS access doesn’t arise. All these projects will be executed directly on your browser and do not need a dedicated server.
Adding the Model
To begin with our Blazor CRUD Application, let’s add a Developer Model on to our Shared Project under the Models folder (create one).
public class Developer{ public int Id { get; set; } public string FirstName { get; set; } public string LastName { get; set; } public string Email { get; set; } public decimal Experience { get; set; }}Entity Framework Core
Now, go to the server project and install the following required packages to enable EF Core.
Install-Package Microsoft.EntityFrameworkCoreInstall-Package Microsoft.EntityFrameworkCore.DesignInstall-Package Microsoft.EntityFrameworkCore.ToolsInstall-Package Microsoft.EntityFrameworkCore.SqlServerDefining Connection String
Navigate to appsettings.json under the Server Project and add the Connection String.
"ConnectionStrings": { "DefaultConnection": "<Connection String Here>" },Adding Application Context
We will need a database context to work on the data. Create a new class in the Server Project at Data/ApplicationDBContext.cs
public class ApplicationDBContext : DbContext{ public ApplicationDBContext(DbContextOptions<ApplicationDBContext> options):base(options) { } public DbSet<Developer> Developers { get; set; }}We will be adding DbSet of Developers to our context. Using this context class, we will be able to perform operations in our database that we will generate in some time.
Configuring
We will need to add EF Core and define it’s connection string. Navigate to the Startup.cs found in the server project and add the following line to the ConfigureServices method.
services.AddDbContext<ApplicationDBContext>(options => options.UseSqlServer(Configuration.GetConnectionString("DefaultConnection")));Generating / Migrating the Database
Now that our Entity Framework Core is all set and up on the ASP.NET Core Application, let ‘s do the migrations and update our database. For this, open up the Package Manager Console and type in the following.
add-migration Initialupdate-databaseImportant - Make sure you have chosen the server project as the default.

Developer Controller.
Now that our database and EF Core is set up, we will build an API Controller that will serve the data to our Blazor client. Create an Empty API Controller, Controllers/DeveloperController.cs
[Route("api/[controller]")][ApiController]public class DeveloperController : ControllerBase{    private readonly ApplicationDBContext _context;
    public DeveloperController(ApplicationDBContext context)    {        this._context = context;    }}
Here we have injected a new instance of ApplicationDBContent to the constructor of the controller. Let’s continue by adding each of the endpoints for our CRUD Operations.
Get
An Action method to get all the developers from the context instance.
[HttpGet]public async Task<IActionResult> Get(){ var devs = await _context.Developers.ToListAsync(); return Ok(devs);}Get By Id
Fetches the details of one developer that matches the passed id as parameter.
[HttpGet("{id}")]public async Task<IActionResult> Get(int id){ var dev = await _context.Developers.FirstOrDefaultAsync(a=>a.Id ==id); return Ok(dev);}Create
Creates a new Developer with the passed developer object data.
[HttpPost]public async Task<IActionResult> Post(Developer developer){ _context.Add(developer); await _context.SaveChangesAsync(); return Ok(developer.Id);}Update
Modifies an existing developer record.
[HttpPut]public async Task<IActionResult> Put(Developer developer){ _context.Entry(developer).State = EntityState.Modified; await _context.SaveChangesAsync(); return NoContent();}Delete
Deletes a developer record by Id.
[HttpDelete("{id}")]public async Task<IActionResult> Delete(int id){ var dev = new Developer { Id = id }; _context.Remove(dev); await _context.SaveChangesAsync(); return NoContent();}Getting Started with Blazor CRUD
With all that out of the way, let’s continue building our Blazor CRUD Application. Our Agenda is to do CRUD Operations on the Developer Entity. Essentially we have completed our data layer. Let’s now build the UI.
Adding a new Navigation Menu Entry
We will have to add a new entry in the navigation menu sidebar to access the Pages. On the client project, Navigate to Shared/NavMenu.razor and add a similar entry to the list.
<li class="nav-item px-3"> <NavLink class="nav-link" href="developer"> <span class="oi oi-people" aria-hidden="true"></span> Developers </NavLink></li>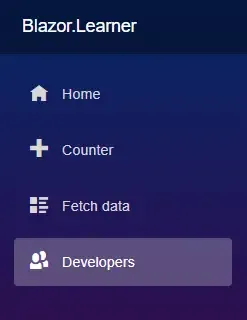
Shared Namespaces
We will be using the Shared/Models/Developer.cs Model class throughout this tutorial. Let’s add it’s the namespace to the _Imports.razor, so that it can be accessed at all our new components.
@using Blazor.Learner.Shared.ModelsProposed Folder Structure
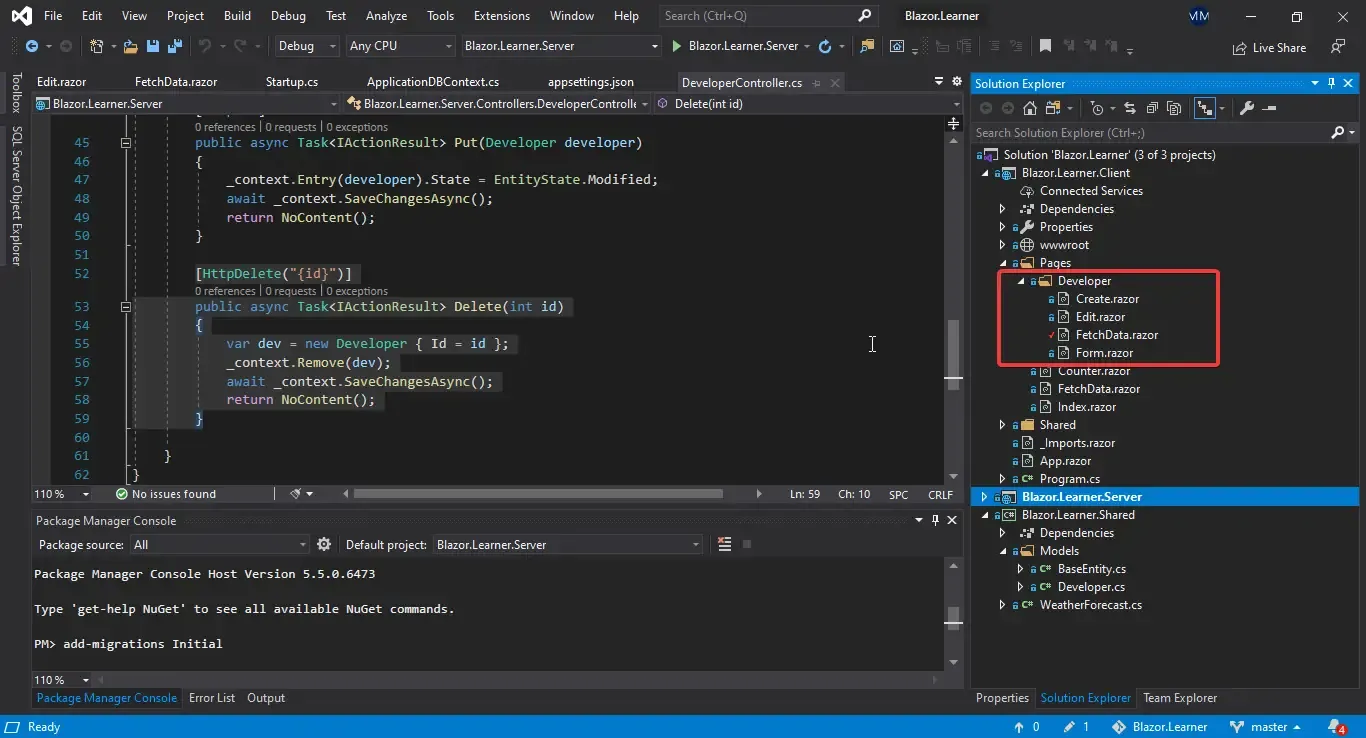
This is considered as one of the better practices. The idea goes like this.
- Have a folder under pages that will be specific for an entity/feature. In our case, we have a Developer as an entity.
- Under this folder, we try to include all the concerned Razor components.
- If you are already an ASP.NET Core Developer, you would know that while implementing standard CRUD, we have many similar things (UI) for Create and Update Forms. For this, we create a common component called Form that will be shared by the Create and Edit components.
- FetchData is to retrieve all the data and display it onto a Bootstrap table.
FetchData Component
We will start off by building our Index Component that fetches all the developers from the database. Let’s call it the FetchData Component. Create a new Blazor Component under Pages, Pages/Developer/FetchData.razor
@page "/developer" @inject HttpClient client @inject IJSRuntime js
<h3>Developers</h3><small>Add as many developers as you wish.</small><div class="form-group">  <a class="btn btn-success" href="developer/create"    ><i class="oi oi-plus"></i> Create New</a  ></div><br />
@if (developers == null) {<text>Loading...</text>} else if (developers.Length == 0) {<text>No Records Found.</text>} else {<table class="table-striped table">  <thead>    <tr>      <th>Id</th>      <th>First Name</th>      <th>Last Name</th>      <th>Email</th>      <th>Experience (Years)</th>      <th></th>    </tr>  </thead>  <tbody>    @foreach (Developer dev in developers) {    <tr>      <td>@dev.Id</td>      <td>@dev.FirstName</td>      <td>@dev.LastName</td>      <td>@dev.Email</td>      <td>@dev.Experience</td>      <td>        <a class="btn btn-success" href="developer/edit/@dev.Id">Edit</a>        <button class="btn btn-danger" @onclick="@(() => Delete(dev.Id))">          Delete        </button>      </td>    </tr>    }  </tbody></table>} @code { Developer[] developers { get; set; } protected override async TaskOnInitializedAsync() { developers = await client.GetFromJsonAsync<Developer[]  >("api/developer"); } async Task Delete(int developerId) { var dev =  developers.First(x => x.Id == developerId); if (await js.InvokeAsync<bool    >("confirm", $"Do you want to delete {dev.FirstName}'s ({dev.Id}) Record?"))    { await client.DeleteAsync($"api/developer/{developerId}"); await    OnInitializedAsync(); } } }</bool  ></Developer[]>
Line 8 - Button to Create a new Developer
Line 34 - Iteration for a new Row for each developer record.
Line 43 - An Edit Button for every record that navigates to ...developer/edit/{id}
Line 44 - Delete Button for the Record. This Button invokes a Delete Method written in the Code area of this component.
Line 53 - Defining a list of Developers.
Line 54-55 - This is the function that gets fired on page load. Here we use the HTTP Client object to retrieve data from the API endpoint, api/developer.
Line 59-67 - A standard delete function that gets invoked on a button click.
Line 61- An Object of IJSRuntime that invoked the confirmation dialog.
What is IJSRuntime?
Previously, we had learned that it is also possible to execute Javascripts in our Blazor Application. The IJSRuntime interface acts as a gateway to JS. This object gives us methods to invoke JS functions in Blazor applications.
Let’s build our application and run it.
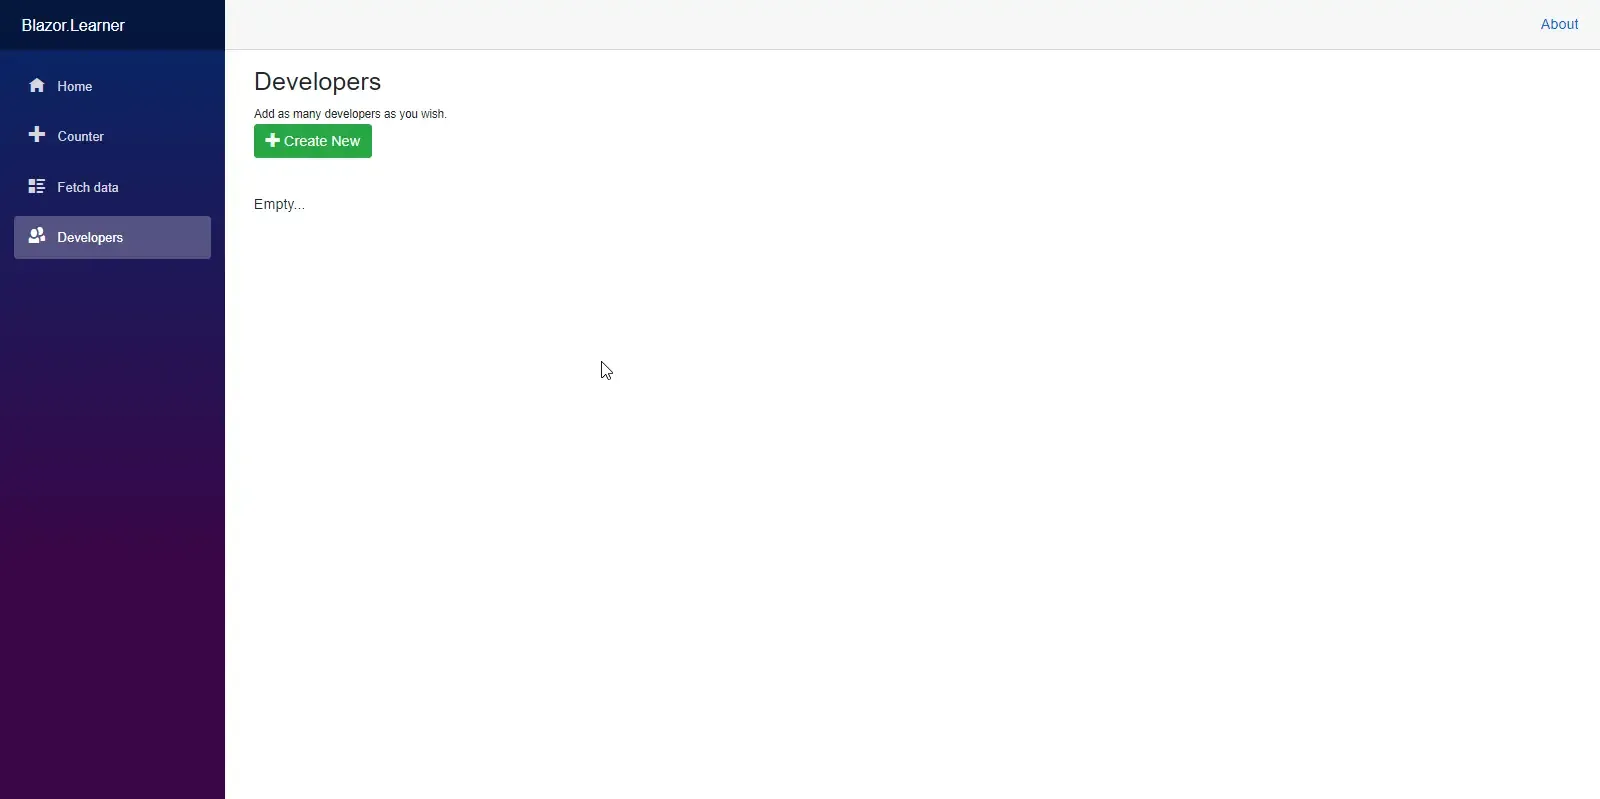
Your first CRUD Component ready in no time! :D You can see that we don’t have any record. Let’s add a Create Razor Component to be able to add new entries to the database.
But before that, we will have to build a common Form that will be shared by Create and Edit Componets.
Form Component
Add a new Razor component at Pages/Developer/Form.razor
<EditForm Model="@dev" OnValidSubmit="@OnValidSubmit">  <DataAnnotationsValidator />  <div class="form-group">    <label>First Name :</label>    <div>      <InputText @bind-Value="@dev.FirstName" />      <ValidationMessage For="@(() => dev.FirstName)" />    </div>  </div>  <div class="form-group ">    <div>      <label>Last Name :</label>      <div>        <InputText @bind-Value="@dev.LastName" />        <ValidationMessage For="@(() => dev.LastName)" />      </div>    </div>  </div>  <div class="form-group ">    <div>      <label>Email :</label>      <div>        <InputText @bind-Value="@dev.Email" />        <ValidationMessage For="@(() => dev.Email)" />      </div>    </div>  </div>  <div class="form-group ">    <div>      <label>Experience :</label>      <div>        <InputNumber @bind-Value="@dev.Experience" />        <ValidationMessage For="@(() => dev.Experience)" />      </div>    </div>  </div>
  <button type="submit" class="btn btn-success">@ButtonText</button></EditForm>
@code { [Parameter] public Developer dev { get; set; } [Parameter] public stringButtonText { get; set; } = "Save"; [Parameter] public EventCallbackOnValidSubmit { get; set; } }
Line 1 - EditForm tag that takes in a Developer Model and has a function call to submit.
Line 2 - Validation.
Line 3-9 - A Text Box for the First Name of the developer. Notice that we have bound it to the FirstName property of the model.
Line 28-36 - An Input for numbers.
Line 46 - Developer Object.
Line 47 - Button Text Caption Defaults.
Line 48 - Here is the Method to be called on submitting the form.
Thinking about this, I feel this is quite similar to the concepts of Interface and Concrete classes. Understand it this way. Form Component is the interface that has a blueprint of the properties and methods needed. And the Create/Edit component would be the Concrete class which has the actual implementation of the interface properties/methods. Doesn’t make sense? Read this paragraph again after going through the Create Component Section.
What is the Parameter tag for?
In Blazor, you can add parameters to any components by decorating them with a Parameter tag. What it does is, it becomes available for external components to pass in these parameters. In our case, we have defined the Developer object as the parameters of the Forms components. So, the other components that will use the Form Components, ie, the Create / Edit Components have an option to pass in the Developer object as a parameter to the Form Components. This helps high re-usability of components.
Create Component
Now, let’s start using the previously created Forms component. We will build an interdace for adding a new developer. Create a new Razor Component, Pages/Developer/Create.razor
@page "/developer/create" @inject HttpClient http @inject NavigationManageruriHelper
<h3>Create</h3>
<form  ButtonText="Create Developer"  dev="@dev"  OnValidSubmit="@CreateDeveloper"/>
@code { Developer dev = new Developer(); async Task CreateDeveloper() { awaithttp.PostAsJsonAsync("api/developer", dev); uriHelper.NavigateTo("developer"); }}
Line 1 - Component Route - ../developer/create
Line 7 - Here we are using the Form Component that we created earlier. To this component tag, we are passing parameters like Button Text, a new Blank Developer Object, and a method that is to be called when a user hits the Create Button of this component,
Line 14 - Post the Data to the DB.
Line 15 - Once Inserted, Navigate back to the FetchData component.
Let’s run the application now. Navigate to the Developers Tab and click on the Create Button. Here add in sample data and hit Create Developer.
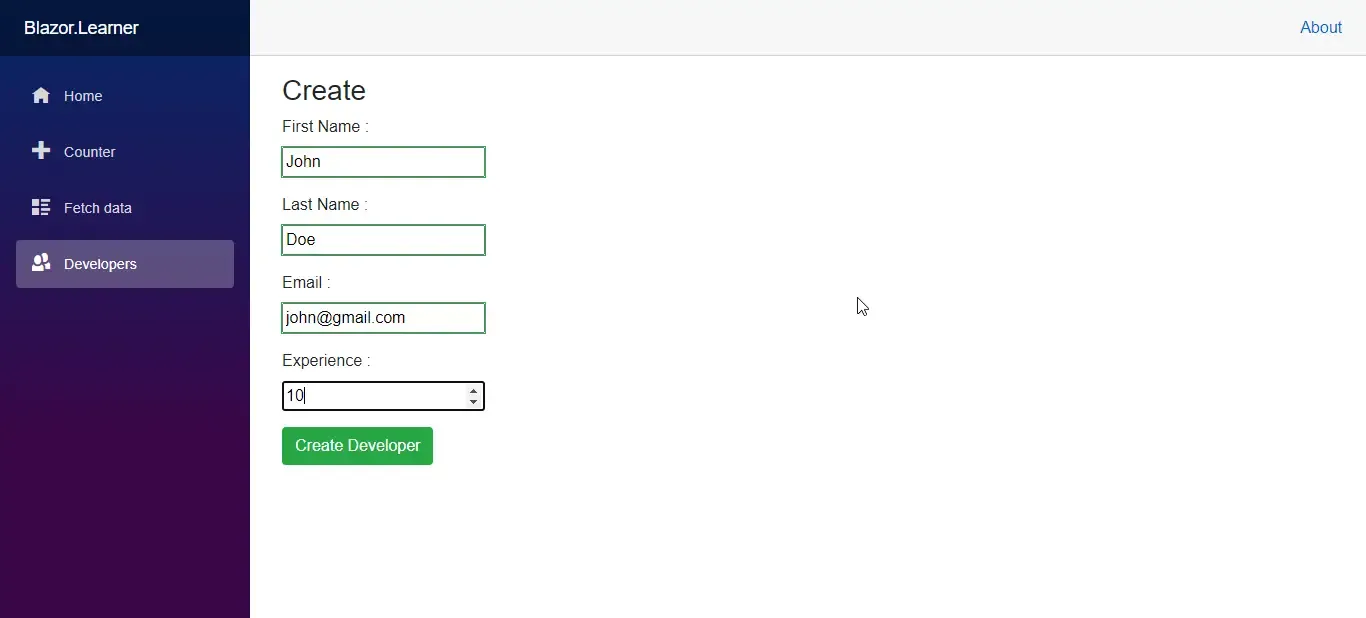
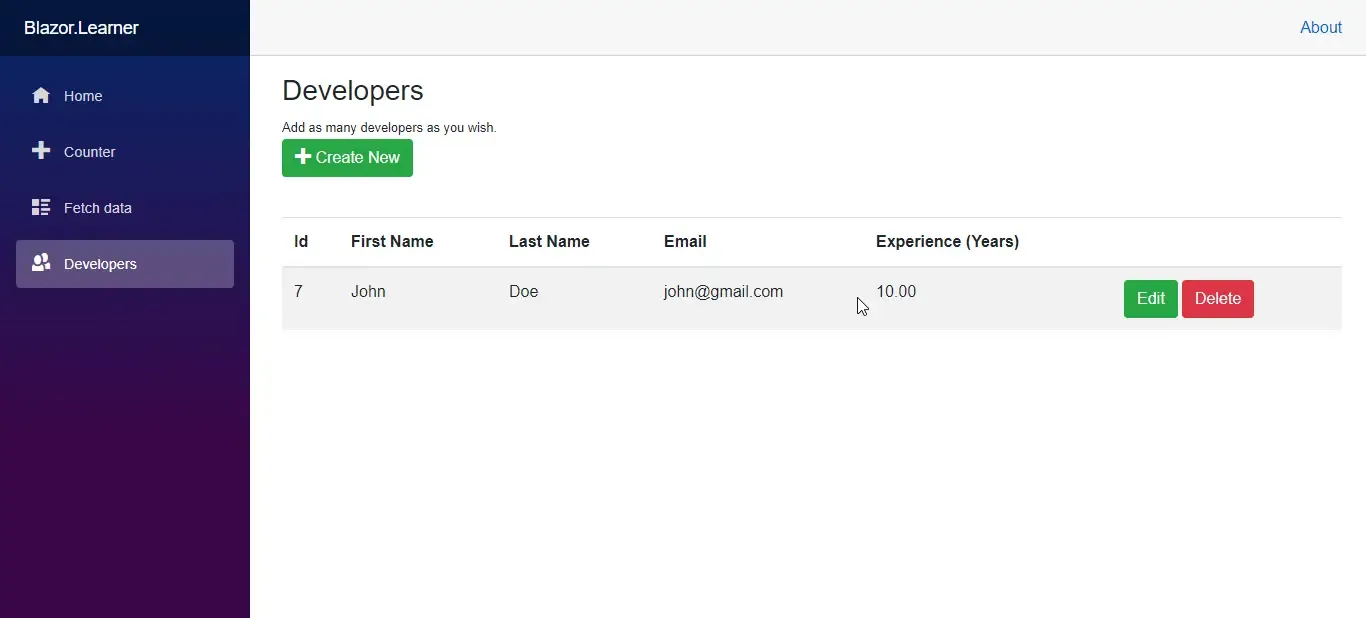
You will be amazed by the speed of the application. Quite smooth yeah? Also, we have built our Create Component quite well by now. Now let’s build our final component. Update.
Edit Component
Create a new Component under Pages/Developer/Edit.razor
@page "/developer/edit/{developerId:int}" @inject HttpClient http @injectNavigationManager uriHelper @inject IJSRuntime js
<h3>Edit</h3>
<form ButtonText="Update" dev="dev" OnValidSubmit="@EditDeveloper" />
@code { [Parameter] public int developerId { get; set; } Developer dev = newDeveloper(); protected async override Task OnParametersSetAsync() { dev = awaithttp.GetFromJsonAsync<Developer  >($"api/developer/{developerId}"); } async Task EditDeveloper() { await  http.PutAsJsonAsync("api/developer", dev); await js.InvokeVoidAsync("alert",  $"Updated Successfully!"); uriHelper.NavigateTo("developer"); } }</Developer>
Line 1 - Component Route - ../developer/edit/{id}
Line 7 - Similar to the precious Create Component, we will use the Forms Component
Line 17 - On getting the parameter from the URL, ie, the developer Id, we retrieve that particular record from our API endpoint. This data will be filled on the form by default.
Line 20- 26 - The method that fires up when the user clicks on the Update Button.
Line 22 - Post the Edited data to the API.
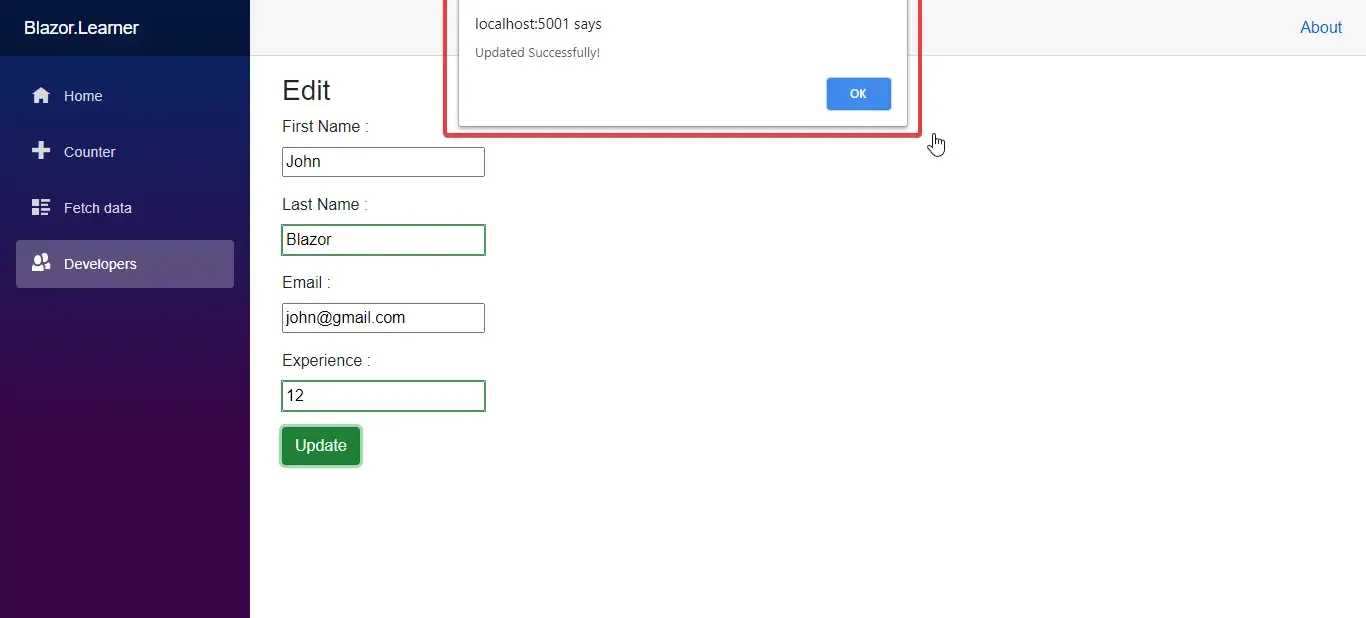
Line 23 - Displays an alert message showing “Updated Successfully!”
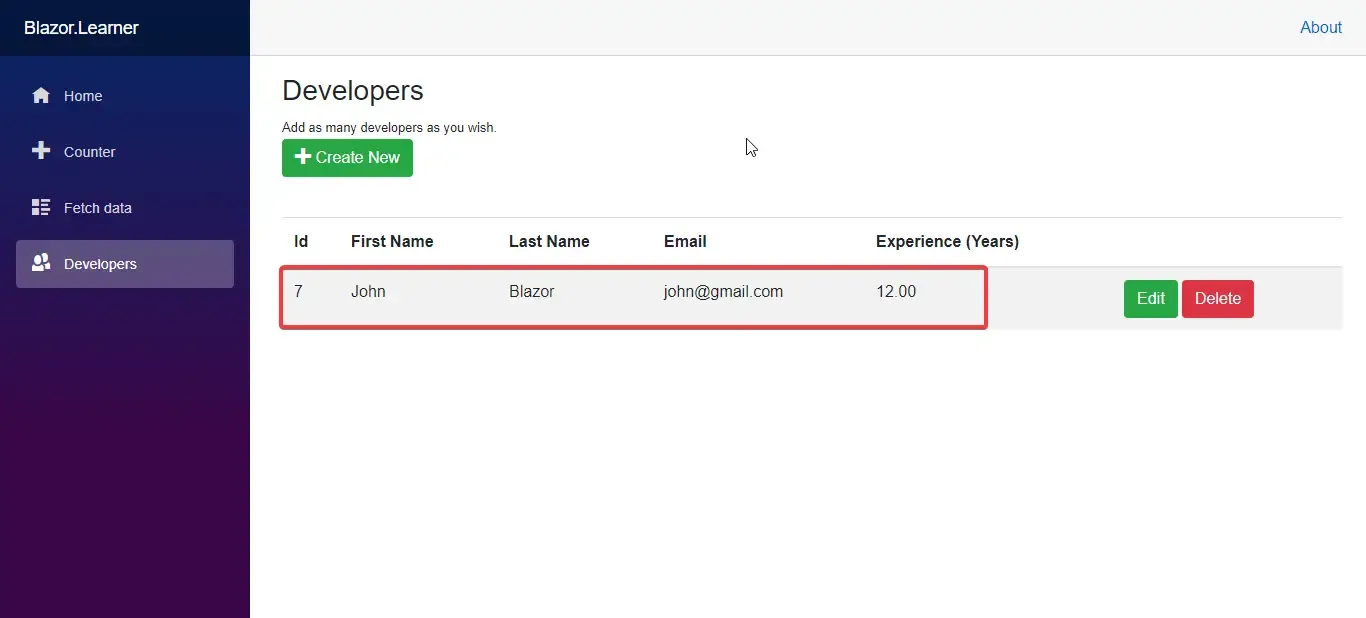
Line 24 - Redirects to the FetchData component.
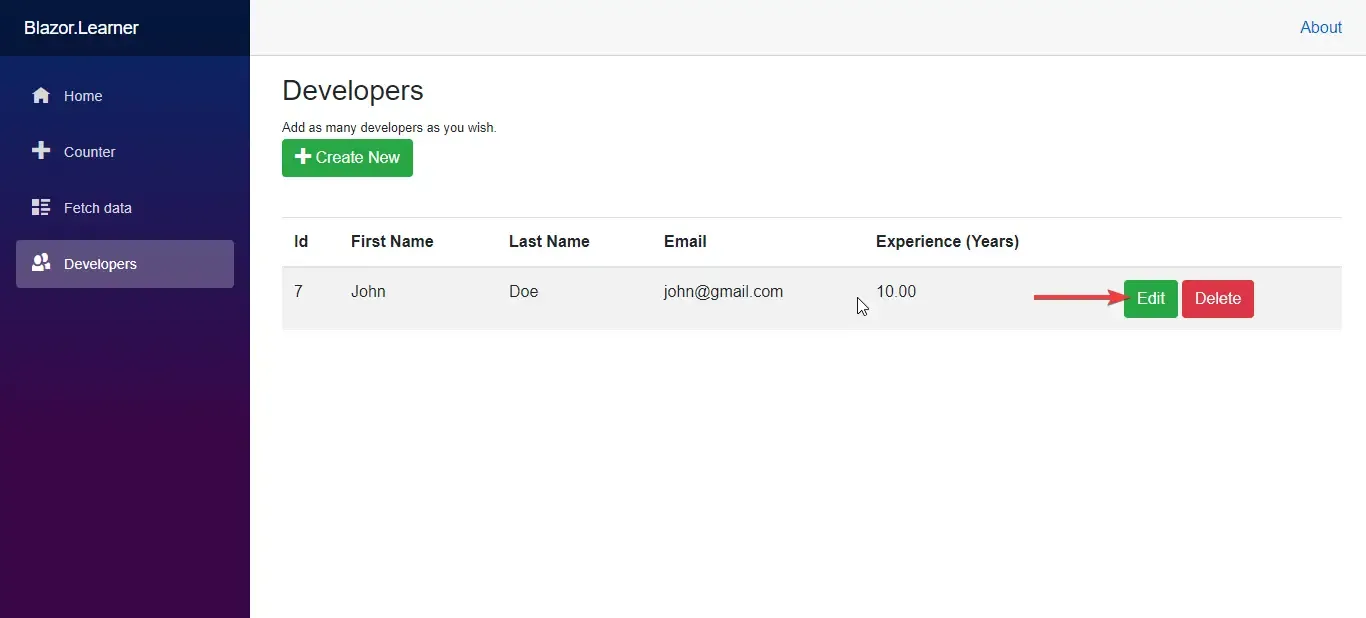
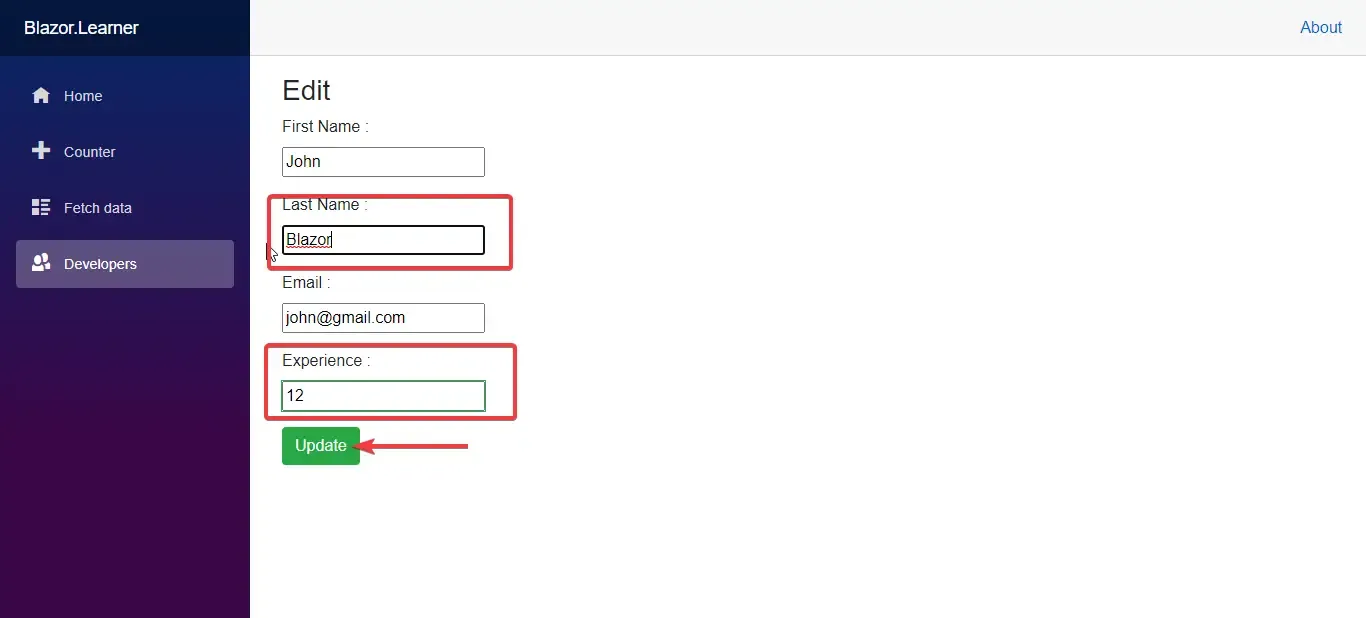
Let’s run the application. Navigate to Developers. and follow the below steps.
Bonus Resource
If you liked this article, I am sure that you would love this too - Implementing Blazor CRUD using Mudblazor Component Library in .NET 5 – Detailed Guide. Here I talk about implementing the same CRUD operations, but with one of the coolest component libraries for Blazor.
Summary of Blazor CRUD Application
By now we are able to Create a Complete Blazor CRUD Application from scratch. It was quite easy too, yeah? We have covered basic concepts of Blazor CRUD and it’s tags and component reusability. We have also seen a good practice folder structure that is quite applicable for Blazor CRUD Applications in general. I hope you guys have understood and enjoyed this detailed tutorial. You can find the completed source code here. As the next step, we will try to implement JWT Authentication in this same Blazor CRUD Project. We will be doing this in the next of the Blazor Blog Series.
More Blazor Action!
I managed to put together a complete Blazor WASM 5.0 Project Template which you can install onto your machines and start generating Complete Blazor WebAssembly Project with just one line of CLI Code! Do check it out.
Here is video as well, that takes you in-depth into Blazor Hero. Do Like and Subscribe to my YouTube channel for more content,
https://www.youtube.com/watch?v=j7BxKN7HYjk
How do you like my Blazor Blog Series? Is it easy to grasp? Do you have any other queries/suggestions for me? Feel free to leave them below in the comments section. Happy Coding :D

