In this article, we will explore how to implement response caching in ASP.NET Core applications using MediatR’s Pipeline Behaviors. MediatR is an essential library for .NET developers that significantly simplifies application architecture while providing complete control. I have previously written articles about MediatR, highlighting why it’s a must-use tool for .NET developers. Now, we’ll dive deeper into its capabilities by demonstrating response caching to improve application performance and efficiency.
Before diving into this article, I assume you are familiar with MediatR and its pipeline behaviors. If not, I recommend checking out the following articles to get up to speed. Cheers!
What’s Response Caching with MediatR?
In a previous article, we discussed the Pipeline Behavior of MediatR and how Logging and Validation of Requests can be implemented. In this post, we will take it a step further and implement caching in the MediatR pipeline. This means that every response sent out from your application (API) will be cached with a very simple implementation.
Caching can be a lifesaver for any application. It helps reduce the round-trip time from the client to the server and then to the database, potentially saving you significant costs by minimizing database calls. When it comes to caching in ASP.NET Core, you have several options available. Some of these include:
However, the decision on where the caching happens is quite vital. Several questions can arise when dealing with caching:
- How long should the cache stay?
- Which part of the application flow should be responsible for caching?
- How can you bypass the cache if needed?
- Do you need to write cache code throughout the application, or is there a simpler way?
- How can you invalidate the cache if necessary?
MediatR Pipeline Behavior is the answer for all these questions. Given that you are already using CQRS with MediatR, why not use it to its complete potential.
Whenever you send a query to MediatR Handlers, your request and response have to go through the MediatR Pipeline. This means, when you send a query request to the application, your request goes into the application scope through the MediatR pipeline. This would be an ideal spot to place your validation logic, right?
Similarly, once the application sends the response back to the client, it passes through the MediatR middleware. Isn’t this the ideal spot to place code that can cache the response? By caching the response at the pipeline level, any similar request coming into the application can check if the required response is available in the cache store and fetch it. Only if the cache data is not present does the request proceed to your MediatR handlers and then to the database. Get it?
Implementing this concept can:
- Drastically reduce your application response time.
- Improve user experience.
- Decrease the load on the API server and database server.
- Save you money.
What we will build?
To demonstrate Response Caching with MediatR in ASP.NET Core, we will build an ASP.NET Core 8 Web API. The use case of this application - a simple API with a /products endpoint that can return a list of products and a single product detail as well. To keep this guide simple, we will re-use the CRUD API that we built earlier using ASP.NET Core 8 and MediatR in one of our previous article.
To this existing codebase, we will introduce a layer of caching within the MediatR Pipeline, so that every time a requests comes in, the pipeline first checks the cache store if any suitable / valid records can be returned from the cache memory, before actually hitting the database.
Let’s get started.
Getting started with Caching with MediatR in ASP.NET Core
As mentioned earlier, we will be re-using the source code from a previous MediatR implementation. In this API you will have a couple of CRUD Operations, connected to an in-memory database with around 3 default records in the database. MediatR / CQRS Handlers are also included in this API Project. You can grab the initial source code from here.
Installing the Required Packages
Here are the NuGet packages required for the entire implementation.
Install-Package MediatRInstall-Package Microsoft.EntityFrameworkCoreInstall-Package Microsoft.EntityFrameworkCore.InMemoryAdding the ICacheable Interface
Create a folder named Caching and add an interface ICacheable.
public interface ICacheable{ bool BypassCache { get; } string CacheKey { get; } int SlidingExpirationInMinutes { get; } int AbsoluteExpirationInMinutes { get; }}This interface includes properties that come handy while writing caching logics. Remember that this interface will be inherited by the MediatR Requests whenever required.
BypassCache- determines if you want to skip caching and go directly to the database/datastore.CacheKey- specifies a unique cache key for each similar requestSlidingExpirationInMinutes- if the cache record is not accessed for this period of time, it will be refreshed.AbsoluteExpirationInMinutes- time in minutes
Implementing the Caching Behavior - Explained
Create a new class and name it CachingBehavior within the Caching Folder. This piece of code is going to the star of the entire implementation.
1public class CachingBehavior<TRequest, TResponse>(2    ILogger<CachingBehavior<TRequest, TResponse>> logger,3    IDistributedCache cache4    )5    : IPipelineBehavior<TRequest, TResponse>6    where TRequest : ICacheable7{8    public async Task<TResponse> Handle(TRequest request, RequestHandlerDelegate<TResponse> next, CancellationToken cancellationToken)9    {10        TResponse response;11        if (request.BypassCache) return await next();12        async Task<TResponse> GetResponseAndAddToCache()13        {14            response = await next();15            if (response != null)16            {17                var slidingExpiration = request.SlidingExpirationInMinutes == 0 ? 30 : request.SlidingExpirationInMinutes;18                var absoluteExpiration = request.AbsoluteExpirationInMinutes == 0 ? 60 : request.AbsoluteExpirationInMinutes;19                var options = new DistributedCacheEntryOptions()20                    .SetSlidingExpiration(TimeSpan.FromMinutes(slidingExpiration))21                    .SetAbsoluteExpiration(TimeSpan.FromMinutes(absoluteExpiration));22
23                var serializedData = Encoding.Default.GetBytes(JsonSerializer.Serialize(response));24                await cache.SetAsync(request.CacheKey, serializedData, options, cancellationToken);25            }26            return response;27        }28        var cachedResponse = await cache.GetAsync(request.CacheKey, cancellationToken);29        if (cachedResponse != null)30        {31            response = JsonSerializer.Deserialize<TResponse>(Encoding.Default.GetString(cachedResponse))!;32            logger.LogInformation("fetched from cache with key : {CacheKey}", request.CacheKey);33            cache.Refresh(request.CacheKey);34        }35        else36        {37            response = await GetResponseAndAddToCache();38            logger.LogInformation("added to cache with key : {CacheKey}", request.CacheKey);39        }40        return response;41    }42}
Let’s understand the code.
We will be using IDistributedCache for this implementation, but tying it to an in-memory cache store. More about this while adding the Distributed Cache to the Service Container.
Line 6 ensures that the incoming request will be of type ICacheable, which we have defined earlier. In the next step, we will be adding this interface to the GetProductQuery class.
Line 11, if the BypassCache is enabled, we simply skip this entire pipeline, and return.
From Lines 12 to 27 we have an inline function which will be called from Line 37. This function is responsible to execute the actual database call service, and add the response to the cache store. response = await next(); returns the response from within the application. If the response has data in it, then we configure the DistributedCacheEntryOptions with the sliding expiration, and the absolute expiration periods. Then we serialize the response, and set it to the cache store using the cache key.
At line 28, we try to fetch the data from cache. If data is present, then we deserialize the cached data to the intended type, and return it to the client instead of proceeding with the internal application call. This means saving time, as well as costs. In our case we will be calling the In-Memory Database. There will be significant efficiency improvements when your application will be tied to a real life production database.
We will also be refreshing the cache, which internally would reset the sliding expiration timeout.
If the data is not present in the cache memory, then we call the above-mentioned inline function, and set the cache memory. In Case as similar request comes through at a later point in time, we will be returning it directly from the cache store.
Updating the Requests
Next, let’s update the GetProductQuery class.
public record GetProductQuery(Guid Id) : IRequest<ProductDto>, ICacheable{    public bool BypassCache => false;
    public string CacheKey => $"product:{Id}";
    public int SlidingExpirationInMinutes => 30;
    public int AbsoluteExpirationInMinutes => 60;}
As you see, wherever you need the caching behavior, we can simply add ICacheable interface signature, which will force you to define the 4 properties of the interface. In this case, we have set the BypassCache flag to false, formed the cache key using the incoming ID, and set the sliding and absolute expirations. This lets you control the caching behavior at a very granular level.
Updating the Registrations
Navigate to Program.cs and update the following.
builder.Services.AddMediatR(cfg =>{ cfg.RegisterServicesFromAssembly(Assembly.GetExecutingAssembly()); cfg.AddOpenBehavior(typeof(CachingBehavior<,>));});builder.Services.AddDistributedMemoryCache();We will be adding the Caching Behavior to the DI Container, as well as Adding the Distributed Memory Cache.
Testing with Swagger
That should be everything needed for our implementation. Let’s do some quick tests with Swagger to validate our implementation.
Quick Hack: As response time is an important parameter to our test, you can easily enable the Response Duration in Swagger UI by the following code change in the Program.cs file.
app.UseSwagger();app.UseSwaggerUI(options =>{ options.DisplayRequestDuration();});Build and run the application. We will be testing the Get Product By ID Endpoint.

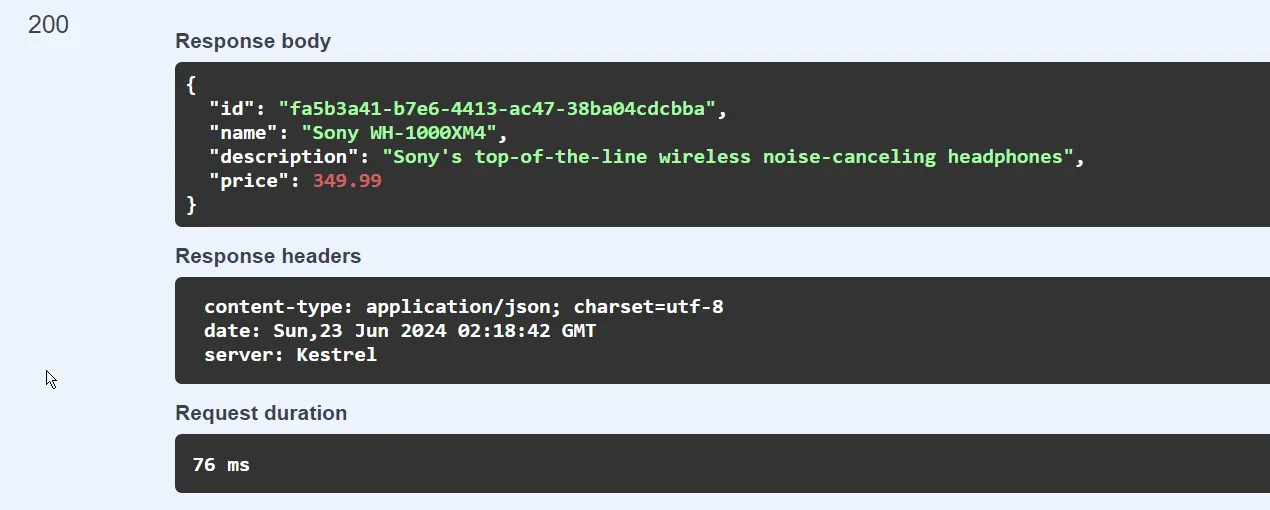
This takes about 80 ms to return the response.
By design, as soon as this API endpoint is hit for the first time, with a particular Product ID, we expect the response to be cached, and be served from the in-memory datastore during the next call. Let’s see.
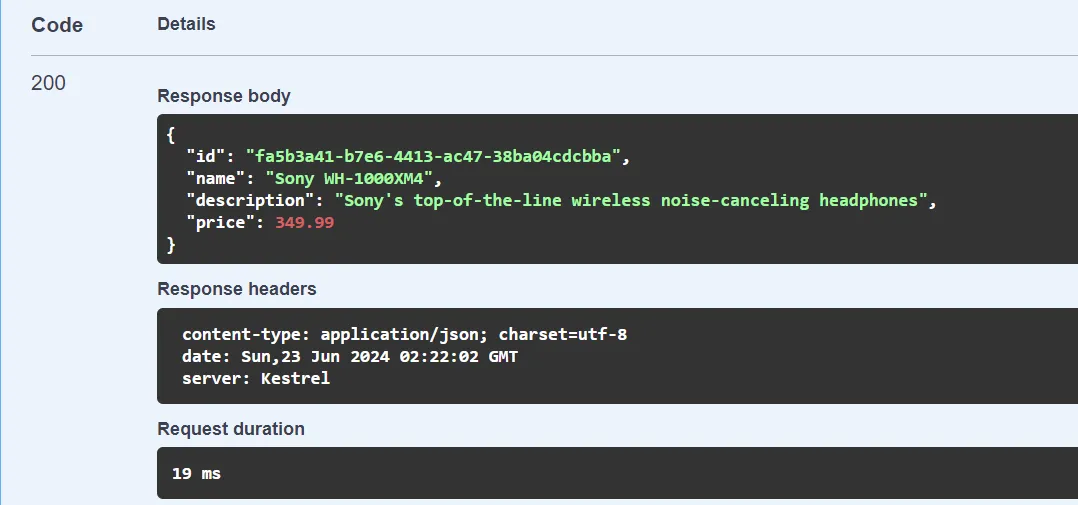
We will hit the endpoint with the same request again.

Now you can see the response time has gone down to under 20 ms. The difference would be significantly larger if you connect to a PostgreSQL or MSSQL Database server instead of an application-memory database.
Other Enhancements to this approach include:
- You can allow the client/API consumer to decide whether they need cached data or not, by exposing the
BypassCacheparameter to the API endpoint. This would be more practical. - Cache invalidation should happen whenever there is Write operation to the associated data store. This avoids the data inconsistency issue with caching.
That’s all for now. Let’s wrap up the article.
Summary
In this article, we have learned an awesome way to implement Caching Behavior with MediatR in ASP.NET Core applications in a powerful yet simple way. We took advantage of MediatR’s Pipeline behavior to implement this. There are many more use-cases for the MediatR pipeline. What’s your favorite? You can also find the complete source code on my GitHub here. Have any suggestions or questions? Feel free to leave them in the comment section below. Thanks and Happy Coding! 😀

