In this article, we will learn about deploying Blazor WebAssembly to AWS S3 in just a couple of simple steps. Once deployed, we will also go through the AWS CloudFront, which is a CDN service that is going to help speed up the delivery of your Blazor standalone website to your visitors.
Blazor is .NET’s answer to building Single Page Applications using C#. It supports both server-side and client-side rendering. In this particular article, we will focus on deploying Blazor WebAssembly to Amazon Web Service’s Simple Storage Service aka S3. I have written a couple of blogs/tutorials around Blazor.
Watch the Video:
AWS S3 is a cloud-based object storage solution service provided by AWS to help developers and companies by providing scalable and reliable ways of storing data. Previously I have written an article about uploading and managing objects in S3 using the AWS SDK in .NET applications (you can read the article here). Apart from this, S3 can also be used to host static websites, which makes it an ideal candidate to host Blazor WebAssembly applications.
We will also get introduced to AWS CloudFront, which can be used to reduce the latency of delivery of your website content. If you are going to get a pretty decent visitor count on your Blazor website that’s hosted on S3, there can be a considerable amount of delays in serving multiple requests from your users. In order to combat this, we will link your S3 bucket to AWS CloudFront distribution, which is a CDN service of AWS, that helps you distribute your static content with high speeds to almost 400+ global regions. This ensures that your content is served faster to your audience. More about this later in the article.
This article is sponsored by AWS. Huge thanks for helping me produce more .NET on AWS content!
Prerequisites
You need to have the following to get started with deploying Blazor WebAssembly to AWS S3.
- .NET 6 SDK Installed on your machine. Download from here.
- An AWS Account. Get it for free from here - https://aws.amazon.com/free
- Basic understanding of relevant AWS Services.
- AWS CLI is Installed and configured on your machine, with permission to perform operations on AWS S3.
If you have not yet configured your AWS Credentials on your machine, here is a video tutorial to get you started. Refer to the video’s ‘AWS CLI & Profiles’ section. This is the ideal & preferred approach for AWS Credentials configurations when you are doing local development. Watch the video - https://www.youtube.com/watch?v=oY0-1mj4oCo
Benefits of Deploying Blazor WebAssembly to AWS S3
First up, if you need a static standalone website, probably as a tool to serve some kind of documentation, Blazor WebAssembly is a terrific option! Blazor is a very powerful web development framework that helps developers build high-performance web applications using C#. If your application is quite static and does not have much dynamic content, it always makes sense to deploy to a static web host. This is where AWS S3 comes in.
- Cost Effective - AWS S3 offers a cost-effective storage solution that is at the same time quite scalable. You get almost 5GB of storage included in the free tier, with almost 20,000 requests. And if you have exhausted your free tier limit, the standard charges are just about $0.023 per GB, which is pretty economical.
- Scalable - Both AWS S3 and CloudFront are managed services that are very scalable. You don’t have to do much work on the service administration part when you see a sudden spike in your website traffic.
- Global Availability - AWS CloudFront helps your application be available in locations all over the globe. This results in faster page load times for your Blazor application.
- Easy Deployment - If you have your Blazor application developed, it would probably take under 5 mins to deploy the entire thing. It’s also very easy to automate the entire process with some kind of CD pipeline, maybe with GitHub actions.
Building a Blazor WebAssembly application
We are not going to do anything fancy here. Just a simple standard Blazor WebAssembly application. Open up Visual Studio and create a new Blazor WebAssembly Project. I named mine as StaticBlazor.
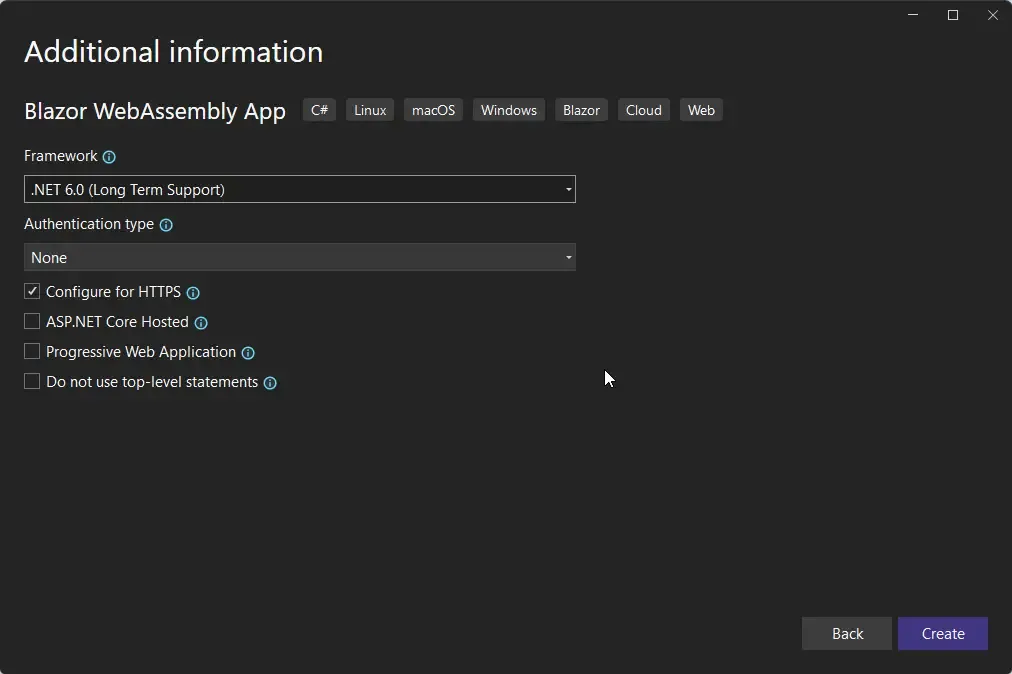
From here on, you can make modifications to build your own Blazor WebAssembly applications, and even include some external API calls if needed. For this tutorial, I am going to skip all that, just add pretty minor changes to the default Blazor Application and assume that this is my production-ready Blazor standalone WebAssembly Application.
With that done, let’s look into the ways to push the required files to AWS S3. Firstly, let’s create a new S3 Bucket.
Creating an S3 Bucket
Login to your AWS Management Console and navigate to AWS S3.
To get a basic understanding of how S3 works (especially if you are a .NET Developer), please refer to this blog post.
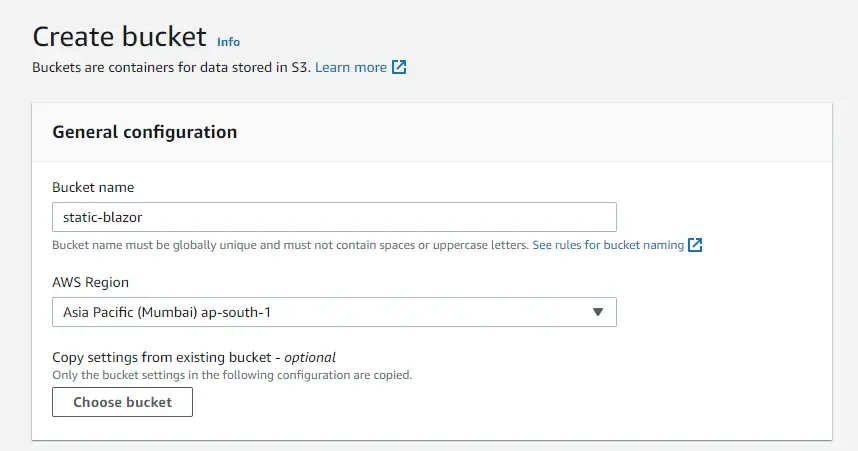
Here, click on create a bucket and give your bucket a unique name. I named mine static-blazor. Also, there is one more consideration while creating an S3 bucket that is going to be used to serve static websites. We will have to ensure that you are creating this bucket at an AWS region that closely relates to your audience. For this example, since I am based in India, I set my AWS region to ap-south-1. Note that later in this article, we will add a CDN to improve the content delivery even more.
Permissions & Policies
Also, since the website is going to be hosted for public access, ensure that you have unticked the “Block all public access” option. There are other optional additions like adding tags and stuff. For now, you can go ahead and create the bucket. Note that once we add the AWS CloudFront later in the article, we will no longer need the S3 Bucket to be publicly accessible. For now, let’s make it public.
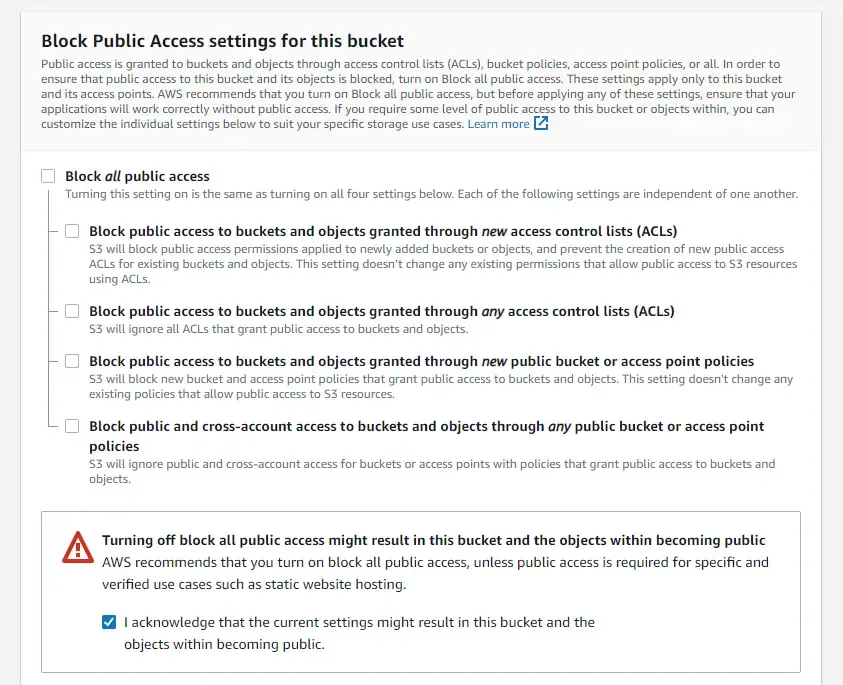
Once your new S3 bucket is provisioned, open it up and navigate to the Permissions tab. Here, we will add a new bucket policy to allow access to s3 objects of this bucket. Add the following policy.
{ "Version": "2012-10-17", "Statement": [ { "Sid": "Stmt1677339806714", "Effect": "Allow", "Principal": "*", "Action": "s3:GetObject", "Resource": "arn:aws:s3:::static-blazor/*" } ]}The above essentially means that you are allowing the s3:GetObject action over the static-blazor/ bucket resource. That’s all the permissions we need to take care of.
Uploading Blazor Artifacts to AWS S3 Bucket
Before configuring the bucket to allow static website hosting, let’s first upload all the required blazor files. There are 2 approaches to this. You can either use the Management Console UI for this, or cli commands for this.
But before all of this, what exactly are the files needed? You need to run a simple .NET CLI Publish command for this. Navigate to the root of your new Blazor WASM Project folder and open up a terminal. Run the following code.
dotnet publish -c ReleaseThis would publish your Blazor Artifacts in the Release mode. Once done, the required files will be available at \bin\Release\net6.0\publish\wwwroot.

Now that we have the required files, let’s upload them!
Let me first show you the Management Console way of doing things. Simply open up your bucket, drag-and-drop the entire content of wwwroot folder, and simply click upload. That’s it!
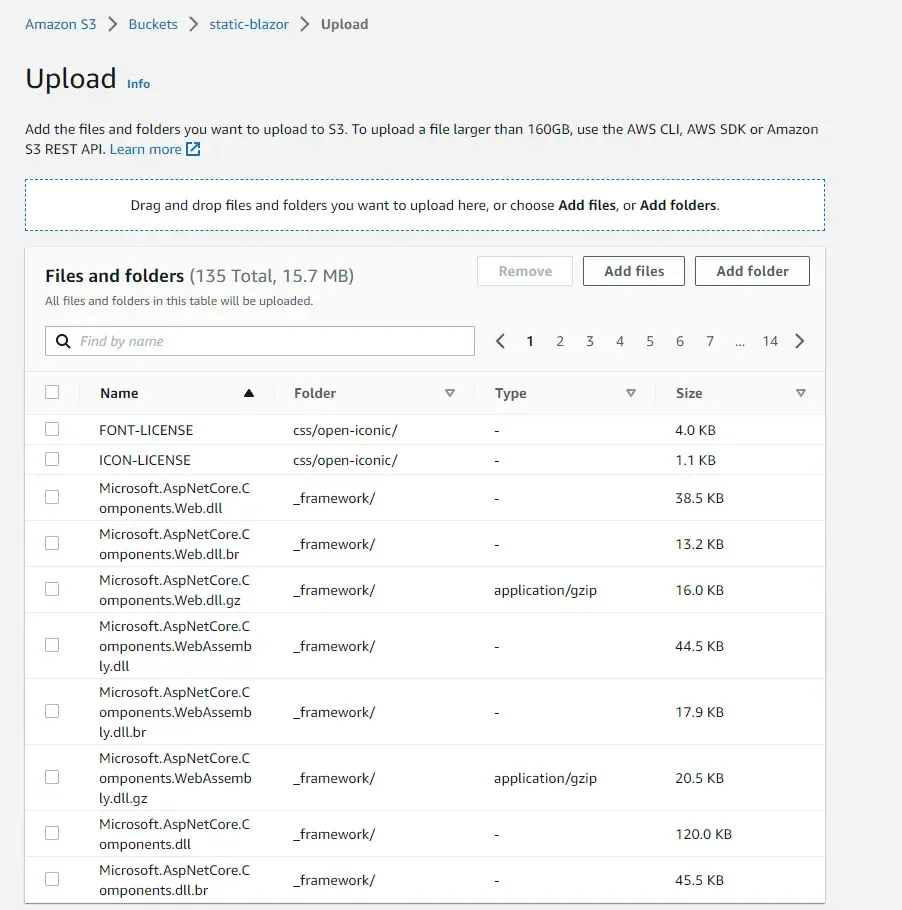
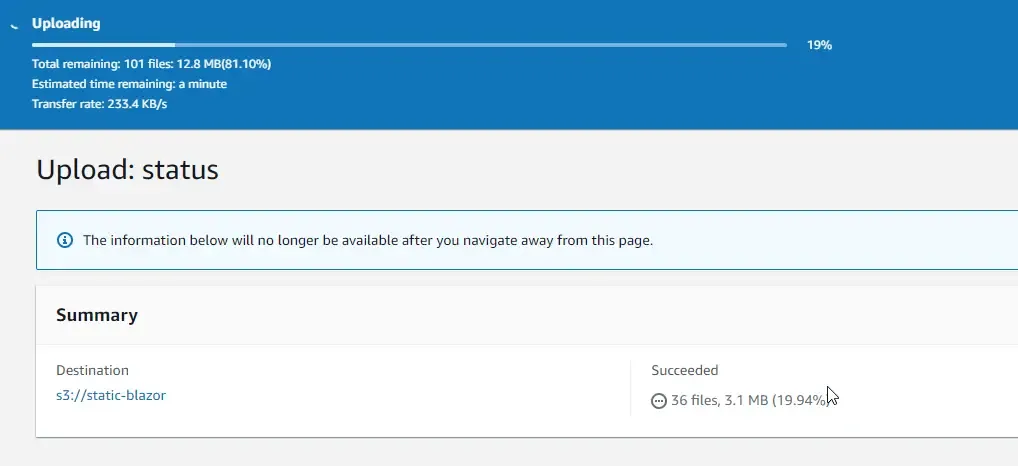
If you are willing to upload at the CLI level, here’s the command for it. Ensure that you are running this command from the wwwroot folder only.
aws s3 sync ./ s3://static-blazor/ --deleteSo, what this does is, using the AWS CLI tools, it invokes the sync command of S3 API. Here is the command for a general understanding.
aws s3 sync <source> <destination> --deleteIn our context, our source folder will be the local wwwroot folder, and the destination will be the root folder of our S3 Bucket. The —delete option signifies that if there are any files in the destination path, which are not available at the source path, they would be deleted. This ensures that the content of both paths is always in sync.
Enabling Static Website Hosting in AWS S3
Now that we have uploaded the required files to our S3 Bucket, let’s make sure that the bucket supports static hosting. For this, open up the bucket and navigate to the Properties tab, and scroll to the bottom. You will see the static website hosting option. Click on Edit.
Here, make the following changes:
- Select the Enable flag for static web hosting.
- For hosting type, select Host a static website.
- For the Index document, mention it as index.html
- For error documents too, type in index.html. What this means is that, if there are any server-level errors, it will be redirected to the index.html, in our case, it’s a Blazor file, which will throw a nice error UI as well.
Attaching a screenshot for your reference.
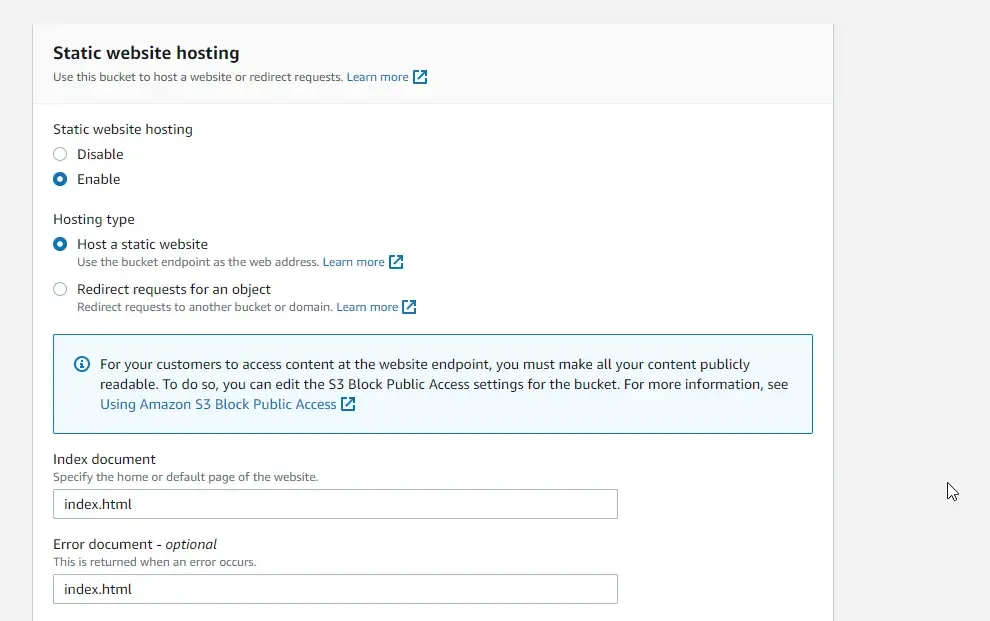
Save these settings, and go back to the Properties and tab and scroll down to the Static Web Hosting option. Now you will be able to see the Bucket website’s endpoint!

Open it up. As expected, you can your brand new Blazor application running on a URL like static-blazor.s3-website.ap-south-1.amazonaws.com, full-fledged!
Getting Started with AWS CloudFront - CDN
Let’s talk about scaling now. Imagine that our StaticBlazor project got popular and started hitting multiple thousand visitors every day. Now that we are requesting the files directly from S3 and the fact that our visitors could be from any part of the globe, the rate at which AWS S3 can serve the static website might vary. This often leads to an increase in delays between requests.
We will fix this by adding a CDN layer above our Blazor Application in the AWS World! As discussed earlier, let’s create an AWS CloudFront distribution for this!
Remember the part earlier where we made our S3 Bucket public? You wouldn’t need that after you put the CloudFront layer. You can go ahead and make your S3 Bucket private again. Note that this will make your existing Static website hosting url invalid and will throw a 403 Access Denied Exception, as your bucket is no longer public. In this case, you can even go ahead and actually disable the Static Website Hosting configuration of your S3 Bucket, as it will be internally handled by our AWS CloudFront once we have done the setup.
AWS CloudFront is a CDN Service provided by AWS, that helps in delivering data at low latency and high transfer speeds. Login to AWS Management Console and open up AWS CloudFront.
Click on Create a CloudFront Distribution. Here, at the origin domain, we will have to choose our S3 Bucket. Under Origin Access, select the recommended option, Original access control settings.
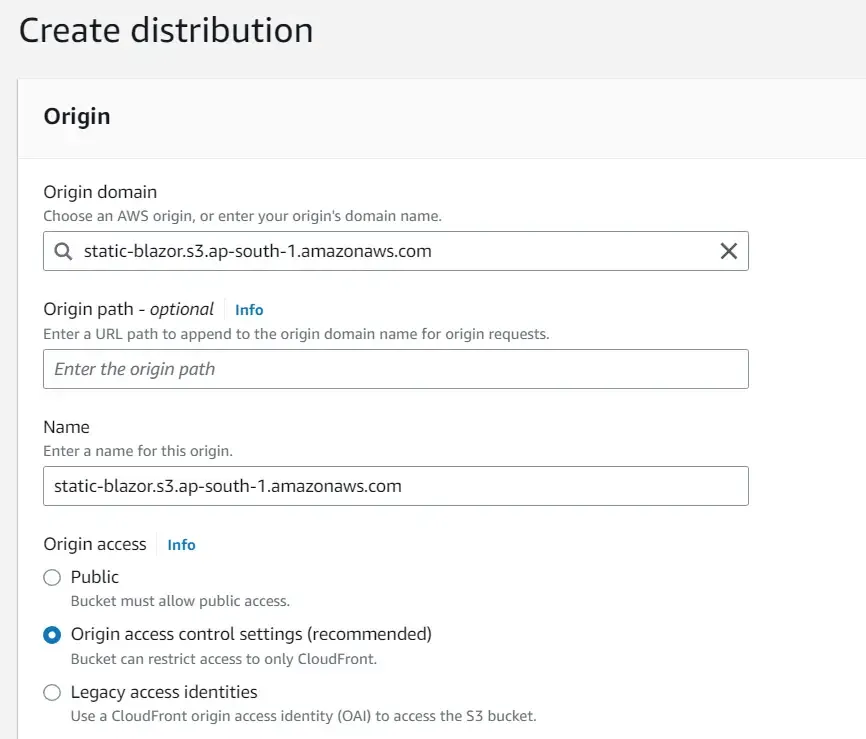
For this, you will have to create a new control setting that will allow CloudFront to actually access your S3 bucket. Remember that we recently made our S3 bucket private? Click on create control setting.
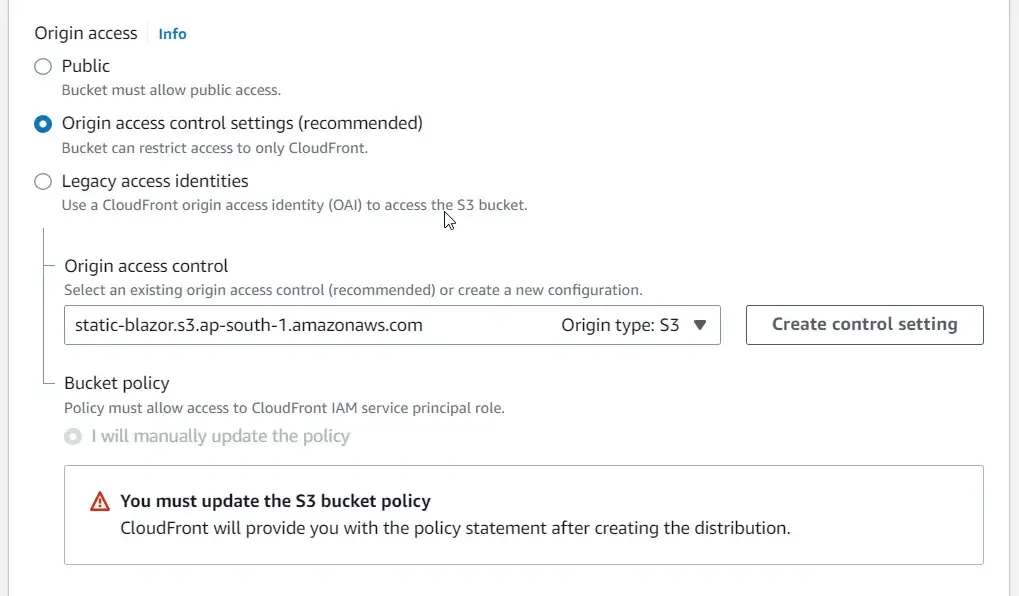
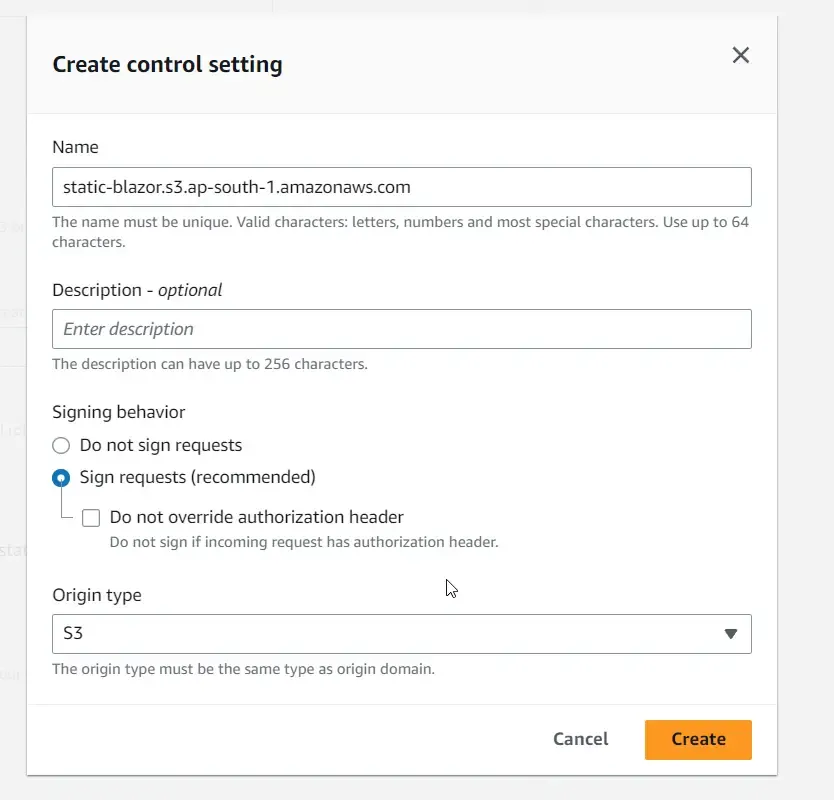
Ensure that the Origin type is S3 here. Click on save. At a later point in time, you will have to edit the bucket policy of your s3 bucket and add a new one to allow AWS CloudFront. Don’t worry, once the CloudFront distribution is created, you will be given an auto-generated policy which you have to copy and paste into your S3 Bucket’s policy. For now, create this.
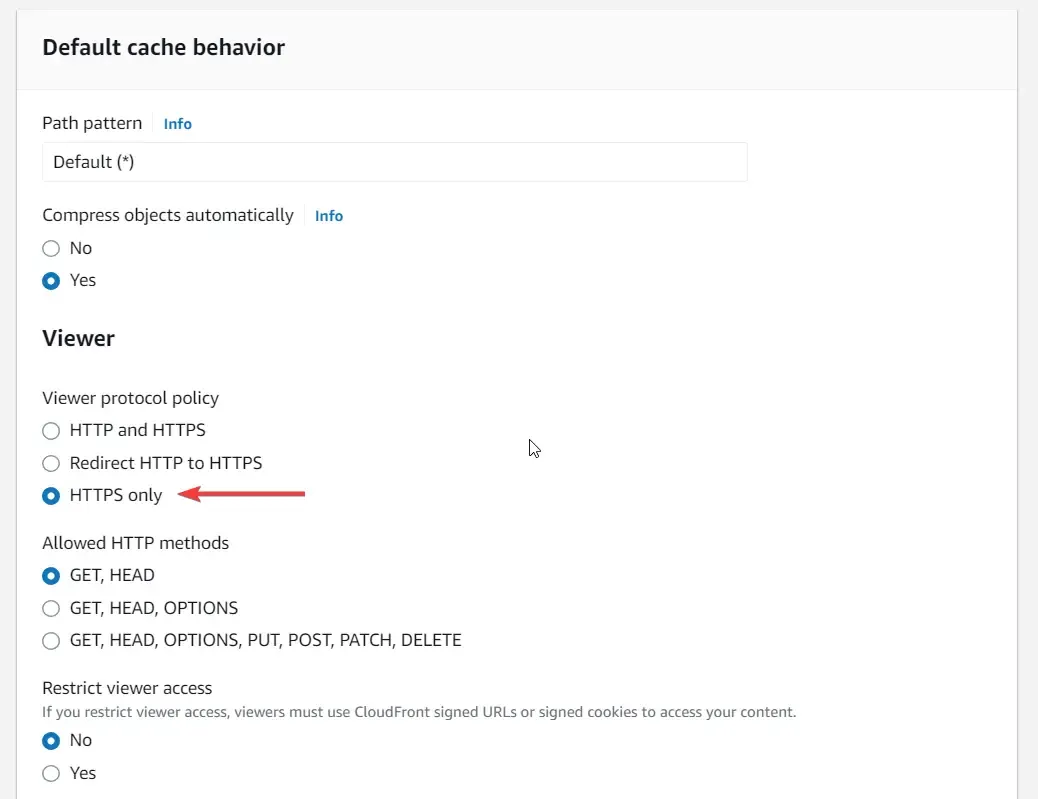
Apart from these changes, also make sure that you have HTTPS only enabled.
Next, under the default root object, mention index.html. You can leave the other settings to default and create the AWS CloudFront Distribution!
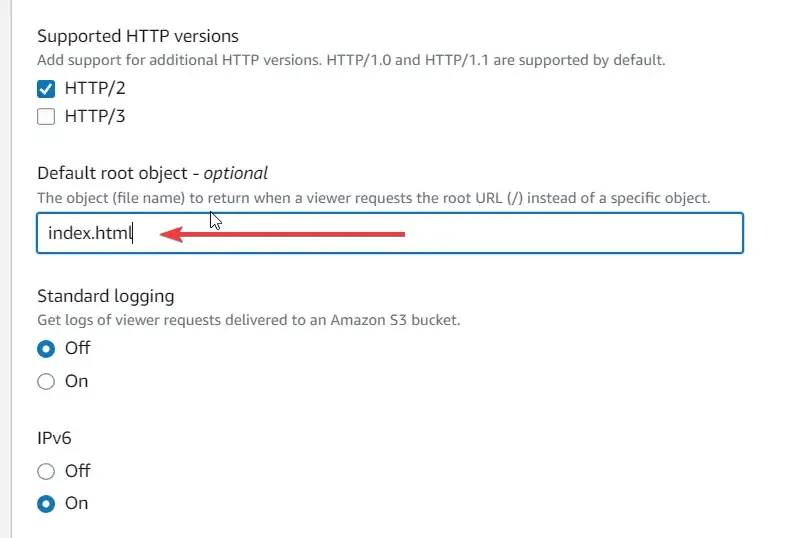
Once the Distribution is created, you will be prompted to copy the generated policy. Click to copy and navigate to the S3 Bucket where we have uploaded our Blazor artifacts.

It would look somewhat like this.
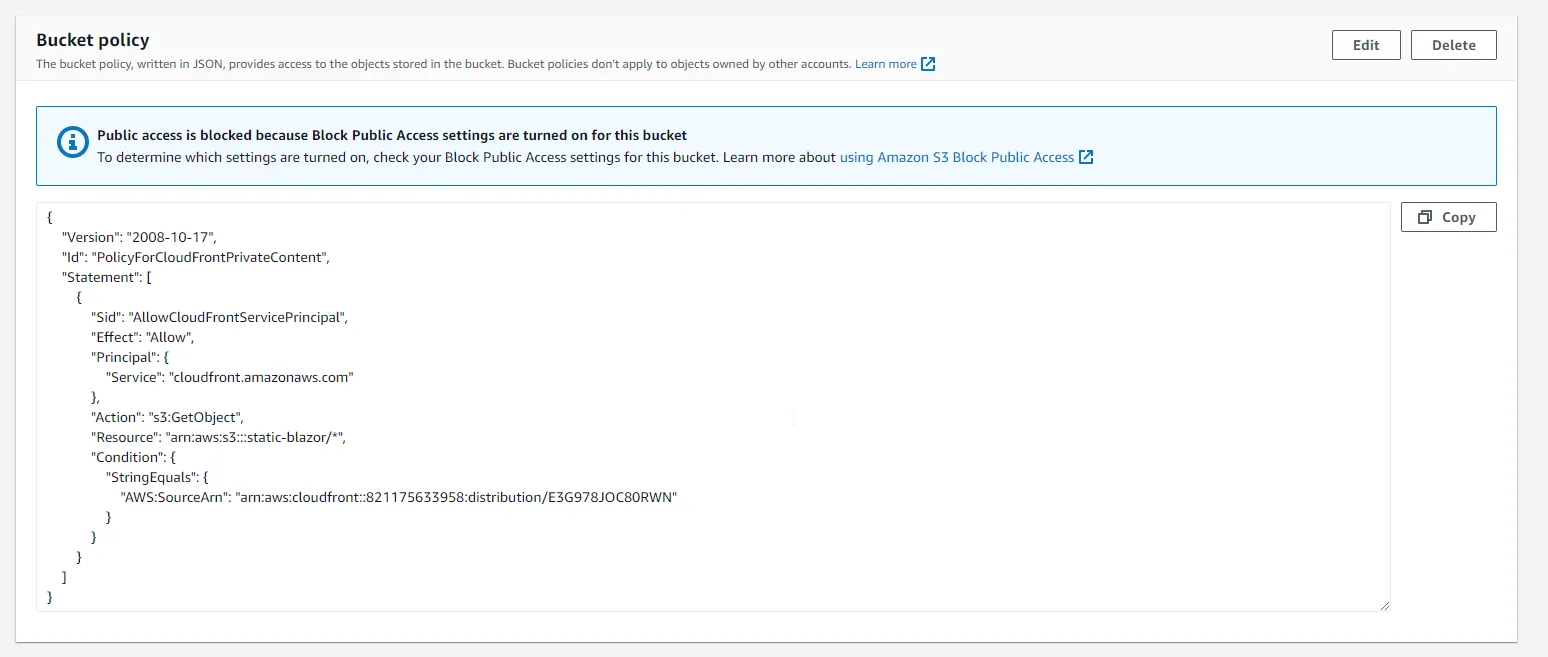
That’s almost it! While testing this, I faced a small issue, where-in my application was accessible at the URL, but at <url>/counter, I was getting a 403 exception. To solve this, I had to add custom error pages/responses for both error code 403 and 404. Open up the CloudFront Distribution and navigate to the Error pages tab, and add the following custom error responses.

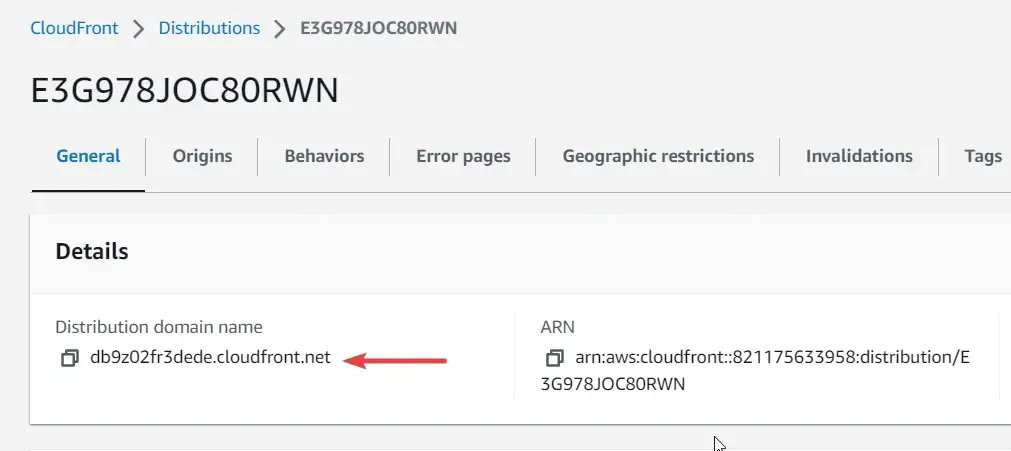
That’s it! Go back to the general tab. Here you will be able to get the URL of your Blazor WASM application that’s hosted on AWS S3 and served by AWS CloudFront.
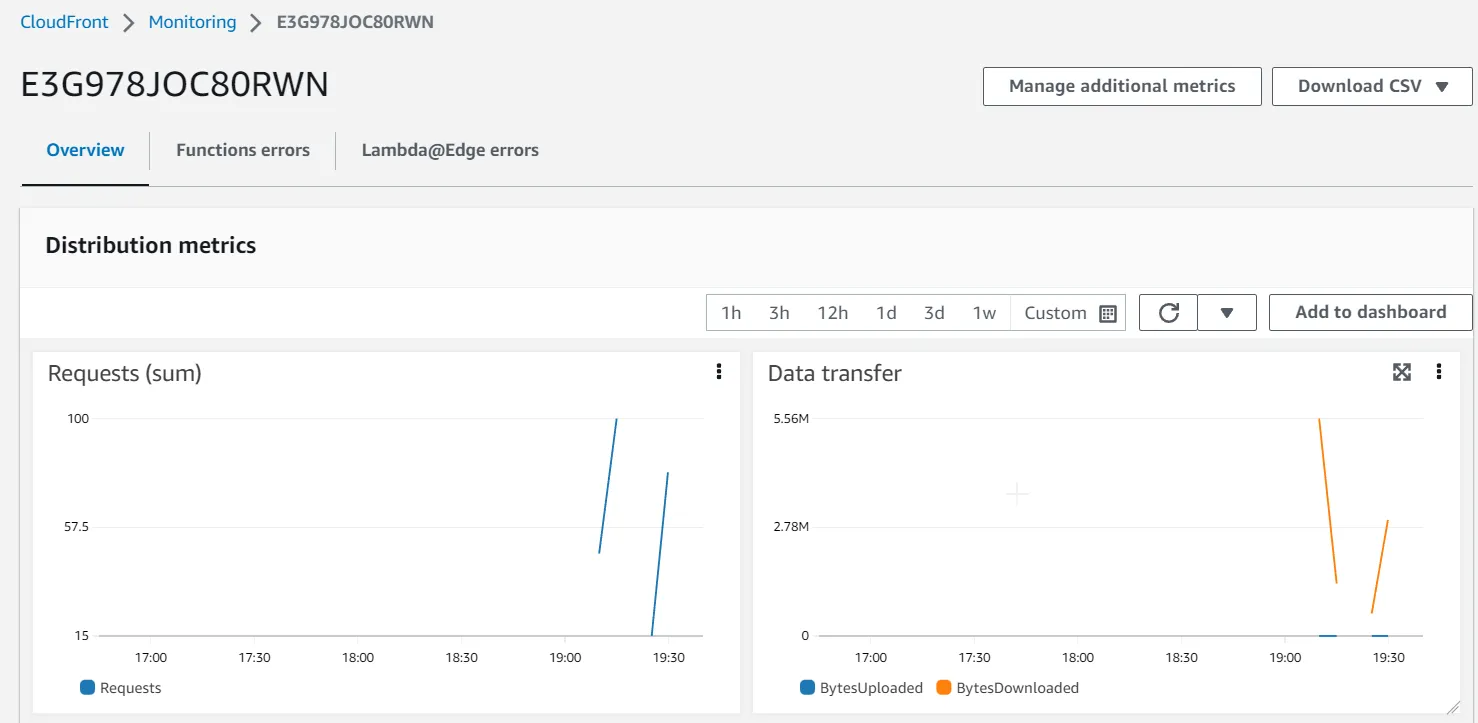
You can also get to see a couple of nice monitoring metrics to be aware of your visitor counts and so on.
Enhancements
This is already a pretty automated way of serving your Blazor standalone application. The only manual part is where you would have to publish your application and push it to S3. This can also be easily automated by some CI/CD pipelines and workflows like GitHub actions, where you can automatically publish and push to S3, where there is a new incoming change on to your GitHub branch.
Apart from this, you can also link a Domain with the CloudFront Url so that you don’t have to use a something.cloudfront.net URL anymore. Rather you can use myblazorapp.com kind of URLs. AWS Route 53 is one service that you can look into for this.
Maybe the best Tech Stack for Serverless Applications?
With this, you can think of building a complete .NET Stack that’s hosted entirely on AWS which is going to be very cost-effective as well. You can think of something like the following stack.
- Frontend - Blazor WASM standalone, which will make API calls. This can be hosted on S3 (like we did in this article), or deployed to AWS Amplify (an article about this coming soon).
- Backend - Lambda Function. I wrote a couple of articles about creating Lambda Functions in AWS using .NET
- Exposing the Lambda Functions using API Gateways. Here is the article for it as well.
- Database - AWS DynamoDB. Another article to get started with this awesome NoSQL Database for .NET Developers.
- CDN - AWS CloudFront
- Authentication - AWS Cognito
- Terraform - For automating the resource creation process
- GitHub workflow - CI/CD Pipeline
With this stack, you can go completely serverless and build decent midlevel applications. A pretty comfortable stack for .NET Developers I suppose. What are your suggestions?
Summary
In this article, we learned about Deploying Blazor WebAssembly to AWS S3 seamlessly and configuring the S3 Bucket to support static web hosting. With that done, we also looked into making our content even more scalable and serving a large audience by integrating with AWS CloudFront distribution, which is a CDN Service provided by AWS.
Make sure to share this article with your colleagues if it helped you! Helps me get more eyes on my blog as well. Thanks!
Stay Tuned. You can follow this newsletter to get notifications when I publish new articles – https://newsletter.codewithmukesh.com. Do share this article with your colleagues and dev circles if you found this interesting. Thanks!

