In this Guide, we will be building a full-fledged Chat Application With Blazor WebAssembly using Identity and SignalR from scratch. When I got started with building a Chat Component for BlazorHero, I was not able to find many resources online that covered this specific requirement to the fullest. All I could get was simple applications that just demonstrated the basic usage of SignalR in Blazor, which were not pretty looking as well.
So, I am compiling this guide to cover each and everything you would need to know while building Realtime Chat Applications with Blazor that is linked to Microsoft Identity as well. This enables us to have a one-on-one chat with the registered users in our system. You can find the entire source code of the application here.
I would also make sure that the application that we are about to build looks clean and professional. To help me with this, I will be using MudBlazor Component Library for Blazor.
Here is the list of features and topics we will be covering in this implementation:
- Blazor WebAssembly 5.0 with ASP.NET Core Hosted Model.
- MudBlazor Integrations - Super cool UI.
- SignalR Integrations - Realtime Messaging.
- Cascade Parameters.
- Chat with Registered Users.
- Chats get stored to Database via EFCore.
- Notification Popup for new messages.
- Notification Tone for new messages.
PRO TIP : As this guide covers everything from the database point to building a Clean UI with Blazor , the content is quite vast as well. I would recommend you to bookmark this page so that you can refer whenever needed. Grab your favorite drink as well ;)
Setting up the Blazor WebAssembly Project
As mentioned earlier, let’s start off by creating a new Blazor WebAssembly App Project in Visual Studio 2019. Make sure you have the latest SDK of .NET installed.
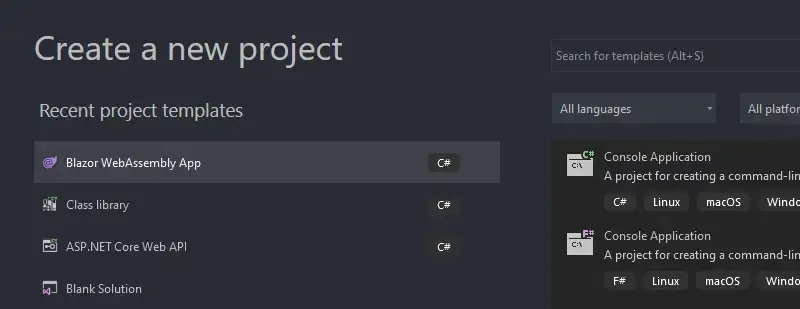
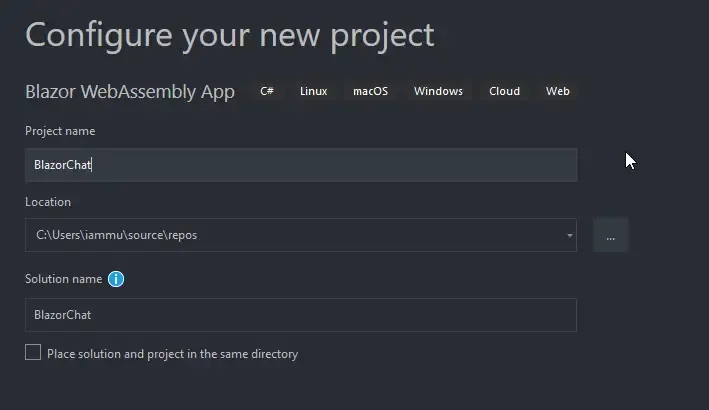
I am naming the application BlazorChat for obvious reasons :P
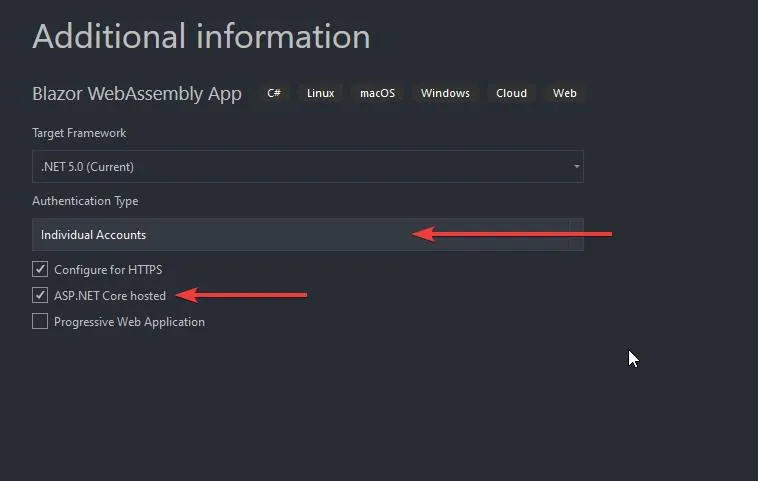
Make sure that you choose Individual Accounts for the Authentication Type so that Visual Studio can scaffold the code required for Login / Registration and Profile Management. I took this approach, so as to keep this implementation simple since our prime focus is building the Chat Application with Blazor.
Also, ensure that you have checked the ASP.NET Core Hosted Checkbox, as SignalR will need a Server Model. We will be dealing with the HttpClient also in this implementation to fetch and save chat records to our Local Database.
Once Visual Studio has created your new shiny Blazor Application, the first thing to always do is to update all the existing packages. For this, open up the Package Manager Console and run the following command.
update-packageIntegrating Mudblazor Components
Now, let’s add some Material Design to our application. MudBlazor is one of the Libraries that has come the closest to offer Material UI feel to Blazor Applications. I have used this awesome component Library in BlazorHero as well.
Let’s setup MudBlazor for Blazor. Open up the package manager console and make sure that you have set the BlazorChat.Client as the default project (as seen in the below screenshot). Run the following command to install the latest version of MudBlazor on to your application.
Install-Package MudBlazor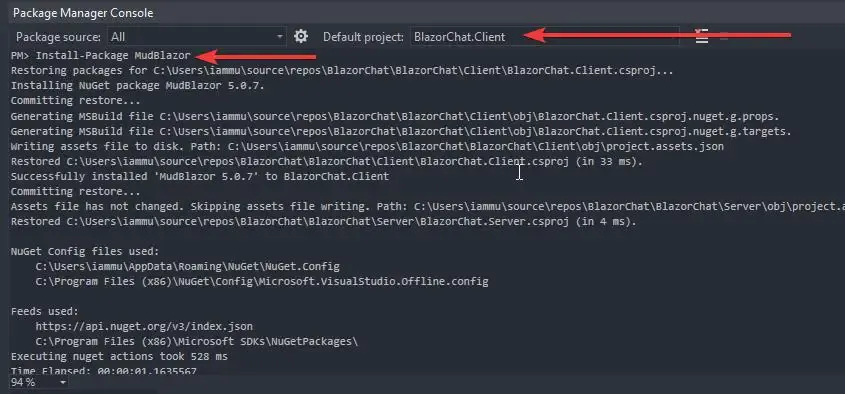
Once it is installed, open up the _Imports.razor file in the Client project under Pages folder, and add the following to the bottom of the file. This helps us to use MudBlazor components throughout the application without having to import the namespace into each and every component/page. We will be adding other interfaces/services to this razor component later in this guide as well.
@using MudBlazorI have put together some UI code throughout the guide to get you started with MudBlazor without wasting much time. We will try to build a Admin Dashboard UX with Navigation Bar (top) , Side Menu (sidebar) and the content at the middle. Get the idea, yeah?
Firstly, open up the index.html from the wwwroot folder of the BlazorChat.Client project. Replace the entire HTML with the code below. In simple words, what we did is to use MudBlazor Stylesheets and some of it’s js file instead of the default styles that we get out of the box with Blazor.
<!DOCTYPE html><html><head> <meta charset="utf-8" /> <meta name="viewport" content="width=device-width, initial-scale=1.0, maximum-scale=1.0, user-scalable=no" /> <title>Blazor Chat</title> <base href="/" /> <link href="https://fonts.googleapis.com/css?family=Roboto:300,400,500,700&display=swap" rel="stylesheet" /> <link href="_content/MudBlazor/MudBlazor.min.css" rel="stylesheet" /></head><body> <div id="app">Loading...</div> <div id="blazor-error-ui"> An unhandled error has occurred. <a href="" class="reload">Reload</a> <a class="dismiss">🗙</a> </div> <script src="_content/Microsoft.AspNetCore.Components.WebAssembly.Authentication/AuthenticationService.js"></script> <script src="_framework/blazor.webassembly.js"></script> <script src="_content/MudBlazor/MudBlazor.min.js"></script></body></html>Next up, we need to register MudBlazor within our ASP.NET Core’s service container to resolve certain internal dependencies. You can also find these steps in MudBlazor documentation.
Open up Program.cs of the Client project and add the following registration along with importing the required namespace.
using MudBlazor.Services;.builder.Services.AddMudServices(c => { c.SnackbarConfiguration.PositionClass = Defaults.Classes.Position.BottomRight; });SnackbarConfiguration is something that we will be using later on in the implementation.
Next, let’s create the Database and apply the migrations. Open up appsettings.json in the server project. Here you can modify the Connection string as you want. I will use the default localdb instance for this development.
"ConnectionStrings": { "DefaultConnection": "Server=(localdb)mssqllocaldb;Database=BlazorChat;Trusted_Connection=True;MultipleActiveResultSets=true"},With that done, open up the package manager console again. This time, make the server project as the default project (refer the below screenshot). Run the following command.
update-database
Once done, your new database would been setup for you.
With the database done, let’s get back to the MudBlazor Integration. We will be modifying few of the Razor components / layouts in this section .Under the Shared folder of the Client Project, open up the MainLayout.razor component. Paste in the following code snippet over the existing code.
@inherits LayoutComponentBase<MudThemeProvider /><MudDialogProvider /><MudSnackbarProvider /><MudLayout> <MudAppBar Elevation="0"> <MudText Typo="Typo.h6" Class="ml-4">Blazor Chat</MudText> <MudAppBarSpacer /> <LoginDisplay /> </MudAppBar> <MudDrawer @bind-Open="_drawerOpen" Elevation="1"> <NavMenu /> </MudDrawer> <MudMainContent> <MudToolBar DisableGutters="true"> <MudIconButton Icon="@Icons.Material.Outlined.Menu" Color="Color.Inherit" OnClick="@((e) => DrawerToggle())" Class="ml-3" /> </MudToolBar> <MudContainer MaxWidth="MaxWidth.False" Class="mt-4"> @Body </MudContainer> </MudMainContent></MudLayout>@code { bool _drawerOpen = false; void DrawerToggle() { _drawerOpen = !_drawerOpen; }}Line 2-4 : Mandatory components to get MudBlazor functional.
Line 9 : This is a component that was generated by Visual Studio when we checked the Individual User Accounts while creating the Blazor project, remember? We will be modifying this component in a while.
Line 12 : NavMenu component will be rendered here. We will be modifying this component as well.
Line 19 : Here is where the Body of the application would be rendered.
That’s almost everything you need to be aware of on this Layout Page. Drawer Toggle is another cool feature implemented. It gives the application a Fluid UI while toggling the sidebar. We will be coming back to this layout page later in this guide to implement Cascading parameters and to add some code around SignalR as well.
Next, Open up the LoginDisplay component and replace the entire component with the following piece of code.
@using Microsoft.AspNetCore.Components.Authorization@using Microsoft.AspNetCore.Components.WebAssembly.Authentication@inject NavigationManager Navigation@inject SignOutSessionStateManager SignOutManager<AuthorizeView> <Authorized> <div class="pa-4 justify-center my-4 mud-text-align-center"> <MudButton Variant="Variant.Filled" Color="Color.Primary" Link="authentication/profile">Hi, @context.User.Identity.Name!</MudButton> <MudButton Variant="Variant.Filled" Color="Color.Primary" OnClick="BeginSignOut">Log Out</MudButton> </div> </Authorized> <NotAuthorized> <div class="pa-4 justify-center my-4 mud-text-align-center"> <MudButton Variant="Variant.Filled" Color="Color.Primary" Link="authentication/register">Register</MudButton> <MudButton Variant="Variant.Filled" Color="Color.Secondary" Link="authentication/login">Log in</MudButton> </div> </NotAuthorized></AuthorizeView>@code{ private async Task BeginSignOut(MouseEventArgs args) { await SignOutManager.SetSignOutState(); Navigation.NavigateTo("authentication/logout"); }}As you can see, the above component is a part of the NavBar which is responsible for displaying the Signin/Register/Logout buttons depending on the Authentication State of the application.
Line 6-11 : If the user is authenticated, he/she will get to see a welcome message alongwith the Logout button.
Line 12-17 : If not authenticated, a login and registration button would be displayed. As simple as that.
Next, let’s fix the NavMenu component. Paste in the following source code replacing the content at NavMenu.razor component.
<MudNavMenu> <MudNavLink Href="/home" Icon="@Icons.Material.Outlined.Home"> Home </MudNavLink> <MudNavLink Href="/chat" Icon="@Icons.Material.Outlined.Dashboard"> Chat </MudNavLink> <MudNavLink Href="https://codewithmukesh.com/blog/realtime-chat-application-with-blazor/" Target="_blank" Icon="@Icons.Material.Outlined.QuestionAnswer"> Documentation / Guide </MudNavLink></MudNavMenu>Let’s add some dummy content just for the sake of it. Open up Index.razor and paste in the following. This is not very important. I am just adding it to make the app look better.
@page "/home"@page "/"<MudContainer Style="display: inline-block; position: fixed; top: 0; bottom: 0; left: 0; right: 0; width: 900px; height: 300px; margin: auto; "> <MudGrid> <MudItem xs="12" sm="12" md="12"> <MudText Align="Align.Center" Typo="Typo.h2" Class="mt-4">Blazor Chat</MudText> <MudText Align="Align.Center" Typo="Typo.subtitle1" Class="smaller">Complete Chat Application in Blazor WebAssembly 5.0 with SignalR and Identity. UI is taken care by MudBlazor Component Library.</MudText> </MudGrid></MudContainer>Let’s run the application and see what we have right now.
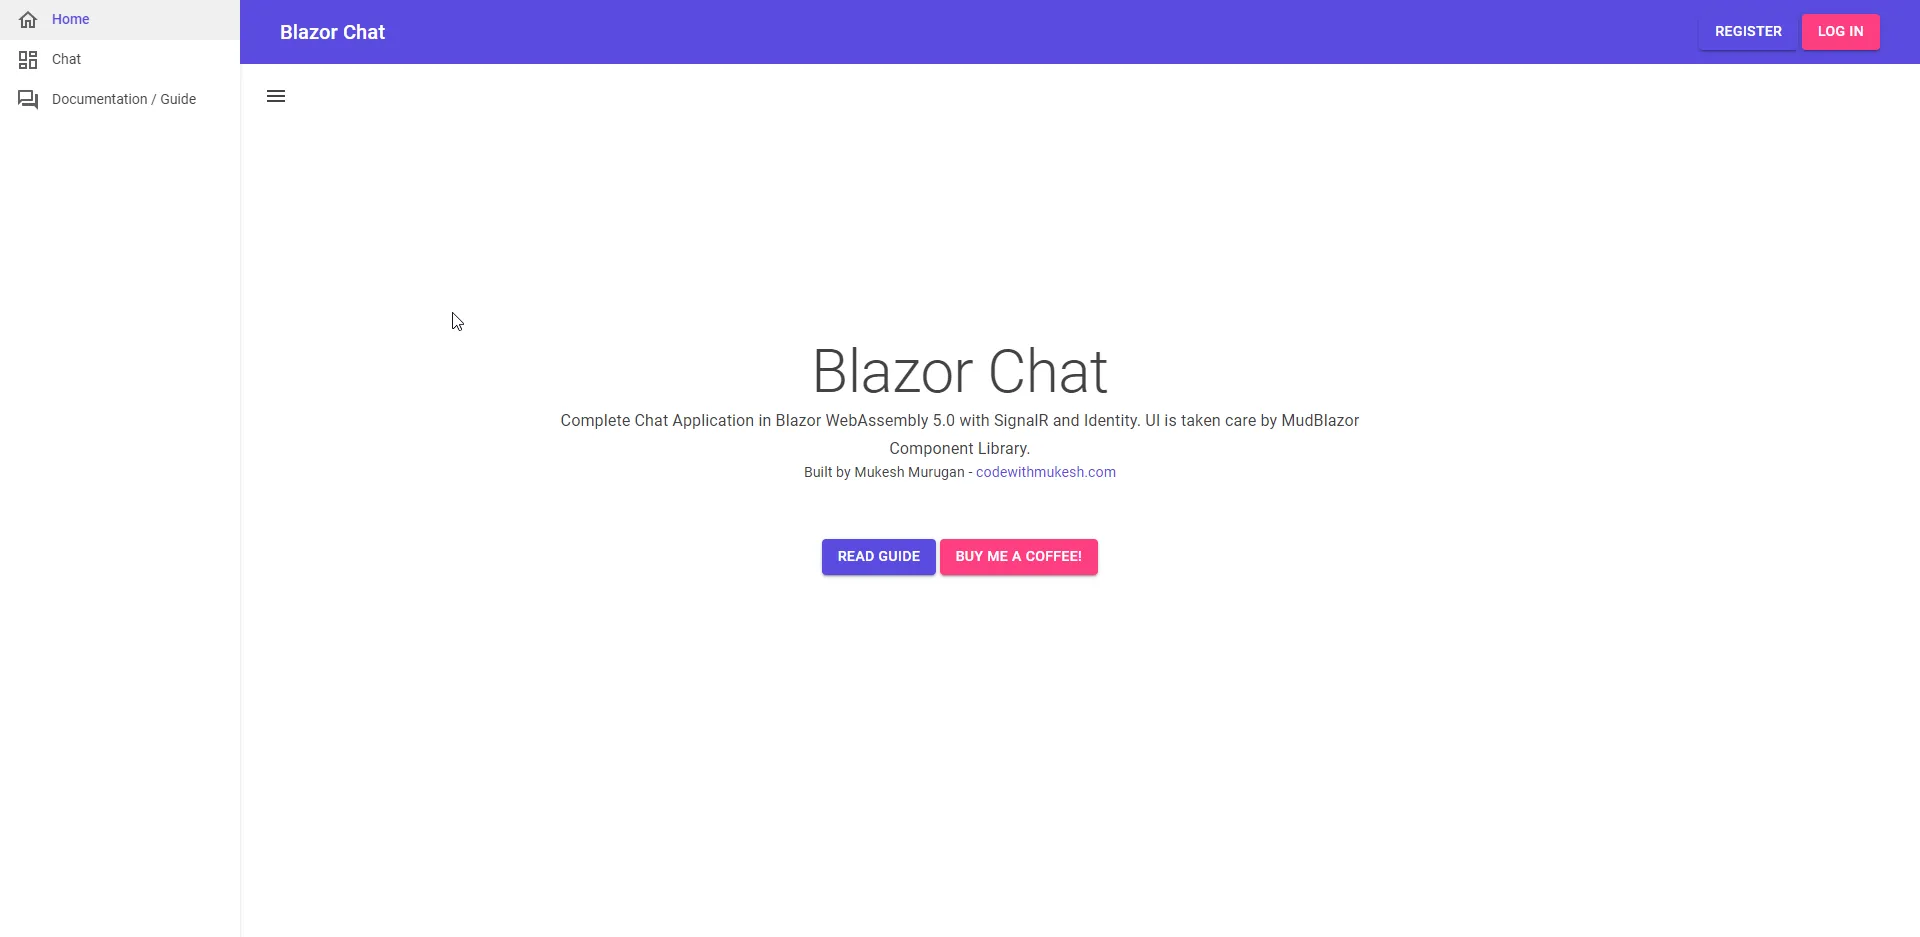
Pretty cool, yeah? So we have the sidebar that will help us with the navigation, a couple of buttons on the NavBar that relates to authentication, and finally the content right at the middle of the page.
Let’s try to register some users into the system.
Make sure that you don’t delete or modify the Authentication.razor component under the Pages folder of the Client project. This is quite a vital component that deals with routing to the Identity (Auth) pages.
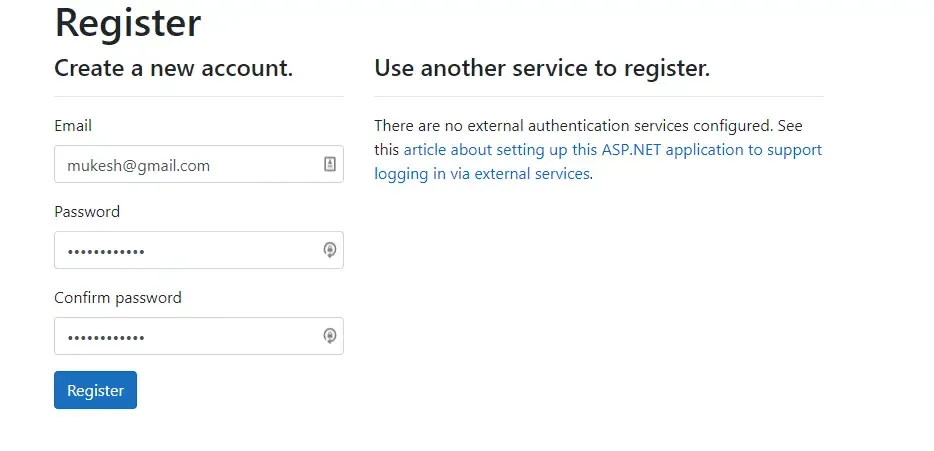

This way, I managed to register 3 users - mukesh, john and henry for our test purposes.
Adding the Chat Models
Now, let’s come to the Core Feature of our implementation. So far we have integrated Mudblazor with our application to make it look cooler. Now, let’s add some Model Classes for chat and related entities.
One major step in this section is related to the architecture of the project. In the server project, under the Models folder, you get to see a ApplicationUser class. This class is used to add extra properties to our Identity user. For example, we need to add in the Birthday of the user, we just have to add in the DateTime property in this ApplicationUser class. It inherits the fields from IdentityUser class. Get the idea, yeah?
Due to certain dependency issues, we would have to move this ApplicationUser class to BlazorChat.Shared Project. Make sure to change the namespace of the ApplicationUser class as well. Delete the ApplicationUser class from the Server project. This would also mean that there would be a couple of reference issues that would arise due to this action. You can easily fix these issues by pointing to the ApplicationUser class which is now in the Shared project. I hope I am being clear with this. Feel free to check out the repository in case any confusions arise.
Another action to take, is to install the EntityFrameworkCore package to the Shared project. I am doing all this to keep the project simple. Else we would have to deal with a lot of DTO classes. To get the ideal way of development with clean architecture, do check out the BlazorHero project.
Open up Package Manager console, set the default project to BlazorChat.Shared and run the following command.
Install-Package Microsoft.AspNetCore.Identity.EntityFrameworkCoreLet’s start adding our Core ChatMessage Model. In the BlazorChat.Shared Project create a new class and name it ChatMessage.cs
public class ChatMessage{ public long Id { get; set; } public string FromUserId { get; set; } public string ToUserId { get; set; } public string Message { get; set; } public DateTime CreatedDate { get; set; } public virtual ApplicationUser FromUser { get; set; } public virtual ApplicationUser ToUser { get; set; }}As you can understand, we are creating the Entity ChatMessage that is supposed to hold all details of a single chat message. This includes the Id, the User Ids of the participants, the actual message, the date of creation, and few virtual properties that can give us the access to the properties of the Participating Users. It’s clear, yeah?
Extending ApplicationUser Class
Now that we have added the Chat Message entity model, let’s extend the ApplicationUser by adding a couple of collections. The idea is that a given user will have many outgoing and incoming chats. This means that User A can be the Receiver of a set of Chat Messages as well as the Sender of a collection of chats. Thus, we add virtual collections so that users are keyed with the messages. This will help us later to extract the required converation details.
Open up the ApplicationUser.cs in the Shared Project and add in the following.
public class ApplicationUser : IdentityUser{ public virtual ICollection<ChatMessage> ChatMessagesFromUsers { get; set; } public virtual ICollection<ChatMessage> ChatMessagesToUsers { get; set; } public ApplicationUser() { ChatMessagesFromUsers = new HashSet<ChatMessage>(); ChatMessagesToUsers = new HashSet<ChatMessage>(); }}With that done, open up the Context class in the BlazorChat.Server Project. It’s usually under the Data Folder with the name as ApplicationDbContext. Here is where you need to add the entities and Builder Logics that will be directly reflected on to our database. Since we have created the ChatMessage Entity, let’s add it here.
public class ApplicationDbContext : ApiAuthorizationDbContext<ApplicationUser>{ public ApplicationDbContext(DbContextOptions options,IOptions<OperationalStoreOptions> operationalStoreOptions) : base(options, operationalStoreOptions){} public DbSet<ChatMessage> ChatMessages { get; set; } protected override void OnModelCreating(ModelBuilder builder) { base.OnModelCreating(builder); builder.Entity<ChatMessage>(entity => { entity.HasOne(d => d.FromUser) .WithMany(p => p.ChatMessagesFromUsers) .HasForeignKey(d => d.FromUserId) .OnDelete(DeleteBehavior.ClientSetNull); entity.HasOne(d => d.ToUser) .WithMany(p => p.ChatMessagesToUsers) .HasForeignKey(d => d.ToUserId) .OnDelete(DeleteBehavior.ClientSetNull); }); }}Line 4 : Here we define a DbSet of ChatMessage with the name as ChatMessages. This will be how our Table will be named.
Line 8-10 : Here we mention the One To Many relationship between the User and the ChatMessages.
Adding Migrations and Updating the Database
Now, save all the changes and open up the Package Manager Console. Remeber to set the default project to the Server Project whenever you are dooing something that relates to the database, as the data contexts live within the server project.
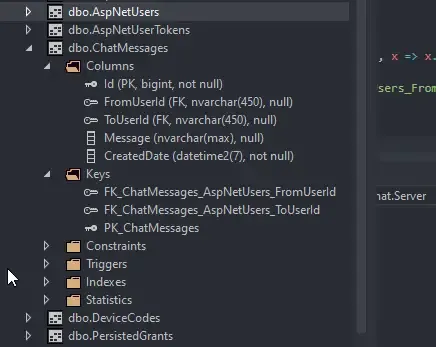
Run the following commands. This updates your database, adds in the new ChatMessages table and sets up the foreign key references.
add-migration chatModelsupdate-database
Let’s check out our database to see the changes and additions. You can see the expected result here.
Setting Up the Chat Controller
Since we are completed with the Database part of the implementation, let’s move on the Server Side implementation. Here we would ideally need a controller that can return / commit data to the ChatMessages table. For this project, we need 4 endpoints on this controller. They are as follows:
- Accepts the Participant Id and returns a list of ChatMessages that occurred between the 2 participants.
- Returns a list of users who are available for chat.
- Returns the details of a chat user.
- Saves a particular chat message (with participant ids) onto the database.
Why we need these endpoints? Let me make it more clear from the UI perspective. Our Chat UI Components will have 2 sections ideally (Mind map it for now).
- Section A - to actually chat,
- Section B - to display the available chat users.
On clicking on a chat user in Section B, the chat history with the user has to load up on Section A. We will also need to able to send in new messages. Thus, these 3 endpoints are quite mandatory.
I believe this makes quite a lot of sense. Let’s get started with our controller now. Under the Controllers folder of the Server Project, add in a new controller and name it ChatController.cs
[Route("api/[controller]")][ApiController][Authorize]public class ChatController : ControllerBase{ private readonly UserManager<ApplicationUser> _userManager; private readonly ApplicationDbContext _context; public ChatController(UserManager<ApplicationUser> userManager, ApplicationDbContext context) { _userManager = userManager; _context = context; }}This is how our controller would look like initially. You can note that the entire controller is secured with an Authorize Attribute. Also, I have injected the ApplicationDbContext as well as the UserManager to the constructor of the controller. Now, let’s add each of the endpoints here.
Get All Users
First off, let’s get all the registered users from our database.
[HttpGet("users")]public async Task<IActionResult> GetUsersAsync(){ var userId = User.Claims.Where(a => a.Type == ClaimTypes.NameIdentifier).Select(a => a.Value).FirstOrDefault(); var allUsers = await _context.Users.Where(user => user.Id != userId).ToListAsync(); return Ok(allUsers);}Line 3 : Getting the userid from the user claims.
Line 4 : Returns a list of all registered users, excluding the current user. You really don’t want to see your own name in the contact list, do you? :P
Get User Details
Similarly, with the help of ApplicationDbContext, we return the details of a single user related to the passed userid.
[HttpGet("users/{userId}")]public async Task<IActionResult> GetUserDetailsAsync(string userId){ var user = await _context.Users.Where(user => user.Id == userId).FirstOrDefaultAsync(); return Ok(user);}Save Chat Message
Our client project would send a ChatMessage object to this endpoint with the message. In this endpoint, we are adding the current user as the sender, created date, and the receiving user data as well. Finally we save the data into our database.
[HttpPost]public async Task<IActionResult> SaveMessageAsync(ChatMessage message){ var userId = User.Claims.Where(a => a.Type == ClaimTypes.NameIdentifier).Select(a => a.Value).FirstOrDefault(); message.FromUserId = userId; message.CreatedDate = DateTime.Now; message.ToUser = await _context.Users.Where(user => user.Id == message.ToUserId).FirstOrDefaultAsync(); await _context.ChatMessages.AddAsync(message); return Ok(await _context.SaveChangesAsync());}Get Conversation Between 2 Participants
So, here is the idea. The client would request for the list of chat message with a particular user. This API endpoint would then get the current user id from the User principal, fetch data from the database with both the participant ids and return a list of chat messages.
[HttpGet("{contactId}")]public async Task<IActionResult> GetConversationAsync(string contactId){ var userId = User.Claims.Where(a => a.Type == ClaimTypes.NameIdentifier).Select(a => a.Value).FirstOrDefault(); var messages = await _context.ChatMessages .Where(h => (h.FromUserId == contactId && h.ToUserId == userId) || (h.FromUserId == userId && h.ToUserId == contactId)) .OrderBy(a => a.CreatedDate) .Include(a => a.FromUser) .Include(a => a.ToUser) .Select(x => new ChatMessage { FromUserId = x.FromUserId, Message = x.Message, CreatedDate = x.CreatedDate, Id = x.Id, ToUserId = x.ToUserId, ToUser = x.ToUser, FromUser = x.FromUser }).ToListAsync(); return Ok(messages);}Line 4 : Gets the current userId from the ClaimsPrincipal.
Line 6 : Filters the Chat Messages table that includes both of the userIds as the conversation participants.
Line 7 : So that Messages are sorted by the creation time.
Line 8-9 : Includes User Entities as well.
Line 20 : Returns the Filtered Chats.
Adding SignalR Hub
Now for the hero of the show, SignalR. Let’s try to understand what SignalR is and how it would help our application become more lively. According to Wikipedia, SignalR is an Open Source Package for Microsoft technologies that essentially enables the server code to send notifications to the client-side applications. So, if something changes on the server, it can notify all the clients (browsers) of this change. It would be more like an event when triggered. It is also possible to make the clients send notifications to other clients via the server using SignalR Hubs.
So, the idea is whenever a user types in a message and hits send, it will hit the Hub Function that notifies the receiver (user / client), that a new message has been received. In this event, we will add snackbar (toast notification) that alerts the participant of a new message. Also, whenever the message is sent, to make it realtime, we have to ensure that new message popups for both the users even without them having to refresh their browsers. You will understand more on this while we write the code.
In the Server Project, add a new class and name it SignalRHub.
public class SignalRHub : Hub{ public async Task SendMessageAsync(ChatMessage message, string userName) { await Clients.All.SendAsync("ReceiveMessage", message, userName); } public async Task ChatNotificationAsync(string message, string receiverUserId, string senderUserId) { await Clients.All.SendAsync("ReceiveChatNotification", message, receiverUserId, senderUserId); }}Line 3 : Notifies all clients and add a new message to the chat.
Line 4 : Notifies the client who was logged in with a particular userId that a new message has been received.
Let’s do the service registration of SignalR now. Open up Startup.cs of the Server project and add in the following into the ConfigureServices method.
services.AddSignalR();Next in the Configure method, add Line 6 to the UseEndpoints extension.
app.UseEndpoints(endpoints =>{ endpoints.MapRazorPages(); endpoints.MapControllers(); endpoints.MapFallbackToFile("index.html"); endpoints.MapHub<SignalRHub>("/signalRHub");});Till now, we have finished our database design, API endpoints, adding and configuring the SignalHub. Now the only task that remains is to make our BlazorChat.Client consume the created API and design the Chat Components as required. Let’s get started with the Client Side implementation.
Chat Manager - Client Side
To consume our API endpoints in a cleaner way, let’s create an interface and it’s implemention. In the BlazorChat.Client, create a new folder name Manager and add in a class ChatManager.cs and an interface IChatManager.cs.
public interface IChatManager{ Task<List<ApplicationUser>> GetUsersAsync(); Task SaveMessageAsync(ChatMessage message); Task<List<ChatMessage>> GetConversationAsync(string contactId); Task<ApplicationUser> GetUserDetailsAsync(string userId);}public class ChatManager : IChatManager{ private readonly HttpClient _httpClient;
public ChatManager(HttpClient httpClient) { _httpClient = httpClient; } public async Task<List<ChatMessage>> GetConversationAsync(string contactId) { return await _httpClient.GetFromJsonAsync<List<ChatMessage>>($"api/chat/{contactId}"); } public async Task<ApplicationUser> GetUserDetailsAsync(string userId) { return await _httpClient.GetFromJsonAsync<ApplicationUser>($"api/chat/users/{userId}"); } public async Task<List<ApplicationUser>> GetUsersAsync() { var data = await _httpClient.GetFromJsonAsync<List<ApplicationUser>>("api/chat/users"); return data; } public async Task SaveMessageAsync(ChatMessage message) { await _httpClient.PostAsJsonAsync("api/chat", message); }}Here we make use of the HttpClient instance, which’s already initialized by default. We have 4 methods, corresponding to each API endpoint. The HTTP Response Message is then converted to the required models and returned back to the callee.
Before we forget, let’s register this manager into the container of the client applications.
builder.Services.AddTransient<IChatManager, ChatManager>();Installing SignalR Client Package
Open up the Package Manager Console and set the Client Project as the default project. Now, run the following command to install the SignalR client. This will be responsible for receiving notifications from the server sent by our previously created hub.
Install-Package Microsoft.AspNetCore.SignalR.ClientNecessary Imports
As mentioned earlier in this article, we have to add in more imports to the _Imports.razor component to make them available throughout other razor components. Open up the _Imports.razor and add in the following.
@inject NavigationManager _navigationManager@inject ISnackbar _snackBar@inject IJSRuntime _jsRuntime@inject AuthenticationStateProvider _stateProvider;
@using BlazorChat.Client.Managers@inject IChatManager _chatManager
Material Chat UI
Now, here is where the actual fun comes in. Let’s start building our Chat Component’s UI. This is a blueprint of how we want our UI to look like. Cool?
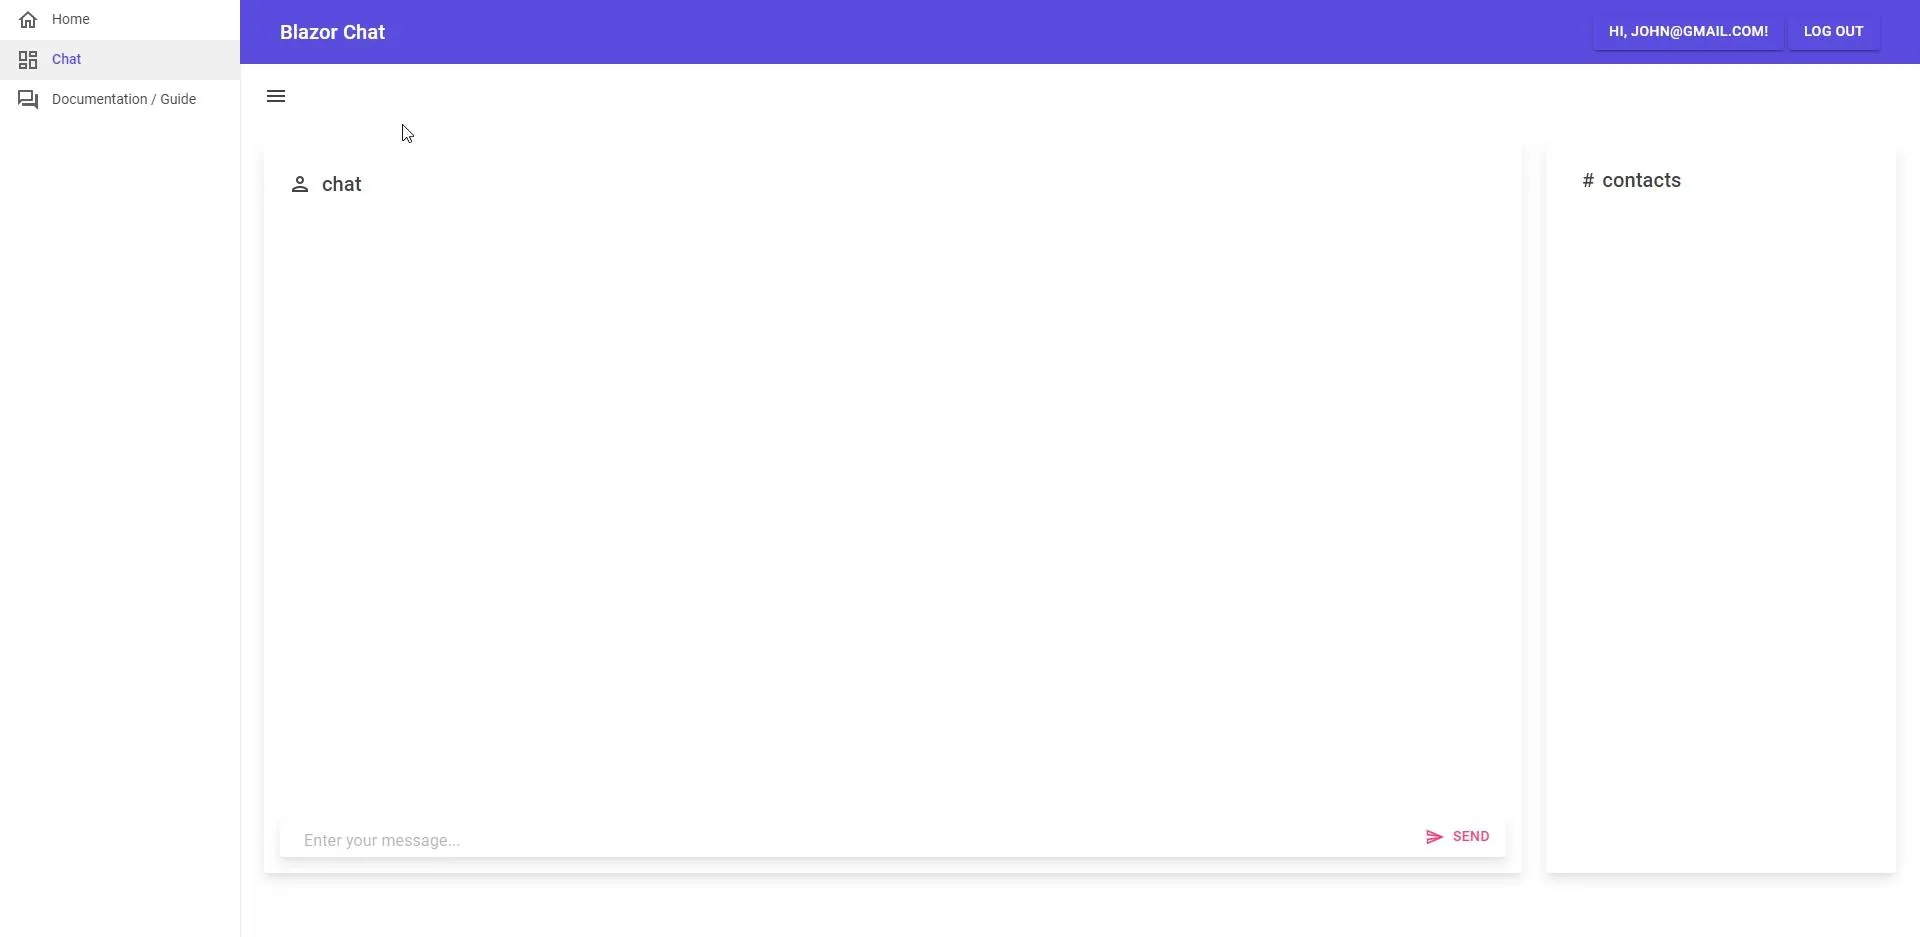
Let’s get started by creating a new RazorComponent under the Pages folder of the Client Project. I am naming the component as Chat.razor.
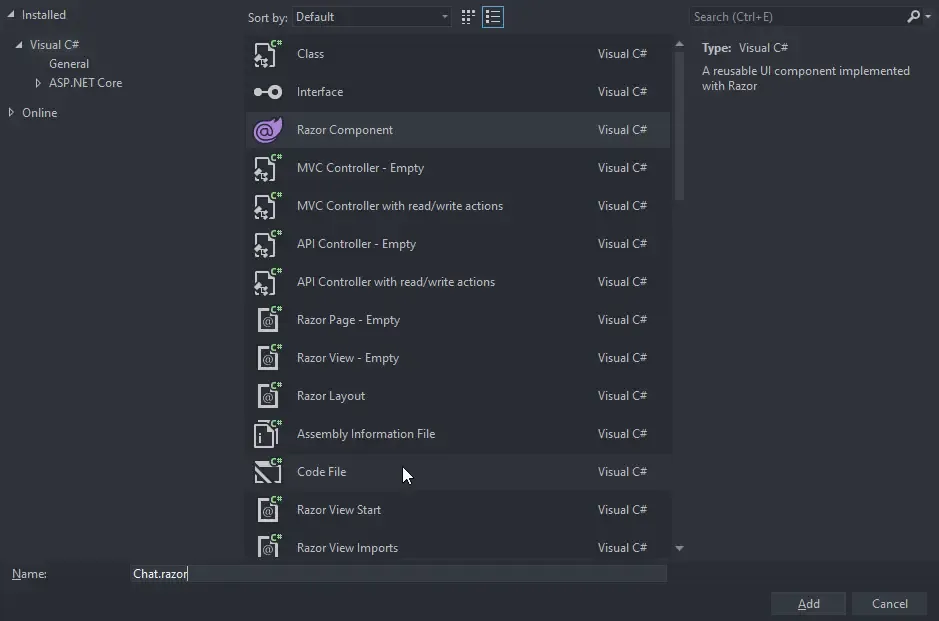
Additionally, we also need to have a C# class that’s linked to this Razor component. Make sure to name it similar to your component, but with an additional .cs extension.

But before going forward with the Chat Component, there are a couple of changes need in the MainLayout page. Open up the MainLayout.razor page and add in the following code snippet under the @code section of the component.
Make sure that you import the namespace for SignalR client on the MainLayout.razor component by the following code - @using Microsoft.AspNetCore.SignalR.Client; on the top of the Component’s code (below the @inherits LayoutComponentBase).
private HubConnection hubConnection;public bool IsConnected => hubConnection.State == HubConnectionState.Connected;protected override async Task OnInitializedAsync(){ hubConnection = new HubConnectionBuilder().WithUrl(_navigationManager.ToAbsoluteUri("/signalRHub")).Build(); await hubConnection.StartAsync(); hubConnection.On<string, string, string>("ReceiveChatNotification", (message, receiverUserId, senderUserId) => { if (CurrentUserId == receiverUserId) { _snackBar.Add(message, Severity.Info, config => { config.VisibleStateDuration = 10000; config.HideTransitionDuration = 500; config.ShowTransitionDuration = 500; config.Action = "Chat?"; config.ActionColor = Color.Info; config.Onclick = snackbar => { _navigationManager.NavigateTo($"chat/{senderUserId}"); return Task.CompletedTask; }; }); } }); var state = await _stateProvider.GetAuthenticationStateAsync(); var user = state.User; CurrentUserId = user.Claims.Where(a => a.Type == "sub").Select(a => a.Value).FirstOrDefault();}Line 1 : Here we declare the HubConnection. This is the connection that we are going to pass through to the Chat Component as well using the Cascading Parameter property.
Line 5 : Initialized the HubConnection instance when the application runs for the first time. Note that it is subscribed to the singalrHub Endpoint of the API. Remember mapping this same endpoint to the SignalR Hub in the Server project?
Line 6 : Kick Starts the Connection.
Line 7 : When any of the client sends a New message to the now logged in user, a notification is popped up on the UI. It is done with the help of this event.
Line 20 : On clicking the generated notification, the user will be redirected to the chatbox of the sender. I really love this feature :D
Line 28 : Gets the current User Id from the Claims Principal.
Finally, in the html section, remeber adding the @body tag earlier? Here we need to replace with the below code.
<CascadingValue Value="hubConnection"> @Body</CascadingValue>This means that the instance of the hubConnection will be passed down to each and every children of the Layout page, which includes our Chat component as well.
Let’s get back to our Chat Component now. I will start off with the C# Class, Chat.razor.cs.
public partial class Chat{    [CascadingParameter] public HubConnection hubConnection { get; set; }    [Parameter] public string CurrentMessage { get; set; }    [Parameter] public string CurrentUserId { get; set; }    [Parameter] public string CurrentUserEmail { get; set; }    private List<ChatMessage> messages = new List<ChatMessage>();    private async Task SubmitAsync()    {        if (!string.IsNullOrEmpty(CurrentMessage) && !string.IsNullOrEmpty(ContactId))        {            var chatHistory = new ChatMessage()            {                Message = CurrentMessage,                ToUserId = ContactId,                CreatedDate = DateTime.Now            };            await _chatManager.SaveMessageAsync(chatHistory);            chatHistory.FromUserId = CurrentUserId;            await hubConnection.SendAsync("SendMessageAsync", chatHistory, CurrentUserEmail);            CurrentMessage = string.Empty;        }    }    protected override async Task OnInitializedAsync()    {        if (hubConnection == null)        {            hubConnection = new HubConnectionBuilder().WithUrl(_navigationManager.ToAbsoluteUri("/signalRHub")).Build();        }        if (hubConnection.State == HubConnectionState.Disconnected)        {            await hubConnection.StartAsync();        }        hubConnection.On<ChatMessage, string>("ReceiveMessage", async (message, userName) =>        {            if ((ContactId == message.ToUserId && CurrentUserId == message.FromUserId) || (ContactId == message.FromUserId && CurrentUserId == message.ToUserId))            {
                if ((ContactId == message.ToUserId && CurrentUserId == message.FromUserId))                {                    messages.Add(new ChatMessage { Message = message.Message, CreatedDate = message.CreatedDate, FromUser = new ApplicationUser() { Email = CurrentUserEmail } } );                    await hubConnection.SendAsync("ChatNotificationAsync", $"New Message From {userName}", ContactId, CurrentUserId);                }                else if ((ContactId == message.FromUserId && CurrentUserId == message.ToUserId))                {                    messages.Add(new ChatMessage { Message = message.Message, CreatedDate = message.CreatedDate, FromUser = new ApplicationUser() { Email = ContactEmail } });                }                StateHasChanged();            }        });        await GetUsersAsync();        var state = await _stateProvider.GetAuthenticationStateAsync();        var user = state.User;        CurrentUserId = user.Claims.Where(a => a.Type == "sub").Select(a => a.Value).FirstOrDefault();        CurrentUserEmail = user.Claims.Where(a => a.Type == "name").Select(a => a.Value).FirstOrDefault();        if (!string.IsNullOrEmpty(ContactId))        {            await LoadUserChat(ContactId);        }    }    public List<ApplicationUser> ChatUsers = new List<ApplicationUser>();    [Parameter] public string ContactEmail { get; set; }    [Parameter] public string ContactId { get; set; }    async Task LoadUserChat(string userId)    {        var contact = await _chatManager.GetUserDetailsAsync(userId);        ContactId = contact.Id;        ContactEmail = contact.Email;        _navigationManager.NavigateTo($"chat/{ContactId}");        messages = new List<ChatMessage>();        messages = await _chatManager.GetConversationAsync(ContactId);    }    private async Task GetUsersAsync()    {        ChatUsers = await _chatManager.GetUsersAsync();    }}
Line 3 : It’s important to declare the CascadingParameter attribute, as we are receiving the instance of HubConnection from our parent component, MainLayout page.
Line 8 - 23 : When the user types in a message and clicks send, this method is invoked. It first ensures that a valid receiver is available and the message is not empty. It then maps these data to a new ChatMessage object and passes it to the API for saving it to the database. After that, the SignalR is triggered passing the message and the current user’s email.
Line 24 - 60 : This is fired up when this component loads. First, for safety, we check if the recieved hubConnection instance is not null and has not stoppped working. If so, it is rectified as the initial step. Line 34 - 50 deals with the event for adding the received message in Realtime to the chat box. We first check if the current user id or the selected contact is a part of the conversation. If so, it adds the message to the required chat box. Line 48 ensures that the component in re-rendered to make the application feel more real-time.
Line 64 - 72 : When the user clicks on an available user from the contact list, this method is invoked. Also note that the conversation is loaded via the API.
Line 73 - 76 : Loads all the registered users via API Call.
Finally, let’s add in the HTML / Components for the Chat.razor component.
@page "/chat/{ContactId}"@page "/chat"<div class="d-flex flex-grow-1 flex-row"> <MudPaper Elevation="25" Class="py-4 flex-grow-1"> <MudToolBar Dense="true"> @if (string.IsNullOrEmpty(ContactId)) { <MudIcon Icon="@Icons.Material.Outlined.Person" Style="margin-right:10px"></MudIcon> <MudText Typo="Typo.h6">chat</MudText> } else { <MudIcon Icon="@Icons.Material.Outlined.ChatBubble" Style="margin-right:10px"></MudIcon> <MudText Typo="Typo.h6">@ContactEmail</MudText> } </MudToolBar> <div class="d-flex flex-column px-4" style="max-height:65vh;min-height:65vh; overflow:scroll;" id="chatContainer"> @foreach (var message in messages) { <div class="d-flex flex-row my-4"> <div class="mr-4"> <MudAvatar Color="Color.Secondary" Style="height:50px; width:50px;">@message.FromUser.Email.ToUpper().FirstOrDefault()</MudAvatar> </div> <div> <MudText Typo="Typo.body1">@message.FromUser.Email</MudText> <MudText Typo="Typo.caption" Style="font-size: xx-small!important;">@message.CreatedDate.ToString("dd MMM, yyyy hh:mm tt")</MudText> <MudText Typo="Typo.body2" Style=" padding: 15px;background-color: var(--mud-palette-background-grey);border-radius: 5px;margin-top:5px">@message.Message</MudText> </div> </div> } </div> <MudPaper Elevation="25" Class="d-flex flex-row px-2 mx-4" Style=""> <MudTextField T="string" Placeholder="Enter your message..."DisableUnderLine="true" Class="mt-n2 mx-4" @bind-Value="CurrentMessage" For="@(()=> CurrentMessage)" /> <MudButton OnClick="SubmitAsync" StartIcon="@Icons.Material.Outlined.Send" Color="Color.Secondary" ButtonType="ButtonType.Button">Send</MudButton> </MudPaper> </MudPaper> <MudPaper Elevation="25" Class="pa-3 ml-6" MinWidth="350px"> <MudToolBar Dense="true"> <MudText Typo="Typo.h6" Inline="true" Class="mr-2">#</MudText> <MudText Typo="Typo.h6">contacts</MudText> </MudToolBar> <div class="d-flex flex-column px-4" style="max-height:70vh;min-height:70vh; overflow:scroll;"> <MudList Clickable="true"> @foreach (var user in ChatUsers) { <MudListItem Class="pa-0 px-2" OnClick="@(() => LoadUserChat(user.Id))"> <div class="d-flex flex-row mt-n1 mb-n1"> <div class="mr-4"> <MudBadge Class="my-2"> @if (user.Id == ContactId) { <MudAvatar Color="Color.Secondary" Style="height:50px; width:50px;"> @user.Email.ToUpper().FirstOrDefault() </MudAvatar> } else { <MudAvatar Color="Color.Dark" Style="height:50px; width:50px;">@user.Email.ToUpper().FirstOrDefault()</MudAvatar> } </MudBadge> </div> <div> <MudText Typo="Typo.body2" Class="mt-3 mb-n2">@user.Email</MudText> <MudText Typo="Typo.caption" Style="font-size: xx-small!important;">@user.Id</MudText> </div> </div> </MudListItem> } </MudList> </div> </MudPaper></div>Line 1 - 2 : Declares the routes of this component.
Line 18-30 : Loops through the list of Chat Message and renders it to the browser.
Line 35 : The Send Message Button.
Line 45 - 69 : Loops through all the registered Users as received from the API.
Most of the code here is for the betterment of the UI. I am skipping it’s explanations as I think it’s quite self explanatory. In case of any questions, please leave a comment below.
Additional Customizations
However, there is always a scope for improvement. Here are a few things I had in my mind as requirements while building this Chat Component for Blazor Hero.
- One main issue was, although the system works perfectly, the user had to scroll down to see the latest message. I googled quite a lot for this and finally ended up using IJSRuntime to acheive this.
- Similarly, to make the system cooler and have a better user experience, why not play a notification tone when a new message comes in? IJSRuntime came in handy here as well.
Wondering why I am going with JS? Although Blazor could be written without depending on Javascript, there are still tons of scenarios and requirements that is not yet supported with C# in Blazor. Trust me, these are very minimal JS usage only.
Auto Scroll to the Bottom of Chat.
Under the wwwroot folder, create a new folder and name it js. Here, add a new javascript file and name it scroll.js.
window.ScrollToBottom = (elementName) => { element = document.getElementById(elementName); element.scrollTop = element.scrollHeight - element.clientHeight;}Now, in the index.html of the wwwroot folder, add in the reference to this js file.
<script src="js/scroll.js"></script>Now that our js is created, how and where do we invoke it?
Firstly, we need the scroll function to be invoked whenever there is a render that occurs in the chat component. Luckily for us, Blazor has a event for it. Add in the following method to the Chat.razor.cs class.
protected override async Task OnAfterRenderAsync(bool firstRender){ await _jsRuntime.InvokeAsync<string>("ScrollToBottom", "chatContainer");}This means that whenever there is a render, the js function gets invoked which in turn scrolls to the bottom of the div with the id chatContainer.
Next, in the hubConnection.On(“ReceiveMessage”, async (message, userName) => event also, we need this js to be invoked. Add Line 1 of the following snippet just above the StateHasChanged method.
await _jsRuntime.InvokeAsync<string>("ScrollToBottom", "chatContainer");StateHasChanged();IMPORTANT : Due to Browser Caching, sometimes there can be chances where the new JS / changes may not be reflected on to the browser, which will also lead to exceptions at the browser level. I usually reload the page by using CTRL+F5 which forces chrome to reload the page without cache. It’s highly important while developing client side applications.
Playing Notification Tone.
Here is my favorite feature. All of a sudden, BlazorHero felt like an Enterprise application , thanks to this super cool feature. We will try to play a short notification mp3 when a new message is received.
In the js folder, add a new javascript file and name it sounds.js
window.PlayAudio = (elementName) => { document.getElementById(elementName).play();}As done earlier, make sure to add the reference of the sound.js to the index.html page.
Additionally, create a new folder under the wwwroot folder and name it media. Download a notification tone mp3 from the web, and place it under the media folder. I am sure that you will be able to find tons of notification tones on the web.
Next, open up the MainLayout.razor page once again and add in the Line 3 from the below code snippet just above the MudThemeProvider.
@inherits LayoutComponentBase@using Microsoft.AspNetCore.SignalR.Client;<audio id="notification" src="/media/notification.mp3" /><MudThemeProvider /><MudDialogProvider />In the same Layout page, under the OnInitializedAsync method, just below the if (CurrentUserId == receiverUserId), add the following code snippet.
_jsRuntime.InvokeAsync<string>("PlayAudio", "notification");Run the application to test this functionality. Please note the you may need to Hard Refresh Chrome by pressing the CTRL + F5 Button.
And there you go, we have now build a Complete Realtime Chat Application with Blazor using Identity, SignalR and Mudblazor Components.
That’s pretty much it for this extremely detailed guide. I hope I have put up a clear solution for the community to work with.
Summary
In this article, we built a full-fledged chat application in Blazor right from scratch using Identity and SignalR. The UI is taken care of with the help of MudBlazor. You can find the source code of the complete implementation here. Did you learn something new? Do let me know in the comments section. If you enjoyed this article, make sure that you share it with your colleagues and blazor developers. This helps me reach a wider audience and stay motivated to produce more content regularly.
Leave behind your valuable queries, suggestions in the comment section below. Also, if you think that you learned something new from this article, do not forget to share this within your developer community. Happy Coding!

