In this article, we will learn how to use Select2 jQuery plugin in ASP.NET Core. We will build a prototype application that can demonstrate various usages of this plugin. The Variants that we will cover are Simple Static Select, AJAX Select, AJAX Multi Select, Custom HTML in Select2. You can find the source code of the entire implementation here. Let’s begin.
What is Select2?
Select2 is a powerful JQuery plugin that is designed to add more power to the traditional <select> box that is displayed on the browser. It supports searching, remote data-sets via AJAX, mult-selects, pagination, grouping, custom rendering and so much more. Why use the normal select box when you use this awesome plugin?
What we will build?
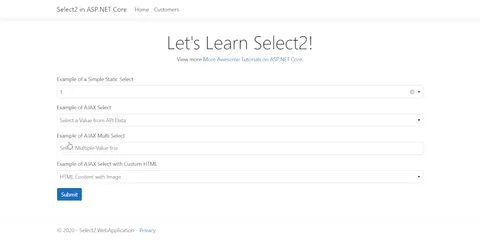
We will be building an ASP.NET Core 3.1 Web Application and use select2 plugin. The variants of the plugin we will be going through are:
- Simple Static Select - Option will be hardcoded
- Select2 box with data returned from an AJAX Call that uses our ASP.NET Core WebApi
- Multi-Select
- Custom Rendered Options using HTML
Here is a quick look on what we will be building in this tutorial.
Getting Started with Select2 jQuery plugin in ASP.NET Core
Let’s create a new ASP.NET Core 3.1 WebApplication with the Razor Pages Template. We will be creating few extra Pages for a simple CRUD Operation ( using Razor View Scaffoding ) on the Customer Entity, an API endpoint that returns a list of Customers based on the search text, re-use the Index.cshtml and add in all the variants of Select2 Plugin.
I will be using Visual Studio 2019 as my IDE. Our Dataaccess layer will be Entity Framework Core with the SQL Server Provider.
public class Customer{ public int Id { get; set; } public string FirstName { get; set; } public string LastName { get; set; } public string City { get; set; } public byte[] Photo { get; set; }}This will be the Customer Model that we will be using throughout our tutorial.
Next, install the required Entity Framework Core packages and connect your application to a database via EFCore. As this part is out of scope for the article, i will skip the steps and reach the point where I have EFCore ready and configured for my application. However, if you are new to EFCore, I have written quite a lot on implementing a simple EFCore Code First Approach. You can read more about it here - Entity Framework Core in ASP.NET Core 3.1 – Getting Started .
Alternatively you could just use any Data Access Technology here like Dapper or even a direct SQLConnection. The Ultimate aim is to build an API that can return list of customers. Even some static values would do, but it’s always better to connect to a database as you can learn quite a lot on the way and also see how it performs in a more practical world.
Scaffolding Customer Entity
Once we have our Database Connection ready, It’s time to add some CRUD Operations with Pages. The easiest approach would be to just sacaffold these views using the ApplicationDBContext Context class. This means that Visual Studio would make all the CRUD Pages for you automatically. Quite cool, yeah?
But it is not always perfect. For example, we have a field for Customer Photo. Visual Studio does not generate this field as we expect, it just makes a text field that would have the binary data of the image. Totally not usable, right? :D But, all you would have to do is to make small modification in the code to replace the text field with an input (image) control. This would still be saving a lot of time.
NOTE : You really don’t have to have these pages for this implementation. I am just adding these pages to make the User Experience better, so that we can add / edit / delete customer on the GO while testing our Select2 Plugin too!
Here is how you would scaffold new pages based on the Customer Entity.
- Create a new Folder under the Pages Folder and name it Customers.
- Right click on this folder and click on Add New -> Razor Page.
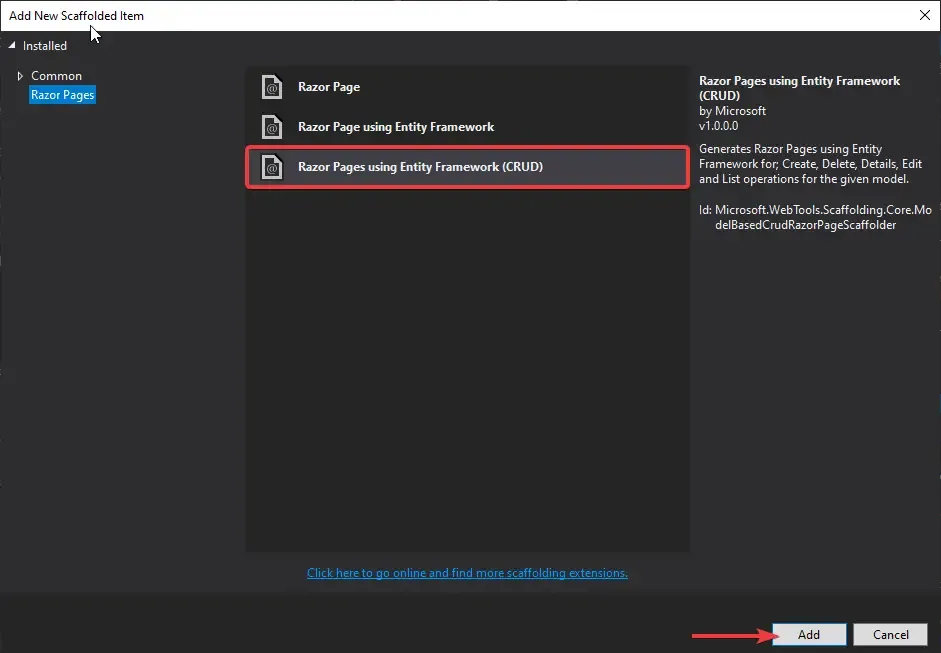
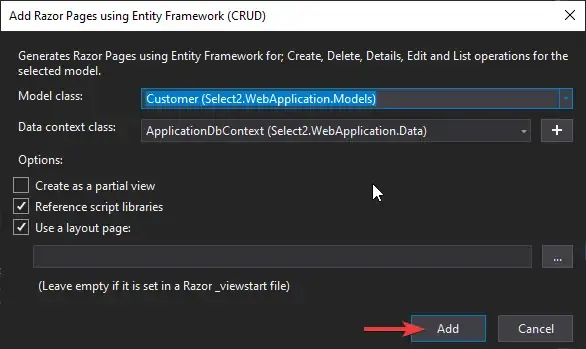
This creates a set of Pages for the Customer Entity, namely Create, Delete, Details, Edit, Index.
As mentioned earlier, you will have to make some changes inorder to accomadate pictures. For more information about uploading pictures in ASP.NET Core to database, refer - File Upload in ASP.NET Core MVC – File System & Database
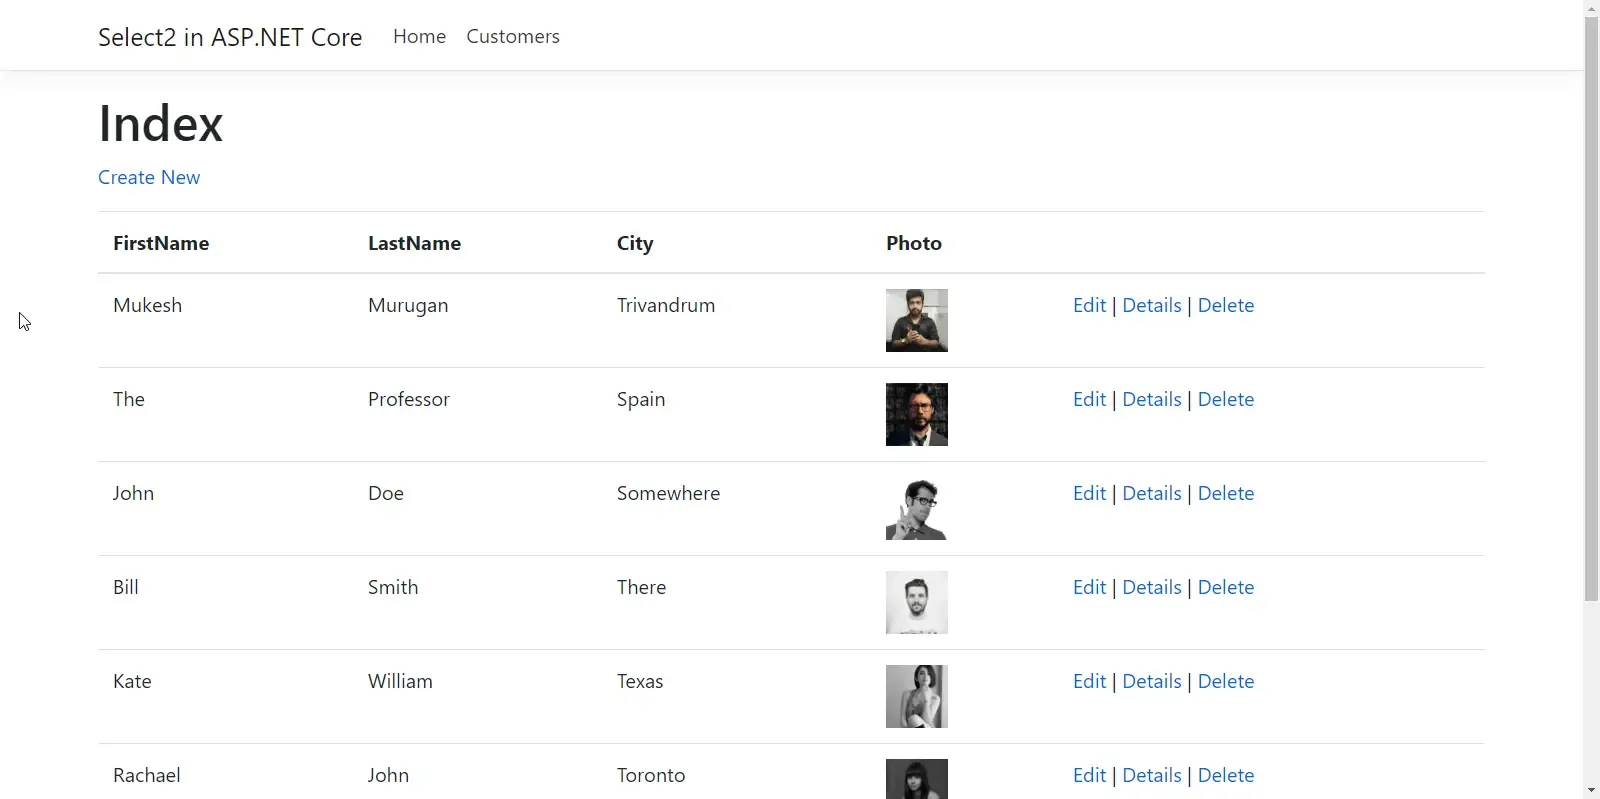
This what we will have when the CRUD Scaffolding is done. Quite Basic.
Building a Search API Endpoint
So now, we have a Customer Entity, connection to the Database and Entity Framework Core that can be used to return list of customers.
With few lines of extra code, ASP.NET Core allows you to have both API as well as Views in the same project, which is awesome. In this section, we will add a new API endpoint that can rreturn a list of customers based on the search parameter. We will keep a requirement such that the search paramteter must be contained in the First Name, Last Name or City Property of the Customer object.
Let’s first configure the ASP.NET Core Application to support API.
Navigate to Startup.cs / ConfigureServices method add this line to the end.
services.AddControllers();Next, in the Configure method, add this too.
app.UseEndpoints(endpoints =>{ endpoints.MapControllers(); endpoints.MapRazorPages();});That’s all you really need to make your Application include APIs.
Add a new Folder in the Root of the Application and name it Controllers. Under it Add another folder and name it API. Here is where wie will be adding the API Controllers associated with our ASP.NET Core Application.
Create a new empty API Controller and name it CustomerController.
In this controller, we need a GET method that accepts a string (search paramter) and generate a list of customers based on it. Here is how you want it to be.
[HttpGet][Route("search")]public async Task<IActionResult> Search(string term){ if(!string.IsNullOrEmpty(term)) { var states = await context.Customers.ToListAsync(); var data = states.Where(a => a.FirstName.Contains(term, StringComparison.OrdinalIgnoreCase) || a.LastName.Contains(term, StringComparison.OrdinalIgnoreCase) || a.City.Contains(term, StringComparison.OrdinalIgnoreCase)).ToList().AsReadOnly(); return Ok(data); } else { return Ok(); }}Line 2, you can see that we have defined a customer route. It would look something like this in realtime ..api/customer/search?term=Mukesh
Line 7 - Gets the list of Customers.
Line 8 - Filters out the data based on our logics. Whenever a customer has a FirstName, LastName or City whose data is similar to our search parameter, we add the customer to the list.
That’s everything you will have to do in the ASP.NET Core end. Let’s move on and talk about Select2 Jquery Implemetation.
Importing Select2 jQuery plugin via Libman
First, let’s import the awesome Select2 jQuery plugin into our ASP.NET Core application. It is just a bunch of css and js files.
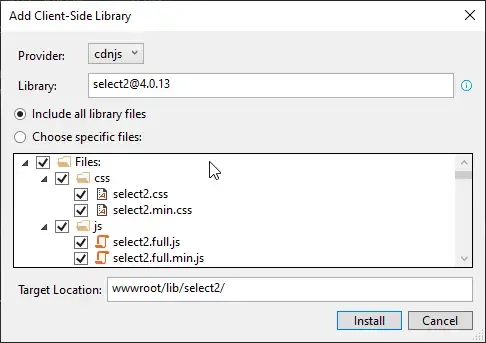
Open up your wwwroot folder and right click the lib folder ( Here is where you want to store all the 3rd party client side libraries). On right click, select Add -> Client-Side Library.
Here, just type in select2 and click Install. This imports the latest select2 Library into our application.
Simple Select with Static Values
Let’s start off by adding a very basic select control to the Index.chtml (Not Customers/Index.cshtml, the one at the Pages Folder.)
But before that we have to add references to the Select2 Libraries as well. Open up Index.chtml and add in the followwing scripts and styles
At top, add these Styles. (You would probably want to add these lines in the _Layout.cshtml to keep the control global, but for our scenario, we just need the select2 plugin to appear in the Index.cshtml page)
<link href="~/lib/select2/css/select2.min.css" rel="stylesheet" /><!-- select2-bootstrap4-theme --><link href="https://raw.githack.com/ttskch/select2-bootstrap4-theme/master/dist/select2-bootstrap4.css" rel="stylesheet">Line 1 - Reference to the previouly installed select2 css file.
Line 3 - Reference to Select2 Bootstrap4 Theme. Since our entire applicaion has Bootstrap4, it makes sense to theme this control as well in bootstrap4, right?.
Before adding the Script Refernces, let’s add a new js file in the wwwroot/js folder. In this Js file, we will add all the scripts required for each of select2 controls we will be building. Name the new file as wwwroot/js/select2.js
Now, come back tot he Index.cshtml page and add this to the end.
@section Scripts{ <script src="~/lib/select2/js/select2.full.min.js"></script> <script src="~/js/select2.js"></script>}Why are we using the section tag? Simple, in order to use any jQuery plugin, we need to ensure that the jquery library itself has loaded. Only after that can we load any jquery plugin library. Now, ASP.NET Core by default comes with jquery library. You must have notices these libraries under wwwroot/lib/jquery. In this _Layout Page, these libraries are already loaded.
By using the Section Tag , we can ensure that our main Library is loaded first.
Line 3 - Js file of the previously installed select2 plugin
Line 4 - our custom Javascript file.
Let’s add the Basic Select2 Control! Add these lines to the Index.cshtml.
<div class="form-group"> <label>Example of a Simple Static Select</label> <select name="simpleSelect2" class="form-control" id="simpleSelect2"> <option data-select2-id="27">1</option> <option data-select2-id="28">2</option> <option data-select2-id="29">3</option> <option data-select2-id="30">4</option> <option data-select2-id="31">5</option> </select></div>You can see that this is pretty simple seelect control. Here we are just adding some static values like 1,2,3 etc.
Also, it is important to note the ID of each control. We are going to identity the controls using this id in the js section. So, give a proper Id for each control.
Now, we have to transform this select control to a select2 control. This can be done with Jquery Initialization. In our custom select2.js , add the follwoing.
$("#simpleSelect2").select2({ placeholder: "Select a Static Value", theme: "bootstrap4", allowClear: true});Line 1 - Initializes the Select2 Component.
Line 2 - Default place holder
Line 3 - use the bootstrap4 theme
Line 4 - Adds a button to the control to clear values.
Let’s run the application.

You can see that our select2 control is loaded properly. It comes with default searching too.
Now let’s add more flavour to this implemetation. AJAX!
Select using AJAX Call to API
Remember, we had created an API endpoint to return a listr of customers? Let’s put it to use now.
Add Another Select Control with a new id, (could be anything unique) as below. Here we are not mentioning any options like earlier. This is because our data will be coming from the API.
<div class="form-group"> <label>Example of AJAX Select</label> <select name="ajaxSelect2" class="form-control" id="ajaxSelect2"> </select></div>Now, jump to the select2.js file and add in this following.
$("#ajaxSelect2").select2({ placeholder: "Select a Value from API Data", theme: "bootstrap4", allowClear: true, ajax: { url: "/api/customer/search", contentType: "application/json; charset=utf-8", data: function (params) { var query = { term: params.term, }; return query; }, processResults: function (result) { return { results: $.map(result, function (item) { return { id: item.id, text: item.firstName + ' ' + item.lastName }; }), }; } }});Line 5 to 25 - AJAX Configuration
Line 6 - Relative URL to our API Endpoint.
Line 9 to 13 - Specify the paramter responsibile for sending the search text to the API.
Line 15 to 24 - Once you get back the response from the API, how do you map it? That is handled here.
Line 19 - Sets the id to object’s id/ Remember that this is done over a loop.
Line 20 - Here we set the text of the select2 component. This is what the user would see. We are using a combination of both first Name and Last Name.
That’s it. Let’s run the application.

Pretty neat feature, yeah? Trust me, this will be heplful for nearly all your new projects.
Multiple Select
Till now, we dealt with cases where you have the ability to select just one customer. Now what if you want to select multiple customers in one go? It is as simple as adding a multiple attribute to the select control. Remaining will be the same as the previous one.
<div class="form-group">    <label>Example of AJAX Multi Select</label>    <select name="ajaxMultiSelect2" class="form-control" id="ajaxMultiSelect2" multiple>    </select></div>
$("#ajaxMultiSelect2").select2({    placeholder: "Select Multiple Values",    theme: "bootstrap4",    allowClear: true,    ajax: {        url: "/api/customer/search",        contentType: "application/json; charset=utf-8",        data: function (params) {            var query =            {                term: params.term,            };            return query;        },        processResults: function (result) {            return {                results: $.map(result, function (item) {                    return {                        id: item.id,                        text: item.firstName + ' ' + item.lastName                    };                }),            };        }    }});
Advanced Select with Custom HTML
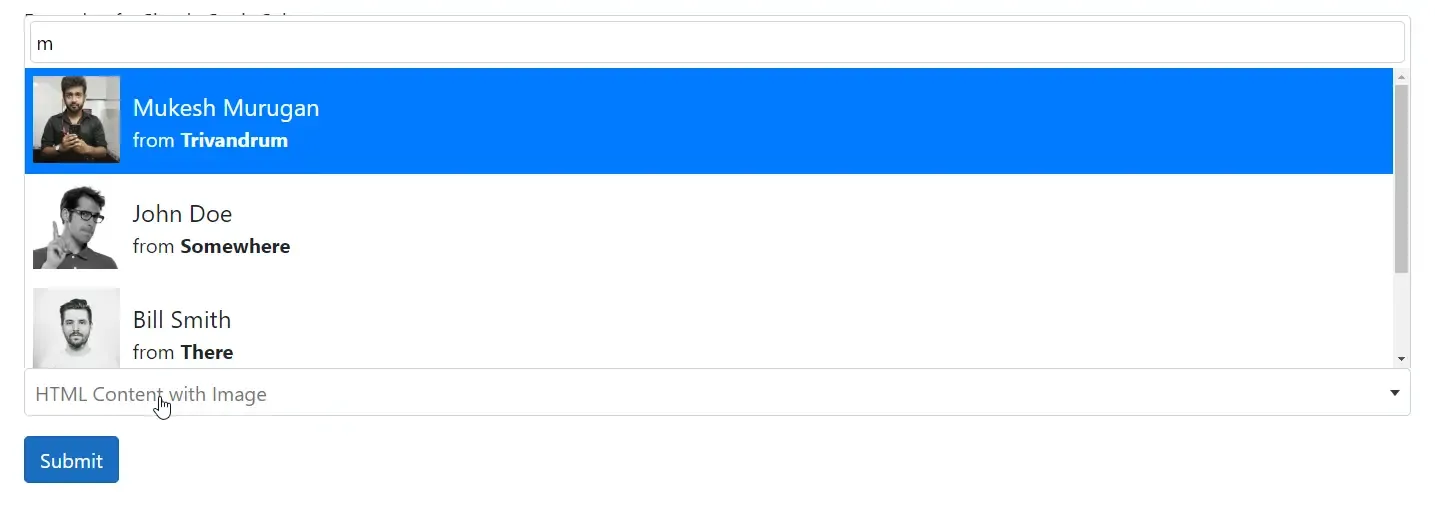
Now, let’s add more spice to our Select2 Component. We have been just rendering plain text as options in the select2 component. Remember that our api is also return image data? Let’s use it now. We will render HTML instead of the plain text. In this rendered HTML, we will also add image of the customer. We will also add a small button that, on click alerts with the selected ID of the customer.
Add in this to the Index.chtml
<div class="form-group"> <label>Example of AJAX Select with Custom HTML</label> <select name="ajaxMultiSelect2HTML" class="form-control" id="ajaxMultiSelect2HTML"> </select> <p></p> <button id="submitButton" class="btn btn-primary">Submit</button></div>Now, our task it to render custome HTMl along with image, right? Therefore, you will have to set a template for the rendered HTML, so that it gets rendered by the select2 component.
What I usually like to do is, build a small prototype kind of implementtion of the required HTML. Here is how I would build it.
<div style="display:flex;"> <div> <img src="data:image/png;base64,<binarydata>" alt="" style="height:70px;width:70px;object-fit:cover;" class="img-rounded img-responsive" /> </div> <div style="padding:10px"> <div style="font-size: 1.2em">"firstname and lastname"</div> <div>from <b> "cityName" </b></div> </div></div>So, we have one main div with 2 sub div. DIV 1 has the image, DIV 2 has the firstname, last name, city. Now for the image, since we are receiveing the image in a binary form, we have to use this specific format ” data:image/png;base64, binaryData” where binaryData is that image data. Also note that this snippet is just for prototyping purposes only.
Let’s now build our JS function. Navigate to select2.js and add the following.
$("#ajaxMultiSelect2HTML").select2({    placeholder: "HTML Content with Image",    theme: "bootstrap4",    allowClear: true,    ajax: {        url: "/api/customer/search",        contentType: "application/json; charset=utf-8",        data: function (params) {            var query =            {                term: params.term,            };            return query;        },        processResults: function (result) {            return {                results: $.map(result, function (item) {                    return {                        id: item.id,                        text: item.firstName + ' ' + item.lastName,                        html: '<div style="display:flex;"><div><img src="data:image/png;base64, ' + item.photo + '" alt="" style="height:70px;width:70px;object-fit:cover;" class="img-rounded img-responsive" /></div><div style="padding:10px" ><div style="font-size: 1.2em">' + item.firstName + ' ' + item.lastName + '</div><div>from <b>' + item.city + '</b></div></div></div >',                    };                }),            };        }    },
    templateResult: template,    escapeMarkup: function (m) {        return m;    }});
function template(data) {    return data.html;}
document.getElementById('submitButton').addEventListener('click', function () {    let result;    result = $("#ajaxMultiSelect2HTML").select2("data")[0];    var id = result.id;    alert("Select Id is " + id);});
Here, the only addition is html. We introduced a new html property and filled it with our protoype HTML (with few modifications to accomadate dynamic valuies from API)
Line 21 - Set the HTML
Line 28 - Set the Templated Result to a Function ‘template’ that returns the previously set HTML.
Line 35 - returns the HTML
Line 38 - 43 - A simple onclick event listener attached to the submittButton control. When clicked, it shows an alert with the selected Customer ID.
Build the Application and Run.
That’s it for this tutorial. Let’s wind up.
Summary
In this comprehensive guide, we have learnt enough to start implementing this cool select2 plugin into your peojects. We have made a static select, AJAX select with various variants and much more. The Coolest part is the one where we added images. pretty nice, yeah? You can find the source code of the entire implementation here.
I hope you got a good knowledge of Select2 jQuery plugin in ASP.NET Core from this article. If you have any comments or suggestions, please leave them behind in the comments section below. Do not forget to share this article within your developer community. Thanks and Happy Coding! ?

