In this article, we will build and learn how to send emails with ASP.NET Core in Just 5 Simple Steps. Our application will send emails in plain text, support attachments (multiple attachments at once) and also we will learn how to Send Branded Emails using HTML Templates. Note that we will be using Mailkit to send the emails. This is what Microsoft recommends over the standard SMTPClient class.
Create a New ASP.NET Core Project
For this tutorial, let’s build our Mail Service on to an ASP.NET Core 3.1 Web API Project. I am using Visual Studio 2019 Community as my IDE (The Best IDE Ever!). You can find the completed source code on my GitHub. This guide will be pretty easy to follow along, especially for the beginners. Create a new Controller and name it MailController.
Add the Required Mail Models
We will need parameters like Email, Subject, Body, List of Attachments in the Request Model so that these data can be passed on to the service layer. Create a new Model Class, Models/MailRequest.cs
public class MailRequest{ public string ToEmail { get; set; } public string Subject { get; set; } public string Body { get; set; } public List<IFormFile> Attachments { get; set; }}In a previous article, we have discussed IFormFile Interface. This is basically a feature of ASP.NET Core to help speed up the process of uploading files. It acts as a medium to hold the uploaded files.
Step 3 - Configure Mail Settings in appsettings.json
There are certain sensitive data/parameters that are required to send emails, like email-id and password (You need to authenticate yourself in order to send a mail). You do not want to hard-code such data. That is why we have appsetting.json. Now, it is not advisable to add sensitive data to the appsettings.json directly. Instead, we will follow these steps. Navigate to appsettings.json and add the following.
"MailSettings": { "Mail": "<fromemail>", "DisplayName": "<displayname>", "Password": "<yourpasswordhere>", "Host": "smtp.gmail.com", "Port": 587}Mail is the Mail-Id from which you would want to send a mail from.
DisplayName is the Name that appears to the receiver.
Host & Port will be explained later in the article.
Now go to appsettings.Development.json (Create one if you don’t have it) and add the same settings there as well. But here, in the Development JSON, we will add the actual data too.
"MailSettings": { "DisplayName": "Mukesh Murugan", "Password": "mysupersecretpassword", "Host": "smtp.gmail.com", "Port": 587}Quick Tip to Secure Sensitive Data
During Development, It is advisable to add data that is to be kept private on to the appsettings.Development.Json. This file is generated while setting the Environment Variable to Development. While adding the project to source control, you can exclude the appsettings.Development.json, so that GIT ignores the file and does not commit it to the main repository. In this way, we can have a good separation of confidential information from the outside world.
Getting the Mail Settings
Wonder what is Host, Port and how i got these sets of data? Well, to send mails, we need a server. Now it’s quite not practical to setup your own server/applications to do that. Hence we use server of other providers. The most popular one is Gmail ofcourse. In our case, the host refers to an SMTP Server.
What’s an SMTP Server?
SMTP or Simple Mail Transfer Protocol servers are just applications whose primary aim to send and receive mails. When you send an email, the SMTP server determines the target domain and relays the mail to the corresponding server.
Developers usually prefer using the GMAIL SMTP server for production and testing purposes, as it is quite easy and reliable too. Gmail allows you to send 2,000 emails per day using the Gmail SMTP Server for FREE. That’s pretty much to get started, right? Here is what you will need to use Gmail SMTP.
- You Gmail ID (Do not use a personal Email ID, quite risky if compromised.) I always have a mail-id specifically for this purpose.
- The Password.
- Host or SMTP Server address - If you are going with Gmail, use smtp.gmail.com
- Port - Use 465 (SSL) or 587 (TLS)
After you get the details, we will need to allow your Gmail account to send emails using external (less- secure applications). To enable this, go to https://myaccount.google.com/security and turn ON Less Secure App Access.
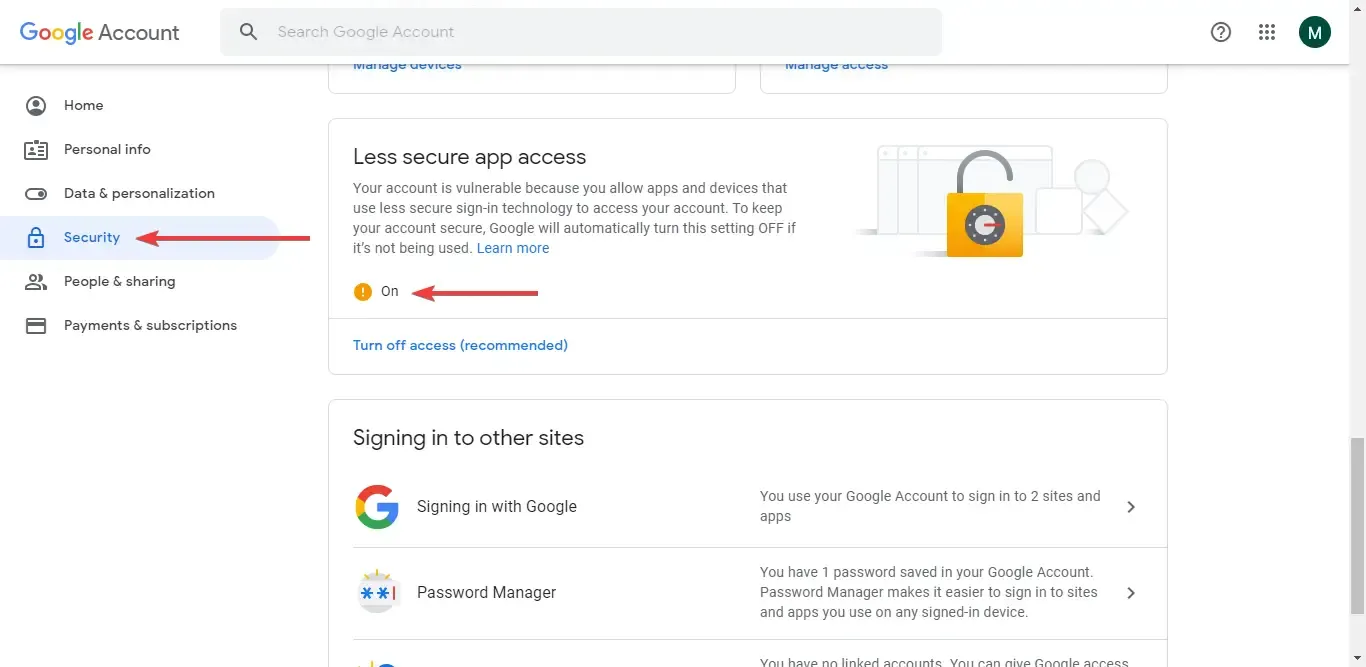
Reference - https://support.google.com/a/answer/176600?hl=en (Read here for more about Gmail SMTP Server and it’s requirements)
A Fake SMTP Provider
It doesnt always make sense to use an actual SMTP provider when you develop, right? Alternatively, you can use a FREE SMTP Provider that is actually not an SMTP but mimics one! Introducing Ethereal - a fake SMTP service.
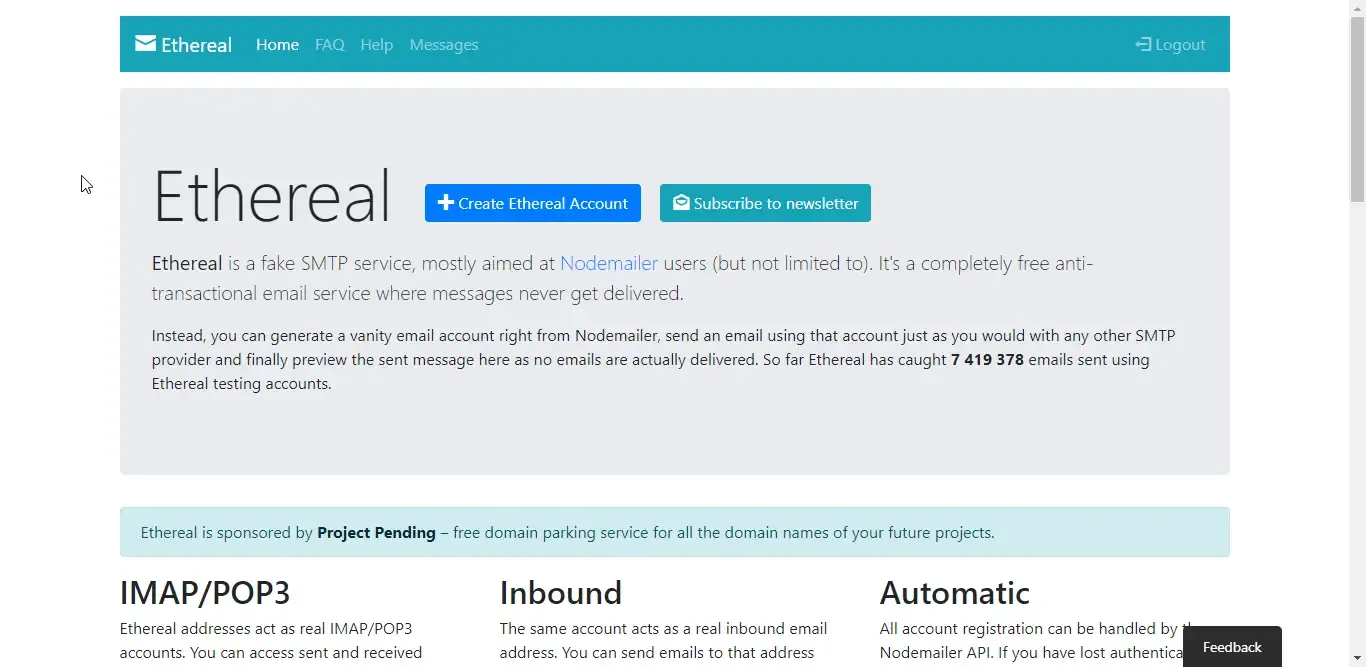
What happens with Ethereal is quite interesting. You create a FREE account, they provide you credentials for the fake SMTP. You can use these credentials for any application to configure the SMTP. It just works! The catch is, it never actually sends a mail to the receiver’s email id but sends the mail back to your ethereal mailbox. Sounds perfect for testing, right? Do give it a try!
Configuring Services
After adding all the required data to the appsettings.Development.json, we will have to make a model that will hold the details from this JSON File. Let’s call it MailSettings. Add a new class , Settings/MailSettings.cs
public class MailSettings{ public string Mail { get; set; } public string DisplayName { get; set; } public string Password { get; set; } public string Host { get; set; } public int Port { get; set; }}We have the data in our JSON file. How do we tranfer these data to an instance of MailSettings at runtime? You are right. IOptions and Dependency Injection to the rescue. Navigate to Starup/ConfigureServices Method and add the following line.
services.Configure<MailSettings>(Configuration.GetSection("MailSettings"));What this does it quite simple. The configuration is an instance of IConfiguration that can read the appSettings.JSON. Now that we are on the Development Environment, it will by default read the data from the appsettings.Development.Json. Then we will have to attach these data to a MailSettings class. For this, we add services.Configure<MailSettings> against the MailSettings section from the JSON. Get it? This is much much better than to simply hardcode all the details within your application code.
Step 4 - Add a Service Layer to Send Mails
Installing the Required Packages
We will be using Mailkit and Mimekit packages for this implementation. These are probably the only two nugget packages that you will need to implement mailing in your ASP.NET Core Applications.
Open up Package Manager Console and install the following.
Install-Package MailKitInstall-Package MimeKitNow with that out of the way, let’s build Service classes that is actually responsible to send Mails. Add an Interface first. Services/IMailService.cs
public interface IMailService{ Task SendEmailAsync(MailRequest mailRequest);}We will have a method that takes in the MailRequest object and sends the email. Next, Add a concrete class that will implement this interface. Services/MailService.cs
public class MailService : IMailService{ private readonly MailSettings _mailSettings; public MailService(IOptions<MailSettings> mailSettings) { _mailSettings = mailSettings.Value; }}You can see that we are Injecting the IOptions<MailSettings> to the constructor and assigning it’s value to the instance of MailSettings. Like this, we will be able to access the data from the JSON at runtime. Now, let’s add the missing Method.
public async Task SendEmailAsync(MailRequest mailRequest){ var email = new MimeMessage(); email.Sender = MailboxAddress.Parse(_mailSettings.Mail); email.To.Add(MailboxAddress.Parse(mailRequest.ToEmail)); email.Subject = mailRequest.Subject; var builder = new BodyBuilder(); if (mailRequest.Attachments != null) { byte[] fileBytes; foreach (var file in mailRequest.Attachments) { if (file.Length > 0) { using (var ms = new MemoryStream()) { file.CopyTo(ms); fileBytes = ms.ToArray(); } builder.Attachments.Add(file.FileName, fileBytes, ContentType.Parse(file.ContentType)); } } } builder.HtmlBody = mailRequest.Body; email.Body = builder.ToMessageBody(); using var smtp = new SmtpClient(); smtp.Connect(_mailSettings.Host, _mailSettings.Port, SecureSocketOptions.StartTls); smtp.Authenticate(_mailSettings.Mail, _mailSettings.Password); await smtp.SendAsync(email); smtp.Disconnect(true);}The basic idea is to create an object of MimeMessage (a class from Mimekit )and send it using a SMTPClient instance (Mailkit).
Line 3 - 6 Creates a new object of MimeMessage and adds in the Sender, To Address and Subject to this object. We will be filling the message related data (subject, body) from the mailRequest and the data we get from our JSON File.
Line 8 - 23 - If there are any attachments (files) in the request object, we transform the file to an attachment and add it to the mail message as an Attachment Object of Body Builder.
Line 24 - Here we the HTML part of the email from the Body property of the request.
Line 25 - Finally, add the attachment and HTML Body to the Body of the Email.
Add the other required information.
Line 29 - Send the Message using the smpt’s SendMailAsync Method.
Configuring Services
We will have to register the IMailService and MailService to our container. For this, navigate to Startup/ConfigureServices.cs and add the following.
services.AddTransient<IMailService, Services.MailService>();Adding the Controller Method
Finally, we will have to wire up an API Endpoint to Send Emails using our Service class. Go to MailController and add an Action Method.
[Route("api/[controller]")][ApiController]public class MailController : ControllerBase{    private readonly IMailService mailService;    public MailController(IMailService mailService)    {        this.mailService = mailService;    }    [HttpPost("send")]    public async Task<IActionResult> SendMail([FromForm]MailRequest request)    {        try        {            await mailService.SendEmailAsync(request);            return Ok();        }        catch (Exception ex)        {            throw;        }
    }}
Do not forget to to inject the mailService object to the Constructor. After that, I add an new POST Action Method, SendMail which takes in Mailrequest From the Form-Data of the Request Body. This is because we will be using Postman to test our API. That’s everything you woulod have to do to Send Emails with ASP.NET Core with multiple attachments! Let’s build the application and run it.
Step 5 - Send the Mail (Testing with Postman)
We will use POSTMAN to quickly test our endpoint. Open up Postman and send a POST request to ../api/mail/send/.
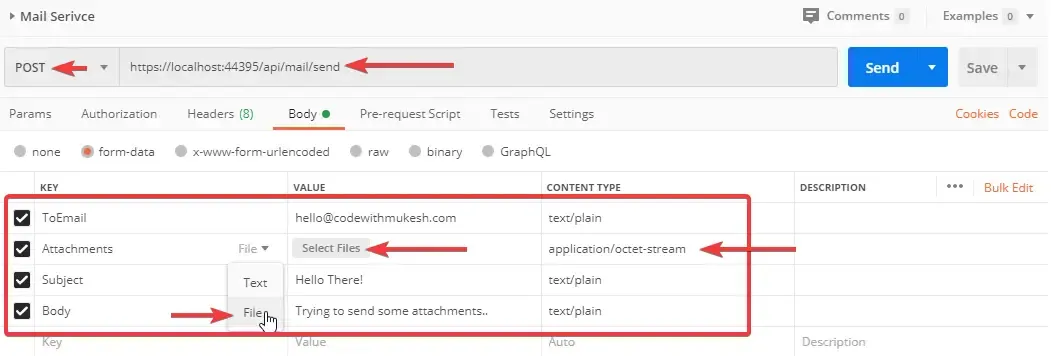
Select form-data and fill in with the following details. For Attachments, select the File option from the dropdown and select files required to send. After that, click the Send Button. You will receive a 200 OK Status code from Postman.

Here is a screenshot from Outlook. You can see that have received the mail successfully. :D Pretty Simple, yeah? Next, we will do a much cooler Mail that actually will send a Welcome Mail with some HTML Template.
HTML Templated Mails
What are HTML Templated Mails?
Ever signed up to a web application and recived a Welcome Mail and so on? You would have noticed that these mails were not plain old texts, but has some styling and images as well. These are HTML Templated Mails. Remeber when we turned isHTML to false earlier? Let’s build another end point that mimics the Welcome Mail.
Welcome Request Model
For Demonstration purpose, let’s create a new Model, Models/WelcomeRequest.cs. This is just to hold the Registered User’s Name and his/her Email Id (we will be sending to this email id.).
public class WelcomeRequest{ public string ToEmail { get; set; } public string UserName { get; set; }}Now, we will need a HTML File that is within our Server Application, to render the welcome mail. You could probably build your own simple HTML page for this purpose. I got a FREE Html Template online. You could do that as well. I am not writting down the entire HTML page here, quite long. Instead here is a link to my HTML Page on the Repository. https://github.com/iammukeshm/MailService.WebApi/blob/master/MailService.WebApi/Templates/WelcomeTemplate.html
The idea is to send a HTML templated mail that says,
Welcome <username>,You are registered using <mail>.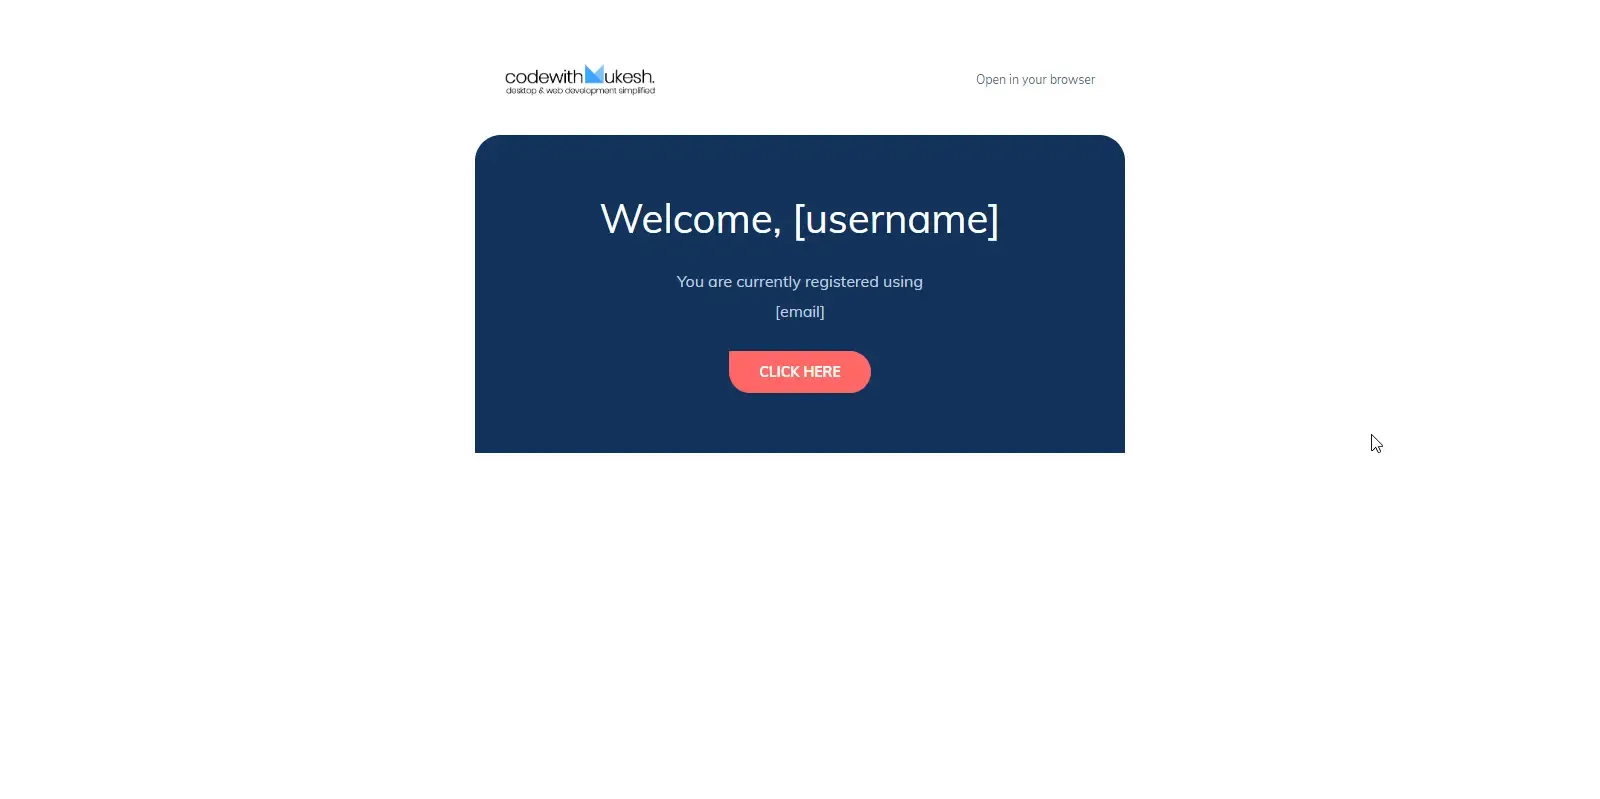
Pretty Neat, yeah? I placed this html file within my Application’s Root Directory / Templates / WelcomeTemplate.html. You guessed it correct. While sending the mail, our only task is to read the content of this HTML file and Replace the [username] and [email] with actual values :D
Let’s start by adding another function definition to our IMailService Interface.
Task SendWelcomeEmailAsync(WelcomeRequest request);Now I will implement the SendWelcomeMailAsync method.
public async Task SendWelcomeEmailAsync(WelcomeRequest request){ string FilePath = Directory.GetCurrentDirectory() + "TemplatesWelcomeTemplate.html"; StreamReader str = new StreamReader(FilePath); string MailText = str.ReadToEnd(); str.Close(); MailText = MailText.Replace("[username]", request.UserName).Replace("[email]", request.ToEmail); var email = new MimeMessage(); email.Sender = MailboxAddress.Parse(_mailSettings.Mail); email.To.Add(MailboxAddress.Parse(request.ToEmail)); email.Subject = $"Welcome {request.UserName}"; var builder = new BodyBuilder(); builder.HtmlBody = MailText; email.Body = builder.ToMessageBody(); using var smtp = new SmtpClient(); smtp.Connect(_mailSettings.Host, _mailSettings.Port, SecureSocketOptions.StartTls); smtp.Authenticate(_mailSettings.Mail, _mailSettings.Password); await smtp.SendAsync(email); smtp.Disconnect(true);}This is quite a smiliar method like the previous one. I am sure it is possible to refactor these methods and reduce the lines of code. I will leave that you.
Line 3 - We get the file path of our welcome template.
Line 4 - 6, we read the file into a string.
Line 7 - Now, I replace the username and email tag with the actual data.
Line 12 - Adds a default Subject.
Line 13 - Set the body of the email from the template string.
Line 18 - Send the Mail.
Finally we have to add an action method to call this Service Function. Navigate to MailController and add this method.
[HttpPost("welcome")]public async Task<IActionResult> SendWelcomeMail([FromForm]WelcomeRequest request){    try    {        await mailService.SendWelcomeEmailAsync(request);        return Ok();    }    catch (Exception ex)    {
        throw;    }}
Send a Welcome Mail - (Testing with Postman)
Build and run the application. Now switch to Postman and send a request to ../api/mail/welcome
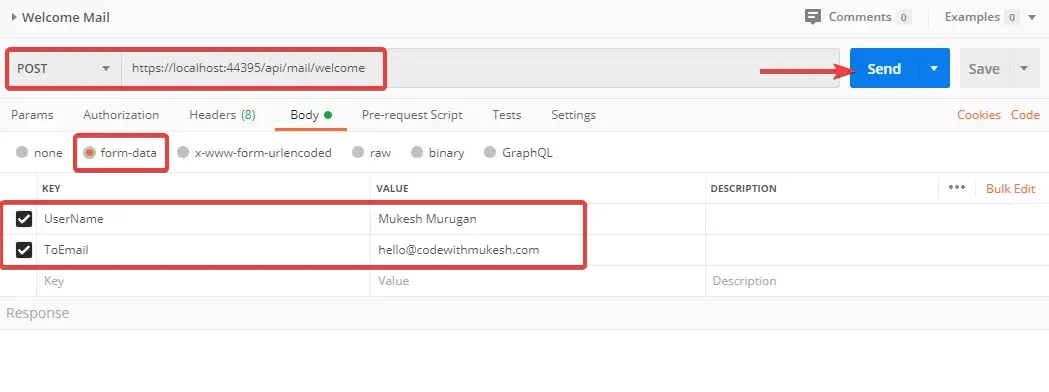
You will get a 200 Ok Status code from Postman. Let’s go on and check our Inbox :D I will add a screenshot from my Mobile.
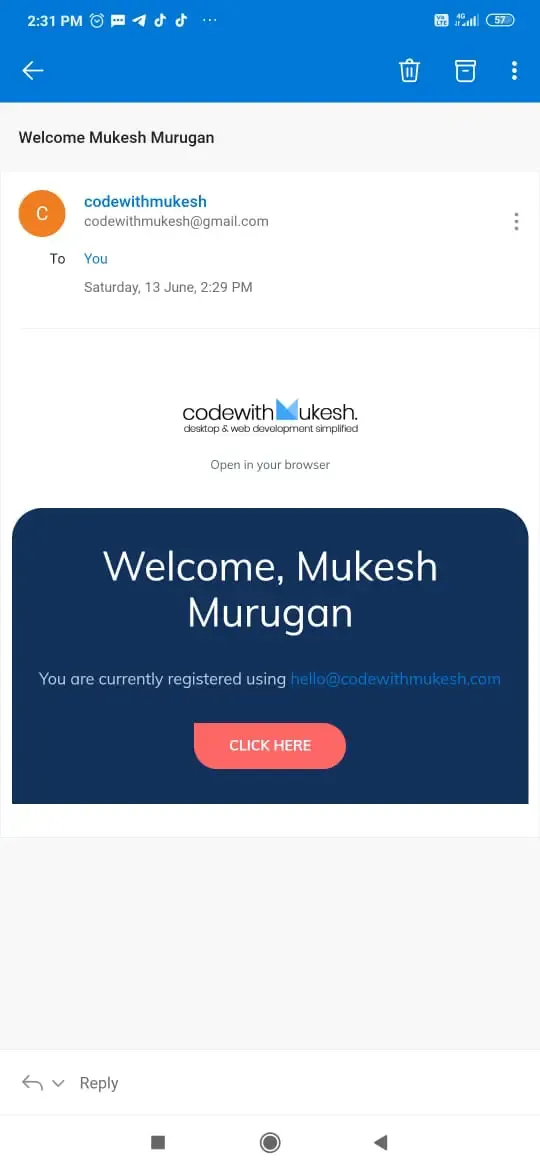
Our own Branded Email. How cool is that! You could use this approach for various other instances like, Forgot Password, Happy Birthday Mails and so on! That’s it for this detailed tutorial on How to Send Emails with ASP.NET Core.
Further Improvements
In a previous article, we discussed sending Emails using our Favorite Background Job Processor - Hangfire. You could probably integrate Hangfire to this Mail Service so that we send these emails in the background. You can read the Hangfire article here
Instead of storing the HTML Templates to the file system. you could also store the HTML content to maybe a Template Table in a centrral Database. This would make things more accessible throughout the network.
Alternatively, you could use other Providers like Sendgrid that gives you access to their APIs to send Mails for Marketing and Transactional Purposes. With them you get around 40,000 emails per day for the first 30 days, then it falls back to 100 a day in the FREE Plan. Do check it out.
Summary
In this detailed Guide, We covered all that is needed to Send Emails with ASP.NET Core in Just 5 Simple Steps. I hope you guys liked this write-up. You can find the source code to this Guide here on my GitHub repo. Do follow me there as well. Share your comments and suggestions about this article in the comments section below. And do not forget to share this article within your developer community! Thanks and Happy Coding :D

