Token Authentication in WebAPI is pretty Smart & Simple! In this In-Depth Guide, let’s learn How to Secure ASP.NET Core API with JWT Authentication that facilitates user registration, JWT Token Generation, and Authentication, User Role Management, and more. You could use this demonstration as a boilerplate template to secure your future/existing APIs with ease. I will leave the link to the GitHub repository at the end of this article.
Disclaimer: This is a quite detailed guide with more than 3000 words. Do not forget to grab a beer/coffee and bookmark this page before continuing_! :D_
The Need to Secure APIs
Since WebApis are stateless, securing them cannot depend on the server sessions. Each request to the concerned API endpoint must contain credential like data that specifically authenticates/authorizes users to access the API data. These credential like data are often placed in the HTTP Headers of the Request Message. There are various ways to Authenticate ASP.NET Core API. In this Guide let’s build a Secure ASP.NET Core API with JWT Authentication.
What is JWT?
This is one of the most commonly used techniques to secure APIs, allowing users to access resources they are authorized to.

Structure of JSON Web Token
Header
Usually contains the details on type of Token (JWT) and the algorithm used to sign the token, such as RSA, SHA256.
Payload
This is the most important section of the JWT. It contains the claims, which is technically the data we are trying to secure. Claims are details about the user, expiration time of the token, etc
Signature
For this section, it is an encryption between the header, payload and a secret key.
You can visit https://jwt.io/#debugger-io to decode, verify and play around with JSON Web Tokens. PS - You would be able to decode JWTs only if you have an actual valid JSON Web Token and a Secret key which is never exposed to the outside world.
Securing ASP.NET Core API with JWT Authentication - Core 3.1
Let’s start implementing JWT Authentication and Secure our ASP.NET Core API. As mentioned earlier, by the end of this article you will be able to register users, secure API endpoints, and we’ll go through role-based Authorization as well. Here is the long list of features we will be implementing in this Solution
- Entity Framework Core - Code First Approach - I have an article regarding this, check it out!
- Seeding the Database
- Microsoft Identity
- User Roles
- Custom Implementation of IdentityUser Class
- API Endpoint to Register a user with email, username, password, firstname, lastname.
- API Endpoint to Generate a valid token for the user who requests with his/her credentials.
- Secured API Endpoint which can be accessed only by an Authenticated user (JWT).
- Adding Roles to Existing Users.
- Secured API Endpoint that demonstrates Role-based Authorization (Only by Admins)
- Testing the Endpoints with Postman
Once implemented, we will have a close-to-production ready Authentication / Authorization system for your ASP.NET Core Applications.
Setting up the Project
Create a new ASP.NET Core 3.1 Application with the API template. We will use Postman for sending requests to our secure API. I use Visual Studio 2019 Community as my go-to IDE for C# development.
Installing the Required Packages
Install-Package Microsoft.AspNetCore.Authentication.JwtBearerInstall-Package Microsoft.AspNetCore.Identity.EntityFrameworkCoreInstall-Package Microsoft.EntityFrameworkCoreInstall-Package Microsoft.EntityFrameworkCore.DesignInstall-Package Microsoft.EntityFrameworkCore.SqlServerInstall-Package Microsoft.EntityFrameworkCore.ToolsInstall-Package Microsoft.VisualStudio.Web.CodeGeneration.DesignInstall-Package System.IdentityModel.Tokens.JwtJWT Settings
Let’s add the Settings for JWT to our appsettings.json
"JWT": { "key": "C1CF4B7DC4C4175B6618DE4F55CA4", "Issuer": "SecureApi", "Audience": "SecureApiUser", "DurationInMinutes": 60 }Key - The Super Secret Key that will be used for Encryption. You can move this somewhere else for extra security.
Issuer - identifies the principal that issued the JWT.
Audience - identifies the recipients that the JWT is intended for.
DurationInMinutes - Defines the Minutes the generated JWT will remain valid.
Now create a new class, Settings/JWT.cs which will be used to read data from our previously created JWT Section of appsettings.json using the IOptions feature of ASP.NET Core.
public class JWT{ public string Key { get; set; } public string Issuer { get; set; } public string Audience { get; set; } public double DurationInMinutes { get; set; }}Application User Model
Create a new class, Models/ApplicationUser.cs. Here we inherit from the IdentityUser Base Class and add additional properties like FirstName and LastName of the user.
public class ApplicationUser : IdentityUser{ public string FirstName { get; set; } public string LastName { get; set; }}Adding DbContext
We will keep this part simple. We will use the DbContext Class only for adding the Identity(User) Tables and nothing more. Create a class, Contexts/ApplicationDbContext.cs.
public class ApplicationDbContext : IdentityDbContext<ApplicationUser>{ public ApplicationDbContext(DbContextOptions<ApplicationDbContext> options) : base(options) { }}Adding the Connection String
Now, Add the ConnectionString of the Database you want to point to. Add these lines to appsettings.json
"ConnectionStrings": { "DefaultConnection": "Your Connection String Here" },Seeding the Database
What is Seeding?
During development, we may need some sample data in our database to test the application. EF Core addresses this requirement by the Seed Functionality. It essentially means that we can push sample data to the database at defined entry events. In this scenario we will add default Roles and a default user to our database using this feature.
Now let’s create a class, Constants/Authorization.cs in which we define the Supported Roles and a default user.
public class Authorization{ public enum Roles { Administrator, Moderator, User } public const string default_username = "user"; public const string default_password = "Pa$$w0rd."; public const Roles default_role = Roles.User;}Line #3 to 8 - We define a Roles Enum of our Supported Roles, ie, Administrator, Moderator, User
Line #9 to 12 - We define the default user details. Note that the default user will have a User Role attached,
With that out of the way, Let’s create another class, Contexts/ApplicationDbContextSeed.cs to add the default data.
public class ApplicationDbContextSeed{    public static async Task SeedEssentialsAsync(UserManager<ApplicationUser> userManager, RoleManager<IdentityRole> roleManager)    {        //Seed Roles        await roleManager.CreateAsync(new IdentityRole(Authorization.Roles.Administrator.ToString()));        await roleManager.CreateAsync(new IdentityRole(Authorization.Roles.Moderator.ToString()));        await roleManager.CreateAsync(new IdentityRole(Authorization.Roles.User.ToString()));
        //Seed Default User        var defaultUser = new ApplicationUser { UserName = Authorization.default_username, Email = Authorization.default_email, EmailConfirmed = true, PhoneNumberConfirmed = true };
        if (userManager.Users.All(u => u.Id != defaultUser.Id))        {            await userManager.CreateAsync(defaultUser, Authorization.default_password);            await userManager.AddToRoleAsync(defaultUser, Authorization.default_role.ToString());        }    }}
We have made the seed class, but haven’t invoked it in our application yet. I prefer to call this seed class during the start of the application. For this, modify the Program.cs/Main class like the below.
public async static Task Main(string[] args){    var host = CreateHostBuilder(args)                    .Build();
    using (var scope = host.Services.CreateScope())    {        var services = scope.ServiceProvider;        var loggerFactory = services.GetRequiredService<ILoggerFactory>();        try        {            //Seed Default Users            var userManager = services.GetRequiredService<UserManager<ApplicationUser>>();            var roleManager = services.GetRequiredService<RoleManager<IdentityRole>>();            await ApplicationDbContextSeed.SeedEssentialsAsync(userManager, roleManager);        }        catch (Exception ex)        {            var logger = loggerFactory.CreateLogger<Program>();            logger.LogError(ex, "An error occurred seeding the DB.");        }    }
    host.Run();}
Here we are calling the Seed class while the application starts. Once the application fires up, the default data will be posted to the database if these data doesn’t exists. You get the point yeah?
Secured Controller
For this demonstration, we will be securing this controller. <localhost>/api/secured. We have added an Authorize Attribute to the top, which means that only authorized requests will be able to access the endpoint. We have an action method, GetSecuredData (a dummy method) which is to be secured by our API.
[Authorize][Route("api/[controller]")][ApiController]public class SecuredController : ControllerBase{ [HttpGet] public async Task<IActionResult> GetSecuredData() { return Ok("This Secured Data is available only for Authenticated Users."); }}User Service
We will need a Services class that contains the Core User Functions like Register, Generate JWTs etc. Create a new Interface, Services/IUserService.cs
public interface IUserService{}And it’s concrete class, Services/UserService.cs. Let them be empty for now. We will add the functions whenever we need them further in this article.
public class UserService : IUserService{    private readonly UserManager<ApplicationUser> _userManager;    private readonly RoleManager<IdentityRole> _roleManager;    private readonly JWT _jwt;
    public UserService(UserManager<ApplicationUser> userManager, RoleManager<IdentityRole> roleManager, IOptions<JWT> jwt)    {        _userManager = userManager;        _roleManager = roleManager;        _jwt = jwt.Value;    }}
User Controller
Create a Controller that consumes the UserService. Let’s call this controller, Controllers/UserController.cs. Do Inject the UserService Interface as well.
[Route("api/[controller]")][ApiController]public class UserController : ControllerBase{ private readonly IUserService _userService; public UserController(IUserService userService) { _userService = userService; }}Configuring Startup
Finally, let’s modify the 2 functions of Startup.cs
public void Configure(IApplicationBuilder app, IWebHostEnvironment env){ if (env.IsDevelopment()) { app.UseDeveloperExceptionPage(); } app.UseHttpsRedirection(); app.UseRouting(); app.UseAuthentication(); app.UseAuthorization(); app.UseEndpoints(endpoints => { endpoints.MapControllers(); });}Make sure that app.UseAuthentication(); always comes before app.UseAuthorization();, since you technically need to Authenticate the user first, and then Authorize.
Now let’s configure the authentication , Add the context classes , userservice classes to our application.
public void ConfigureServices(IServiceCollection services){    //Configuration from AppSettings    services.Configure<JWT>(_configuration.GetSection("JWT"));    //User Manager Service    services.AddIdentity<ApplicationUser, IdentityRole>().AddEntityFrameworkStores<ApplicationDbContext>();    services.AddScoped<IUserService, UserService>();    //Adding DB Context with MSSQL    services.AddDbContext<ApplicationDbContext>(options =>        options.UseSqlServer(            _configuration.GetConnectionString("DefaultConnection"),            b => b.MigrationsAssembly(typeof(ApplicationDbContext).Assembly.FullName)));    //Adding Athentication - JWT    services.AddAuthentication(options =>    {        options.DefaultAuthenticateScheme = JwtBearerDefaults.AuthenticationScheme;        options.DefaultChallengeScheme = JwtBearerDefaults.AuthenticationScheme;    })
        .AddJwtBearer(o =>        {            o.RequireHttpsMetadata = false;            o.SaveToken = false;            o.TokenValidationParameters = new TokenValidationParameters            {                ValidateIssuerSigningKey = true,                ValidateIssuer = true,                ValidateAudience = true,                ValidateLifetime = true,                ClockSkew = TimeSpan.Zero,
                ValidIssuer = _configuration["JWT:Issuer"],                ValidAudience = _configuration["JWT:Audience"],                IssuerSigningKey = new SymmetricSecurityKey(Encoding.UTF8.GetBytes(_configuration["JWT:Key"]))            };        });    services.AddControllers();}
Line #4 Adds the JWT Section from appsettings to our JWT Class.
Line 6 and 7 Adds Identity and User Service to the application.
Line #14 to 36 is for JWT Authentication. Let’s go in detail.
Line #14 is a default extension in ASP.NET Core to add Authentication Service to the application.
Line #16 and 17 defined the default type of authentication we need, ie, JWT Bearer Authentication.
From Line #20 it is about configuring the JWT Bearer.
Line #22 defines if we need an HTTPS connection. Let’s set it to false.
Line #32 to 32 reads the settings from appsettings.json and adds to the JWT Object.
Migrations & Updating the Database
Now that our context classes, required services, and connection strings are added, let’s go and generate our database. Run the following commands on the Package Manager Console to apply the migrations.
add-migration “initial” update-database
Once the operations are completed, you will get a “Done” message on the console. Build and Run the Application. Open up SQL Server Object Explorer to investigate the created database. Let’s check if the default user and Roles are added to the Database.
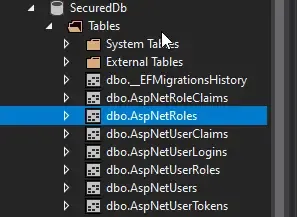
You can see the the database was created succesfully. Open up the AspNetUser Table. This is the table from Identity that store the user details.

Our default user was added. Let’s now check if the Seeded Roles are added. For this open up the AspNetUserRoles tables.

Great, the roles are added as well. Let’s now proceed with the actual tasks.
Registering a New User
Now, we need an endpoint to allow users to register. To this endpoint the user has to post his name,email and password. If these are valid, we register the user with the default role as User.
For this, let’s create Models/RegisterModel.cs with the following properties. The user has to post data with this object to register.
public class RegisterModel{ [Required] public string FirstName { get; set; } [Required] public string LastName { get; set; } [Required] public string Username { get; set; } [Required] public string Email { get; set; } [Required] public string Password { get; set; }}In IUserService.cs, add a function definition to Register the user accepting a Register Model.
Task<string> RegisterAsync(RegisterModel model);Go to the Concrete class, UserService to implement the Register Function.
public async Task<string> RegisterAsync(RegisterModel model){    var user = new ApplicationUser    {        UserName = model.Username,        Email = model.Email,        FirstName = model.FirstName,        LastName = model.LastName    };    var userWithSameEmail = await _userManager.FindByEmailAsync(model.Email);    if (userWithSameEmail == null)    {        var result = await _userManager.CreateAsync(user, model.Password);        if (result.Succeeded)        {            await _userManager.AddToRoleAsync(user, Authorization.default_role.ToString());
        }        return $"User Registered with username {user.UserName}";    }    else    {        return $"Email {user.Email } is already registered.";    }}
Here, we take in the RegisterModel object, and create a new ApplicationUser model object from it. We will also have some kind of validation to check if the email is already registered with our api. If the email is not used already, we will proceed to creating the user and adding a Role ‘User’.Else, let’s send a message that says, “Already Registered.”
Let’s call this method from an API endpoint. Go to Controllers/UserController and add this set of code. Here we take in the Register model and pass it to user service, which returns a specific string message.
[HttpPost("register")]public async Task<ActionResult> RegisterAsync(RegisterModel model){
    var result = await _userService.RegisterAsync(model);    return Ok(result);}
Testing with Postman
Open up Postman and define a raw JSON object that is to be posted to <localhost>/api/user/register

You will get a message confirming user registration.
Requesting Secured Controller with Postman
Remember we have a secured Controller / endpoint at ../api/secured ? Let’s try to access it via Postman.

As expected, we get a 401 Unauthorized Error. Why? Because we have not passed a valid JWT token to the endpoint yet. How do you get the token ? Well, let’s build another endpoint that generates this JWT token for us.
Generate JWT Token
Now that we have completed Registration, let’s try to fetch the JWT Token. We will build a Token Generation function that takes in a TokenRequestModel (email, password) , validates if the email and password , and build a token for us.
Start by creating Models/TokenRequestModel.cs
public class TokenRequestModel{ [Required] public string Email { get; set; } [Required] public string Password { get; set; }}Now, create another class, Models/AuthenticationModel.cs which is basically the response from the endpoint. The endoint is supposed to return you a status message, user details, his/her roles and finally our token.
public class AuthenticationModel{ public string Message { get; set; } public bool IsAuthenticated { get; set; } public string UserName { get; set; } public string Email { get; set; } public List<string> Roles { get; set; } public string Token { get; set; }}Go back to IUserService.cs and add a GetTokenAsync Method.
Task<AuthenticationModel> GetTokenAsync(TokenRequestModel model);Let’s implement it in our Concrete Class, Services/UserService.cs.
public async Task<AuthenticationModel> GetTokenAsync(TokenRequestModel model){    var authenticationModel = new AuthenticationModel();    var user = await _userManager.FindByEmailAsync(model.Email);    if (user == null)    {        authenticationModel.IsAuthenticated = false;        authenticationModel.Message = $"No Accounts Registered with {model.Email}.";        return authenticationModel;    }    if (await _userManager.CheckPasswordAsync(user, model.Password))    {        authenticationModel.IsAuthenticated = true;        JwtSecurityToken jwtSecurityToken = await CreateJwtToken(user);        authenticationModel.Token = new JwtSecurityTokenHandler().WriteToken(jwtSecurityToken);        authenticationModel.Email = user.Email;        authenticationModel.UserName = user.UserName;        var rolesList = await _userManager.GetRolesAsync(user).ConfigureAwait(false);        authenticationModel.Roles = rolesList.ToList();        return authenticationModel;    }    authenticationModel.IsAuthenticated = false;    authenticationModel.Message = $"Incorrect Credentials for user {user.Email}.";    return authenticationModel;}private async Task<JwtSecurityToken> CreateJwtToken(ApplicationUser user){    var userClaims = await _userManager.GetClaimsAsync(user);    var roles = await _userManager.GetRolesAsync(user);
    var roleClaims = new List<Claim>();
    for (int i = 0; i < roles.Count; i++)    {        roleClaims.Add(new Claim("roles", roles[i]));    }
    var claims = new[]    {        new Claim(JwtRegisteredClaimNames.Sub, user.UserName),        new Claim(JwtRegisteredClaimNames.Jti, Guid.NewGuid().ToString()),        new Claim(JwtRegisteredClaimNames.Email, user.Email),        new Claim("uid", user.Id)    }    .Union(userClaims)    .Union(roleClaims);
    var symmetricSecurityKey = new SymmetricSecurityKey(Encoding.UTF8.GetBytes(_jwt.Key));    var signingCredentials = new SigningCredentials(symmetricSecurityKey, SecurityAlgorithms.HmacSha256);
    var jwtSecurityToken = new JwtSecurityToken(        issuer: _jwt.Issuer,        audience: _jwt.Audience,        claims: claims,        expires: DateTime.UtcNow.AddMinutes(_jwt.DurationInMinutes),        signingCredentials: signingCredentials);    return jwtSecurityToken;}
Line #3 Creating a new Response Object,
Line #4 to #10 checks if the passeed email is valid. Return a message if not valid.
Line #11 Checks if the password is valid, else returns a message saying incorrect credentials.
Line #14 Calls the CreateJWTToken function.
Line #20 returns the response object
Line #26 to 58 builds the JWT.
Line #28 gets all the claims of the user ( user details )
Line #29 gets all the roles of the user.
Line #51 to #57 creates a new JWT Security Token and returns them.
Now that our Service Function is done, let’s wire it up with the User Controller. Add the following to Controllers/UserController.cs
[HttpPost("token")]public async Task<IActionResult> GetTokenAsync(TokenRequestModel model){ var result = await _userService.GetTokenAsync(model); return Ok(result);}Theoretically, on posting a valid email and password to ../api/user/token, We are supposed to receive a AuthenticationModel object containing user details and our precious JWT Token (that expires in 60 minutes). Fire up Postman and do the following.
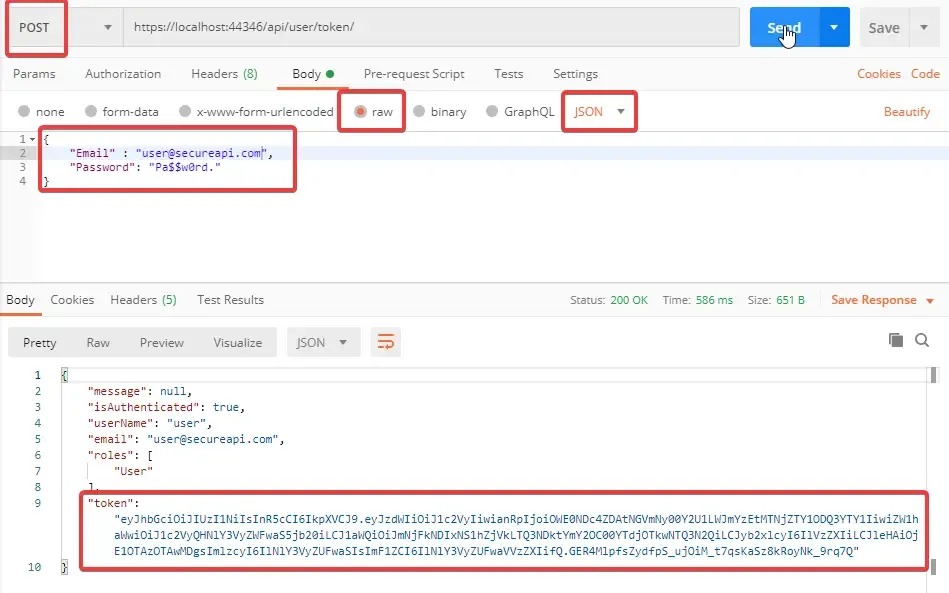
You can see that, on posting valid credentials we have now received the token along with user detials. Let’s post a invalid email and check the response.

Cool right? Let’s post a valid email with a wrong password.

Pretty Secure now huh? Now let’s copy the generated Token string and try to access the secured endpoint. In postman, go the Authorization Tab and Change the type to Bearer Token , Paste your Token and click on send. Now the 401 error goes away, You have successfully accessed the secure controller with JWT tokens.
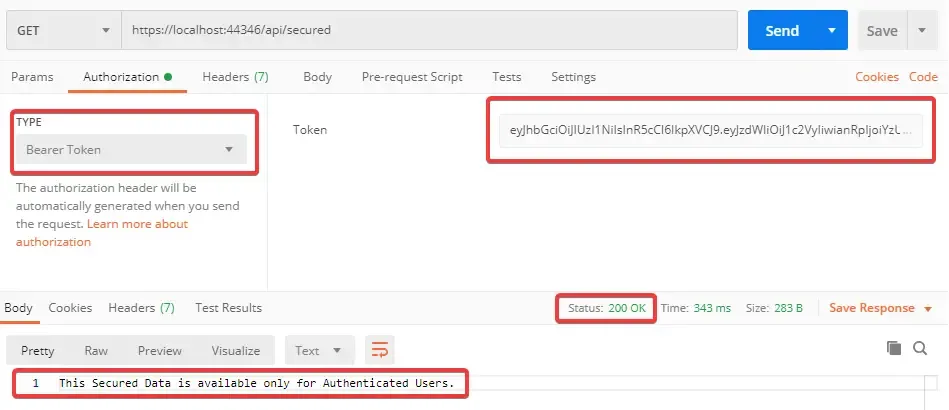
Authorization
We are done with Authentication, let’s go to Authorization.
Authentication vs Authorization.
Authentication means confirming your identity, proving that you are a user registered in the system. We have already done that.
Authorization means verifying that you as a user have enough permission to access a particular resource. In APIs, there can be endpoints that are accessible only for the Admins.
Let’s add a new action method in our Controllers/SecuredController.cs. Let’s build this method in a way that only the users who have an ‘Administrator’ Role can access. This can be easily done by adding a Role property to the Authorize attribute and specifying the allowed Roles.
[HttpPost][Authorize(Roles ="Administrator")]public async Task<IActionResult> PostSecuredData(){ return Ok("This Secured Data is available only for Authenticated Users.");}When you try to POST to the secured endpoint with a valid JWT token, you can notice that we get a new error, 403 Forbidden. This means that you do not have enough permission to access this endpoint.
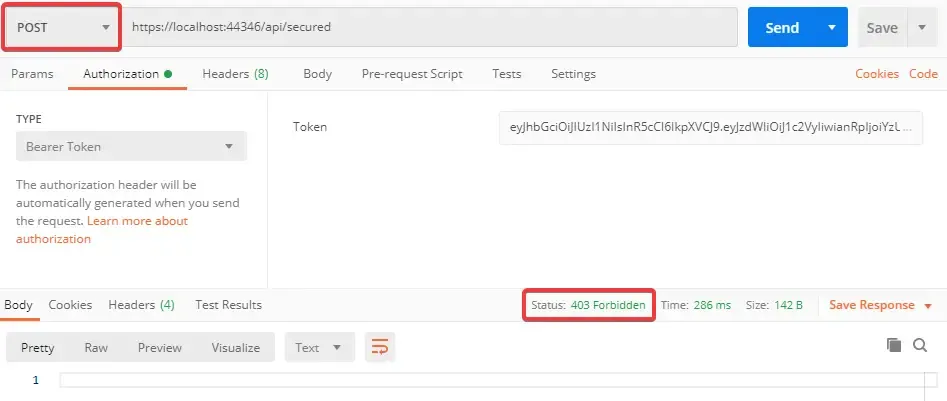
Adding Roles to User
Let’s create our last function which is responsible to add Roles to a specified user. With this, you can upgrade the permissions of a user, so that he/she can become a Moderator / Administrator and access our secured endpoint.
Create a new Model class, Models/AddRoleModel.cs with the following Properties.
public class AddRoleModel{ [Required] public string Email { get; set; } [Required] public string Password { get; set; } [Required] public string Role { get; set; }}Add this to Services/IUserService.cs Interface.
Task<string> AddRoleAsync(AddRoleModel model);Let’s implement the AddRoleSync Function in Services/IUserService.cs
public async Task<string> AddRoleAsync(AddRoleModel model){ var user = await _userManager.FindByEmailAsync(model.Email); if (user == null) { return $"No Accounts Registered with {model.Email}."; } if (await _userManager.CheckPasswordAsync(user, model.Password)) { var roleExists = Enum.GetNames(typeof(Authorization.Roles)).Any(x => x.ToLower() == model.Role.ToLower()); if (roleExists) { var validRole = Enum.GetValues(typeof(Authorization.Roles)).Cast<Authorization.Roles>().Where(x => x.ToString().ToLower() == model.Role.ToLower()).FirstOrDefault(); await _userManager.AddToRoleAsync(user, validRole.ToString()); return $"Added {model.Role} to user {model.Email}."; } return $"Role {model.Role} not found."; } return $"Incorrect Credentials for user {user.Email}.";}Line #10 to #17 is our core function if the user is a valid one.
Line #11 checks if the passed Role is present in our system. If not, throws an error message.
Line #15 adds the role to the valid user.
Finally, let’s wire this function up with an action method in Controllers/UserController.cs
[HttpPost("addrole")]public async Task<IActionResult> AddRoleAsync(AddRoleModel model){ var result = await _userService.AddRoleAsync(model); return Ok(result);}This route , addrole, takes in the email, password, and required role from the request object and passes it to the Service , which in turn adds the requested role to the user, if valid. Let’s try to add a role, “Moderator” to the user.
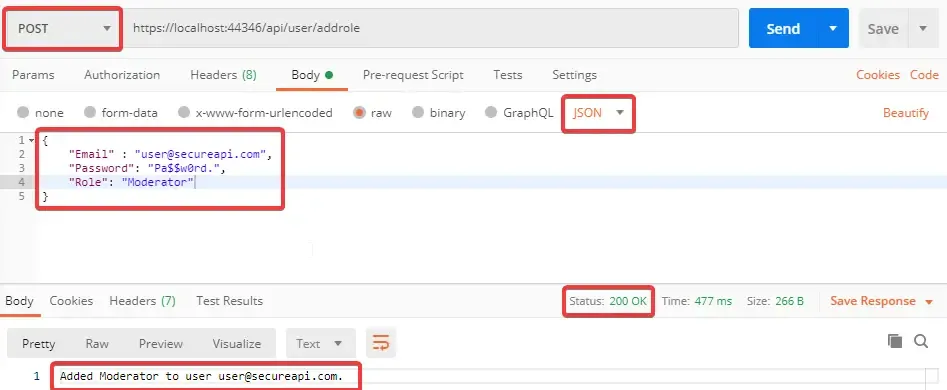
Great, it works. Now try to add a invalid role to the user. Let’s say “RandomRole”.
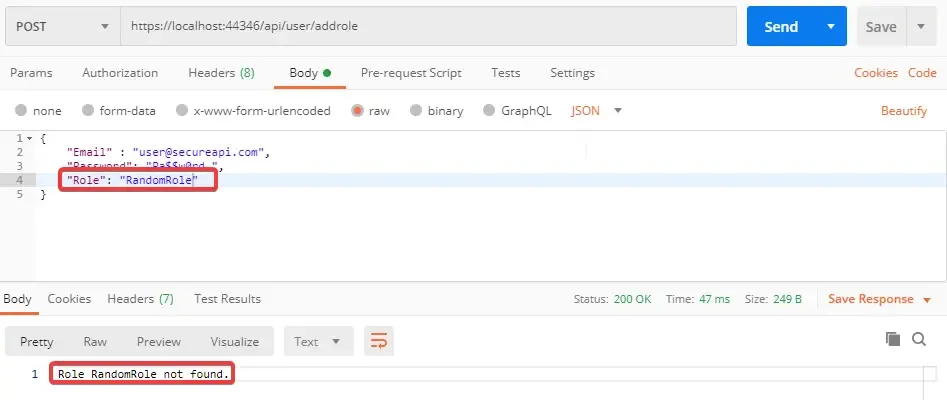
Seem fine. Role RandomRole not found. Now, Let’s elevate the user’s permission to Administrator.
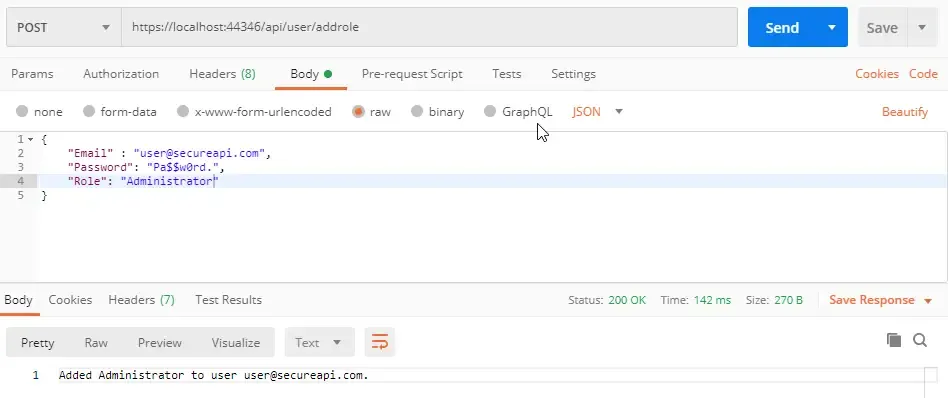
That’s done too. Now we will need a new token, since the user’s roles has changed quite a lot. The old token that we have will become invalid. Let’s request for a new token.
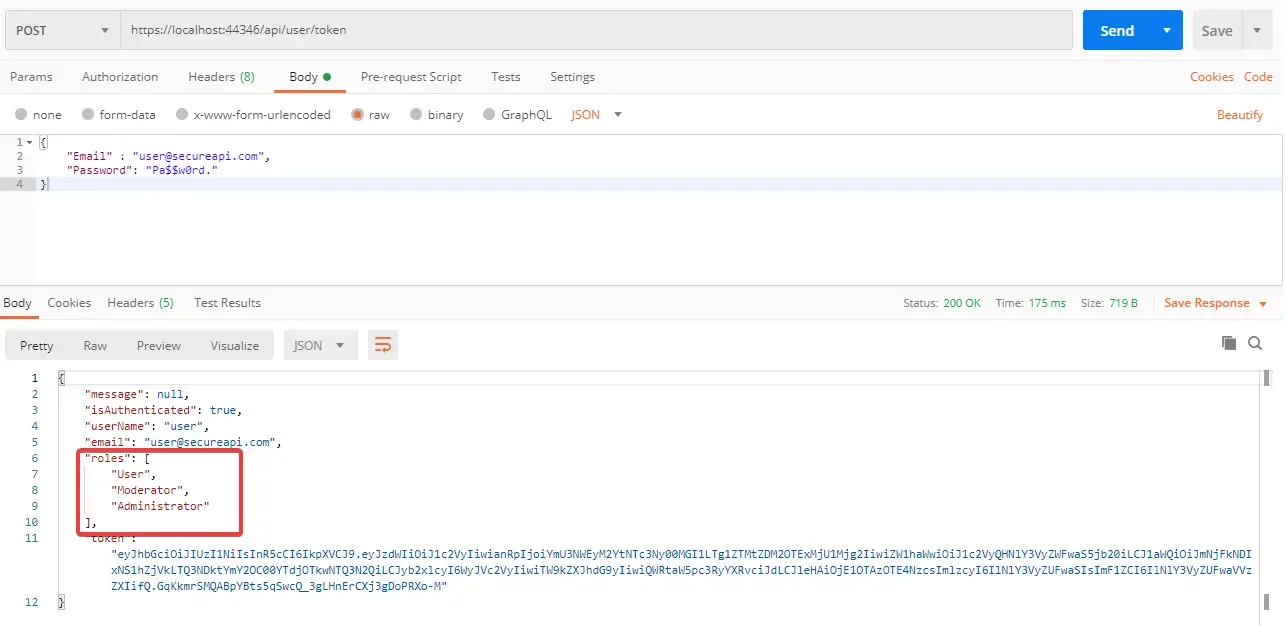
WHile requesting for the token, you can have a glance at the Roles of the User. Now the user has User/Moderator and Admin roles attached. So hopefully, with this new token, we must be able to access our second restridcted endpoint. Let’s check.

There you go! Now we have successfully completed Role Based Authorization as well. That’s it for this Huge Article. Hope you have learnt everything clearly. Bookmark this page, so that you can come back and go through one more time. It takes more than one time to understand anything clearly ;)
Summary
In this Detailed guide we have covered the basics of JWT, Registering Users, Seeding Databases, Entity Framework Core - Code First, Generating JWTs, Securing Endpoint based on Roles, Adding Roles to Users.
In the next article, we will discuss Refresh Tokens, which makes our APIs even more secure. The article is published. You can check it here to learn more about Refresh tokens and it’s implementation in ASP.NET Core APIs here.
Do you have any other queries suggestions for me? Feel free to leave them below in the comments section. Happy Coding :)


