If you’ve ever deployed a .NET app to AWS, you know the drill — spin up EC2 or ECS, fiddle with load balancers, deal with IAM roles, set up auto scaling, wire up CI/CD… and somewhere along the way, your “quick deployment” turns into a weekend project.
AWS App Runner changes that game. It’s fully managed, takes your container, and runs it with HTTPS, auto scaling, health checks, and zero server management. You focus on the app — AWS handles the plumbing.
This article is sponsored by AWS. Huge thanks for helping me produce more .NET on AWS content!
But here’s the catch: doing it manually through the AWS Console is fine for a proof-of-concept… until you have to replicate it for staging, production, or the next project. That’s where Terraform comes in. Infrastructure-as-Code means your entire App Runner service, ECR repo, IAM roles, and networking config are versioned, repeatable, and one command away from deployment.
This combo — App Runner + Terraform — hits the sweet spot for .NET teams who want:
- Simplicity of deployment without giving up control.
- Repeatability across environments (dev, staging, prod).
- CI/CD integration that actually sticks.
By the end of this guide, you’ll have a production-ready .NET app running on App Runner, fully provisioned and deployed via Terraform, with GitHub Actions doing the heavy lifting. No more manual clicks. No more “it works on my machine” excuses.
Who This Guide Is For (and who should skip it)
This guide is for .NET developers who:
- Are tired of wrestling with EC2, ECS, or Elastic Beanstalk just to get a container running.
- Want a clean, repeatable deployment process using Infrastructure-as-Code.
- Prefer focusing on application logic over server patching and load balancer tuning.
- Are looking to integrate AWS App Runner into a proper CI/CD pipeline with GitHub Actions.
You’ll get the most value if you already have some familiarity with Docker, basic AWS services, and Terraform fundamentals.
You can skip this guide if you:
- Need complex multi-container orchestration — in that case, ECS or EKS might be a better fit.
- Want deep VPC control and custom networking setups beyond what App Runner offers.
- Are building workloads that require GPU acceleration or highly specialized compute.
What You’ll Build: App Runner + Terraform + GitHub Actions (high-level architecture)
We’re putting together a streamlined pipeline that takes your .NET app from source code to a running, scalable service on AWS — all without touching the AWS Console.
Here’s the flow: you’ll containerize your .NET application with Docker, push the image to Amazon ECR, and then use Terraform to provision an AWS App Runner service that runs that image with HTTPS, auto scaling, and health checks out of the box. Terraform will also handle IAM roles, permissions, and any supporting infrastructure you need.
On top of that, GitHub Actions will automate the build and deployment process. Every time you push to your main branch, the pipeline will build the Docker image, push it to ECR, run a Terraform plan, and apply the changes — ensuring your environments stay consistent and up to date.
When you deploy an App Runner service, AWS automatically assigns it a default *.awsapprunner.com domain and provisions an AWS-managed TLS certificate for it. This means:
- You can access your app securely over HTTPS right away.
- No manual ACM certificate requests or DNS validation needed for the default domain.
Route 53 (or any other DNS provider) only comes into play if you want to use a custom domain like api.yourdomain.com. In that case, you’d map it in App Runner’s settings, validate it (via DNS), and ACM will handle the certificate for the custom domain.
Prerequisites
You need:
- AWS: An active account, a target region (e.g.,
ap-south-1). - Access: AWS CLI v2 configured with a role/user that can manage ECR, App Runner, IAM, CloudWatch, ACM (and S3/DynamoDB if you’ll use remote state within Terraform).
- Tooling:
- .NET 8+ SDK (for building/publishing)
- Docker (to build images)
- Terraform ≥ 1.12.2
- Git + GitHub (we’ll use GitHub Actions)
- Repository: A GitHub repo with a minimal
.NETWeb API, a production-gradeDockerfile, and aninfra/folder for Terraform.
Quick sanity checks (run locally):
aws sts get-caller-identity # should return your Account, Arn, UserIdaws --version # v2.xdocker version # client/server both reachabledotnet --info # .NET 8 SDK presentterraform version # >= 1.12.2Quick Links: Recommendation
Here are some of my previous articles that might help you with regards to this article’s context.
- AWS Credentials for .NET Applications – Learn how to securely handle AWS credentials in your .NET projects.
- GitHub Actions: Deploy .NET WebAPI to Amazon ECS – A similar CI/CD setup, but with ECS instead of App Runner.
- Deploying ASP.NET Core WebAPI to AWS App Runner – My earlier step-by-step guide focused purely on App Runner deployments.
- Automate AWS Infrastructure Provisioning with Terraform – A deep dive into how Terraform can save you hours of manual AWS setup.
Containerizing the .NET App
Our goal build a small, secure, production-ready image that App Runner can run without surprises. Keep it linux/amd64, listen on 8080, add a /health endpoint, and run as non-root.
I am setting up a new ASP.NET Core .NET 9 Web API project, that has a single endpoint at the root (localhost:xxxx/) which returns a Hello World Message, and a health endpoint.
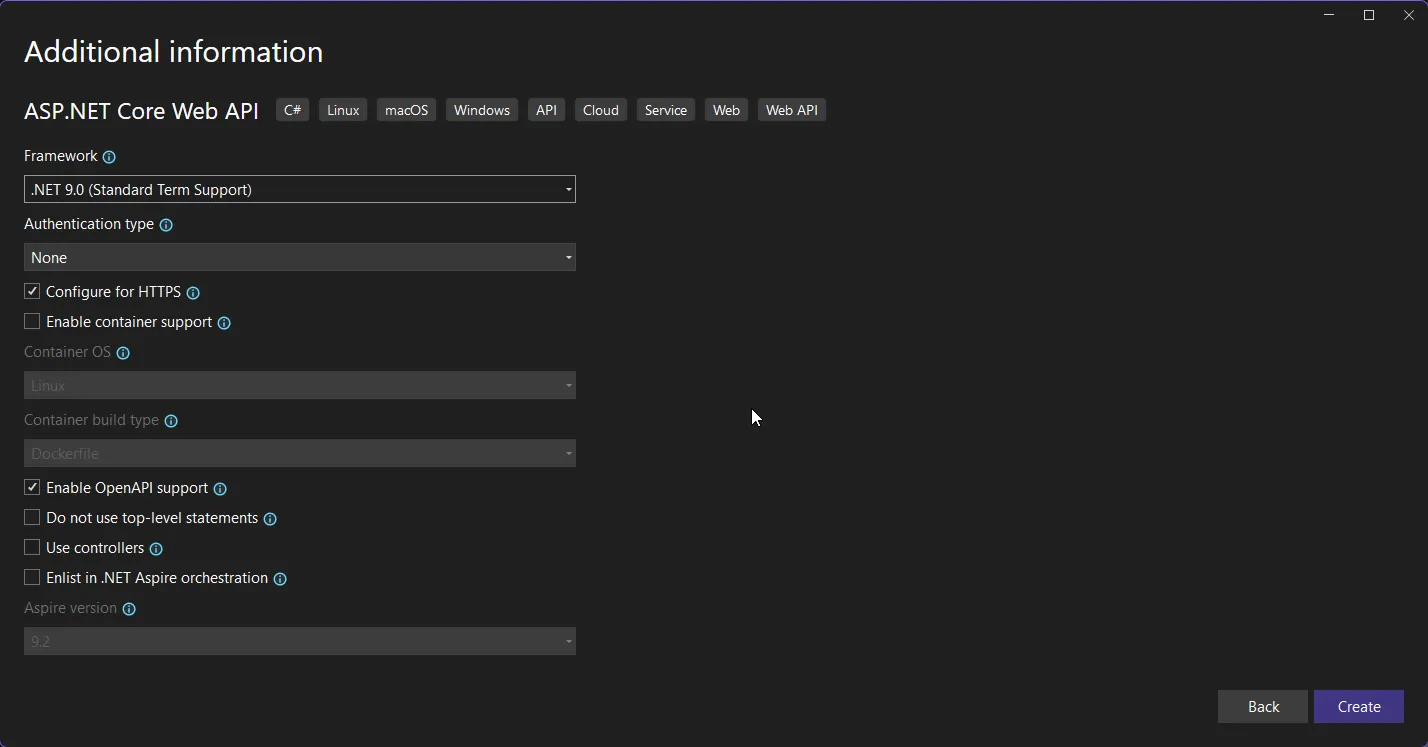
Next, Make the app predictable for App Runner: root returns “Hello World”, and a simple health check endpoint.
app.MapGet("/", () =>{    return TypedResults.Ok("Hello World");}).WithName("HelloWorld");
app.MapGet("/health", () => Results.Ok(new { status = "ok" }));
That’s it on the code side.
Let’s start adding Docker!
First up, create a Dockerfile at the root of the solution.
FROM mcr.microsoft.com/dotnet/sdk:9.0 AS buildWORKDIR /src
COPY ./src/HelloWorld/*.csproj ./src/HelloWorld/RUN dotnet restore ./src/HelloWorld/HelloWorld.csproj
COPY ./src/HelloWorld/ ./src/HelloWorld/RUN dotnet publish ./src/HelloWorld/HelloWorld.csproj -c Release -o /out \    -p:PublishReadyToRun=true \    -p:PublishSingleFile=true \    -p:InvariantGlobalization=true \    -p:TieredPGO=true \    --self-contained=false
FROM mcr.microsoft.com/dotnet/aspnet:9.0 AS runtimeENV ASPNETCORE_URLS=http://0.0.0.0:8080 \    ASPNETCORE_ENVIRONMENT=Production \    DOTNET_EnableDiagnostics=0
WORKDIR /app
RUN useradd -r -u 10001 appuser
COPY --from=build /out/ /app/EXPOSE 8080USER 10001ENTRYPOINT ["./HelloWorld"]
The Dockerfile uses a multi-stage build, which is the standard way to create lean and production-ready images. In the first stage, we start from the full .NET 9 SDK image. This container includes the compiler and all the tooling needed to restore NuGet packages and build the app. We copy in the project file first and run dotnet restore, which takes advantage of Docker’s layer caching so dependencies aren’t re-fetched on every build. Then the rest of the source code is copied in, and dotnet publish compiles the app into a trimmed, optimized output folder. Flags like PublishReadyToRun, PublishSingleFile, and TieredPGO are used to improve startup time and runtime performance, while InvariantGlobalization helps keep the final image smaller if you don’t need culture-specific formatting.
The second stage starts from the lighter ASP.NET Core 9 runtime image. This one doesn’t include build tools — only what’s necessary to run the app. We set a couple of environment variables so the app listens on port 8080 (which is what App Runner expects) and disables the diagnostics pipe for security. We also set the environment to Production so the app runs with optimized settings. The published output from the first stage gets copied into /app, which becomes the working directory for the container.
For security, the container doesn’t run as root. Instead, a dedicated non-root user (appuser) is created and the process is switched to that account. This is a basic best practice that keeps the container more secure by default. Finally, port 8080 is exposed, and the entrypoint is set to the compiled binary (./HelloWorld), which is the executable produced by dotnet publish.
The end result is a compact image that has everything needed to run your ASP.NET Core API and nothing more — no SDK, no extra tools, and no root privileges. This makes it faster to start up, smaller to ship to AWS, and safer to run in production.
Optionally, you can also add a .dockerignore file to save the size and build time.
**/bin**/obj**/.vs**/.vscode**/*.user**/*.suo**/*.swp.git.gitignoreREADME**.mdNow that everything is setup, let’s try to build the image locally, and also run it!
At the root of the repository, run the following command.
docker buildx build --platform linux/amd64 -t helloworld:local .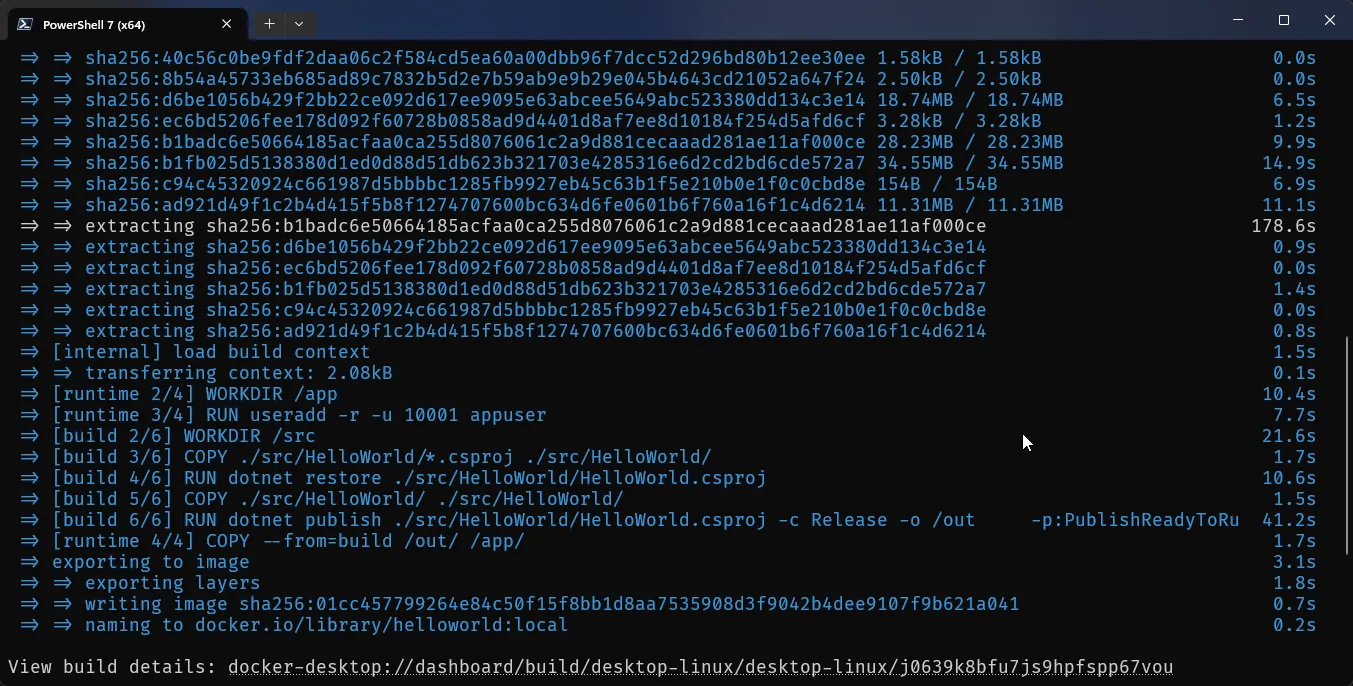
Once the build process is completed, let’s spin up a Docker container using this image. Run this command,
docker run --rm -p 8080:8080 helloworld:localOnce that’s up and running, you can navigate to
http://localhost:8080/http://localhost:8080/healthYou should be able to see the expected results on your browser!
ECR Setup & Image Lifecycle
We’ll keep this dead simple: one ECR repository, one mutable tag (latest), and a basic retention policy so your registry doesn’t bloat. No fancy versioning—out of scope for this article.
Let’s create an ECR repository to store the container image App Runner will pull.
Login to AWS Console, Navigate to Amazon ECR -> Create New Repository.
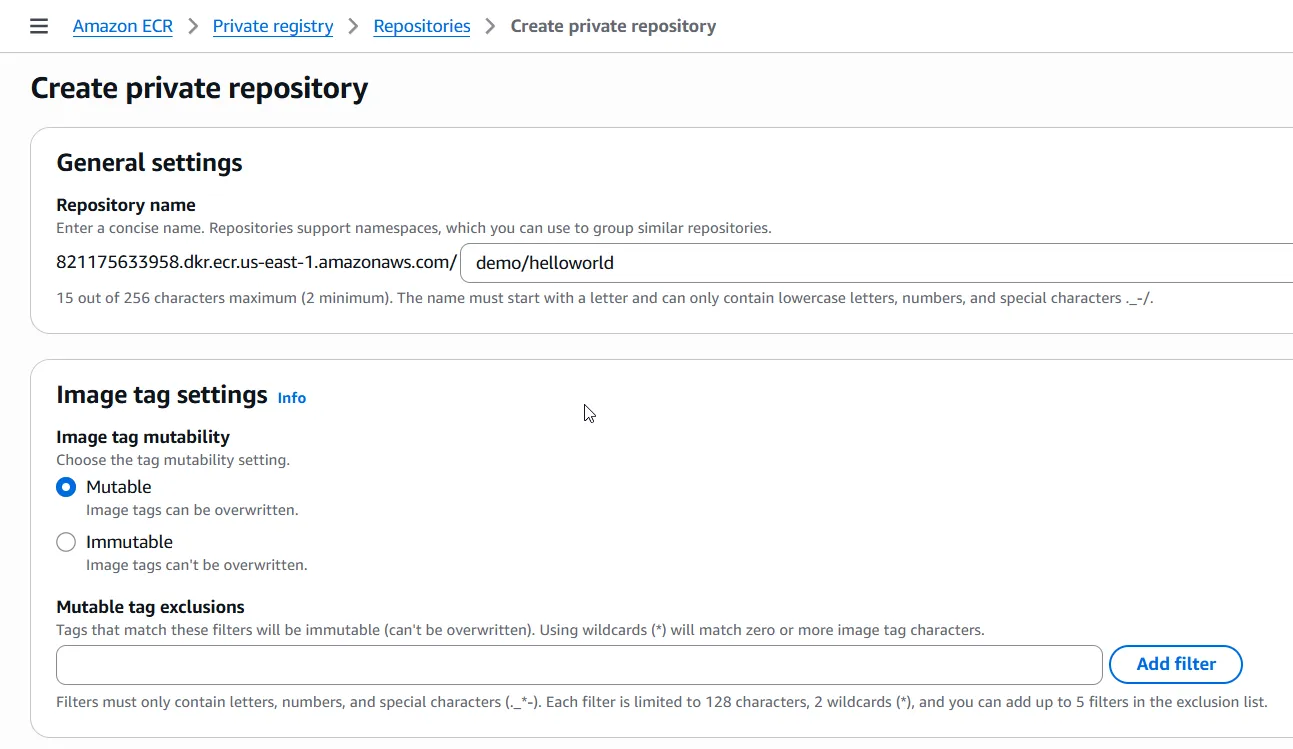
Once the repository is created, let’s try to push the image from our local to ECR by running the following command,
aws ecr get-login-password --region <aws_region> | docker login --username AWS --password-stdin <your_aws_account_number>.dkr.ecr.<aws_region>.amazonaws.comdocker buildx build --platform linux/amd64 -t <your_aws_account_number>.dkr.ecr.<aws_region>.amazonaws.com/demo/helloworld:latest .docker push <your_aws_account_number>.dkr.ecr.<aws_region>.amazonaws.com/demo/helloworld:latestThe above command would first asks AWS for a short-lived ECR password using your current credentials. That password is then piped directly into docker login, which tells Docker to authenticate against your AWS ECR registry so you can push and pull images. Ensure that your system is authenticated to work with AWS.
Post the login process, it would build the docker image locally for you with the specified tag, and then push to ECR.
Now if you navigate to your newly created ECR repository, you would able to see your latest push.

AWS App Runner - Recap
AWS App Runner is Amazon’s fully managed service for running containerized web applications and APIs without touching servers, load balancers, or scaling groups. You give it a container image (or even a Git repo), and App Runner takes care of the rest — provisioning compute, attaching a load balancer, enabling HTTPS by default, wiring health checks, and scaling your service up or down based on traffic. It’s designed for developers who want to deploy production-ready apps without the heavy lifting of ECS, EKS, or Elastic Beanstalk.
For .NET teams, App Runner is especially appealing because it removes the common infrastructure headaches: configuring EC2 capacity, setting up ALBs, patching OS images, or writing scaling policies manually. Instead, you package your Web API in a Docker image, push it to Amazon ECR, and point App Runner at it. Within minutes, your API is live on an HTTPS endpoint with built-in autoscaling.
The trade-off is that App Runner is less customizable than ECS or EKS — you don’t control the underlying VMs, networking is simpler, and advanced scenarios (like sidecars or GPU workloads) aren’t supported. But for most APIs, SaaS backends, and internal services, that simplicity is the whole point. You pay only for the CPU and memory your app consumes while it’s running, and the service automatically handles scaling and availability.
Using Terraform to define App Runner resources gives you Infrastructure-as-Code repeatability. Instead of clicking through the AWS Console, you describe your service configuration in .tf files: CPU and memory size, autoscaling thresholds, health check path, and IAM roles for ECR access. This ensures that your staging, QA, and production environments look identical, and updates are applied safely through versioned code.
In the next section, we’ll write Terraform code that provisions an App Runner service for our .NET application — complete with CPU/Memory settings, runtime config, autoscaling, and health checks — so deployment is automated, consistent, and production-ready.
Provision AWS App Runner with Terraform
At the root of the solution, create a new folder named infra. We’ll define all our terraform files here.
First up, create a provider.tf file.
variable "aws_region" {  description = "AWS region"  type        = string  default     = "us-east-1"}
provider "aws" {  region = var.aws_region}
The provider.tf file tells Terraform which cloud provider to use and in which region resources should be created. Here, we declare a variable aws_region with a default value of "us-east-1". This makes the setup flexible—you can easily switch to another AWS region by overriding the variable when running Terraform, instead of editing the code.
The provider "aws" block then uses this variable to configure the AWS provider. It ensures that all resources in this project are provisioned in the specified region, while Terraform automatically picks up your AWS credentials from your CLI or environment.
In short, provider.tf is the entry point that connects Terraform to AWS and sets the deployment region in a clean, reusable way.
Next, add a version.tf,
terraform {  required_version = "= 1.12.2"
  required_providers {    aws = {      source  = "hashicorp/aws"      version = "~> 6.0"    }  }}
This file does two things.
- It pins the Terraform CLI to version
1.12.2. That way, you (and your CI/CD pipeline) don’t accidentally run with a different version and hit weird errors. - It tells Terraform which AWS provider to use. Here we’re pulling from the official HashiCorp registry and locking to the
6.xline. That gives you the latest bug fixes and features in v6, but avoids surprises if AWS provider v7 drops breaking changes.
Next, the backend.tf
terraform { backend "s3" { bucket = "cwm-tf-states" key = "apprunner/helloworld/terraform.tfstate" region = "us-east-1" use_lockfile = true }}This little backend.tf tells Terraform where to store and coordinate state.
Instead of letting terraform.tfstate sit locally on the runner (which gets wiped out every time a GitHub Action finishes), you push the state into an S3 bucket so it’s always persisted between pipeline runs and never lost. This way, Terraform knows exactly what resources already exist, even if the workflow container is fresh every time.
Here’s what each piece means, dev-to-dev:
bucket→ The S3 bucket name where Terraform will store the state file (cwm-tf-statesin my case).key→ The “path” inside that bucket. Think of it as a folder + filename for the state (apprunner/helloworld/terraform.tfstate). This lets you have multiple projects/environments in the same bucket without clashing.region→ Where the S3 bucket lives. Must match the bucket’s region (us-east-1here).use_lockfile→ This creates a.terraform.lock.hcllocally to pin provider versions, ensuring consistent runs across machines. It’s not full concurrency locking (like DynamoDB does), but at least you won’t have version drift.
So now, every time you run terraform apply, the state is fetched from S3, updated, and written back. That way, your pipeline, your laptop, or even a teammate’s machine all stay in sync with the single source of truth for infra.
Now, the variables.tf
variable "ecr_repo_name" {  description = "ECR repository name"  type        = string  default     = "demo/helloworld"}
variable "service_name" {  description = "App Runner service name"  type        = string  default     = "helloworld"}
variable "image_tag" {  description = "Image tag to deploy"  type        = string  default     = "latest"}
This file keeps your setup flexible. Instead of hard-coding names in the Terraform code, you declare them as variables here:
- ecr_repo_name → the Amazon ECR repository where your Docker image lives. Default is demo/helloworld.
- service_name → the App Runner service name. Useful when you want multiple services running with different names.
- image_tag → which Docker image tag to deploy. We keep it simple with latest for this guide.
Finally, create the main.tf which contains the essential code to provision the actual app runner service.
# ---------------------------# IAM Role for App Runner# ---------------------------data "aws_iam_policy_document" "apprunner_trust" {  statement {    actions = ["sts:AssumeRole"]    principals {      type        = "Service"      identifiers = ["build.apprunner.amazonaws.com", "tasks.apprunner.amazonaws.com"]    }  }}
resource "aws_iam_role" "apprunner_ecr_access" {  name               = "${var.service_name}-ecr-access"  assume_role_policy = data.aws_iam_policy_document.apprunner_trust.json}
resource "aws_iam_role_policy_attachment" "apprunner_ecr_access" {  role       = aws_iam_role.apprunner_ecr_access.name  policy_arn = "arn:aws:iam::aws:policy/service-role/AWSAppRunnerServicePolicyForECRAccess"}
# ---------------------------# Auto Scaling Configuration# ---------------------------resource "aws_apprunner_auto_scaling_configuration_version" "basic" {  auto_scaling_configuration_name = "${var.service_name}-asc"  max_concurrency                 = 80  min_size                        = 1  max_size                        = 5}
# ---------------------------# App Runner Service# ---------------------------data "aws_caller_identity" "me" {}data "aws_region" "cur" {}
locals {  image = "${data.aws_caller_identity.me.account_id}.dkr.ecr.${data.aws_region.cur.id}.amazonaws.com/${var.ecr_repo_name}:${var.image_tag}"}

resource "aws_apprunner_service" "api" {  service_name                   = var.service_name  auto_scaling_configuration_arn = aws_apprunner_auto_scaling_configuration_version.basic.arn
  source_configuration {    image_repository {      image_repository_type = "ECR"      image_identifier      = local.image      image_configuration {        port = "8080"      }    }
    authentication_configuration {      access_role_arn = aws_iam_role.apprunner_ecr_access.arn    }
    auto_deployments_enabled = true  }
  instance_configuration {    cpu    = "1024"  # 1 vCPU    memory = "2048"  # 2 GB  }
  health_check_configuration {    protocol            = "HTTP"    path                = "/health"    interval            = 10    timeout             = 5    healthy_threshold   = 1    unhealthy_threshold = 3  }}
output "apprunner_service_url" {  value = aws_apprunner_service.api.service_url}
Here is a short Explanation of each code blocks.
First, we create an IAM role that App Runner can assume. This role is given the built-in policy that allows it to pull images from Amazon ECR. Without this, App Runner wouldn’t be able to run your container.
Next comes the auto scaling configuration. It defines how App Runner adjusts instances based on traffic: we set a baseline of one instance, a maximum of five, and allow each instance to handle up to 80 concurrent requests before scaling out.
We then declare some helper data sources to fetch the AWS account ID and region, which are combined into the full ECR image path dynamically.
Finally, the App Runner service ties it all together. It references the ECR image, uses our IAM role for authentication, and applies the scaling rules. We also set instance size (1 vCPU, 2 GB RAM) and configure health checks on /health so App Runner knows when containers are healthy.
Note that, auto_deployments_enabled = true is crucial because it enables AppRunner to pull the latest docker image although the images were pushed with the same tags, which in our case is latest.
The output at the end simply prints the service URL, making it easy to grab once Terraform finishes.
Let’s test this by running the following terraform commands,
terraform initterraform planterraform apply -auto-approveWhen you run these commands, Terraform will:
- Init → download the AWS provider and set up your working directory.
- Plan → show you exactly which AWS resources it’s going to create (IAM role, auto scaling config, App Runner service, etc.).
- Apply → actually provision them in AWS.
The process usually takes a few minutes because App Runner has to pull your container image from ECR, spin up infrastructure behind the scenes, and pass the health checks you defined.
Once everything is ready, Terraform will output the service URL. This is a fully managed HTTPS endpoint exposed by App Runner. Open it in your browser and you should see your Hello World response coming directly from your containerized .NET app running in AWS. 🎉
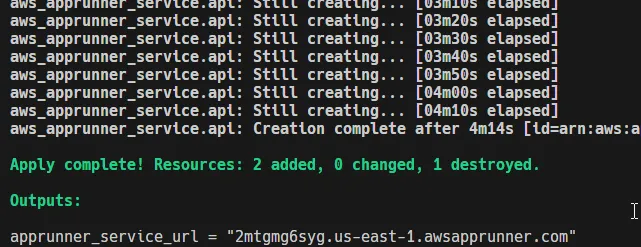
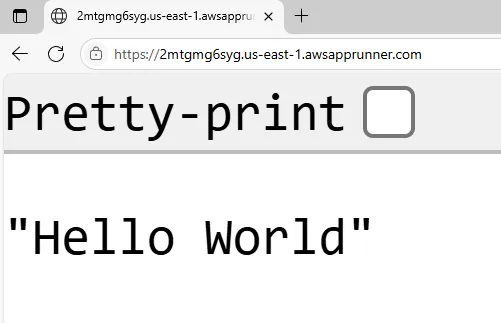
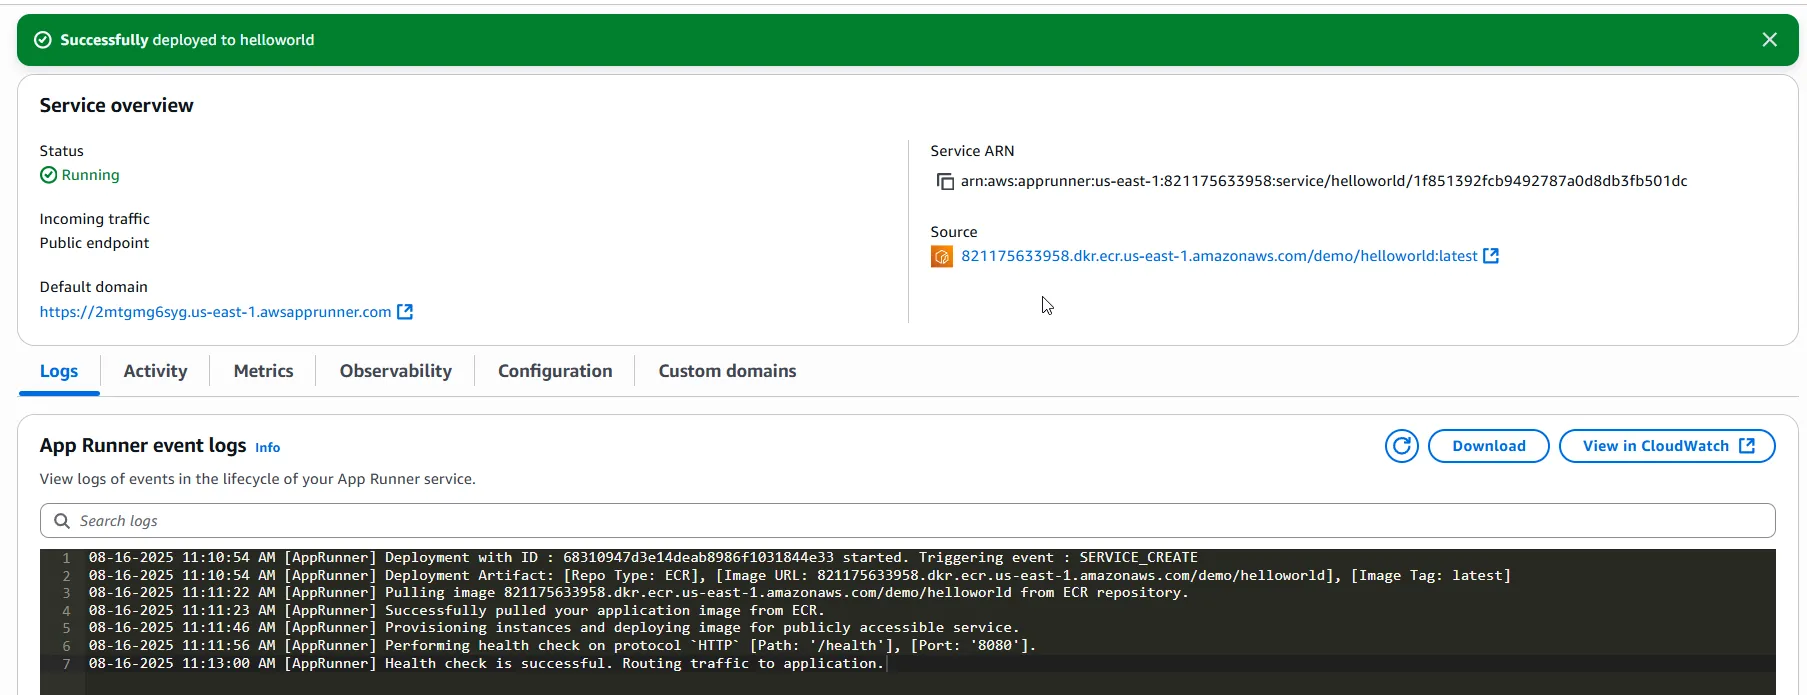
After running terraform apply, head over to the AWS Console → App Runner, and you’ll see your service details.
- The status is
Running, meaning App Runner has pulled your image, provisioned instances, and passed health checks. - You get a default HTTPS domain (e.g.,
https://2mtgmg6syg.us-east-1.awsapprunner.com) which is publicly accessible right away — no need to worry about load balancers or TLS setup. - Under Source, you can confirm that the container is being pulled directly from your ECR repo with the correct tag.
- The event logs show each step in the lifecycle: image pulled, instances provisioned, health check on
/healthpassed, and finally traffic routed to your app.
In short, within just a few minutes, your containerized .NET app is live on the internet with a fully managed endpoint. 🚀
CI/CD with GitHub Actions
We’ve already written an entire article that dives deep into GitHub Actions, covering how to set up workflows, triggers, and all the moving pieces that make it such a powerful automation tool. But since we’re dealing with deployments here, it’s worth reminding ourselves why CI/CD matters in the first place.
The reality is this: writing code is easy, but shipping it reliably is hard. If you’re still building images locally, pushing them to ECR, and manually updating services with Terraform, you’re essentially repeating the same set of steps over and over again—and every manual step is a potential source of mistakes. CI/CD solves this by automating the grind. With GitHub Actions, the moment you push a commit (or merge a pull request), the workflow kicks in, builds your Docker image, pushes it to ECR, and applies your Terraform changes to update App Runner. No manual intervention, no missed steps, no “oops, I forgot to set the region.”
By wiring this up, deployments stop being a separate phase of your workflow and simply become part of coding itself. You focus on building features, and GitHub Actions ensures that those features end up running in production in a safe, repeatable, and traceable way. It’s the glue between writing software and actually delivering it. And since we’ve already covered the “how” in detail in the earlier article, here we’ll focus more on integrating it into the context of App Runner and Terraform.
Let’s get started.
You will need to ensure that your code directory is pushed to GitHub.
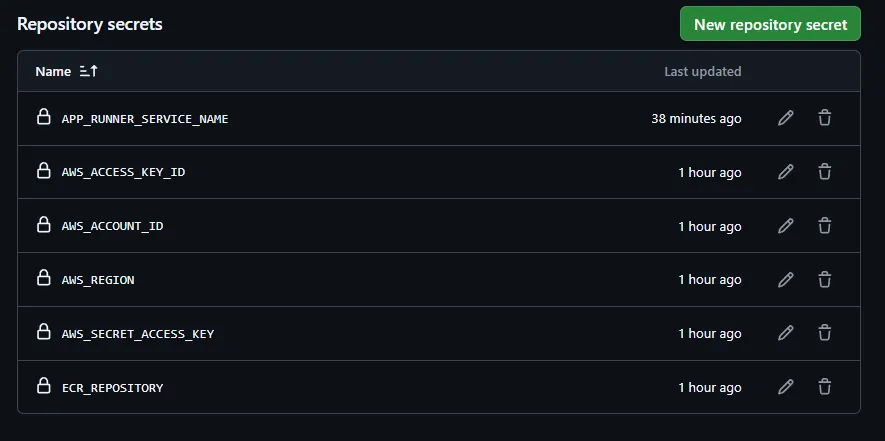
First, ensure that you have the required Secrets configured on your Github Account or Repository. Here are the required secrets.
Create a new deployment action by creating a file at .github/workflows/deploy.yml
name: 🚀 Deploy to App Runner
on:  workflow_dispatch:  push:    branches:      - master
jobs:  build:    name: 🛠️ Build .NET App    runs-on: ubuntu-latest    steps:      - name: 📥 Checkout Code        uses: actions/checkout@v5
      - name: 🔧 Setup .NET        uses: actions/setup-dotnet@v4        with:          dotnet-version: "9.0.x"
      - name: 🧪 Restore & Build        run: |          dotnet restore ./src/HelloWorld          dotnet build ./src/HelloWorld --no-restore --configuration Release
  docker:    name: 🐳 Build & Push Docker Image    runs-on: ubuntu-latest    needs: build    steps:      - name: 📥 Checkout Code        uses: actions/checkout@v5
      - name: 🔑 Configure AWS Credentials        uses: aws-actions/configure-aws-credentials@v4        with:          aws-access-key-id: ${{ secrets.AWS_ACCESS_KEY_ID }}          aws-secret-access-key: ${{ secrets.AWS_SECRET_ACCESS_KEY }}          aws-region: ${{ secrets.AWS_REGION }}
      - name: 🔐 Login to Amazon ECR        run: |          aws ecr get-login-password --region ${{ secrets.AWS_REGION }} \          | docker login --username AWS \          --password-stdin ${{ secrets.AWS_ACCOUNT_ID }}.dkr.ecr.${{ secrets.AWS_REGION }}.amazonaws.com
      - name: 🐳 Build & Push Image        run: |          IMAGE_TAG=latest          ECR_URI=${{ secrets.AWS_ACCOUNT_ID }}.dkr.ecr.${{ secrets.AWS_REGION }}.amazonaws.com/${{ secrets.ECR_REPOSITORY }}:$IMAGE_TAG          docker buildx build --platform linux/amd64 -t $ECR_URI .          docker push $ECR_URI
  deploy:    name: 🚀 Terraform Deploy    runs-on: ubuntu-latest    needs: docker    steps:      - name: 📥 Checkout Code        uses: actions/checkout@v5
      - name: 🔑 Configure AWS Credentials        uses: aws-actions/configure-aws-credentials@v4        with:          aws-access-key-id: ${{ secrets.AWS_ACCESS_KEY_ID }}          aws-secret-access-key: ${{ secrets.AWS_SECRET_ACCESS_KEY }}          aws-region: ${{ secrets.AWS_REGION }}
      - name: ⚙️ Setup Terraform        uses: hashicorp/setup-terraform@v3
      - name: 🏗️ Terraform Init        working-directory: ./infra        run: terraform init
      - name: 🚀 Terraform Apply        working-directory: ./infra        run: terraform apply -auto-approve
This pipeline is split into three logical jobs – build, docker, and deploy – chained in sequence with needs: so they only run if the previous one succeeds. That’s how you enforce a clean flow from source → artifact → infrastructure update.
🛠️ Build job
The first stage is nothing fancy – just sanity. It checks out the repo, installs the .NET 9 SDK, and runs dotnet restore + dotnet build. The goal here isn’t to produce artifacts but to catch compilation errors before wasting time building Docker images or touching AWS infra. Think of this as the “fail fast” guardrail.
🐳 Docker job
Once we know the code compiles, this job takes over. It checks out again (each job runs in a fresh VM, so you can’t reuse files from previous ones), configures AWS creds, and logs into ECR.
Then it builds the Docker image with docker buildx build --platform linux/amd64. Forcing amd64 is important since App Runner doesn’t handle arm images well and CI runners may default to arm. After that, the image is tagged with the ECR repo + :latest and pushed. This ensures that the latest build is always available for App Runner to pick up.
🚀 Deploy job
The last stage is infra as code. It checks out the repo again, sets up AWS creds, installs Terraform, and runs terraform init + terraform apply inside ./infra. The expectation is that infra/ contains your App Runner service definition, IAM roles, and maybe remote backend config.
This is where the link between “latest image in ECR” and “running service” is established. If you’ve got auto_deployments_enabled = true in Terraform, App Runner will notice the updated tag and roll forward. If not, the apply here explicitly kicks a new deployment.
Why split like this?
- Isolation: If your .NET build fails, you never waste AWS API calls.
- Visibility: Each job shows clearly in GitHub Actions UI, so you can tell if the failure is code, containerization, or infra.
- Reusability: You could run only the build stage for PR validation, or only the deploy stage for infra tweaks.
- Platform correctness: The docker stage pins architecture, avoiding weird runtime mismatches.
That’s it. Commit your changes and push to the repository. You should now see the pipeline getting started.
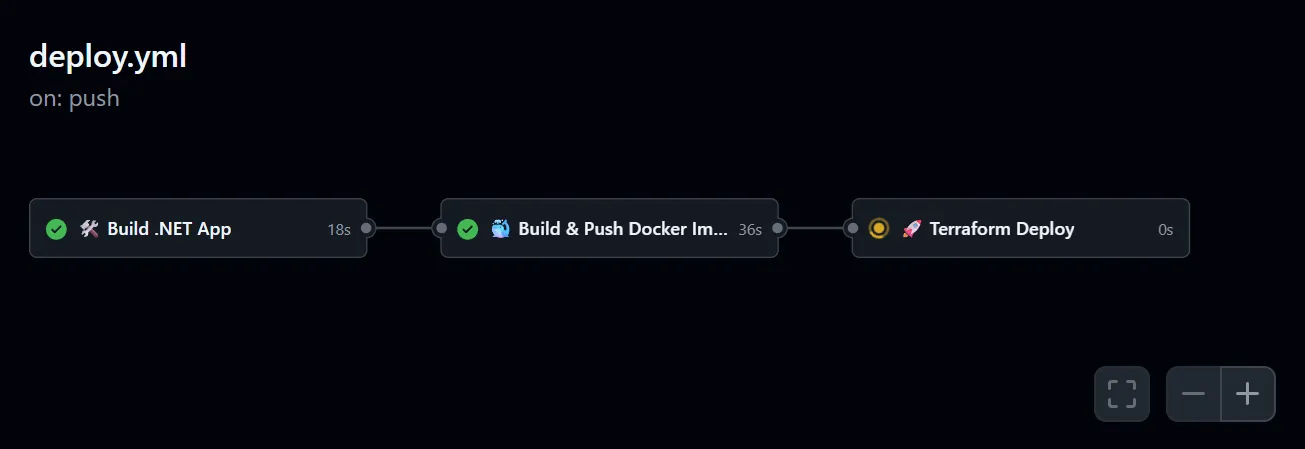
Here’s what this workflow gives you:
- Every push first builds your .NET 9 WebAPI, making sure there are no compile-time surprises.
- The app is then packaged into a Docker image and pushed to ECR, ready for App Runner to consume.
- Finally, Terraform kicks in, updating or provisioning App Runner with the latest image, all managed with a remote S3 state so nothing breaks across runs.
In other words, you now have a source → container → AWS deployment pipeline that you can run on autopilot. No more manual builds, no more guesswork with AWS console clicks.
And the best part? With terraform destroy, you can tear down the whole thing in minutes when you’re done testing—leaving behind no dangling resources and no surprise AWS bills.
Perfect addition — because right now the article focuses heavily on how to deploy, but not why App Runner is worth it. Here’s a dev-to-dev style breakdown you can just plug in as a new section:
Why AWS App Runner is a Big Deal - Key Takeaways 🚀
One of the best parts about using App Runner is that it takes away so much of the operational burden we usually carry when deploying containerized apps. Normally, you’d have to think about EC2 instances, load balancers, SSL certificates, scaling groups, patching, and whatnot. With App Runner, that entire headache is abstracted away.
1. Free HTTPS without the hassle 🔒 Every service you spin up on App Runner gets a fully managed HTTPS endpoint out of the box. No need to fiddle with ACM certificates, Route53, or reverse proxies — it just works. You push your container, App Runner gives you a secure public URL instantly.
2. Autoscaling on demand 📈 Traffic spikes? App Runner automatically scales out containers for you. Midnight lull? It scales them back down. You don’t touch any settings unless you really want to fine-tune concurrency or scaling configs. This means you’re paying only for the traffic you actually serve.
3. No servers to babysit 🖥️ → ❌ Forget patching Linux images or configuring AMIs. App Runner is serverless at heart — you give it a container, and AWS runs it at scale. Think of it like Lambda, but designed for full-blown APIs and long-running processes.
4. Easy CI/CD integration 🔄 As you’ve seen in this article, combining GitHub Actions + Docker + Terraform + App Runner gives you a complete zero-touch pipeline. Push your code, and the latest version gets built, containerized, and deployed — no manual deployments, no “did you update the load balancer?” discussions.
5. Built-in monitoring & logging 📊 Every App Runner service hooks into CloudWatch automatically. You don’t have to wire up log shipping or metrics exporters — they’re already there. This gives you visibility without spending a day setting up Prometheus + Grafana just to know if your app is alive.
If you found this useful, share it with your team or fellow devs—because every .NET developer should know how easy it is to get a production-ready CI/CD workflow running with GitHub Actions + Terraform + AWS. 🚀

