In this article, we are going to explore yet another deployment option from AWS, which is about Deploying ASP.NET Core WebAPI to AWS App Runner, the latest Container based Compute Service from AWS. In earlier articles of the .NET on AWS Series, we have learned quite a lot of ways to provision your .NET-based backends into the Cloud using Services like EC2, ECS, Elastic BeanStalk, and even Lambda functions. We will be deploying an ASP.NET Core WebAPI to AWS App Runner using Docker Images from AWS ECR as well as from a GitHub repository!
What is AWS App Runner?
AWS App Runner is a fully managed service for deploying containerized web applications and APIs. This service makes it easy to build, deploy, and scale with minimal configuration needed. It can be seen as a successor to ECS Fargate, but with much less configuration. AWS App Runner offers a more abstract way of deployment and could be the perfect candidate for simple use cases. In our scenario, deploying an ASP.NET Core WebAPI is indeed a straightforward use case.
Imagine effortlessly transforming your code into a live, resilient web application without drowning in intricate configurations. With AWS App Runner, this vision becomes a reality. App Runner empowers developers to focus on what truly matters: crafting exceptional web applications and APIs. Its fully managed environment takes care of the heavy lifting, from building to scaling, all while ensuring security and high availability.

With a simple CLI command (or you could use the Management Console or any IAC Tool like Terraform), you can create a service using AWS App Runner by providing the required parameters like the ECR Image URL. The source of an App Runner service can be either a Container Image or even a GitHub Repository.
You also get other features like Auto-Scaling, SSL, Load balancing, Health Checks, and Networking. Once the service is created, you get an HTTPS URL, to which you can later add domains.
As of August 2023, AWS App Runner is not available in certain regions like the ap-south region. I had to switch to us-east-1 to check out this service.
Why AWS App Runner?
- Simplicity and Ease of Use: Infrastructure Configuration might get complicated while using other AWS Services like EC2 and ECS, especially when you have to work with Load Balancing, Autoscaling, Domains, Certificates & Monitoring.
- Cost Efficiency: App Runner’s pay-as-you-go pricing model helps you manage costs effectively.
- Rapid Deployment: App Runner streamlines the deployment process, enabling you to take your code from development to a live, scalable application in minimal time.
- Scalability: The service’s automatic scaling capabilities ensure that your application can handle varying levels of traffic without manual intervention.
Pricing
The App Runner pricing model is pretty effective. You are charged only for the memory and CPU consumed by your application. When there are no incoming requests, your CPU is idle and in turn, you won’t be charged for CPU at that point in time. Memory on the other hand will be reserved, and you will be charged accordingly. There are additional charges during Deployment Triggers, and Build times. Overall, for a small application with test traffic, you will be charged about 5 USD per month, which is pretty good deal.
Read more about this service pricing here: https://aws.amazon.com/apprunner/pricing/
What we’ll Build?
In this demonstration, we will build a simple Games Web API using ASP.NET Core Web API. We’ll proceed to generate a docker file for this application, which we will use as the source in provisioning AWS App Runner Service. Further, we will also explore deploying the application with the source set as GitHub. Note that we will be pushing our Games API Image to Elastic Container Registry.
Prerequisites
- .NET 6 SDK or higher. I will build the Web API using .NET 6.
- AWS Account. A free tier would be enough.
- Basic understanding of Docker and Containerization.
- AWS CLI & Profile Configured. This will help you access your AWS resources programmatically. Read more about it here.
- AWS Toolkit extension for Visual Studio.
- Visual Studio IDE: I am using Visual Studio 2022 Preview.
Building a Simple ASP.NET Core WebAPI - Minimal API
Open up Visual Studio and Create a new ASP.NET Core Web API Project. Note that I will be using .NET 6 for this demonstration. Let’s name our project Games.API.

Ensure that you have selected the latest supported .NET SDK Version, which at the time of writing is .NET 6.

As mentioned earlier, we will be using the Minimal API approach for this demonstration. We will have 2 endpoints for the demo purpose. One will return a Hello World message, while the other returns a simple list of games that I had right on top of my head. Below is how my Program.cs file looks like.
var builder = WebApplication.CreateBuilder(args);builder.Services.AddEndpointsApiExplorer();builder.Services.AddSwaggerGen();var app = builder.Build();app.UseSwagger();app.UseSwaggerUI();
app.UseHttpsRedirection();
var games = new[]{    "call of duty", "free fire", "doom", "half life", "team fortress", "apex legends"};
app.MapGet("/", () => "Hello World!");app.MapGet("/api/games", () => games);
app.Run();
Now that our application is ready, let’s write a Dockerfile for this application so that we can push the image to the Private AWS ECR repository.
Dockerizing the ASP.NET Core Web API
Create a new file at the root of the csproj file and name it Dockerfile. Here is the content of the Dockerfile that you need to have.
FROM mcr.microsoft.com/dotnet/sdk:6.0 AS buildARG BUILD_CONFIGURATION=ReleaseWORKDIR /srcCOPY *.csproj .RUN dotnet restoreCOPY . .RUN dotnet publish -c Release -o /app
FROM mcr.microsoft.com/dotnet/aspnet:6.0 AS runtimeWORKDIR /appEXPOSE 80EXPOSE 443COPY --from=build /app .ENTRYPOINT ["dotnet", "Games.API.dll"]
As always, this is a simple Multi-Stage build for our .NET 6 application, where we expose port numbers 80 and 443. Note that I have also done some minor changes in the launchsettings.json file of this .NET application to allow these ports as the default ones.
Pushing Docker Image to a Private Amazon ECR
Once the Dockerfile is ready, we are good to build and push the image to our AWS repository. But before that, we will have to create an empty Elastic Container Repository. Login to AWS Management Console and open up ECR. Here click on Create Repository. In my case, I am naming my repository gamesapi. Leave everything else to default and click on Create.

Now that the repository is created, let’s build our image locally and push it to this particular repository.
Ensure that you have authenticated your system to use docker cli commands. Open the terminal at the location where our Dockerfile resides and run the following commands.
aws ecr get-login-password --region us-east-1 | docker login --username AWS --password-stdin <account-number>.dkr.ecr.<region>.amazonaws.comdocker build -t gamesapi .docker tag gamesapi:latest <account-number>.dkr.ecr.<region>.amazonaws.com/gamesapi:latestdocker push <account-number>.dkr.ecr.<region>.amazonaws.com/gamesapi:latestHere is what the above commands do:
- Fetches Login Password internally from AWS for Docker CLI to use while pushing to the private AWS ECR Repository.
- Simple Docker Build command with the name of the image set to gamesapi.
- To the image, we are adding the latest tag, both to the local version as well as the for the ECR image.
- Finally, push the local image to the remote repository.
Note that <account-number> and <region> have to be replaced with your correct details.
The following screenshot shows how the above commands get executed on your terminal.

Once everything is done, navigate back to your AWS Management Console and switch to ECR. You can see that image is available now.

Great! now we will use this image as the source for starting up our AWS App Runner instance.
Deploying ASP.NET Core WebAPI to AWS App Runner using Docker Image
On AWS Management Console, search for AWS App Runner and open it up. Here click on “Create an App Runner service”.

On the next screen, you will have to define the source of your service. By default, the Container registry will be chosen. However, note that you will also get a chance to directly build Docker Images from the GitHub repository (or any other source code control systems). If you choose a Source code repository, you will have to connect your GitHub account to AWS, select a repository, and add build commands that can run your application. For this section, we will continue with Container Registry and create our AWS App Runner Service. In the next section, we will use GitHub as our Source!
Select Container Registry and select Private ECR.

Browse for the image we created earlier and select it.

Let’s make the deployment Automatic, meaning whenever there is a new version of the image pushed, AWS App Runner will intelligently pull the latest image and deploy it. Try to automate everything - that’s the mantra, right?
Apart from this, based on your requirements you can create a new IAM role with the required permissions. For now, the basic role is enough for us.

Finally, let’s configure our service. Give a name to your service. I will give a minimal configuration to my instance, that is 1vCPU and 2GB Memory. Apart from this, you can also add in the ENV Variables as your applications need. Next, mention the port as 80, since we have already added it to our Dockerfile.
Leave everything else to the default (We will explore other options in the later sections) and click on Review.

Review your changes and click on Create & Deploy.

Give it a couple of minutes. It took me about 4 minutes for all the resources to be provisioned, pipelines created, and the docker image pulled. Once things are done, you will see the status of your service as Running. You can also notice the default endpoint/domain. Let’s open it up and test it.
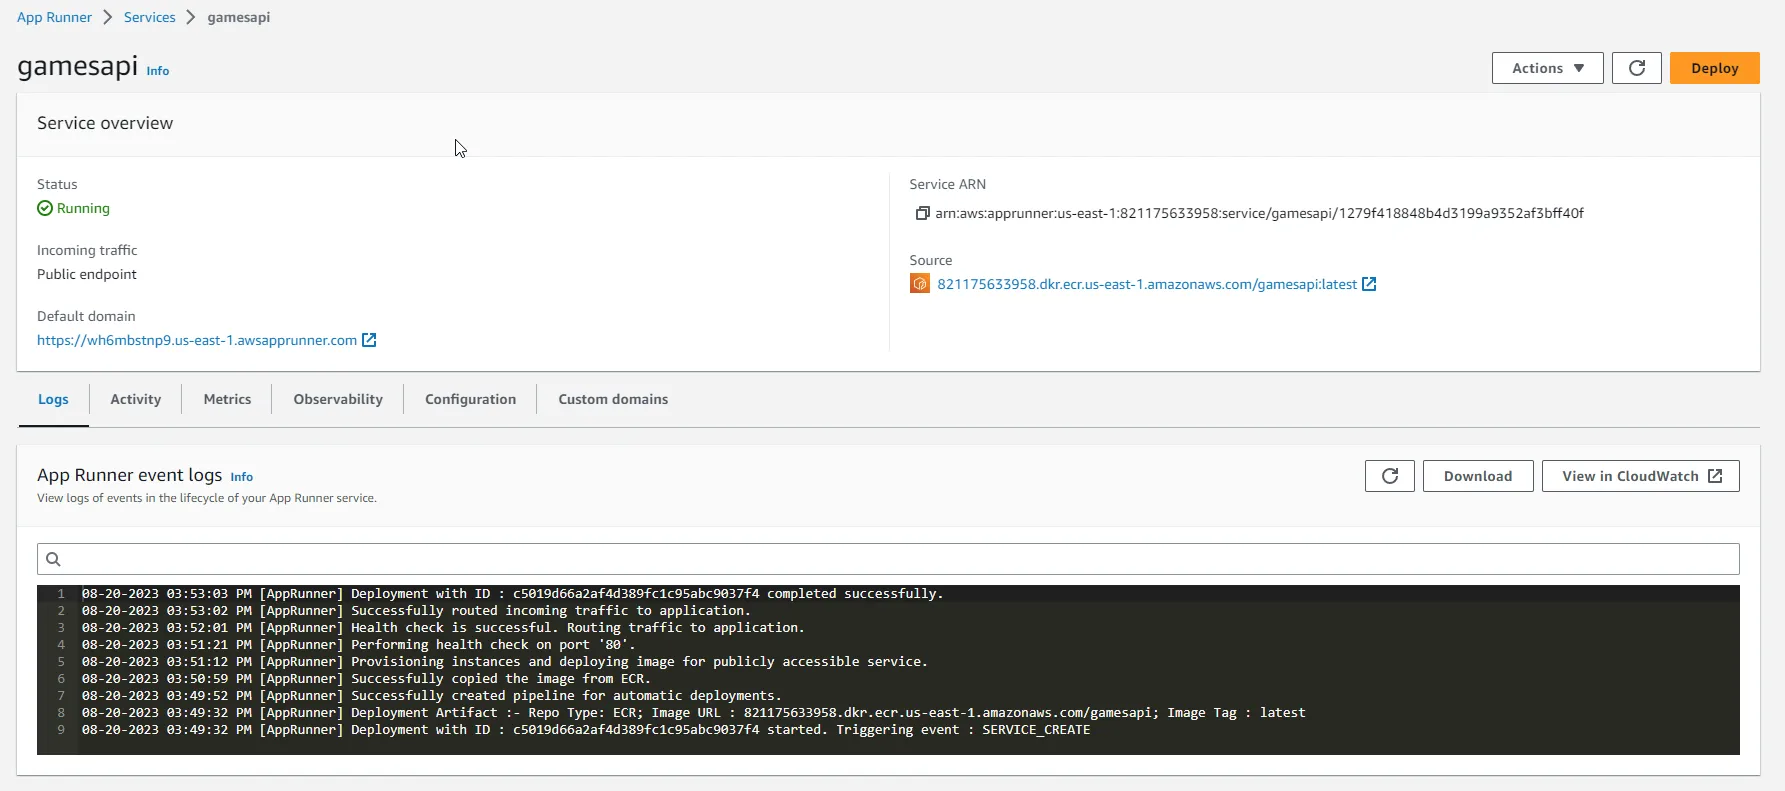
There you go, here are the 2 simple endpoints that we created on our ASP.NET Core Web API! That’s how easy it is to deploy your application to the cloud using AWS App Runner.


Deploying ASP.NET Core WebAPI to AWS App Runner using GitHub Source
In this section, we will deploy the same application again, using GitHub as the source. Make sure your ASP.NET Core Web API application’s source code is pushed to your GitHub Repository. You will also have to create a new connection to GitHub so that AWS can read and pull your source code.
Again, go to the AWS Management Console and open up AWS App Runner. Create a new Service. This time, select the Source code repository as the source. I have already created a connection between my AWS Account and my GitHub account. If you haven’t, click on Add New button, and grant the required permissions. Once you are connected, select the repository where your .NET WebAPI resides, and also select the appropriate branch.

Select the Deployment Trigger to Automatic. This means that every time you push a new commit to your GitHub branch, the pipeline will be triggered, and AWS App Runner will deploy the latest changes to your service.

Next comes the interesting part, where you would have to add the build and start commands.
- Set your runtime as .NET 6
- in the Build Command - add
dotnet publish -c Release -o release. This publishes the application in Release mode to the /release folder. - Start Command, add
dotnet release/Games.API.dll --urls=http://0.0.0.0:80. This starts the application at port 80 - Set the port to 80, as this is where the application is running.

The next screens are basically the same as you did earlier while deploying the application via ECR images. Give a unique service name, and choose the instance configuration. Leave everything else to default. Review and create the service.

Again, give it a couple of minutes, and your application should be all ready!

Let’s try to push a new change to our repository and see how the AWS App Runner reacts. I am going to change the “Hello World” text to “Hello Folks” and push the changes onto the main branch.

As you can see, a deployment started as soon as I pushed the changes to my branch, and within minutes, my new changes are available! Also, note that there are no downtimes during the deployment. Same as ECS, the containers will be brought down only when the deployment is completed. Sweet, yeah?
Here is the new message returned by the API.

AutoScaling
Next up, let’s test auto-scaling. Open up the Service and Edit Configurations. In Auto Scaling Section, create a new configuration, with about 5 requests per instance as concurrency. This means that AWS would spin up instances as soon as the current instance handles more than 5 concurrent requests.

I used Postman to Performance test this API endpoint with around 100 Virtual Users sending requests for around 60 seconds. As you see, this is the number of requests that came in, 3000+ requests. FYI, you can access these graphs in the metrics tab of the service.

And here is auto-scaling in action. You can see that a new instance has spun up for handling the traffic.

Other Features
Apart from this, you can also attach your custom domains to this service URL. Domains can be purchased from Route53 (we will explore this AWS Service in a separate article), or other Domain providers like Namecheap, GoDaddy, etc.

Also, Health checks can be configured at intervals using both the HTTP protocol as well as the TCP protocol to ensure that your app is up and running.

When to Use?
AWS App Runner is perfect for Small-Mid Load Applications. Also, the ease of configuration proves to be a nice addon to this service. But if you need extra flexibility, AWS App Runner might not be the right candidate. AWS App Runner is container-based, as you might already have noticed. Mid Scale Web APIs and Applications can be a good fit for this service.
In summary, AWS App Runner is a suitable choice for quickly deploying and managing web applications, especially if you prioritize simplicity, automation, and ease of use. However, it’s essential to evaluate your application’s specific requirements and architecture to determine if App Runner aligns with your needs.
Deleting Resources
Once you are done with your learning, ensure that you delete any of the AWS Resources created, as this can contribute to your monthly AWS bill. That’s it for this article! Thanks.
You can find the source code of the ASP.NET Core Web API and Dockerfile here: https://github.com/iammukeshm/deploying-aspnet-core-webapi-to-aws-apprunner
Summary
In this article, we learned about deploying ASP.NET Core Web API to AWS App Runner using various sources like a Docker image hosted on a private AWS ECR Repository, as well as building the application directly from GitHub and running it. We built a simple ASP.NET Core Web API in .NET 6, wrote a Dockerfile for it, and finally pushed the image to ECR. This image was used as a source to create a new AWS App Runner Service.
Next, as mentioned, we pushed the code to a GitHub repository and used the source control repository as the source to build our application and deploy it to AWS App Runner.
You can find the source code of the entire implementation here.
Make sure to share this article with your colleagues if it helped you! Helps me get more eyes on my blog as well. Thanks!
What's your take?
Push back, share a war story, or ask the obvious question someone else is wondering. I read every comment.