GenAI, short for Generative AI, is at the forefront of technological evolution, representing a groundbreaking paradigm in artificial intelligence. In this article, we are going to deep dive into this exact topic by integrating Generative AI in .NET with Amazon BedRock. Together, we will explore and build a .NET application that can generate AI chats and even images using the seamless integration with Amazon BedRock and its GenAI foundational models.
What will we build?
We will build an ASP.NET Core WebAPI (.NET 8) with 2 Minimal API endpoints.
- Generate Text-based responses to our question that we pass as a request to the API. Let’s say something close to ChatGPT, but less interactive for now. We will build a full-fledged AI chat application in a later post!
- Generate and store Images as requested by the client.
Click here to skip the Introduction part and jump straight over to the .NET implementation.
Get the complete source code of this demonstration from here.
This article is sponsored by AWS. Huge thanks for helping me produce more .NET on AWS content!
Introducing Amazon BedRock
Amazon BedRock is a fully managed service by AWS that makes it easy to build and scale generative AI applications with foundational models. It combines choices of high-performing AI models from Meta, Stability AI, and Anthropic into a single API. By leveraging advanced algorithms and prompt engineering, GenAI can produce text, images, and even entire scenarios, offering unprecedented potential across industries such as content creation, design, and innovation.
You can create your custom models as well.
Learn more about Amazon BedRock here: https://aws.amazon.com/bedrock/
Pricing
The Pricing for Amazon BedRock varies widely depending on the foundational models that you work it. But the primary concept is tokens, based on which the pricing breakdown happens. 1 Token is somewhere close to 6 characters.
Read more about the Pricing Models here: https://aws.amazon.com/bedrock/pricing/
Exploring Amazon BedRock and Models
Let’s first log in to the AWS Management Console.
Amazon BedRock Supported Regions
Note that this service has gotten into General Availability just a few months back, which is on September 2023. Hence, it doesn’t support all of the available AWS regions for now. As of January 2024, here are the supported regions.
- Europe (Frankfurt)
- US West (Oregon)
- Asia Pacific (Tokyo)
- Asia Pacific (Singapore)
- US East (N. Virginia)
For this demonstration, I will be switching to “us-east-1”, which is the US East AWS Region.
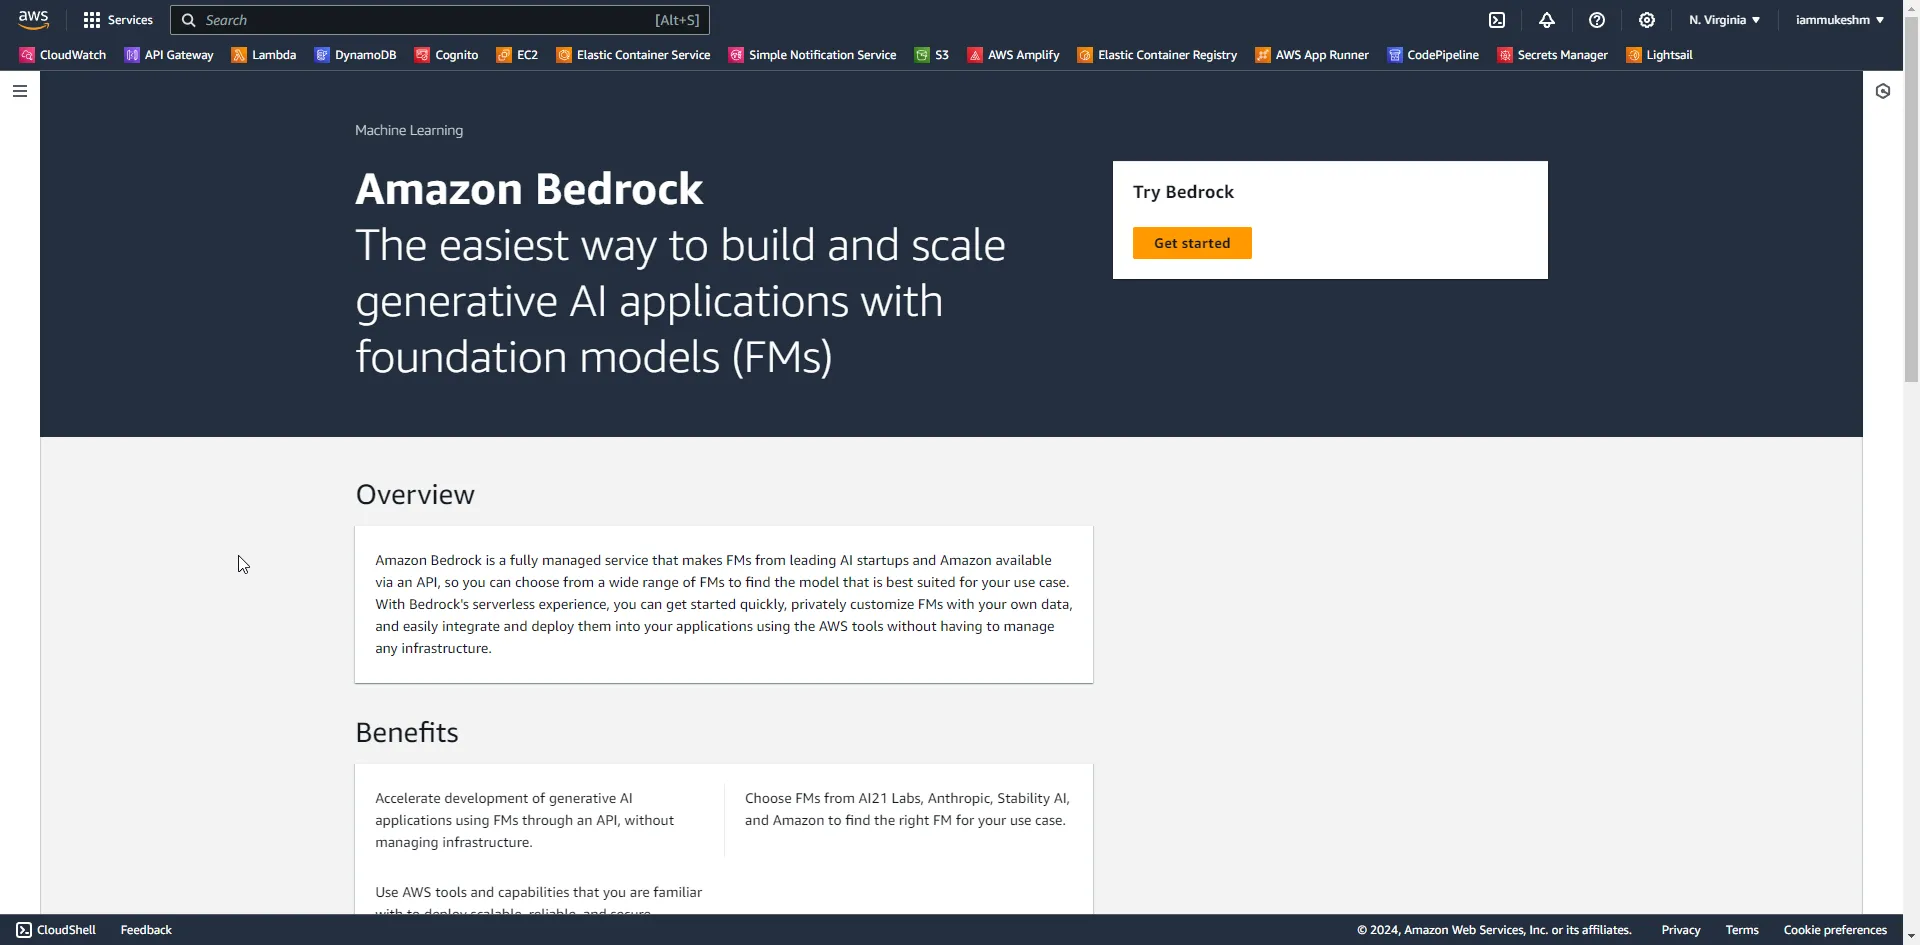
Available Foundational Models - Manage Access
In the context of machine learning or deep learning, foundational models could refer to the fundamental models that serve as the basis for more complex architectures and contexts. These are often the building blocks upon which more advanced use cases or models are built.
Here are some of the Available Foundational Models from Leading AI Startups. You will have access to this for your experiments and learning.
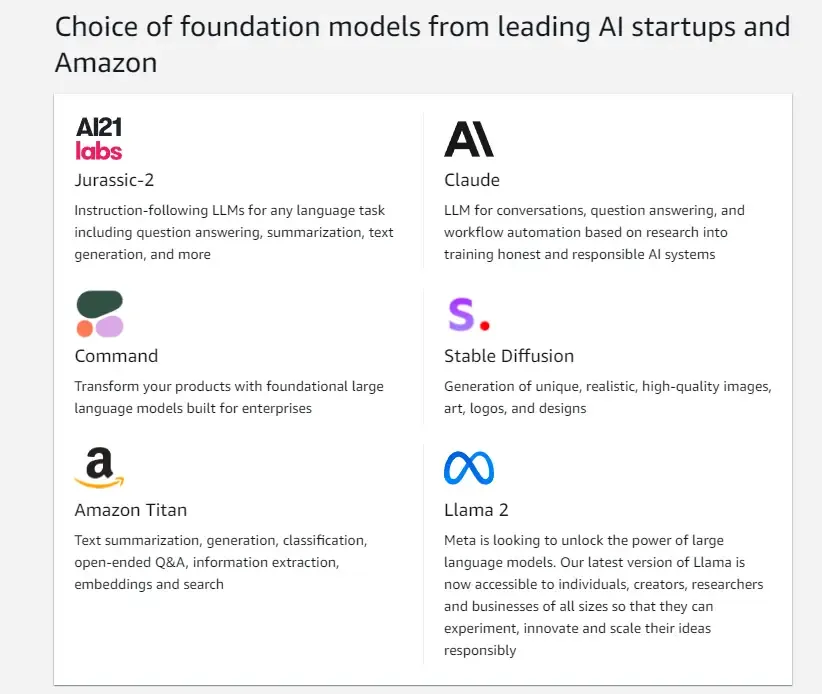
If you are trying BedRock for the first time, you will have to get access to these models, or whichever you want. You will be prompted with an option to manage Model Access. Otherwise, there is also a “Manage access” option in the sidebar after you open up Amazon BedRock.
Next, click on Manage model access.
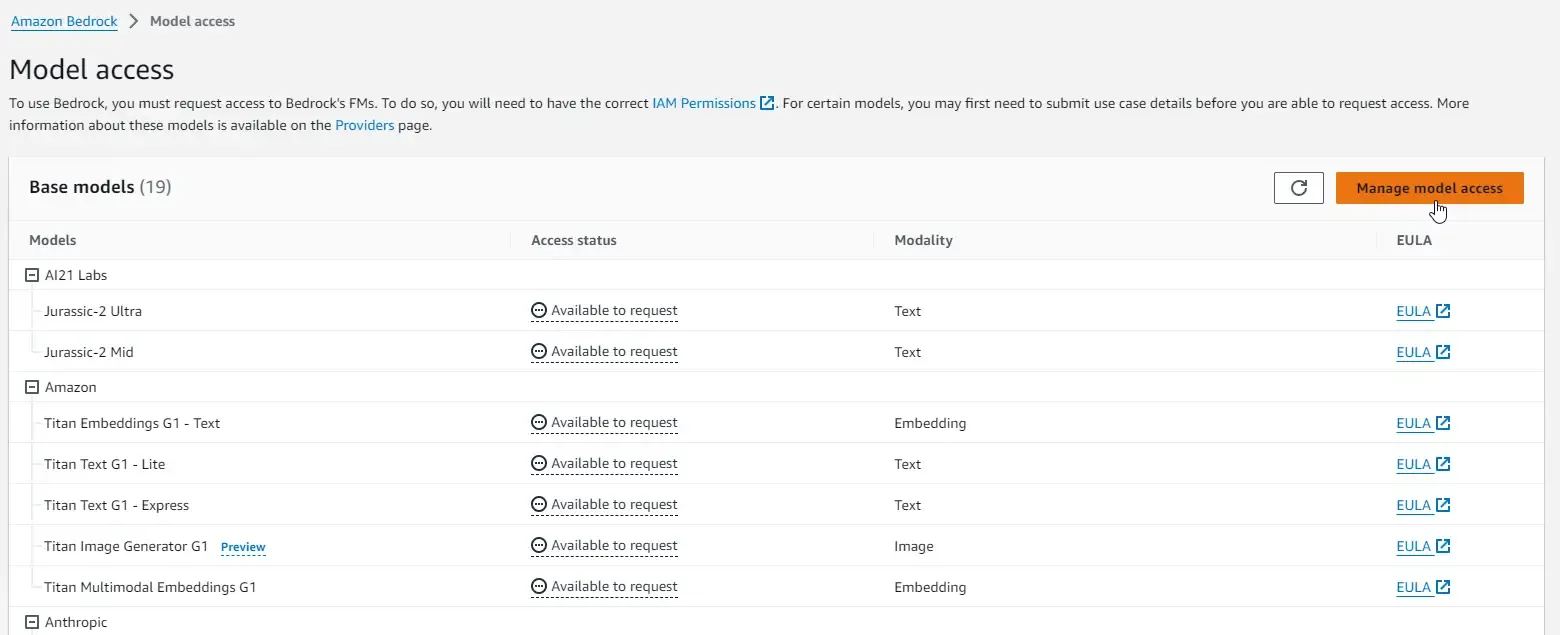
For now, I am going to select all the models and request access. In about a couple of minutes, you should be able to see that you are granted access to these models. For certain models like Anthropic, you may first need to submit use case details before you can request access. This list of models is going to grow with time.
Get more details about each of the Foundational Model Providers, by clicking on the Providers Menu in the Sidebar.
Let’s navigate to the Playground Tab!
Text Generation with BedRock
For demonstration, I am going to use the Jurassic-2 Mid model, from AI21 Labs in the Text Playground.
I gave an initial prompt “Write a short story about the life of a software developer for kids”.
Here is the response.
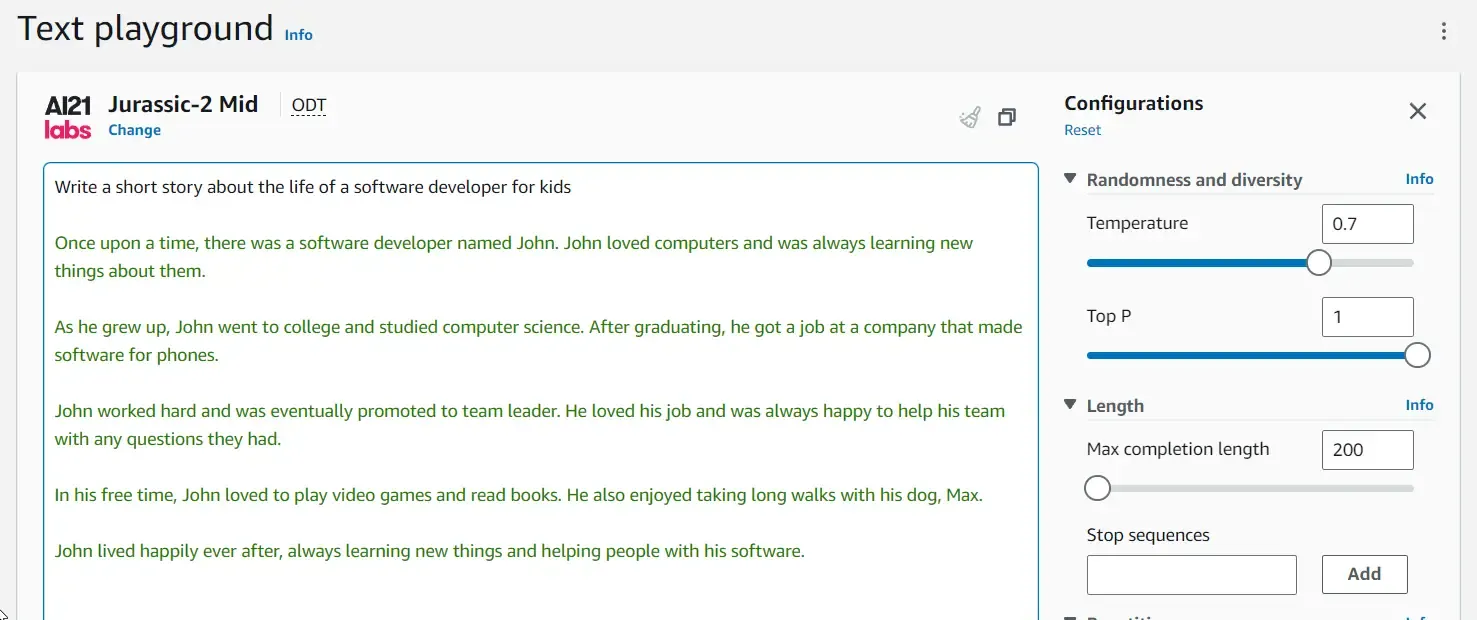
You can fiddle around with various other parameters that you can see in the right sidebar. This varies with the models that you may choose.
The text chat also can follow context, something like this.

Probably the most AI-optimized Career Advice ever :)
Chat With GenAI Models
This is an even more interactive way to maintain the context of your questions and communications. I will be choosing the Titan Text G1 - Express model for this section.
I will just ask how to improve performance in Entity Framework Core.
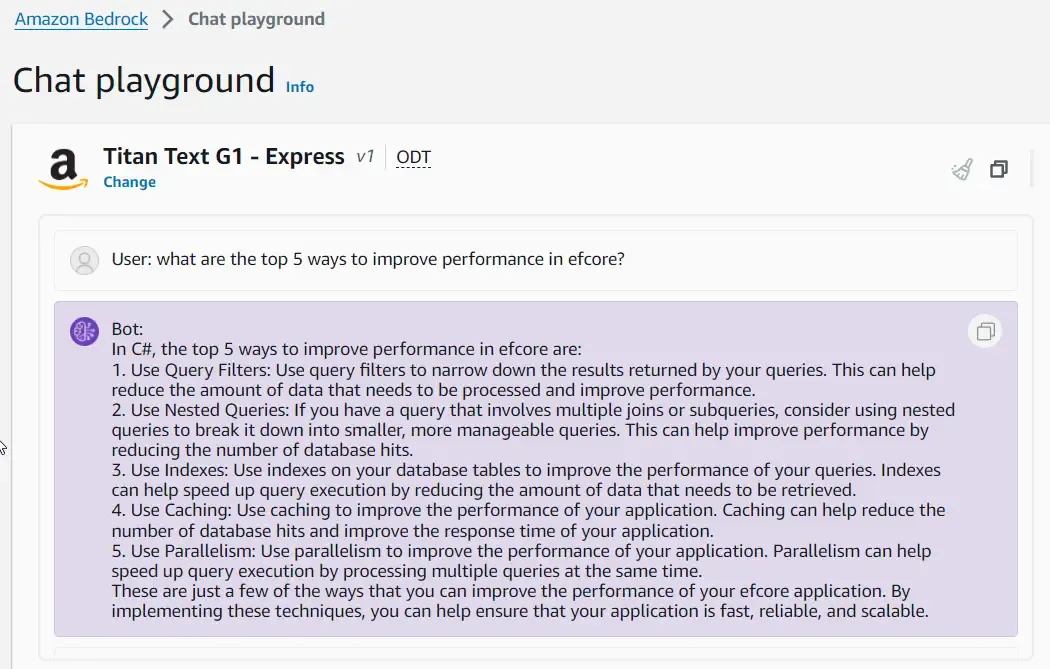
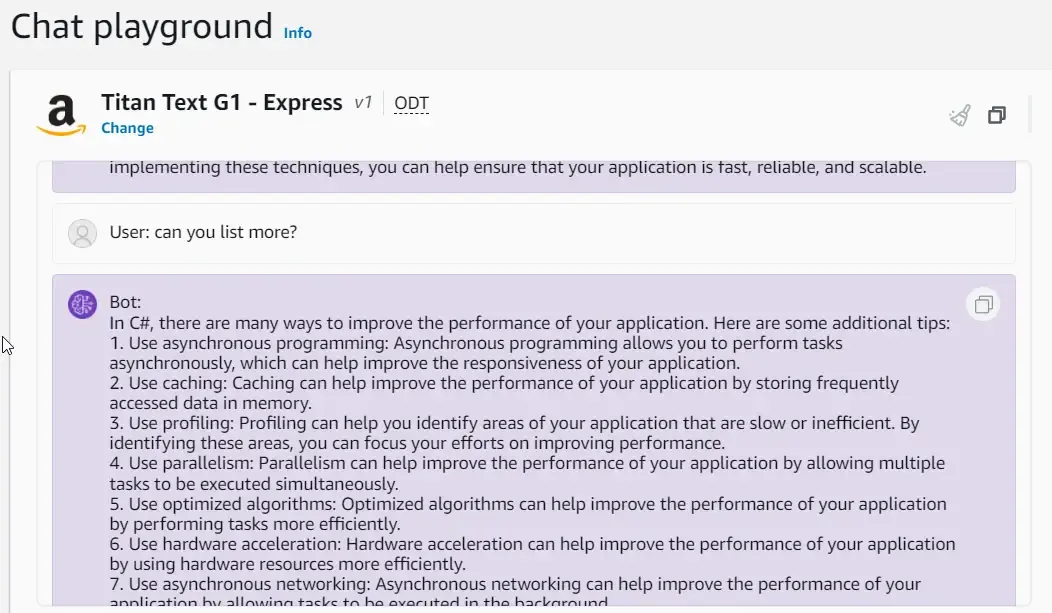
Your own custom ChatGPT :) The responses completely depend on how well-engineered your chat prompts are.
Image Generation with Stability Diffusion
For image generation, we will use the SDXL 1.0 model, which is from Stability Diffusion.
Get as illogical as you can get while sending out prompts! But, a pretty nice response.
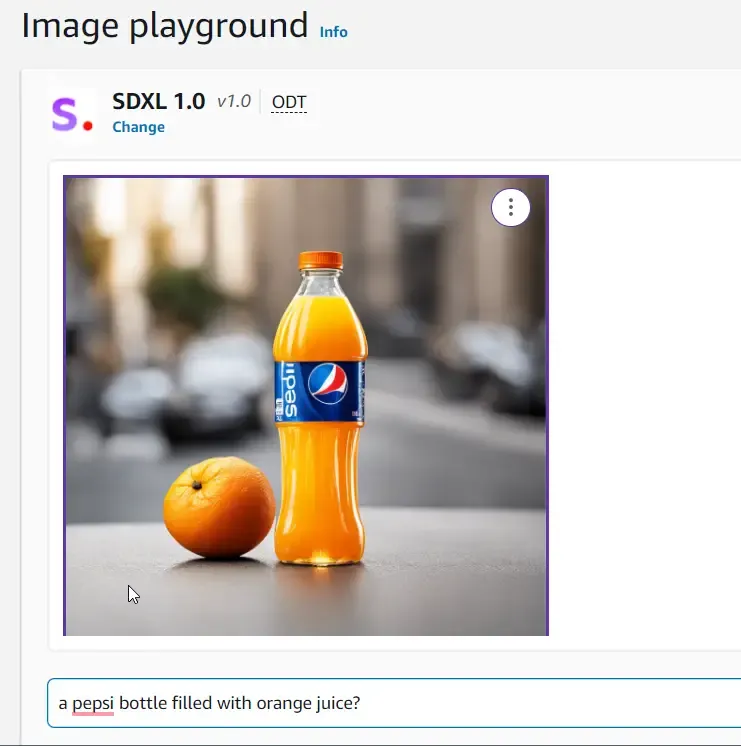
We will be using this set of APIs to integrate Generative AI in .NET with Amazon BedRock.
Prerequisites
To start developing the .NET application with Generative AI Integration, here are the prerequisites:
- .NET 8 SDK (Optional). I prefer to use the latest LTS version of .NET.
- Visual Studio IDE. I am using Visual Studio Community 2022.
- AWS Account. You can get a free account from here.
- AWS Credentials should be configured on your Development Machine. Learn more about it from here.
Integrating Generative AI in .NET with Amazon BedRock
First up, let’s create our Empty ASP.NET Core Web API (.NET 8) project in Visual Studio.
Setting up an ASP.NET Core WebAPI Project
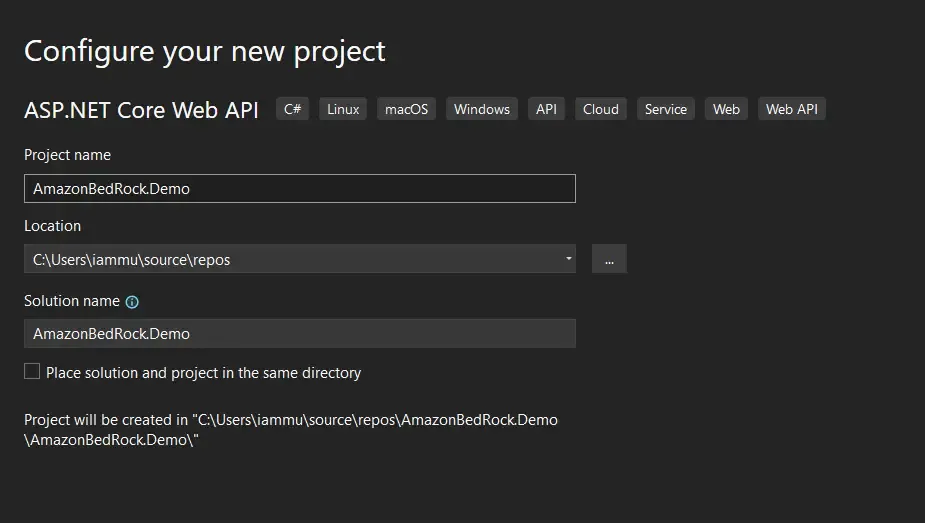
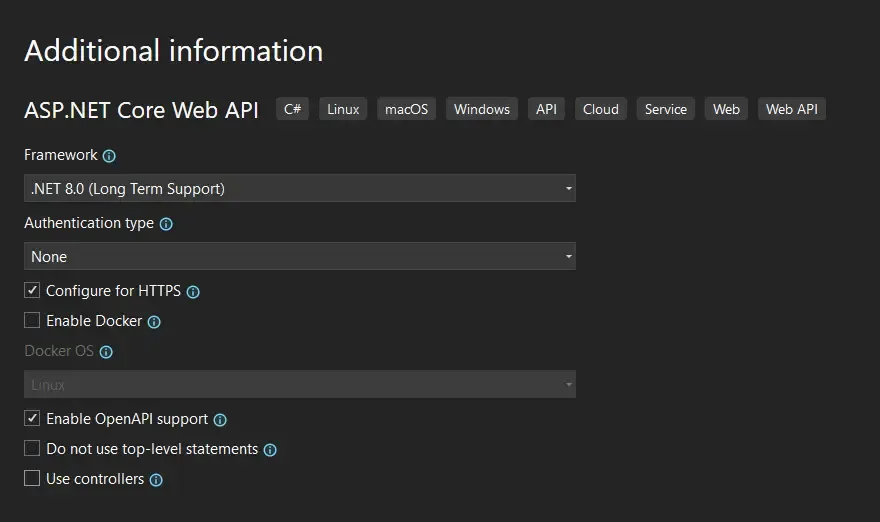
Ensure that you have enabled OpenAPI support. This is just to make our API testing process easier. I have also disabled controllers in favor of Minimal APIs.
AWS Profile
Make sure that you have selected the us-east-1 or any other supported aws region. Earlier we learnt that BedRock is supported in only about 4-6 AWS Regions. I have configured my machine to use us-east-1 as the default region.

Installing the Required Packages
You need only one package for this demonstration, which is the BedRock Runtime.
Install Package AWSSDK.BedrockRuntimeService Registration
Once the package is installed, navigate to your Program.cs and add the following line to register the BedRock client with Transient Lifetime in your application.
builder.Services.AddTransient<AmazonBedrockRuntimeClient>();Text Generation Endpoint
Before we get started with consuming the BedRock client, we will have to set up Models and DTOs for API Communication. First up, Create a new folder named Models, and create both of the records, TextPromptRequest and TextPromptReponse. These will be the DTOs that will be sent to the API, and returned by the API respectively.
public record TextPromptRequest(string Prompt);public record TextPromptReponse(string Response);Once the DTOs are added, let’s add the actual contracts of the Foundational Model. For this demonstration, we will be using the Cohere Command v14 Model. Under the Models folder, create another folder named Cohere, and add the following classes.
Firstly, the prompt class contains model-specific configuration details like Prompt, Max Tokens, and more. Make sure to model your classes as per the available documentation. I referred to the models specified in the AWS Bedrock, Providers section. This is likely to be the most time-consuming part of your development. You might also have to refer to the documentation of the provider if you find any issues.
So, this class accepts a string as a prompt. All the other properties have default values since this is just a demonstration. I have limited the Max Tokens property to 100 so that the cost is kept under control.
internal class CoherePrompt{ public CoherePrompt(string prompt) { Prompt = prompt; } [JsonPropertyName("prompt")] public string Prompt { get; set; } [JsonPropertyName("max_tokens")] public int MaxTokens { get; set; } = 100; [JsonPropertyName("temperature")] public decimal Temperature { get; set; } = 0.7m;}The CohereResponse model was what I got from the Cohere documentation: https://docs.cohere.com/reference/generate. I have included only the field that we need here.
public class CohereResponse{    [JsonPropertyName("generations")]    public Generation[]? Generations { get; set; }}
public class Generation{    [JsonPropertyName("text")]    public string? Text { get; set; }}
Once the models are created, let’s add our Minimal API Endpoint. Add the following code in your Program.cs
app.MapPost("/prompts/text", async (AmazonBedrockRuntimeClient client, TextPromptRequest request) =>{ var coherePrompt = new CoherePrompt(request.Prompt); var bytes = Encoding.UTF8.GetBytes(JsonSerializer.Serialize(coherePrompt)); var stream = new MemoryStream(bytes); var requestModel = new Amazon.BedrockRuntime.Model.InvokeModelRequest() { ModelId = "cohere.command-text-v14", ContentType = "application/json", Accept = "*/*", Body = stream }; var response = await client.InvokeModelAsync(requestModel); var data = JsonSerializer.Deserialize<CohereResponse>(response.Body); return new TextPromptReponse(data!.Generations![0].Text!.Trim());});Here, the prompts/text POST endpoint expects to receive a TextPromptRequest from the client, which contains the Prompt as a string. A new CoherePrompt model is created by passing the string to the model. This model is then converted to a MemoryStream object.
Then, we create a new InvokeModelRequest, which takes in the ModelId (I got this from AWS BedRock), and the stream.
That’s it. Next, send the request using the client that we registered earlier. We will have to deserialize this response and return the Text field.
Once done, Build and Run your application, and Launch Swagger.
Let’s ask something about CI/CD to our all-new ChatGPT competitor!
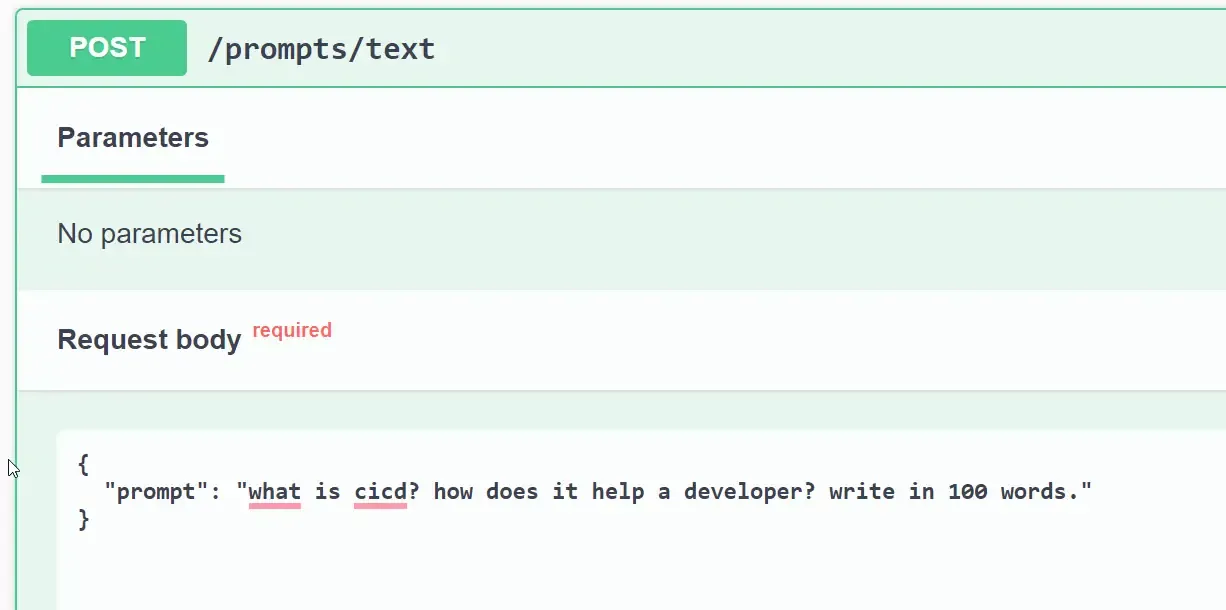
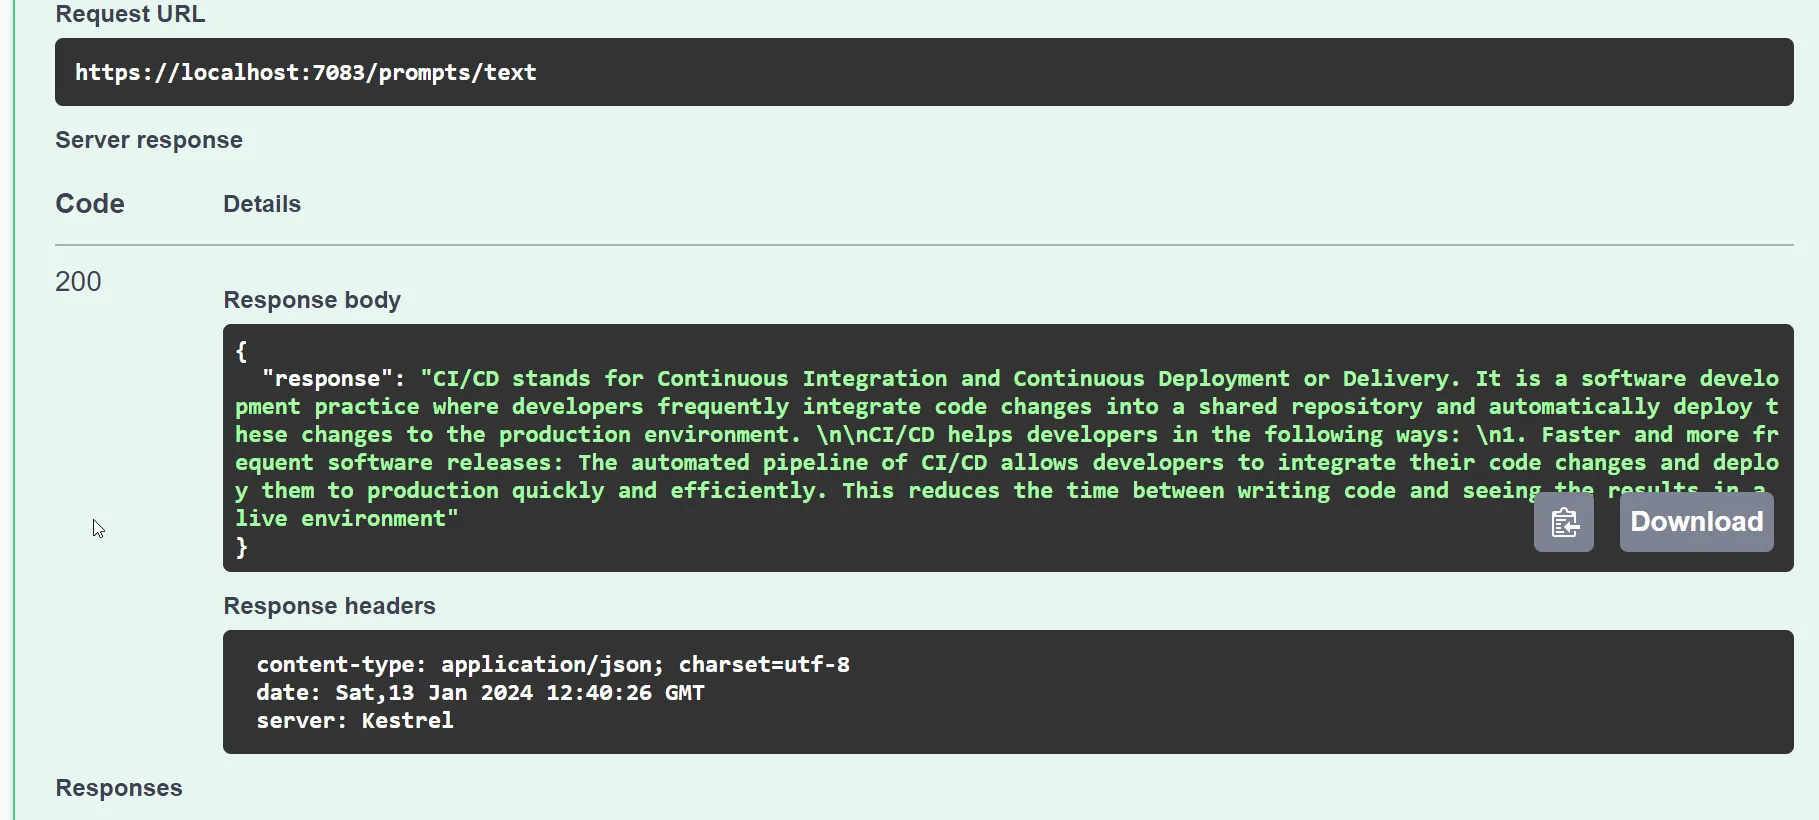
And here is the response.
📌 Subscribe to my .NET Newsletter, for more tips and quick reads: https://newsletter.codewithmukesh.com.
Endpoint for Image Generation using Stability Diffusion
Next, let’s build an even more interesting API endpoint that can generate images for you based on your prompt.
Let’s understand how the API should work. The endpoint will accept a prompt, which then sends a request to BedRock. We will be using the “stability.stable-diffusion-xl-v1” model for this section of the demonstration. The application will then receive a base64 from the BedRock API, which then we will have to store it to a local path. The API will return an OK response when completed.
First, let’s create the ImagePromptRequest under the Models folder. This will accept Prompts like “an image of a bird flying in space”.
public record ImagePromptRequest(string Prompt);Next, create a new folder named SD and create a new class named StabilityDiffusionPrompt. The request and response models of this provider can be found here: https://docs.aws.amazon.com/bedrock/latest/userguide/model-parameters-diffusion-1-0-text-image.html.
This model accepts a string as a prompt. As earlier, I have set some default values to keep things simple. Go through the documentation to customize your request even further.
public class StabilityDiffusionPrompt{    public StabilityDiffusionPrompt(string prompt)    {        var textPrompt = new TextPrompt()        {            Text = prompt,        };        TextPrompts.Add(textPrompt);    }    [JsonPropertyName("text_prompts")]    public List<TextPrompt> TextPrompts { get; set; } = new List<TextPrompt>();    [JsonPropertyName("cfg_scale")]    public float CFGScale { get; set; } = 20F;    [JsonPropertyName("steps")]    public int Steps { get; set; } = 50;}
public class TextPrompt{    [JsonPropertyName("text")]    public string? Text { get; set; }    [JsonPropertyName("weight")]    public float Weight { get; set; } = 1F;}
Similarly, create another class, StabilityDiffusionResponse which maps to a list of artifacts produced by the API. Note that the Base64 property is the one we are looking out for.
public class StabilityDiffusionResponse{    [JsonPropertyName("result")]    public string Result { get; set; }    [JsonPropertyName("artifacts")]    public List<Artifact> Artifacts { get; set; }}
public class Artifact{    [JsonPropertyName("base64")]    public string Base64 { get; set; }    [JsonPropertyName("finishReason")]    public string FinishReason { get; set; }}
With that done, Switch back to the Program.cs file, and add the following endpoint.
This is again a POST endpoint at /prompts/image, that accepts an ImagePromptRequest. Similar to the previous endpoint, we are creating the Model using the Prompt, and getting the memory stream of the resulting bytes.
This time around, we will set the model id to “stability.stable-diffusion-xl-v1”. This request model is sent to BedRock API via the Client that we had registered.
app.MapPost("/prompts/image", async (AmazonBedrockRuntimeClient client, ImagePromptRequest request) =>{    var sdPrompt = new StabilityDiffusionPrompt(request.Prompt);    var bytes = Encoding.UTF8.GetBytes(JsonSerializer.Serialize(sdPrompt));    var stream = new MemoryStream(bytes);    var requestModel = new Amazon.BedrockRuntime.Model.InvokeModelRequest()    {        ModelId = "stability.stable-diffusion-xl-v1",        ContentType = "application/json",        Accept = "*/*",        Body = stream    };    var response = await client.InvokeModelAsync(requestModel);
    string pathToSave = Path.Combine(Directory.GetCurrentDirectory(), "genai-images");    Directory.CreateDirectory(pathToSave);
var data = JsonSerializer.Deserialize<StabilityDiffusionResponse>(response.Body); foreach (var artifact in data!.Artifacts) { int suffix = 1; var imageBytes = Convert.FromBase64String(artifact.Base64); var fileName = $"{request.Prompt.Replace(' ', '-')}-{suffix}.webp"; var filePath = Path.Combine(pathToSave, fileName); File.WriteAllBytes(filePath, imageBytes); suffix++; } return Results.Ok();});- From line 15, we will be handling the image creation part.
- Lines 15 and 16 ensure that predefined paths exist on the local file system.
- Line 18, we will be deserializing the response from the API to the C# models that we had defined. This would include the List of Artifacts which in turn consists of the base64 encoded strings.
- We then iterate over the list of artifacts, convert each of the base64 encoded strings to images, and get it saved into the file system as PNG files.
- Finally, a status Code of 200 is returned to the client.
Let’s test this endpoint now. I am giving a wild idea as a prompt to the API.
{ "prompt": "silhouette image of a car flying in the night"}
Pretty accurate, yeah? Let’s try something else too.
{ "prompt": "image of a bird flying in space with a space suit"}
How cool is this! This is what you get when you combine Twitter, SpaceX and Tesla :P I have included all these images in the sample GitHub repository as well.
You can probably build another MidJourney with a different flavor! This is how easy it is to get started.
That’s a wrap for this article. You can find the complete implementation code over at my GitHub repository.
Summary
In this interesting article, we learned about integrating Generative AI in .NET with Amazon BedRock. We explored the BedRock Dashboard, its supported AWS Regions, and various popular Foundational Models. We also fiddled around with the Text, Chat, and Image Playgrounds. In the later section, we built an ASP.NET Core Web API that has endpoints to generate text with the Cohere model and images using the Stability Diffusion AI Model.
If you liked this article, do share it with your friends and network!

