In this article, we will learn about hosting ASP.NET Core Web API with AWS Lambda in a rather simple-to-follow manner. It is going to be as simple as developing a .NET 6 Web API as you would normally do using Controllers or Minimal APIs, and running some CLI commands which will deploy your API as Lambda Function to AWS Lambda super fast!
As part of the “Serverless Applications with AWS on .NET” series, in earlier articles, we learned about hosting AWS Lambdas and exposing them via Amazon API Gateways to achieve the same. With this article, we will be learning a simple way to get your ASP.NET Core Web API Hosted onto the AWS Infrastructure with AWS Lambda! In other words, we will be building a serverless REST API with .NET 6 and deploying it to the AWS Infrastructure using AWS Lambdas.
This article is sponsored by AWS. Huge thanks for helping me produce more .NET on AWS content!
You will need good knowledge about AWS Lambda and Amazon API Gateways to follow along with this tutorial. Please go through this and this article to learn about the previously mentioned topics.
Pros & Cons of Hosting ASP.NET Core Web API with AWS Lambda
Yes, we previously built REST APIs with .NET 6 and AWS Lambda. So how is this tutorial different from it?
Well, firstly those were the basic concepts that we used and are applicable when your API has just a couple of endpoints. In a previous article, we deployed multiple Lambdas to AWS (one for each of the API end-point), connect it all together using Amazon API Gateway to form a single REST API instance which was serverless, of course, and added some security to it. Although it’s a pretty cool way to do things and makes the entire process clear to you, It becomes difficult to maintain over the long run.
But the process involved might be a bit hectic, right? Remember from the previous articles, that we actually had a totally different way of development for setting up a REST API, where you had to work with APIGatewayRequest and Request and pretty much had to compromise on many things that comes out of the box with a default ASP.NET Core Web API?
When you have more than a couple of endpoints for your Rest API, it would be better if you were able to still follow the traditional concepts of WebAPI using the Controller and Minimal API approach (thanks to the .NET 6 Runtime support in AWS) and build out your APIs, rather than converting everything to Lambdas right? So, in this approach, as we mentioned earlier, we will be just building a .NET Web API the usual way, deploying it to AWS Lambda, and using the Function URL concept of Lambda to expose it (Not Amazon API Gateway).
Reduced cost of execution is one of the most appealing features of this approach. Imagine having a simple application and you try to host it on an EC2 instance, which is much costlier than a simple AWS Lambda. Using an EC2 instance for a simple Web API would be overkill and would definitely cost you much more. With AWS Lambda, you only pay for each request execution. All the scaling activities are taken care of by AWS! This is the beauty of Serverless Architecture.
And here are a few cons related to this approach. Being Serverless, the AWS Lambdas are loaded into the memory only when the first request hits it. This is related to the Cold Start of .NET applications hosted on AWS Lambda coupled with the whole serverless concept. It’s not like the Lambdas are always active and are waiting to be called. Now, the first request that actually hits the Lambda will take a couple of seconds, or even more to load the Lambda into the memory.
This highly depends on the following parameters:
- how complex your application is?
- how many other infrastructure dependencies does it have?
- how long the startup configuration takes for your ASP.NET Core application?
- and, the memory allocation for your AWS Lamba?
So, once the Lambda is hit for the first time, it takes some time for it to be loaded into the memory, With that done, it stays in the memory, and each of the subsequent requests will be served super fast! But there is a catch again! These Lambdas are persisted in the memory only for a certain period of time, after which the process is terminated, and we are back to cold starts again.
This period is usually anywhere from 15-40 mins depending on how long the Lambda is in an idle state. I was not able to find the exact time to live of the Lambda from Amazon documentation, so feel free to drop in comments if you are aware of this.
But after a couple of Searches on Google, I was able to understand that there are ways to reduce the cold start issues associated with the AWS Lambdas. You can keep the application WARM by periodically invoking an endpoint that has a very small handler logic which would cost close to nothing. Using Cloudwatch Events in combination with a scheduler to keep the application warm can be a safe bet.
Another limitation of this approach is that it’s not very suitable for large-scale applications. Lambdas generally have quota limits over the deployable zip packages which should not be above 50 Mb (zipped) and 250 Mb (unzipped). To give context, the fullstackhero .NET Web API project, when published and zipped comes to around 35Mb. Read more about AWS Lambda Resource Quotas here.
When to Host ASP.NET Core Web API with AWS Lambda?
Choosing when and where to use what kind of Hosting Strategies is vital for your business and customer needs. This can also be the break or make a decision in saving costs of your AWS services. Now that we understand the pros and cons of hosting web APIs in AWS Lambdas, let’s understand when to use this approach and when not to.
Hosting ASP.NET Core Web API is pretty cool for building a Web API that is not very crucial or not called very often. Always keep in mind that the response time of APIs hosted over AWS Lambda can be a bit longer, with the cold starts adding at least 1-2 additional seconds to the overall response times. Being serverless, it costs nothing when there are no incoming requests, and also it costs close to nothing even when there are requests coming in, thanks to the generous Free Tier of AWS!
The Free Tier provides you with 1 Million free requests per month for AWS Lambda, forever! And after 1 Million Lambda requests per month, you will be charged 0.20 USD for the next 1 Million requests, which is again very affordable! And if your application is hitting 1 Million requests a month, you would probably be running a pretty successful business as well ;) Read more about the AWS Free Tier and AWS Lambda Pricing here.
And, as mentioned in the previous section, if you plan to deploy a complicated, large-scale .NET Web API to AWS Lambda, it’s probably not a good idea. A better approach would be to Dockerize the application and run it over AWS App Runner, ECS, EC2 or even deploy it into an Elastic Kubernetes Cluster of Amazon! As you see, the options you get while hosting ASP.NET Core to the AWS Infrastructure are pretty deep, and solely depend on the use case and purpose of your application! Let me know in the comments section below if you want me to write articles related to the other approaches to deploying an ASP.NET Core Web API to the AWS Infrastructure.
Also, if your application endpoints have long-running tasks, AWS Lambdas won’t be a recommended approach. Try to keep your task run times to well under 5 mins of execution time, as this can also contribute to the AWS Lambda costs. There is also a 1000 concurrent execution limit for Lambda.
Thus, it’s pretty much clear that it’s not a very good idea to try to host complex applications in AWS Lambda. If you have a simple to medium Web API that maybe does some CRUD functionalities and connects to a few other simple AWS Services like DynamoDB, Cloudwatch, Kinesis, and S3, this approach will do wonders for you and incredibly optimize your AWS running costs.
Let’s get into the implementation and explore a couple of cool ways of hosting ASP.NET Core Web API with AWS Lambda! I assure you that you are going to learn a lot from this article. Leave a comment if you did :)
Prerequisites
You will need the following for this implementation.
- Visual Studio 2022 or other IDEs installed. I will be demonstrating this with VS 2022 Community Edition.
- .NET6 SDK installed on your development machine.
- AWS Account. A Free account is more than enough.
- AWS CLI configured. You can follow the steps from here.
- AWS Tools and Toolkit installed. You can install this as an extension from the Visual Studio Extensions. Refer to the steps from here.
Hosting ASP.NET Core Web API with AWS Lambda - Getting Started
First up, let’s build an ASP.NET Core Web API with Visual Studio using the default .NET templates, add in some changes to give it a Lambda Hosting, zip it up, and publish the Lambda using the AWS CLI. We will be doing this with and without the aws lambda configuration file. This approach is to help you understand what really happens behind the scene. Moving forward we will automate the step where you had to manually enter the lambda-related configuration and load it from a JSON file.
You can clone the repository from here.
Creating the .NET 6 Web API Project
Let’s create a new .NET 6 Web API project and named it VerySimpleAPI. As the name suggests, this API will be just a plain default Web API. We will keep it simple to make the article compact. But you get the idea, it can be a full-fledged API as well (keeping in mind the pros and cons of this deployment strategy).
Keep in mind that this also can be an already existing .NET 6 Web API. We will just have to install a package to it and add a couple of lines of code to it to be able to deploy it into AWS Lambda.
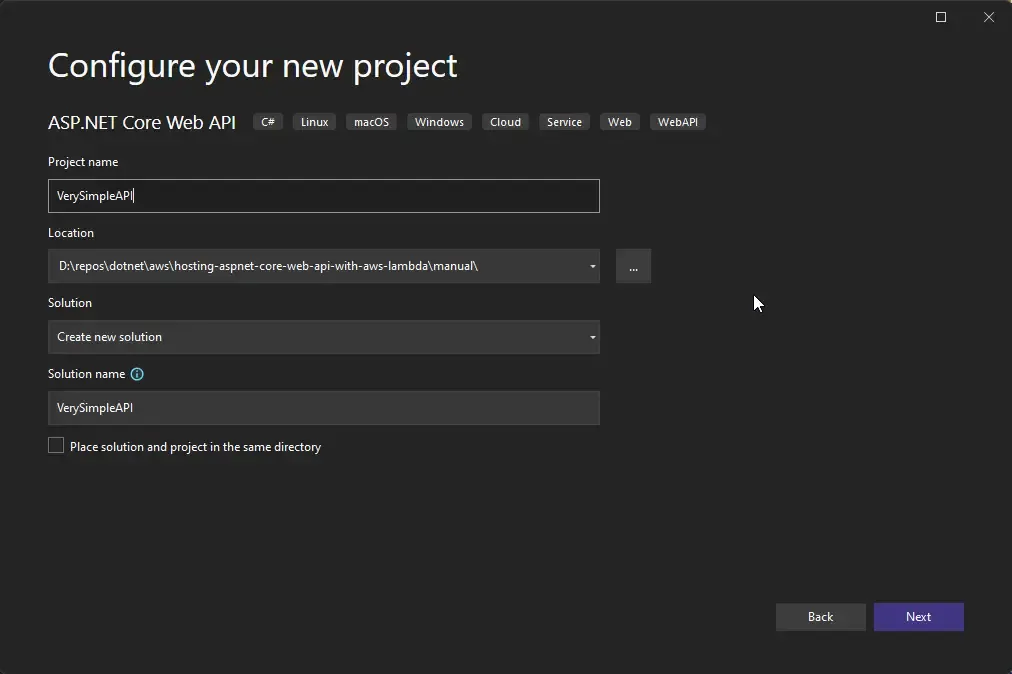
You can also choose the Minimal API approach if you want. But for this demo, I will showcase both the Controller and Minimal API endpoints within the same deployment.
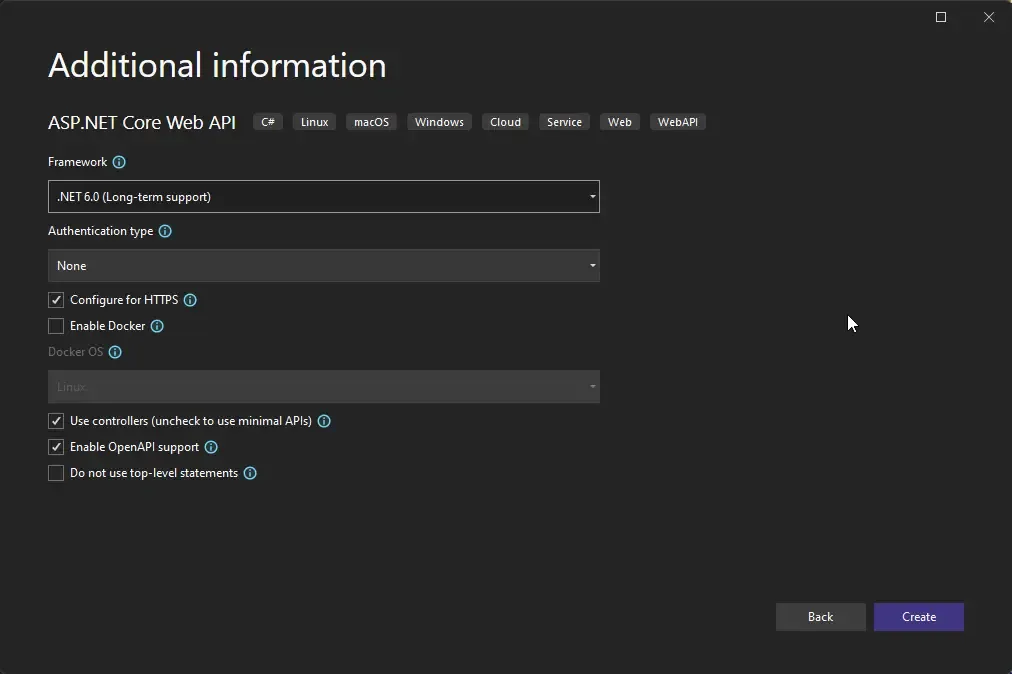
With that done, open up the Startup.cs and the following line just before the app.Run() line. This is just to add a minimal API endpoint to the application.
app.MapGet("/", () => "Hello from AWS Lambda!");As of now, we just have 2 endpoints in the picture, which are the /weatherforecast (the one from the traditional API Controller) and / endpoint (from the newly created Minimal API route).
Installing the Required Lambda Package & Service Registration
Next, we need to install a package from AWS and add in a single line of service registration code which will automatically make the application use the Lambda Runtime. Open up the package manager console and run the following command to install the required package.
Install-Package Amazon.Lambda.AspNetCoreServer.HostingThis is the only package you will need to turn your application into an AWS Lambda! As simple as that ;) With the package installed, let’s register the Lambda Hosting Service and mention the type of resource we intend to create. In our case, it will be an HTTP API. Add the following line of code in the Startup file right after the Controllers are registered in the application container.
builder.Services.AddAWSLambdaHosting(LambdaEventSource.HttpApi);And would you be surprised if I told you that these are the only code changes actually required to make your ASP.NET Core Web API eligible to be deployed to AWS Infrastructure? ;) Now Lambda would recognize your entire API as a Function. This makes it so easy to get it deployed into AWS Lambda as well.
Deploying the AWS Lambda with CLI
Next, let’s open up the terminal right at the root of the project’s directory and use the AWS CLI and Toolkit to actually deploy the Lambda. Make sure to navigate to the folder where the csproj file exists.
Run the following command.
dotnet lambda deploy-function
Now, you will have to enter some configuration to actually deploy the Lambda.
Firstly, the CLI asks you to enter the required runtime. In our case, it will be dotnet6, as this is the latest runtime available for .NET applications. Read more about Lambda Runtimes here.
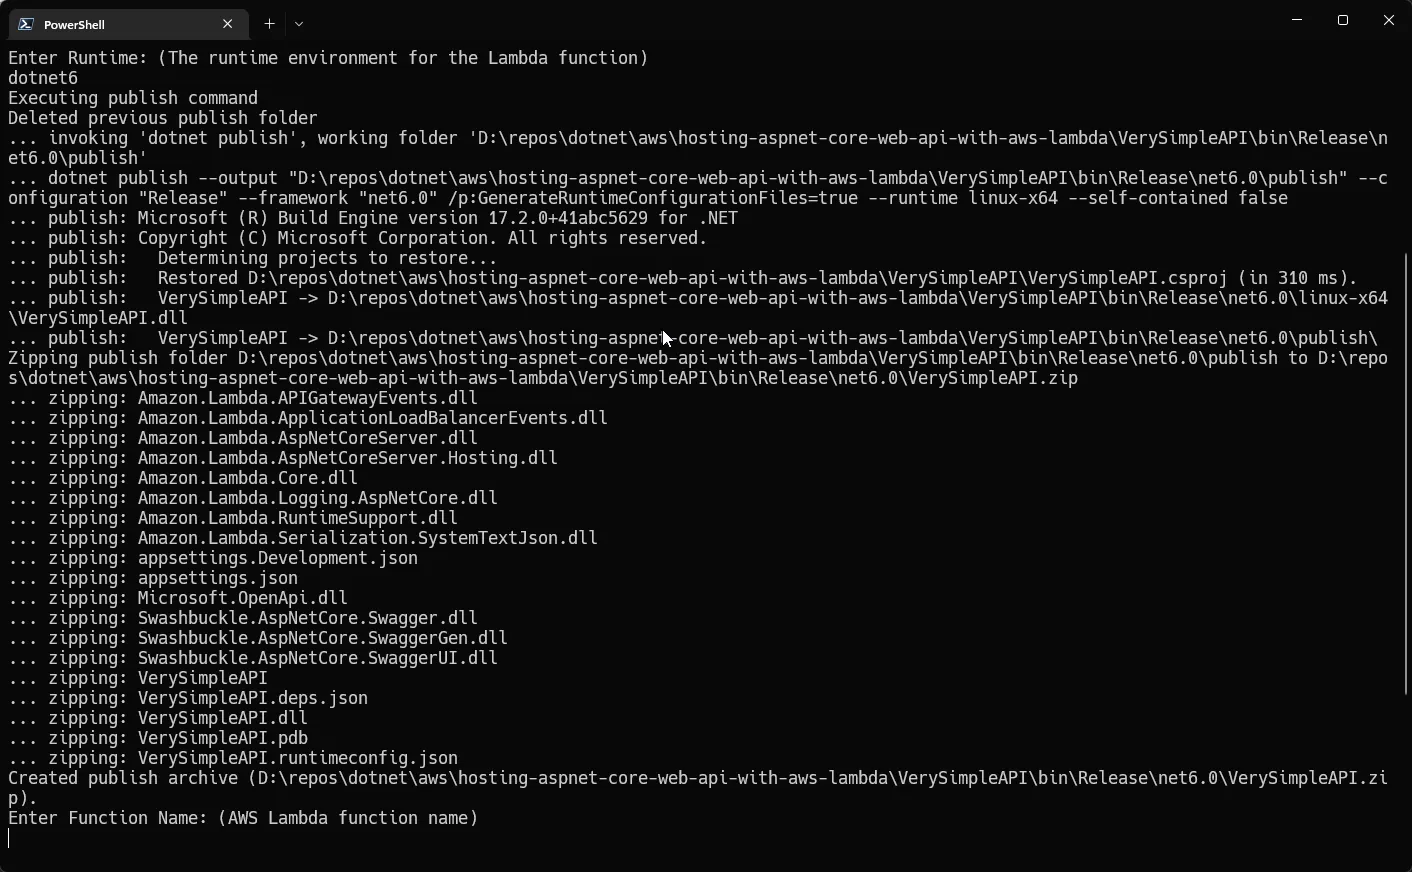
Once you enter the runtime, the cli publishes your ASP.NET Core Web API in release mode with Linux runtime and ZIPs it to {namespace}.zip which can be located inside the publish folder.
Nex,t follow the series of questions asked by the CLI
- Enter the function name: simpleapi - This will be the internal name of the Lambda in AWS. This will create the Lambda for you.
- Role Selection: Here you can select an already existing IAM role or create a new one. I created a new IAM role and named it simpleapirole.
- Select Policy to attach with the IAM role. From the list that appears on the terminal, I selected #6 which points to a basic Lambda Execution Role. You can obviously select the policy based on your requirement, or even attach more policies to the role using the AWS Management Console. I did a similar thing in one of the previous articles, where my Lambda needed permission to access the DynamoDB Table. Read about it here. This would create and propagate the IAM role into the AWS regions.
- Enter memory size (MB): Here, let’s go with 256
- Enter timeout (seconds): Proceed with 30
- Enter Handler: Be careful here. This should be the name of the namespace of the API project. In our case it is VerySimpleAPI. When the Lambda is created it will use the namespace as the entry point of the application. Make sure it’s set to the namespace / DLL name.
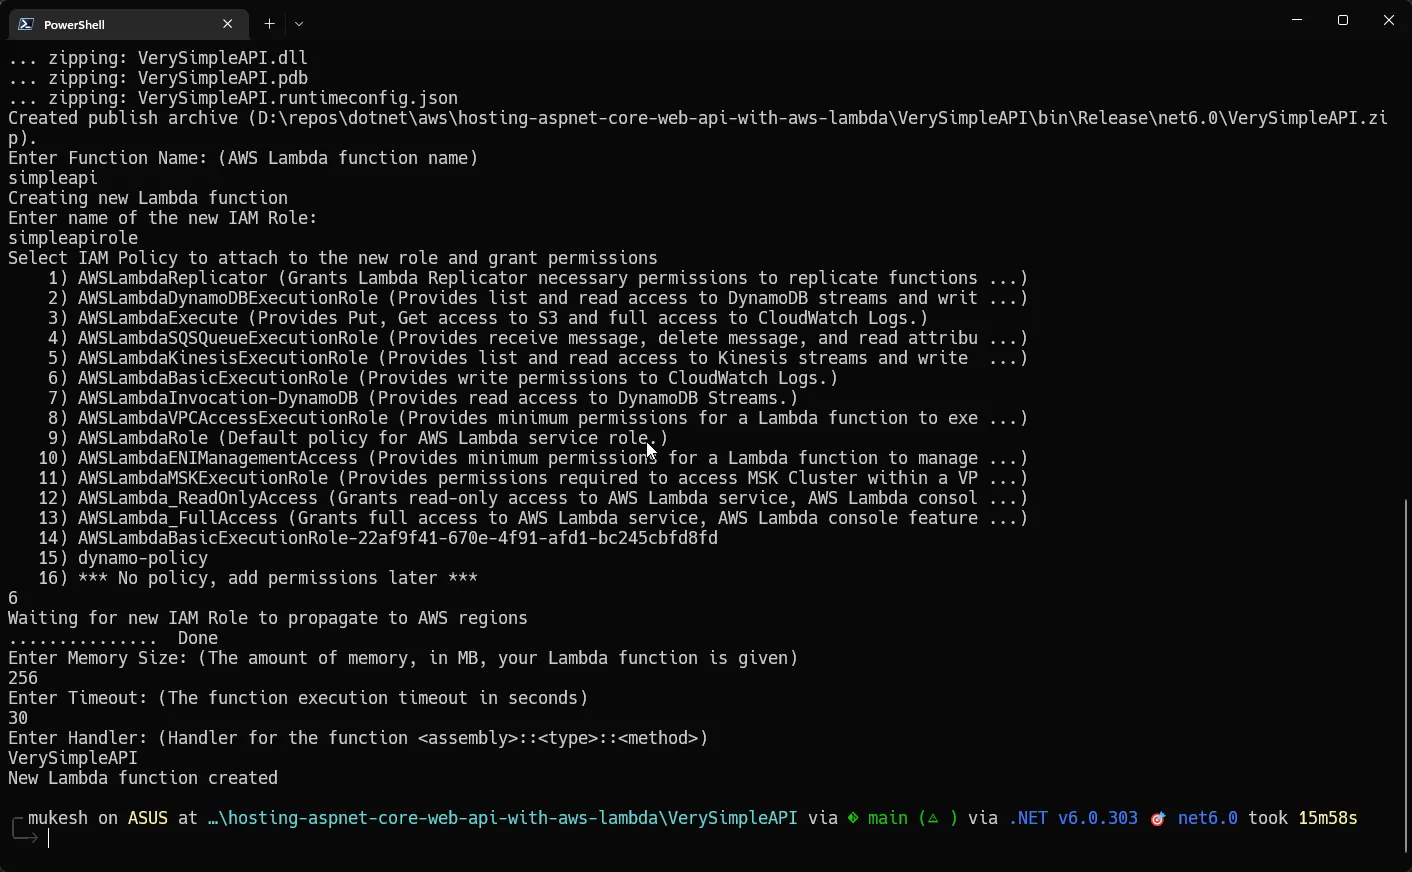
That’s it for the configurations! Your Lambda is now created. We have a couple of things to do before we test our deployment. Navigate to the AWS Management console’s AWS Lambda homepage.
If things went as expected, you will be able to see your Lambda Function.

Lambda Function URLs
I earlier mentioned that in order to keep things simple we are not going to use the Amazon API Gateway to expose Lambda as a URL, right? So how are we going to do this? Well, there is this feature in AWS Lambda known as function URLs wherein we can create access endpoints per Lambda without having to create an API Gateway at all.
Function URL is a dedicated HTTP endpoint for a Lambda function. When configured, the Function URL can be used to access the Lambda function via browser, client applications, and simple CURL requests. These URLs can be secured using AWS IAM Authorization. For now, we will be setting these endpoints as public.
Click on the Lambda Function Name. On the Lambda Dashboard, click on the Configuration Tab and select the Function URL.
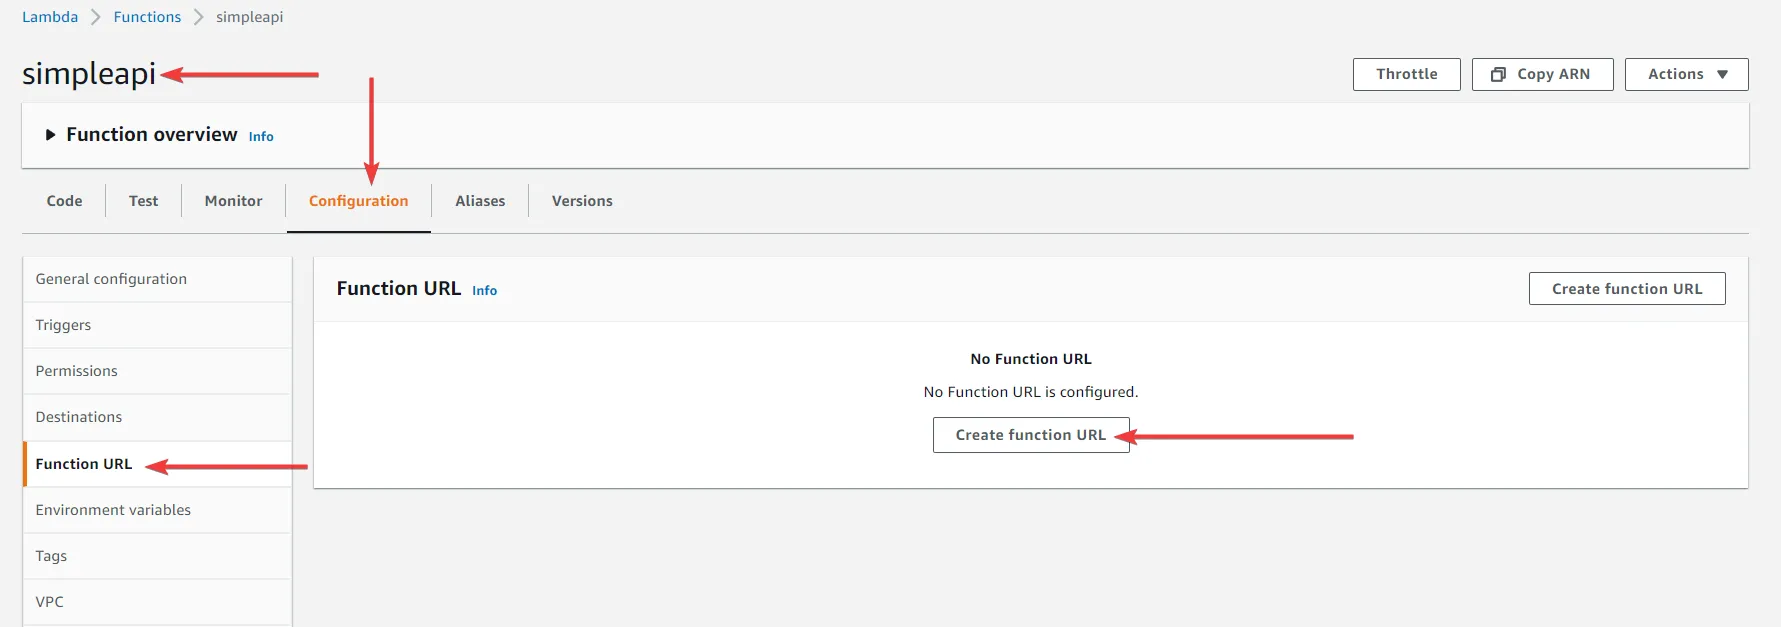
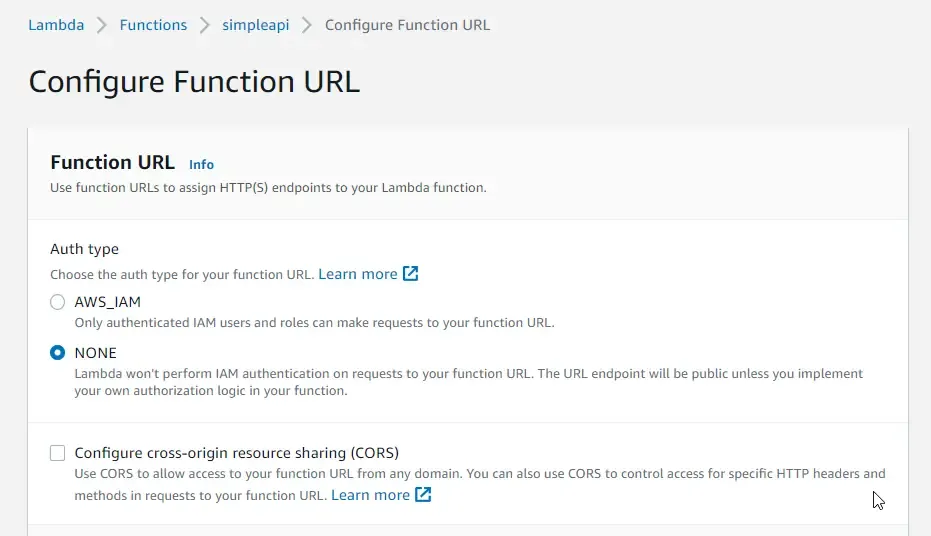
Here, click on Create Function URL and select the Auth type to None.
This means that AWS will not be responsible for securing access to your .NET 6 Web API. Rather, authentication and authorization will be the responsibility of you as a developer and how you implement the Auth logic of your ASP.NET Core Web API. You can simply write in code that can handle Authentication using JWT tokens or OAuth, or anything you wish.
Feel free to explore the CORS configuration as well. I kept it as it is. Click on save.
This would generate a Function URL that is linked with your Lambda.

Testing
Let’s use this Function URL and test it via our browser since we have not really added any POST / Delete / Patch methods to the endpoints. It’s just 2 simple GET endpoints if you remember. First, let’s test the / endpoint. And as we expected, we get a simple Hello message. Note that there is a slight delay in response, but just under a couple of seconds. When you retry the request, it’s much faster. This is because of the cold start of the AWS Lambda that we learned in the Pros and Cons section of this article.

Next, let’s navigate to the /weatherforecast endpoint. You can see that the response is pretty fast.

Adding Environment Variables to the AWS Lambda
The swagger endpoint doesn’t seem to work though. This is because of our Startup file where we set the Swagger to be enabled only if the Environment is DEVELOPMENT. The simple fix here is to add a new environment variable to the AWS Lambda and set the ASPNETCORE ENVIRONMENT to Development.
Again, open up the Lambda Function and navigate to Configuration / Environment Variables and add a new one with the key as “ASPNETCORE_ENVIRONMENT” and value as “Development”.

Save it, give it a couple of seconds for the propagation to happen and then navigate to <function-url>/swagger
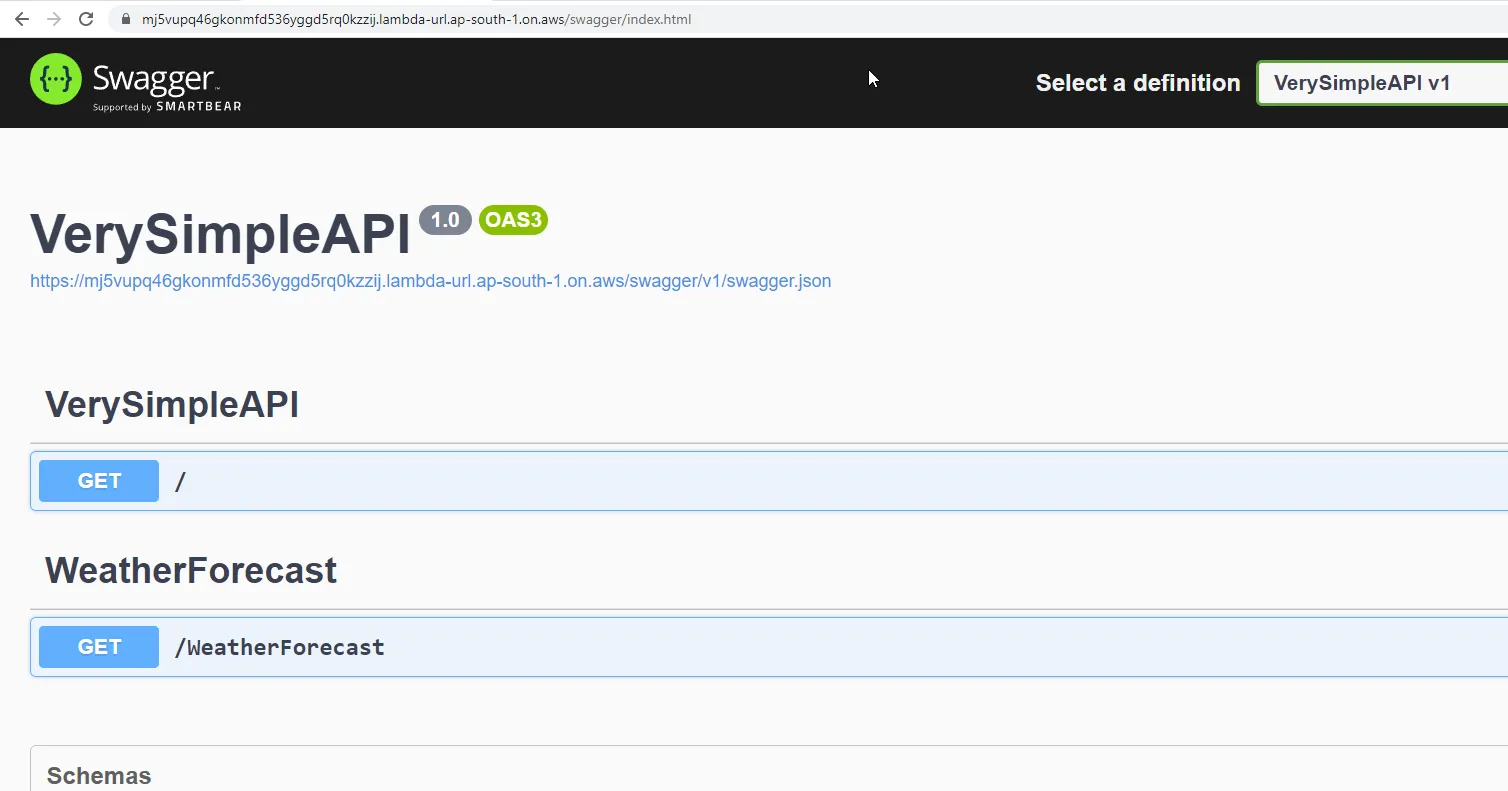
There you go, Swagger is now accessible as well. I am actually enjoying working with .NET and AWS. The team has actually made it pretty intriguing to work with .NET applications.
That’s actually how simple it is for Hosting ASP.NET Core Web API with AWS Lambda! Now, there are certain parts of this approach that can be automated and made much easier to deploy. For example, in cases where you have made changes to the VerySimpleAPI project and want to re-deploy it to AWS Lambda, the CLI would again ask for the runtime, function name, handler, roles and so much more. Remember entering these values in the CLI while creating the Lambda?
Or in case, where you need to deploy this API to another AWS account for some reason, you would have to manually go into the AWS Management Console to create a new function URL and add a new environment variable.
Wouldn’t it make sense to store these values somewhere as configurations within the project so that the CLI can read the data from the configuration the next time we intend to deploy? That’s exactly what the AWS CLI does. All you have to do is just add in a new JSON file, fill in the required configuration one time, and from then on the CLI picks up the configuration and makes things much quicker for you! Let’s explore this now.
AWS Lambda CLI Functions
Before proceeding, let’s delete the Lambda that we deployed earlier. You can do this by navigating to the management console, selecting the Lambda function, and clicking on delete. But since we have AWS CLI already set up locally, I prefer to run a cli command that can delete the Lambda easily. To list the available Lambdas, run the following.
aws lambda list-functions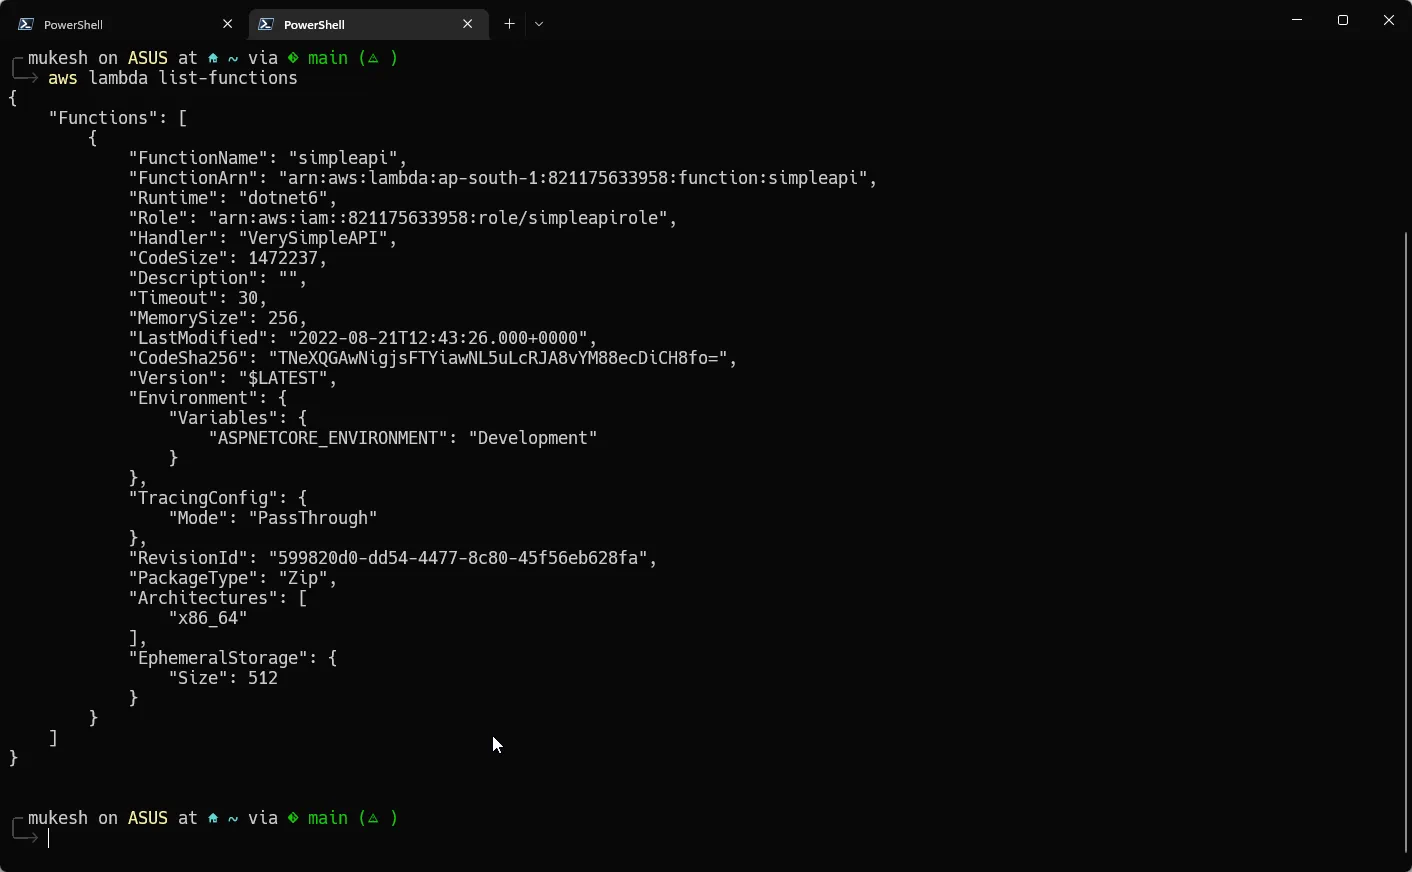
To delete the Lambda, run the following.
aws lambda delete-function --function-name simpleapi
Always make sure to remove AWS resources once you are done with the testing. This makes sure that you are not accumulating any additional AWS costs without knowledge. I prefer using the CLI to remove resources. This is the AWS CLI Documentation - https://docs.aws.amazon.com/cli/latest/index.html, pretty handy. Make sure that you are aware of the CLI commands of the most frequent AWS services that you work with, like S3, IAM, EC2, Lambda, DDB, and so on.
Now that our Lambda is removed, let’s continue.
Storing Lambda Configurations in aws-lambda-tools-defaults.json
Switch to Visual Studio. At the root of the project, add a new JSON file and name it aws-lambda-tools-defaults.json. This is the Default File Name expected by the AWS Lambda Tools CLI. There was no proper documentation for this file. So I dug up the Source from the AWS DOTNET CLI Repository. Here is the class for your reference. All the properties supported by the aws-lambda-tools-defaults.json file are listed in this class.
You can also get hold of this file while creating AWS Lambda functions using Visual Code. Here is the file from my previous article’s attached repository.
We would be adding some crucial configurations to this JSON file. Add the following content to your aws-lambda-tools-defaults.json file.
{ "profile": "", "region": "", "configuration": "Release", "function-runtime": "dotnet6", "function-memory-size": 256, "function-timeout": 30, "function-handler": "VerySimpleAPI", "function-name": "verysimpleapi", "environment-variables": "ASPNETCORE_ENVIRONMENT=Development;SOMETHING_ELSE=SomeValue", "function-url-enable": true}As you see, since the profile and regions are already configured within the AWS CLI, we are keeping it empty. In case you need to deploy to another AWS region using a different configured local profile, you would have to modify these values.
Next up, the configuration is set to Release for optimizing the published package size, the runtime is set to dotnet6, the memory size to 256, the timeout to 30, the handler to the namespace of the ASP.NET Core application, function name to verysimpleapi.
Then, remember we needed to add Environment variables to change the ASP.NET Core Environment to Development? So, to the environment-variables property, we add a list of key-value pairs using the following format -> “key1=value1;key2=value2”. I added a second dummy variable just to showcase the usage.
Finally, we set the function URL to enable the boolean to be true. This is to enable and create a Function URL that is associated with this Lambda. This also prints us the Function URL on the terminal once the Lambda is deployed, pretty handy, right? Thus the only property that we left out is the role and policy selection. This is to keep it flexible for adding new roles or using existing ones.
Let’s see our changes in action now. Save the changes and open up the terminal at the root of the project directory where the csproj file lives and run the deploy command again.
dotnet lambda deploy-functionYou can see that Lambda gets deployed automatically using the values read from the configuration file. We will still have to enter the role to be used for this Lambda. Once that’s entered, the Lambda function is deployed and the Function URL is written onto the terminal window. Just click on the URL and you are all ready to test your new deployment. Attaching a screenshot for this.
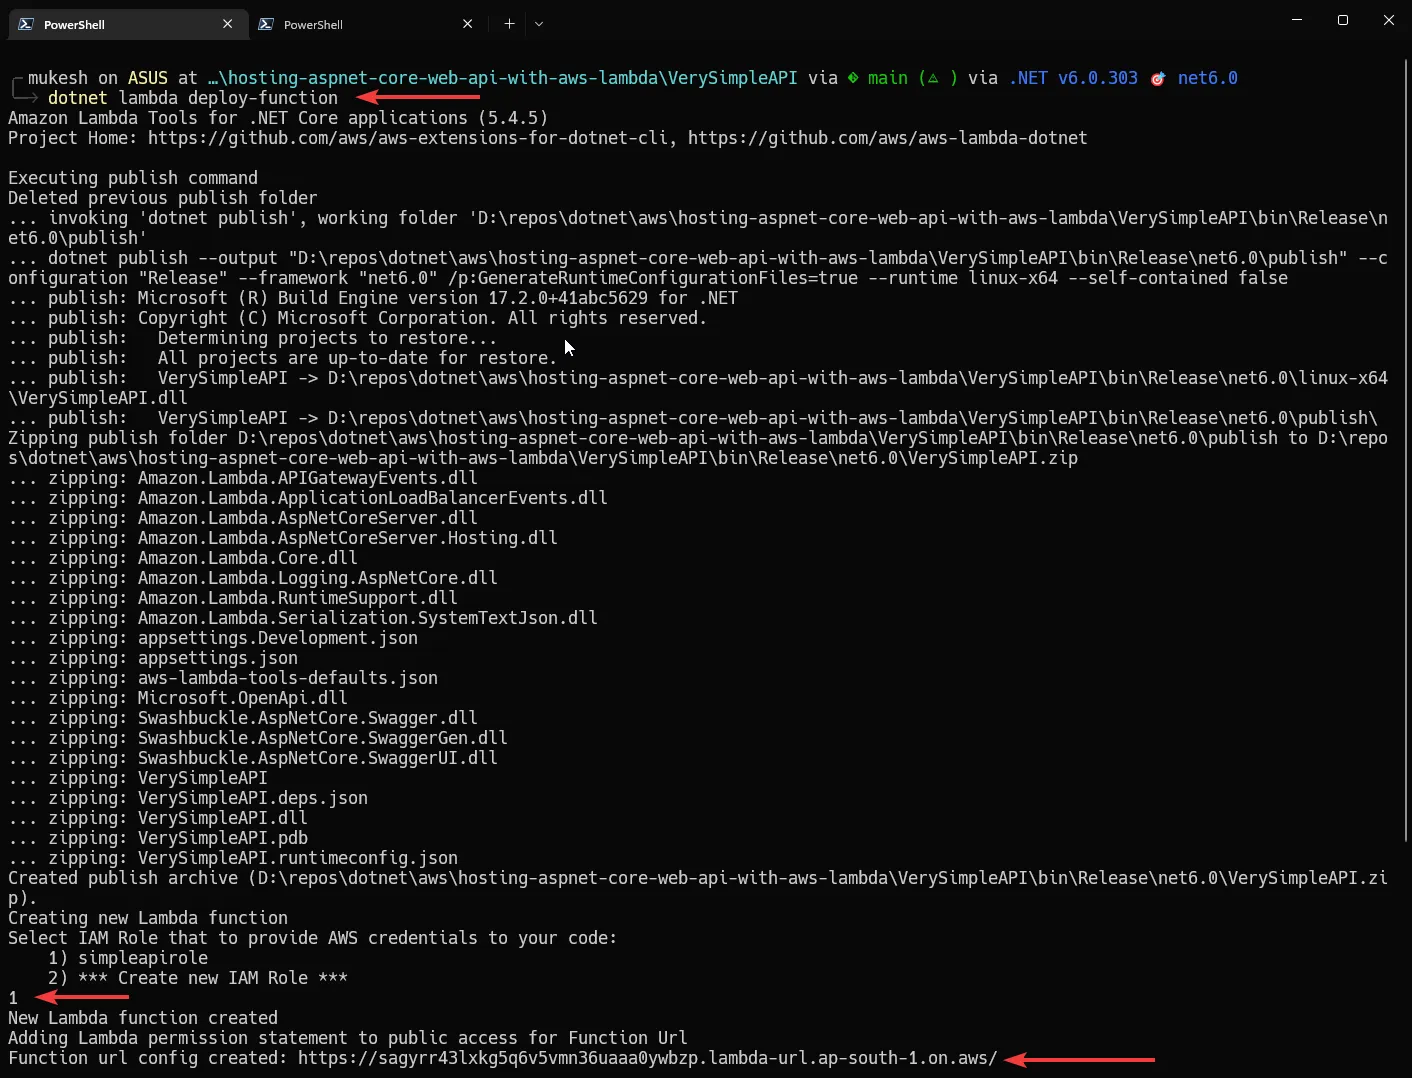
I will leave the testing of this newly deployed Lambda Function URL to you ;)
DevOps Enhancement for CI/CD
Pretty solid tooling from AWS, right? Imagine the power this could bring into the DevOps scenarios once integrated with the Build Pipelines. For example, you could tweak this to work with GitHub Actions Workflow, so that every time you push a change to the master branch of your GitHub repository or a PR gets approved/merged, you could run these CLI commands within GitHub workflow that would automatically deploy the changes into AWS Lambda.
This would make your latest API changes available in seconds as soon as any new changes are pushed into the master branch. This could be a perfect CI/CD Pipeline for applications with small or limited scope. And the best part is that this entire CI/CD pipeline setup would actually cost you nothing!
Just got a bit carried away! So, that’s a wrap for this comprehensive guide. Hope you learned a lot, I did.
Additionally.
If you need to add more spices to your WebAPI, feel free to go through the following articles, where I integrated AWS Services like DynamoDB and AWS S3 with a .NET 6 Web API project.
- Working with AWS S3 using ASP.NET Core – Upload, Download & Delete Files – Simplified
- CRUD with DynamoDB in ASP.NET Core – Getting Started with AWS DynamoDB Simplified
Maybe you can build APIs that use the above AWS Services and then deploy the application into AWS Lambda!
Summary
This article taught us about hosting ASP.NET Core Web API with AWS Lambda! We went through the pros & cons of this approach and understood what is the most suitable scenario to implement. Then we went ahead with the actual implementation, adding some dummy endpoints to our Web API and deploying it to the AWS Infrastructure with AWS Lambda. We also exposed this AWS Lambda using the Function URL and not the Amazon API Gateway. This was just to keep things simple. Then we used JSON configurations to automatically deploy the Lambda in a much more efficient way, which can also have a pretty positive impact if included in the DevOps CI/CD Pipelines.
In the next article, we will learn AWS SAM templates / Cloudformation and so much more Or feel free to suggest new topics that you would be interested in. Stay Tuned.
Share this article with your colleagues and dev circles if you find this interesting. You can find the source code of the project here. Thanks!


