In this article, let’s learn how to implement Multitenancy in ASP.NET Core in a rather simple way making use of Entity Framework Core. You can find the source code of the entire implementation in this repository.
Multitenancy in ASP.NET Core is yet another topic that is not very well documented on the internet. It’s kind of tricky to build a Multitenant application right from scratch. In my ongoing open-source project ‘fullstackhero .NET WebApi Boilerplate’, Multitenancy was the top priority on my to-do list. Let’s get started with understanding and implementing a simple, yet feature-packed version of Multitenancy in ASP.NET Core.
What is MultiTenancy?
Multitenancy is an architectural pattern where-in a software system can serve multiple groups of users or organizations. SAAS Products are a prime example of Multitenant architecture.
We are all familiar with single tenancy, where an API / Service is used by a single group of users or a single organization. In such a scenario, single application deployment is needed for every new set of users or organization.
Let’s imagine we have an application that is needed by several Organizations or User Groups. It’s known that the application will have the same code base for all the users. In such a scenario, is it always smart to deploy the same application over and over again for each of the tenants? Doesn’t it add to the infrastructure cost and maintenance? Isn’t it smarter to design an application in such a way that it can accommodate multiple user groups in a single deployment? This can dramatically reduce the deployment count and server costs.
Refer to the following diagram.
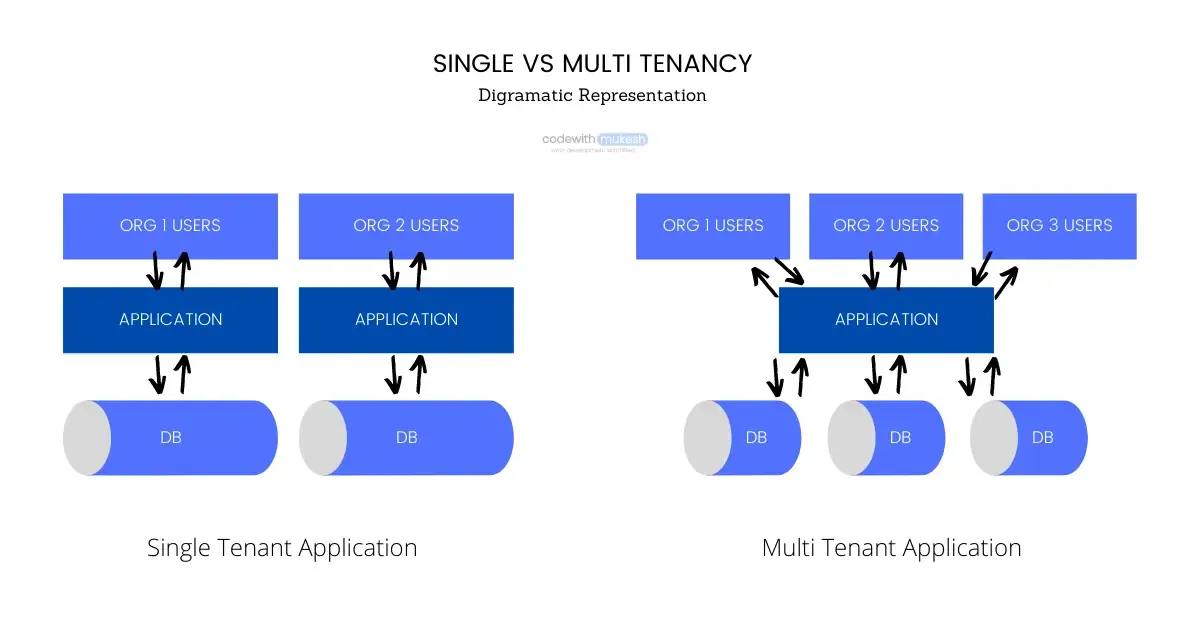
Here, the first section demonstrates the usual Single Tenant Application where Separate Deployments are needed per tenant. Tenant refers to the user group or the Organization / Company that wishes to use our application. You can see that each of the tenants will need a full-fledged deployment of the infrastructure.
Whereas, in the second section, single application deployment is shared by multiple tenants. The tenants can also choose to share the database as well or have a completely isolated database for themselves.
Database Access Strategies
For the Multitenant application to communicate with the database, there are essentially the following strategies.
Schema Seperation
This is one of the lesser-used strategies where each tenant will get its own Database Table, separated by the schema name. Let’s say an application has 3 tenants, alpha, beta, and gamma. Its products tables will look like this:
- [alpha].[Products]
- [beta].[Products]
- [gamma].[Products]
In this way, there is a clear separation of the tenant data.
Single Database - Tenant Column Seperation
This is a quite popular approach where the application has just 1 Database, and all the tenants share both the application and the database. This is more of an economical approach when there is not a lot of data operations happening in the application.
Each of the tables will have an additional column ‘TenantId’, which will be responsible for filtering the data tenant-wise.

When your tenants are worried about data security and have a lot of data flow happening, this may not be an ideal solution. There are high chances that the developer forgets to filter out the tenantId of a service which can potentially expose the data of other tenants as well. Also, when a tenant is highly data space-hungry, this approach won’t be much ideal.
Multiple Database - Complete Data Isolation
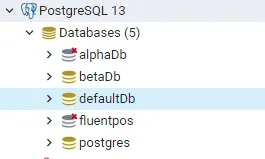
In this approach, each of the tenants gets to enjoy a separate database and thus complete data isolation and security. This is the most preferred solution when it comes to Multitenancy.
Hybrid Approach - Favorite!
Here is an interesting approach, where we design an application that can allow the tenants to choose if they need a separate database or shared database. This can be important when you know that not all tenants are going to have high database usage. The tenants who use the database in a minimal way can be assigned to use the shared database, while the more Data-intensive tenants can choose to have a separate database. This also has a positive impact economically.
In this tutorial, we will build an ASP.NET Core WebApi that supports Hybrid Multitenancy!
Identifying Tenants
Now that we understood how Database Access works in Multitenant applications, let’s learn how our ASP.NET Core application can identify tenants from the incoming requests.
Query String
This is a simple mechanism, where the tenant can be identified using a Query string. It’s as simple as passing ‘?TenantId=alpha’ in the request URL and the application gets to know that this request is meant for tenant alpha. As this strategy has several vulnerabilities, it’s advised to use this approach only for Test and Development purposes.
Request IP Address
Here, we assume that each tenant request will be generated from a particular IP range. Once an IP range is set for a tenant, the application can detect which tenant it belongs to. Although this is a secure approach, it’s not always convenient to use this.
Request Header
This is a more robust strategy to identity Tenants. Each of the requests will have a Header with TenantID in it. The application then serves the request for that particular tenant. This approach is recommended to be used when requesting Authentication Tokens only. We will be using this approach in our tutorial.
Claims
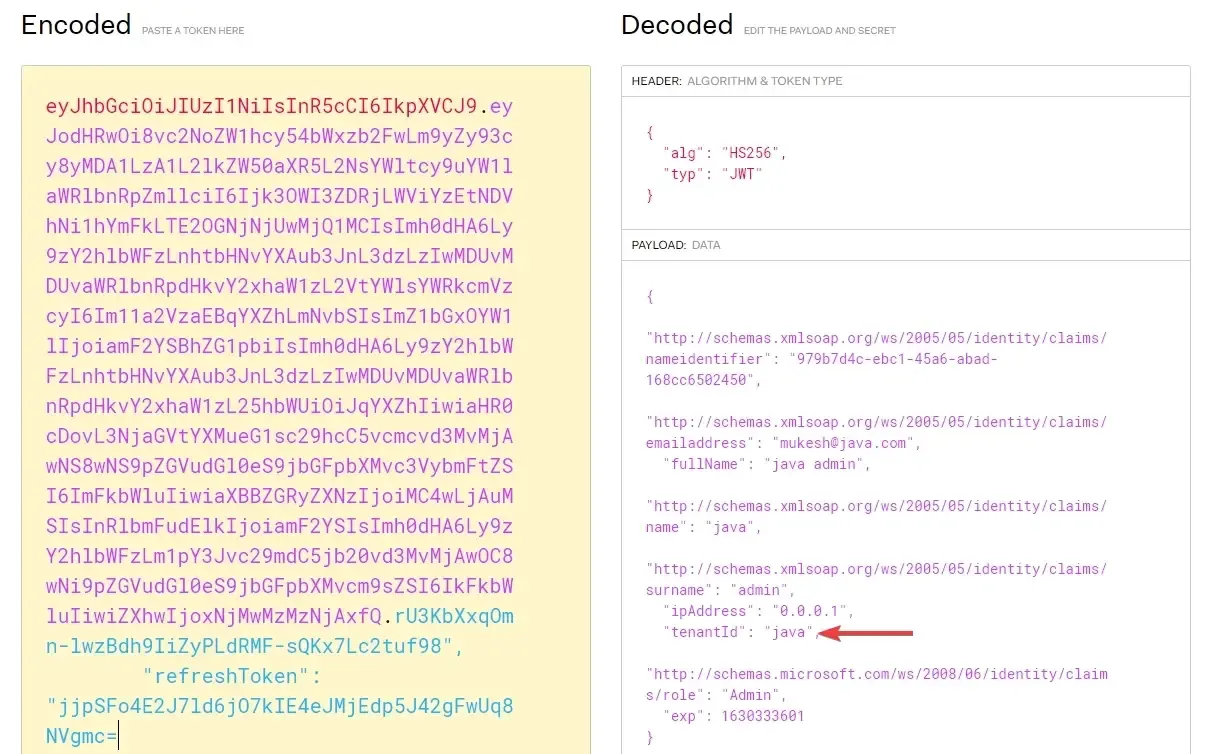
A more secure way to detect Tenants. In systems where JWT Tokens are involved for Authentication, the tenantId of the user can be encoded into the claims of the Token. This approach ensures that the request is both authenticated and belongs to a user from the mentioned tenant.
This is the approach I took for implementing Multitenancy in fullstackhero’s .NET WebApi Boilerplate project.
I generated a token from the Token endpoint and tried to decode the JWT. As you can see, there is tenant data available in the claims of the token, which further on can be worked upon by the client or server application with ease.
What we will Build?
In this tutorial, we will be building a Multitenant ASP.NET Core WebApi that demonstrates how easy it can be to achieve and understand Multitenancy in ASP.NET Core applications.
We will make this application completely configurable via the appsettings of the ASP.NET Core application. We will have the possibility to configure the details of each tenant with IDs using which we will perform CRUD operations on a simple entity. The tenant IDs will be passed to the application via the request headers. Each tenant will have the possibility of using a shared database or a dedicated database. The application will be performing automatic migrations of the database for each of the tenants, thanks to Entity Framework Core. EFCore’s Global Filter feature will be used to segregate each of the tenants too!
Let’s get started!
Getting Started with Multitenancy in ASP.NET Core
As mentioned earlier, we will be building a Multitenant ASP.NET Core 5.0 WebApi in this tutorial. I will be using Visual Studio 2019 as my IDE for development.
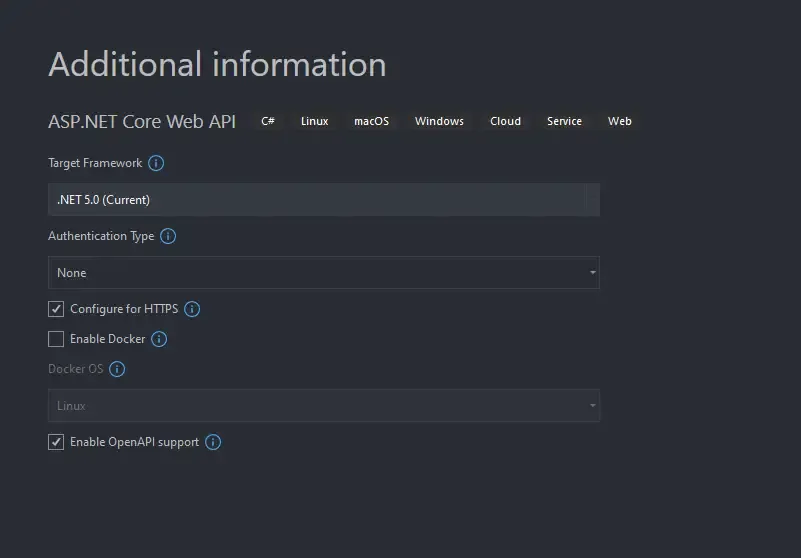
Let’s start by creating a new ASP.NET Core WebApi Project. Make sure to use the .NET 5.0 Framework.
Next up, let’s add in 2 C# Class Library Projects, namely Core and Infrastructure. Your Solution would look like this now.
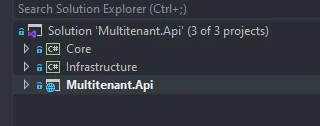
Make sure to delete the Classes that are created in the new Library Project. Also, I removed the boilerplate classes and controllers that Visual Studio added when I created the API Project.
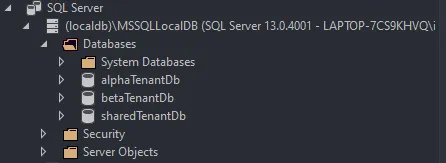
Building the Entity
Let’s build a simple Product Entity first! In your Core project, add a new folder named Entities and add in a new class, and name it BaseEntity.
public abstract class BaseEntity{ public int Id { get; private set; }}As you know, this is the Base Abstract class that our Entities will inherit to obtain the ID field. We will be using this in our Product Class.
Next comes the important part, where we need to have a contract/interface that will be implemented for Entities that need Multitenancy support. You can simply add a new property to each tenant called TenantId, but here is a cleaner way to do it.
Create a new folder in the Core Project and name it Contracts. Here, add a new interface and name it IMustHaveTenant. As it sounds, all the entity classes that implement this interface will have a Tenant Id. You will see the importance of having this contract later on in this guide.
public interface IMustHaveTenant{ public string TenantId { get; set; }}After, create a new class in the Entities Folder and name Product.
public class Product : BaseEntity, IMustHaveTenant{ public Product(string name, string description, int rate) { Name = name; Description = description; Rate = rate; } protected Product() { } public string Name { get; private set; } public string Description { get; private set; } public int Rate { get; private set; } public string TenantId { get; set; }}As said earlier, our Product class will inherit from BaseEntity Class and implement the IMustHaveTenant interface, which in turn adds the TenantId property to the class. Also, I have followed a simple DDD pattern for creating the class where all the properties of the Entity have a private setter and have a constructor that can create objects by accepting the name, description, and rate properties.
Tenant Settings - Explained
First, let’s add a Settings class which will be used for the IOptions Pattern later on in this guide. In the Core project, add a new folder named Settings and add a new class TenantSettings.
using System.Collections.Generic;namespace Core.Options{ public class TenantSettings { public Configuration Defaults { get; set; } public List<Tenant> Tenants { get; set; } } public class Tenant { public string Name { get; set; } public string TID { get; set; } public string ConnectionString { get; set; } } public class Configuration { public string DBProvider { get; set; } public string ConnectionString { get; set; } }}Remember that we will be using the same structure in the appsettings.json as well.
- TenantSettings will have a Default Configuration which includes the DBProvider (MSSQL will be used in this tutorial), and a Connection String to the default shared database.
- Tenant Setting will also have a definition for the List of Tenants that are supposed to have access to the system.
- A Tenant Object will have Name, TID and Tenant Specific Connection String.
- In cases where the tenant needs to use the shared database, the idea is to leave the Connection string of the tenant blank.
Let’s add a sample settings node in the appsettings.json to understand the setup even better. Open up your appsettings.json from the API project and add in the following.
"TenantSettings": { "Defaults": { "DBProvider": "mssql", "ConnectionString": "Data Source=(localdb)\\mssqllocaldb;Initial Catalog=sharedTenantDb;Integrated Security=True;MultipleActiveResultSets=True" }, "Tenants": [ { "Name": "alpha", "TID": "alpha", "ConnectionString": "Data Source=(localdb)\\mssqllocaldb;Initial Catalog=alphaTenantDb;Integrated Security=True;MultipleActiveResultSets=True" }, { "Name": "beta", "TID": "beta", "ConnectionString": "Data Source=(localdb)\\mssqllocaldb;Initial Catalog=betaTenantDb;Integrated Security=True;MultipleActiveResultSets=True" }, { "Name": "charlie", "TID": "charlie" }, { "Name": "java", "TID": "java" } ]}In this demo settings, we mention that we have 4 Tenants set up to use our API. Tenant alpha and beta wish to have a separate Database, while tenant charlie and java are ok to use the shared database which is mentioned in the default section of the tenant settings.
Now, that we got our requirements and concepts clear, let’s how to proceed further.
Installing the Required Packages
To go further, let’s first install the required Nuget packages to the Infrastructure Project. I would recommend copying and pasting the following PackageReference to the csproj file to make things easier. If you face any trouble, you can individually install these packages as well.
PS, there may be newer versions of the packages available at the time you are reading this article. Make sure to update all the packages after you install them. Use the update-package command in the Package Manager Console of Visual Studio Code!
<ItemGroup> <PackageReference Include="Microsoft.AspNetCore.Http.Abstractions" Version="2.2.0" /> <PackageReference Include="Microsoft.EntityFrameworkCore" Version="5.0.9" /> <PackageReference Include="Microsoft.Extensions.Options" Version="5.0.0" /> <PackageReference Include="Microsoft.Extensions.Configuration" Version="5.0.0" /> <PackageReference Include="Microsoft.Extensions.Configuration.Binder" Version="5.0.0" /> <PackageReference Include="Microsoft.EntityFrameworkCore.Relational" Version="5.0.9" /> <PackageReference Include="Microsoft.Extensions.Configuration.Abstractions" Version="5.0.0" /> <PackageReference Include="Microsoft.Extensions.DependencyInjection.Abstractions" Version="5.0.0" /> <PackageReference Include="Microsoft.EntityFrameworkCore.SqlServer" Version="5.0.9" /> <PackageReference Include="Microsoft.EntityFrameworkCore.Tools" Version="5.0.9"> <PrivateAssets>all</PrivateAssets> <IncludeAssets>runtime; build; native; contentfiles; analyzers; buildtransitive</IncludeAssets> </PackageReference></ItemGroup>To give a brief idea, we need packages related to EFCore and SQLServer, Extension packages of Microsoft for IOptions, Configurations, and finally HTTP package to be able to read the Request header of the incoming request.
Also, in the API Project, make sure to install the following package. This is needed when we start generating migrations for our EFCore Context.
<PackageReference Include="Microsoft.EntityFrameworkCore.Design" Version="5.0.9"> <PrivateAssets>all</PrivateAssets> <IncludeAssets>runtime; build; native; contentfiles; analyzers; buildtransitive</IncludeAssets></PackageReference>Tenant Service
We need to devise a way to identify the tenant from the incoming requests. To achieve this, let’s start by creating an ITenantService interface in the Core Project. Create a new folder named Interfaces in the Core project and add a new interface, ITenantService.
public interface ITenantService{ public string GetDatabaseProvider(); public string GetConnectionString(); public Tenant GetTenant();}Basically, this interface should return the current DBProvider, Connection string, and Tenant Data. Let’s implement this interface in the Infrastructure project next.
Create a new folder in the Infrastructure project and name it Services. Here, add a new class and name it TenantService.
public class TenantService : ITenantService{ private readonly TenantSettings _tenantSettings; private HttpContext _httpContext; private Tenant _currentTenant; public TenantService(IOptions<TenantSettings> tenantSettings, IHttpContextAccessor contextAccessor) { _tenantSettings = tenantSettings.Value; _httpContext = contextAccessor.HttpContext; if (_httpContext != null) { if (_httpContext.Request.Headers.TryGetValue("tenant", out var tenantId)) { SetTenant(tenantId); } else { throw new Exception("Invalid Tenant!"); } } } private void SetTenant(string tenantId) { _currentTenant = _tenantSettings.Tenants.Where(a => a.TID == tenantId).FirstOrDefault(); if (_currentTenant == null) throw new Exception("Invalid Tenant!"); if (string.IsNullOrEmpty(_currentTenant.ConnectionString)) { SetDefaultConnectionStringToCurrentTenant(); } } private void SetDefaultConnectionStringToCurrentTenant() { _currentTenant.ConnectionString = _tenantSettings.Defaults.ConnectionString; } public string GetConnectionString() { return _currentTenant?.ConnectionString; } public string GetDatabaseProvider() { return _tenantSettings.Defaults?.DBProvider; } public Tenant GetTenant() { return _currentTenant; }}Line 10 to 20 - We first check if HTTP context is not null, then we try to read the tenant key from the header of the request. If a tenant value is found, we set the tenant using the SetTenant(string tenantId) method.
Line 22 to 30 - Here, we take in tenant from the request header and compare it against the data we have already set in the appsettings of the application. If the matching tenant is not found, it throws an exception. If the found tenant doesn’t have a connection string defined, we simply take the default connection string and attach it to the connection string property of the current tenant, as simple as that.
The remaining methods are quite straightforward.
Note that we have not yet registered any of the services of settings into the DI Container of the application. We will be doing it towards the end of the tutorial only.
Extended ApplicationDBContext
Now that we have our Tenant Service ready, let’s do the DbContext part.
In the Infrastructure project, create a new folder named Persistence and add in a new class named ApplicationDbContext.
public class ApplicationDbContext : DbContext{ public string TenantId { get; set; } private readonly ITenantService _tenantService; public ApplicationDbContext(DbContextOptions options, ITenantService tenantService) : base(options) { _tenantService = tenantService; TenantId = _tenantService.GetTenant()?.TID; } public DbSet<Product> Products { get; set; } protected override void OnModelCreating(ModelBuilder modelBuilder) { base.OnModelCreating(modelBuilder); modelBuilder.Entity<Product>().HasQueryFilter(a => a.TenantId == TenantId); } protected override void OnConfiguring(DbContextOptionsBuilder optionsBuilder) { var tenantConnectionString = _tenantService.GetConnectionString(); if (!string.IsNullOrEmpty(tenantConnectionString)) { var DBProvider = _tenantService.GetDatabaseProvider(); if (DBProvider.ToLower() == "mssql") { optionsBuilder.UseSqlServer(_tenantService.GetConnectionString()); } } } public override async Task<int> SaveChangesAsync(CancellationToken cancellationToken = new CancellationToken()) { foreach (var entry in ChangeTracker.Entries<IMustHaveTenant>().ToList()) { switch (entry.State) { case EntityState.Added: case EntityState.Modified: entry.Entity.TenantId = TenantId; break; } } var result = await base.SaveChangesAsync(cancellationToken); return result; }}- It is assumed that, whenever the application tries to access the database via EFCore context, there is a valid tenantID present in the request header, or atleast provided by the Tenant Service.
- Line 14 - This is the part where we define the Global Query Filter for the DBContext. Everytime a new request is passed to the DBContext, the applicationDbContext will be smart enough to work with the data the is relavant to the current tenantId only.
- Line 16 to 27 - Here, everytime a new instance of ApplicationContext is invoked, the connection string is pulled from the tenant settings and set to EFCore Context.
- Finally, in Line 28 to 42, we override the SaveChanges method. In this method, whenever there is a modification of the Entity of type IMustHaveTenant, TenantId is written to the entity during the Save process.
Product Service
Let’s quickly write a Product Service Implementation that takes care of Creating a new product, Getting all Products and Getting Product Details by Id. First, let’s create a new interface in the Core Project, IProductService.
public interface IProductService{ Task<Product> CreateAsync(string name, string description, int rate); Task<Product> GetByIdAsync(int id); Task<IReadOnlyList<Product>> GetAllAsync();}Now, in the Infrastructure/Services folder, let’s create a new class and name it ProductService.
public class ProductService : IProductService{ private readonly ApplicationDbContext _context; public ProductService(ApplicationDbContext context) { _context = context; } public async Task<Product> CreateAsync(string name, string description, int rate) { var product = new Product(name, description, rate); _context.Products.Add(product); await _context.SaveChangesAsync(); return product; } public async Task<IReadOnlyList<Product>> GetAllAsync() { return await _context.Products.ToListAsync(); } public async Task<Product> GetByIdAsync(int id) { return await _context.Products.FindAsync(id); }}This is a very straightforward usage of DBContext to perform some simple CRUD Operations. Let’s proceed to the fun part next.
Automated Migrations
We will build an extension method that can
- Create DBs for each tenant on startup
- Update the new Databases with available Migrations
- Register the ApplicationDbContext.
Under the Infrastructure Project, create a new folder named Extensions. Here add a new static class named ServiceCollectionExtensions
public static class ServiceCollectionExtensions{ public static IServiceCollection AddAndMigrateTenantDatabases(this IServiceCollection services, IConfiguration config) { var options = services.GetOptions<TenantSettings>(nameof(TenantSettings)); var defaultConnectionString = options.Defaults?.ConnectionString; var defaultDbProvider = options.Defaults?.DBProvider; if (defaultDbProvider.ToLower() == "mssql") { services.AddDbContext<ApplicationDbContext>(m => m.UseSqlServer(e => e.MigrationsAssembly(typeof(ApplicationDbContext).Assembly.FullName))); } var tenants = options.Tenants; foreach (var tenant in tenants) { string connectionString; if (string.IsNullOrEmpty(tenant.ConnectionString)) { connectionString = defaultConnectionString; } else { connectionString = tenant.ConnectionString; } using var scope = services.BuildServiceProvider().CreateScope(); var dbContext = scope.ServiceProvider.GetRequiredService<ApplicationDbContext>(); dbContext.Database.SetConnectionString(connectionString); if (dbContext.Database.GetMigrations().Count() > 0) { dbContext.Database.Migrate(); } } return services; } public static T GetOptions<T>(this IServiceCollection services, string sectionName) where T : new() { using var serviceProvider = services.BuildServiceProvider(); var configuration = serviceProvider.GetRequiredService<IConfiguration>(); var section = configuration.GetSection(sectionName); var options = new T(); section.Bind(options); return options; }}- Line 5 to 7 - Gets default settings from appsettings.json file
- Line 10 - Registers ApplicationDbContext using the SQLServer package.
- Line 13 to 31 - Iterates through the list of tenants configured. If a tenant has no Connection String declared, it assigns the default connection string to it. From there, we extract the DBContext Service, set it’s connection to the tenant’s connection string and finally perform migrations.
- Line 34 to 42 - This is a generic method to Get the configuration from AppSettings.json in a static file.
Setting up the Controller
With that done, let’s create a new API controller for our test purpose.
Under the API Project, Create a ProductsController in the Controllers folder.
namespace Multitenant.Api.Controllers{ [Route("api/[controller]")] [ApiController] public class ProductsController : ControllerBase { private readonly IProductService _service; public ProductsController(IProductService service) { _service = service; } [HttpGet] public async Task<IActionResult> GetAsync(int id) { var productDetails = await _service.GetByIdAsync(id); return Ok(productDetails); } [HttpPost] public async Task<IActionResult> CreateAsync(CreateProductRequest request) { return Ok(await _service.CreateAsync(request.Name, request.Description, request.Rate)); } } public class CreateProductRequest { public string Name { get; set; } public string Description { get; set; } public int Rate { get; set; } }}Nothing complicated here as well. Just a simple controller that uses the IProductService DI at the container level and exposes 3 Endpoints
- Get By Id
- Create a new Product
- You can add in the endpoint to consume the GetAll Service method as well.
Generating the Migrations
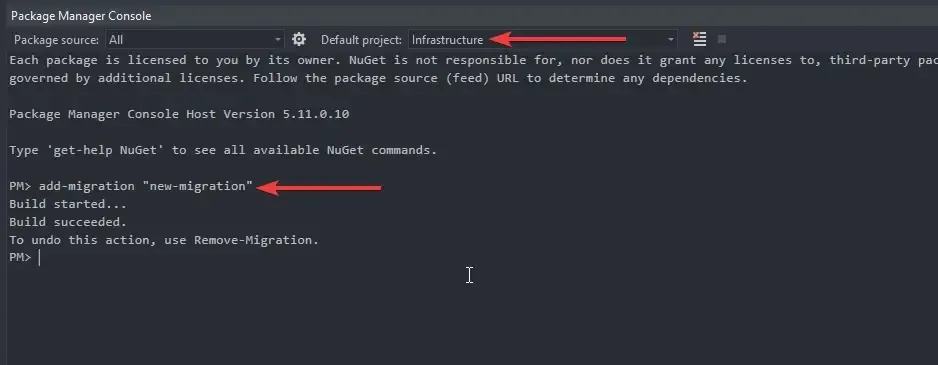
As usual, make the API Project your startup project and open up the Package Manager Console. Now, set the Default project as the Infrastructure project.
Finally, run the ‘add-migration “new-migration”’ command to generate the required migrations.
Service Registrations
Finally, let’s finish off this implementation by adding the Services to the ASP.NET Core DI Container. Open up the Startup.cs file of the API project and modify the ConfigureServices method as below.
public void ConfigureServices(IServiceCollection services){ services.AddHttpContextAccessor(); services.AddControllers(); services.AddSwaggerGen(c => { c.SwaggerDoc("v1", new OpenApiInfo { Title = "Multitenant.Api", Version = "v1" }); }); services.AddTransient<ITenantService, TenantService>(); services.AddTransient<IProductService, ProductService>(); services.Configure<TenantSettings>(config.GetSection(nameof(TenantSettings))); services.AddAndMigrateTenantDatabases(config);}That’s it for Multitenancy in ASP.NET Core Applications. Let’s build our project and do some tests.
Testing
As soon as you build the project, the first thing you expect the application to do is to create the databases for each tenant and update the databases with the available Migrations, right? Let’s see what has happened on our Local Database Server.
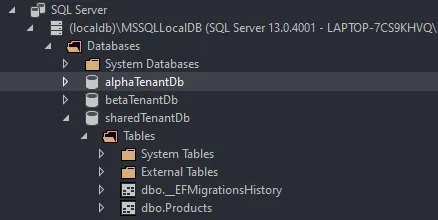
As you can see, all the required databases are created along with the Products table. The first part of the Test is passed.
For the next tests, let me use Postman.
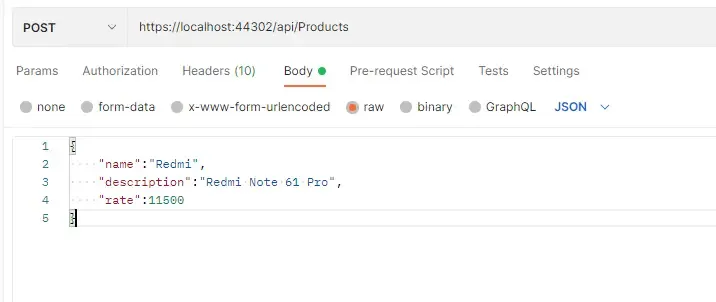
Creating a new Product with TenantId
Here is my Request Body
and here are the Request Headers
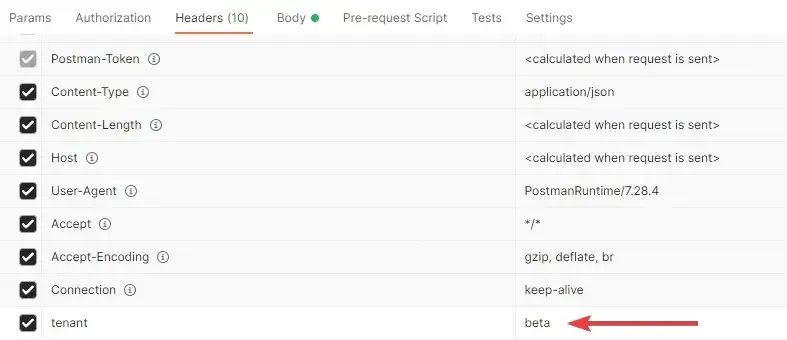
And here is the response to my POST Request.

You can see that we get a 200 Status Code. Now let’s see the Database to check if our data is available along with the TenantId. As for the tenant settings, the tenant beta is supposed to have a separate database. So, we expect to find our Product there.

There you go! Pretty cool, yeah. Let’s test other scenarios.
Creating a new Product without TenantId
Let me remove the tenant key from the request header of Postman and try to create a product.

Invalid Tenant as expected.
Shared Database Demonstration.
We know that charlie and java are configured to use the shared default database. Let me create products for each of these tenants by passing the required tenant Ids. Once done, let’s check out the Shared Database.

Cool, yeah? Let me try to use the GET endpoint to request for a product with ID = 1 and tenant as java. As you can see from the above screenshot, the Product with ID 1 belongs to charlie and not java. Thus we can expect a blank result. Let’ see.
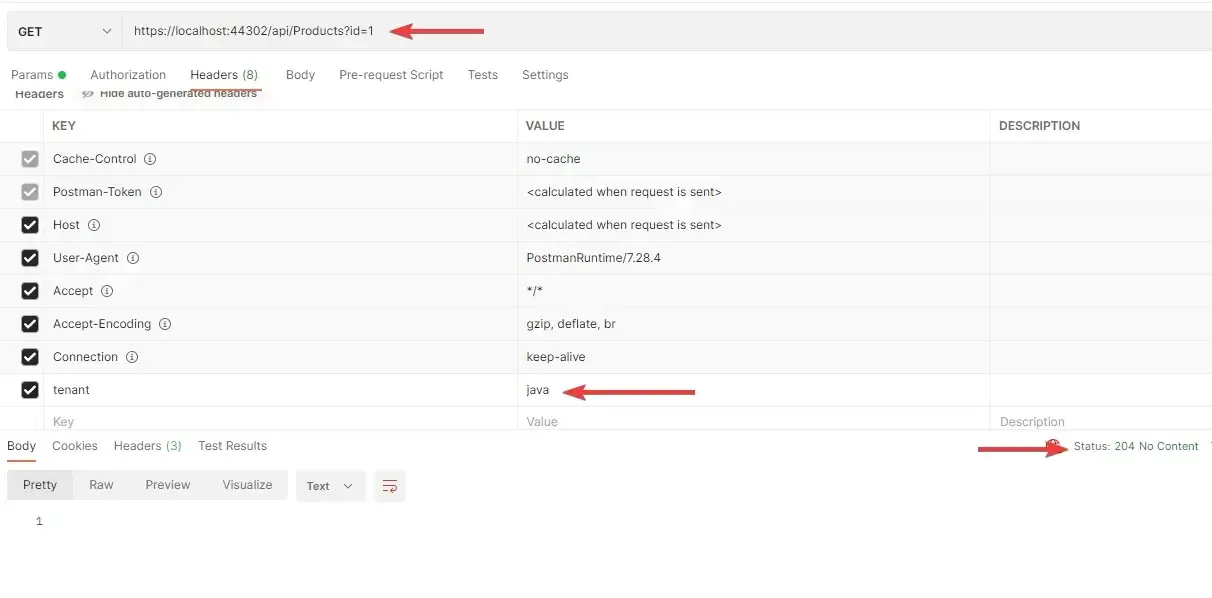
Exactly like we expected. Now, let’s change the tenant to charlie and see if we are able to retrieve the product with ID 1.
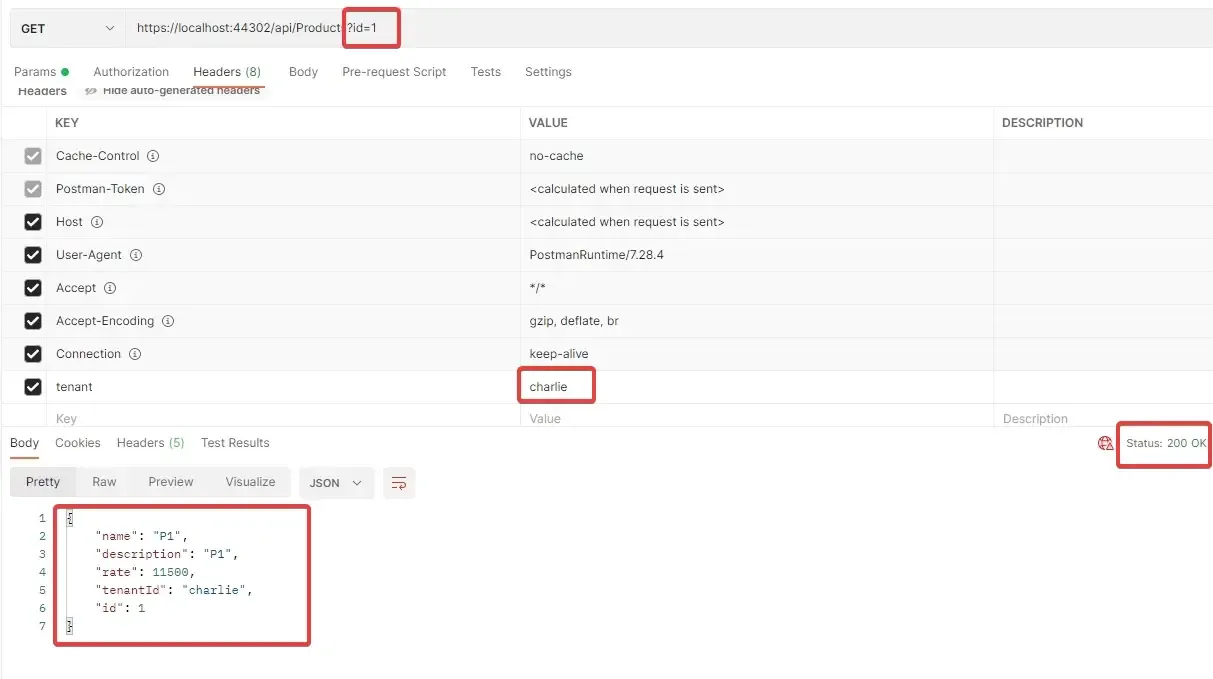
There you go. This is probably the simplest way to achieve Multitenancy in ASP.NET CoreApplications.
Further Enhancements
- Multitenacy can be extended to use Identity as well. We can create Identity users for each tenant. In this way we can restrict the access of the each tennant to the corresponding users / user group only. This is true Multitenancy. I have already implemented this features in the fullstackhero’s .NET WebApi Boilerplate project. Do check it out!
- In this implmentation, we have stored the Tenant Settings to a simple appsettings file. In advanced cases, we can maintain a seperate Database Table to Manage Tenants and their settings.
I am currently working on bringing about a collection of Enterprise level Boilerplates under the name of fullstackhero for kick start ing application development in a rapid manner. As of now, the planned Boilerplates are:
- .NET 6.0 WebApi Boilerplate - Currently in Progress (Star the Repository!)
- Angular Material Boilerplate that consumes the above API Project.
- Blazor WASM the consumes the API Project
- .NET MVC that consumes the API Project
Do let me know your view on this :)
Summary
I have tried my maximum to research and bring about a well-detailed article on Multitenancy in ASP.NET Core Applications. I hope that this article can help other developers learn and implement Multitenancy. There are definitely several variants to this implementation that is completely dependant on your requirement. But this is definitely a good starting point for achieving Multitenancy with ease!
You can find the source code of the entire implementation of Multitenancy in ASP.NET Core applications here. Cheers!
