In this article, we will learn about an approach with which we will build a SUPER-FAST Repository Implementation using all the latest libraries and concepts. We will be implementing Repository Pattern with Caching and Hangfire in ASP.NET Core along with Onion Architecture just to make sure our code is well organized and be readily used in any random project. You can find the source code of this implementation here.
The Requirement
Let’s have a simple ASP.NET Core 3.1 WebAPI that does CRUD operations over a Customer Entity. That’s quite simple, yeah? But we will try to make this API return much faster than it would do traditionally. How can we achieve this? Caching, of-course. The first question is where would you implement caching? The ideal layer would be to couple it somehow with the Repository layer, so that every time you work with the Repository Layer, your results are being cached.
The other requirement is to implement a generic caching where-in the user can have the flexibility to use different caching techs like In-Memory, Redis, and so on. Finally, let’s integrate caching with Hangfire so that it runs in the background at specific triggers.
So, the idea is simple. We will build a traditional Repository Pattern along with the DBContext of Entity Framework Core. Every time a user requests for Customer data, we need to check if it already exists in the cache, else retrieve it from DB and cache it. And whenever someone deletes or modifies a record, the cached data should get invalidated and recached. Caching again may take some time. Thus, we set this caching process as a background job. Simple? Let’s get started!
Tech-Stack and Concepts
- ASP.NET Core 3.1 WebAPI
- Onion Architecture
- Entity Framework Core
- Generic Repository Pattern
- Generic Caching to support various caching techs
- Hangfire to process Caching Jobs in the background
- Single Interface with Multiple Implementations**
Getting Started - Repository Pattern with Caching and Hangfire in ASP.NET Core
Let’s get started by creating a new Blank Solution in Visual Studio 2019 IDE and adding in 3 New Projects. Clean Architecture, Remember?
- ASP.NET Core 3.1 WebAPI. I named it Web
- .NET Core 3.1 Library - Let’s name it Core. The entities and Interfaces will live here.
- .NET Core 3.1 Library - Name it Infrastructure. Everything related to EFCore, Caching, Hangfire will be implemented here.
Customer Model
In this Core Project, add a new folder and name it Entities. Here create a new class, Customer.cs
public class Customer{ public int Id { get; set; } public string FirstName { get; set; } public string LastName { get; set; } public string Contact { get; set; } public string Email { get; set; } public DateTime DateOfBirth { get; set; }}Adding Entity Framework Core and Context
Let’ add the required EFCore packages to the Infrastructure Project.
Install-Package Microsoft.EntityFrameworkCoreInstall-Package Microsoft.EntityFrameworkCore.ToolsInstall-Package Microsoft.EntityFrameworkCore.SqlServerInstall-Package Microsoft.EntityFrameworkCore.DesignInstall-Package Microsoft.VisualStudio.Web.CodeGeneration.DesignSimilarly, add the following packages to the API Project.
Install-Package Microsoft.EntityFrameworkCore.ToolsInstall-Package Microsoft.EntityFrameworkCore.SqlServerInstall-Package Microsoft.AspNetCore.Diagnostics.EntityFrameworkCoreInstall-Package Microsoft.VisualStudio.Web.CodeGeneration.DesignEFCore Implementations belongs to the Infrastructure Layer of our Solution. In the Infrastructure project, add a new Folder Data and create a new class, ApplicationDbContext.cs
public class ApplicationDbContext : DbContext{ public ApplicationDbContext(DbContextOptions<ApplicationDbContext> options) : base(options) { ChangeTracker.QueryTrackingBehavior = QueryTrackingBehavior.NoTracking; } public DbSet<Customer> Customers { get; set; }}Now, we will have to register EFCore into the Service container of the ASP.NET Core Application. For this, open up Startup.cs and add the following to the ConfigureServices Method.
services.AddDbContext<ApplicationDbContext>(options => options.UseSqlServer( Configuration.GetConnectionString("DefaultConnection"), b => b.MigrationsAssembly(typeof(ApplicationDbContext).Assembly.FullName)));Next, open up appsettings.json and add in the connection string to your database. Note that I have used SQLServer instance in this article.
"ConnectionStrings": { "DefaultConnection": "your connection string here"},That’s it for the EFCore part. Open Package Manager Console on Visual Studio and run the following commands. This will essentially add in all the Entity Framework Core Migrations and update your database (the one that you have mentioned in your connection string).
add-migration initialupdate-databaseMake sure that you have set the API Project as the Startup Project , and the Infrastructure Project as the Default Project. (You can find this dropdown at the top corner of the Package Manager Console)
Add Caching Service
Caching is the Heart of our concept. With caching, we ensure that users can request data from our API without waiting for a considerable amount of time. So, when the 1st user requests for all customer data, it goes to the DB, fetches the records, and also caches this data to either application memory or any external cache service like Redis.
Now, when the second user requests for the same data, it wouldn’t make sense to fetch from the database, as it can be a bit time consuming, right? And since we already have the data cached, why not return it? This saves the consequent requests a lot of time, literally a lot.
The first question is what is the customer data changed during the time between 1st request and the 2nd, 3rd request? If we still serve the cached data, that’s essentially invalid, right? So, the apt solution is every time there is a modification to the Customer Collection, we will have to remove the cache and recache it somehow with Hangfire.
Let’s start building a generic Caching Service. The main intention is to future proof our solution so that we can integrate various Caching Techniques as and when required by the application.
If you are new to the concept of caching, here are a few MUST Read articles on In-Memory Caching and Redis Caching in ASP.NET Core. Make sure you read them before continuing.
We will need to specify certain configurations related to Caching. Let’s use the IOptions Pattern to read the settings directly from appsettings.json. In the Core Project, add a new folder and name it Configurations. Here, add a new class named CacheConfiguration.cs
public class CacheConfiguration{ public int AbsoluteExpirationInHours { get; set; } public int SlidingExpirationInMinutes { get; set; }}Let’s add it to the service container of the application. Open Startup.cs and add in the following under the ConfigureServices method.
services.Configure<CacheConfiguration>(Configuration.GetSection("CacheConfiguration"));With that done, open appsettings.json and add in the following config.
"CacheConfiguration": { "AbsoluteExpirationInHours": 1, "SlidingExpirationInMinutes": 30}SlidingExpirationInMinutes refers to the duration in minutes within which the cache will be cleared if there is so request from any user.
AbsoluteExpirationInHours refers to the duration in Hours within which the cache will be cleared even if there are requests from the users. These configurations enable maximum efficiency and minimal response times keeping in check that the cache is always valid and the users are not being served outdated information.
Single Interface with Multiple Implementations
Next, as mentioned earlier, we will be designing our system to accommodate multiple cache techniques like in-memory and Redis, and so on. This calls for a Concept of Single Interface with Multiple Implementations.
So, the idea is that we know before hand that all the cache techniques will have 3 Core functions, Get the data, Set the Data and Remove the Cached data. Thus we will build a common interface, ICacheService that defines these 3 functions. And the implementation will be multiple, like MemoryCacheService and RedisCacheService. Get the point?
But, before that, let’s add in an Enum that consists of the supported Caching Techniques. In the core Project, add a new folder, Enums. Here add a new class CacheTech.cs
public enum CacheTech{ Redis, Memory}You can see that we have added Redis and Memory as options. This can be extended as per your requirment. Let’s build our ICacheService interface now. In the Core Project, add another folder named Interfaces. Remember that, with clean architecture all the interface should be at the Core of the application. This Inverts the Dependencies and the Application no longer depends on the implementation, but only on the interface.
Under the Interface folder, add in ICacheService.cs
public interface ICacheService{ bool TryGet<T>(string cacheKey, out T value); T Set<T>(string cacheKey, T value); void Remove(string cacheKey);}There you go, as mentioned earlier, we defined our 3 Major functions in the interface. Now, let’s proceed with the implementation. For this article, we will be only implementing In-Memory Caching. I will leave Redis caching to you. For reference to Redis caching implementation, please see this article.
Implementations live in the Infrastructure layer. In the Infrastructure Project, add a new folder, Services. Here, add in a new class, MemoryCacheService.cs
public class MemoryCacheService: ICacheService{ private readonly IMemoryCache _memoryCache; private readonly CacheConfiguration _cacheConfig; private MemoryCacheEntryOptions _cacheOptions; public MemoryCacheService(IMemoryCache memoryCache, IOptions<CacheConfiguration> cacheConfig) { _memoryCache = memoryCache; _cacheConfig = cacheConfig.Value; if (_cacheConfig != null) { _cacheOptions = new MemoryCacheEntryOptions { AbsoluteExpiration = DateTime.Now.AddHours(_cacheConfig.AbsoluteExpirationInHours), Priority = CacheItemPriority.High, SlidingExpiration = TimeSpan.FromMinutes(_cacheConfig.SlidingExpirationInMinutes) }; } } public bool TryGet<T>(string cacheKey, out T value) { _memoryCache.TryGetValue(cacheKey, out value); if (value == null) return false; else return true; } public T Set<T>(string cacheKey, T value) { return _memoryCache.Set(cacheKey, value, _cacheOptions); } public void Remove(string cacheKey) { _memoryCache.Remove(cacheKey); }}Note - If you are not very aware of the above implementation, please refer to the Detailed Article on In-Memory Caching in ASP.NET Core here.
Similarly, add in another class, this time for Redis. Let’s name it RedisCacheService.cs
public class RedisCacheService : ICacheService{ public void Remove(string cacheKey) { throw new NotImplementedException(); } public T Set<T>(string cacheKey, T value) { throw new NotImplementedException(); } public bool TryGet<T>(string cacheKey, out T value) { throw new NotImplementedException(); }}Please note that we have not implemented RedisCache as of now.
Finally, let’s register our Cache Services. Open Startup.cs and add in the following to the ConfigureServices method.
services.Configure<CacheConfiguration>(Configuration.GetSection("CacheConfiguration"));//For In-Memory Cachingservices.AddMemoryCache();services.AddTransient<MemoryCacheService>();services.AddTransient<RedisCacheService>();services.AddTransient<Func<CacheTech, ICacheService>>(serviceProvider => key =>{ switch (key) { case CacheTech.Memory: return serviceProvider.GetService<MemoryCacheService>(); case CacheTech.Redis: return serviceProvider.GetService<RedisCacheService>(); default: return serviceProvider.GetService<MemoryCacheService>(); }});Line 1 - Adds the Configurations settings to the container so that it can be accessed later on via the IOptions Pattern.
Line 3 - 5 Adds the InMemoryCache and Redis Service to the container.
For a single interface injection to work with multiple implementations, we have to define it as a funciton that accepts the previoustly created Enum as a parameters. Inside it will be a very simple switch statement that returns the service as requeried.
For example, if you pass CacheTech.Redis, this function should return RedisCacheSerive to the calling method, constructor. Get the idea?
Setting up Hangfire
Hangfire is one of the best Background Job Processing Library ever. Let’s use this awesome library to improve our application’s effeciency ever further. Again, Hangfire belongs to the Infrastructure project. So, install the following package to the Infrastructure Project.
Install-Package HangfireFor this article, we will be using the API Project as the Server that will process the jobs enqueud to Hangfire. In some cases it makes sense to create a Blank ASP.NET Core Application and install Hangfire in it. This isolates the application and Hangfire would not interfere with the Resources of the API Server. But here, let’s just use our API as the Hangfire Server.
In the API/Startup.cs file, add in the following under the ConfigureServices method. Note that we will also be using the same connection string to store in Hangfire job data.
services.AddHangfire(x => x.UseSqlServerStorage(Configuration.GetConnectionString("DefaultConnection")));services.AddHangfireServer();Finally, in the Configure Method, add the following. This determines the path at which you will be able to monitor the Hangfire Jobs via it’s awesome Dashboard.
app.UseHangfireDashboard("/jobs");Hangfire is pretty awesome. In this article, we limit the functionality of Hangfire to only what we require. Hangfire is capable of much more than this. To learn in-depth about everything Hangfire can do, refer to this article.
Adding Repository Interfaces and Implementations
With the Caching and Hangfire done, most of the complex parts of the implementation are taken care of. Let’s switch to the basic Repository Pattern implementation. At the Core/Interfaces folder, add in 2 More interfaces as below, IGenericRepository.cs and ICustomerRepository.cs
public interface IGenericRepository<T> where T : class{    Task<T> GetByIdAsync(int id);    Task<IReadOnlyList<T>> GetAllAsync();    Task<T> AddAsync(T entity);    Task UpdateAsync(T entity);    Task DeleteAsync(T entity);}
public interface ICustomerRepository : IGenericRepository<Customer>{}
Now, in the Infrastructure Project, add a new Folder , Repositories. Here add in 2 files, that is the implementation of the previous interfaces.
First, let’s add GenericRepository.cs
public class GenericRepository<T> : IGenericRepository<T> where T : class{ private readonly static CacheTech cacheTech = CacheTech.Memory; private readonly string cacheKey = $"{typeof(T)}"; private readonly ApplicationDbContext _dbContext; private readonly Func<CacheTech, ICacheService> _cacheService; public GenericRepository(ApplicationDbContext dbContext, Func<CacheTech, ICacheService> cacheService) { _dbContext = dbContext; _cacheService = cacheService; } public virtual async Task<T> GetByIdAsync(int id) { return await _dbContext.Set<T>().FindAsync(id); } public async Task<IReadOnlyList<T>> GetAllAsync() { if (!_cacheService(cacheTech).TryGet(cacheKey, out IReadOnlyList<T> cachedList)) { cachedList = await _dbContext.Set<T>().ToListAsync(); _cacheService(cacheTech).Set(cacheKey, cachedList); } return cachedList; } public async Task<T> AddAsync(T entity) { await _dbContext.Set<T>().AddAsync(entity); await _dbContext.SaveChangesAsync(); BackgroundJob.Enqueue(() => RefreshCache()); return entity; } public async Task UpdateAsync(T entity) { _dbContext.Entry(entity).State = EntityState.Modified; await _dbContext.SaveChangesAsync(); BackgroundJob.Enqueue(() => RefreshCache()); } public async Task DeleteAsync(T entity) { _dbContext.Set<T>().Remove(entity); await _dbContext.SaveChangesAsync(); BackgroundJob.Enqueue(() => RefreshCache()); } public async Task RefreshCache() { _cacheService(cacheTech).Remove(cacheKey); var cachedList = await _dbContext.Set<T>().ToListAsync(); _cacheService(cacheTech).Set(cacheKey, cachedList); }}Line 3 - Here we are specifying the Caching Technique we wish to use. Here it is In-Memory Caching.
Line 4 - Since this is a generic Implementation, we will have to define the name of the key used to cache. Caching is more like a dictionary with key value pair. With key as the identifier, the data is stored. Hence, here the key will be the name of the Class itself, i.e Customer
Line 6 - Here we use the Function that returns the service instance as required.
We will not be caching the Result of GetByID because it is usually a very fast performing query. We will need caching only when the user requests for all Data or modifies any.
Line 16 - 23 - Here to the _cacheService, we pass the selected cacheTech (Memory) as a parameter and try to check if any data exists. If not, get the data from the DB and set it to the cache and finally return the data to the user. By now, the data is readily available in the cache for the subsequent requests.
Note that if, instead of Memory you specify the cache tech as Redis, the API would throw a Not Implemented Exception as the service itself is not implemented yet.
Adding, Updating, Deleting means that there is a modification in the Data Collection, right? Hence I made a common method, RefreshCache that removes the existing data from the cache for that particular cache key and re-query the database to load the cache again.
Note that this method may be time-consuming depending on the amount of data involved. Hence at Line 29, 36, and 42, we are adding the RefreshCache function as a Background Job to Hangfire to ease the process. Pretty smooth theoretically, yeah?
Finally, let’s implement CustomerRepository which will contain nothing special for now, as all the awesomeness is implemented at the Generic Repository. But, note that the constructor injection remains similar.
public class CustomerRepository : GenericRepository<Customer>, ICustomerRepository{ private readonly DbSet<Customer> _customer; public CustomerRepository(ApplicationDbContext dbContext, Func<CacheTech, ICacheService> cacheService) : base(dbContext, cacheService) { _customer = dbContext.Set<Customer>(); }}Open the Startup.cs and add in the following code under the ConfigureServices to register the repositories.
#region Repositoriesservices.AddTransient(typeof(IGenericRepository<>), typeof(GenericRepository<>));services.AddTransient<ICustomerRepository, CustomerRepository>();#endregionWiring up with the API Controller
Now that everything is done, let’s build up our API Controller. In the Controller folder, add a new Empty API Controller and name it CustomerController. This is a very straight-forward code snippet that uses up the ICustomerRepository Interface to perform CRUD Operations.
[Route("api/[controller]")][ApiController]public class CustomerController : ControllerBase{ private readonly ICustomerRepository _repository; public CustomerController(ICustomerRepository repository) { this._repository = repository; } [HttpGet] public async Task<IReadOnlyList<Customer>> Get() { return await _repository.GetAllAsync(); } [HttpGet("{id}")] public async Task<ActionResult<Customer>> Get(int id) { var customer = await _repository.GetByIdAsync(id); if (customer == null) { return NotFound(); } return customer; } [HttpPut("{id}")] public async Task<IActionResult> Put(int id, Customer customer) { if (id != customer.Id) { return BadRequest(); } await _repository.UpdateAsync(customer); return NoContent(); } [HttpPost] public async Task<ActionResult<Customer>> Post(Customer customer) { await _repository.AddAsync(customer); return CreatedAtAction("Get", new { id = customer.Id }, customer); } [HttpDelete("{id}")] public async Task<ActionResult<Customer>> Delete(int id) { var customer = await _repository.GetByIdAsync(id); if (customer == null) { return NotFound(); } await _repository.DeleteAsync(customer); return customer; }}Test Data
For test purposes, I am adding in around 1000 Dummy Customer Records. You can find the SQL Insert Script here.
Testing with Postman
We will be using Postman to run Tests. But before that, run the application and navigate to /jobs.
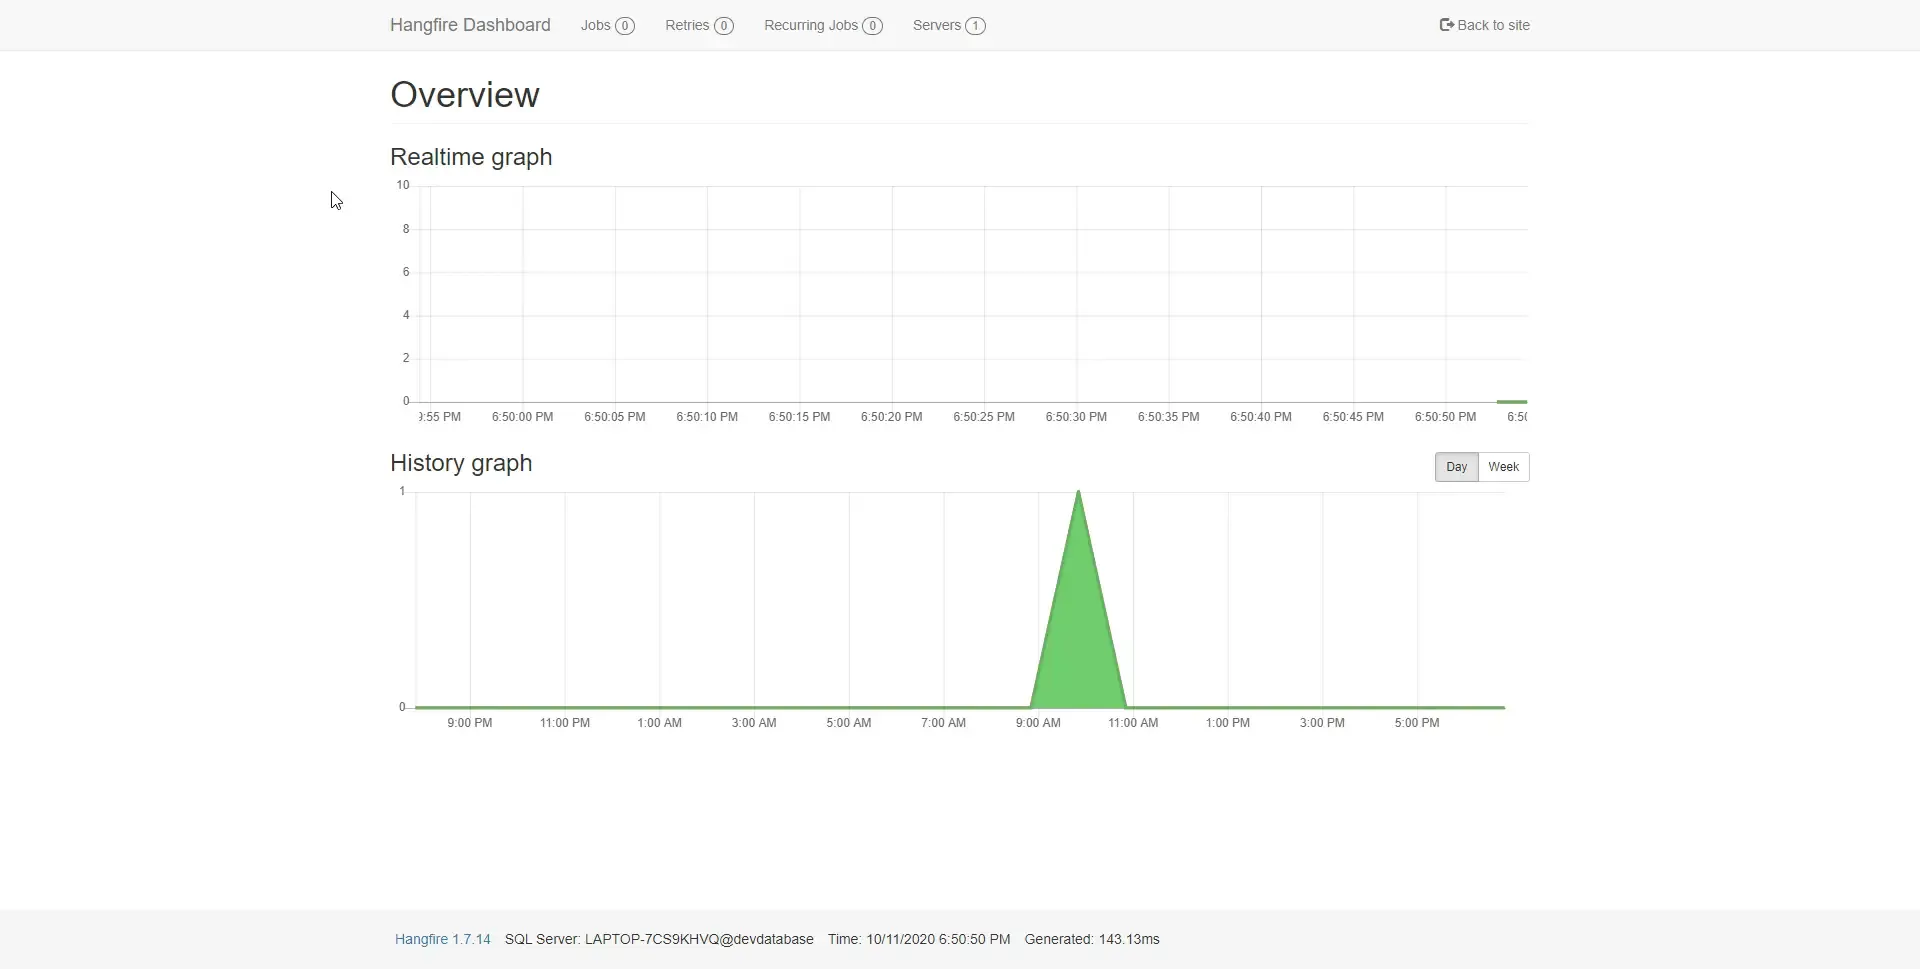
You can see the Hangfire is up and running. Note that you may see a rather blank graph.
Open up POSTMAN and send a GET Request to https://localhost:xxxx/api/customer
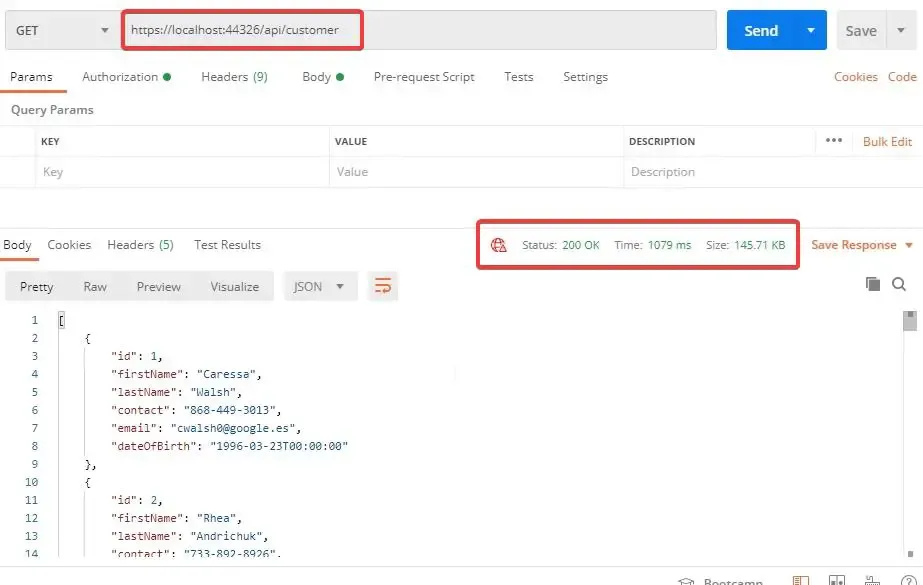
You can see that the API returns all the 1000 sets of customer record in under 1 second. That is still acceptable, but with caching you can see the improvement considerably. Theoretically, after the first request all the 1000 customer data is cached. So, the second request should take much lesser time. Let’s request one more time.
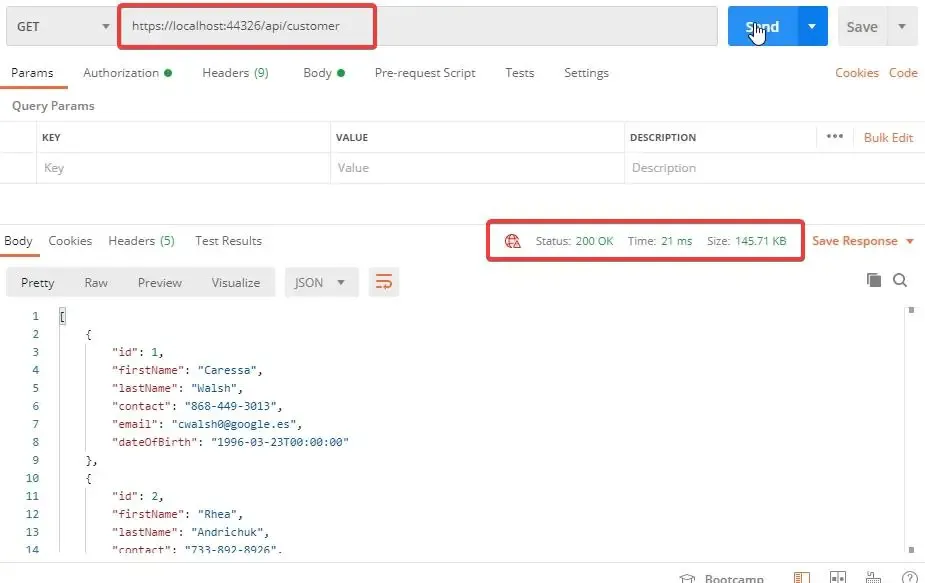
There you go. From 1 second to under 25 milliseconds. Quite a noticeable performance improvement,yeah?
Now, let’ s try to modify the records set by adding in a new customer. By theory, this action should invalidate the existing cache and fire the RefreshCache function and set it to Hangfire. Let’s see.
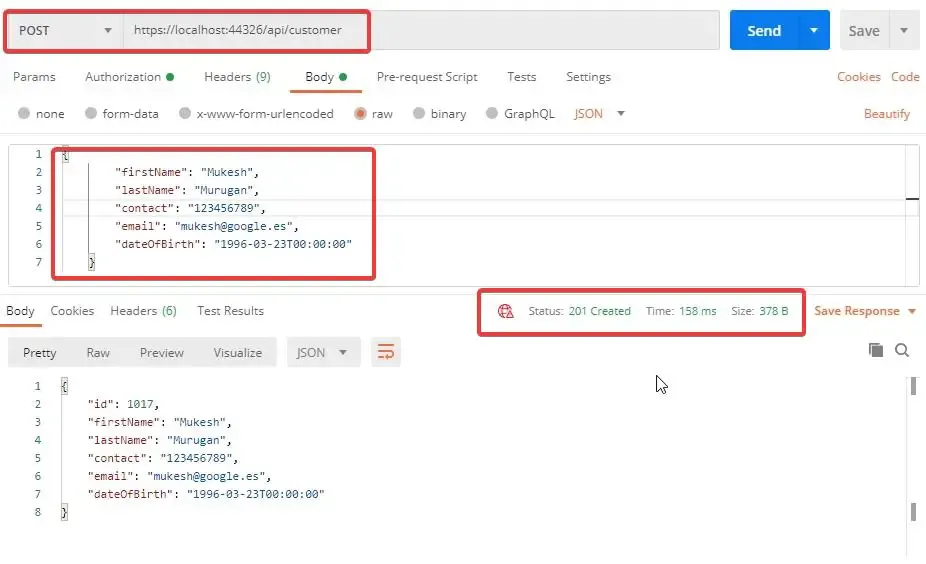
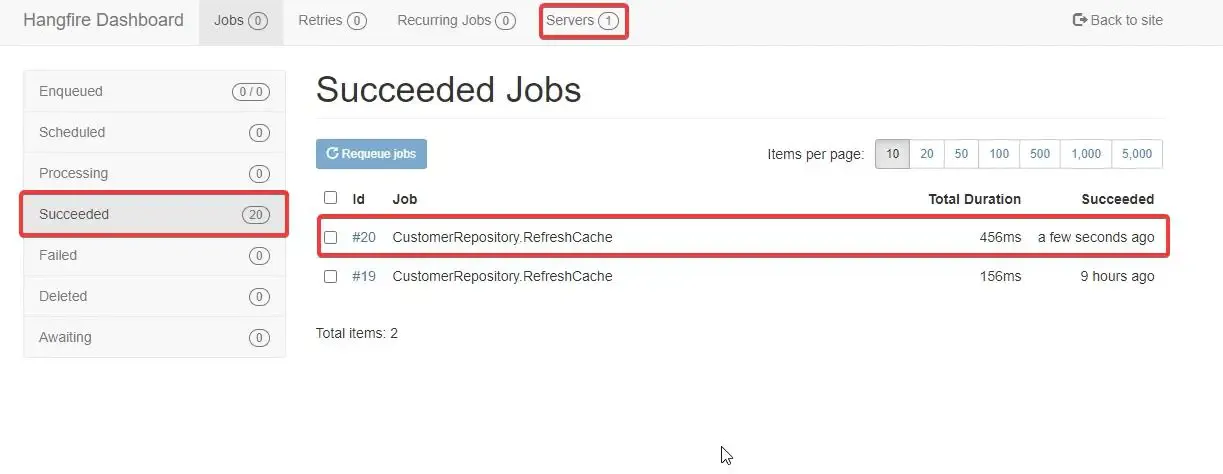
Now switch back to your Hangfire Dashboard. By the time you open up Hangfire, the job should have already been processed. Click on the Jobs Tab. You might see a new Succeeded Job. This means that our cache has been reloaded properly. Pretty cool yeah?
Let’s wrap up the article.
Summary
In this article, we learned in-depth an awesome implementeion to build a SUPER Fast Repository Implementation accompanied by Caching and Hangfire Job Processing. You can find the complete source code of the CRUD Application here. Do follow me as well over at Github ;)
Leave behind your valuable queries, suggestions in the comment section below. Also, if you think that you learned something new from this article, do not forget to share this within your developer community. Happy Coding :D

