In this article, we will be looking into How to Deploy ASP.NET Core Web API to Amazon ECS, aka Amazon Elastic Container Services. So, with this we will cover tons of topics including ASP.NET Core Web API with MongoDB (this will be our sample application, just to demonstrate the usage of multiple docker containers), Dockerizing the Application, Pushing Docker Images to ECR (Elastic Container Registry), Creating Amazon ECS Services and Task Definitions, Port Mappings, Working with VPC and so much more.
Basically, you will get a complete working understanding of Hosting your .NET Application to AWS ECS with AWS Fargate (to avoid the complications that may arise for setting up EC2 instances). More about all this in the next sections! I will try to keep things precise and crisp.
You can find the source code of this example in my GitHub Repository.
This article is sponsored by AWS. Huge thanks for helping me produce more .NET on AWS content!
What is Amazon Elastic Container Service / Amazon ECS?
Amazon ECS is an AWS-managed service to run and manage containers using Docker. ECS kinda sits on top of Docker, so that it takes away all the complicated stuff and manages it for you. There are two types of Options to run Docker Images on ECS, via Fargate (serverless) and the self-managed option - EC2 instances.
To learn about the pricing of ECS (using the Fargate model), refer to https://aws.amazon.com/fargate/pricing/
ECS Workflow - In Short
The whole idea of this article is to demonstrate the hosting of an ASP.NET Core Web API to AWS ECS with Docker Images from ECR. So, we first would build the .NET 6 API Project locally and test its connection with a Local MongoDB Instance. Moving ahead, we will write a DockerFile for this application (only the .NET code) and push the docker image to a publically accessible image repository, which in our case will be ECR or Amazon Elastic Container Repository.
From here, we would create an ECS Cluster which would have task definitions to pull and run the defined Docker Images. Once the task definitions are in place, we would create the Cluster services to orchestrate the docker images using the task definitions we had created earlier.
The core idea behind ECS is that every ECS Cluster would have N task definitions, where each task definition can have multiple docker containers associated depending on our application deployment approach. Now once a task definition is created, a service can be created based on this task definition. In our case, we would create a cluster, then two task definitions, one which pulls the mongo image, and the other task definition which pulls and runs our dotnet application’s image from ECR.
Previously, we have explored other ways to deploy a .NET Application to the AWS Infrastructure using AWS Lambdas and Amazon API Gateways.
Building a Simple ASP.NET Core Web API with MongoDB Integration
I will be using Visual Studio 2022 Community as my default IDE, but let’s not use the AWS Toolkit. This ensures that we clearly understand the process of setting up the entire thing. Once you are familiar with the process, you can try the AWS Toolkit features that can make things simpler right from the IDE.
As mentioned, we will be building a fairly simple ASP.NET Core Web API that can talk to a MongoDB instance and transact data. As in, we will be having simple read/write operations. We will not discuss in detail the setting up on MongoDB and Compass locally, as I have already covered these topics in a separate article - Working with MongoDB in ASP.NET Core – Ultimate Guide. Thus, let’s assume that you already have MongoDB running locally (for testing purposes only).
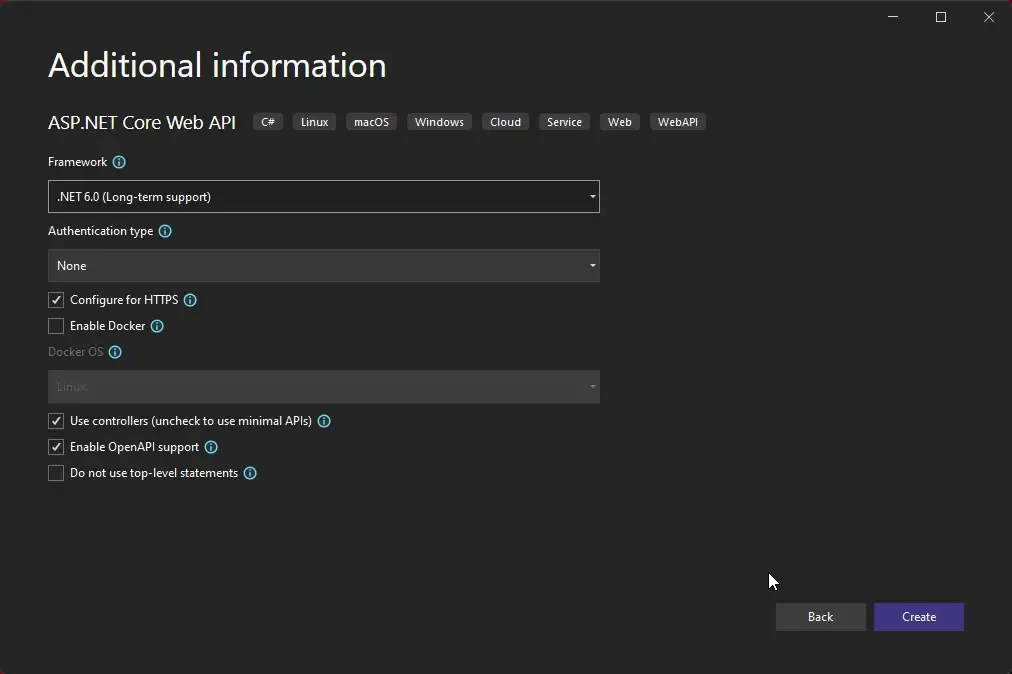
Note that I am building a .NET 6 Application.
Let’s open up our IDE and create a new Project and name it BookManager. Heads up, I am going to take a lot of references from my previous MongoDB Article, as the main focus of this guide is to have the application deployed to ECS and not specifically on how the code would function. However, I will add in some quick code walk-throughs also.
Note that we will be building just 2 endpoints in our BookManager application:
- [HTTP GET] api/books/ - To fetch all the books records from the MongoDB instance.
- [HTTP POST] api/books/ - To Create a new book record based on the input sent to the application by the client.
Ensure that you have installed the following MongoDB Driver package.
Install-Package MongoDB.DriverFirst up, let’s create the Book Model. At the root of the project, create a new class and name it Book.cs
namespace BookManager{ public class Book { [BsonId] [BsonRepresentation(BsonType.ObjectId)] public string? Id { get; set; } public string? Name { get; set; } public string? Author { get; set; } public string? PublishedYear { get; set; } }}Here, our Student Model will have the primary key set to ID. This is how MongoDB Drivers identify the primary key.
Next, add a MongoDBConfig.cs which will contain the configuration properties for MongoDB.
namespace BookManager{ public class MongoDBConfig { public string? BookCollectionName { get; set; } public string? ConnectionString { get; set; } public string? DatabaseName { get; set; } }}With that done, open up appsettings.json and add in the following. Note that since we are testing the application locally, I have pointed the connection string to the local Mongo DB Instance which usually runs at the 27017 port.
"MongoDBConfig": { "BookCollectionName": "Books", "ConnectionString": "mongodb://localhost:27017", "DatabaseName": "DevelopmentDatabase"}Next, Let’s add a BookService that will actually connect to the Database and perform the required operations. Create a new class named BookService.cs
using Microsoft.Extensions.Options;using MongoDB.Driver;namespace BookManager{ public class BookService { private readonly IMongoCollection<Book> _book; private readonly MongoDBConfig _settings; public BookService(IOptions<MongoDBConfig> settings) { _settings = settings.Value; var client = new MongoClient(_settings.ConnectionString); var database = client.GetDatabase(_settings.DatabaseName); _book = database.GetCollection<Book>(_settings.BookCollectionName); } public async Task<List<Book>> GetAllAsync() { return await _book.Find(c => true).ToListAsync(); } public async Task<Book> CreateAsync(Book book) { await _book.InsertOneAsync(book); return book; } }}Line 7-15, we use Dependency Injection to access the instance of the Book Collection and the Configurations from the appsettings. We also initialize a new mongo DB client using the connection details and connect to the specific Book Collection.
Line 18 - Returns all the book records from the Mongo DB Collection.
Line 20-24: Using the passed book record details, this function goes ahead a creates a new record onto the Mongo Collection, and returns the ID of the newly created book.
Next, Let’s create a controller that would expose endpoints for getting all books and creating a new one. Under the Controllers folder, create a new API Controller named BooksController.
using Microsoft.AspNetCore.Mvc;namespace BookManager.Controllers{ [Route("api/[controller]")] [ApiController] public class BooksController : ControllerBase { private readonly BookService _bookService; public BooksController(BookService bookService) { _bookService = bookService; } [HttpGet] public async Task<IActionResult> GetAll() { return Ok(await _bookService.GetAllAsync()); } [HttpPost] public async Task<IActionResult> Create(Book book) { if (!ModelState.IsValid) { return BadRequest(); } await _bookService.CreateAsync(book); return Ok(book.Id); } }}Notice that we have injected the BookService instance in the BooksController. Apart from that, we have two Methods that return a list of all the books and a POST endpoint that would create a new book for you.
Finally, let’s wire up the services into the DI Container of the application. Navigate to the Program.cs file and add the following just above the line where you Add Controllers into the Services.
builder.Services.Configure<MongoDBConfig>(builder.Configuration.GetSection("MongoDBConfig"));builder.Services.AddScoped<BookService>();builder.Services.AddControllers();Line 1: We link the MongoDBConfig to read the settings defined in the MongoDBConfig section of appsettings.
Line 2: Add BookService instance with scoped lifetime.
Build and Run the application. Since Swagger comes by default with .NET 6 Applications, run the application and navigate to /swagger endpoint.

I created a couple of books using the POST/api/books endpoint. Once the books are created, I tested it by using the GET endpoint which would ideally return a list of all books. Here is the result.
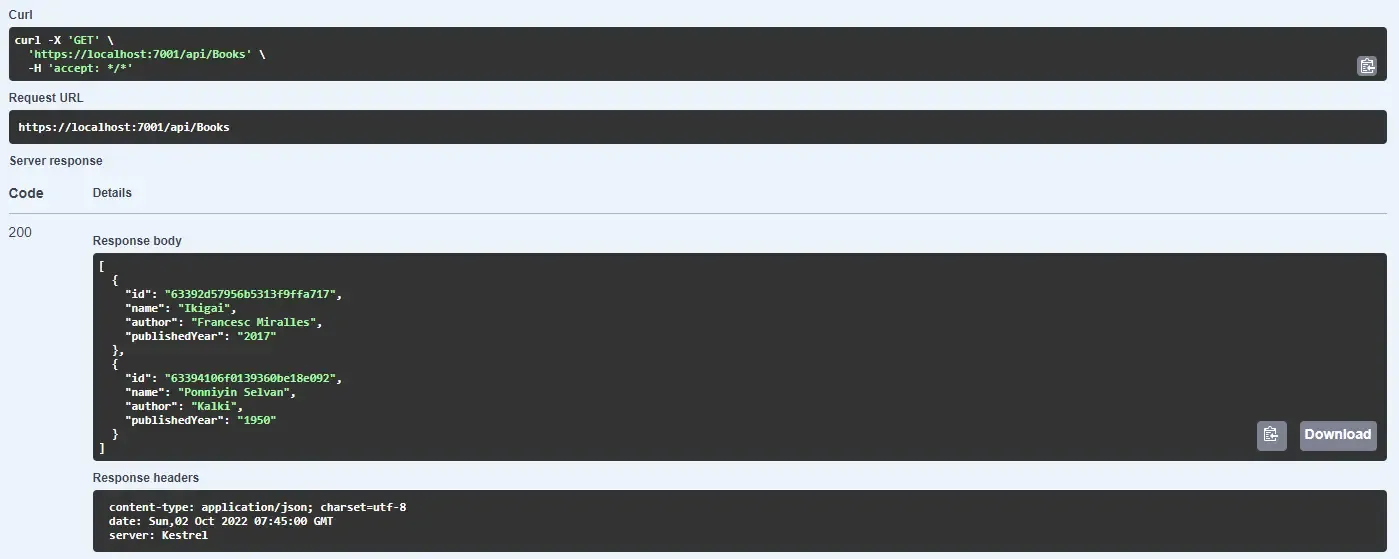
Note that when our application will be deployed to ECS as containers, it no longer would connect to our local MongoDB instance. We would have to pull the MongoDB image from the docker hub and run it as a separate container beside our BookManager container. This BookManager container would then connect to the mongo container and read/write data.
Now that our application is up and running, let’s dockerize it and push the image to Amazon ECR.
Prerequisites
Moving forward, ensure that you have the following.
- AWS Account. Free Tier would do.
- AWS CLI is Installed and configured, as we are going to run a couple of CLI commands against the AWS Services (for example, pushing docker images to ECR). If you haven’t already done this, refer to this.
- Docker Desktop Installed.
- Docker CLI - you can verify this by running “docker —version” in the command line.
Docker File
At the root of the solution, where the .csproj exists, create a new file and name it DockerFile (without any extensions) and add the following lines of code. Here we will be adding code to build the application, publish it in release mode and create a docker image out of it.
FROM mcr.microsoft.com/dotnet/sdk:6.0 AS buildWORKDIR /source
COPY . .RUN dotnet restore
COPY . ./RUN dotnet publish -c release -o /app
FROM mcr.microsoft.com/dotnet/aspnet:6.0WORKDIR /appCOPY --from=build  /app ./
EXPOSE 80
ENTRYPOINT ["dotnet", "BookManager.dll"]
Line 1: We use the official image of the .NET 6 SDK to build our application.
Line 2: Setting the work folder to the source.
Line 4: Copying the contents of the root folder to the Docker workspace.
Line 5: Restoring the .NET Project to pull in all dependencies.
Line 7&8: Publishes the application in release mode to a folder named app.
Line 10: Here, we use a lighter image of .NET. This is because we would really not need the entire SDK. Thus, we include just the ASPNET runtime image of dotnet 6. Line 11: Switching the working directory to app/ where the published version of the application exists.
Finally, we expose the 80 port and set the entry point of the .NET application to BookManager.dll, which actually is the entry point of the application.
That’s all related to this file. In the next step, let’s run a command to build this image.
Docker is a pretty vast topic to start with. I will probably be writing a separate article dedicated solely to Docker for .NET Developers in the near future and will link it to this article once ready. But for now, we will cover the basics of whatever is necessary for the current scope of development.
Building Docker Image
Navigate to the root of the application where .csproj and the Dockerfile exists. Open up a terminal and run the following command to build the docker image.
docker build -t book-manager .This would actually run the commands in the Dockerfile against the current docker environment and build an image with the name book-manager. This would finally save the docker image locally. Let’s see.
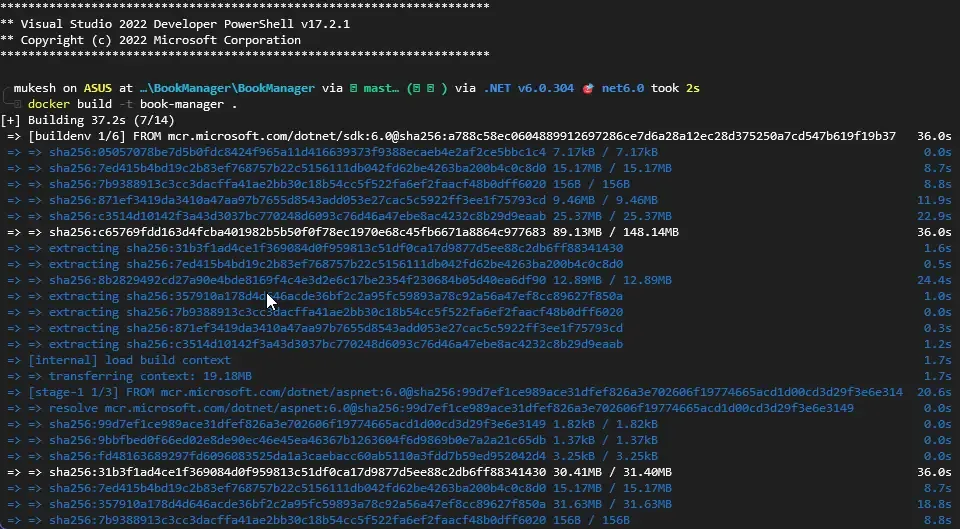
As you can see, all of the steps we have defined in the Dockerfile are run and the image will be created. To verify this, you can open up Docker Desktop and navigate to the Images section. Here, you will be able to see the docker image named book-manager that we have just created.

Now that we have our application dockerized into a local image, let’s try to push this somewhere on the internet. This is because the Amazon ECS would need to pull this image from where it can access it easily. It surely cannot connect to your local and pull this image right?
Amazon ECR - Amazon Elastic Container Registry
Amazon ECR or the Amazon Elastic Container Registry is more like a Repository for pushing Docker Images with ease. It’s a fully managed container registry offering high-performance hosting, so you can reliably deploy application images and artifacts anywhere. Another alternative to this is Docker Hub. But for this demonstration, let’s stick to pushing our images into Amazon ECR.
But before we push the image, we need to make sure that we have a new repository in ECR. For this, log in to AWS Management Console and navigate to ECR.
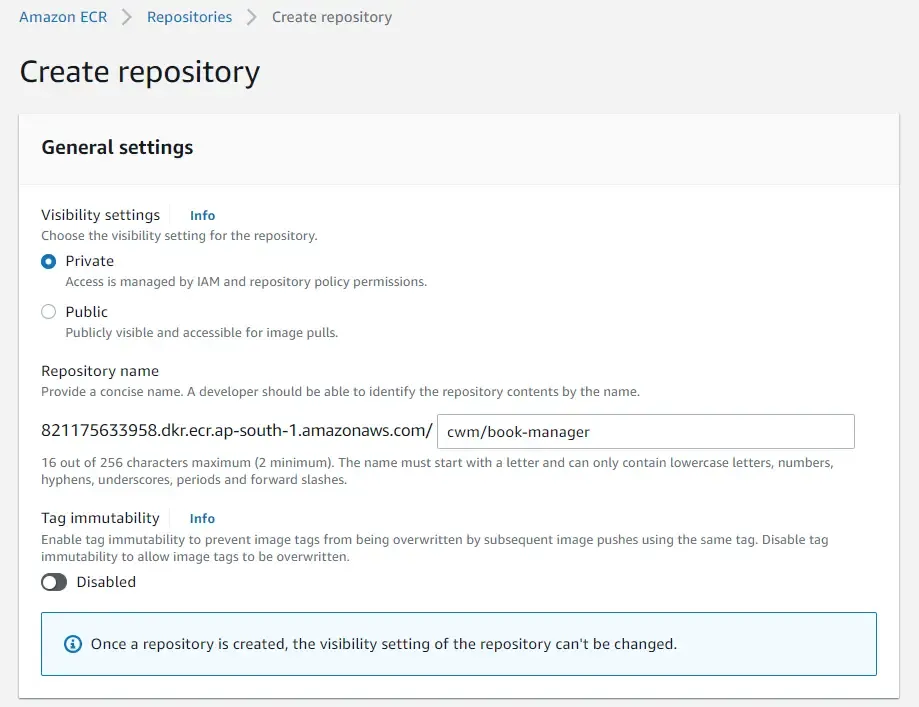
I named my repository as …/cwm/book-manager. Create it. That’s it. Now we are ready to push our image to this repository.
Pushing Docker Image to Amazon ECR
Open up the Terminal at the location where the DockerFile exists and run the following command. Probably run it line by line.
aws ecr get-login-password | docker login --username AWS --password-stdin 821175633958.dkr.ecr.ap-south-1.amazonaws.comdocker tag book-manager 821175633958.dkr.ecr.ap-south-1.amazonaws.com/cwm/book-managerdocker push 821175633958.dkr.ecr.ap-south-1.amazonaws.com/cwm/book-managerLine 1: Logs you in. Make sure that you replace the 821175633958 with your AWS account id. This would ideally log you into docker using the aws username and the ECR password into the ECR URL.
Line 2: Tags the image to the remote repository.
Line 3: Finally pushes the image to the ECR Repository, that we created earlier.
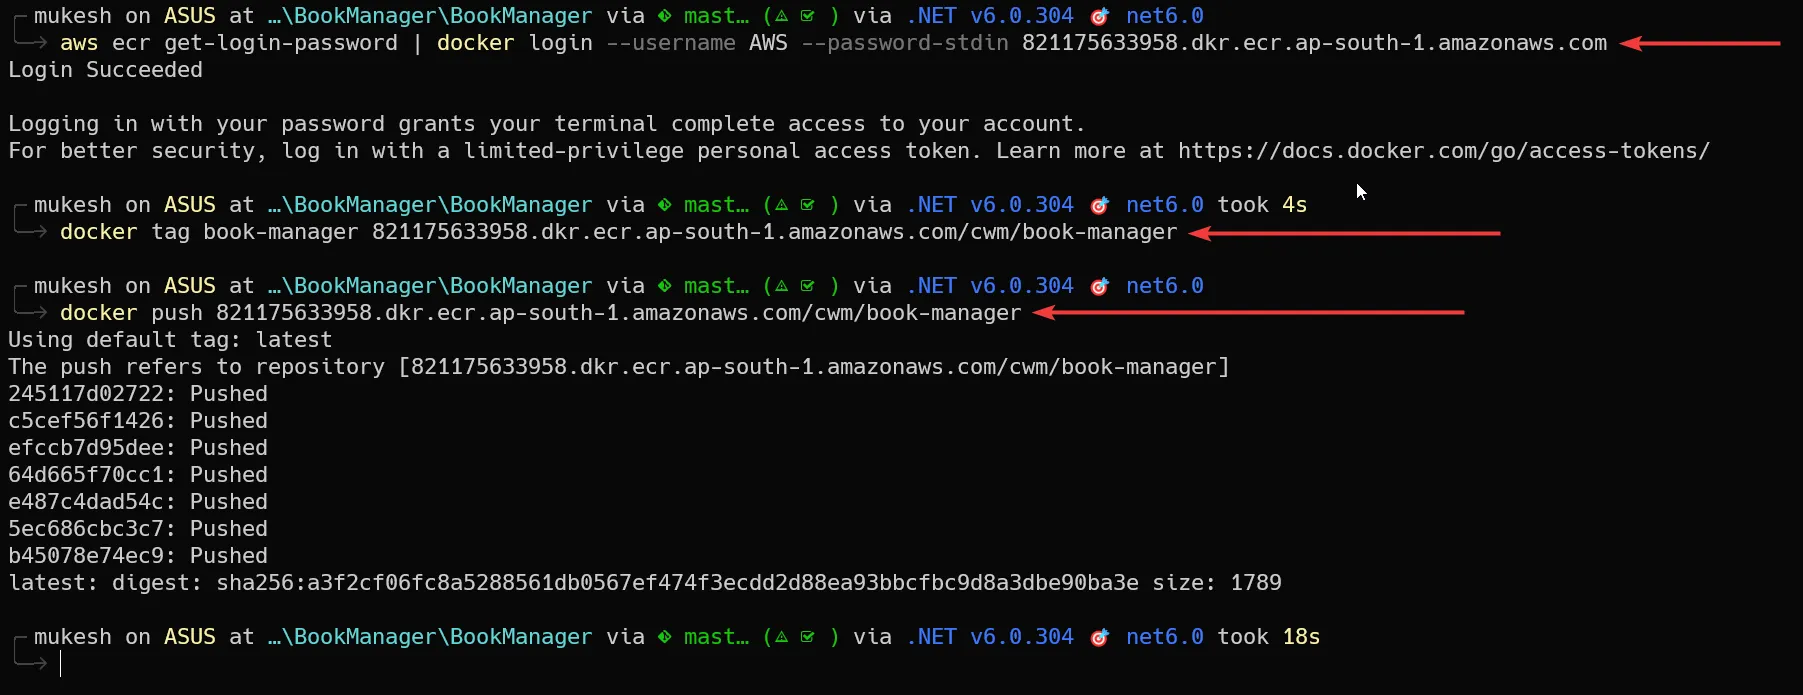
You can verify this by going into ECR and confirming that a new image has come in.

Running the Docker Image Locally and Connection to Local MongoDB Instance
Now that we have pushed the book-manager image to AWS ECR, let’s do a small test locally. The idea is to run the application in a local docker container but connect to the local instance of MongoDB.
Open up the terminal and run the following.
docker run -p 8080:80 -e MONGODBCONFIG:CONNECTIONSTRING='mongodb://host.docker.internal:27017' -e ASPNETCORE_ENVIRONMENT=Development book-managerLet’s go through this command. We are passing a couple of parameters again in the docker run command.
- -p 8080:80 - This means that we are linking the internal port 80 of the Docker container to be accessible at port 8080.
- -e MONGODBCONFIG:CONNECTIONSTRING=‘mongodb://host.docker.internal:27017’ - I had to override the configuration that we had set in the appsettings.json file. The issue was that the docker container was not able to connect to localhost. Instead, we have to specify it as host.docker.internal to allow docker to connect to localhost. Also, -e refers to an environment variable. This command would override the connection string from the appsettings.
- -e ASPNETCORE_ENVIRONMENT=Development - Again, we are setting the env variable ASPNETCORE_ENVIRONMENT to Development, just to make sure Swagger is accessible.
This should fire up a docker container locally and start serving your application that should ideally connect to the local MongoDB instance. For testing, you can navigate to http://localhost:8080/api/books.

There you go, everything working as expected. Let’s move into the more interesting part now, deploying ASP.NET Core Web API to Amazon ECS.
Getting Started - Deploy ASP.NET Core Web API to Amazon ECS
Setting up AWS ECS
First up, let’s create an ECS cluster, which will in the future run our mongo DB and dotnet applications. Navigate to the AWS Management Console and search for ECS. Here, create a new cluster.
Create an ECS Cluster via the Management Console, using the cluster template as AWS Fargate. We selected this template because AWS Fargate would manage the server for us with minimal setup effort. If we had gone with the EC2 template, there would be many additional steps to prepare the entire setup. If you really want the flexibility to manage the server yourself, do select the EC2 template. But for this demonstration, we will stick to Fargate to keep things simple.
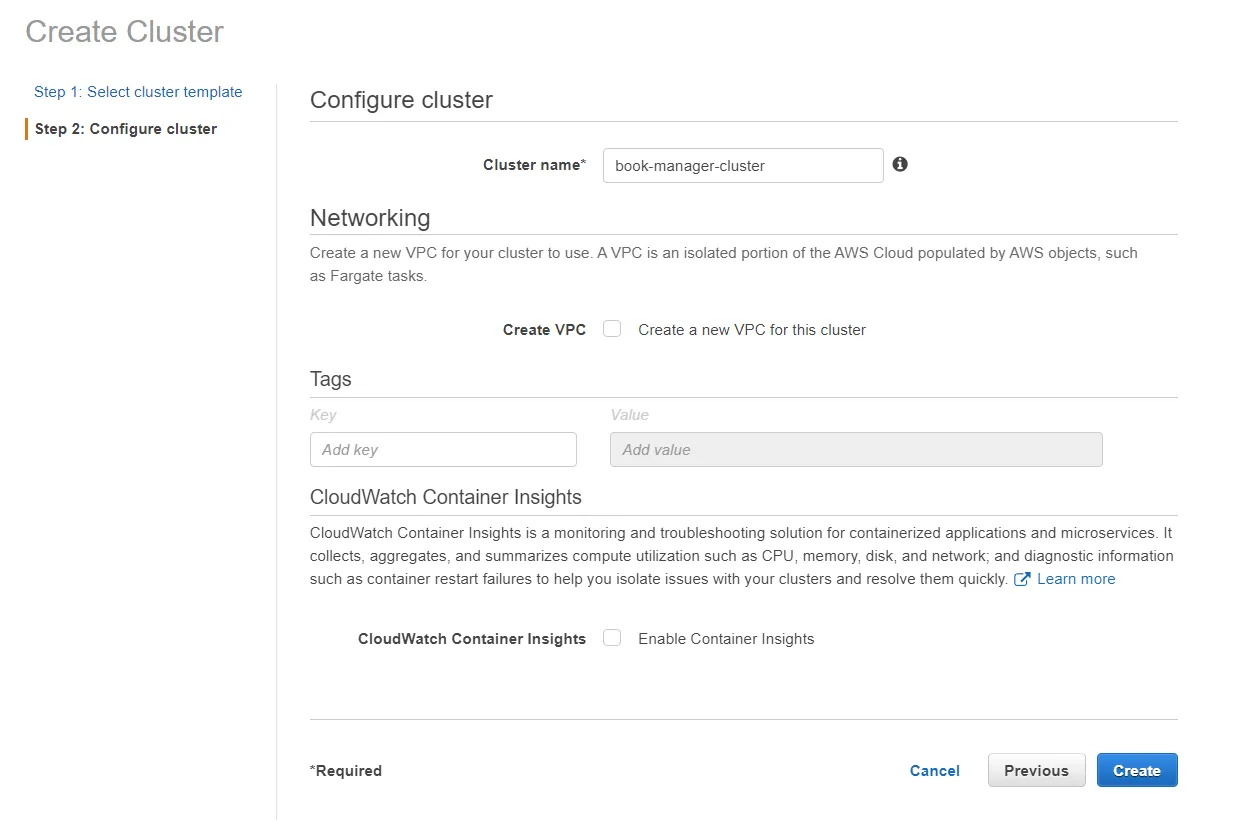
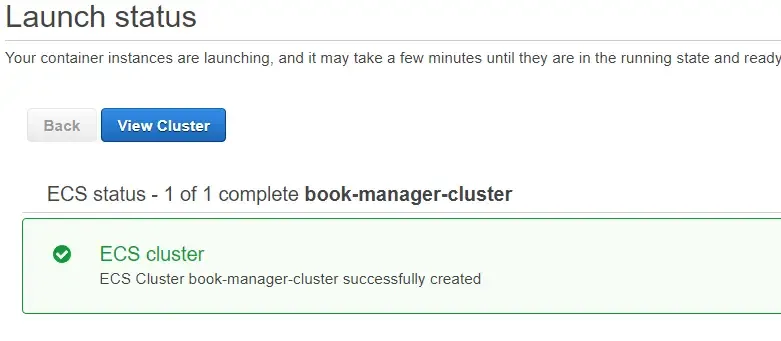
That’s it. Our ECS Cluster should be now ready. But we haven’t added any services or tasks to it, right?
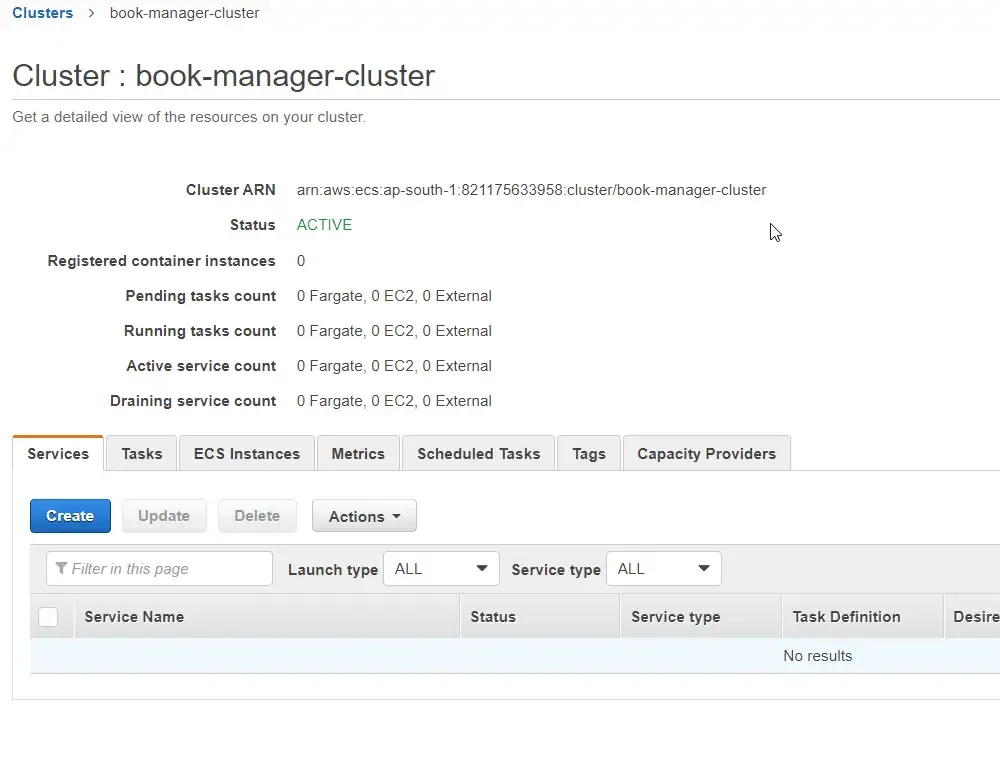
Defining Tasks in Amazon ECS
We will be creating 2 Task Definitions here.
- Mongo DB Task
- Book Manager Task.
Deploy MongoDB Container to ECS
IMPORTANT: We are deploying MongoDB as containers for demonstration purposes only. In production, you would have to perform additional configurations such as mounting a volume to the container and so to make sure you do not lose data. As of now, we are just working on a temporary environment. For production usage, you can also check out the AWS DocumentDB Clusters.
First up, let’s spin up a MongoDB container within ECS. Post this we will be testing this by connecting our MongoDBAtlas to this newly created Mongo Instance using a publicly exposed URL.
MongoDB Task Definition
Go to AWS ECS, and on the sidebar, click on Task Definitions. Here, Create a new Task Definition.
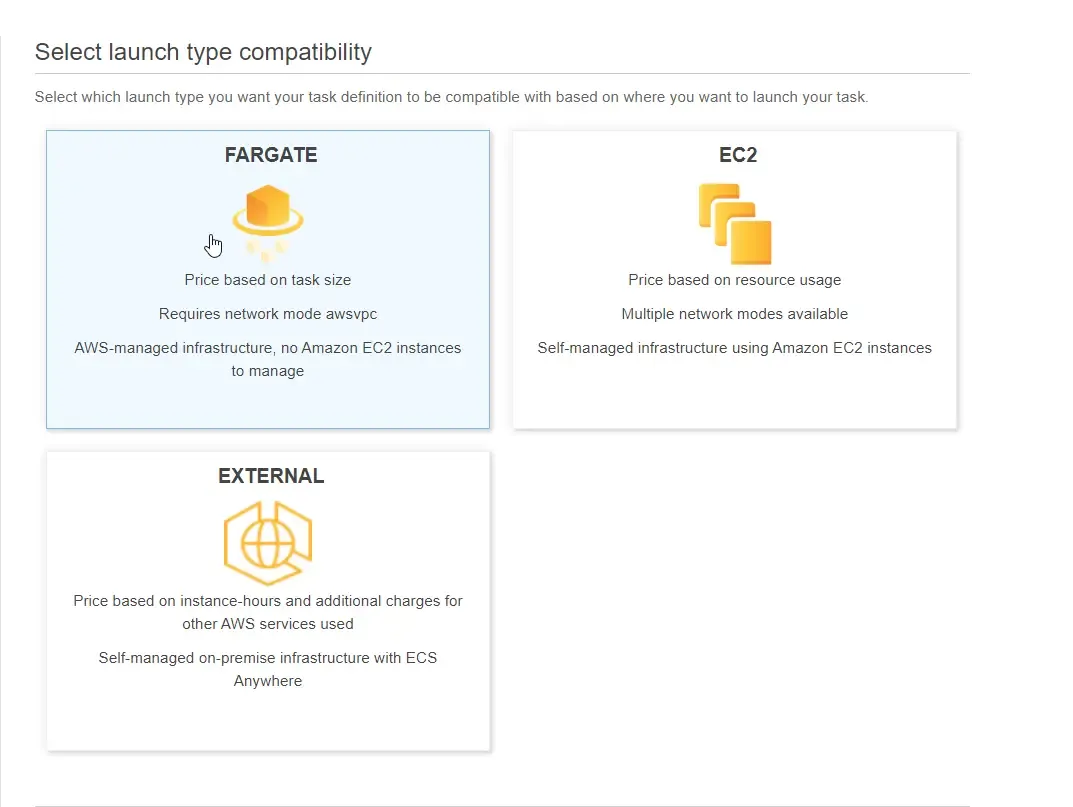
Make sure that you select Fargate Launch Type, as it’s far easier to manage this rather than using EC2 directly.
In the next screens, add the following details.
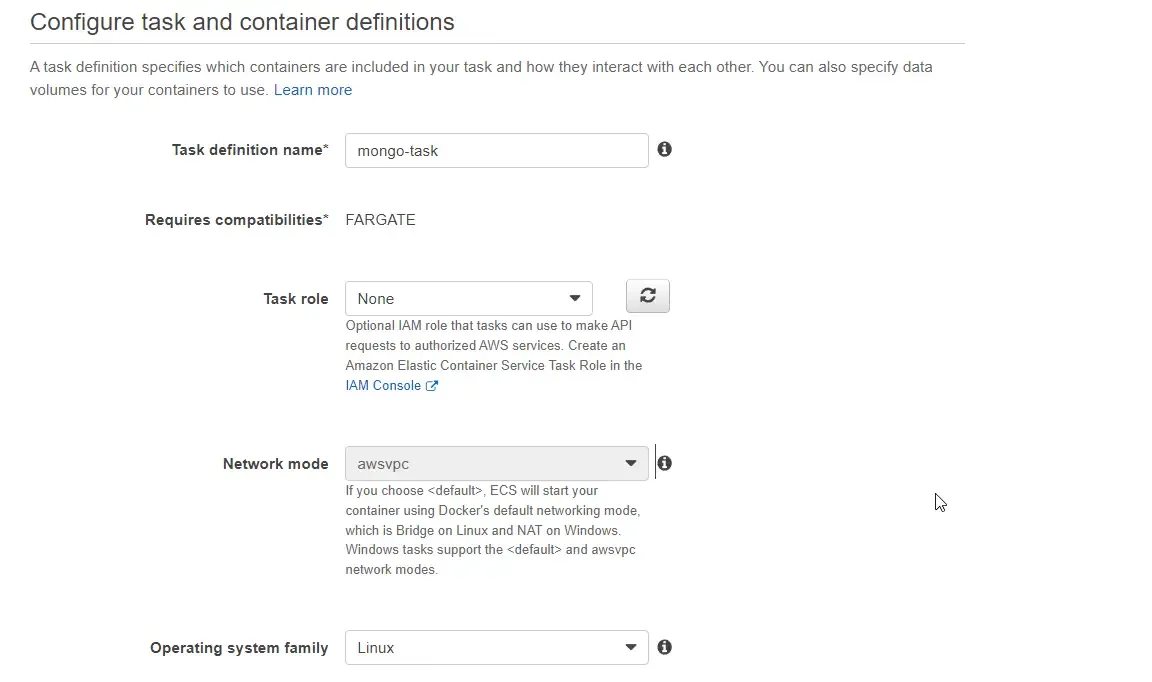
Let’s keep the task size minimal, as there is not going to be any huge traffic coming through. We will be setting the RAM size as 0.5GB and CPU as 0.25.
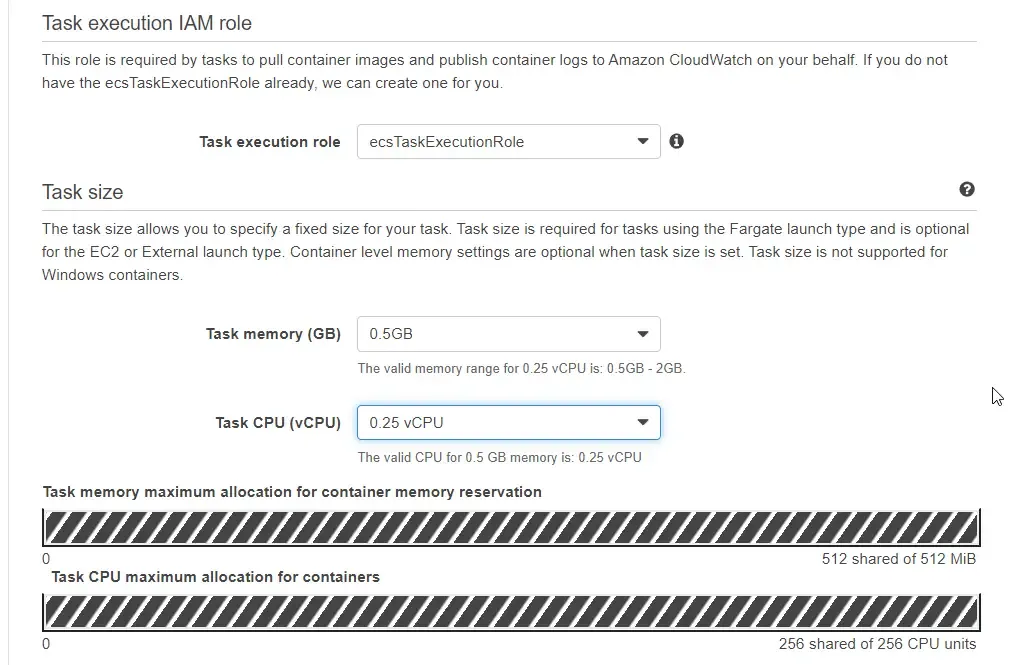
We will be adding a single container to this task. Click on the Add Containers and add in the following details.
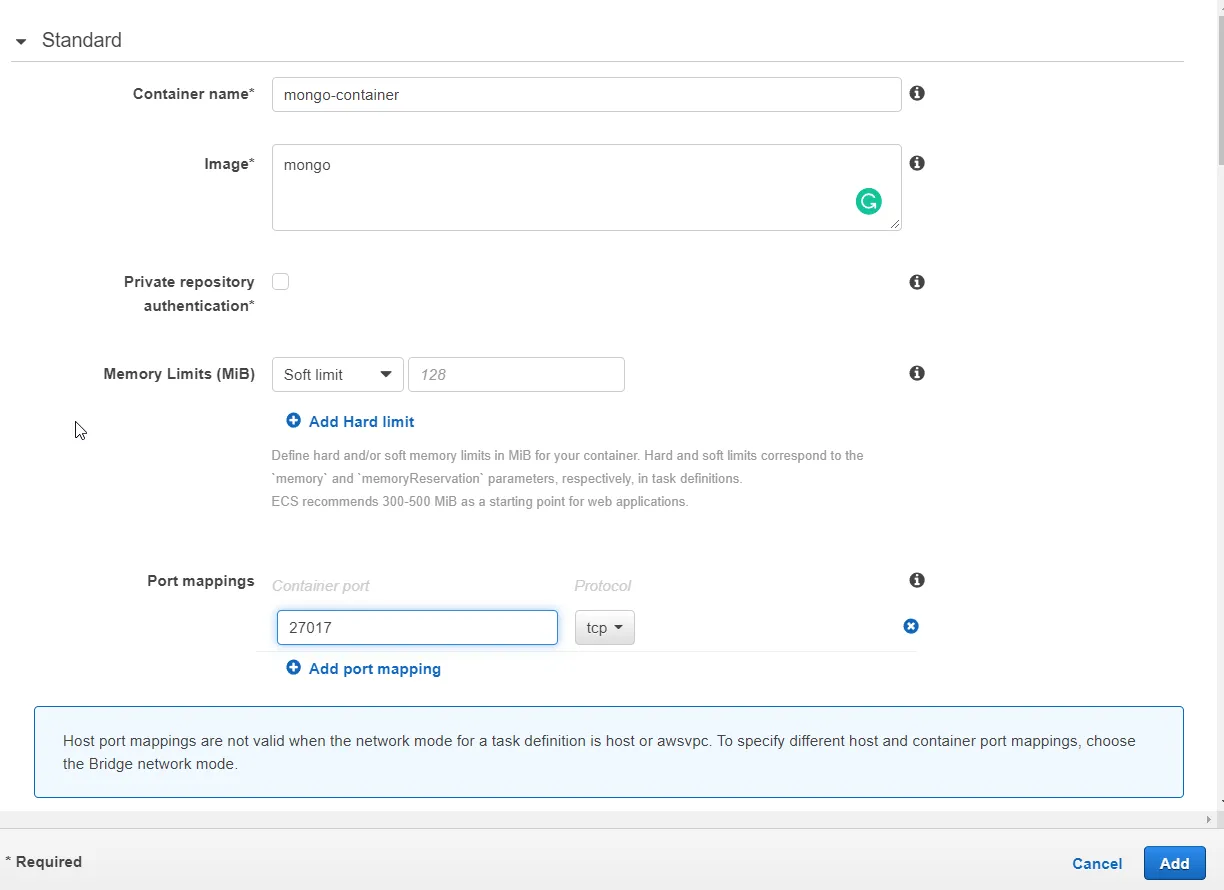
The important fields here are the container name, image name, and port mappings. Note that the image name will be just mongo. This would pull the Official MongoDB image from Docker Hub.
That’s it for the task definition. Let’s save it.
MongoDB Service Creation
With that done, go back to clusters and select our newly created cluster, book-manager-cluster. Here, in the Services tab, hit on Create. Use the details from the below images to set up the service.
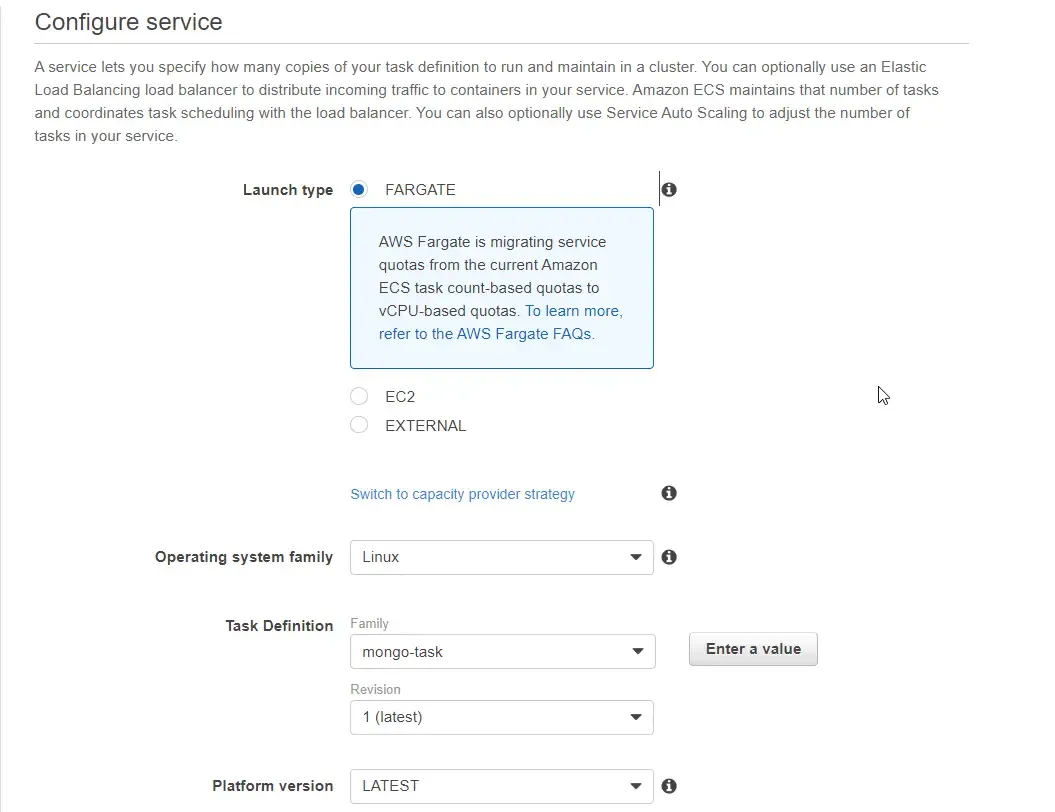
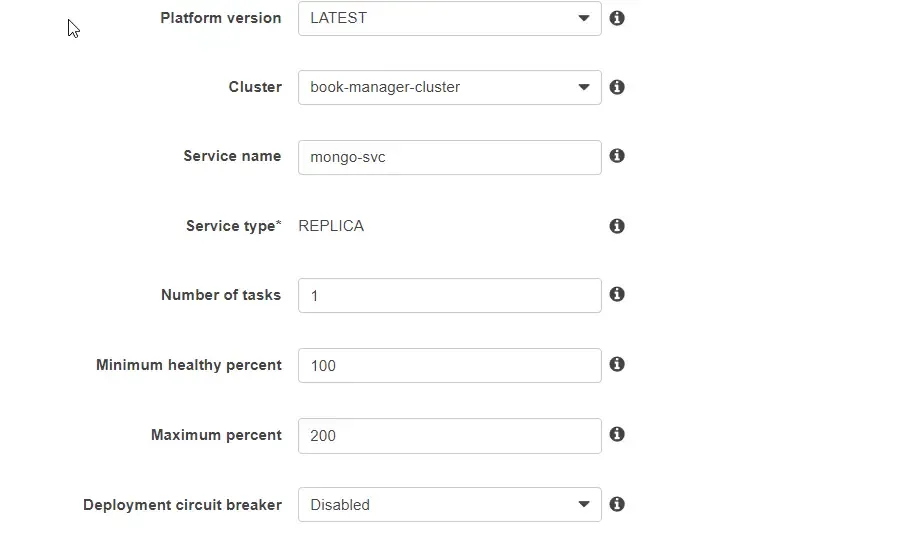
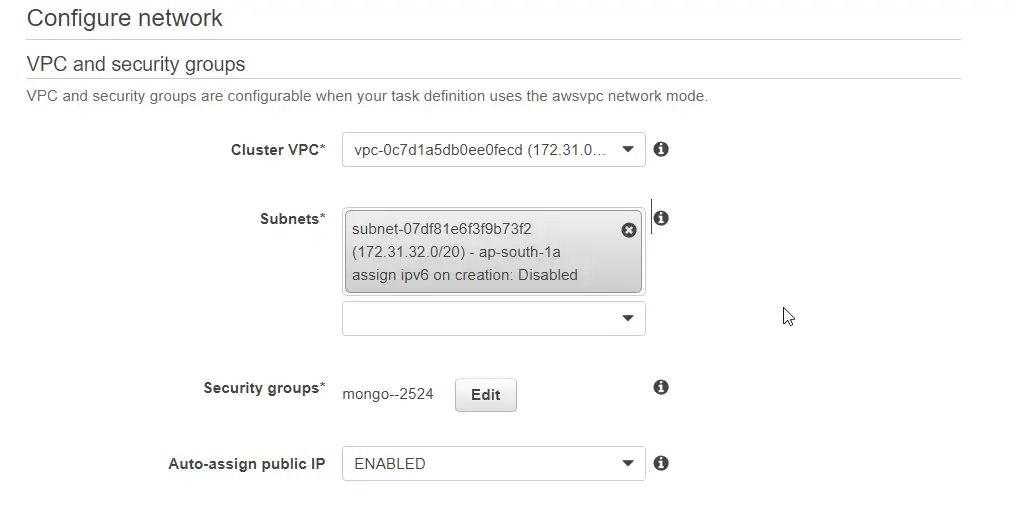
Make sure auto-assign public IP is enabled. This would create and map a public IP address to the container.
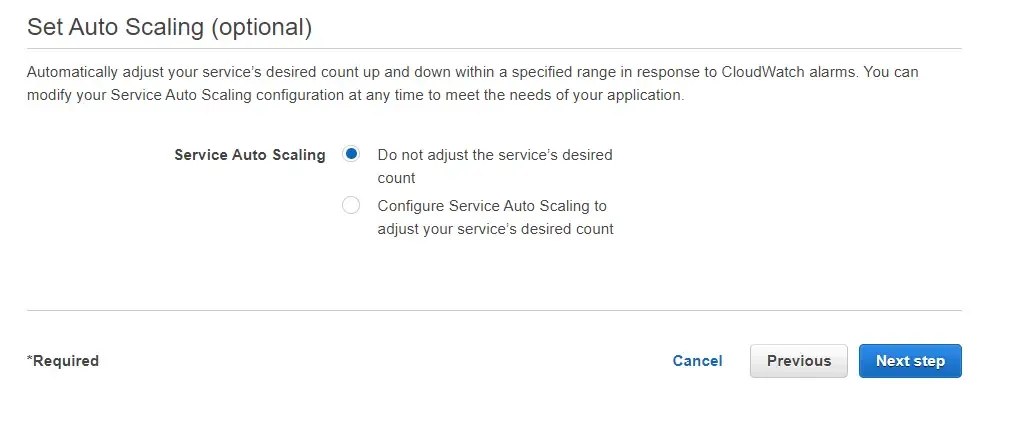
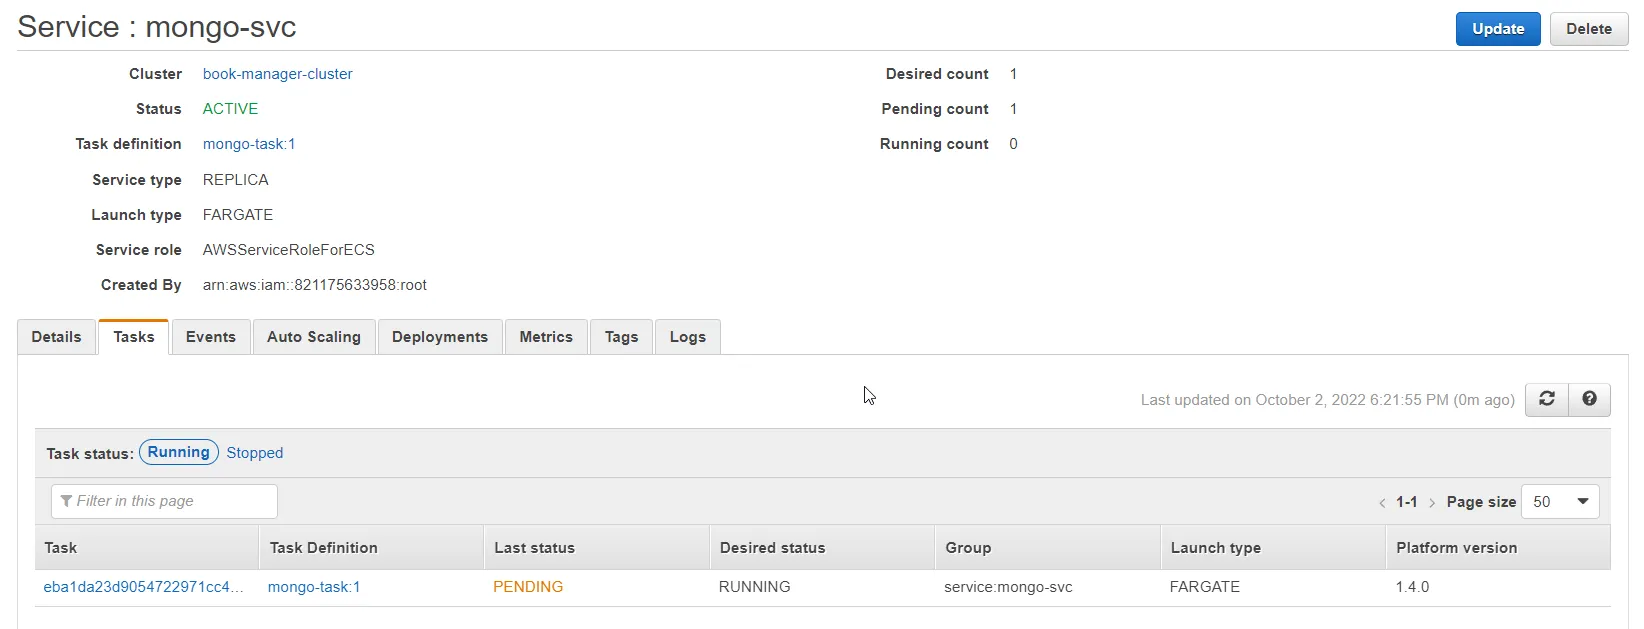
That’s it. Wait for some time for the container to be up and running.
So, let’s go back to the clusters, and switch to the tasks tab. From here you can see that the mongo-svc service is up and running now. Click on this new task.
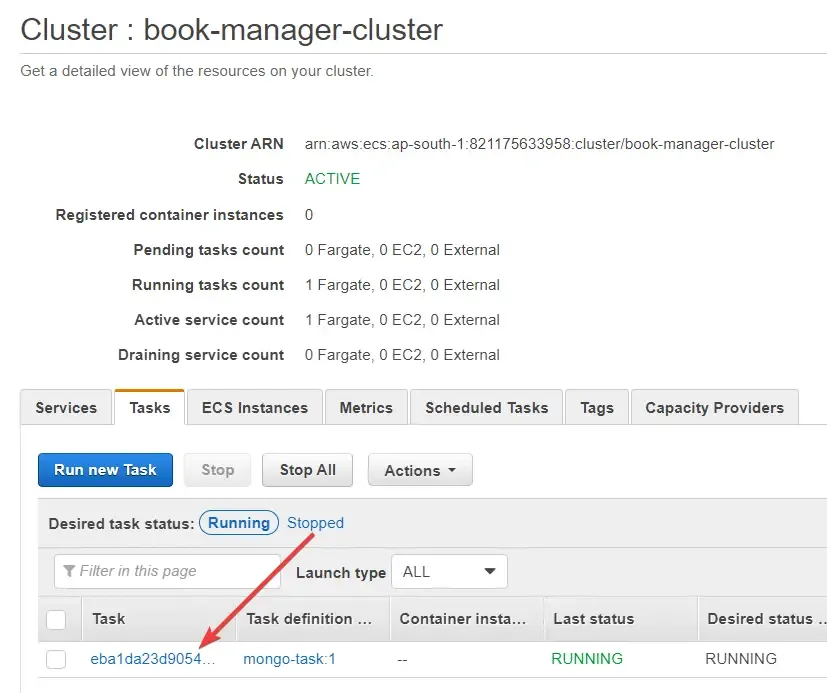
So, the whole idea of deploying MongoDB to containers in ECS is to allow our .NET application ( which is still not deployed yet ) to use this mongo instance. We first need a connection string for this, right? We have already exposed port 27107 during the task definition. But which URL to connect to?
As soon as we had created the mongo service, a public IP would be assigned to this task. Where do we get this IP from? That’s exactly why are navigating into the newly created task. Here is the screenshot of the Task details.
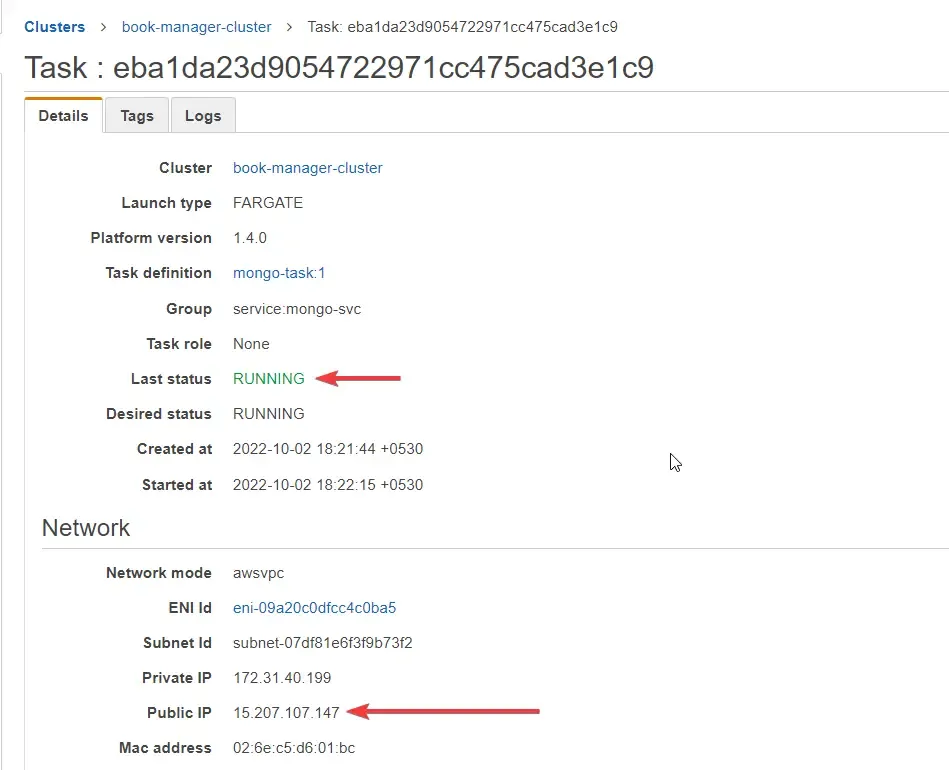
In the Task details, you can find the Public IP. Let’s take this IP and try to connect this from our local MongoDBAtlas. Heads up, this is not going to work, because our ECS Security Group does not allow traffic into the 27017 port.
Enabling Traffic to 27017 Port - VPC
Let’s enable traffic inbound rules first. For this, go back to the cluster and select the Mongo Service.
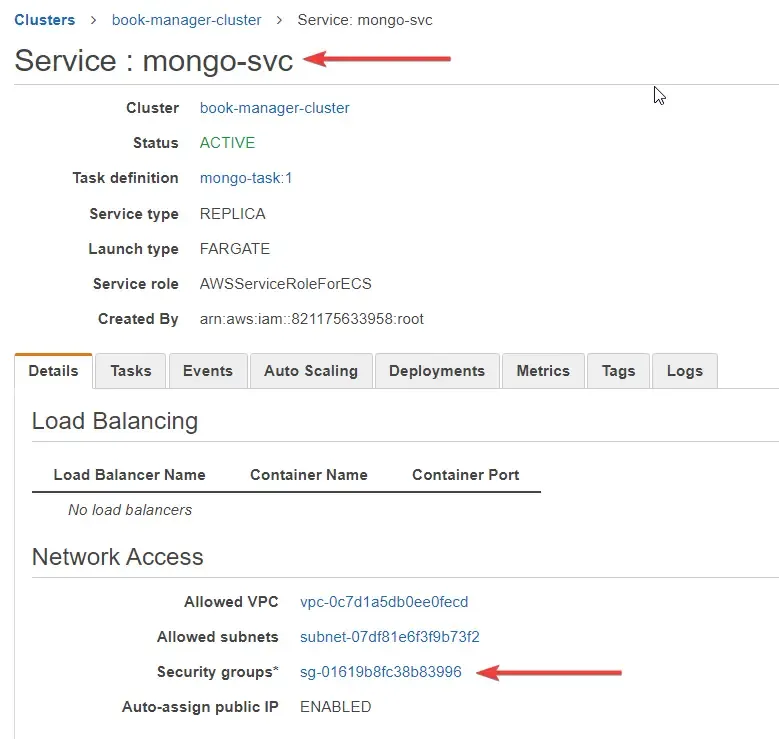
Here click on the link to Service Groups. This would open up the VPC configurations. You can see that currently, only the 80 port is open. We will have to edit the inbound rules and add port 27017 port as well.
Click on Edit Inbound Rules.

As you can see in the below screenshot, add a new rule, which will be a custom TCP with port range as 27017 and source as anywhere. With that done, save this rule.

There you go. Now we are able to connect to this instance. Remember that we will be using this IP address as MongoDB Connection Strings while setting up our Book Manager Task.
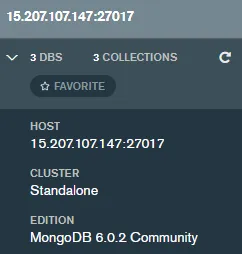
Now, let’s go back to the mongo task, get the public IP and try to connect to this from our local MongoDB Compass.
As you can see, we are able to successfully connect to the instance running on Amazon ECS!
Deploying the .NET API to ECS
Now that we have our MongoDB Instance ready to connect. Let’s deploy the Book Manager Container and connect it to this MongoDB Instance using the Public IP.
Go back to task definitions are create a new one.
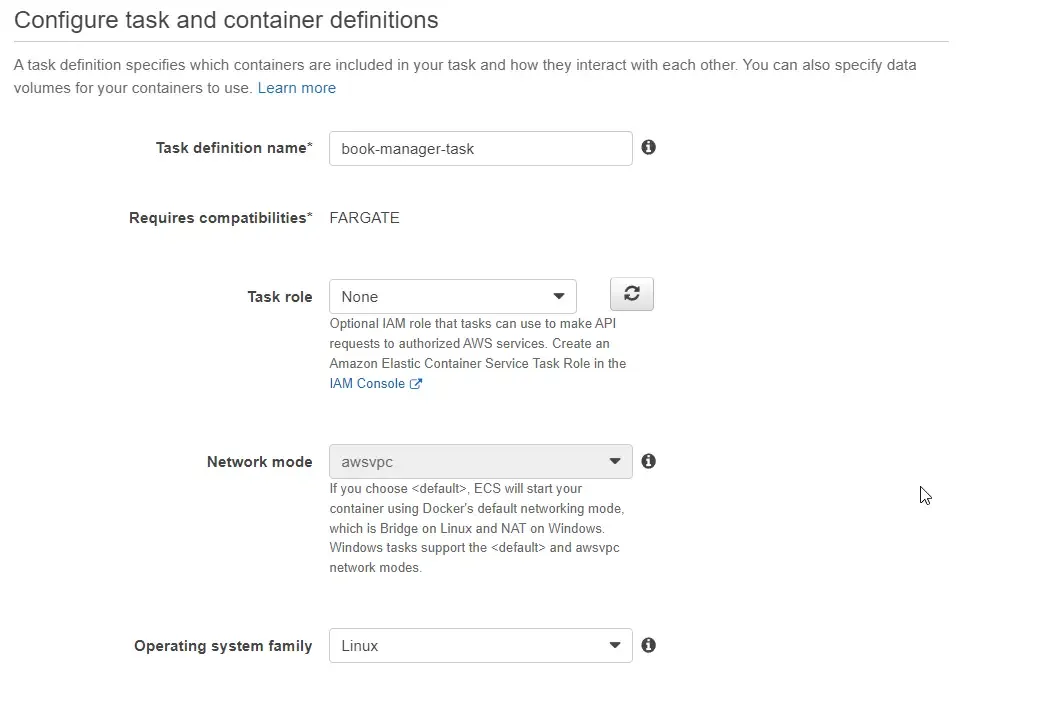
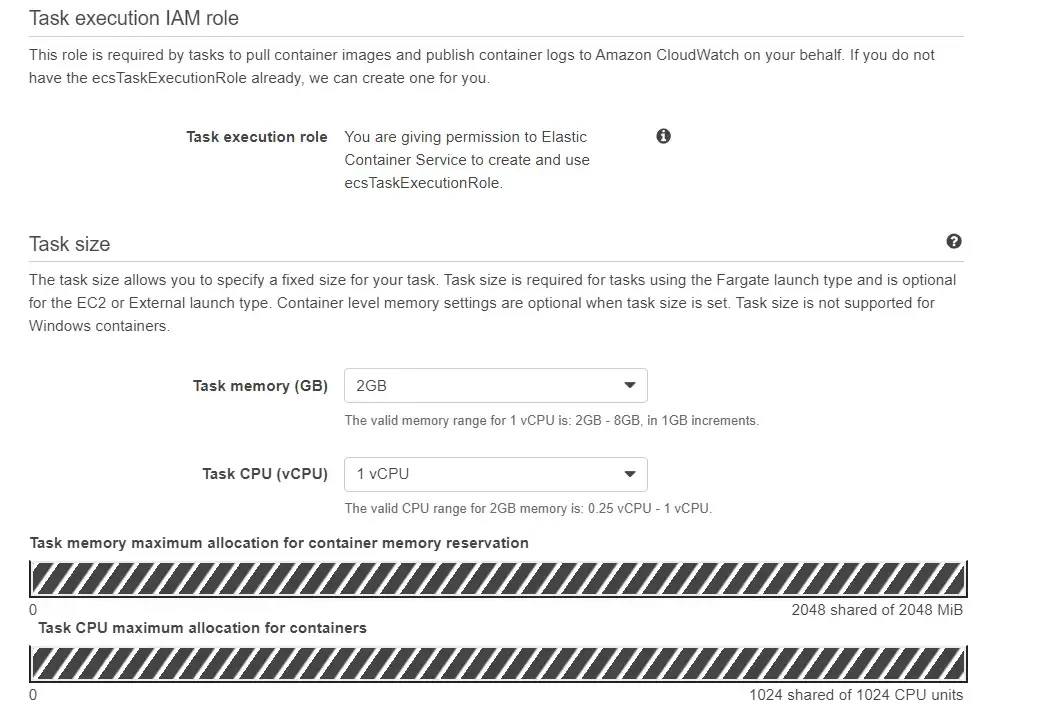
For the task size, I have set the memory as 2GB and CPU as 1 vCPU.
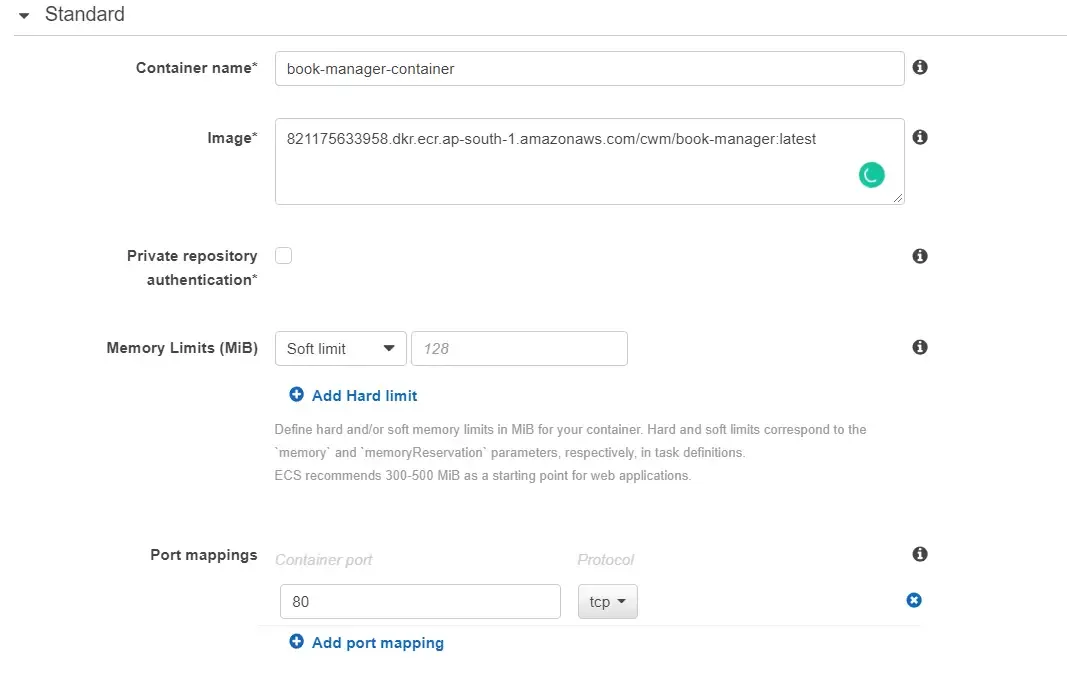
Next, in the container definitions, add a container with the following details.
The name of the container is book-manager-container. For the Image URL, you will have to navigate back to ECR / our new repository and fetch its URL. Remember, this is the image that we pushed earlier from the command line.
Also, ensure to add the port mapping for port 80.
Setting Environment Variables
Scroll a bit down to set the Environment Variables. I have added the following Variables.
- MONGODBCONFIG:CONNECTIONSTRING - mongodb://15.207.107.147:27017
- ASPNETCORE_ENVIRONMENT - Development

That’s it. Leave everything else to default and create the task definition.
Next, as we did for MongoDB, create a new service for Book-Manager that would point to the book-manager task.
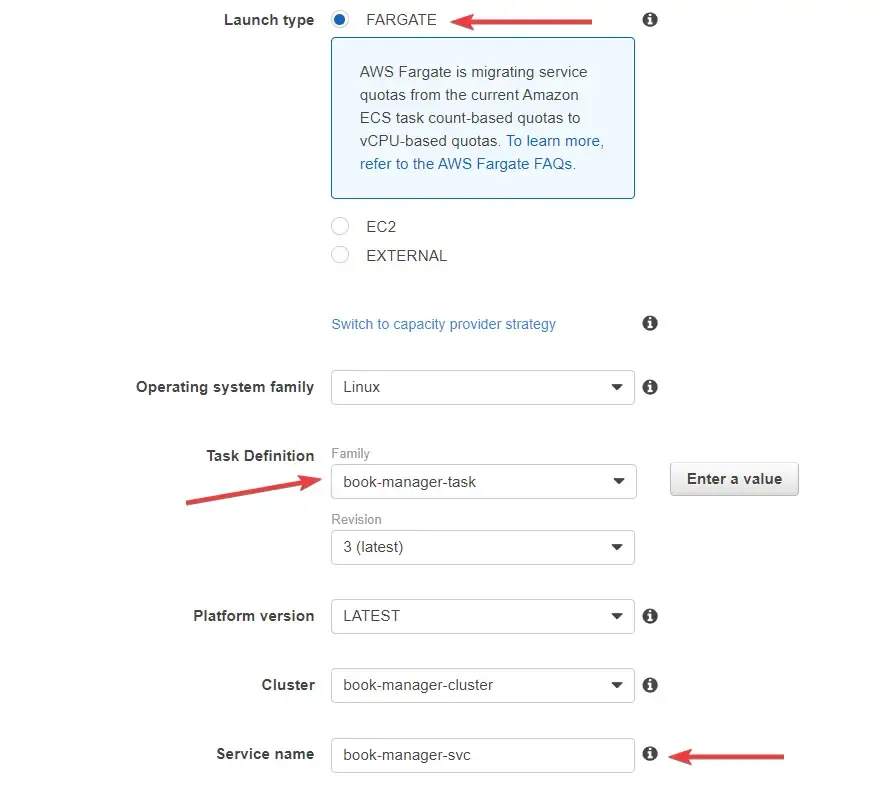
Here also, ensure that you have enabled Public IP Creation. Once done, create the service.
That’s actually everything you need to do! Yes, for the first time I too felt it to be quite long. But eventually, everything would make sense :) And no, you don’t have to do anything for VPC (adding inbound rules), because port 80 is always open by default.
Once you have created the service, it would take a couple of seconds for the container to be up and running. If you go into the Book Manager Task, you will be able to also see the logs of our .NET Application.
Let this be an exercise for you. Try to fetch the Public IP of the newly created Book Manager Task. With that in hand, let’s test the deployment.
Testing
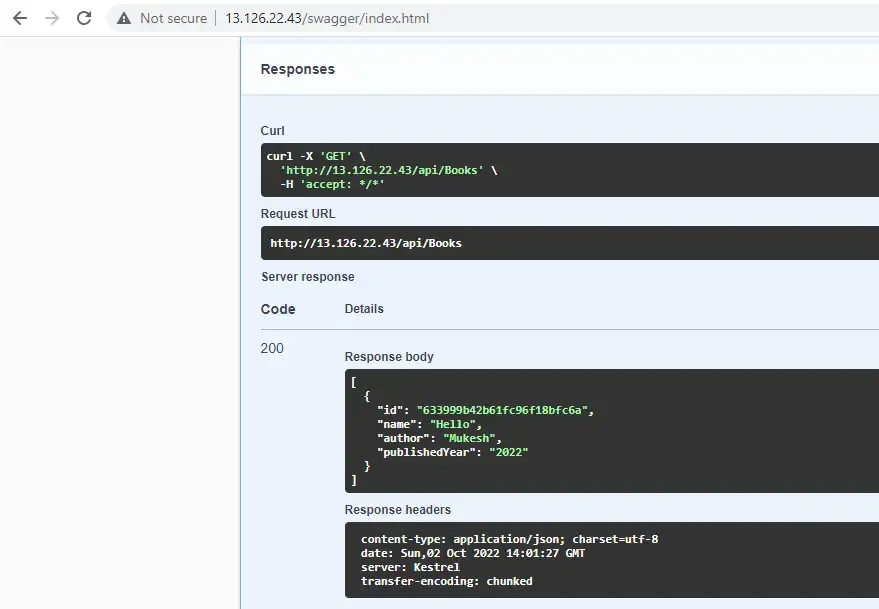
I just navigated to /swagger/index.html and was able to see Swagger available. That’s almost a confirmation that our deployment went well. But, to check if this container is able to communicate with the MongoDB URL, I tried creating a new book and fetching all the books. As expected, everything went fine. Successful Deployment!
IMPORTANT: As our testing is completed, It’s recommended to delete the AWS Resources that we created. This helps to keep our AWS Bills minimal so that you don’t incur any additional costs. You can directly remove the ECS Cluster, which would internally remove all the tasks and services associated with it. Additionally, you can also delete the image that we had pushed to Amazon ECR. Cheers!
That’s a wrap for this article.
Summary
In this article, we learned quite a lot, right? :D Starting from building a simple .NET 6 Application that integrates with MongoDB and building a DockerFile for it. We pushed this Docker Image to Amazon ECR and worked with ECS for creating services and tasks for MongoDB and our .NET Application. We looked into other important aspects like Fargate, port mapping, adding inbound rules to the ECS Security group, and so on. That on the whole answers the question, How to Deploy ASP.NET Core Web API to Amazon ECS.
Stay Tuned. Do share this article with your colleagues and dev circles if you found this interesting. Thanks!

