In this article, we will explore the .NET Lambda Annotations Framework released recently by the AWS Team to improve development experiences while working with AWS Lambdas. This Framework makes the entire Lambda Function creation task feel more natural to C# / .NET Developers. In a previous article, we learned about Getting started with AWS Lambda for .NET Developers.
You can get the complete source code of this implementation here.
.NET Lambda Annotations Framework
As mentioned earlier, the .NET Lambda Annotations Framework simplifies the development experience while building AWS Lambdas. As in, it gets rid of the boilerplate code that you might have noticed in .NET AWS Lambda Projects. Adding to this, it also takes care of modifying the Cloudformation template automatically as soon as anything in the code changes. For example, let’s say you add a new Lambda Function Handler using the Framework, it automatically syncs your code changes and makes the necessary CloudFormation template changes making the lambda stack deployment seamless!
(example 1)
public APIGatewayHttpApiV2ProxyResponse LambdaMathAdd(APIGatewayHttpApiV2ProxyRequest request, ILambdaContext context){ if (!request.PathParameters.TryGetValue("x", out var xs)) { return new APIGatewayHttpApiV2ProxyResponse { StatusCode = (int)HttpStatusCode.BadRequest }; } if (!request.PathParameters.TryGetValue("y", out var ys)) { return new APIGatewayHttpApiV2ProxyResponse { StatusCode = (int)HttpStatusCode.BadRequest }; } var x = int.Parse(xs); var y = int.Parse(ys); return new APIGatewayHttpApiV2ProxyResponse { StatusCode = (int)HttpStatusCode.OK, Body = (x + y).ToString(), Headers = new Dictionary<string, string> { { "Content-Type", "text/plain" } } };}Here is a quick view of the code simplification done using the .NET Lambda Annotation Framework. This is a simple Lambda function that’s behind an Amazon API Gateway which takes in 2 integers from the URL path and performs addition. You can see that there is quite a lot of boilerplate code to be written to achieve this small functionality.
And, here is how you would do the same exact thing using the .NET Lambda Annotations Framework! Basically, you no longer would need to worry about getting the boilerplate code right anymore. Just focus on writing the business use cases! Also, we as .NET Developers are already very familiar with the Annotations model of programming. Thus, this framework can be quite useful for improving the developer experience.
(example 2)
[LambdaFunction][HttpApi(LambdaHttpMethod.Get, "/add/{x}/{y}")]public int Add(int x, int y){ return x + y;}In the background, this framework uses source generators, which automatically convert the simplified annotations-based programming model (in example 2) to the default lambda programming model (in example 1).
PS, the above examples are taken from the AWS Blog (https://aws.amazon.com/blogs/developer/introducing-net-annotations-lambda-framework-preview/).
The Framework comes in handy when our Lambda is behind the Amazon API Gateway, as you can see from the above example.
Apart from this, you also get to customize aspects of the Lambda functions like the Memory & CPU usage, and so much more by passing it to the attributes using this framework. We will look into this in detail in the upcoming sections of this article.
Prerequisites
- AWS Account - Free Tier would do
- Visual Studio IDE
- AWS CLI Installed & Profile Configured (Watch Guide here)
- AWS SAM Toolkit installed
- Install AWS Templates ( dotnet new -i Amazon.Lambda.Templates )
What we’ll Build?
We’ll start with a default AWS Lambda project template. Make it compatible with Amazon API Gateway and get it deployed. Then we will use the Annotations Framework to simplify it. I will build 2 Lambda Functions in this demonstration. The first one will be a very basic one, something like a HelloWorld or so, just to get the idea of the Framework. The next function will have some complications like Dependency Injection, DynamoDB Crud, CloudFormation changes, Function Customizations, and so on.
Before you get started
I would recommend you go through the following articles (in the given order) before you get started with the Annotations Framework.
- AWS Lambda with .NET 6 – Getting Started with Serverless Computing
- Amazon API Gateway with .NET – AWS Lambda & DynamoDB Integrations
- AWS SAM CLI for .NET Developers – Getting Started with Serverless Application Model CLI Tool
This will give you a clear understanding of AWS Lambda and how you would deploy it. Following that, you will understand about building AWS Lambdas behind Amazon API Gateway, and the various changes you would have to do to make the Lambdas compatible with the Gateway. Finally, you will cover the SAM (Serverless Application Model) of AWS that comes with Cloudformation templates to simplify the deployment of AWS Lambdas to the cloud.
Creating a new Serverless Project
Since we are dealing with APIs and Gateways, let’s use the SAM CLI to get started with the demonstration. Open up the terminal (wherever you need your project to be created) and run the following command.
sam init 

Once you have specified all your requirements, SAM CLI generates an application for you using SAM Templates (which it pulls from the AWS repository). Here, I used the simple HelloWorld example and named my project as AnnotationsDemo as you can see from the screenshots above.
Note that I have selected dotnet6 as the runtime of choice.
I will assume that you already have a working idea about AWS SAM CLI. If not, please refer to this article to get a complete understanding - https://codewithmukesh.com/blog/aws-sam-cli-for-dotnet-developers/
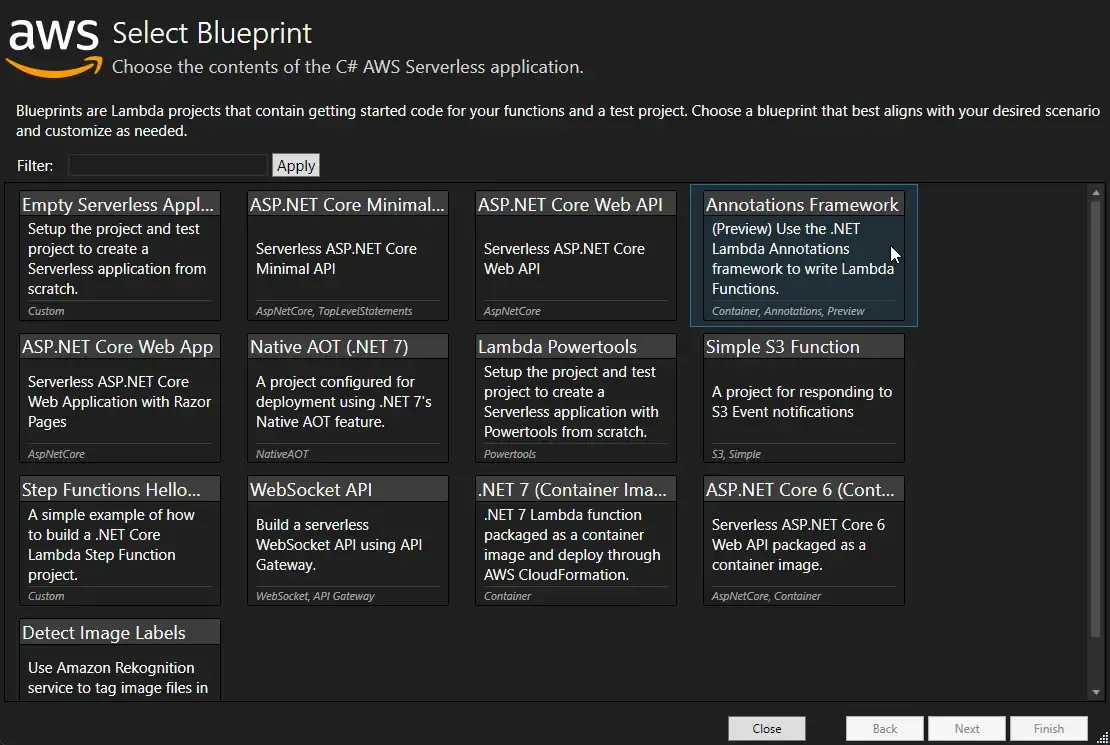
Alternatively, you can also use Visual Studio to generate the Serverless Project for you using the below blueprint. Ensure that you have the AWS Toolkit installed along with the Lambda Templates (Amazon.Lambda.Templates NuGet package)
Once the project is set up on your machine, navigate to the src/HelloWorld folder and up the HelloWorld.csproj using your favorite IDE. I am using Visual Studio 2022 community for this demonstration.
Let’s examine the Function.cs file now.
[assembly: LambdaSerializer(typeof(Amazon.Lambda.Serialization.SystemTextJson.DefaultLambdaJsonSerializer))]namespace HelloWorld{ public class Function { private static readonly HttpClient client = new HttpClient(); private static async Task<string> GetCallingIP() { client.DefaultRequestHeaders.Accept.Clear(); client.DefaultRequestHeaders.Add("User-Agent", "AWS Lambda .Net Client"); var msg = await client.GetStringAsync("http://checkip.amazonaws.com/").ConfigureAwait(continueOnCapturedContext:false); return msg.Replace("\n",""); } public async Task<APIGatewayProxyResponse> FunctionHandler(APIGatewayProxyRequest apigProxyEvent, ILambdaContext context) { var location = await GetCallingIP(); var body = new Dictionary<string, string> { { "message", "hello world" }, { "location", location } }; return new APIGatewayProxyResponse { Body = JsonSerializer.Serialize(body), StatusCode = 200, Headers = new Dictionary<string, string> { { "Content-Type", "application/json" } } }; } }}So, the default code we get is a simple GetCallingIP method which uses an HTTP client to call a URL that basically returns your IP Address.
Let’s see how to simplify this code using the Annotations Framework now.
You just have to install one package for this. Run the following command to install the Annotations package.
Installing the Annotations Package
dotnet add package Amazon.Lambda.AnnotationsOnce that’s done, navigate to the Function.cs and make the following changes.
[LambdaFunction][HttpApi(LambdaHttpMethod.Get, template: "/hello/{name}")]public async Task<Dictionary<string, string>> GetCallingIpFunction(string name){ var location = await GetCallingIP(); return new Dictionary<string, string> { { "message", $"Hello {name}" }, { "location", location } };}Here, I have changed the function name from FunctionHandler to GetCallingIpFunction. This is just to achieve more readability of code. Apart from that we have also changed the signature of the method itself. The function (Lambda) now returns a dictionary.
As per the Annotation attributes, we have set it to LambdaFunction, so that the framework understands that it’s an actual lambda function. Next, we have added the HttpApi attribute. This ensures that the lambda function will be attached to an Amazon API Gateway endpoint. Within this, you can also mention the HttpMethod, which in our case is GET. I have also defined the route of the endpoint, which also accepts a string name. Note that this string is passed on as the request to the method as well. Ensure that the variable names match, or else the framework would throw errors while you write code.
Now, the most interesting part is the template.yaml file that gets generated for you. So, as you make changes related to the annotations attribute, the framework detects it and makes the required changes to this cloud formation template. As you can see in the below snippet, the framework has changed the handler name to our new method name, and updated the events (API gateway routes).
{ "AWSTemplateFormatVersion": "2010-09-09", "Transform": "AWS::Serverless-2016-10-31", "Description": "This template is partially managed by Amazon.Lambda.Annotations (v0.13.1.0).", "Resources": { "HelloWorldFunctionGetCallingIpFunctionGenerated": { "Type": "AWS::Serverless::Function", "Metadata": { "Tool": "Amazon.Lambda.Annotations", "SyncedEvents": [ "RootGet" ] }, "Properties": { "Runtime": "dotnet6", "CodeUri": ".", "MemorySize": 256, "Timeout": 30, "Policies": [ "AWSLambdaBasicExecutionRole" ], "PackageType": "Zip", "Handler": "HelloWorld::HelloWorld.Function_GetCallingIpFunction_Generated::GetCallingIpFunction", "Events": { "RootGet": { "Type": "HttpApi", "Properties": { "Path": "/hello/{name}", "Method": "GET" } } } } } }}SAM Deploy
With these changes done, let’s build our application before we deploy it.
sam buildsam validatesam deploy --guidedThe `sam deploy` command would start up the guided deployment process for you. Use the below screenshot for reference.

Note that I named my CloudFormation stack as Annotations. Here is a screenshot of the resources that will be deployed as part of this stack.

Once deployed, log in to AWS Management Console and navigate to API Gateway, Open up the Annotations gateway and navigate to the Invoke URL.
Here, I am going to navigate to /hello/mukesh, where mukesh will be mapped to the string `name`.

As you see, here is the expected response.
Dependency Injection with .NET Lambda Annotations Framework
Next, we will develop a couple of other lambda functions that will basically create a new entry to a DDB table and another for retrieving the data. We will use Dependency Injection for this.
Firstly, ensure that you have installed the following packages into your HelloWorld project.
<PackageReference Include="Amazon.Lambda.Annotations" Version="0.13.1" /><PackageReference Include="Amazon.Lambda.Core" Version="2.1.0" /><PackageReference Include="Amazon.Lambda.Serialization.SystemTextJson" Version="2.2.0" /><PackageReference Include="Amazon.Lambda.APIGatewayEvents" Version="2.4.0" /><PackageReference Include="AWSSDK.DynamoDBv2" Version="3.7.102.31" /><PackageReference Include="Microsoft.Extensions.DependencyInjection" Version="7.0.0" /><PackageReference Include="AWSSDK.Extensions.NETCore.Setup" Version="3.7.2" />Next, create a new class at the root of the project and name it Startup.cs. This is where we would write our service registrations. In our case, we will add the DynamoDb-related services here.
[LambdaStartup]public class Startup{ public void ConfigureServices(IServiceCollection services) { services.AddAWSService<IAmazonDynamoDB>(); services.AddScoped<IDynamoDBContext, DynamoDBContext>(); }}Here, the [LambdaStartup] attribute is how the framework identifies that the service registrations are done here.
Next, navigate to the Function.cs and add the following right at the start of the Function class.
private readonly IDynamoDBContext _context;public Function(IDynamoDBContext context){ _context = context;}As you see, the Dependency Injection works the same way as you are already used to. This is a constructor-based injection. Note that method-based injection ([FromServices]) is also supported.
You can also inject IDynamoDBContext this way -> public async Task CreateDeveloper([FromBody] Developer request, [FromServices] IDynamoDBContext context)
Next, let’s add a model class. Create a new class and name it Developer.
[DynamoDBTable("developers")]public class Developer{ [DynamoDBHashKey("id")] public int Id { get; set; } [DynamoDBProperty("name")] public string Name { get; set; } [DynamoDBProperty("email")] public string Email { get; set; }}For additional details about working with AWS DynamoDB in ASP.NET Core Applications, you can refer to this detailed article where we built a complete CRUD Web API using DynamoDB.
Now that the model class is created, let’s build the required Lambda Functions.
-
Create Student
-
Get Student By Id
Let’s Assume that the CreateStudent endpoint is going to get a lot of requests, and will have some heavy memory-intensive operations as well. Thus, I am setting its memory size to 1024 Mb. You can do this at the attribute level itself as you can see from the code snippet below at Line #1.
[LambdaFunction(MemorySize = 1024)][HttpApi(LambdaHttpMethod.Post, template: "/developers")]public async Task<int> CreateDeveloper([FromBody] Developer request){    await _context.SaveAsync(request);    return request.Id;}
[LambdaFunction][HttpApi(LambdaHttpMethod.Get, template: "/developers/{id}")]public async Task<Developer> GetDeveloper(int id){    var developer = await _context.LoadAsync<Developer>(id);    return developer;}
As soon as you save this, the template.yaml will be updated to match the changes. Here, we will have to do a couple of manual changes as well.
Since both the Lambda functions have to access the DynamoDb table, we need to ensure that these Functions have required permissions. For this, navigate to the template.yaml file and add the following policy to each of the Lambda functions.
"Policies": [ "AWSLambdaBasicExecutionRole", "AmazonDynamoDBFullAccess"],Here, the ‘AmazonDynamoDBFullAccess’ policy is what we are looking for. Add it to the policies section of both the Lambda functions.
Next, let’s add a Cloudformation resource for creating our required ‘developers’ DynamoDb table. Add the following element under the Resources section of the template.yaml file.
"DevelopersTable": { "Type": "AWS::DynamoDB::Table", "Properties": { "AttributeDefinitions": [ { "AttributeName": "id", "AttributeType": "N" } ], "KeySchema": [ { "AttributeName": "id", "KeyType": "HASH" } ], "TableName": "developers", "BillingMode": "PAY_PER_REQUEST" }},That’s it. Let’s build and deploy the projects. Run the following.
sam buildsam deploy --guided 
Once deployed, go to CloudFormation via the AWS Management Console. Almost 12 resources would have been created for you.
Now get your Amazon API Gateway URL and open up Postman.
First, let’s create a new developer. I will send a Post request to the <gateway-url>/developers endpoint with the following body.
{ "Id": 1, "Name": "Mukesh Murugan", "Email": "hello@codewithmukesh.com"}You will get a response of 200 Ok with the Body as 1, which is the Id of the newly created developer.

Let’s go to DynamoDb via Management Console to check if the entry has been added.

As you can see, the Lambda Function has inserted our record into DDB as expected.
Let’s check the GET endpoint next. I am sending a GET request to the <gateway-url>/developer/1 endpoint where 1 is the id of the developer I am looking for.

There you go, our developer data is now returned from the Lambda function. That’s everything for this demonstration.
Deleting the SAM Stack
Once you have completed your testing, ensure to delete the created AWS resource. You really don’t want the resources to stay and cause any unwanted increase in your overall AWS bills. Run the following command to remove the created stack’s resources.
sam delete --stack-name AnnotationsSummary
In this article, we learned about .NET Lambda Annotations Framework and how the framework can greatly improve the developer experience while building AWS Lambdas. We have also looked into how Dependency Injection would work with this framework. You can get the complete source code of this implementation here.
Make sure to share this article with your colleagues if it helped you! Helps me get more eyes on my blog as well. Thanks!
Stay Tuned. You can follow this newsletter to get notifications when I publish new articles – https://codewithmukesh.com/newsletter. Do share this article with your colleagues and dev circles if you found this interesting. Thanks!
What's your take?
Push back, share a war story, or ask the obvious question someone else is wondering. I read every comment.